Wiznet makers

mason

Published July 03, 2026 ©

181 UCC

21 WCC

33 VAR

0 Contests

0 Followers

0 Following

Original Link

PiKVM

PiKVM

COMPONENTS Hardware components

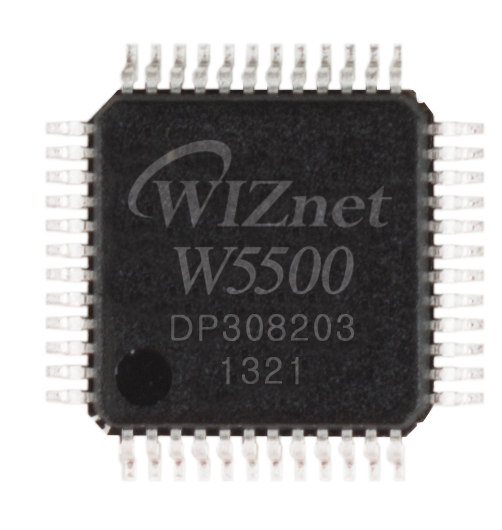
WIZnet - W5500

x 1


PROJECT DESCRIPTION

프로젝트 개요

KVM은 Keyboard, Video, Mouse의 약자로, 다른 컴퓨터의 화면을 확인하고 키보드와 마우스를 제어하는 장치입니다. KVM-over-IP는 이 기능을 네트워크로 확장하여 원격지에서도 대상 컴퓨터를 관리할 수 있도록 합니다.

PiKVM은 Raspberry Pi를 기반으로 구현된 KVM-over-IP 시스템입니다. 운영체제의 원격 데스크톱 프로그램에 의존하지 않으므로 부팅 화면, BIOS·UEFI, 복구 콘솔에도 접근할 수 있습니다.

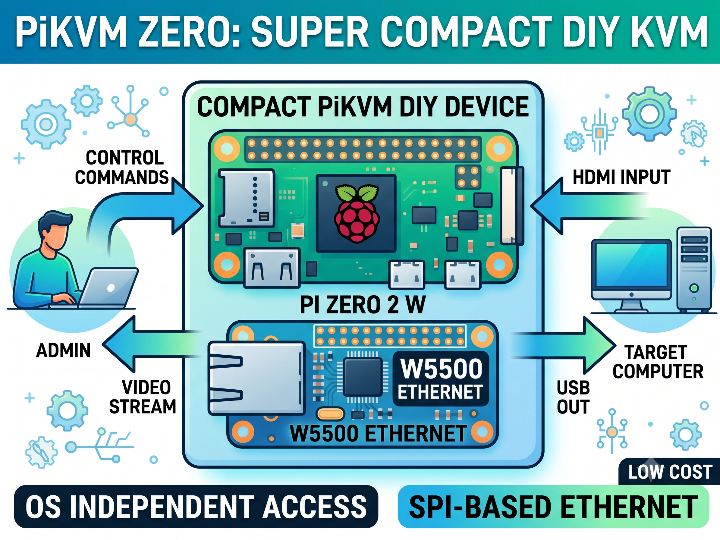
이 프로젝트는 Raspberry Pi Zero 2 W, HDMI-to-CSI-2 어댑터, WIZnet W5500을 결합해 소형 PiKVM을 구현합니다. Raspberry Pi Zero 2 W에는 기본 유선 이더넷 포트가 없으므로 W5500이 SPI 기반 네트워크 인터페이스를 제공합니다.

데이터는 다음 순서로 이동합니다.

관리자 브라우저 → W5500 → PiKVM → HDMI·USB HID → 대상 컴퓨터

HDMI-to-CSI-2 어댑터는 대상 컴퓨터의 화면을 Raspberry Pi로 전달합니다. Raspberry Pi는 영상을 네트워크로 전송하고, 관리자의 키보드와 마우스 입력을 USB HID 신호로 변환해 대상 컴퓨터에 전달합니다.

이미지 출처 : AI 생성

산업 현장에서의 활용

무인 산업용 PC 관리

생산 설비의 산업용 PC가 부팅되지 않거나 화면이 멈췄을 때 BIOS 화면과 부팅 로그를 원격에서 확인할 수 있습니다.

머신비전 및 검사 장비 유지보수

카메라 검사 PC, 바코드 시스템, 품질 검사 장비의 부팅 실패나 화면 설정 문제를 원격으로 점검할 수 있습니다.

엣지 서버 복구

운영체제의 원격 서비스가 동작하지 않더라도 HDMI 출력과 USB 입력이 정상이라면 로컬 콘솔에 접근할 수 있습니다.

시험 장비 관리

테스트 PC마다 모니터와 키보드를 설치하지 않고 원격 관리 환경을 구성할 수 있습니다.

산업 현장에 적용하려면 전원 안정화, 절연, 접지, EMI 대책, 방진 케이스와 접근 제어를 추가로 검토해야 합니다. 대상 컴퓨터의 전원까지 제어하려면 ATX 제어 보드나 관리형 PDU도 필요합니다.

유사 프로젝트

esp32-deskflow-client는 ESP32-S3와 W5500을 사용해 Deskflow 서버의 키보드와 마우스 입력을 다른 컴퓨터로 전달하는 장치입니다. 두 프로젝트 모두 W5500과 HID 입력을 사용하지만, PiKVM은 화면과 입력을 함께 원격 제어하고 Deskflow 클라이언트는 입력 공유에만 집중합니다.

유사점

항목공통점
네트워크W5500 기반 유선 이더넷을 사용합니다.
연결W5500을 SPI로 연결합니다.
입력키보드와 마우스 입력을 HID로 전달합니다.
목적외부 장치를 통해 컴퓨터를 제어합니다.

차이점

항목PiKVMesp32-deskflow-client
플랫폼Raspberry Pi와 LinuxESP32-S3 펌웨어
주요 기능화면 확인과 입력 제어키보드·마우스 공유
영상HDMI 캡처 지원지원하지 않음
대상 연결USB HIDBLE HID
활용원격 유지보수와 장애 복구여러 PC 간 입력 공유

WIZnet이 들어가는 위치

이 프로젝트에서 사용하는 WIZnet 제품은 W5500입니다.

W5500은 Raspberry Pi의 SPI0 버스에 연결됩니다.

신호Raspberry Pi 보드 핀기능
MOSI19W5500으로 데이터를 전송합니다.
MISO21W5500에서 데이터를 수신합니다.
SCLK23SPI 클록 신호입니다.
CS024W5500을 선택합니다.
INT22네트워크 이벤트를 전달합니다.

W5500은 Raspberry Pi Zero 2 W에 유선 이더넷 인터페이스를 추가합니다. USB 이더넷 어댑터가 필요하지 않으므로 USB 포트를 대상 컴퓨터와의 HID 연결에 사용할 수 있습니다.

W5500은 하드웨어 TCP/IP 스택과 8개 소켓, 내부 송수신 버퍼를 제공합니다. 하지만 이 프로젝트에서는 Linux 드라이버가 W5500을 일반 네트워크 인터페이스로 등록합니다. TCP, DHCP, HTTPS와 같은 상위 프로토콜은 Raspberry Pi의 Linux 네트워크 스택에서 처리합니다.

따라서 이 프로젝트에서 W5500의 주요 역할은 다음과 같습니다.

Raspberry Pi Zero 2 W에 유선 이더넷 추가

USB 포트를 사용하지 않는 네트워크 연결

PiKVM 영상과 제어 데이터 전송

Wi-Fi와 분리된 관리망 구성

구현 메모

W5500 활성화

관련 위치: README.md/boot/config.txt 설정

dtparam=spi=on
dtoverlay=w5500

dtparam=spi=on은 Raspberry Pi의 SPI 컨트롤러를 활성화합니다.

dtoverlay=w5500은 W5500용 Device Tree Overlay를 적용합니다. 재부팅하면 Linux 커널이 W5500을 감지하고 네트워크 드라이버를 연결합니다.

장치 상태는 다음 명령으로 확인할 수 있습니다.

ip link
dmesg | grep -Ei 'w5100|w5500|spi'
lsmod | grep w5100

유선 인터페이스가 나타나지 않는다면 다음 항목을 확인해야 합니다.

MOSI와 MISO 배선

SCLK와 CS0 연결

인터럽트 핀 연결

SPI 활성화 여부

Device Tree Overlay 설정

WIZnet 커널 드라이버 포함 여부

PiKVM 이미지 구성

저장소는 SPI 이더넷을 사용하기 위해 PiKVM OS를 빌드하는 절차를 제공합니다.

BOARD = zero2w
PLATFORM = v2-hdmi
HOSTNAME = pikvm
LOCALE = en_US
TIMEZONE = UTC

이미지를 SD 카드에 기록한 뒤 부팅 파티션에서 SSH, SPI, W5500 Overlay와 초기 네트워크 정보를 설정합니다.

README에 제시된 기본 암호는 테스트용이므로 실제 운영 환경에서는 사용하지 않아야 합니다. 첫 부팅 직후 SSH와 웹 관리자 암호를 변경하는 것이 좋습니다.

설치 스크립트의 역할

파일: install.sh

rw
pikvm-update
cp motd /etc/motd

rw는 PiKVM 시스템 영역을 쓰기 가능한 상태로 전환합니다. pikvm-update는 PiKVM 패키지를 업데이트합니다.

설치 스크립트는 다음 작업을 처리합니다.

시스템 업데이트

로그인 배너 적용

호스트 이름 변경

고정 MAC 주소 설정

Wi-Fi 액세스 포인트 설치

E-Ink용 Python 패키지 설치

W5500 드라이버 활성화는 이 스크립트에 포함되어 있지 않으므로 부팅 설정에서 먼저 처리해야 합니다.

호스트 이름 입력 부분에는 다음 코드가 사용됩니다.

read -p "Change hostname (Blank to skip): " $H

일반적인 Bash 변수 입력 형식은 $H가 아니라 H입니다.

read -p "Change hostname (Blank to skip): " H

원본 코드에서는 입력값이 의도한 변수에 저장되지 않을 수 있으므로 실행 전에 수정하는 것이 좋습니다.

Wi-Fi 액세스 포인트 전환

파일: bin/access-point.sh

이 스크립트는 hostapddnsmasq를 사용해 wlan0을 액세스 포인트로 전환합니다.

SSID="$HOSTNAME"
DHCP_START="10.10.10.2"
DHCP_END="10.10.10.254"

연결 상태는 다음 함수로 확인합니다.

is_connected() {
    [ -n "$(iwgetid -r)" ]
}

iwgetid는 Wi-Fi 상태만 확인합니다. 따라서 W5500 유선 네트워크가 정상이어도 Wi-Fi가 연결되지 않았다면 장애로 판단할 수 있습니다.

W5500을 기본 관리 인터페이스로 사용한다면 유선 링크와 기본 경로도 함께 확인하는 것이 좋습니다.

ip route show default
cat /sys/class/net/eth0/carrier

인터페이스 이름은 시스템에 따라 달라질 수 있으므로 ip link에서 먼저 확인해야 합니다.

E-Ink 기능

설치 스크립트는 E-Ink 기능을 선택하면 Pillow, RPi.GPIO, spidev를 설치합니다.

W5500과 E-Ink 디스플레이는 MOSI와 SCLK를 공유하며, W5500은 CE0, E-Ink는 CE1을 사용합니다. 동일한 SPI 버스를 공유하므로 각 장치에는 서로 다른 CS 핀을 할당해야 합니다.

실전 팁과 주의점

산업망에서는 PiKVM을 생산 제어망과 분리된 관리 VLAN에 배치하는 것이 좋습니다.

원격 스크립트는 바로 실행하지 말고 내용을 먼저 확인해야 합니다.

W5500이 인식되지 않는다면 설치 스크립트보다 배선과 Overlay를 먼저 점검해야 합니다.

액세스 포인트 전환 조건에 W5500 링크 상태를 추가하는 것이 좋습니다.

긴 케이블을 사용하는 환경에서는 차폐, 접지, 서지 보호를 검토해야 합니다.

PiKVM 웹 UI와 SSH는 인터넷에 직접 노출하지 않는 것이 좋습니다.

원격 전원 복구가 필요하다면 ATX 제어 회로나 관리형 PDU를 추가해야 합니다.

FAQ

Q: 산업용 원격 관리에 KVM이 필요한 이유는 무엇인가요?

일반 원격 데스크톱은 대상 컴퓨터의 운영체제와 네트워크 서비스가 정상적으로 실행되어야 합니다. KVM은 HDMI 출력과 USB 입력을 직접 사용하므로 운영체제가 멈추거나 부팅에 실패해도 BIOS·UEFI와 복구 화면에 접근할 수 있습니다.

Q: 이 프로젝트에서 W5500을 사용하는 이유는 무엇인가요?

Raspberry Pi Zero 2 W에는 기본 유선 이더넷 포트가 없습니다. W5500을 SPI로 연결하면 USB 포트를 점유하지 않고 유선 네트워크를 추가할 수 있습니다.

Q: W5500은 Raspberry Pi Zero 2 W에 어떻게 연결하나요?

SPI0를 사용합니다. MOSI, MISO, SCLK, CS0, 인터럽트, 전원과 GND를 연결한 뒤 /boot/config.txtdtparam=spi=ondtoverlay=w5500을 추가합니다.

Q: 초보자도 이 프로젝트를 설치할 수 있나요?

기본적인 Raspberry Pi와 Linux 사용 경험이 있다면 따라갈 수 있습니다. 다만 GPIO 배선, SD 카드 이미지 기록, SSH 접속과 부팅 설정 편집이 필요합니다.

Q: PiKVM과 esp32-deskflow-client 중 어떤 프로젝트를 선택해야 하나요?

화면 확인과 장애 복구가 필요하다면 PiKVM이 적합합니다. 화면 전송 없이 여러 컴퓨터에서 키보드와 마우스를 공유하려면 esp32-deskflow-client가 더 단순합니다.


Project Overview

KVM stands for Keyboard, Video, and Mouse. It is a device that allows users to view another computer’s display and control its keyboard and mouse. KVM-over-IP extends this functionality over a network, allowing users to manage a target computer remotely.

PiKVM is a KVM-over-IP system built on Raspberry Pi. Because it does not depend on remote desktop software running within the operating system, it can also provide access to boot screens, BIOS or UEFI settings, and recovery consoles.

This project combines a Raspberry Pi Zero 2 W, an HDMI-to-CSI-2 adapter, and a WIZnet W5500 to build a compact PiKVM. Since the Raspberry Pi Zero 2 W does not include a built-in wired Ethernet port, the W5500 provides an SPI-based network interface.

Data flows through the system in the following order:

Administrator’s browser → W5500 → PiKVM → HDMI and USB HID → Target computer

The HDMI-to-CSI-2 adapter transfers the target computer’s display output to the Raspberry Pi. The Raspberry Pi sends the captured video over the network and converts the administrator’s keyboard and mouse input into USB HID signals for the target computer.

Image source: AI-generated

Industrial Applications

Unattended Industrial PC Management

If an industrial PC installed in production equipment fails to boot or its display freezes, an administrator can remotely inspect the BIOS screen and boot logs.

Machine Vision and Inspection Equipment Maintenance

Boot failures and display configuration problems in camera inspection PCs, barcode systems, and quality inspection equipment can be diagnosed remotely.

Edge Server Recovery

Even when the operating system’s remote access service is unavailable, the local console can still be accessed as long as the HDMI output and USB input remain functional.

Test Equipment Management

A remote management environment can be created without installing a separate monitor and keyboard for every test PC.

For industrial deployment, additional considerations are required, including power stabilization, electrical isolation, grounding, EMI protection, dust-resistant enclosures, and access control. An ATX control board or managed PDU is also required if remote power control of the target computer is needed.

Similar Project

The esp32-deskflow-client uses an ESP32-S3 and W5500 to forward keyboard and mouse input from a Deskflow server to another computer. Both projects use the W5500 and HID input. However, PiKVM provides remote display and input control, while the Deskflow client focuses only on input sharing.

Similarities

CategorySimilarity
NetworkBoth use W5500-based wired Ethernet.
InterfaceBoth connect the W5500 over SPI.
InputBoth forward keyboard and mouse input as HID signals.
PurposeBoth control a computer through an external hardware device.

Differences

CategoryPiKVMesp32-deskflow-client
PlatformRaspberry Pi and LinuxESP32-S3 firmware
Main functionDisplay monitoring and input controlKeyboard and mouse sharing
VideoSupports HDMI captureNot supported
Target connectionUSB HIDBLE HID
ApplicationRemote maintenance and fault recoveryInput sharing between multiple PCs

Where WIZnet Fits

The WIZnet product used in this project is the W5500.

The W5500 is connected to the Raspberry Pi’s SPI0 bus.

SignalRaspberry Pi Board PinFunction
MOSI19Sends data to the W5500.
MISO21Receives data from the W5500.
SCLK23SPI clock signal.
CS024Selects the W5500.
INT22Delivers network events.

The W5500 adds a wired Ethernet interface to the Raspberry Pi Zero 2 W. Because a USB Ethernet adapter is not required, the USB port can remain available for the HID connection to the target computer.

The W5500 provides a hardware TCP/IP stack, eight sockets, and internal transmit and receive buffers. In this project, however, the Linux driver registers the W5500 as a standard network interface. Higher-level protocols such as TCP, DHCP, and HTTPS are handled by the Raspberry Pi’s Linux network stack.

The main roles of the W5500 in this project are therefore:

Adding wired Ethernet to the Raspberry Pi Zero 2 W

Providing a network connection without using a USB port

Transmitting PiKVM video and control data

Creating a management network separated from Wi-Fi

Implementation Notes

Enabling the W5500

Relevant location: /boot/config.txt configuration in README.md

dtparam=spi=on
dtoverlay=w5500

dtparam=spi=on enables the Raspberry Pi’s SPI controller.

dtoverlay=w5500 applies the Device Tree Overlay for the W5500. After rebooting, the Linux kernel detects the W5500 and attaches the network driver.

The device status can be checked with the following commands:

ip link
dmesg | grep -Ei 'w5100|w5500|spi'
lsmod | grep w5100

If a wired network interface does not appear, check the following items:

MOSI and MISO wiring

SCLK and CS0 connections

Interrupt pin connection

Whether SPI is enabled

Device Tree Overlay configuration

Whether the WIZnet kernel driver is included

PiKVM Image Configuration

The repository provides instructions for building PiKVM OS with SPI Ethernet support.

BOARD = zero2w
PLATFORM = v2-hdmi
HOSTNAME = pikvm
LOCALE = en_US
TIMEZONE = UTC

After writing the image to an SD card, configure SSH, SPI, the W5500 Overlay, and the initial network settings in the boot partition.

The default passwords shown in the README are intended for testing and should not be used in an actual deployment. It is recommended to change both the SSH and web administrator passwords immediately after the first boot.

Role of the Installation Script

File: install.sh

rw
pikvm-update
cp motd /etc/motd

rw switches the PiKVM system area to writable mode. pikvm-update updates the PiKVM packages.

The installation script performs the following tasks:

System update

Login banner configuration

Hostname change

Static MAC address configuration

Wi-Fi access point installation

Installation of Python packages for the E-Ink display

W5500 driver activation is not included in this script, so it must be completed first through the boot configuration.

The following code is used for hostname input:

read -p "Change hostname (Blank to skip): " $H

The standard Bash variable input format uses H, not $H.

read -p "Change hostname (Blank to skip): " H

In the original code, the entered value may not be stored in the intended variable. It is therefore recommended to correct this line before running the script.

Wi-Fi Access Point Switching

File: bin/access-point.sh

This script uses hostapd and dnsmasq to switch wlan0 into access point mode.

SSID="$HOSTNAME"
DHCP_START="10.10.10.2"
DHCP_END="10.10.10.254"

The connection status is checked with the following function:

is_connected() {
    [ -n "$(iwgetid -r)" ]
}

iwgetid checks only the Wi-Fi connection status. As a result, the script may report a failure when Wi-Fi is disconnected even if the W5500 wired network is operating normally.

If the W5500 is used as the primary management interface, it is recommended to check the wired link and default route as well.

ip route show default
cat /sys/class/net/eth0/carrier

The interface name may vary by system, so it should first be confirmed with ip link.

E-Ink Function

If the E-Ink option is selected, the installation script installs Pillow, RPi.GPIO, and spidev.

The W5500 and E-Ink display share MOSI and SCLK. The W5500 uses CE0, while the E-Ink display uses CE1. Because both devices share the same SPI bus, each device must use a separate CS pin.

Practical Tips and Considerations

In an industrial network, it is recommended to place PiKVM on a management VLAN separated from the production control network.

Remote scripts should be reviewed before they are executed.

If the W5500 is not detected, check the wiring and Device Tree Overlay before reviewing the installation script.

It is recommended to include the W5500 link state in the access point switching conditions.

In environments with long cables, shielding, grounding, and surge protection should be considered.

The PiKVM web interface and SSH service should not be exposed directly to the internet.

An ATX control circuit or managed PDU is required for remote power recovery.

FAQ

Q: Why is KVM needed for industrial remote management?

Standard remote desktop software requires the target computer’s operating system and network services to be running normally. KVM uses the HDMI output and USB input directly, allowing access to BIOS, UEFI, and recovery screens even when the operating system has stopped or failed to boot.

Q: Why does this project use the W5500?

The Raspberry Pi Zero 2 W does not include a built-in wired Ethernet port. Connecting the W5500 over SPI adds wired networking without occupying the USB port.

Q: How is the W5500 connected to the Raspberry Pi Zero 2 W?

It uses SPI0. Connect MOSI, MISO, SCLK, CS0, the interrupt pin, power, and ground. Then add dtparam=spi=on and dtoverlay=w5500 to /boot/config.txt.

Q: Can beginners install this project?

It is possible for users with basic Raspberry Pi and Linux experience. However, the project requires GPIO wiring, SD card image writing, SSH access, and boot configuration editing.

Q: Which project should I choose: PiKVM or esp32-deskflow-client?

PiKVM is suitable when display access and fault recovery are required. If only keyboard and mouse sharing between multiple computers is needed, without video transmission, esp32-deskflow-client is the simpler option.

Documents
  • Github Code

Comments Write