
[AIoT] Smart Surveillance System with Human Detection
Send an alert notification with a photo to Telegram when a person is detected in a restricted area.

WIZnet - WizFi360-EVB-Pico
x 1
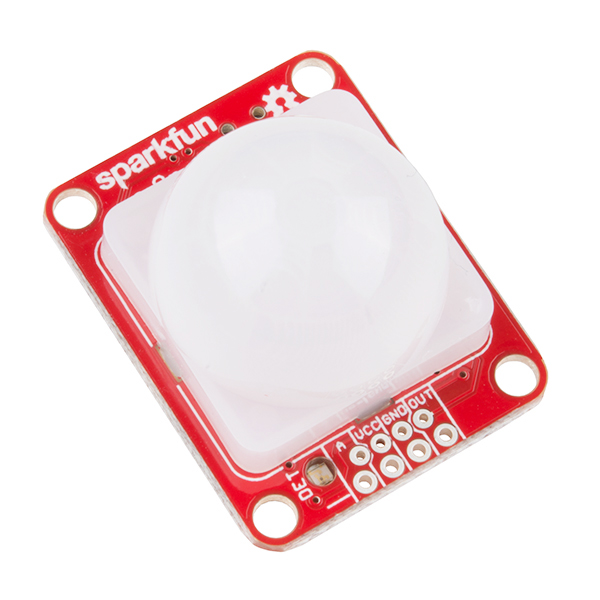
sparkfun - SparkFun OpenPIR
x 1

Arduino - Arduino IDE
x 1
TABLE OF CONTENTS:
1. INTRODUCTION
2. HARDWARES USED
3. SOFTWARES USED
4. PROGRAMMING LANGUAGES
5. WORKFLOW
6. ROADBLOCKS
- SETTING UP ARDUCAM WITH WizFi360 BOARD
- TELEGRAM API CONNECTION
- SETTING UP YOLOV5
7. OUTPUT
8. CONCLUSION
9. REFERENCES
1. INTRODUCTION:
The Smarter Surveillance System project aims to create a smart surveillance camera using the WizFi360 board, Arducam Mini 2MP Plus, and a PIR sensor. The system is designed to detect motion using the PIR sensor and capture an image of the person using the Arducam camera. The captured image is then sent to a Flask server, which is running in the background, to be processed using YOLOv5, an object detection algorithm. The first step in building a smarter surveillance system is to gather the necessary hardware components. For this project, we will be using the WizFi360 board, Arducam Mini 2MP Plus, and a PIR (Passive Infrared) sensor. These components will work together to detect motion, capture an image, and send it to a Flask server for processing. The WizFi360 board is a powerful IoT module that provides WiFi connectivity and supports various wireless protocols such as TCP/IP, HTTP, FTP, and SSL/TLS. It has an onboard processor and can be easily programmed using the Arduino IDE, making it an ideal choice for IoT applications.
The Arducam Mini 2MP Plus is a small camera module with a resolution of 2 megapixels. It supports various interfaces, including SPI, I2C, and UART, and can be easily connected to the WizFi360 board. The PIR sensor is a motion detection sensor that detects changes in infrared radiation emitted by a moving object. It is commonly used in security systems and can detect motion up to several meters away. If a person is detected in the captured image, the system sends a notification to a Telegram channel, indicating that someone is in a restricted area. The notification includes the detected picture, allowing for quick response and action. Overall, the Smarter Surveillance System is an innovative and efficient way to monitor and secure restricted areas, making use of the latest technology available.
2. HARDWARES USED:
3. SOFTWARE AND SERVICES USED:
4. PROGRAMMING LANGUAGES
5. WORK FLOW:
- Setup the Hardware Components
The first step is to set up the hardware components. Connect the Arducam Mini 2MP Plus camera module to the WizFi360 board using the SPI interface. Connect the PIR sensor to one of the digital pins of the WizFi360 board. Connect the power source to the WizFi360 board.
- Configure the WizFi360 Board
Configure the WizFi360 board to connect to the WiFi network. Program the board using the Arduino IDE to communicate with the Arducam camera module and PIR sensor. Set up the board to capture an image when the PIR sensor detects motion.
- Capture an Image
When the PIR sensor detects motion, the WizFi360 board triggers the Arducam camera module to capture an image. The captured image is saved in the memory of the WizFi360 board.
- Send the Image to Flask Server
The WizFi360 board is programmed to send the captured image to a Flask server using an HTTP POST request. The Flask server is running in the background and is waiting to receive the image.
- Process the Image Using YOLOv5
Once the Flask server receives the image, it processes the image using the YOLOv5 algorithm. YOLOv5 is an object detection algorithm that can detect objects in real-time with high accuracy. The Flask server is programmed to run the YOLOv5 algorithm on the captured image to detect whether there is a person in the image.
- Send a Notification to Telegram
If a person is detected in the image, the Flask server generates a notification and sends it to a Telegram channel. The notification includes a message indicating that someone is in a restricted area, along with the detected image.
- Take Action
Once a notification is received on the Telegram channel, appropriate action can be taken, such as alerting security personnel or sounding an alarm.

6. ROADBLOCKS:
1. SETTING UP ARDUCAM WITH WizFi360 BOARD
Below shows the overall setup for the WizFi360 with the Arducam. The pin configuration is also given below:

The WizFi360 is a compact and powerful Wi-Fi module that provides seamless connectivity to the Internet of Things (IoT) devices. It features a low-power ARM Cortex-M4 microcontroller and a high-performance Wi-Fi transceiver that supports IEEE 802.11 b/g/n protocols. With its built-in security features and easy-to-use software development kit, the WizFi360 is an ideal solution for creating smart and connected IoT applications.On the other hand, a PIR (Passive Infrared) sensor is a type of motion sensor that detects movement by sensing changes in infrared radiation levels. It is commonly used in security systems, automatic lighting, and other applications where motion detection is required. PIR sensors are called "passive" because they do not emit any energy themselves; instead, they detect the energy emitted by other objects, such as the human body.
When combined, the WizFi360 and PIR sensor can create powerful and intelligent IoT applications that enable remote monitoring and control of motion detection systems. For example, a PIR sensor can detect movement in a room and send a signal to the WizFi360 module, which can then send a notification to a smartphone app or trigger an alarm. The WizFi360 can also be used to control the sensitivity and operating modes of the PIR sensor, making it a flexible and customizable solution for a wide range of IoT applications.

The ArduCam provides document and source codes SPI Camera for Raspberry Pi Pico and it also uses SPI0. To avoid the confliction, this project uses SPI1 for the ArduCam OV2640 Module.ArduCam OV2640 Module requires CS, MOSI, MISO, SCLK pins for SPI connection, and SDA, SCL pins for I2C connection. This project modified the source code of ArduCam to use SPI1.
Pico pin configuration for ArduCam OV2640
1. CS --> GPIO 13
2. MOSI --> GPIO 11
3. MISO --> GPIO 12
4. SCLK --> GPIO 10
5. SDA --> GPIO 8
6. SCL --> GPIO 9
Code Explaination
WizFi_Flask Server/WizFi_CamPost.ino
- setup(): This function is called once when the Arduino board is powered on or reset. It initializes the serial communication with a baud rate of 115200 and also initializes the ArduCAM module by calling the ArduCam_setup() function.
- loop(): This function is called repeatedly after the setup() function. It captures an image with the ArduCAM module, sends the image data to a server using the Wi-Fi module, and then waits for a period of time before repeating the process.
- ArduCam_setup(): This function initializes the ArduCAM module by setting the CS pin as an output and initializing the Wire library for I2C communication.
- ArduCam_sendImg(): This function captures an image with the ArduCAM module and stores the image data in the img_buf array. It then calls the http_postData() function to send the image data to the server.
- http_postData(byte *buf, uint32_t length):
This function sends the image data to a server using the Wi-Fi module. It first checks if the client is connected to the server, and if not, it tries to reconnect several times before giving up. It then sends an HTTP POST request to the server with the image data as the payload. The payload includes the file name and content type of the image. Finally, it waits for a response from the server before closing the connection.
- buffer_transfer(byte *bptr, size_t len): This function sends a buffer of data to the server in multiple chunks of size max_transfer (1024 bytes in this code) to prevent buffer overflows.
- client: This object of the WiFiClient class is used to establish a connection with the server and send/receive data.
2. SETTING UP THE TELEGRAM-API
- Open Telegram and search for the BotFather user.
- Start a conversation with BotFather and type /newbot.
- Follow the prompts to give your bot a name and username.
- Once you've created your bot, BotFather will send you a message containing your bot's token. The token is a long string of characters that uniquely identifies your bot and is required to authenticate API requests.
- Save your bot's token in a secure place, as you will need to use it to interact with the Telegram Bot API.
For more information click the link.
3. SETTING UP YOLO
YOLOv5 (You Only Look Once version 5) is a state-of-the-art real-time object detection algorithm developed by Ultralytics. YOLOv5 builds upon the success of its predecessors by introducing a new model architecture and training process, resulting in significantly improved accuracy and speed. The architecture consists of a backbone network (CSPDarknet53), a neck network (SPP), and a head network (YOLOv5). The CSPDarknet53 network uses a novel cross-stage partial network to enhance information flow between layers, resulting in improved feature representation. The SPP network incorporates spatial pyramid pooling, which allows the network to better capture objects at different scales. The YOLOv5 head network uses anchor boxes and a classification and regression layer to detect and localize objects in an image. The training process of YOLOv5 uses a combination of multi-scale training, label smoothing, and focal loss to improve the model's performance.
STEPS:
- Install Git: If you don't have Git installed on your system, download and install it from the official website: https://git-scm.com/downloads.
- Clone the YOLOv5 repository: Open a terminal window and navigate to the directory where you want to store the YOLOv5 code. Then run the following command:
git clone https://github.com/ultralytics/yolov5.git
- Install dependencies: Navigate to the 'yolov5' directory and run the following command to install the dependencies required for YOLOv5:
pip install -r requirements.txt
- Download pre-trained weights: YOLOv5 requires pre-trained weights to perform object detection. You can download the weights from the official YOLOv5 website by running the following command:
wget https://github.com/ultralytics/yolov5/releases/download/v5.0/yolov5s.pt
- Test YOLOv5: You can test YOLOv5 by running the following command:
python detect.py --weights yolov5s.pt --img 640 --conf 0.4 --source 0
After running the above mentioned steps downliad the main.py program given in this github repository. It contains program for capturing the image from the Arducam , send them for detection to the Yolo model and finally if a person is detected in the image send an notification with the detected pic to the telegram API.
Code Explaination
main.py
- This code is a Flask server application that takes an image in JPEG format as input and performs object detection using the YOLOv5 model. The detected objects are then classified, and if a person is detected in the image, a message is sent to a Telegram chat group along with the image.
- The code first imports necessary libraries and initializes the Flask application. It then sets up an upload destination for the image file and initializes a Telegram bot using the token. The run function from the detect module of the YOLOv5 model is called to perform object detection. If a person is detected, a message is sent to the Telegram chat group along with the image.
- In the upload function, the server checks if the incoming request is a POST request and the content type is an image in JPEG format. If so, it saves the image to a file and sets a flag indicating that object detection should be performed. A separate thread is then created to run the detect_person function, which calls the run function to perform object detection. If the detection identifies a person, the send_telegram_message function is called to send a message to the Telegram chat group.
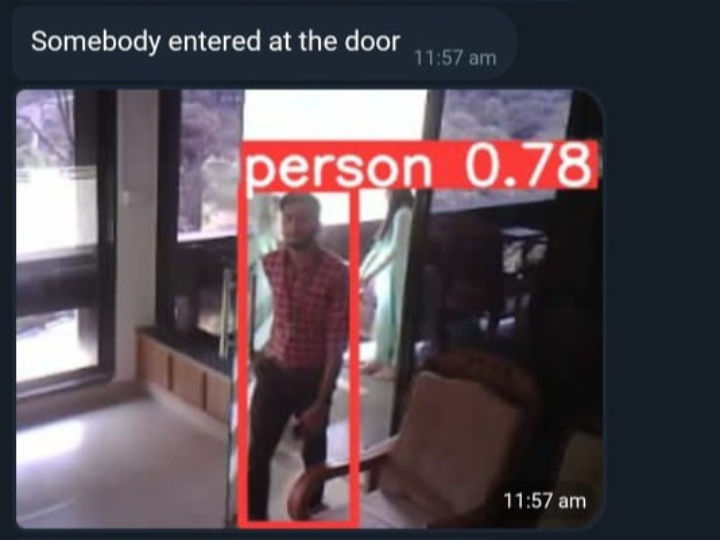
7. OUTPUT
The output of the overall project is shown below:
8. CONCLUSION:
In conclusion, the development of a Smart Surveillance System using Arducam, WizFi360, YOLOv5, and Telegram Bot has shown tremendous potential in the field of security and surveillance. By integrating these technologies, the system can effectively detect and alert users of any person's presence in real-time, thereby reducing the likelihood of criminal activity.
The Arducam and WizFi360 combination provided reliable and stable image capture and transmission, while YOLOv5 proved to be an accurate and efficient object detection model. Additionally, the integration of Telegram Bot allowed for quick and easy notification of the detected person's presence, making the system highly responsive to any potential security threats.Overall, the Smart Surveillance System's successful development underscores the importance of leveraging advanced technologies to enhance public safety and security.
9. REFERENCES
- https://www.hackster.io/innovation4x/webcamserver-arducam-ov2640-module-wiznet-evb-pico-73ceae
- https://api.telegram.org/bot6031744449:AAFoNG8OKbcDCCT2saMyVj6N5r2WoNnFeMk/getUpdates
- https://www.geeksforgeeks.org/send-message-to-telegram-user-using-python/
- https://circuitmaker.com
- https://www.wiznet.io/product-item/wizfi360/
- https://www.arducam.com/product/arducam-2mp-spi-camera-b0067-arduino/
- https://www.hackster.io/innovation4x/early-fire-detection-using-ai-dd27bf
- https://ultralytics.com/yolov5
- https://github.com/ultralytics/yolov5/wiki/Tips-for-Best-Training-Results
- https://github.com/ultralytics/yolov5.git
-
GitHub - Source code
