[AIoT] Smart Plant Irrigation with Health Detection
It can detect the moisture level and shows the current humidity level and temperature in degrees, as well as the plant's health condition.

WIZnet - W5100S-EVB-Pico
x 1
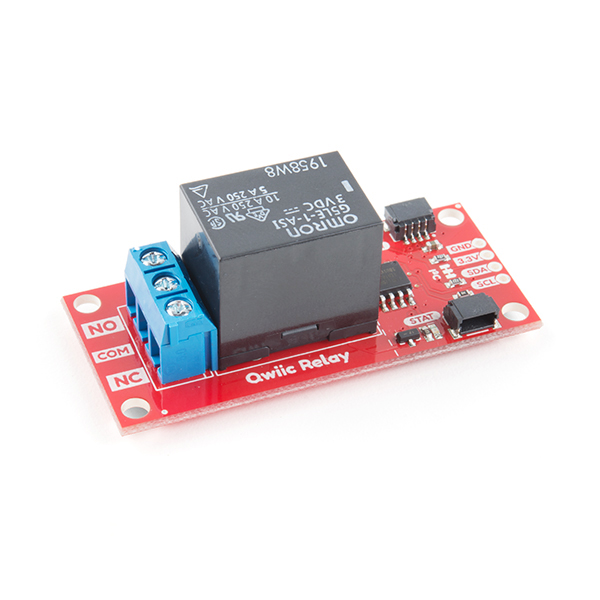
sparkfun - SparkFun Qwiic Single Relay
x 1
Sensors - DHT11 Temperature & Humidity Sensor (4 pins)
x 1

Arduino - Arduino IDE
x 1
The Linux Foundation - PyTorch
x 1
Introduction
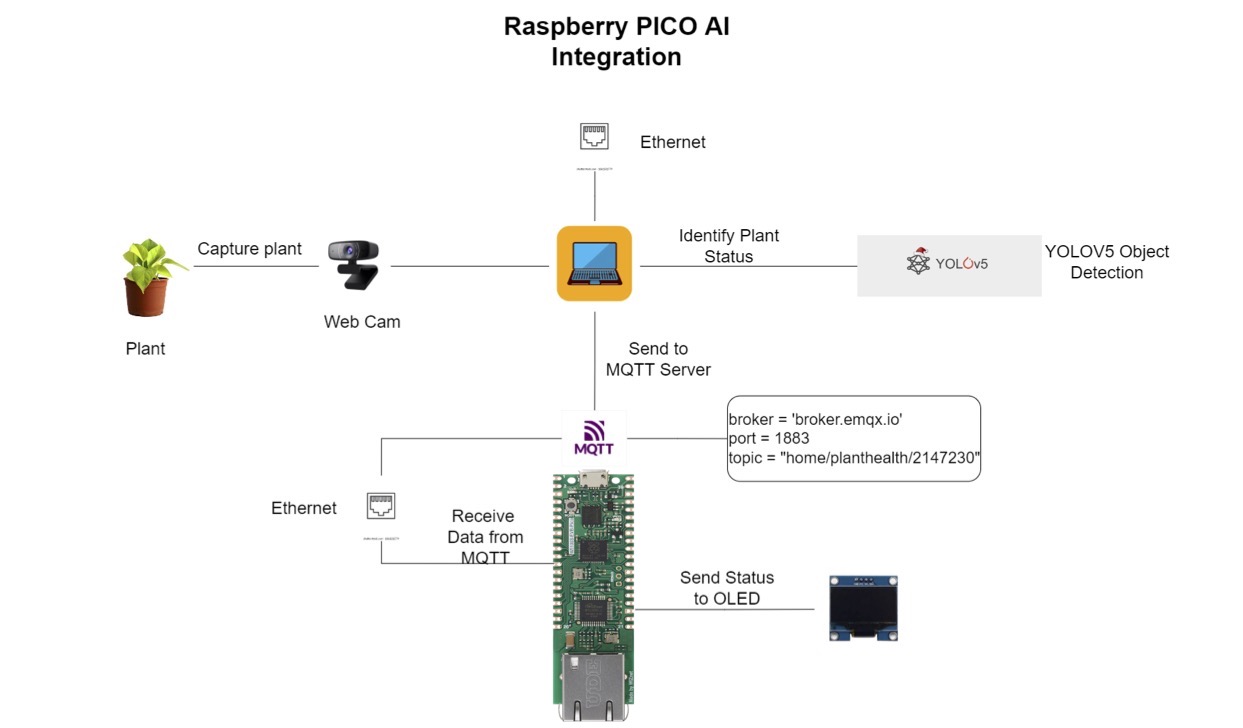
India is one of the largest freshwater users in the world, and our country uses a larger amount of fresh water than other countries. There is a large amount of water used in agriculture rather than in the domestic and industrial sector. 65% of total water is contributed as groundwater. Today water has become one of the most important sources on the earth and most of it is used in the agriculture field. As the a capacitive soil-moisture sensor and temperature/humidity sensor are placed in the root zone of the plants, the system can distribute this information to the microcontroller.The raspberry pico is the heart of the system.The system can use the sensors such as soil moisture sensor and atmosphere humidity and temperature.The raspberry pi model is programmed such that if either soil moisture dips below a predefined threshold level, the irrigation system is activated, i.e. the relay connected to the raspberry pico will turn ON or OFF the motor.In order to prevent over irrigation a timeout is added.For small use cases such as a houseplant, the motor will turn on only for 5 seconds waits for recalibration of the moisture sensor if water is adequate and is above threshold it will stop irrigating else it will pump again for 5 seconds.Moreover the onboard OLED display and Serial Monitor will display the current temperature, moisture, humidity level and healthiness of the plant.Healthiness of the plant is determined by using a webcam connected to a laptop and by making use of YOLOV5 which will send the plants current status to an MQTT server. This project presents an efficient, fairly cheap and easy automated irrigation system. This system once installed has less maintenance cost and is easy to use.
Explanation
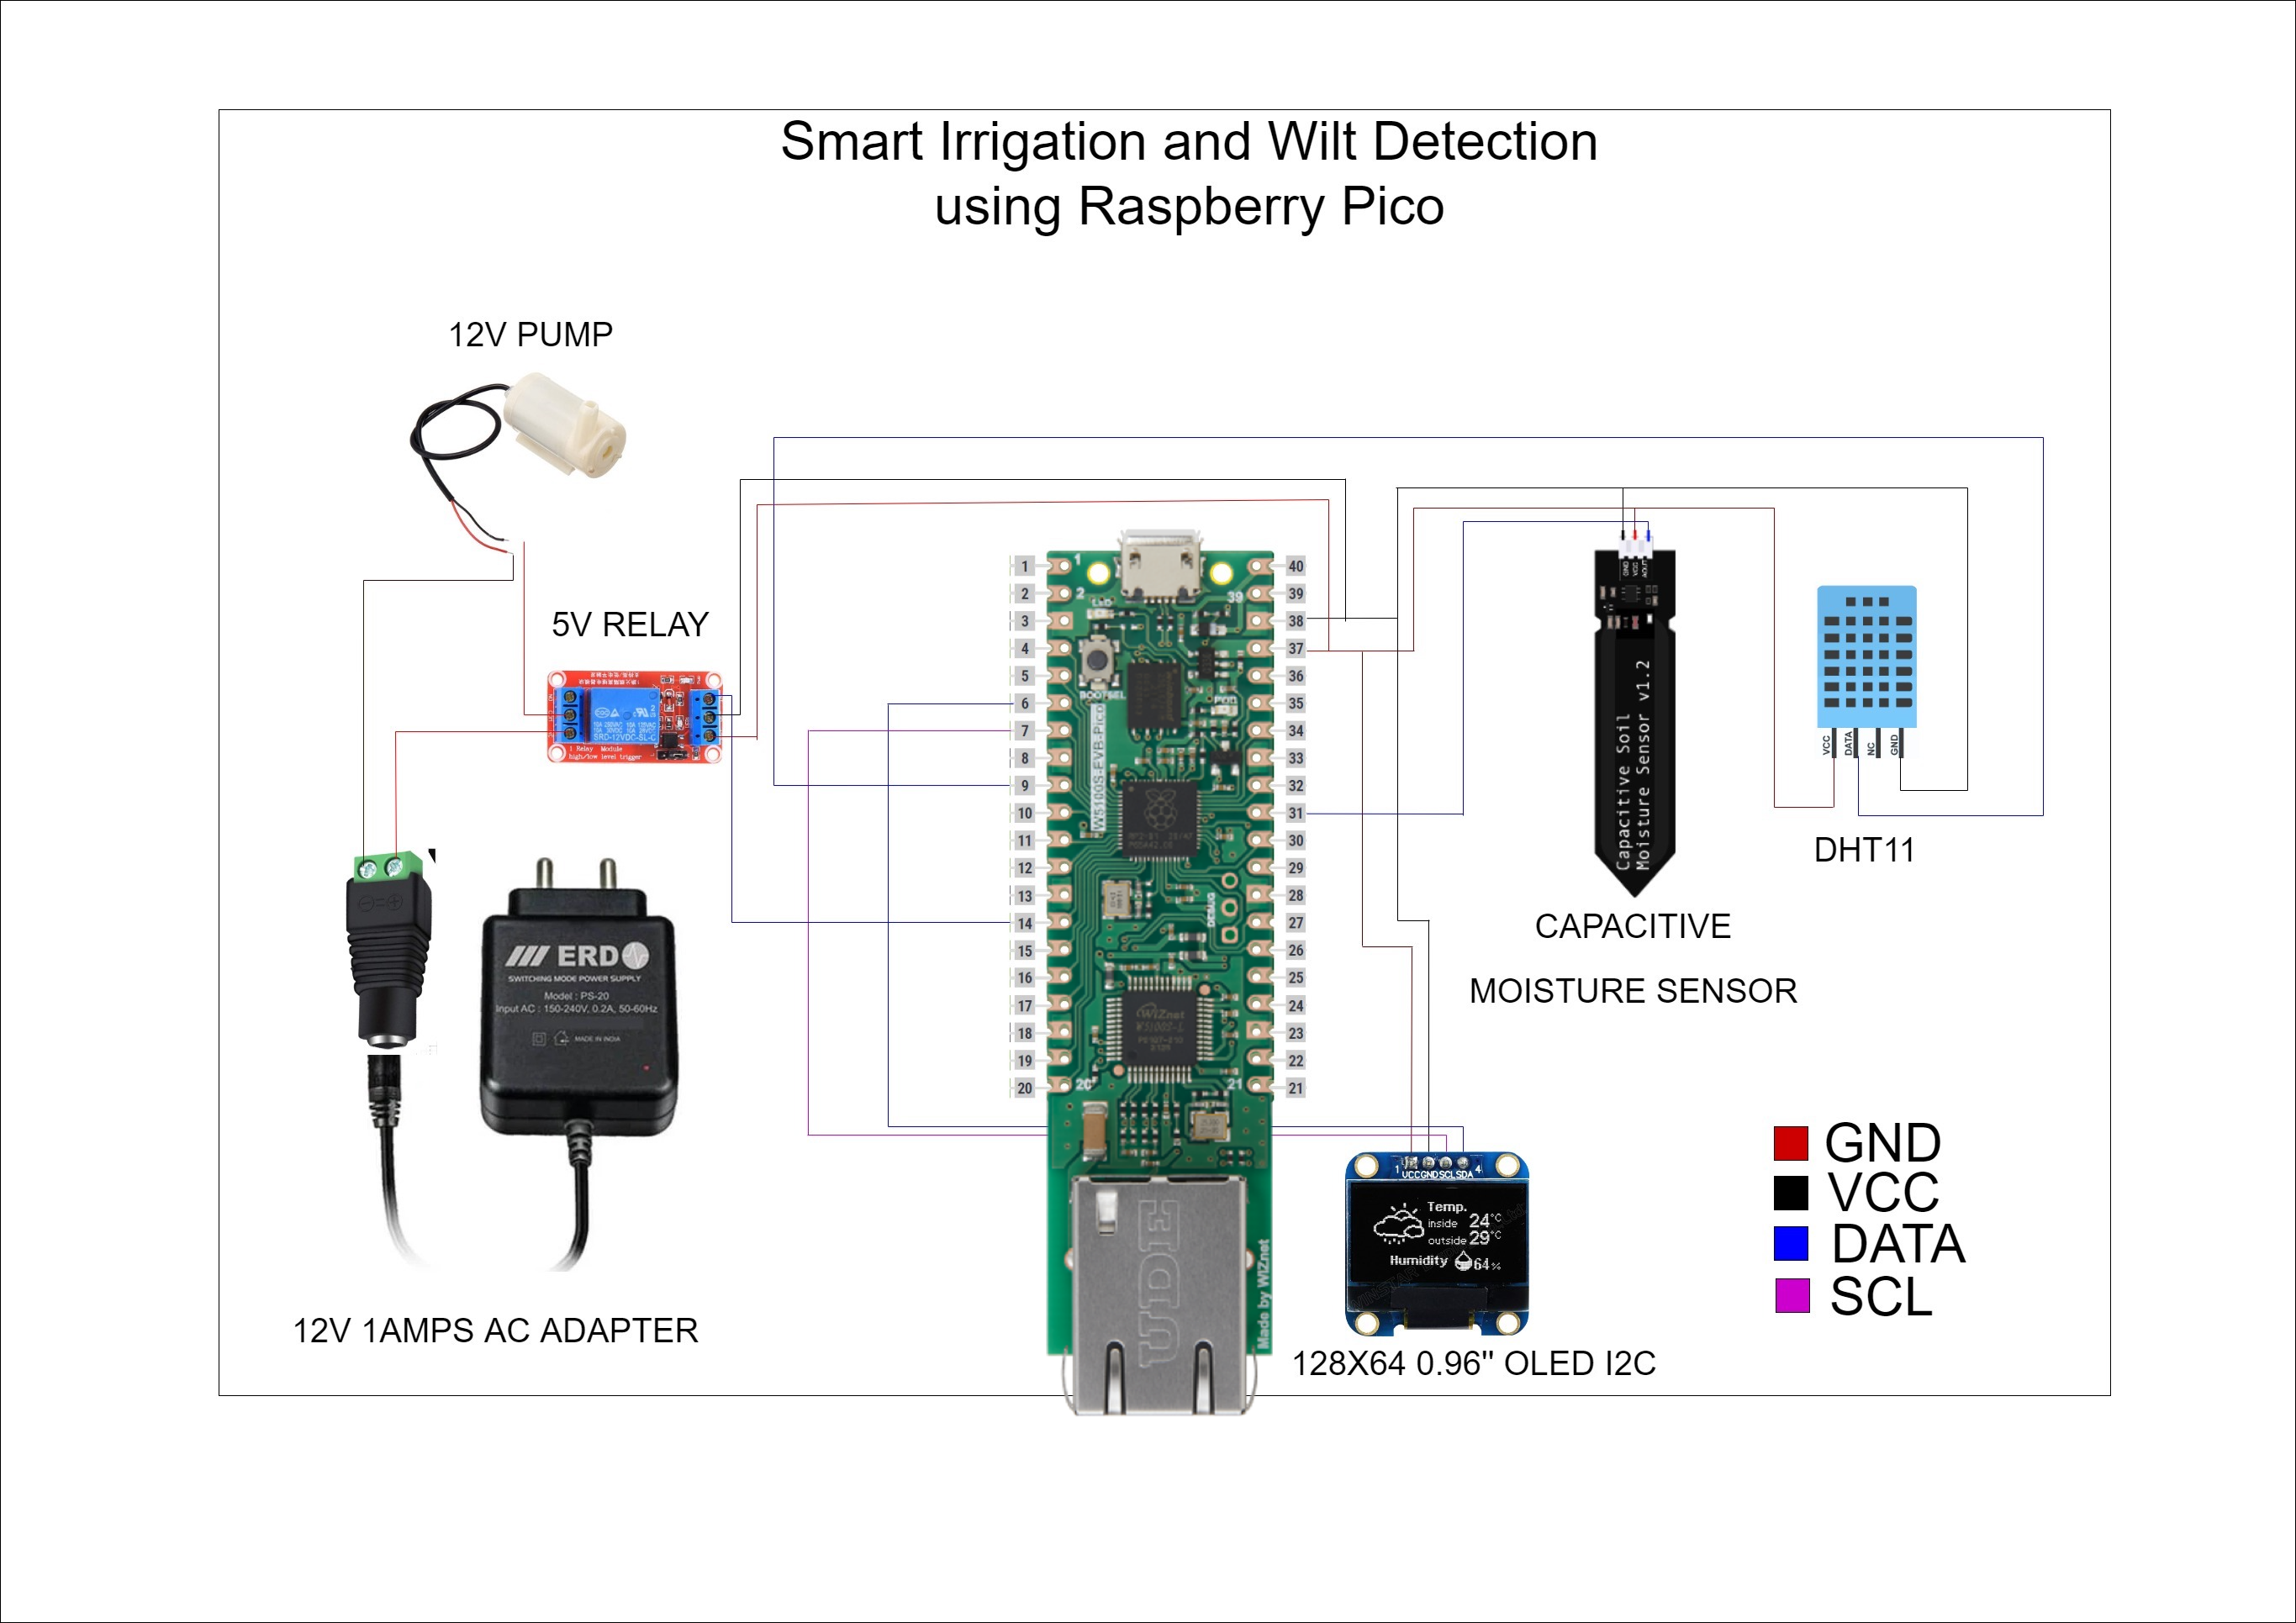
VCC, GND are connected to a common point in the bread board so that other sensors can share this point. The DHT sensor is connected to GPIO PIN 9 of the pico board which will provide temperature and humidity readings. The capacitive moisture sensor is connected to Analogue PIN A0 which will provide current soil moisture readings. The SDA and SCL pins of the OLED display are connected to the GPIO 5 and 4. Readings from DHT11 and moisture sensor are displayed on the OLED display. A relay is connected to the GPIO PIN 14 for turning on and off the pump. The +ve of the pump is connected to the relay and -ve is directly connected to the pump from the DC jack. +ve of the DC jack is connected to the common point of the relay. The system uses a 5v motor powered by a 5v DC adapter. If the moisture percent drops below 30% the relay will activate the pump mechanism for 5 seconds. It turns off the pump for 10 sec inorder for the moisture sensor to recalibrate. The microcontroller will check for the moisture level and activate the pump if the moisture level is still below 30. The relay will stop activating if the water level is above 30 inorder to prevent over watering. The OLED display will also display the health status of the plant.
How to integrate AI ?
In this project we have used the YOLOV5 object detection model on a custom trained dataset which could detect accurately when a plant is dry or not. Training is done by collecting dry pictures and healthy pictures of the same plant type. We then annotate these pictures differentiating between dry and healthy. Then feed it to the training algorithm. Ensure that the present working directory is the YOLOV5 directory and all dependencies are installed. The coco128.yaml file has to be updated with the dataset directory and also the classes used [Healthy, dry]. Train using the command:
!python train.py --img 416 --batch 16 --epochs 100 --data coco128.yaml --weights yolov5s.pt --cache
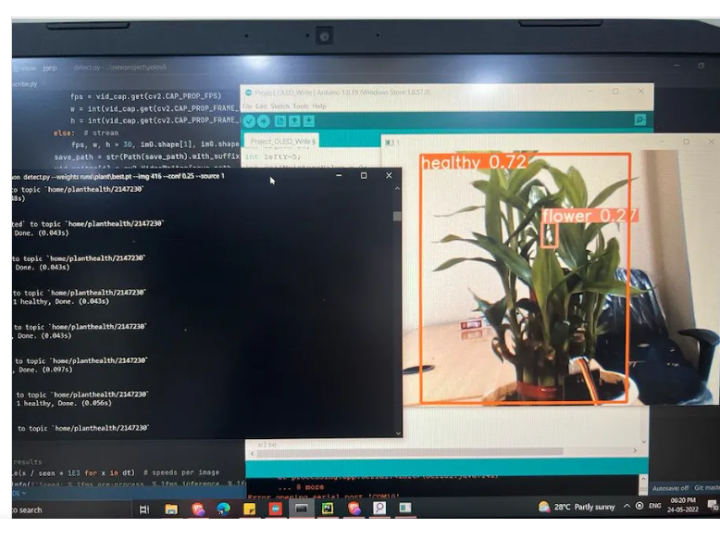
A pertained weight has been assigned to the training [yolov5s.pt] and is running at 100 epochs. Once the training is done check in the “runs” folder to check the accuracy of predictions in the.jpg files. The real time detection can be used with the command :python detect.py --weights runs\plant\best.pt --img 416 --conf 0.25 --source 1
While running this command the present working directory should be the root of the yolov5 folder. The weight file ending in “.pt” file has to be given in the - -weight argument. The source can be set to 1 or 0 depending on the webcam used internal or external. On running this command a frame opens up with bounding box detection. In the detect.py we have made some edits so that the frames will only only be sent at a slower rate so that it matches with the speed of mqtt receiver in the microcontroller. The status of the plant will be displayed in the console. In this project we are sending this plant status to the mqtt server. These status messages include “plant is healthy”, ”plant is dried”, in case no plants are detected “no plant detected”. On receiving the status from the mqtt server in raspberry pico, we check for keywords such as “healthy”, “dried” and “no”. A global variable is assigned for each status and this status will be displayed in the OLED display as well as the Serial Monitor.
Code Explanation
The code starts with including all the libraries required for the components and the mqtt server (line no 7-13).All global variables and definitions for the MQTT server are initialized(Line no 16-21).Width and Height information for the OLED display and the DHT11 pin number is initialized(Line no 24-29). The baseframe for the OLED display bitmap is initialized(Line no 47-112). On powering the system, the microcontroller initializes all the global variables and readings from the sensors (line no 36-40). The system has to be connected to ethernet so that it will be able to receive messages from the MQTT server. Global constants for the moisture sensor is provided (Line no 43, 44).The void loop function initializes pins and the OLED display and attempt to connect to the MQTT server, when this script is run a recalibration message is displayed on the OLED screen (Line no 255-256). The ethernet initialization is done by the function ethstart(); (Line no 264) and is defined in Line 169-206. It attempts to connect to the ethernet and displays a warning message to the serial port in case of any issues.
Once connected to the ethernet it also provides a delay for the system to sort itself out (Line no 206). Once the void setup function is executed looping begins in the void loop() function (Line no 269-339). If the microcontroller is disconnected from the ethernet it attempts to reconnect (Line no 272-274). Subscription to the topic is defined in line 276. The temperature, humidity and moisture data is read (Line no 279-284). If the reading fails it displays a warning message to the serial monitor (Line no 287-289). The temperature, humidity and moisture data is displayed to the OLED display using function printTemp, printHumidity and printMoist. These functions are defined in Line no 211, 222, 233 which sets upto the cursor in the specific row and column and prints the data to the display. Based on the moisture level the pump will be activated, if the moisture drops below 30% the pump activates for 5 seconds by turning on the relay and stops this allowing the moisture sensor to calibrate.If the moisture percentage is above 30 percent the relay stays off(Line no 324-335).
The global variable current_status is set by the callback function to MQTT server ( Line no 115). The message from the MQTT server is in the form of a character array. We use the indexOf function to check whether a string exists in the array(Line no 134, 136). If found “healthy” the current variable is set to 0, else 1. If “no” is found then it is set to 3. This information is displayed to OLED using the printStatus() function (Line no 244).
Youtube
-
Smart Plant Irrigation with. Health Detection

-
Circuit Diagram
-
Schemetics