
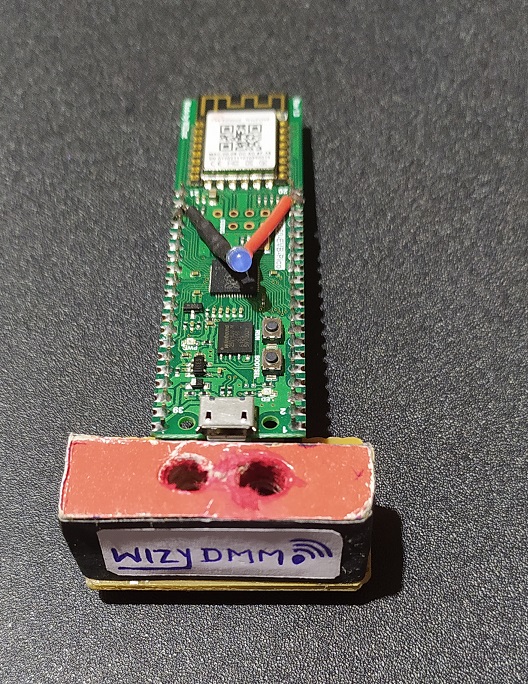
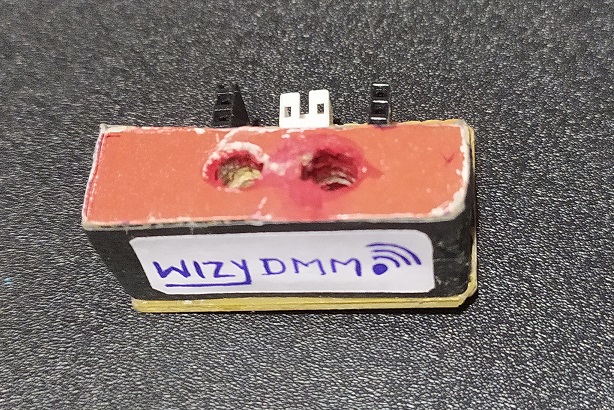
ThingDMM - Internet Connected DMM based on wizfi360 evb pico
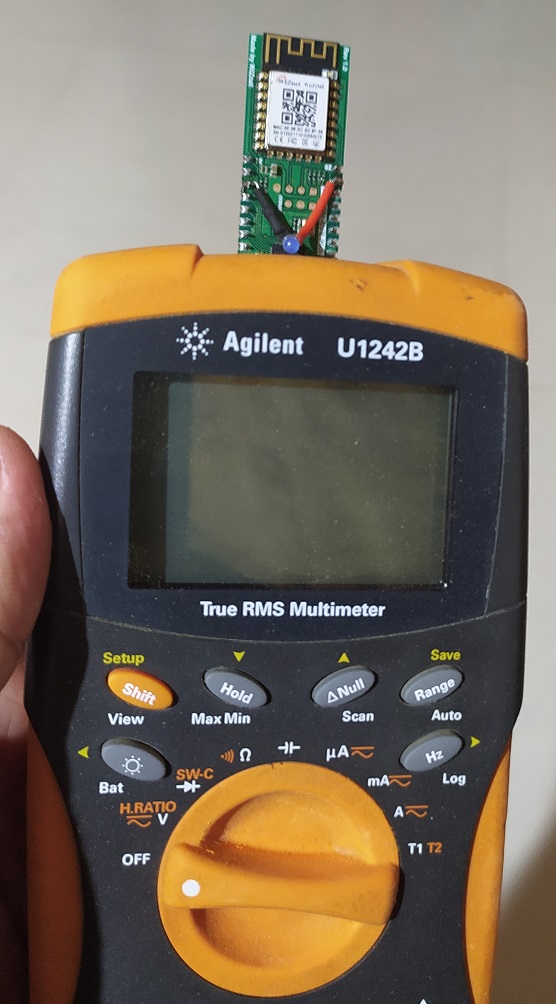
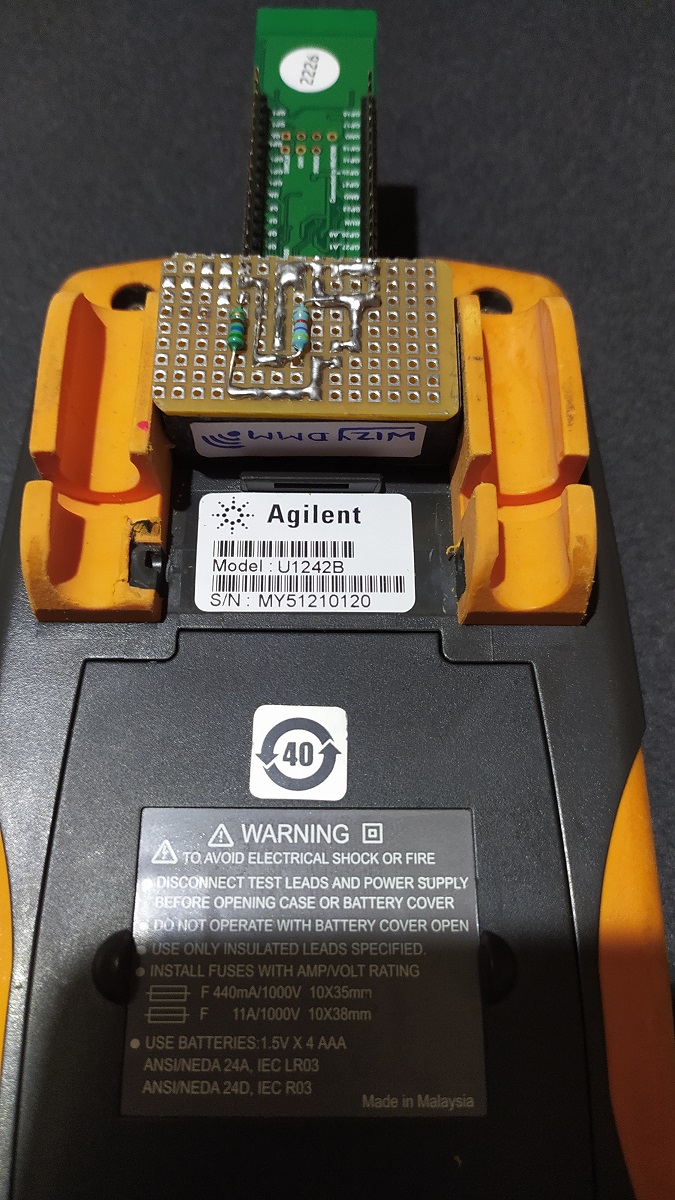
Connecting Standard DMM to internet using Wizfi360-evb-pico and Optically Isolated communication port of DMM


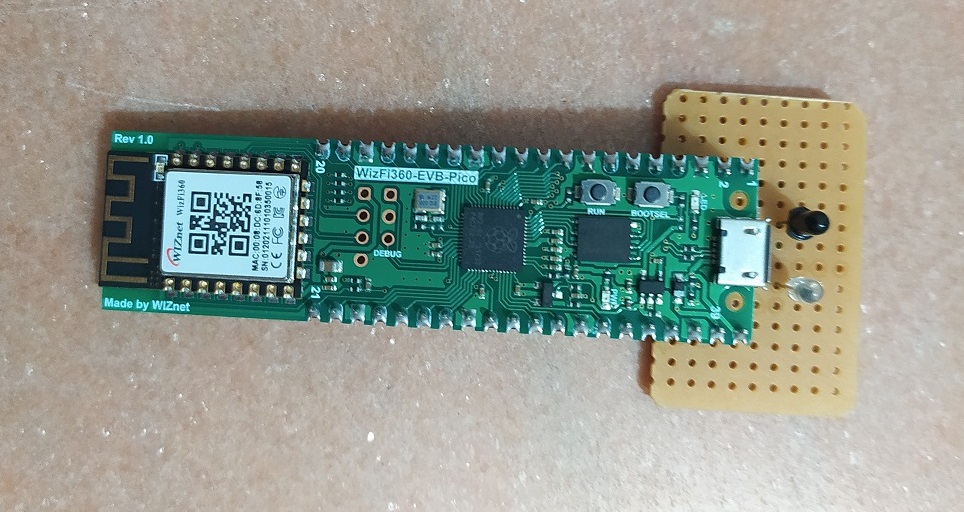
WIZnet - WizFi360-EVB-Pico
x 1
to communicate with DMM and Cloud Control App via MQTT

Arduino - Arduino IDE
x 1
to develop firmware for WizFi360-evb-pico
"Simplicity is the ultimate Sophistication"
-Leonardo Da Vinci
ThingDMM project is inspired by this famous quote, used as few as possible components to make simple Internet Connected dongle using WizFi360-EVB-PICO, that does following tasks,
- Communicate with Keysight or Any standard DMM That Supports SCIP Protocol using Optically Isolated data port.
- Send DMM data / Receive DMM commands to/from ThingDMM Dash App via Internet using MQTT.
- Just Attach ThingDMM dongle to DMM and its now a thing in IoT and can be control/read from anywhere.
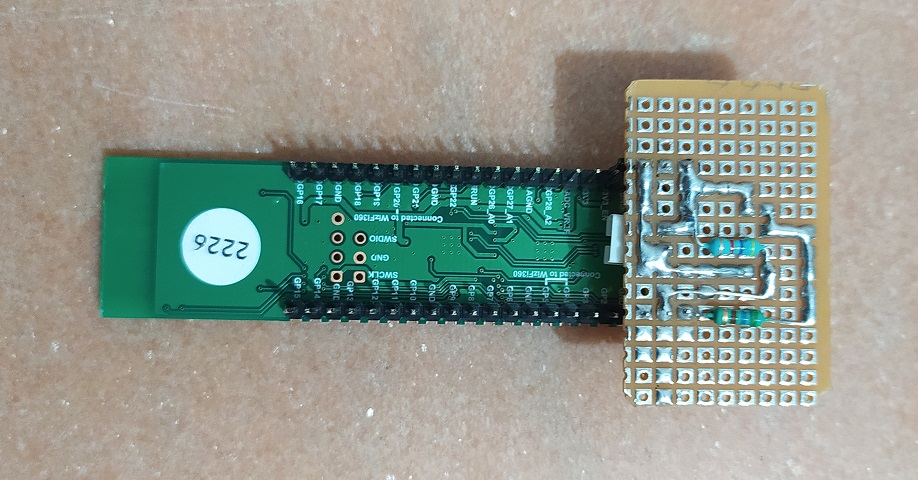
And to make this happen, used only following Parts.
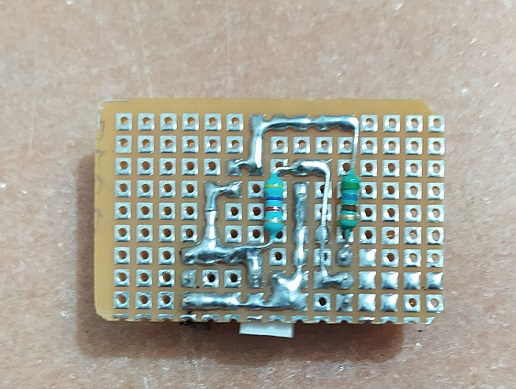
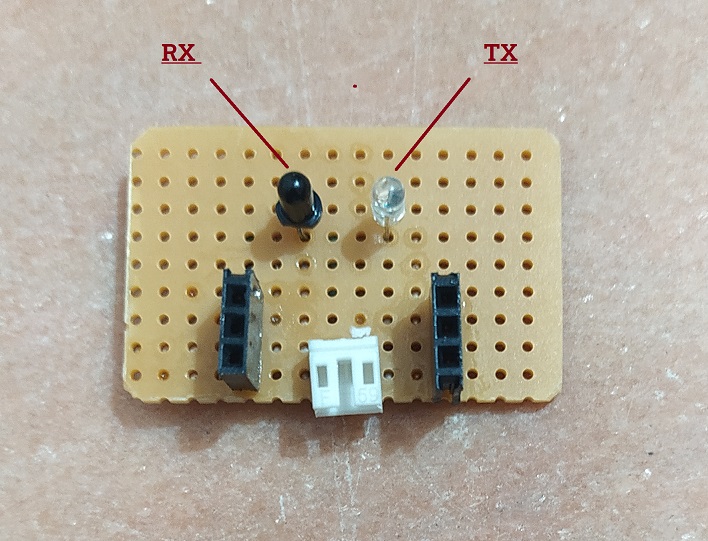
- IR Photo Transistor ( QSD123 ) - To Read data from DMM
- IR LED ( QED123 ) - To Send Commands to DMM
- Wizfi360-EVB-PICO - at Center stage to process data received from DMM, send those data to ThingDMM app and Get commands from ThingDMM App Process Those commands and send those commands to DMM.
- Tiny 1 Cell Lithium Polymer battery to power ThingDMM
- Few Resistors (560 ohms - 2 and 4.7K ohms - 1) and one Status LED
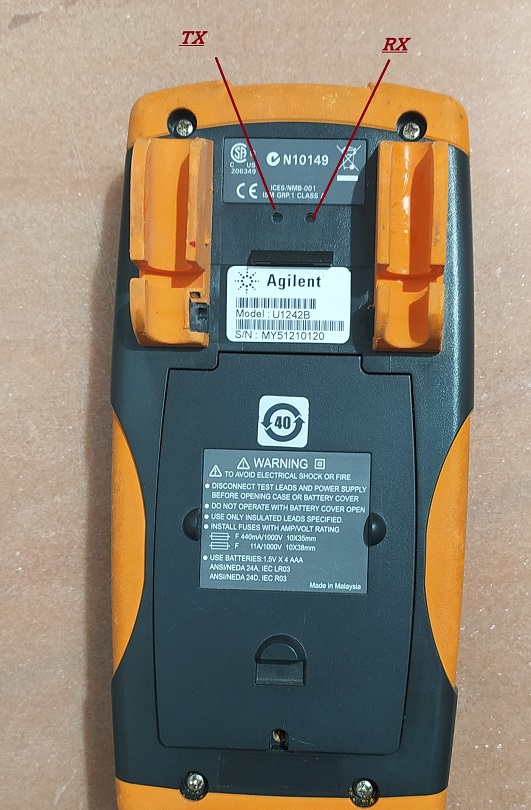
Used Keysight U1242B DMM for this project, but project can be used to any DMM that supports bidirectional optically isolated interface port and Supports SCIP Protocol.
Video of Working -
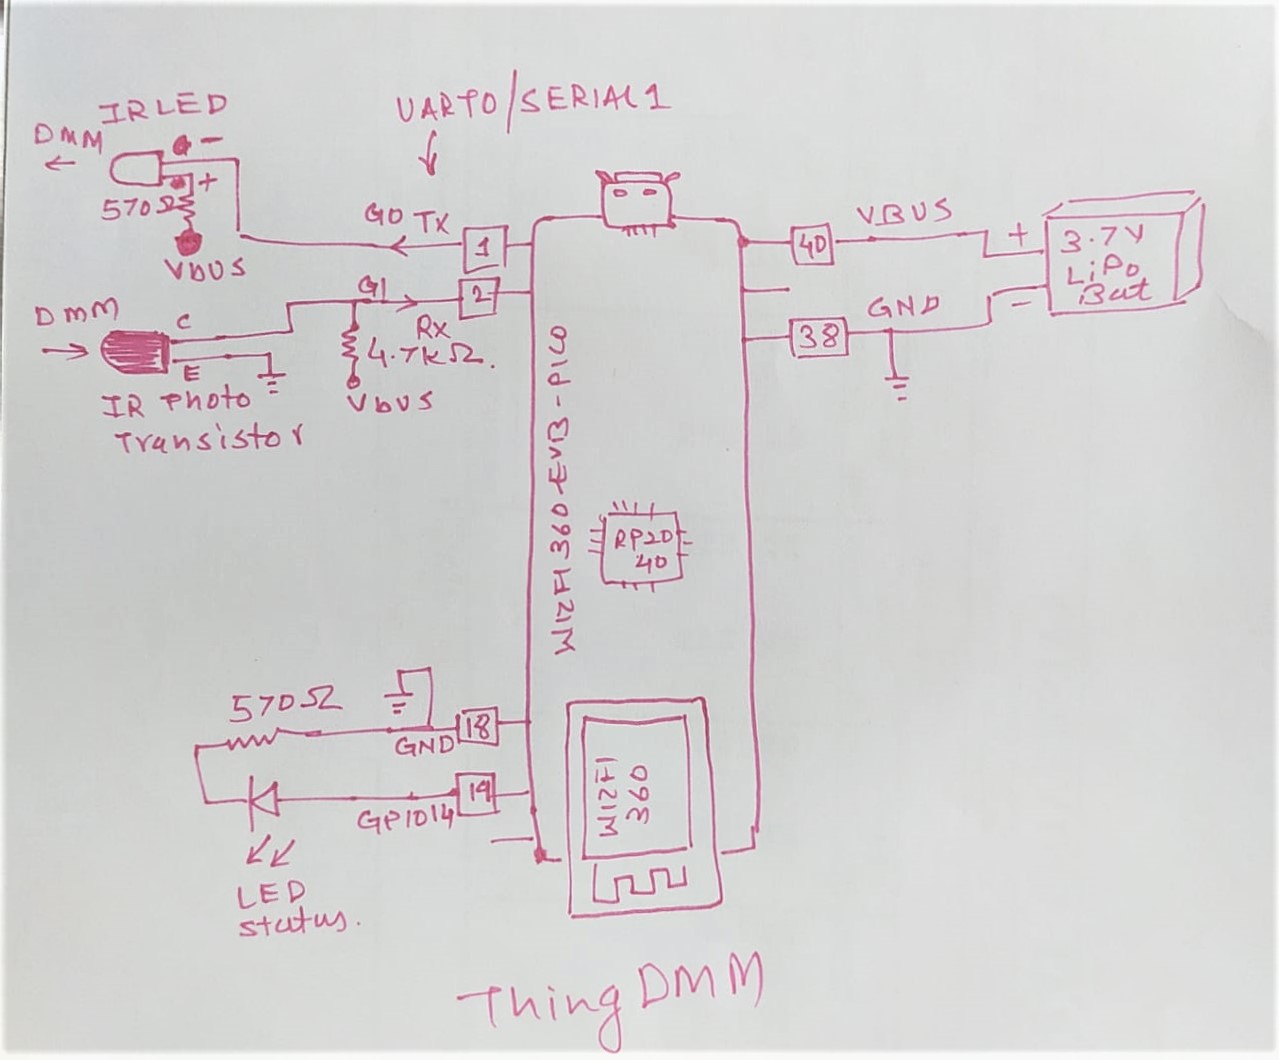
ThingDMM Hardware Circuit-
Build log -


ThingDMM Dash App -
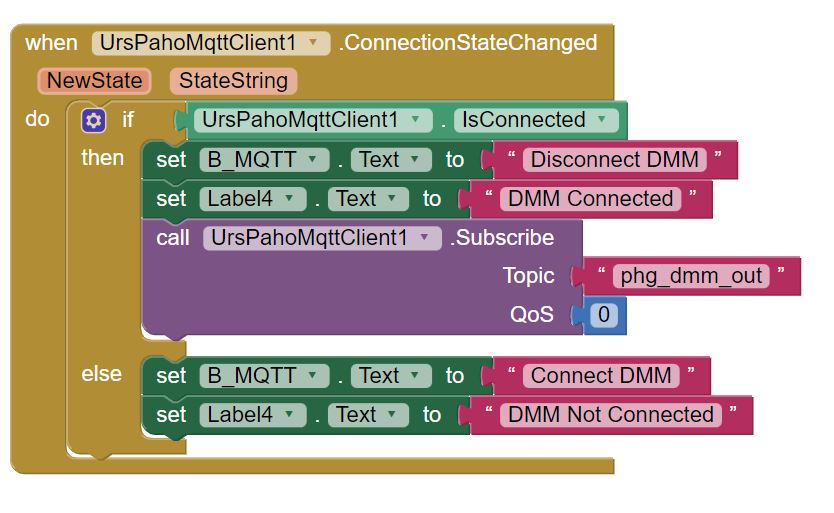
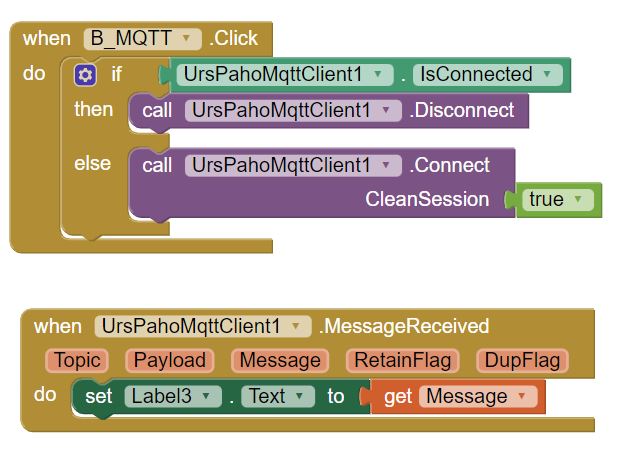
ThingDMM Android Application made using MIT App Inventor 2 here are Blocks used in App..
Apk file and Aia file documentation part,
MQTT Implementation in ThingDMM App
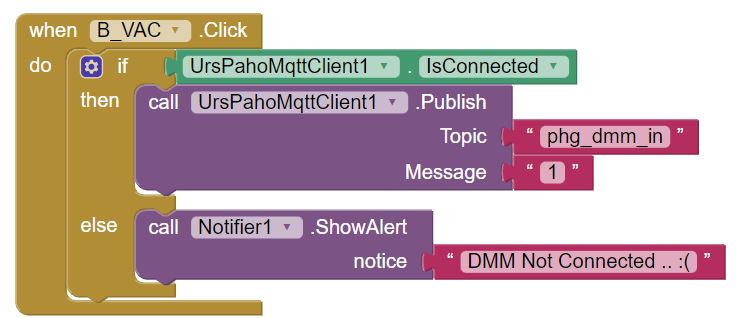
All blocks of ThingDMM App

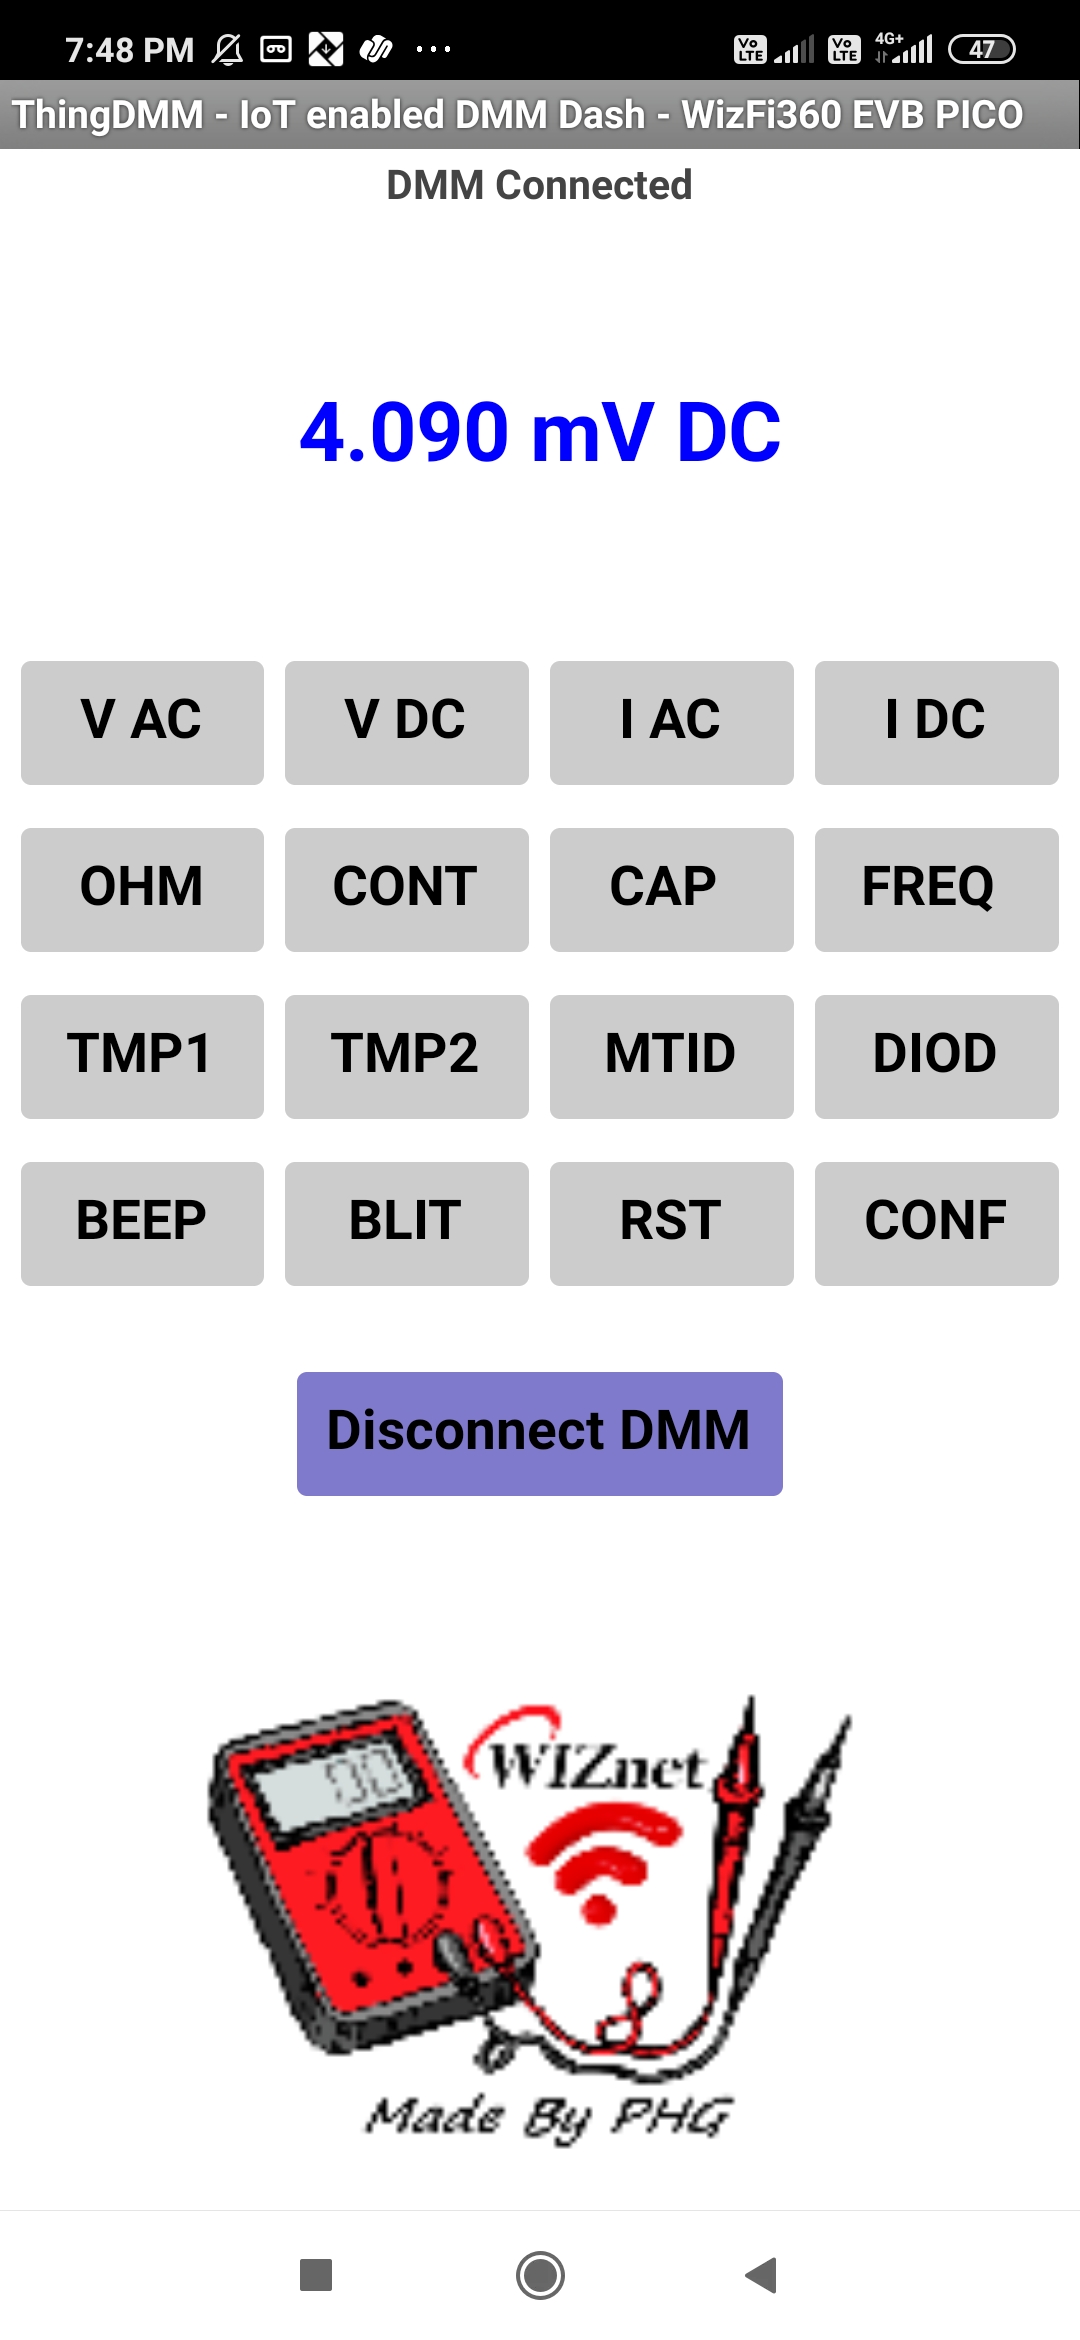
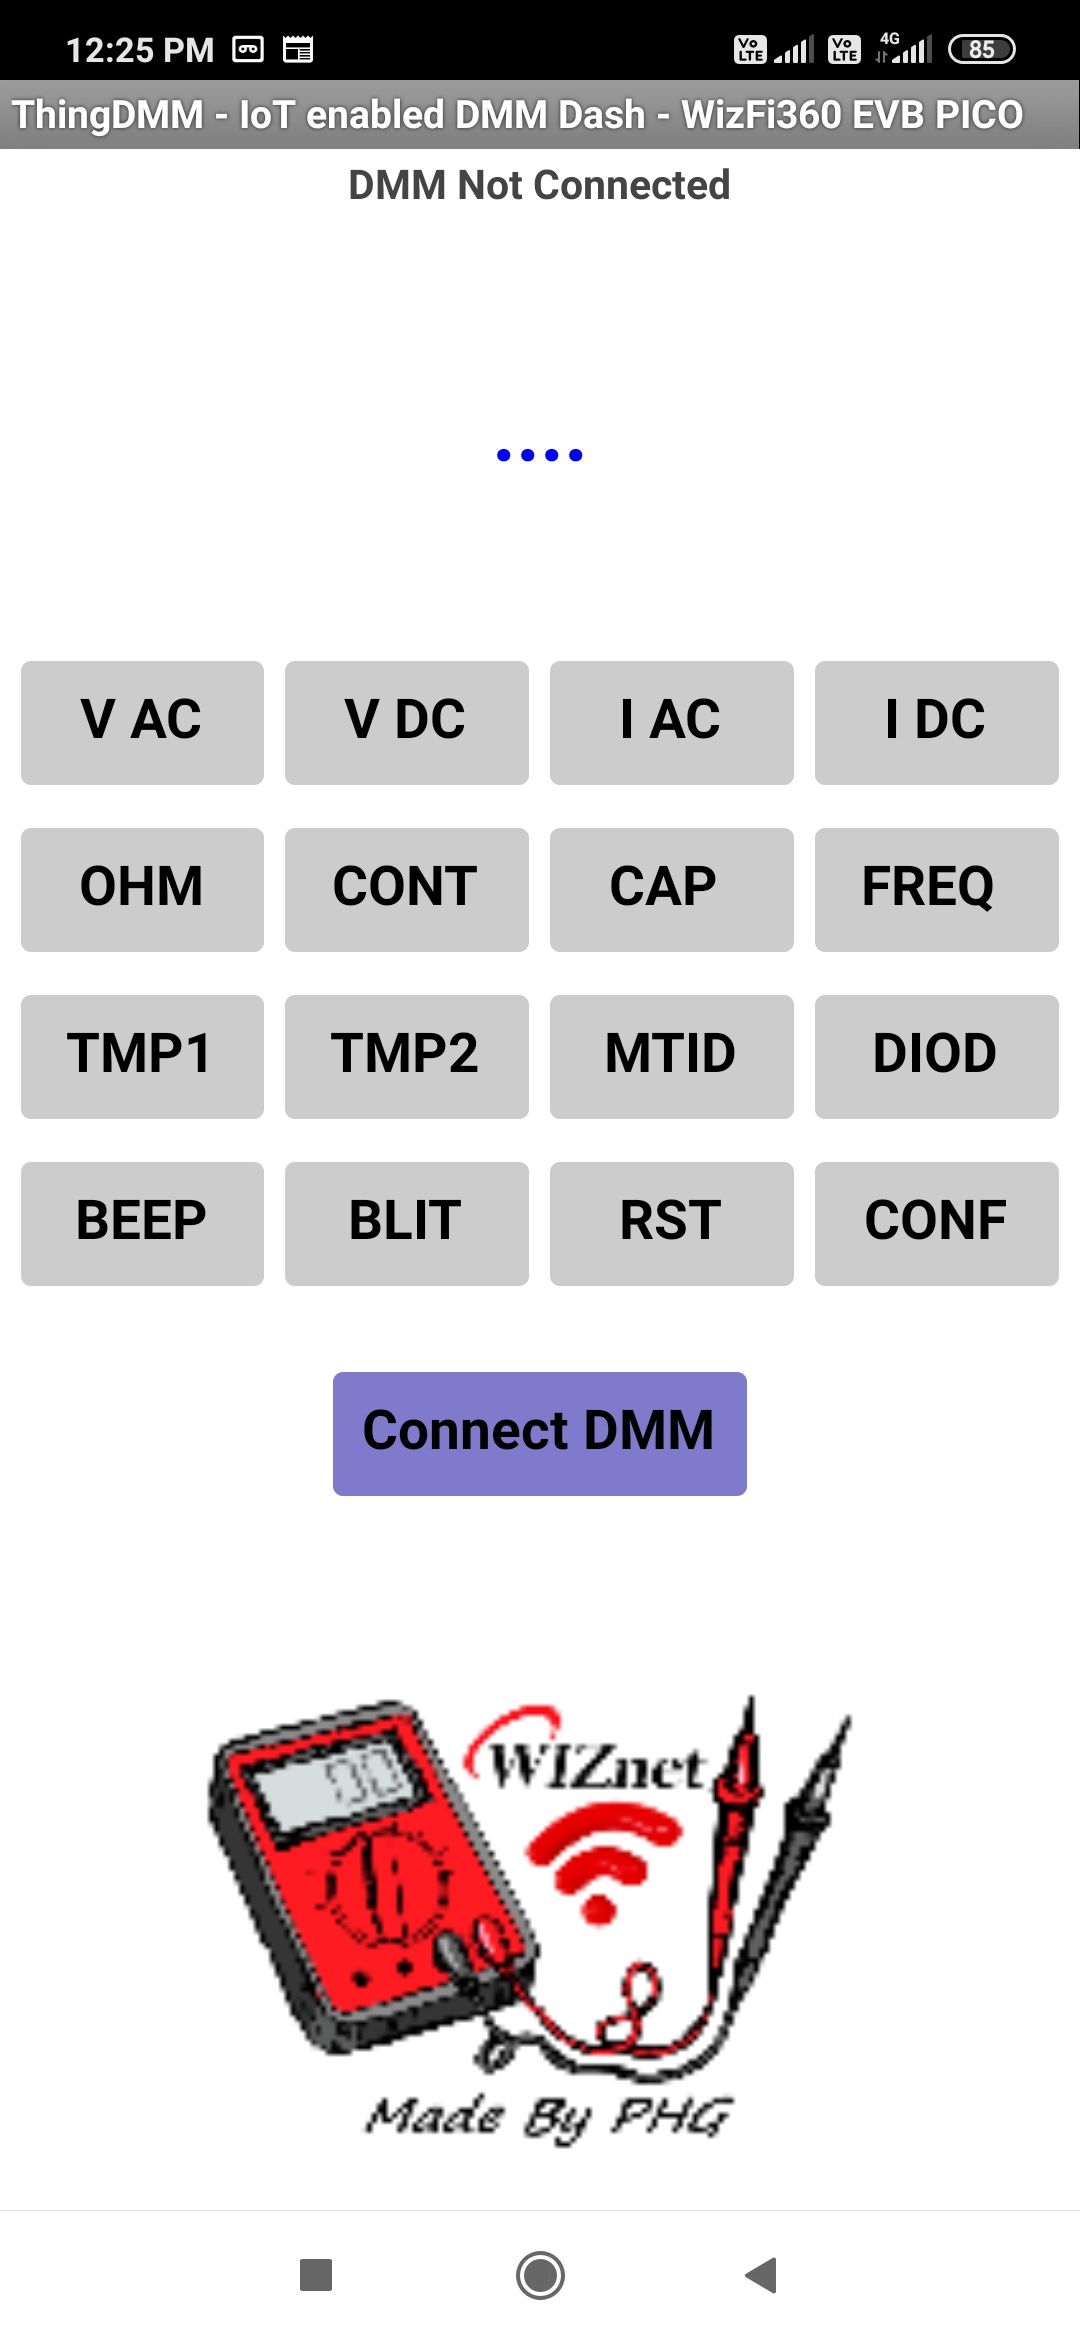
UI of thing DMM app with most frequently available mode options on any DMM
WizFi360-EVB-PICO Code -
WizFi360 WiFi Connection and MQTT part of program using AT commands is used from this project entry in this contest.
DMM communicates on Optically Isolated port with 9600 Baud rate,
This Sigrok community Page having Details of commands and responses used by keysight U12XXX series DMM,
following commands implemented in WizFi360-EVB-PICO arduino Code,
// Agilent DMM U1242B COMMANDS
#define C1 "CONF:VOLT:AC"
#define C2 "CONF:VOLT:DC"
#define C3 "CONF:CURR:AC"
#define C4 "CONF:CURR:DC"
#define C5 "CONF:RES"
#define C6 "CONF:CONT"
#define C7 "CONF:CAP"
#define C8 "CONF:FREQ"
#define C9 "CONF:TEMP"
#define CA "CONF:T1"
#define CB "*IDN?"
#define CC "SYST:BATT?"
#define CD "SYST:BEEP"
#define CE0 "SYST:BLIT 0"
#define CE1 "SYST:BLIT 1"
#define CF "*RST"
#define CG "CONF?"

#define DMMVAL "FETC?"
This Sample code converts Scientific Readings received from DMM to normal string displayed on App with Logic to display units.
char buf[] = "-9.25000000E-01";
char dmm_buf[50];
char dmm_final_buf[50];

void setup() {
  // put your setup code here, to run once:
  Serial.begin(115200);
  Serial.println("Test Scientific Number string to normal DMM display!");
}

void loop() {
  float x = atof(buf);
  if(x>1.0E26) {
    sprintf( dmm_buf, "OL");
    Serial.println( dmm_buf );
  }
  else if( x<-1.0E26) {
  sprintf( dmm_buf, "-OL");
  Serial.println( dmm_buf );
  }
  else if(x>1.0E6 || x<-1.0E6) {
  sprintf( dmm_buf, "%0.3f M", x/1.0E6 );
  Serial.println( dmm_buf );
  }
  else if(x>1.0E3 || x<-1.0E3) {
  sprintf( dmm_buf, "%0.3f K", x/1.0E3 );
  Serial.println( dmm_buf );
  }
  else if(x>1.0 || x<-1.0) {
  sprintf( dmm_buf, "%0.3f", x );
  Serial.println( dmm_buf );
  }
  else if(x>1.0E-3 || x<-1.0E-3) {
  sprintf( dmm_buf, "%0.3f m", x/1.0E-3 );
  Serial.println( dmm_buf );
  }
  else if(x>1.0E-6 || x<-1.0E-6) {
  sprintf( dmm_buf, "%0.3f u", x/1.0E-6 );
  Serial.println( dmm_buf );
  }
  else if(x>1.0E-9 || x<-1.0E-9) {
  sprintf( dmm_buf, "%0.3f n", x/1.0E-9 );
  Serial.println( dmm_buf );
  }
  sprintf( dmm_final_buf, "%s Volt AC", dmm_buf );
  Serial.println( dmm_final_buf );

  // put your main code here, to run repeatedly:
  delay(1000); // this speeds up the simulation
}
Following is Single Main ThingDMM Arduino Program that includes above logic, Connect to MQTT Broker broker.hivemq.com, Subscribe to phg_dmm_in topic to which App sends commands '1' to '9' and 'A' to 'F' mapped to command buttons, converts this command to actual DMM command, Send it to DMM, receive DMM Response and process response and publish result to APP by phg_dmm_out topic for display on App.
// ThingDMM IoT Digital Multimeter - using WizFi360-EVB-PICO made by phg

// Agilent DMM U1242B COMMANDS
#define C1 "CONF:VOLT:AC"
#define C2 "CONF:VOLT:DC"
#define C3 "CONF:CURR:AC"
#define C4 "CONF:CURR:DC"
#define C5 "CONF:RES"
#define C6 "CONF:CONT"
#define C7 "CONF:CAP"
#define C8 "CONF:FREQ"
#define C9 "CONF:TEMP"
#define CA "CONF:T1"
#define CB "*IDN?"
#define CC "SYST:BATT?"
#define CD "SYST:BEEP"
#define CE0 "SYST:BLIT 0"
#define CE1 "SYST:BLIT 1"
#define CF "*RST"
#define CG "CONF?"

#define DMMVAL "FETC?"

// merge Mode msg after value
#define MC1 "V AC"
#define MC2 "V DC"
#define MC3 "A AC"
#define MC4 "A DC"
#define MC5 " Ω" // OHM
#define MC6 "  🔊" // Contunity
#define MC7 "F -||-" // Capacitor
#define MC8 "Hz"
#define MC9 " ℃ T1" // degree celcius T1
#define MC10 " ℃ T2" // degree celcius T2
#define MC11 " ℃ DT" // degree celcius T2-T1
#define MC12 " Diode"

#define DMM_TX   0
#define DMM_RX   1
#define LED_BLUE 14

// WiFi Details
const char* ssid = "krishna"; // edit with preffered AP SSID
const char* psk  = "krishna123";  // edit with preffered AP PSK

// MQTT Related functions Taken from this amazing project https://maker.wiznet.io/mvpatel/contest/smart-home-iot-hub-using-wizfi360-evb-pico/
// MQTT Broker and topic details
const char* broker = "broker.hivemq.com"; // edit with preffered MQTT Broker
const int   port = 1883; // edit with preffered MQTT Broker port
const char* pub_topic = "phg_dmm_out";   // edit with preffered MQTT Publish topic
const char* sub_topic = "phg_dmm_in"; // edit with preffered MQTT Subcribe topic

char dmm_rx_buf[200];
char dmm_buf[200];
char dmm_final_buf[200];
int blit_flag = 0;
int chk_flag = 0;
int mode = 2;
long millis_old = 0;
// the setup routine runs once when you press reset:
void setup() {
  // initialize serial communication at 9600 Baudrate For DMM Optical Isolated UART Link
  Serial1.setTX(DMM_TX);
  Serial1.setRX(DMM_RX);
  Serial1.begin(9600);
  // initialize serial communication at Baudrate For Debug Pico on host system
  Serial.begin(115200); // Serial Debug Port

  pinMode(LED_BLUE,OUTPUT);
  digitalWrite(LED_BLUE,LOW);

  // Init MQTT over wifi using AT Commands on WIZFI360 on board
  setup_wifi_mqtt_at_wizfi360();
}

// the loop routine runs over and over again forever:
void loop() {

  mqtt_at_chk_sub_msg();
  delay(50);
  if(millis() - millis_old > 1000)
  {
    millis_old = millis();
    serial1_Flush();
    delay(50);
    if(chk_flag == 0)
    {
      Serial1.println(CG);
      delay(150);
      check_DMM_mode();
      chk_flag = 1;
    }
    else
    {
      Serial1.println(DMMVAL);
      delay(150);
      process_DMM_link();
      chk_flag = 0;
    }
  }
}

// function to read DMM data if available and process and send to App over MQTT
void process_DMM_link(void)
{
  if(Serial1.available()>0)
  {
    int cntt = 0;
    delay(50);
    while(Serial1.available()>0)
    {
      dmm_rx_buf[cntt] = Serial1.read();
      cntt++;
    }
    dmm_rx_buf[cntt-1] = 0x00;
    float x = atof(dmm_rx_buf);
    if(x>1.0E26) {
      sprintf( dmm_buf, "OL ");
      Serial.println( dmm_buf );
    }
    else if( x<-1.0E26) {
    sprintf( dmm_buf, "-OL ");
    Serial.println( dmm_buf );
    }
    else if(x>1.0E6 || x<-1.0E6) {
    sprintf( dmm_buf, "%0.3f M", x/1.0E6 );
    Serial.println( dmm_buf );
    }
    else if(x>1.0E3 || x<-1.0E3) {
    sprintf( dmm_buf, "%0.3f K", x/1.0E3 );
    Serial.println( dmm_buf );
    }
    else if(x>1.0 || x<-1.0) {
    sprintf( dmm_buf, "%0.3f ", x );
    Serial.println( dmm_buf );
    }
    else if(x>1.0E-3 || x<-1.0E-3) {
    sprintf( dmm_buf, "%0.3f m", x/1.0E-3 );
    Serial.println( dmm_buf );
    }
    else if(x>1.0E-6 || x<-1.0E-6) {
    sprintf( dmm_buf, "%0.3f u", x/1.0E-6 );
    Serial.println( dmm_buf );
    }
    else if(x>1.0E-9 || x<-1.0E-9) {
    sprintf( dmm_buf, "%0.3f n", x/1.0E-9 );
    Serial.println( dmm_buf );
    }
    if(mode == 1)sprintf( dmm_final_buf, "%s %s", dmm_buf, MC1);
    else if(mode == 2)sprintf( dmm_final_buf, "%s%s", dmm_buf, MC2);
    else if(mode == 3)sprintf( dmm_final_buf, "%s%s", dmm_buf, MC3);
    else if(mode == 4)sprintf( dmm_final_buf, "%s%s", dmm_buf, MC4);
    else if(mode == 5)sprintf( dmm_final_buf, "%s%s", dmm_buf, MC5);
    else if(mode == 6)sprintf( dmm_final_buf, "%s%s", dmm_buf, MC6);
    else if(mode == 7)sprintf( dmm_final_buf, "%s%s", dmm_buf, MC7);
    else if(mode == 8)sprintf( dmm_final_buf, "%s%s", dmm_buf, MC8);
    else if(mode == 9)sprintf( dmm_final_buf, "%s%s", dmm_buf, MC9);
    else if(mode == 10)sprintf( dmm_final_buf, "%s%s", dmm_buf, MC10);
    else if(mode == 11)sprintf( dmm_final_buf, "%s%s", dmm_buf, MC11);
    else if(mode == 12)sprintf( dmm_final_buf, "%s%s", dmm_buf, MC12);

    Serial.println( dmm_final_buf );

    // Publish VALUE to DMM
    flash_LED(20);
    Serial2.print("AT+MQTTPUB=\"");
    Serial2.print(dmm_final_buf);
    Serial2.println("\"");
  }
}

// Setup wifi connection and MQTT broker using WizFi360 AT Commands
// Taken from https://maker.wiznet.io/mvpatel/contest/smart-home-iot-hub-using-wizfi360-evb-pico/
void setup_wifi_mqtt_at_wizfi360(void)
{
  Serial2.setTX(4);
  Serial2.setRX(5);
  Serial2.begin(115200);
  // make the pushbutton's pin an input:
  delay(1000);
  Serial2.println("AT+RST");
  delay(2000);
  flash_LED(50);
  Serial2.println("AT+CWQAP");
  delay(2000);
  flash_LED(50);
  serial2_Flush();
  Serial2.println("ATE0");
  delay(1000);
  flash_LED(50);
  serial2_Flush();
  Serial2.println("AT+CWMODE=1");
  delay(1000);
  flash_LED(50);
  serial2_Flush();
  Serial2.print("AT+CWJAP_CUR=\"");
  Serial2.print(ssid);
  Serial2.print("\",\"");
  Serial2.print(psk);
  Serial2.println("\"");
  delay(6000);
  flash_LED(50);
  serial2_Flush();
  Serial2.println("AT+CIFSR");
  delay(500);
  serial2_Flush();
  Serial2.print("AT+MQTTSET=\"");
  Serial2.print(broker);//2
  Serial2.println("\",\"\",\"wiznet_te7863\",60");//2
  delay(3000);
  flash_LED(50);
  serial2_Flush();
  Serial2.print("AT+MQTTTOPIC=\"");
  Serial2.print(pub_topic);//2
  Serial2.print("\",\"");//2
  Serial2.print(sub_topic);//2
  Serial2.println("\"");//2
  delay(3000);
  flash_LED(50);
  serial2_Flush();
  Serial2.print("AT+MQTTCON=0,\"");//2
  Serial2.print(broker);//2
  Serial2.print("\",");//2
  Serial2.println(port);//2
  delay(3000);
  flash_LED(50);
  serial2_Flush();
  Serial2.println("AT+MQTTPUB=\"WizfiDMM Online\"");//2
  digitalWrite(LED_BLUE,HIGH);
  delay(3000);
  digitalWrite(LED_BLUE,LOW);
  flash_LED(50);
  serial2_Flush();
}

// MQTT Callback function
// Taken from https://maker.wiznet.io/mvpatel/contest/smart-home-iot-hub-using-wizfi360-evb-pico/
void mqtt_at_chk_sub_msg(void)
{
  char payload[100];
  uint8_t len = 0;
  uint8_t i = 0;
  while(Serial2.available()>0)
  {
    char xx = Serial2.read(); // if first char is > means its message from sub topic
    if(xx == '>')
    {
      chk_flag =0;
      flash_LED(20);
      xx = Serial2.read(); // avoid space after >
      while(Serial2.available()>0)
      {
        payload[i] = Serial2.read();
        i++;
      }
      len = i;

      Serial.print("Received msg from topic - ");
      Serial.print(sub_topic);
      Serial.print(" : ");
      for (int i=0;i<len;i++) {
        Serial.print((char)payload[i]);
      }
      serial1_Flush();
      if(payload[0] == '1') {Serial1.println(C1);}
      else if(payload[0] == '2') {Serial1.println(C2);}
      else if(payload[0] == '3') {Serial1.println(C3);}
      else if(payload[0] == '4') {Serial1.println(C4);}
      else if(payload[0] == '5') {Serial1.println(C5);}
      else if(payload[0] == '6') {Serial1.println(C6);}
      else if(payload[0] == '7') {Serial1.println(C7);}
      else if(payload[0] == '8') {Serial1.println(C8);}
      else if(payload[0] == '9') {Serial1.println(C9);}
      else if(payload[0] == 'A') {Serial1.println(CA);}
      else if(payload[0] == 'B') {Serial1.println(CB);}
      else if(payload[0] == 'C') {Serial1.println(CC);}
      else if(payload[0] == 'D') {Serial1.println(CD);}
      else if(payload[0] == 'F') {Serial1.println(CF);}
      else if(payload[0] == 'G') {Serial1.println(CG);}
      else if(payload[0] == 'E' && blit_flag == 0) {Serial1.println(CE1); blit_flag =1;}
      else if(payload[0] == 'E' && blit_flag == 1) {Serial1.println(CE0); blit_flag =0;}
      else Serial.println("Invalid Command...");
      delay(1000);
      if(Serial1.available()>0)
      {
        int cnt = 0;
        delay(100);
        while(Serial1.available()>0)
        {
          payload[cnt] = Serial1.read();
          cnt++;
        }
        payload[cnt-2] = 0x00;
        Serial2.print("AT+MQTTPUB=\"");
        Serial2.print(payload);
        Serial2.println("\"");
        delay(2000);
      }
//      else
//      {
//        Serial2.print("AT+MQTTPUB=\"");
//        Serial2.print("OK");
//        Serial2.println("\"");
//        delay(2000);
//      }

    }
  }
}

// flush serial 2 wizfi360 uart incoming data
// Taken from https://maker.wiznet.io/mvpatel/contest/smart-home-iot-hub-using-wizfi360-evb-pico/
void serial2_Flush(void)
{
  while(Serial2.available()>0)
  {
    char dummy = Serial2.read();
    Serial.write(dummy);
  }
}

// flush serial 1 DMM uart incoming data
// Taken from https://maker.wiznet.io/mvpatel/contest/smart-home-iot-hub-using-wizfi360-evb-pico/
void serial1_Flush(void)
{
  while(Serial1.available()>0)
  {
    char dummy = Serial1.read();
    Serial.write(dummy);
  }
}

// flash LED
void flash_LED(int td)
{
  digitalWrite(LED_BLUE,HIGH);
  delay(td);
  digitalWrite(LED_BLUE,LOW);
}

// check DMM Mode
void check_DMM_mode(void)
{
  if(Serial1.available()>0)
  {
    char dmm_mode_buf[100];
    int cn = 0;
    delay(100);
    while(Serial1.available()>0)
    {
      dmm_mode_buf[cn] = Serial1.read();
      cn++;
    }
    dmm_mode_buf[cn-1] = 0x00;
    if(dmm_mode_buf[1] == 'V' && dmm_mode_buf[5] == ':')mode = 1;
    else if(dmm_mode_buf[1] == 'V')mode = 2;
    else if(dmm_mode_buf[1] == 'C' && dmm_mode_buf[2] == 'U' && dmm_mode_buf[5] == ':')mode = 3;
    else if(dmm_mode_buf[1] == 'C' && dmm_mode_buf[2] == 'U')mode = 4;
    else if(dmm_mode_buf[1] == 'C' && dmm_mode_buf[2] == 'O')mode = 6;
    else if(dmm_mode_buf[1] == 'C' && dmm_mode_buf[2] == 'A')mode = 7;
    else if(dmm_mode_buf[1] == 'R')mode = 5;
    else if(dmm_mode_buf[1] == 'F' && dmm_mode_buf[2] == 'R')mode = 8;
    else if(dmm_mode_buf[1] == 'T' && dmm_mode_buf[2] == '1')mode = 9;
    else if(dmm_mode_buf[1] == 'T' && dmm_mode_buf[2] == '2')mode = 10;
    else if(dmm_mode_buf[1] == 'D' && dmm_mode_buf[2] == 'T')mode = 11;
    else if(dmm_mode_buf[1] == 'D' && dmm_mode_buf[2] == 'I')mode = 12;

  }
}
Thank you
-
ThingDMM APK File
Android Application of ThingDMM Dashboard made with MIT App Inventor

-
ThingDMM MIT AI2 Project
If need to make changes to app use this MIT AI2 APP source in .aia format to directly import in MIT AI2
-
Arduino Code - Thing DMM
Arduino Code - Thing DMM
-
ckt diagram
Thing DMM ckt