Skip to content

WIZnet Ethernet HAT[RP2040] + Loopback

WIZnet Ethernet HAT[RP2040] + Loopback

WIZnet

Published February 16, 2023

Original author: louis_mOriginal source (new tab)

WIZnet Ethernet HAT[RP2040] + Loopback

Components

Hardware components
WIZnet Ethernet HAT

x 1


Project description

Overview

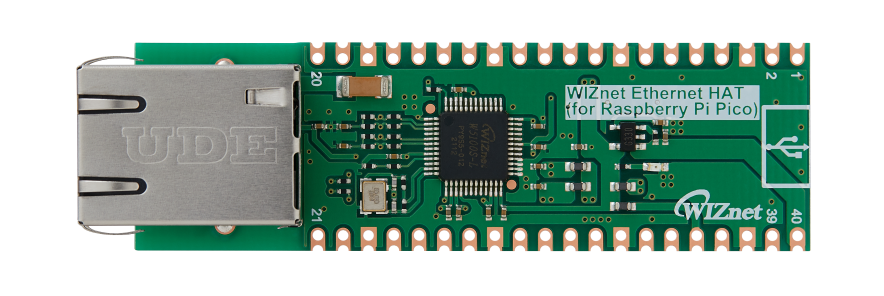
WIZnet Ethernet HAT (Hardware Attached on Top) is a Raspberry Pi Pico pin-compatible board that utilizes W5100S and supports both 3.3V & 5V.

Please refer to this link to find more information about W5100S.

  • Raspberry Pi Pico Pin-Compatible
  • Ethernet (W5100S Hardwired TCP/IP CHIP)
  • Product page : https://docs.wiznet.io/Product/iEthernet/W5100S/overview
  • Support 4 Independent Hardware SOCKETs simultaneously
  • Support SOCKET-less new Command: ARP-Request, PING-Request
  • Support Auto-MDIX only when Auto-Negotiation mode
WIZnet Ethernet HAT[RP2040] + Loopback, Overview
 
WIZnet Ethernet HAT
WIZnet Ethernet HAT
 

RP2040 Datasheet – https://www.raspberrypi.org/documentation/microcontrollers/raspberry-pi-pico.html

RP2040
RP2040
 

Prepare

Prepare Hardware

1. Combine WIZnet Ethernet HAT with Raspberry Pi Pico.

2. Connect ethernet cable to Ethernet HAT ethernet port.

3. Connect Raspberry Pi Pico to desktop or laptop using 5 pin micro USB cable.

– If you use W5100S-EVB-Pico, you can skip ‘1. Combine…’

Prepare Software

1.Installing CircuitPython

Install CircuitPython on Raspberry Pi Pico by referring to the link above.

https://learn.adafruit.com/getting-started-with-raspberry-pi-pico-circuitpython/circuitpython

  • Download the below uf2 file link on your computer

CircuitPython 7.0.0 – https://downloads.circuitpython.org/bin/raspberry_pi_pico/en_US/adafruit-circuitpython-raspberry_pi_pico-en_US-7.0.0.uf2

2.Setup WIZnet Ethernet Library

Copy the WIZnet library Into the lib folder inside the Raspberry Pi Pico. https://learn.adafruit.com/ethernet-for-circuitpython/circuitpython-setup

Before continuing, make sure your board’s lib folder has at least the following files and folders copied over: https://github.com/Wiznet/RP2040-HAT-CircuitPython

adafruit_bus_device

adafruit_wiznet5k

WIZnet Ethernet HAT[RP2040] + Loopback, Prepare
 

CIRCUITPY/lib

Run PICO

1.Install Programs

The following serial terminal program is required for Loopback test, download and install from below links.

✔Tera Term

✔Hercules

Before this, you should find the Raspberry Pi Pico COM port number from “Device Manager” on your PC.

WIZnet Ethernet HAT[RP2040] + Loopback, Run PICO


2. How to LoopbackExample

Setup LoopbackExample – download https://github.com/Wiznet/RP2040-HAT-CircuitPython/tree/master/examples/Loopback

WIZnet Ethernet HAT[RP2040] + Loopback, Run PICO
 
WIZnet Ethernet HAT[RP2040] + Loopback, Run PICO
 

– The server was created by opening the socket with IP address 192.168.1.100 and PORT 5000.

Open the Hercules program to set [IP Address] and [PORT number] and Connect to the Server.

WIZnet Ethernet HAT[RP2040] + Loopback, Run PICO
 

You can check through the terminal that the client has accessed the server.

WIZnet Ethernet HAT[RP2040] + Loopback, Run PICO
 

If you send the phrase Loopback Test, you can see that you are sending and receiving data.

WIZnet Ethernet HAT[RP2040] + Loopback, Run PICO

Comments

Similar projects you might like

Comments