Quality Assurance with TinyAutomator
Computer Vision provides the relentless electronic eye that will watch thousands of components exit the production line in good shape
Story
Motivation
The role of quality assurance is to ensure that the final product matches the company's quality standards. Factory end-products usually consist of assemblies of smaller sub-assemblies.
By introducing additional nodes of QA in a production line, the overall efficiency of the facility increases.
Before starting out building your own Quality Assurance solution, make sure to walk through our Introduction to TinyAutomator tutorial as it will give you a birds-eye perspective regarding the reasons why we picked it for our solution, what features it has and how to use its basic functions efficiently.
Our use case 🏭
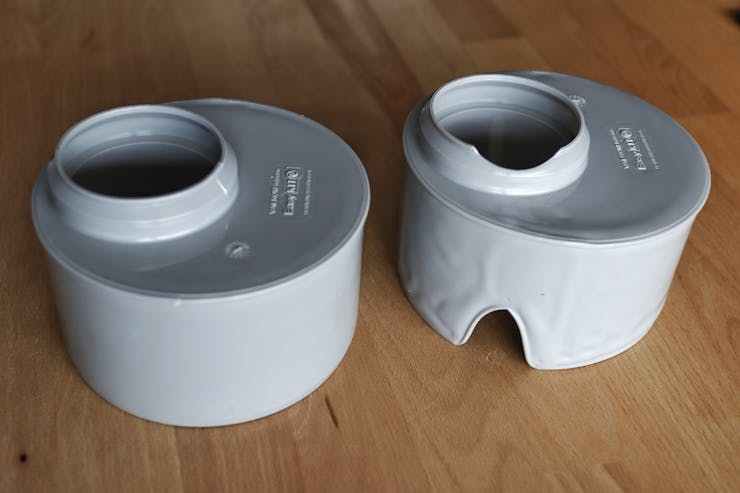
In our case, we are monitoring an Injection molding machine that creates polypropylene fittings. Due to various reasons, those fittings may end up with various defects specific to injection molding, like flow lines, sink marks, warping, and others. In this tutorial, we will recognize the short filling of a certain fitting, as seen in the pictures below.
Of course, this has to be eliminated from the packaging line, the machine has a basic weighting mechanism, but sometimes it cannot detect some defects on that alone.
Hardware requirements 🧰
- Industrial Shields RPI based PLC - running a TinyAutomator instance (Industrial Shields 012002000200);
- Power supply - 24V, 1.5A;
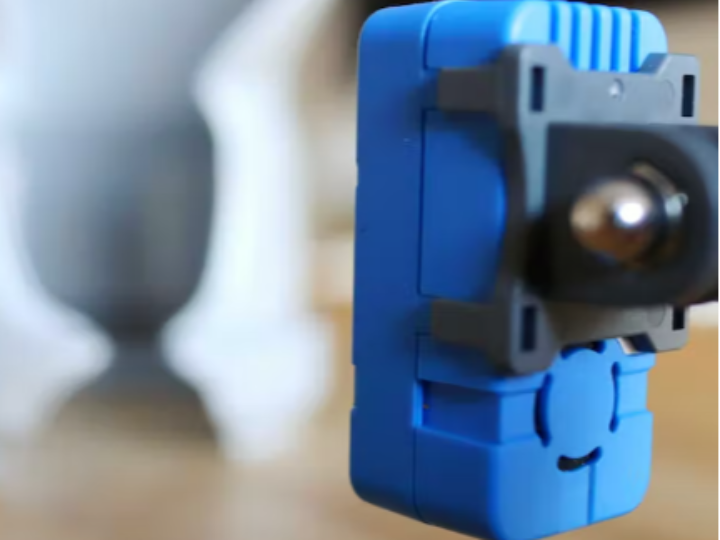
- M5Stack UnitV2 - The standalone AI Camera for Edge Computing (SSD202D) TinyML;
- WiFi-enabled relay module - We've used a NORVI IIOT ESP32 Based Industrial Controller (NORVI-IIOT-AE02-V).
Computer vision 📷
Setting up the M5stack UnitV2 camera
First thing first, power up your camera by connecting it to your PC via a USB-C cable. The driver installation varies, depending on your operating system and a thorough setup guide can be found in the official documentation. If you are using a Linux-based machine, there is no driver installation required as the camera is automatically recognized.
Once the connection is successful, open your browser of choice and access 10.254.239.1, the static IP of the camera, which will lead you to the control interface.
The user interface gives you access to all the functioning modes of the UnitV2, as well as provides you with a continuous camera stream alongside the serial output of the camera.
Once the camera is set up and the training is done, it can be powered through the USB-C cable and run independently, without it being connected to the PC. You can connect to the camera remotely using SSH. In the M5Stack documentation you can find details about how to access the device as root:
ssh m5stack@10.254.239.1

//user: m5stack
//pwd: 12345678

//user: root
//pwd: 7d219bec161177ba75689e71edc1835422b87be17bf92c3ff527b35052bf7d1f
The Online Classifier
For our application, we will be using the online classifier mode. While using the Online Classifier, you can train and classify the objects in the green target frame in real-time, and the feature values obtained from training can be stored on the device for the next boot.
For reliable results, you need at least 100 good photos of the features you intend to classify, in all the possible positions. For best results, we recommend having good repeatability of the system that places the objects in front of the camera.
Training the model
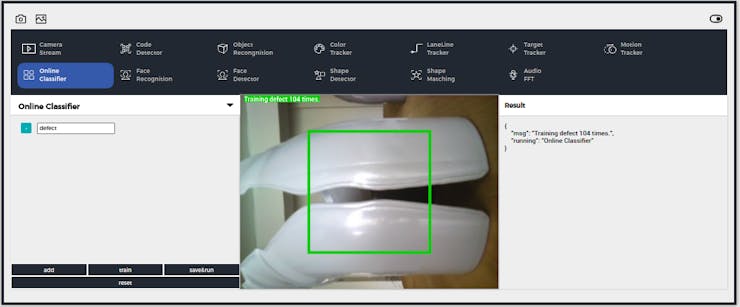
Under the Online Classifier tab, you will notice a checkbox list. This allows us to define the features we wish to identify and train the model accordingly. In the middle of the screen, you can observe the live camera stream and the bounding box in which we will be placing the feature to be recognized and on the right side, you can see the serial output of the camera in JSON format.
Because we are training a model from scratch, first click the reset button, rename the class with the feature you want to identify, and click the checkbox next to it. Next, place the object inside the green bounding box and press the train button. Congrats! You just recorded your first data point. Keep doing this until you have at least 100 good pictures with the feature.
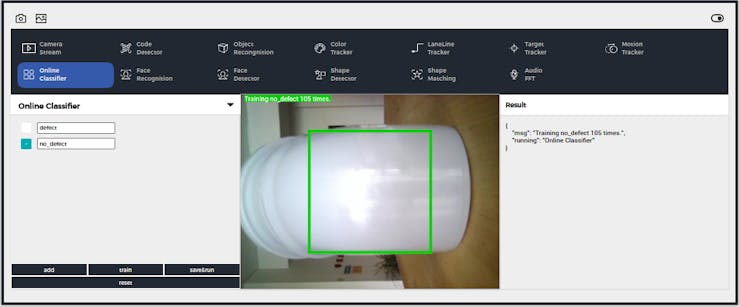
Next, click on the add button, rename the new class to something on the lines of no_defect and click on the checkbox next to it. Now, we will be training the model to recognize a proper object. Just like before, take at least 100 good photos. Next, click on the add button, rename the new class something on the lines of no_defect and click on the checkbox next to it. Now, we will be training the model to recognize a proper object. Just like before, take at least 100 good photos.
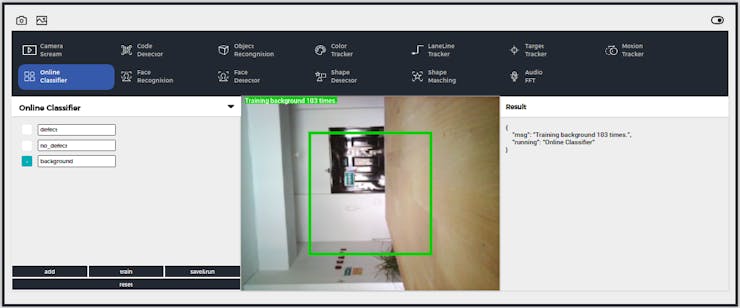
Finally, we must take at least 50 good photos of the background against which the objects are presented. We strongly suggest that the background is a static one and if possible, provide a uniformly colored-background (something along the line of a big piece of cardboard).
Model execution
Once the training is done, click Save and run and the model is saved on UnitV2. If you wish to further add new samples to your model, simply click on the checkbox corresponding to the feature you wish to train and keep adding data points to it. When you are done, clicking on save and run will update your model.
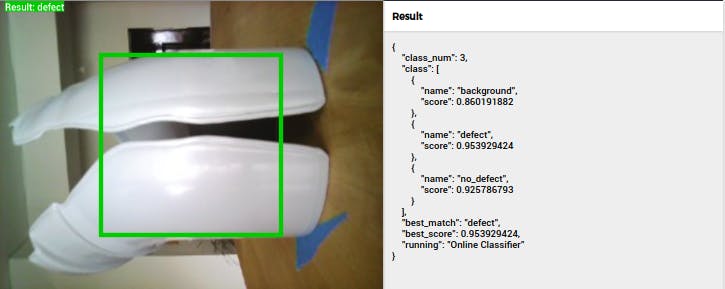
Once the model is running on the UnitV2, the value corresponding to the best_match key is the result of the analysis.
Data gathering 📊
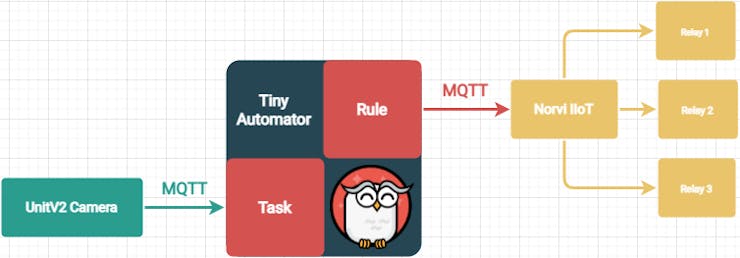
Fundamentally, the system we have devised for this use case employs the UnitV2 camera to monitor the production line and, in the case, if a defective item is detected, it sends a message via MQTT to TinyAutomator, where a task gathers the data stream, passes it through a set of rules and sends an MQTT message to a Norvi IIot that triggers a relay linked to an actuator that disposes of the defectuous item.
To integrate the M5Stack UnitV2 with TinyAutomator, we had to modify the firmware of the camera to filter out the relevant value from the JSON and send the result via MQTT to a certain topic. The first thing we had to do was to integrate the Paho MQTT Client library:
import paho.mqtt.client as mqttClient
import time
def on_connect(client, userdata, flags, rc):
if rc == 0:
print("Connected to broker")
global Connected                #Use global variable
Connected = True                #Signal connection
else:
print("Connection failed")
Connected = False   #global variable for the state of the connection
broker_address= "192.168.0.163"
port = 1883
client = mqttClient.Client("Camera Detection")               #create new instance
#client.username_pw_set(user, password=password)    #set username and password
client.on_connect= on_connect                      #attach function to callback
client.connect(broker_address, port=port)          #connect to broker
client.loop_start()        #start the loop
We've also declared some variables to be used for the detection:
defectDetected = False
noDefectDetected = False
backgroundDetected = False
Here is a very basic detection code based on the labels we added in the previous step that will automatically send a message on state change via MQTT:
global backgroundDetected
global noGasketDetected
global gasketDetected

if str(doc["best_match"]) == "background" and not backgroundDetected:
    client.publish("test-topic",json.dumps({"value",0}) )
    backgroundDetected = True
    defectDetected = False
    noDefectDetected = False
if str(doc["best_match"]) == "no_defect" and not noDefectDetected:
    client.publish("test-topic",json.dumps({"value":1}))
    backgroundDetected = False
    defectDetected = False
    noDefectDetected = True
if str(doc["best_match"]) == "defect" and not defectDetected:
    client.publish("test-topic", json.dumps({"value":2}))
    backgroundDetected = False
    defectDetected = True
    noDefectDetected = False
We also added these three lines in the server_core.py file at line 893 for the automatic change of the detection type:
protocol.write("{\msg\":\"Waiting 5 seconds for the server to start.\"}\r\n". encode('utf-8'))
time.sleep(5)
switchFunction("online_classifier","")
You can find the complete server_core.py file in the Github repository.
Actuator control ⚙️
Using the template editor of TinyAutomator, we have created a flow in which it listens on a certain MQTT topic and if the message received corresponds to a defective object, it sends an MQTT message to an actuator. Additionally, every time a defective object is identified, a counter is incremented so we can keep track of the total number of manufacturing failures.

