
Oh no.... not another home environment monitoring system
Home monitoring unit using a Seeed Grove shield and devices.
Monitor home environment, displaying a screen and sending to a Node Red screen.

WIZnet - WizFi360-EVB-Pico
x 1
WIZnet Pico WiFi board

Seeed Studio - Grove Shield for Pi Pico
x 1
Pico Grove breakout board
micropython - MicroPython
x 1
Project programed in MicroPython

node-red - Node-RED
x 1
Used on Raspberry Pi for the Dashboard
Oh no.... not another home environment monitoring system
Home environment monitoring system using WizFi360-EVB-Pico
This project was created to be a proof of concept using the WIZnet WizFi360-EVB-Pico board.
The POC has the following objectives:
- see how well the board works on WiFi
- see how easy it is to program using MicroPython
- see how easy it is to use Seeed Studio Grove boards (I used Seeed Studio Grove devices for fast prototyping. The WizFi360-EVB-Pico board fits on the Seeed Studio Grove Shield for Pi Pico ok.)
I created the project in 2 versions:
Version 1 was created to test the WiFi connection and Internet connection. It also connects to a BME680 sensor (temperature, humidity, pressure and gas sensor), SDD1315 OLED to display the sensor data and a 4-Digit alphanumeric display to display the current time.
The program performs the following:
- The board connects to a router and assigns a custom host name
- Connect to an NPT server and syncs the time to the onboard RTC (real time clock)
- Displays time on the TM1637 alphanumeric display
- Collects data from the BME680 sensor
- Displays collected information on the serial monitor and SDD1315 OLED display
Version 2 was created to develop a home environment monitor. I used Version 1 and added a MQTT connection to Node Red to display the indoor environment conditions on a dashboard. This version also adds the current outside temperature pulled from openweathermap.org to the Alphanumeric display.
The program performs the following:
- The board connects to a Raspberry Pi MQTT broker
- The Raspberry Pi runs Node Red and has a Dashboard for environment information
- Node Red requests current weather data from openweathermap.org
- Node Red publishes weather data to the WizFi360 using MQTT
- Displays the current temperature and time on the TM1637 alphanumeric display
- Displays weather data on the serial monitor
Github - russel2512/environment (github.com)
Monitor operation:
In this section I'll discuss the operation of the hardware and sofware. This discussion will only be about Version 2, as Version 1 was refined and incorporated into Version 2.
- At start, the program displays Machine type, MicroPython version and AT version.

- Add a unique Host name (WizFi360_1).
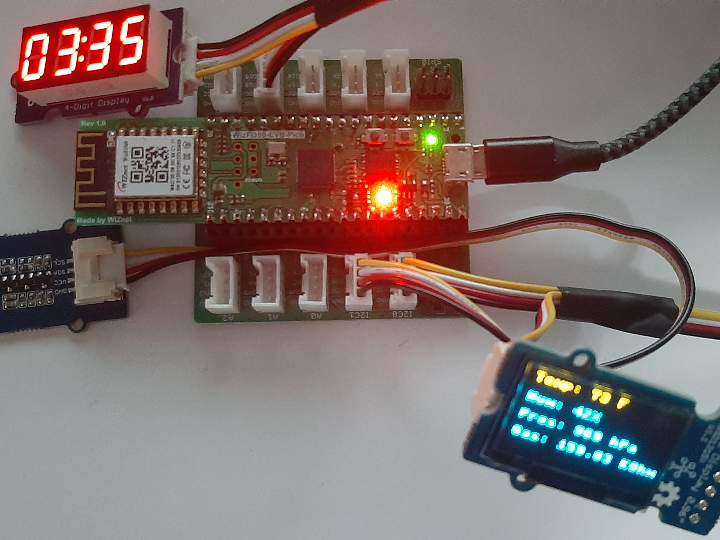
Log into the router. Green LED turns on to show the board is connected. Network ID and password blanked out.


- Connect to a NTP (time server) and sink the time to the RTC (real time clock).
Set MQTT information (security is not set and hasn't been tested).
Set MQTT topics.
Set MQTT QOS.
Connect to MQTT broker. My Raspberry Pi broker is at 192.168.68.127,1883.

- The first cycle of the program sends the time to the TM1637 alphanumeric display. The time is displayed every 12 seconds and temperature is displayed every 3 seconds. **Note that the temperature may not display for up to 5 minutes.

- The BME680 will be scanned every 15 seconds and the data (temperature, humidity, pressure and gas sensor) is displayed on the serial monitor and the SDD1315 OLED display.


- The data is Published to the Raspberry Pi broker over MQTT. The data is displayed on the Node Red dashboard on the Raspberry Pi. (AT+MQTTPUB= nn. nn, nnn, nnnn )

Hardware design:
Bill of materials:
- WIZnet WizFi360-EVB-Pico
www.wiznet.io
- Grove Shield for Pi Pico
Grove Shield for Pi Pico v1
- Grove - Temperature, Humidity, Pressure and Gas Sensor for Arduino - BME680
BME680
- Grove - 4-Digit Display
TM1637
- Grove - OLED Yellow&Blue Display 0.96 (SSD1315)
SSD1315
- Grove - Universal 4 Pin Buckled 20cm Cable
Grove Universal 4 Pin Buckled 20cm Cable 5 PCs pack
- Micro USB cable
Project build out:
- Insert the WizFi360-EVB-Pico in the Grove Shield for Pi Pico socket
- Using a Grove - Universal 4 pin buckled 20cm cable, connect the Grove TM1637 to D18 on the shield
- Using a 20cm cable, connect the Grove SSD1315 to I2C0 on the shield
- Using a 20cm cable, connect the Grove BME680 to I2C1 on the shield


Circuit Schematic:
Software buildout:
This is an overview of the project deployment environment. You should have a general knowledge of RP2040. Information can be found at https://www.raspberrypi.com/products/raspberry-pi-pico/ and https://docs.wiznet.io/Product/Open-Source-Hardware/wizfi360-evb-pico.
This project was developed with MicroPython v1.19.1 deployed on the wizfi360-evb-pico. The firmware can be found at https://micropython.org/download/rp2-pico/. A good reference can be found at https://docs.micropython.org/en/latest/rp2/quickref.html.
Update the board firmware to AT version:1.1.1.9 and can be found at https://github.com/wizfi/Release/tree/master/Binary.
The easiest way to do the update is to use WizFi360_AT_update.py at https://github.com/russel2512/environment.
Install Thonny IDE to program the wizfi360-evb-pico. It can be found at https://thonny.org/.
Test MicroPython with the wizfi360-evb-pico using the Blink example program. Projects | Computer coding for kids and teens | Raspberry Pi
Library deployment steps:
- Create lib folder on the board
- Download and copy the following libraries to lib
- https://github.com/mcauser/micropython-tm1637 (tm1637.py)
at line 186 make these changes:
#self.write([_SEGMENTS[38], _SEGMENTS[12]], 2) # degrees C
self.write([_SEGMENTS[38], _SEGMENTS[15]], 2) # degrees F
- https://randomnerdtutorials.com/micropython-esp32-esp8266-bme680-web-server/ (bme680.py)
- https://github.com/stlehmann/micropython-ssd1306/blob/master/ssd1306.py (ssd1306.py)
Copy the monitor code (WizFi360_design_ver1.py or WizFi360_design_ver2.py) from https://github.com/russel2512/environment.
- Rename program to main.py (autorun) or you can run the code from Thonny.
- Copy code to the Pico
- Program changes needed to run on other networks:
- Set Host name (optional, current name is set to WizFi360_1)
- AP ID and password
- MQTT broker IP address
Go to https://openweathermap.org/ and create an account. You will need your API key.
Setup a Raspberry Pi (Node Red is needed).
- For information on Raspberry Pi deployment, see https://www.raspberrypi.com/.
- For information on Mosquitto MQTT broker, see https://randomnerdtutorials.com/how-to-install-mosquitto-broker-on-raspberry-pi.
- For information on Node Red, see https://nodered.org/docs/getting-started/raspberrypi.
- Import the text from NodeRed.txt into Node Red. You may need to modify MQTT broker information. Server - 'localhost' works ok in my configuration. Change the username and password. These will need to be change in both the code and Node Red.
- username="rpi-pico"
- password="wiznet"
- Add your city and openweathermap.org key.


Proof of concept results:
The board uses AT commands which are sometimes confusing to understand without examples. **Note that you need to update the board firmware. I spent days trying to troubleshoot an MQTT issue that was fixed with an update.
- The board connects easily to a router.
- The board works well with MicroPython. The board can use a standard Pico build and the libraries I used worked ok.
- The Grove Pico shield worked well. It's convenient that WIZnet kept the Pico pinouts.
All requirements for Versions 1 and 2 were meet.
Issues:
- The firmware needed to be updated. (I included a small program to update it. WizFi360_AT_update.py)
- Documentation of the AT commands were confusing. I had to experiment with them to figure out how they worked. They do seem to be similar to ESP32 commands.
- I could not get GET commands to work. I would have liked to pull weather data directly off the site.
- MQTT isn't fully implemented. I couldn't get multiple Topics to work. Again, this could be my fault with not fully understanding the documentation.
Future enhancements:
These are just ‘blue sky’ ideas. Some may not be valid or work. The biggest ‘got ya’ was not getting GET to work and MQTT implementation not being complete.
- Break up data for better data handling (ie, filling JASON fields and adding to databases).
- Send BME680 sensor data to a database or an external site (i.e. ThingSpeak).
- Quantify the gas data from the BME680.
- Design a circuit board for the project.
- Design a 3D printed case.
I enjoyed working with this board. There were some challenges, but I was able to work through most of them. In the following months, I play to build this out as a full working monitor.
-
WizFi360_design_ver2.py
Version 2 was created to develop a home environment monitor. I used Version 1 and added a MQTT connection to Node Red to display the indoor environment conditions on a dashboard. This version also add

-
tm1637 library
at line 186 make these changes: #self.write([_SEGMENTS[38], _SEGMENTS[12]], 2) # degrees C self.write([_SEGMENTS[38], _SEGMENTS[15]], 2) # degrees F
-
bme680 library
The bme680.py library code is found in the page.
-
ssd1306 library
Use ssd1306.py for SSD1315 board
-
WizFi360_AT_update.py
Use to update AT firmware. Update router and password to work on your network.
-
NodeRed.txt
Open NodeRed.txt and copy the raw data to the clipboard. Import into NodeRed.
-
Project
Fritzing diagram. Any source should work for the LED, OLED and BME680 boards.
