
MicroPython RGB LED Controller via Ethernet HTTP API
MicroPython + W5500 Ethernet RGB LED controller with HTTP REST API. Multithreading for concurrent control. Polish developer. IoT lighting project
개요
이 프로젝트는 WIZnet W5500을 통한 유선 이더넷 연결로 완전한 HTTP API와 브라우저 기반 웹 인터페이스를 제공하는 임베디드 RGB LED 컨트롤러입니다. 전체 코드를 MicroPython으로 작성했으며, 멀티스레딩을 활용해 HTTP 서버를 블로킹하지 않고 LED 애니메이션을 백그라운드에서 실행합니다. 원래는 인턴십 중에 주차권 발급기의 상태(대기, 처리 중, 오류)를 색으로 표시하기 위해 개발되었습니다.
소스 코드: https://github.com/kuba122388/embedded-led-controller
실제 사용 사례
이 시스템은 주차권 발급기에서 기기 상태를 색으로 전달하기 위해 개발되었습니다.
| LED 색상 / 애니메이션 | 기기 상태 |
|---|---|
| 정적 색상 (예: 녹색) | 대기 / 준비 완료 |
| 펄스 애니메이션 | 티켓 처리 중 |
| 정적 빨간색 | 에러 / 장애 |
| 페이드 애니메이션 | 상태 전환 중 |
단순한 취미 프로젝트가 아니라 실용적인 산업용 IoT 신호 표시 도구입니다.
기능
- RGB LED 제어 — PWM 방식, 채널별 0~255 전체 범위 지원
- HTTP REST API — 색상 및 애니메이션 제어를 위한 GET/POST 엔드포인트
- 웹 인터페이스 — RGB 슬라이더, 프리셋 버튼, 애니메이션 제어 (
web/index.html) - LED 애니메이션 — 페이드(부드러운 전환), 펄스(점멸), 백그라운드 스레드로 실행
- 멀티스레딩 — MicroPython
_thread모듈 사용, HTTP 서버와 LED 드라이버 독립 실행 - Basic 인증 — HTTP 요청에
admin/1234자격증명 필요 - 워치독 타이머(WDT) — 하드웨어 워치독으로 행업 시 자동 복구
- 상태 저장 — 마지막 LED 상태를 저장하고 재부팅 시 복원
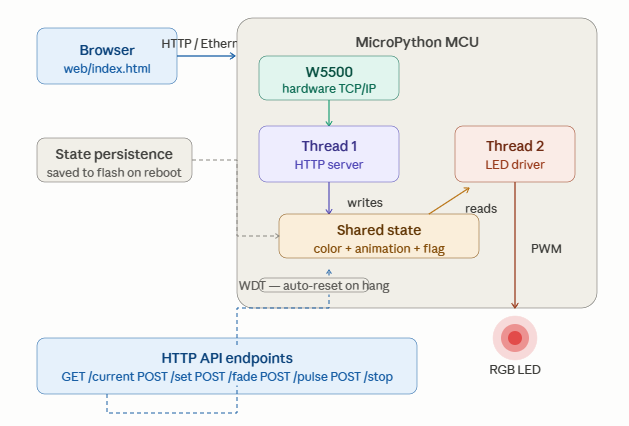
시스템 아키텍처
브라우저 (웹 UI)
       │
       │  HTTP (REST API) over Ethernet
       ▼
마이크로컨트롤러 (MicroPython)
  ├── Thread 1: HTTP 서버  ← API 요청 수신 및 처리
  ├── Thread 2: LED 드라이버 ← 애니메이션 실행, PWM 구동
  └── WDT                    ← 워치독 타이머, 행업 시 리셋
       │
       ▼
   RGB LED (PWM)
두 스레드가 병렬로 실행됩니다. 하나는 HTTP 요청을 처리하고, 다른 하나는 LED 출력을 구동합니다. 덕분에 애니메이션이 실행 중에도 서버가 블로킹되지 않습니다. 워치독 타이머(WDT)는 메인 루프가 멈추면 보드를 자동으로 리셋하고, 마지막 LED 상태는 플래시에 저장되어 재부팅 후 복원됩니다. W5500은 TCP/IP 스택을 하드웨어로 처리하므로 MCU 부담이 낮고, 전기적으로 노이즈가 많은 환경에서도 연결이 안정적입니다.

하드웨어
구성 부품
- MCU: MicroPython 호환 보드 (ESP32, Raspberry Pi Pico 등)
- 이더넷: WIZnet W5500 모듈 (SPI)
- LED 출력: RGB LED (공통 캐소드/애노드), PWM GPIO 핀으로 구동
- 언어: MicroPython
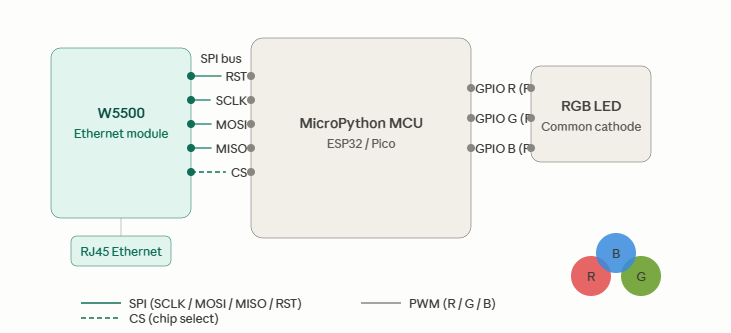
배선 (SPI → W5500)
| 신호 | 설명 |
|---|---|
| SCLK | SPI 클록 |
| MOSI | SPI 데이터 출력 |
| MISO | SPI 데이터 입력 |
| CS | 칩 셀렉트 |
| RST | 하드웨어 리셋 |
RGB LED의 R/G/B 채널을 보드의 PWM 가능 GPIO 핀에 연결하세요.
네트워크 설정
업로드 전에 firmware/main.py를 수정하세요:
ETH_CONF = { "ip": "192.168.1.108", "subnet": "255.255.255.0", "gateway": "192.168.1.100", "dns": "8.8.8.8" }HTTP API 레퍼런스
모든 엔드포인트에 Basic 인증 필요: admin / 1234
GET /current
현재 LED 색상을 JSON으로 반환합니다.
응답:
{ "r": 255, "g": 0, "b": 0 }POST /set
즉시 정적 RGB 색상을 설정합니다. 실행 중인 애니메이션은 중지됩니다.
Body (form-encoded):
r=255&g=100&b=50POST /fade
색상 간 부드러운 페이드 애니메이션을 시작합니다.
Body:
color=green&speed=slow지원 속도: slow, medium, fast
POST /pulse
펄스(점멸) 애니메이션을 시작합니다.
Body:
color=red&speed=fastPOST /stop
현재 애니메이션을 중지하고 마지막 색상을 유지합니다.
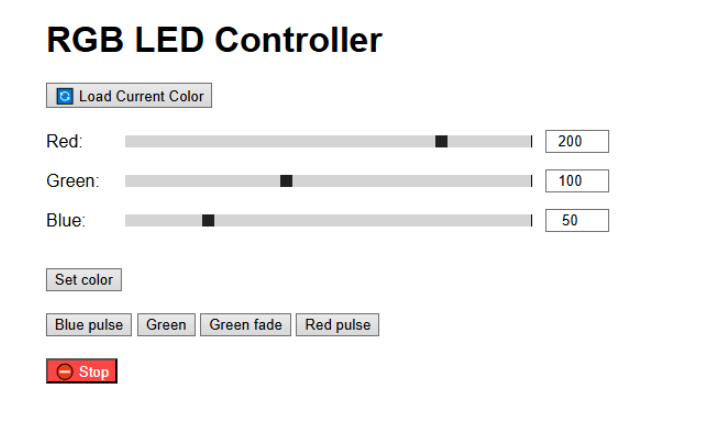
웹 인터페이스
단일 페이지 HTML/JavaScript UI(web/index.html)가 기기에서 직접 서비스됩니다. 브라우저에서 접속:
http://<기기 IP>UI 구성:
- RGB 값 슬라이더 (실시간 미리보기)
- 프리셋 색상 버튼
- 속도 선택이 포함된 페이드/펄스 애니메이션 제어
- 정지 버튼
시작하기
1. MicroPython 플래시
보드에 MicroPython 펌웨어를 플래시합니다. micropython.org에서 다운로드.
2. 네트워크 설정
firmware/main.py의 ETH_CONF를 네트워크에 맞게 수정합니다.
3. 펌웨어 업로드
Thonny 또는 mpremote 사용:
mpremote connect /dev/ttyUSB0 cp firmware/main.py :main.py4. 하드웨어 연결
보드의 SPI 핀에 W5500 모듈을 연결합니다. 이더넷 케이블과 RGB LED를 연결합니다.
5. 전원 ON 및 접속
http://192.168.1.108admin / 1234로 로그인합니다.
기술 스택
| 레이어 | 기술 |
|---|---|
| 언어 | MicroPython (Python) |
| 네트워킹 | WIZnet W5500, SPI, HTTP/REST |
| 동시성 | _thread (MicroPython 멀티스레딩) |
| LED 출력 | GPIO PWM |
| 신뢰성 | 워치독 타이머(WDT), 상태 저장 |
| 프론트엔드 | HTML + JavaScript (Fetch API) |
개선 가능한 사항
- 홈 오토메이션 시스템과의 pub/sub 통합을 위한 MQTT 지원
- 보안 API 접근을 위한 HTTPS / TLS
- 레인보우, 스트로브, 컬러 체이스 등 추가 애니메이션 타입
- 모바일 앱 제어
- OTA (무선) 펌웨어 업데이트
응용 프로젝트 — WIZnet Makers에서 찾은 확장 아이디어
이 프로젝트는 다양한 방향으로 확장할 수 있는 튼튼한 기반입니다. WIZnet Makers에서 찾은 4개의 프로젝트를 소개합니다. 각각 핵심 아이디어를 다른 방향으로 발전시킨 것들입니다.
1. MQTT 추가 — W55RP20-EVB-Pico + Beebotte MQTT 기반 LED 제어
무엇을 추가하는가: HTTP 폴링 모델을 MQTT pub/sub 방식으로 교체합니다. 브라우저가 POST 요청을 보내는 대신, 어떤 MQTT 클라이언트(Home Assistant, Node-RED, 스마트폰 앱)든 토픽에 메시지를 발행하면 LED가 즉시 반응합니다. W55RP20-EVB-Pico와 MicroPython, Beebotte 클라우드 브로커를 사용하며, LED 컨트롤러를 더 큰 IoT 에코시스템에 통합하고 싶을 때 자연스러운 다음 단계입니다.
이 프로젝트에 적용하는 법: 기존 HTTP API는 로컬 웹 UI 제어용으로 유지하고, MQTT 구독 스레드를 두 번째 제어 경로로 추가합니다. 수신된 MQTT 페이로드가 LED 드라이버 스레드가 이미 읽고 있는 공유 색상/애니메이션 상태를 업데이트하는 방식으로 연결됩니다.
2. 디스플레이 추가 — ESP32-S3 스마트 디스플레이 포털 (W5500 + WS2812 LED)
무엇을 추가하는가: W5500 이더넷, 4인치 TFT 디스플레이, WS2812 주소 지정 LED 스트립을 하나의 ESP32-S3 보드에 통합합니다. 디스플레이는 현재 상태를 로컬에서 보여주면서 REST API는 여전히 원격 명령을 받습니다 — 완전한 대시보드 + 컨트롤러입니다. W5500과 TFT 두 개의 SPI 디바이스를 칩 셀렉트로 동시에 관리하는 방법도 보여줍니다.
이 프로젝트에 적용하는 법: RGB LED 출력을 WS2812 스트립으로 업그레이드하고, 현재 색상과 활성 애니메이션 이름을 표시하는 소형 디스플레이를 추가합니다. 이 프로젝트의 HTTP API 구조가 해당 프로젝트의 REST 엔드포인트와 직접 매핑됩니다.
3. 센서 추가 — WIZnet W5500 + STM32 스마트 디바이스 제어
링크: https://maker.wiznet.io/Benjamin/projects/smart-device-control-using-wiznet-w5500-and-stm32/
무엇을 추가하는가: "LED + 웹 인터페이스" 패턴을 센서 데이터(DHT22로 온습도, MQ2로 가스 감지)까지 확장하고, 동일한 W5500 웹 서버를 통해 제공합니다. 웹 UI에서 센서 수치와 디바이스 제어를 함께 볼 수 있어 LED 컨트롤러가 완전한 환경 모니터링 + 신호 표시 노드로 진화합니다.
이 프로젝트에 적용하는 법: MicroPython 펌웨어에 온도 또는 조도 센서를 추가합니다. 기존 LED 엔드포인트 옆에 새로운 GET /sensors 엔드포인트를 노출하고, 웹 UI에서 수치를 표시합니다. LED는 센서 임계값에 자동으로 반응할 수도 있습니다 — 예: 온도가 일정 수준을 초과하면 빨간색 펄스.
4. NeoPixel 스트립으로 확장 — Raspberry Pi Pico 웹 서버 (W5100S/W5500 + NeoPixel)
링크: https://maker.wiznet.io/2021/10/05/raspberrypi-pico-web-server-w-w5100sw5500-neopixel-led/
무엇을 추가하는가: Raspberry Pi Pico에서 CircuitPython 기반 HTTP 웹 서버로 NeoPixel(WS2812) LED 스트립을 브라우저 컬러 피커로 제어합니다. URL 기반 색상 API(/led/<hex_color>)는 간단한 HTTP 라우팅을 주소 지정 가능한 LED 스트립으로 확장하는 깔끔한 예시입니다.
이 프로젝트에 적용하는 법: 단일 RGB LED를 MicroPython의 neopixel 모듈을 사용하는 NeoPixel 스트립으로 교체합니다. 기존 /set 엔드포인트 페이로드(r, g, b)는 그대로 유지되고 — LED 드라이버 스레드만 PWM 출력에서 NeoPixel 데이터 전송으로 변경하면 됩니다.
FAQ
Q: LED 제어에 WiFi 대신 이더넷을 사용하는 이유는? 이더넷은 WiFi에서 흔히 발생하는 재연결 지연이나 간섭 없이 결정론적이고 낮은 지연 시간을 제공합니다. 주차 기계나 산업용 캐비닛 같은 전기적으로 노이즈가 많은 환경에서는 WiFi 신뢰성이 크게 저하됩니다. W5500은 이 문제를 완전히 없애줍니다 — 케이블만 꽂으면 연결이 안정적으로 유지됩니다. 기기 이벤트와 동기화되어야 하는 LED 효과에는 일관된 지연 시간이 중요합니다.
Q: MicroPython에서 멀티스레딩은 어떻게 동작하나요? MicroPython의 _thread 모듈이 기본적인 협력 스레딩을 제공합니다. 이 프로젝트에서는 한 스레드가 HTTP 서버를 실행하며 — 연결을 수락하고, 요청을 파싱하고, 공유 색상/애니메이션 상태를 업데이트합니다. 두 번째 스레드는 LED 드라이버를 실행하며 — 공유 상태를 읽어 PWM 값을 적용하거나 타이밍 기반 애니메이션 루프를 실행합니다. 이 분리 덕분에 긴 애니메이션이 실행 중에도 HTTP 서버가 다음 명령을 수신하는 것을 블로킹하지 않습니다.
Q: 기기가 행업되거나 크래시되면 어떻게 되나요? 워치독 타이머(WDT)가 메인 루프가 타임아웃 내에 피드를 멈추면 자동으로 마이크로컨트롤러를 리셋합니다. 상태 저장(마지막 LED 상태가 플래시에 저장)과 결합되어, 재부팅 후 이전 색상을 복원하며 수동 개입이 필요 없습니다.
Q: WS2812 (NeoPixel) LED 스트립도 사용할 수 있나요? 현재 구현은 PWM GPIO로 RGB LED를 구동합니다. WS2812 지원은 향후 개선 사항으로 계획되어 있으며 — MicroPython의 neopixel 모듈을 사용하거나, RP2040 보드에서는 타이밍 정확한 데이터 전송을 위해 PIO로 구현할 수 있습니다.
Q: 기본 admin / 1234 비밀번호는 안전한가요? 프로토타입 또는 인트라넷 배포용으로 의도적으로 최소화된 설정입니다. 인터넷 노출 환경이나 실 운용에서는 firmware/main.py에서 자격증명을 변경하고, 평문 전송을 막기 위해 HTTPS/TLS(개선 사항으로 계획됨)를 추가하는 것을 권장합니다.
Q: 여러 클라이언트가 동시에 LED를 제어할 수 있나요? HTTP 요청은 서버 스레드가 순차적으로 처리합니다. 동시 요청은 대기열에 쌓입니다. LED 상태 업데이트는 사실상 즉각적이므로, 마지막으로 완료된 명령이 적용됩니다 — 단일 공유 LED 출력에 대한 예상된 동작입니다. 더 엄격한 동시성 제어가 필요하다면 공유 상태 변수에 Mutex를 추가할 수 있습니다.
Q: 어떤 MicroPython 보드와 호환되나요? MicroPython을 지원하고 W5500용 SPI 하드웨어가 있는 모든 보드와 호환됩니다. ESP32, Raspberry Pi Pico가 참조 구현으로 사용됩니다. 핵심 요구사항은 W5500용 SPI 핀, LED 채널용 PWM 가능 GPIO, HTTP 서버와 스레딩을 실행할 충분한 RAM(~256 KB면 충분)입니다.
Q: 정적 IP 주소는 어떻게 변경하나요? 업로드 전에 firmware/main.py의 ETH_CONF 딕셔너리를 수정합니다. ip, subnet, gateway, dns를 로컬 네트워크에 맞게 설정하세요. DHCP 클라이언트는 없으며 — 정적 주소 지정은 임베디드 신뢰성을 위한 의도적인 설계입니다(부팅 시 DHCP 서버에 의존하지 않음).
Overview
This project is an embedded RGB LED controller that exposes a complete HTTP API and browser-based web interface over a wired Ethernet connection using the WIZnet W5500. Written entirely in MicroPython, it uses multithreading to run background LED animations without blocking the HTTP server — and was originally built during an internship to signal device states on parking ticket machines (standby, processing, error).
Source Code: https://github.com/kuba122388/embedded-led-controller

Real-World Use Case
The system was developed for parking ticket machines to communicate device state through color:
| LED Color / Animation | Machine State |
|---|---|
| Static color (e.g. green) | Standby / ready |
| Pulse animation | Processing ticket |
| Static red | Error / fault |
| Fade animation | Transitioning state |
This makes it a practical industrial IoT signaling tool, not just a hobby LED project.
Features
- RGB LED control via PWM — full 0–255 range per channel
- HTTP REST API — GET and POST endpoints for color and animation control
- Web interface — browser-based RGB sliders, preset buttons, and animation controls (
web/index.html) - LED animations — Fade (smooth transitions) and Pulse (blinking), running in background threads
- Multithreading via MicroPython's
_thread— HTTP server and LED driver run independently - Basic Authentication — HTTP requests require
admin/1234credentials - Watchdog Timer (WDT) — hardware watchdog for automatic recovery from hangs
- State persistence — last LED state saved and restored on reboot
System Architecture
Browser (Web UI)
       │
       │  HTTP (REST API) over Ethernet
       ▼
Microcontroller (MicroPython)
  ├── Thread 1: HTTP server  ← handles incoming API requests
  ├── Thread 2: LED driver   ← runs animations, drives PWM
  └── WDT                    ← watchdog timer, resets on hang
       │
       ▼
   RGB LED (PWM)
Two threads run in parallel: one handles incoming HTTP requests, the other drives the LED output. This prevents a running animation from blocking the server. A Watchdog Timer (WDT) resets the board automatically if the main loop hangs, and the last LED state is saved to flash so it restores after a reboot. The W5500 handles the TCP/IP stack in hardware, keeping the MCU free and the connection stable even in electrically noisy environments.
Hardware
Components
- MCU: Any MicroPython-compatible board (ESP32, Raspberry Pi Pico, etc.)
- Ethernet: WIZnet W5500 module (SPI)
- LED output: RGB LED (common cathode/anode) driven via PWM GPIO pins
- Language: MicroPython

Wiring (SPI to W5500)
| Signal | Description |
|---|---|
| SCLK | SPI clock |
| MOSI | SPI data out |
| MISO | SPI data in |
| CS | Chip select |
| RST | Hardware reset |
Connect RGB LED R/G/B channels to PWM-capable GPIO pins on your board.
Network Configuration
Edit firmware/main.py before uploading:
ETH_CONF = { "ip": "192.168.1.108", "subnet": "255.255.255.0", "gateway": "192.168.1.100", "dns": "8.8.8.8" }HTTP API Reference
All endpoints require Basic Authentication: admin / 1234
GET /current
Returns the current LED color as JSON.
Response:
{ "r": 255, "g": 0, "b": 0 }
POST /set
Set a static RGB color immediately. Stops any running animation.
Body (form-encoded):
r=255&g=100&b=50POST /fade
Start a smooth fade animation between colors.
Body:
color=green&speed=slowSupported speeds: slow, medium, fast
POST /pulse
Start a pulse (blink) animation.
Body:
color=red&speed=fastPOST /stop
Stop the current animation and hold the last color.
Web Interface
A single-page HTML/JavaScript UI (web/index.html) is served directly from the device. Open in any browser:
http://<device-ip>The UI includes:
- RGB value sliders (live preview)
- Preset color buttons
- Fade / Pulse animation controls with speed selection
- Stop button
Getting Started
1. Flash MicroPython
Flash MicroPython firmware to your board. Download from micropython.org.
2. Configure network
Edit ETH_CONF in firmware/main.py to match your network.
3. Upload firmware
Use Thonny or mpremote:
mpremote connect /dev/ttyUSB0 cp firmware/main.py :main.py4. Connect hardware
Wire the W5500 module to your board's SPI pins. Connect the Ethernet cable and RGB LED.
5. Power on and access
http://192.168.1.108Login with admin / 1234.
Tech Stack
| Layer | Technology |
|---|---|
| Language | MicroPython (Python) |
| Networking | WIZnet W5500, SPI, HTTP/REST |
| Concurrency | _thread (MicroPython multithreading) |
| LED output | PWM via GPIO |
| Reliability | Watchdog Timer (WDT), state persistence |
| Frontend | HTML + JavaScript (Fetch API) |
Possible Improvements
- MQTT support for pub/sub integration with home automation systems
- HTTPS / TLS for secure API access
- More animation types (rainbow, strobe, color chase)
- Mobile app control
- OTA (over-the-air) firmware updates
Going Further — Related Projects on WIZnet Makers
This project is a solid foundation to build on. Here are four projects from WIZnet Makers that extend the core ideas in different directions.
1. Add MQTT — MQTT-Based LED Control with W55RP20-EVB-Pico + Beebotte
What it adds: Replaces the HTTP polling model with MQTT pub/sub. Instead of a browser sending POST requests, any MQTT client (Home Assistant, Node-RED, a phone app) can publish a message to a topic and the LED responds instantly. This project uses the W55RP20-EVB-Pico with MicroPython and the Beebotte cloud broker — a natural next step once you want the LED controller to integrate into a larger IoT ecosystem.
How to apply it here: Keep the existing HTTP API for local web UI control, and add an MQTT subscriber thread as a second control path. Incoming MQTT payloads update the same shared color/animation state that the LED driver thread already reads.
2. Add a Display — ESP32-S3 Smart Display Portal with W5500 + WS2812 LED Control
What it adds: Combines W5500 Ethernet, a 4″ TFT display, and WS2812 addressable LED strips in one ESP32-S3 board. The display shows current status locally while the REST API still accepts remote commands — making it a full dashboard + controller. The project also shows how to manage two SPI devices (W5500 and TFT) simultaneously using chip-select.
How to apply it here: Upgrade the RGB LED output to a WS2812 strip, add a small display that shows the current color and active animation name. The HTTP API structure from this project maps directly onto the REST endpoints described in that one.
3. Add Sensors — Smart Device Control with WIZnet W5500 + STM32
Link: https://maker.wiznet.io/Benjamin/projects/smart-device-control-using-wiznet-w5500-and-stm32/
What it adds: Extends the "LED + web interface" pattern to include sensor data (temperature/humidity via DHT22, gas detection via MQ2) served through the same W5500 web server. The web UI shows sensor readings alongside the device controls — turning the LED controller into a full environmental monitoring + signaling node.
How to apply it here: Add a temperature or ambient light sensor to the MicroPython firmware. Expose a new GET /sensors endpoint alongside the existing LED endpoints, and update the web UI to display readings. The LED can then react to sensor thresholds automatically — e.g., pulse red when temperature exceeds a limit.
4. Scale to NeoPixel Strips — Raspberry Pi Pico Web Server with W5100S/W5500 + NeoPixel
Link: https://maker.wiznet.io/2021/10/05/raspberrypi-pico-web-server-w-w5100sw5500-neopixel-led/
What it adds: A CircuitPython-based HTTP web server on Raspberry Pi Pico that controls NeoPixel (WS2812) LED strips via a browser color picker. The URL-based color API (/led/<hex_color>) is a clean example of how to extend simple HTTP routing to addressable LED strips.
How to apply it here: The single RGB LED in this project can be swapped for a NeoPixel strip using MicroPython's neopixel module. The existing /set endpoint payload (r, g, b) stays the same — just the LED driver thread changes from PWM output to NeoPixel data transmission.
FAQ
Q: Why use Ethernet instead of WiFi for LED control? Ethernet provides deterministic, low-latency communication without the reconnection delays or interference common in WiFi. In electrically noisy environments like parking machines or industrial cabinets, WiFi reliability degrades significantly. The W5500 eliminates that entirely — once the cable is in, the connection is stable. For LED effects that must be synchronized with device events, consistent sub-millisecond latency matters.
Q: How does multithreading work in MicroPython? MicroPython's _thread module provides basic cooperative threading. In this project, one thread runs the HTTP server — accepting connections, parsing requests, and updating a shared color/animation state. A second thread runs the LED driver — reading that shared state and applying PWM values or running timed animation loops. This separation means a long-running animation never blocks the HTTP server from accepting the next command.
Q: What happens if the device hangs or crashes? The Watchdog Timer (WDT) automatically resets the microcontroller if the main loop stops feeding it within the timeout period. Combined with state persistence (the last LED state is saved to flash), the device recovers and resumes its previous color after a reboot — no manual intervention needed.
Q: Can this work with WS2812 (NeoPixel) LED strips? The current implementation drives RGB LEDs via PWM GPIO. Adding WS2812 support is listed as a future improvement — it can be implemented using MicroPython's neopixel module or, on RP2040 boards, via PIO for timing-accurate data transmission.
Q: Is the default admin / 1234 password safe to use? It is intentionally minimal for a prototype/intranet deployment. For any internet-facing or production use, change the credentials in firmware/main.py and consider adding HTTPS/TLS (also listed as a planned improvement) to prevent credentials from being transmitted in plaintext.
Q: Can multiple clients control the LEDs simultaneously? Each HTTP request is handled sequentially by the server thread. Simultaneous requests will be queued. Since LED state updates are effectively instantaneous, the last command to complete wins — which is the expected behavior for a single shared LED output. For stricter concurrency control, a mutex around the shared state variable can be added.
Q: What MicroPython boards are compatible? Any board that supports MicroPython and has SPI hardware for the W5500. Tested references include ESP32 and Raspberry Pi Pico. The key requirements are SPI pins for W5500, PWM-capable GPIO for the LED channels, and enough RAM to run the HTTP server and threading (~256 KB is sufficient).
Q: How do I change the static IP address? Edit the ETH_CONF dictionary in firmware/main.py before uploading. Set ip, subnet, gateway, and dns to match your local network. There is no DHCP client — static addressing is intentional for embedded reliability (no dependency on a DHCP server being available at boot).