



poors-man-ip-kvm
It's just ridiculous the price for an IP KVM solution. I simply can't get accept that! So, this is a poor man IP KVM that works pretty well, and allows one to g
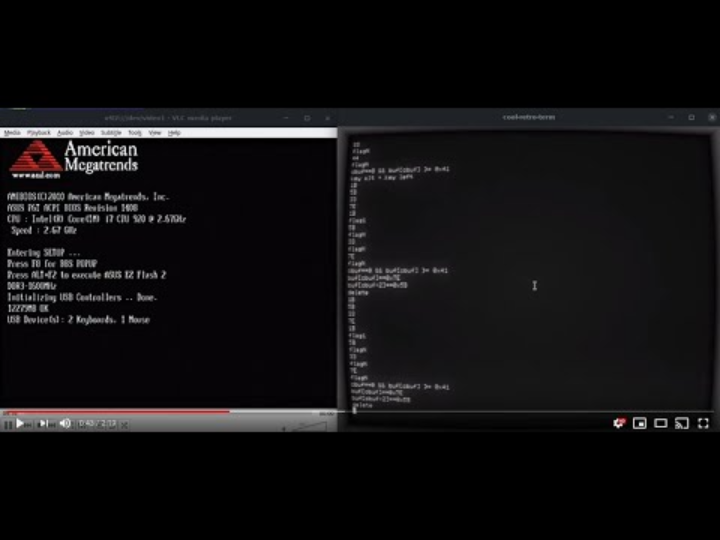
Poor Man's IP KVM — BIOS-Level Remote Control for ~$10, and a WIZnet Chip Hiding in the Network Path
#IPKVM #OutOfBandManagement #BIOSAccess #RemoteConsole #SerialOverLAN #Telnet #USBHID #Arduino #TOE #TCP #W5100 #Ethernet
📚 Context: DIY / hobby out-of-band management project (GPL-3.0, ~56★, YouTube demo). A remote KVM built from two cheap Arduinos, an HDMI/USB capture dongle, and — on its networked control path — a WIZnet Ethernet shield. Verification: Main keystroke + video path is documented in the README and demonstrated on video. The networked control-channel variant lives in
src/SerialOverLan/sol.ino, verified directly in source (Arduino Ethernet library v2.0.0;EthernetServer(23)→ hardware-offloaded TCP listen). The exact WIZnet chip is not pinned in code — the library auto-detects W5100 / W5200 / W5500; the classic Arduino Ethernet Shield is W5100-class.
01 — What is this project?
First, the domain. A KVM (Keyboard-Video-Mouse) switch lets one operator drive a computer's keyboard and see its screen without sitting in front of it. An IP KVM (KVM-over-IP) does the same over a network. The reason IP KVMs matter — and the reason data centers pay for them — is out-of-band management: they operate below the target machine's operating system. Tools like SSH, RDP, and VNC all require the target's OS to be up and networking to be configured. An IP KVM does not. It injects keystrokes as if a real keyboard were plugged in, and it captures the raw video output, so you can:
- watch a machine POST and enter its BIOS/UEFI,
- pick a boot device and install an operating system from scratch,
- recover a crashed or bricked machine that has no working OS,
- administer a headless box that never had a monitor attached.
Enterprise gear delivers this through server BMCs (Dell iDRAC, HPE iLO, IPMI) or standalone IP-KVM appliances — reliable, but expensive, often gated behind licenses, and overkill for a homelab or a single machine.
This project's answer: reproduce that same out-of-band, BIOS-level capability from roughly $10 of parts. The author's premise is blunt — "it's just ridiculous the price for an IP KVM solution" — so they built one from two commodity Arduinos and a cheap HDMI/USB capture card.
The result: a working, if raw, IP KVM. One Arduino presents itself to the target computer as a real USB keyboard (the target genuinely "thinks it's a keyboard"), a second Arduino relays keystrokes into it over a serial link, and a USB video-capture dongle grabs the target's HDMI output so the operator can watch the screen live over VLC. It has no polished front-end yet, but it does the one thing that matters: it drives a remote machine from power-on, at the firmware level.
02 — Why this architecture (HID injection + independent video capture)?
🔷 It is OS-independent by construction
Because keystrokes arrive as a hardware USB HID device and video is grabbed straight off the HDMI signal, the whole thing works when the target has no OS at all — sitting in BIOS, at a bootloader, mid-install, or frozen. This is exactly the regime where SSH/VNC/RDP are useless. The KVM sees what a monitor would see and types what a keyboard would type, nothing more assumed.
🔷 It is absurdly cheap
Two Arduino Leonardo/Uno-class boards (~$2.50 each), an HDMI→USB2 capture dongle (~$5–10 for XVGA/BIOS-resolution capture; ~$70 if you insist on 1080p), plus wire. Against hundreds of dollars for commercial IP-KVM hardware or BMC feature licenses, the cost delta is the entire point.
🔷 The two channels are decoupled
The control channel (keystrokes) and the video channel (screen capture) are fully independent subsystems. You can upgrade the capture card for higher resolution without touching the keyboard path, and — critically for this write-up — you can swap how the control channel reaches the network without redesigning anything else. That is precisely the seam where a WIZnet chip enters.
03 — System architecture
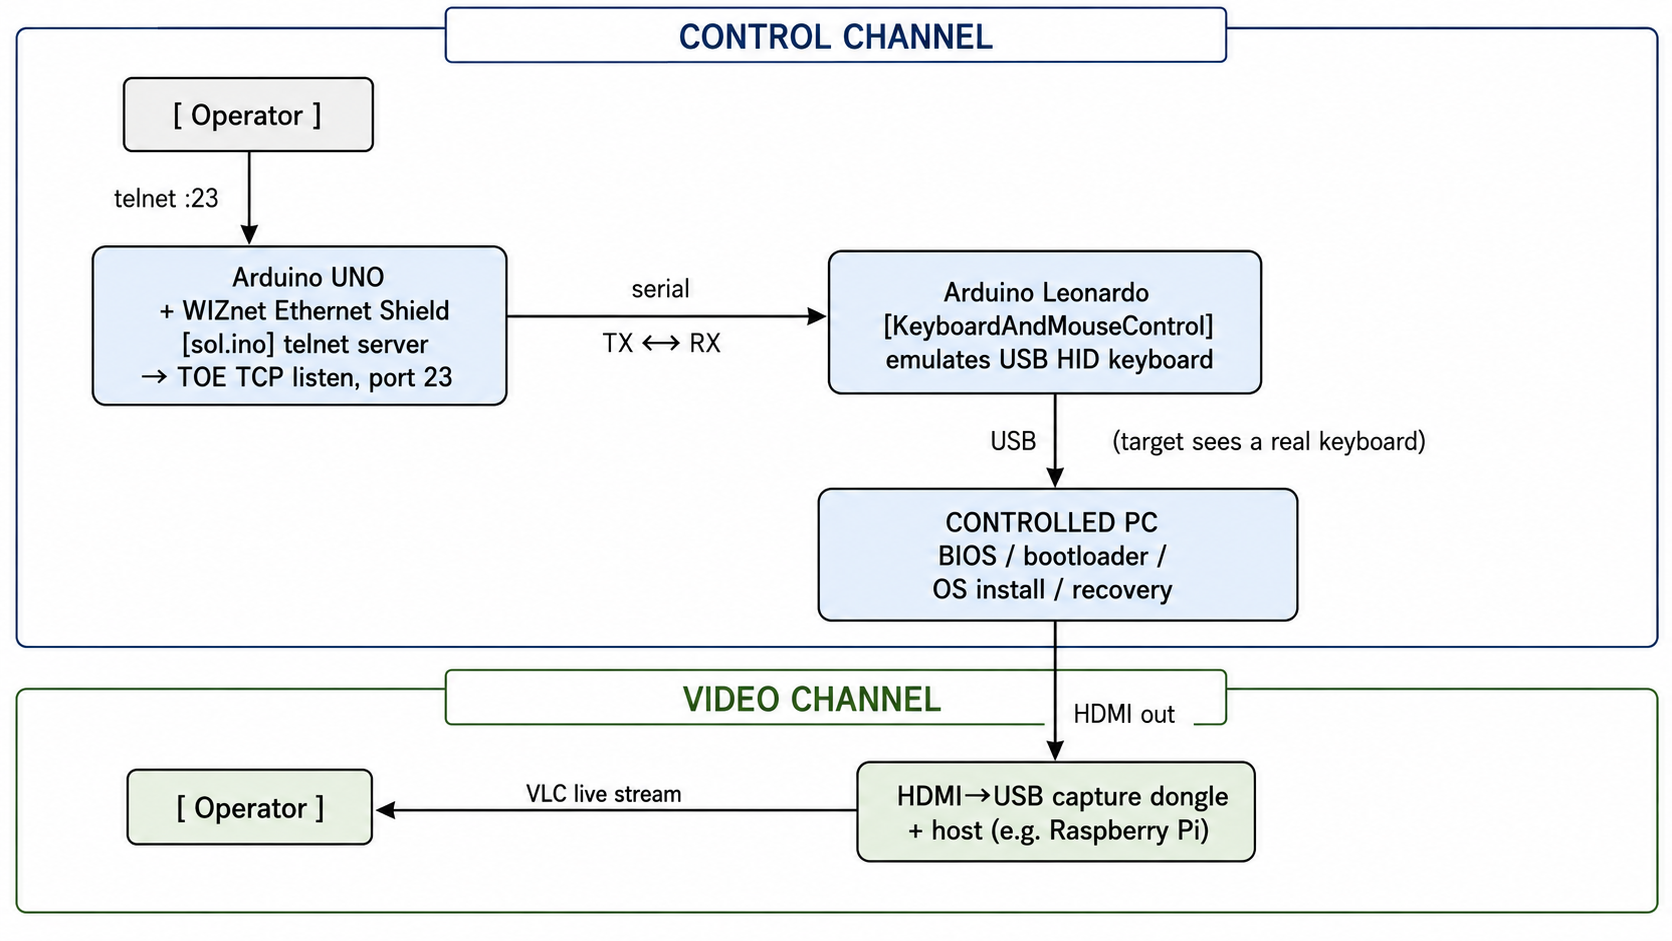
Two operator-facing streams: telnet into the control Arduino to type, and a VLC window to watch the captured screen. The base project can also run the control side as a plain USB-serial device attached to a Linux host reached over SSH; the diagram above shows the networked variant (sol.ino), where the Arduino itself is directly reachable on the LAN.
04 — Why WIZnet? ⭐
This is where the project quietly becomes a WIZnet story. In its base form the control Arduino is reached as a USB-serial device (/dev/ttyACM0) through a Linux host over SSH. The src/SerialOverLan/sol.ino sketch removes that host from the loop: it puts the control Arduino directly on the network as a telnet endpoint.
🔷 The technical core — a telnet↔serial pump on an 8-bit MCU
sol.ino runs a telnet server and bridges bytes bidirectionally between the TCP socket and the hardware UART:
- incoming TCP bytes from the telnet client → written to
Serial(which feeds the crossover link to the HID Arduino → keystrokes into the target), - bytes coming back on
Serial→ written to all connected TCP clients, - with a
~.escape sequence to drop the session cleanly.
So an operator anywhere on the LAN types into a telnet window and their keystrokes land on the controlled PC as real USB keyboard input — no intermediate Linux host required for the keystroke channel.
🔷 The WIZnet socket mode — TOE TCP (Sn_MR_TCP, 0x01)
The relevant lines make the mode unambiguous:
#include <SPI.h>
#include <Ethernet.h>
...
byte mac[] = { 0xDE,0xAD,0xBE,0xEF,0xFE,0xED };
byte ip[]  = { 192,168,10,49 };
EthernetServer server = EthernetServer(23);   // telnet
...
Ethernet.begin(mac, ip, gateway, subnet);
server.begin();                               // hardware-offloaded LISTEN
...
EthernetClient client = server.available();   // accept
c = client.read();  Serial.write(c);          // net → serial
server.write(sc);                             // serial → net
EthernetServer(...) + server.begin() opens a listening TCP socket, and available()/read()/write() handle accept and streaming. On a WIZnet chip this is the hardwired TCP Offload Engine (TOE) in TCP mode — the chip runs the full TCP state machine (handshake, ACK/retransmit, windowing) in silicon, exchanging only payload with the MCU over SPI.
🔷 Why it has to be hardwired TCP here
The control side is an Uno-class ATmega with ~2 KB of SRAM. A software TCP/IP stack plus serial buffering simply does not fit comfortably, and even if squeezed in, a software stack on an 8-bit AVR makes a poor always-listening console socket. Hardware TCP offload is effectively the only practical way to give this board a stable, permanently-listening telnet port. The WIZnet chip carries the entire connection so the MCU can spend its cycles shuttling keystrokes. The bundled Ethernet library (v2.0.0) auto-detects the chip at runtime across W5100 / W5200 / W5500; the classic Arduino Ethernet Shield this sketch targets is W5100-class.
🔷 Verified evidence
- Static network config and a listening socket on port 23 are present and complete in
sol.ino(shown above). - The bidirectional pump loop (
client.read()→Serial.write()andSerial.read()→server.write()) is fully implemented. - Chip family confirmed via the bundled
arduino-1.8.9/libraries/Ethernetv2.0.0, whose driver (utility/w5100.cpp) runtime-detects W5100/W5200/W5500.
(Scope note, stated plainly: this Ethernet/telnet path is the networked variant of the control channel, complementary to the USB-serial-over-SSH path in the README. The video channel does not involve the WIZnet chip.)
05 — Key components
🌐 WIZnet W5100-class Ethernet Shield (SPI) — TOE TCP telnet server
The heart of the networked control path. Hosts the sol.ino telnet server on port 23 in hardware-offloaded TCP mode, making the keystroke-injection Arduino a first-class network device.
🔧 Arduino Leonardo (ATmega32u4) — USB HID keyboard
Runs KeyboardAndMouseControl.ino. The 32u4's native USB lets it present as a real HID keyboard to the controlled PC, using the HID-Project library for full keyboard/mouse reports.
🔧 Arduino Uno (control side) — serial ⇄ network bridge
Runs sol.ino (networked) or MultiSerial.ino (USB-serial). Connected to the Leonardo by a TX↔RX crossover so the two boards talk over their hardware UARTs.
🔧 advancedSerial library
Lightweight serial framing/logging used across the serial link between the two boards.
🔧 HDMI → USB capture dongle + VLC
The independent video channel. A ~$5–10 UVC capture dongle grabs the target's HDMI/analog output at BIOS/boot resolution; the operator views it live in VLC.
🔧 ffserver / serial-web-terminal (in progress)
A Node.js-based web front-end (a serial web terminal) is scaffolded in the repo — an early step toward a browser UI replacing raw telnet + VLC.
06 — Application scenarios
01. Homelab / headless-server BIOS recovery
Reach a fanless mini-PC or rack box that has no BMC, no monitor, and a wedged OS — enter BIOS, change boot order, and recover it from your desk over the LAN.
02. Remote OS installation on machines with no out-of-band management
Boot from USB/PXE and click through an OS installer end-to-end on a machine you can't physically touch, without buying a licensed BMC.
03. Pre-boot / frozen-machine access where SSH and VNC cannot reach
Because control is HID and video is captured, the KVM works when the target's OS is dead — the exact gap software remote-access tools leave open.
04. Cheap networked bench consoles for labs and classrooms
With sol.ino, each bench station's console becomes a telnet address on the LAN — no per-station host PC needed just to reach the keyboard channel.
Conclusion
A hundreds-of-dollars enterprise capability, rebuilt for the price of lunch — and even at the very bottom of the cost curve, the instant the control channel needs to live on the network, it lands on a WIZnet chip.
- ✅ Delivers genuine out-of-band, BIOS-level remote control, the thing SSH/VNC/RDP fundamentally cannot do
- ✅ Built for ~$10 against commercial IP-KVM/BMC gear costing orders of magnitude more
- ✅ Target sees a real USB HID keyboard — no drivers, no agent, no cooperating OS
- ✅ Decoupled control and video channels, each independently upgradeable
- ✅ Networked control variant (
sol.ino) turns an 8-bit Arduino into a telnet-reachable console with no host PC in the keystroke path - ✅ Uses the WIZnet chip's hardwired TCP (TOE) in TCP mode — the only practical way to run a stable listening socket on a 2 KB-RAM AVR
- ✅ Reach: the IP-KVM category runs from expensive rack appliances down to a two-Arduino hack — and this project shows that even the poor man's version reaches for a WIZnet Ethernet chip the moment it goes on-net. Hardwired TCP/IP turns up everywhere, right down to the $10 tier.
07 — Similar Projects on WIZnet Makers
The platform already hosts a small but telling IP-KVM / remote-console spectrum, which places this project nicely:
- IP Keyboard on W5500-EVB-Pico (josephsr) — the closest analog to this project's control channel: a UDP-controlled USB HID keyboard on a W5500-EVB-Pico (RP2040). Network in → keystrokes out, exactly the injection idea here, but as a purpose-built W5500 board using UDP rather than a telnet/TCP bridge. Original:
github.com/andrewmk/IP-keyboard. - PiKVM (mason) — the mature, full-featured end of the spectrum: a Raspberry-Pi-based IP KVM with a polished web UI. Where poor-man's-ip-kvm is the bare-minimum $10 build, PiKVM is the "do it properly" reference.
- SKVMOIP and simpleipmi (Lihan__) — adjacent KVM-over-IP / IPMI-style remote-management builds already on the platform, rounding out the cluster.
- Arduino Telnet Client tutorial (WIZnet) — the canonical telnet-over-Ethernet-on-Arduino reference; the same TOE-TCP-plus-telnet building block
sol.inouses, in tutorial form.
Comparison (verified projects):
| poor-man's-ip-kvm (this) | IP Keyboard on W5500-EVB-Pico (josephsr) | Arduino Telnet Client (WIZnet) | |
|---|---|---|---|
| Core MCU | Arduino Uno + Leonardo (ATmega328/32u4) | RP2040 (W5500-EVB-Pico) | Arduino + Ethernet shield |
| WIZnet chip | W5100-class shield | W5500 (integrated EVB) | W5100-class shield |
| Chip's role | Telnet server → serial (SoL bridge) | UDP keystroke receiver | Telnet client (demo) |
| Socket mode | TOE TCP, listen :23 | UDP | TOE TCP, client |
| Control channel | net → telnet → serial → USB HID | net → UDP → USB HID | net → telnet (no HID) |
| Video | HDMI/USB capture + VLC | none (keyboard only) | none |
| Scope | Full KVM (video + keyboard) | Keyboard only | Networking demo |
Insight: the cluster spans the whole IP-KVM design space — from a full Pi-based appliance (PiKVM) down to a two-Arduino hack. Within it, poor-man's-ip-kvm is the extreme low-cost anchor, and it makes an interesting protocol choice against its nearest neighbor: where josephsr's IP Keyboard fires keystrokes over UDP (fire-and-forget), this project runs them over TCP/telnet — trading a little overhead for the ordered, reliable delivery you actually want when you're typing into a BIOS screen and a dropped key means a wrong menu.
Q&A
Q. Which WIZnet chip and socket mode does this use? A telnet server on port 23, i.e. the TOE TCP mode (Sn_MR_TCP) — a hardware-offloaded listening socket. The chip family is auto-detected by the Ethernet library (W5100/W5200/W5500); the classic Arduino Ethernet Shield the sketch targets is W5100-class.
Q. Why TCP/telnet here when the similar IP Keyboard project used UDP? A console session wants reliable, ordered delivery — a dropped or reordered keystroke while navigating firmware menus is a real problem. TCP (and telnet on top of it) gives that for free; the WIZnet TOE carries the whole connection so the tiny MCU doesn't pay for it in software.
Q. Does the WIZnet path remove the Raspberry Pi entirely? For the keystroke channel, yes — sol.ino makes the control Arduino directly telnet-reachable, so no Linux host/SSH is needed to type. The video channel still needs a capture host (Pi or PC) running VLC.
Q. Is it really only ~$10? For BIOS/XVGA-resolution capture, yes (two ~$2.50 Arduinos + a ~$5 capture dongle). Stepping up to reliable 1080p capture pushes the dongle toward ~$70 — still far below commercial IP-KVM hardware.
Q. How much RAM does the networked control side need? Very little — that's the whole point of offload. The Uno-class ATmega (~2 KB SRAM) only buffers keystrokes; the WIZnet chip handles the TCP state machine, which is why a listening telnet server is feasible on 8-bit hardware at all.
[한글 버전] Poor Man's IP KVM — 단돈 1만 원짜리 BIOS 원격 제어, 그리고 네트워크 경로에 숨어 있던 WIZnet 칩
#IPKVM #OutOfBand관리 #BIOS접근 #원격콘솔 #SerialOverLAN #Telnet #USBHID #Arduino #TOE #TCP #W5100 #Ethernet
📚 맥락: DIY·취미용 out-of-band(대역 외) 관리 프로젝트 (GPL-3.0, 약 56★, 유튜브 데모 있음). 저렴한 아두이노 2개 + HDMI/USB 캡처 동글로 만든 원격 KVM이며, 네트워크 제어 경로에 WIZnet 이더넷 실드가 쓰인다. 검증: 메인 키입력 + 영상 경로는 README에 서술되고 영상으로 시연됨. 네트워크 제어채널 변형은
src/SerialOverLan/sol.ino에 있고 소스에서 직접 확인함 (Arduino Ethernet 라이브러리 v2.0.0;EthernetServer(23)→ 하드웨어 오프로드 TCP listen). 정확한 WIZnet 칩은 코드로 특정되지 않으며, 라이브러리가 W5100/W5200/W5500을 자동 감지한다. 클래식 Arduino Ethernet Shield는 W5100 계열.
01 — 이 프로젝트는 무엇인가?
먼저 이 분야부터. KVM(Keyboard-Video-Mouse) 스위치는 컴퓨터 앞에 앉지 않고도 그 컴퓨터의 키보드를 조작하고 화면을 볼 수 있게 해 준다. IP KVM(KVM-over-IP)은 이를 네트워크 너머로 하는 것이다. IP KVM이 중요한 이유 — 그리고 데이터센터가 돈을 지불하는 이유 — 는 out-of-band(대역 외) 관리 때문이다. IP KVM은 대상 머신의 운영체제 아래 계층에서 동작한다. SSH·RDP·VNC는 전부 대상의 OS가 살아 있고 네트워크가 설정돼 있어야 하지만, IP KVM은 그렇지 않다. 마치 실제 키보드가 꽂힌 것처럼 키입력을 주입하고, 원본 영상 출력을 그대로 캡처하기 때문에 다음이 가능하다:
- 머신이 POST하며 BIOS/UEFI로 진입하는 과정을 지켜보고,
- 부팅 장치를 골라 OS를 처음부터 설치하고,
- OS가 없는 크래시·벽돌 상태 머신을 복구하고,
- 모니터가 한 번도 연결된 적 없는 헤드리스 장비를 관리한다.
엔터프라이즈 장비는 이를 서버 BMC(Dell iDRAC, HPE iLO, IPMI)나 독립형 IP-KVM 어플라이언스로 제공한다. 신뢰성은 높지만 비싸고, 흔히 라이선스에 묶여 있으며, 홈랩이나 머신 한 대에는 과하다.
이 프로젝트의 답: 그 동일한 대역 외·BIOS 레벨 능력을 약 1만 원어치 부품으로 재현한다. 저자의 전제는 노골적이다 — "IP KVM 솔루션 가격이 말도 안 된다" — 그래서 흔한 아두이노 2개와 값싼 HDMI/USB 캡처 카드로 직접 하나 만들었다.
결과물: 거칠지만 실제로 동작하는 IP KVM이다. 아두이노 하나가 대상 컴퓨터에 진짜 USB 키보드로 인식되고(대상은 정말로 "키보드"라고 믿는다), 두 번째 아두이노가 시리얼 링크로 그쪽에 키입력을 중계하며, USB 영상 캡처 동글이 대상의 HDMI 출력을 잡아 운영자가 VLC로 화면을 실시간으로 본다. 아직 세련된 프런트엔드는 없지만, 정작 중요한 한 가지는 해낸다 — 전원 인가 순간부터 펌웨어 레벨에서 원격 머신을 조작하는 것.
02 — 왜 이런 구조인가 (HID 주입 + 독립 영상 캡처)?
🔷 구조적으로 OS에 독립적이다
키입력이 하드웨어 USB HID 장치로 도착하고 영상이 HDMI 신호에서 직접 잡히기 때문에, 대상에 OS가 전혀 없어도 — BIOS 상태, 부트로더, 설치 도중, 혹은 멈춘 상태에서도 — 전부 동작한다. 바로 이 영역이 SSH/VNC/RDP가 무력해지는 구간이다. KVM은 모니터가 볼 것을 보고 키보드가 칠 것을 칠 뿐, 그 이상을 전제하지 않는다.
🔷 터무니없이 싸다
아두이노 레오나르도/우노 계열 보드 2개(개당 약 2.5달러), HDMI→USB2 캡처 동글(XVGA/BIOS 해상도 캡처용 약 5~10달러; 1080p를 고집하면 약 70달러), 그리고 배선. 상용 IP-KVM 하드웨어나 BMC 기능 라이선스의 수백 달러와 비교하면, 이 원가 차이가 프로젝트의 존재 이유 그 자체다.
🔷 두 채널이 분리돼 있다
제어 채널(키입력)과 영상 채널(화면 캡처)은 완전히 독립된 서브시스템이다. 키보드 경로를 건드리지 않고 캡처 카드만 고해상도로 바꿀 수 있고 — 그리고 이 글의 핵심으로서 — 나머지를 재설계하지 않고 제어 채널이 네트워크에 닿는 방식만 교체할 수 있다. 바로 그 이음새에 WIZnet 칩이 들어온다.
03 — 시스템 아키텍처
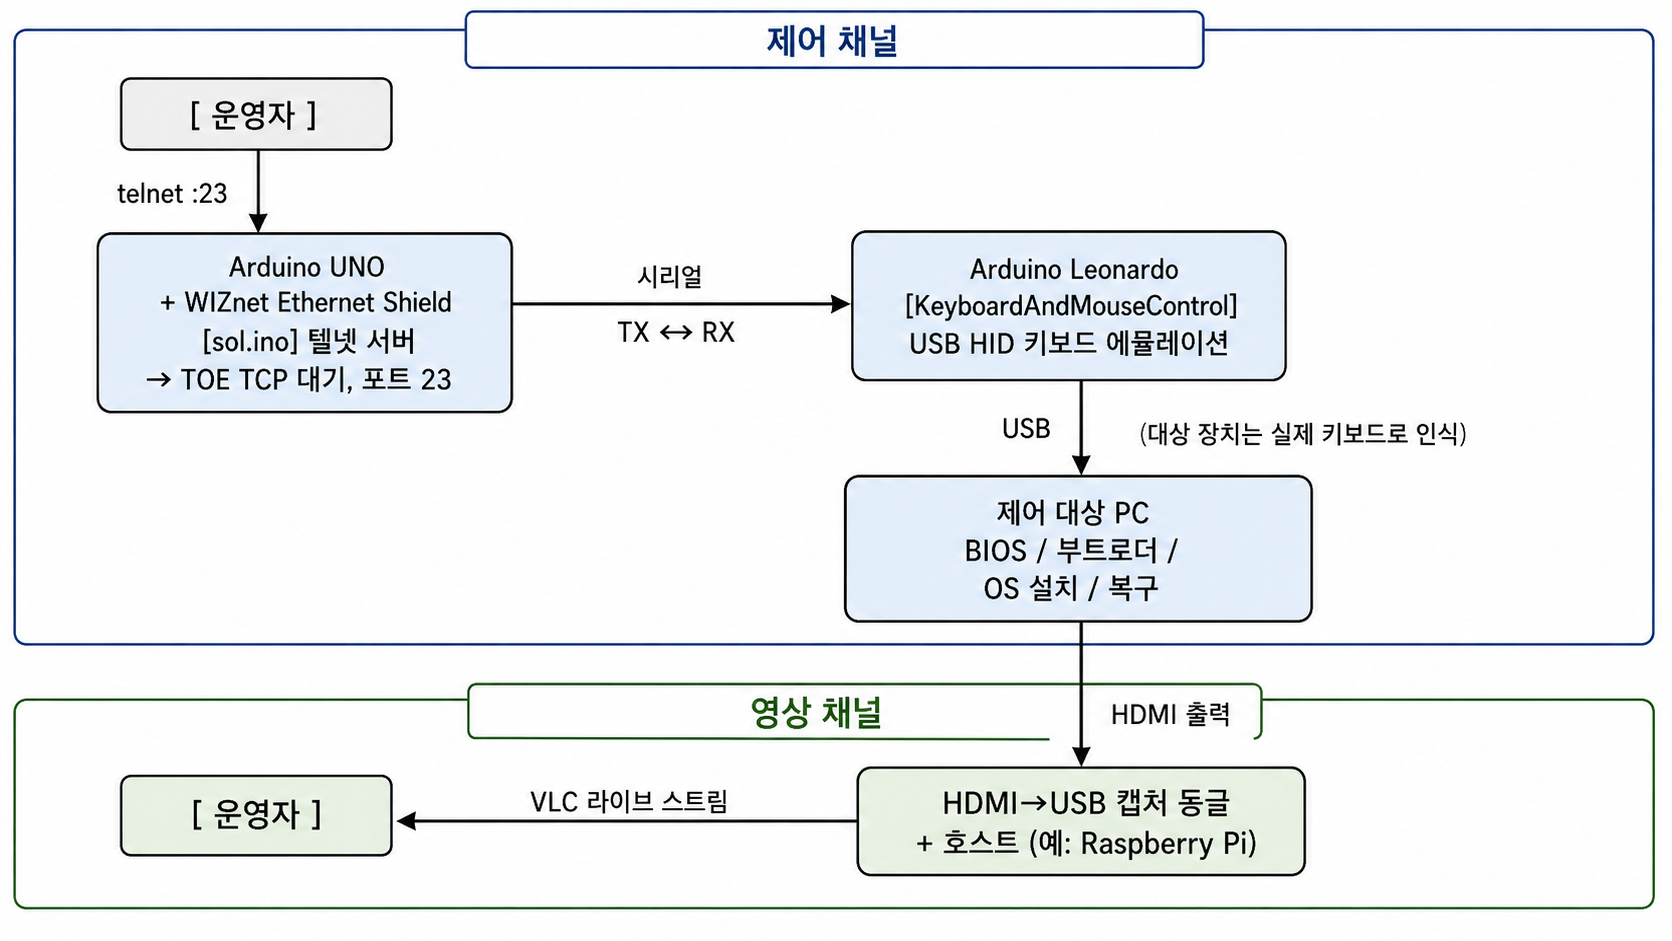
운영자 쪽 스트림은 둘: 제어 아두이노로 telnet 접속해 타이핑하고, VLC 창으로 캡처된 화면을 본다. 기본 프로젝트는 제어 측을 리눅스 호스트에 붙는 USB-시리얼 장치로 SSH를 통해 운영할 수도 있으며, 위 다이어그램은 아두이노 자체가 LAN에서 직접 접근되는 네트워크 변형(sol.ino)을 나타낸다.
04 — 왜 WIZnet인가? ⭐
바로 여기서 이 프로젝트가 조용히 WIZnet 이야기가 된다. 기본 형태에서 제어 아두이노는 리눅스 호스트를 거쳐 SSH로 USB-시리얼 장치(/dev/ttyACM0)로 접근된다. src/SerialOverLan/sol.ino 스케치는 그 호스트를 경로에서 제거한다 — 제어 아두이노를 네트워크에 직접 텔넷 엔드포인트로 올린다.
🔷 기술적 핵심 — 8비트 MCU 위의 telnet↔시리얼 펌프
sol.ino는 텔넷 서버를 돌리며 TCP 소켓과 하드웨어 UART 사이에서 바이트를 양방향으로 중계한다:
- 텔넷 클라이언트에서 온 TCP 바이트 →
Serial로 write (→ HID 아두이노로 가는 크로스오버 링크 → 대상에 키입력), Serial에서 돌아온 바이트 → 연결된 모든 TCP 클라이언트로 write,~.이스케이프 시퀀스로 세션을 깔끔하게 종료.
즉 LAN상의 운영자가 텔넷 창에 타이핑하면 그 키입력이 제어 대상 PC에 실제 USB 키보드 입력으로 도달한다 — 키입력 채널에 중간 리눅스 호스트가 필요 없다.
🔷 WIZnet 소켓 모드 — TOE TCP (Sn_MR_TCP, 0x01)
관련 코드가 모드를 분명하게 드러낸다:
#include <SPI.h>
#include <Ethernet.h>
...
byte mac[] = { 0xDE,0xAD,0xBE,0xEF,0xFE,0xED };
byte ip[]  = { 192,168,10,49 };
EthernetServer server = EthernetServer(23);   // telnet
...
Ethernet.begin(mac, ip, gateway, subnet);
server.begin();                               // 하드웨어 오프로드 LISTEN
...
EthernetClient client = server.available();   // accept
c = client.read();  Serial.write(c);          // net → serial
server.write(sc);                             // serial → net
EthernetServer(...) + server.begin()은 리스닝 TCP 소켓을 열고, available()/read()/write()가 accept와 스트리밍을 처리한다. WIZnet 칩에서 이것은 하드와이어드 TCP 오프로드 엔진(TOE)의 TCP 모드 — 칩이 TCP 상태 머신 전체(핸드셰이크, ACK/재전송, 윈도잉)를 실리콘에서 돌리고, MCU와는 SPI로 페이로드만 주고받는다.
🔷 왜 여기서 하드와이어드 TCP여야 하는가
제어 측은 SRAM 약 2KB의 우노 계열 ATmega다. 소프트웨어 TCP/IP 스택에 시리얼 버퍼링까지는 여유 있게 들어가지 않고, 억지로 욱여넣어도 8비트 AVR 위의 소프트 스택은 상시 리스닝 콘솔 소켓으로는 부실하다. 하드웨어 TCP 오프로드가 사실상 유일하게 실용적인 방법으로, 이 보드에 안정적으로 항상 열려 있는 텔넷 포트를 준다. WIZnet 칩이 연결 전체를 짊어지므로 MCU는 키입력을 나르는 데만 사이클을 쓸 수 있다. 번들된 Ethernet 라이브러리(v2.0.0)는 런타임에 W5100/W5200/W5500 중 칩을 자동 감지하며, 이 스케치가 겨냥하는 클래식 Arduino Ethernet Shield는 W5100 계열이다.
🔷 검증된 증거
- 정적 네트워크 설정과 포트 23 리스닝 소켓이
sol.ino에 온전히 존재함(위 코드). - 양방향 펌프 루프(
client.read()→Serial.write()및Serial.read()→server.write())가 완전히 구현됨. - 칩 계열은 번들
arduino-1.8.9/libraries/Ethernetv2.0.0의 드라이버(utility/w5100.cpp)가 W5100/W5200/W5500을 런타임 감지하는 것으로 확인함.
(범위 명시, 솔직히: 이 Ethernet/telnet 경로는 제어 채널의 네트워크 변형이며, README의 USB-시리얼-over-SSH 경로와 상호 보완적이다. 영상 채널에는 WIZnet 칩이 관여하지 않는다.)
05 — 핵심 구성요소
🌐 WIZnet W5100 계열 Ethernet Shield (SPI) — TOE TCP 텔넷 서버
네트워크 제어 경로의 심장. sol.ino 텔넷 서버를 포트 23에서 하드웨어 오프로드 TCP 모드로 호스팅하여, 키입력 주입 아두이노를 어엿한 네트워크 장치로 만든다.
🔧 Arduino Leonardo (ATmega32u4) — USB HID 키보드
KeyboardAndMouseControl.ino를 실행. 32u4의 네이티브 USB 덕분에 제어 대상 PC에 진짜 HID 키보드로 나타나며, HID-Project 라이브러리로 완전한 키보드/마우스 리포트를 낸다.
🔧 Arduino Uno (제어 측) — 시리얼 ⇄ 네트워크 브리지
sol.ino(네트워크) 또는 MultiSerial.ino(USB-시리얼)를 실행. 레오나르도와 TX↔RX 크로스오버로 연결돼 두 보드가 하드웨어 UART로 통신한다.
🔧 advancedSerial 라이브러리
두 보드 사이 시리얼 링크에서 쓰이는 경량 시리얼 프레이밍/로깅.
🔧 HDMI → USB 캡처 동글 + VLC
독립 영상 채널. 약 5~10달러 UVC 캡처 동글이 대상의 HDMI/아날로그 출력을 BIOS/부팅 해상도로 잡고, 운영자는 VLC로 실시간 시청.
🔧 ffserver / serial-web-terminal (진행 중)
Node.js 기반 웹 프런트엔드(시리얼 웹 터미널)가 저장소에 스캐폴딩돼 있음 — 생 telnet + VLC를 대체할 브라우저 UI로 가는 초기 단계.
06 — 활용 시나리오
01. 홈랩 / 헤드리스 서버 BIOS 복구
BMC도, 모니터도 없고 OS가 멈춘 팬리스 미니 PC나 랙 장비에 접근 — BIOS로 진입해 부팅 순서를 바꾸고 책상에서 LAN으로 복구한다.
02. 대역 외 관리가 없는 머신에 원격 OS 설치
직접 만질 수 없는 머신에서 USB/PXE로 부팅해 OS 설치 마법사를 끝까지 진행 — 라이선스 BMC를 사지 않고도.
03. SSH·VNC가 닿지 못하는 프리부트/멈춘 머신 접근
제어는 HID, 영상은 캡처이므로 대상 OS가 죽어 있어도 KVM은 동작한다 — 소프트웨어 원격 접속 도구가 남기는 바로 그 공백.
04. 랩·강의실용 저가 네트워크 콘솔
sol.ino를 쓰면 각 벤치 스테이션의 콘솔이 LAN상의 텔넷 주소가 된다 — 키보드 채널에 닿기 위한 스테이션별 호스트 PC가 필요 없다.
결론
수백 달러짜리 엔터프라이즈 기능을 점심값으로 재현했다 — 그리고 원가 곡선의 맨 밑바닥에서도, 제어 채널이 네트워크로 올라가야 하는 순간 결국 WIZnet 칩에 도달한다.
- ✅ SSH/VNC/RDP가 근본적으로 못 하는 대역 외·BIOS 레벨 원격 제어를 실제로 구현
- ✅ 수십~수백 배 비싼 상용 IP-KVM/BMC 대비 약 1만 원으로 구축
- ✅ 대상은 진짜 USB HID 키보드로 인식 — 드라이버·에이전트·협조하는 OS 불필요
- ✅ 제어·영상 채널을 분리해 각각 독립적으로 업그레이드 가능
- ✅ 네트워크 제어 변형(
sol.ino)이 8비트 아두이노를 텔넷 접근 가능한 콘솔로 전환, 키입력 경로에서 호스트 PC 제거 - ✅ WIZnet 칩의 하드와이어드 TCP(TOE) TCP 모드 활용 — 2KB RAM AVR에서 안정적 리스닝 소켓을 돌리는 유일한 실용적 방법
- ✅ Reach: IP-KVM 카테고리는 값비싼 랙 어플라이언스부터 아두이노 두 개짜리 핵까지 걸쳐 있다 — 그리고 이 프로젝트는, 가난한 자의 버전조차 온라인으로 가는 순간 WIZnet 이더넷 칩을 집어 든다는 것을 보여준다. 하드와이어드 TCP/IP는 1만 원짜리 티어까지, 어디에나 나타난다.
07 — WIZnet Makers 내 유사 프로젝트
플랫폼에는 이미 작지만 시사적인 IP-KVM / 원격 콘솔 스펙트럼이 있고, 그 안에 이 프로젝트가 잘 자리한다:
- IP Keyboard on W5500-EVB-Pico (josephsr) — 이 프로젝트 제어채널의 가장 가까운 유사물: W5500-EVB-Pico(RP2040) 위의 UDP 제어 USB HID 키보드. 네트워크 입력 → 키입력 출력이라는 여기와 똑같은 주입 아이디어이되, 텔넷/TCP 브리지가 아니라 UDP를 쓰는 전용 W5500 보드다. 원본:
github.com/andrewmk/IP-keyboard. - PiKVM (mason) — 성숙하고 완성도 높은 스펙트럼의 반대쪽 끝: 세련된 웹 UI를 갖춘 라즈베리파이 기반 IP KVM. poor-man's-ip-kvm이 최소 사양 1만 원 빌드라면, PiKVM은 "제대로 하는" 레퍼런스다.
- SKVMOIP, simpleipmi (Lihan__) — 플랫폼에 이미 올라와 있는 인접 KVM-over-IP / IPMI 스타일 원격 관리 빌드로 클러스터를 채운다.
- Arduino Telnet Client 튜토리얼 (WIZnet) — 아두이노에서의 telnet-over-Ethernet 정석 레퍼런스;
sol.ino가 쓰는 TOE-TCP+telnet 빌딩블록의 튜토리얼 형태.
비교 (확인된 프로젝트):
| poor-man's-ip-kvm (본건) | IP Keyboard on W5500-EVB-Pico (josephsr) | Arduino Telnet Client (WIZnet) | |
|---|---|---|---|
| 핵심 MCU | Arduino Uno + Leonardo (ATmega328/32u4) | RP2040 (W5500-EVB-Pico) | Arduino + Ethernet 실드 |
| WIZnet 칩 | W5100 계열 실드 | W5500 (통합 EVB) | W5100 계열 실드 |
| 칩의 역할 | 텔넷 서버 → 시리얼 (SoL 브리지) | UDP 키입력 수신 | 텔넷 클라이언트 (데모) |
| 소켓 모드 | TOE TCP, listen :23 | UDP | TOE TCP, 클라이언트 |
| 제어 채널 | net → telnet → 시리얼 → USB HID | net → UDP → USB HID | net → telnet (HID 없음) |
| 영상 | HDMI/USB 캡처 + VLC | 없음 (키보드 전용) | 없음 |
| 범위 | 완전한 KVM (영상 + 키보드) | 키보드만 | 네트워킹 데모 |
인사이트: 이 클러스터는 IP-KVM 설계 공간 전체를 아우른다 — 완전한 파이 기반 어플라이언스(PiKVM)부터 아두이노 두 개짜리 핵까지. 그 안에서 poor-man's-ip-kvm은 극단적 저가 앵커이며, 가장 가까운 이웃과 흥미로운 프로토콜 선택 차이를 보인다: josephsr의 IP Keyboard가 키입력을 UDP(쏘고 잊기)로 보내는 반면, 이 프로젝트는 TCP/telnet으로 보낸다 — 약간의 오버헤드를 내주는 대신, BIOS 화면에 타이핑할 때 정작 필요한 순서 보장·신뢰 전달을 얻는다(키 하나가 누락되면 잘못된 메뉴로 가니까).
Q&A
Q. 어떤 WIZnet 칩과 소켓 모드를 쓰나? 포트 23의 텔넷 서버, 즉 TOE TCP 모드(Sn_MR_TCP) — 하드웨어 오프로드 리스닝 소켓. 칩 계열은 Ethernet 라이브러리가 자동 감지(W5100/W5200/W5500)하며, 스케치가 겨냥하는 클래식 Arduino Ethernet Shield는 W5100 계열이다.
Q. 유사한 IP Keyboard 프로젝트는 UDP를 썼는데, 여기선 왜 TCP/telnet인가? 콘솔 세션은 신뢰성 있는 순서 보장 전달을 원한다 — 펌웨어 메뉴를 오가는 중 키입력이 누락되거나 순서가 뒤바뀌면 실제 문제가 된다. TCP(그 위의 telnet)가 이를 공짜로 주며, WIZnet TOE가 연결 전체를 짊어지므로 작은 MCU가 소프트웨어로 그 비용을 치르지 않는다.
Q. WIZnet 경로가 라즈베리파이를 완전히 없애나? 키입력 채널은 그렇다 — sol.ino가 제어 아두이노를 직접 텔넷 접근 가능하게 만들어, 타이핑에 리눅스 호스트/SSH가 필요 없다. 영상 채널은 여전히 VLC를 돌리는 캡처 호스트(파이 또는 PC)가 필요하다.
Q. 정말 약 1만 원인가? BIOS/XVGA 해상도 캡처라면 그렇다(약 2.5달러 아두이노 2개 + 약 5달러 캡처 동글). 안정적 1080p 캡처로 올리면 동글이 약 70달러로 오르지만 — 그래도 상용 IP-KVM 하드웨어보다는 한참 아래다.
Q. 네트워크 제어 측은 RAM이 얼마나 필요한가? 아주 적다 — 그게 오프로드의 요점이다. 우노 계열 ATmega(약 2KB SRAM)는 키입력만 버퍼링하고, TCP 상태 머신은 WIZnet 칩이 처리한다. 8비트 하드웨어에서 리스닝 텔넷 서버가 애초에 가능한 이유다