W5500を使ってESP32でEthernet UDP通信する
Let's try UDP communication with ESP32 (Arduino core for the ESP32) using WIZnet's W5500.
1. Preparation
Purchase W5500 on Aliexpress etc.

ESP32 uses ESP32-DevKitC. It can be purchased at Akizuki Denshi .
2. Connection
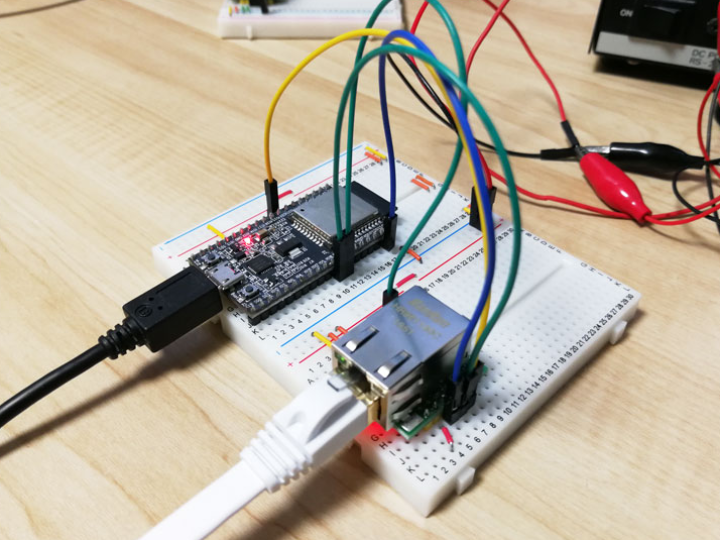
Connect the W5500 and ESP32 as follows. As for the 3.3V supply, the current consumption of the W5500 is large, so it is added externally instead of from the ESP32.'
ESP32-DevKitC uses NCP1117 that can output 1A or more to the 3.3V regulator, so I think it can be driven even if it is directly connected to W5500.
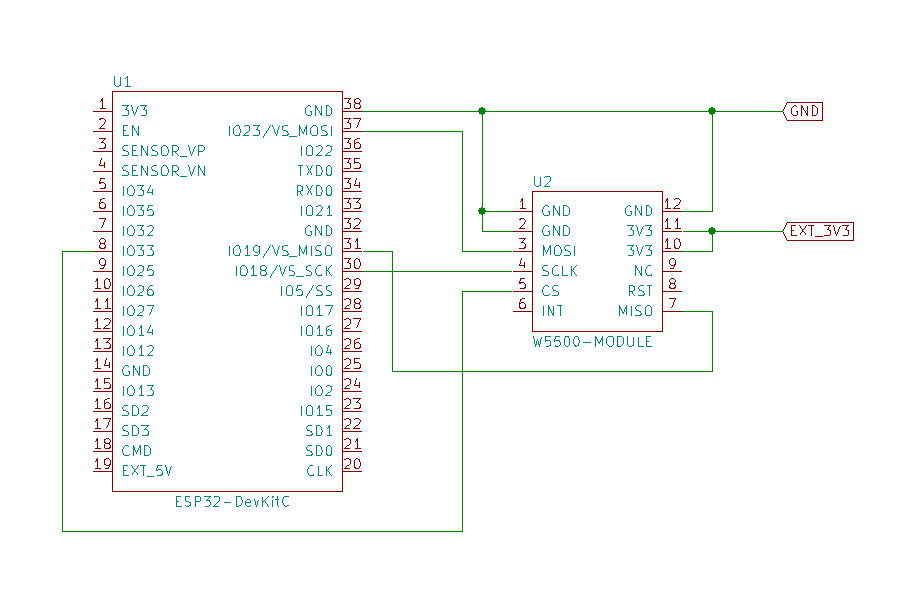
ESP32 --- W5500
IO33 --- CS
IO23 (VS_MOSI) --- MOSI
IO19 (VSMISO) --- MISO
IO18 (VS_SCK) --- SCLK
3V3 --- VCC
GND --- GND
According to the data sheet, it consumes 132mA at 100M Transmitting, so it is better to prepare an external power supply that can supply 200mA or more.
products:w5500:datasheet [Document Wiki]


3. Library modification
I would like to proceed with writing the code after wiring is completed, but Arduino core for the ESP32 Ver 1.0.2 has a defect in the library for using Ethernet , so it cannot be compiled .
In order to be able to compile , it is necessary to modify Client.h of Arduino core for the ESP32. Client.h can be found in the path below if you installed it using Boards Manager. ( Windows )
C:\Users\<account name>\AppData\Local\Arduino15\packages\esp32\hardware\esp32\1.0.2\cores\esp32\Client.h
Open Client.h in a text editor and comment out the line below .
You can find out more about this in the conversation below.
- Adding ESP32 support and fix for ESP32 v 1.0.2 by kmpelectronics Pull Request #95 arduino-libraries/Ethernet GitHub
- compilation error with ESP32 DIV Kit Issue #97 arduino-libraries/Ethernet GitHub
- Server.h not matching Arduino API Issue #2704 espressif/arduino-esp32 GitHub
- Add connect with timeout to Client class espressif/arduino-esp32@9a9ff62 GitHub
Also, the bug reported by this event
- Problem with Ethernet.h compilation after board library update from 1.0.1 to 1.0.2 Issue #2786 espressif/arduino-esp32 GitHub
- Problem that Ethernet cannot be used with M5Stack - Qiita
- Virtual functions in client.h are out of line with standard Arduino API Issue #2755 espressif/arduino-esp32 GitHub
In summary, Arduino core for the ESP32 Ver 1.0.2 seems to have a compilation error because the implementation is not aware of compatibility with Arduino 's Ethernet .h.
Here, following Mr. Juraj Andrássy's intention, instead of modifying the library on the Arduino side, we will modify the library on the Arduino core for the ESP32 side.
4. Code
After fixing the library, write the code below to the ESP32.
#include <Ethernet.h>
#include <EthernetUdp.h>
bytemac [] = { 0x70 , 0x69 , 0x69 , 0x2D , 0x30 , 0x31 };
unsigned  int localPort = 3001 ;
char packetBuffer[UDP_TX_PACKET_MAX_SIZE];
char ReplyBuffer[] = "acknowledged" ;
Ethernet UDP Udp;
void setup() {
 Serial. begin( 115200 );
 Serial.println( "starting..." );

 Ethernet.init( 33 ); // CS pin 33
 Ethernet.begin(mac); // use DHCP
 // Check for Ethernet hardware present
 if (Ethernet.hardwareStatus() == EthernetNoHardware) {
   Serial.println( "Ethernet shield was not found. Sorry, can't run without hardware. :(" );
    while ( true ) {
     delay( 1 ); // do nothing, no point running without Ethernet hardware
   }
 }
 if (Ethernet.linkStatus() == LinkOFF) {
   Serial.println( "Ethernet cable is not connected." );
 }
 Serial. print( "IP: " );
 Serial.println(Ethernet.localIP());

 Udp. begin(localPort);
}
void loop() {
  // if there's data available, read a packet
 int packetSize = Udp.parsePacket();
  if (packetSize) {
   Serial.print( "Received packet of size " );
   Serial.println(packetSize);
   Serial. print( "From " );
   IPAddress remote = Udp.remoteIP();
   for ( int i= 0 ; i < 4 ; i++) {
     Serial.print(remote[i], DEC);
     if (i < 3 ) {
       Serial. print( "." );
     }
   }
   Serial. print( ", port " );
   Serial.println(Udp.remotePort());
   // read the packet into packetBuffer
   Udp.read(packetBuffer, UDP_TX_PACKET_MAX_SIZE);
   Serial. print( "Contents: " );
   Serial.println(packetBuffer);
   // send a reply to the IP address and port that sent us the packet we received
   Udp.beginPacket(Udp.remoteIP(), Udp.remotePort());
   Udp.write(ReplyBuffer);
   Udp.endPacket();
 }
 delay( 10 );
}
Change the MAC address according to your environment. DHCP is used to set the IP address , but you can also set a fixed IP by specifying the IP address or gateway as an argument to Ethernet .begin() .
Default values are set for dns , gateway , and subnet when setting with a fixed IP, so it may work only with the MAC address and IP address , but if you do not specify it, it will not work or communication will be unstable. Therefore, it is better to specify everything even if it is troublesome. You can check the details of Ethernet .begin() from the official reference below.
5. Run
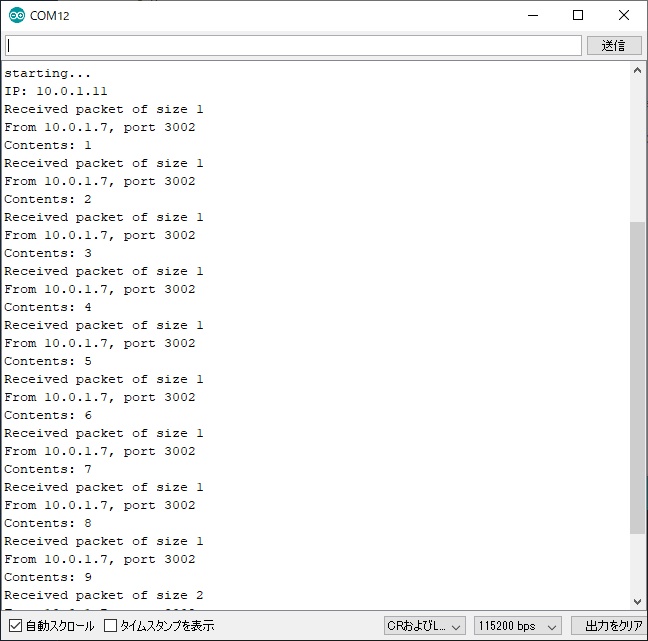
Check the logs in the serial monitor. Communication partners can be easily prepared using Node.js. If it works properly, you will see the received message in the log and the character string set in ReplyBuffer to the other party.
