
🚀 Building Stable Ethernet MQTT Communication with ESP32 and W5500
Let's try MQTT communication with ESP32 ( Arduino core for the ESP32) using WIZnet's W5500 .
Espressif - ESP32
x 1
WIZnet - W5500
x 1

Arduino - Arduino IDE
x 1
If you're developing an embedded application with the ESP32 and need more stable network connectivity than Wi-Fi can offer, using the WIZnet W5500 Ethernet chip is a smart choice. In a detailed blog post by Hikoleaf, the author walks through how to implement MQTT communication over Ethernet using ESP32 + W5500, powered by the Arduino development environment.
🔧 Project Overview
The tutorial demonstrates how to connect the ESP32 microcontroller to a W5500 Ethernet module via SPI, then use MQTT to send and receive messages through a local broker.
🛠️ Core Components
- ESP32: Wi-Fi-enabled microcontroller with SPI support
- W5500: SPI-based Ethernet controller with built-in TCP/IP stack
- Arduino IDE: Used for code development
- Mosquitto (on Raspberry Pi): Acts as a local MQTT broker
📦 Step-by-Step Implementation
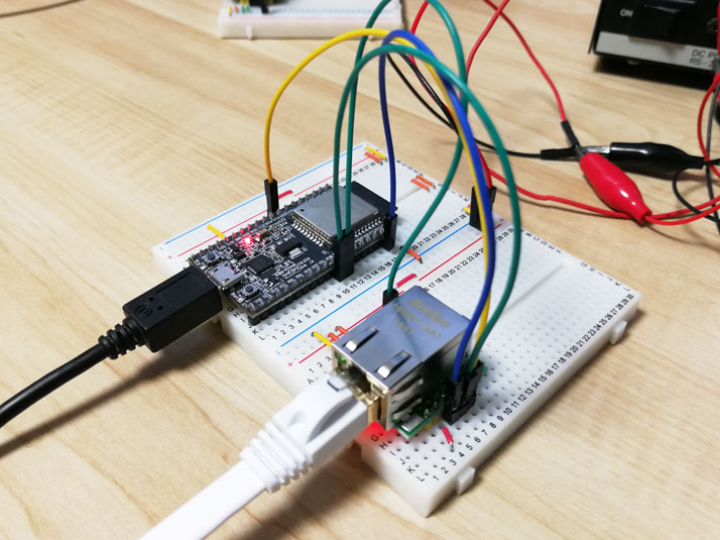
1. Hardware Wiring
Connect the W5500 module to the ESP32 using SPI pins (MOSI, MISO, SCLK, CS).
2. Arduino Library Setup
Install the following libraries:
3. Code Implementation
- Initialize Ethernet using
Ethernet.begin() - Connect to the MQTT broker with
PubSubClient - Send and receive messages on subscribed topics
4. MQTT Broker Setup
Install and configure Mosquitto on a Raspberry Pi to act as your MQTT server.
🧪 Example Code Snippet
#include <Ethernet.h>
#include <PubSubClient.h>

byte mac[] = { 0x70, 0x69, 0x69, 0x2D, 0x30, 0x31 };
byte server[] = { 10, 0, 1, 5 };

void callback(char* topic, byte* payload, unsigned int length) {
  payload[length] = '\0';
  String msg = String((char*) payload);
  Serial.println(msg);
}

EthernetClient ethClient;
PubSubClient client(server, 1883, callback, ethClient);
This code initializes Ethernet, connects to the MQTT server, and listens for incoming messages.
✅ Why Use Ethernet on ESP32?
While ESP32 is known for its Wi-Fi capability, there are many reasons to choose Ethernet with W5500:
- 🚫 Avoid unstable or congested wireless networks
- 🔐 Improve security and isolation
- 📈 Ensure real-time data delivery in industrial environments
📘 Read the Full Tutorial
For complete wiring diagrams, full source code, and detailed setup instructions, check out the original blog post:
👉 W5500を使ってESP32でEthernet MQTT通信する
This guide is a must-read if you're building an IoT system with stable wired network communication using ESP32 and Rust or Arduino.