
W5500を使ってArduinoでMQTT通信する
Let's try MQTT communication with Arduino using WIZnet's W5500 .
WIZnet - W5500
x 1

Arduino - Arduino UNO
x 1

Arduino - Arduino IDE
x 1
1. Prepare
Purchase W5500 on Aliexpress etc.

Arduino uses UNO R3.
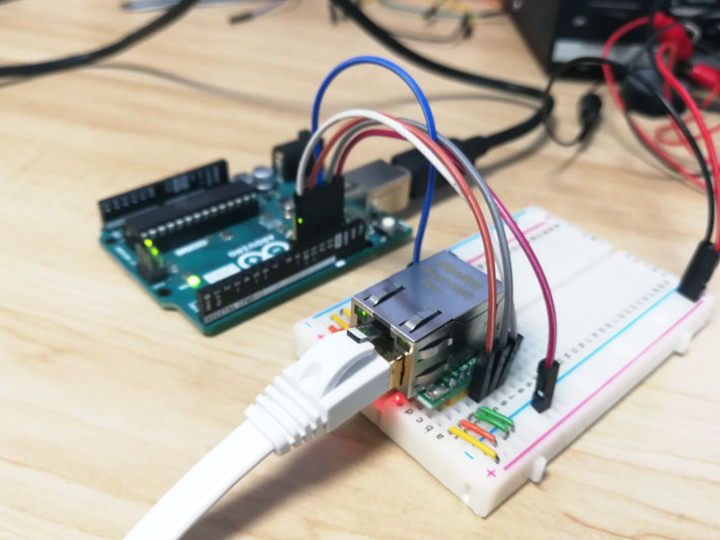
2. Connection
To communicate with Arduino via SPI, connect the W5500 as follows. The IO level is 3.3V, but it is also 5V tolerant, so it can be directly connected to Arduino . Another point to note is that the current consumption of the W5500 is large, so the 3.3V is supplied externally instead of from the Arduino .

| Arduino | W5500 |
|---|---|
| D10 (SS) | CS |
| D11 (MOSI) | SMOKE |
| D12 (MISO) | MISO |
| D13 (SCK) | SCLK |
| GND | GND |
According to the data sheet, it consumes 132mA at 100M Transmitting, so it is better to prepare an external power supply that can supply 200mA or more.
products:w5500:datasheet [Document Wiki]
")

[Caution] When connecting with a breadboard, keep the wires as short as possible. If the wire is long, the communication will be unstable.
3. Library installation
When using W5500 , unlike ENC28J60, you can control the module with the standard Ethernet library , so install only PubSubClient that handles the MQTT part.
The library can be searched by name from the library manager of the Arduino IDE and installed.

4. Code
Write the following code to Arduino .
PubSubClient also has API documentation.
Change the MAC address and server address according to your environment. The server address is the address of MQTT Broker, and MQTT Broker is required to check the operation. The easiest and recommended way to build MQTT Broker is to install mosqitto on Raspberry Pi .
5. Run
After confirming that the MQTT Broker is working, check the log on the serial monitor connected to the Arduino . If everything works fine, you should see something like this:

When you install mosquitto, PubSub client is installed in addition to Broker, so let's check the operation by launching terminals for Publish (Pub) and Subscribe (Sub).

Subscribe to topic output. You can confirm that ready is sent when Arduino starts up. If you miss it , reset the Arduino and it will be sent again.

If you send a message (payload) to the input topic, you can check the reception on the Arduino 's serial monitor.
6. Summary
In this blog, I have introduced that TCP and UDP communication is possible even with weak microcomputers by using W5500 and ENC28J60 . Recently, with the advent of ESP8266 and ESP32 equipped with Wi-Fi , it has become possible to easily create IoT devices by themselves. I think there are situations where you want it.
When communicating with a microcomputer , it would be nice to be able to select wired, wireless, and protocols in consideration of cost, application, usage environment, etc.