
Wire Raspberry Pi Pico or Pico 2 to your LAN and Internet
This guide explains how to connect a Raspberry Pi Pico or Pico 2 to the internet using a wired Ethernet connection

Raspberry Pi - Raspberry Pi Pico
x 1
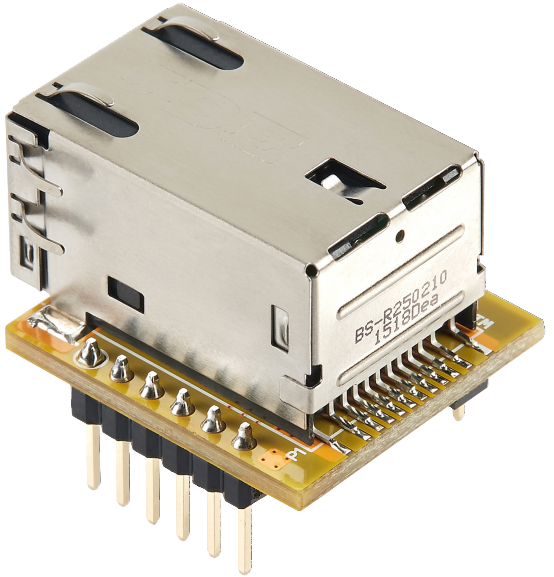
WIZnet - WIZ850io
x 1

Arduino - Arduino IDE
x 1
Connecting Raspberry Pi Pico to the Internet via Ethernet
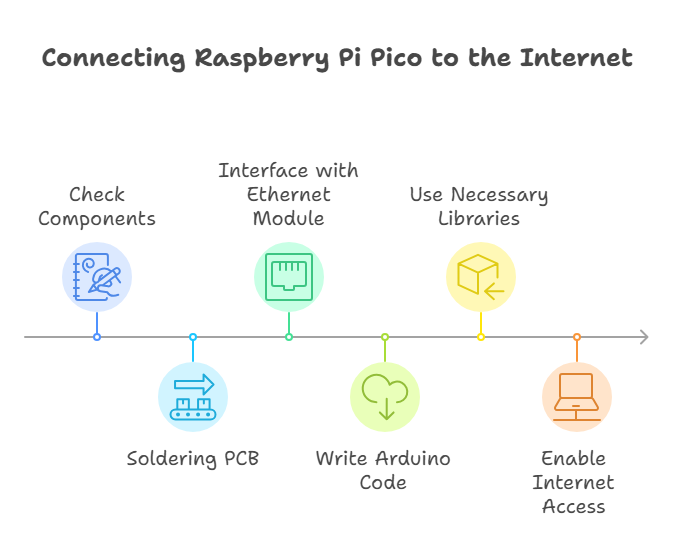
Table of Contents
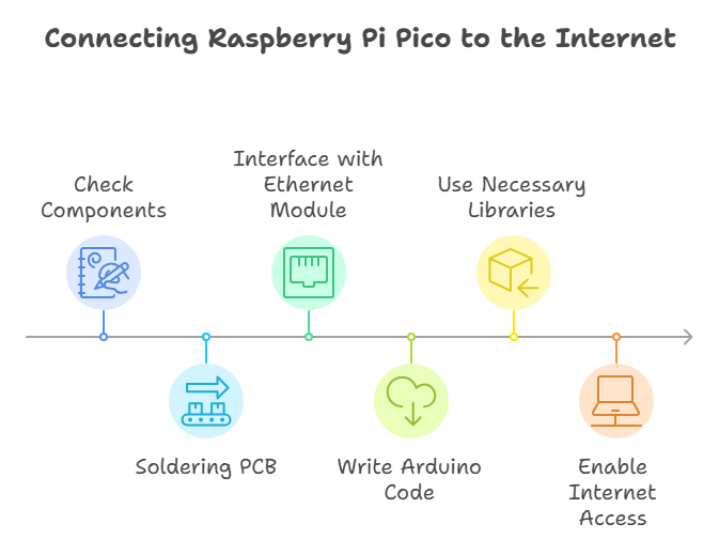
1. Introduction
2. Required Components
3. Setting Up the Hardware
4. Soldering Components for Raspberry Pi Pico
5. Connecting the W5500 Ethernet Module
6. Software Setup and Arduino Code
7. Testing the Connection
8. Conclusion
1. Introduction
This guide explains how to connect a Raspberry Pi Pico or Pico 2 to the internet using a wired Ethernet connection. By following these steps, you will establish network connectivity for the development board using the WIZnet W5500 Ethernet module. This setup is particularly useful for IoT projects requiring stable, low-latency communication over a wired network.
A custom PCB designed using KiCad and manufactured by PCBWay is used to interface the Raspberry Pi Pico with the W5500 module. Additionally, we will cover the necessary Arduino code and libraries required to configure the Pico for network communication.
2. Required Components
To complete this project, you will need:
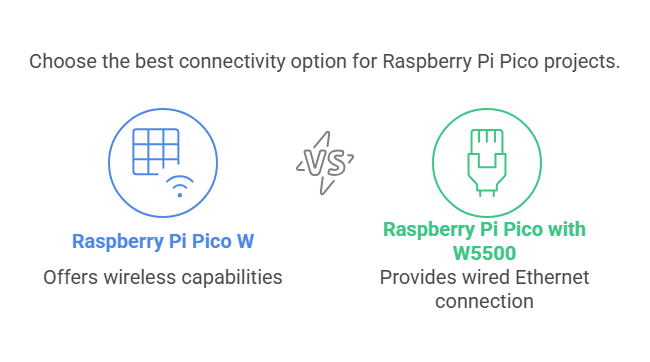
Raspberry Pi Pico (or Pico 2)
WIZnet W5500 Ethernet Module (WIZ850io)
Custom PCB (optional, designed with KiCad)
Male and female header pins
Ethernet cable (RJ45)
Soldering iron and solder
Jumper wires (if not using a PCB)
USB cable for power and data transfer
Computer with Arduino IDE installed
3. Setting Up the Hardware
3.1. Why Use Ethernet with Raspberry Pi Pico?
Unlike the Raspberry Pi Pico W, which includes wireless capabilities, the standard Pico lacks built-in connectivity. Using a W5500 Ethernet module allows for reliable, high-speed (100 Mbps) wired network communication.
3.2. Hardware Connections
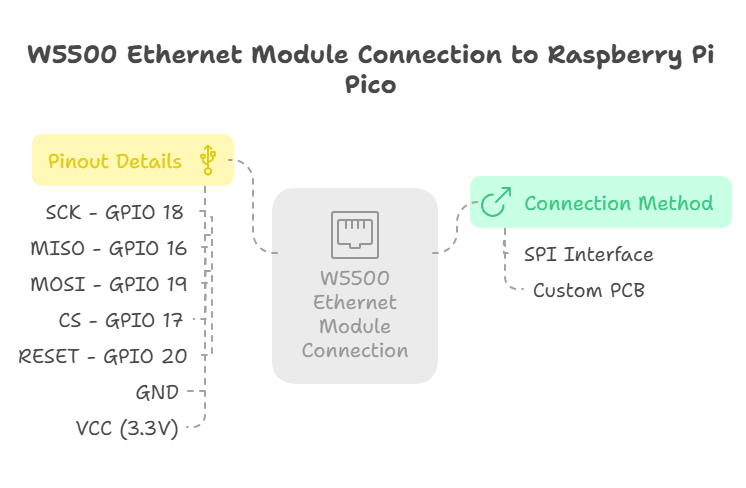
The W5500 Ethernet module connects to the Raspberry Pi Pico via SPI (Serial Peripheral Interface). If using a custom PCB, connections are pre-defined; otherwise, use the following pinout:
| W5500 Pin | Raspberry Pi Pico (GPIO) |
|---|---|
| SCK | GPIO 18 |
| MISO | GPIO 16 |
| MOSI | GPIO 19 |
| CS | GPIO 17 |
| RESET | GPIO 20 |
| GND | GND |
| VCC (3.3V) | 3.3V |
4. Soldering Components for Raspberry Pi Pico
Before assembling the board, you may need to solder the header pins:
Male header pins for the Raspberry Pi Pico
Female header pins for the custom PCB
Ensure proper alignment and a strong electrical connection
This guide follows through-hole soldering, a simple method where component pins pass through the board before soldering.
5. Connecting the W5500 Ethernet Module
5.1. Direct Connection Using Jumper Wires
If not using a custom PCB, you can connect the W5500 directly to the Raspberry Pi Pico using female-to-male jumper wires.
5.2. Using a Custom PCB
A custom screw terminal board improves stability, prevents loose connections, and simplifies prototyping.
6. Software Setup and Arduino Code
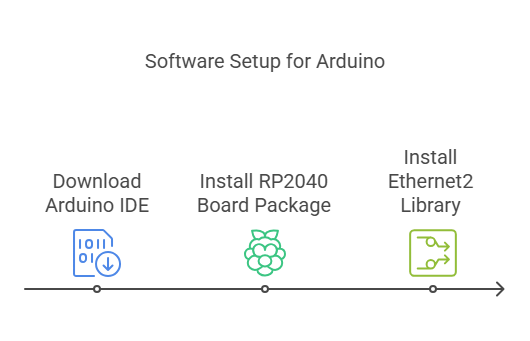
6.1. Installing the Necessary Libraries
Download and install Arduino IDE
Install the RP2040 board package in the Arduino Board Manager
Install the Ethernet2 library from Arduino’s Library Manager
6.2. Uploading the Arduino Sketch
Use the following Arduino sketch to connect the Raspberry Pi Pico to the internet:
#include <SPI.h>
#include <Ethernet2.h>

byte mac[] = {0x00, 0x08, 0xDC, 0xAB, 0xCD, 0xEF};
char server[] = "example.com";
EthernetClient client;

void setup() {
    Serial.begin(9600);
    if (Ethernet.begin(mac) == 0) {
        Serial.println("Failed to configure Ethernet using DHCP");
        while (true);
    }
    Serial.print("My IP address: ");
    Serial.println(Ethernet.localIP());
}

void loop() {
    if (client.connect(server, 80)) {
        client.println("GET / HTTP/1.1");
        client.println("Host: example.com");
        client.println("Connection: close");
        client.println();
    }
    while (client.available()) {
        char c = client.read();
        Serial.print(c);
    }
    client.stop();
    delay(5000);
}
6.3. Understanding the Code
Configures the MAC address and network settings
Uses DHCP to obtain an IP address (can be modified for static IP)
Establishes a connection to example.com and retrieves webpage data
Prints received data to the serial monitor
7. Testing the Connection
Connect the Pico to a network switch/router using an Ethernet cable.
Power the Pico via a USB cable connected to a computer.
Open the Arduino Serial Monitor and verify the assigned IP address.
Monitor network requests and responses printed in the serial output.
8. Conclusion
By following this guide, you have successfully connected a Raspberry Pi Pico to the internet via Ethernet. This setup enables reliable network communication for IoT applications, data logging, remote control systems, and more. You can further experiment by hosting a web server on the Pico or integrating it with other networked devices.
Key Term
**DHCP**
This stands for **Dynamic Host Configuration Protocol**. It's a system that automatically assigns IP addresses to devices on a network. Imagine it as a system that automatically gives each device a unique address so they can communicate on the internet.
**Static IP**
This refers to a **fixed IP address** that is manually assigned to a device. Unlike DHCP, a static IP doesn't change. It's like giving your device a permanent address on the internet, which can be useful for certain applications.
**KiCad**
This is a **free software** used to design electronic circuit boards. It's like a digital drawing board for creating the layout of electronic components and their connections. People use it to create custom PCBs for their projects.
-
Arduino Code
