
Arduino Nano + WIZ550io: A Compact Ethernet Upgrade in 5 Steps (W5500 Hardwired TCP/IP)
Wire a WIZ550io to an Arduino Nano, update the Ethernet library for W5500, then run the WebServer example to verify wired networking.

Arduino - Arduino Nano R3
x 1

WIZnet - WIZ550io
x 1

Arduino - Arduino IDE
x 1
Introduction
Let’s start with the motivation.
The Arduino Nano is compact and convenient—until you plug in a full-size Ethernet shield and lose that neat, tiny form factor.
This project shows a cleaner approach: pair the Nano with WIZnet WIZ550io, a much smaller Ethernet module, wire just a handful of pins, and you’ve got a compact wired-network Nano setup.
WIZnet Product Integration
Here’s what’s happening in the simplest form:
Arduino Nano → SPI → WIZ550io (W5500) → Ethernet LAN
WIZ550io brings a hardwired TCP/IP Ethernet controller into your Nano project without the bulk of a full shield.
Technical Implementation
We’ll do this in three practical chunks: wiring, library setup, and a quick webserver test.
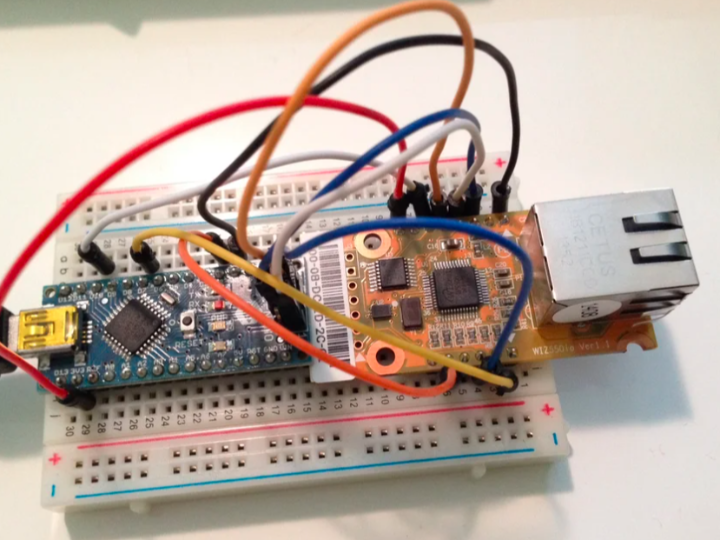
1) Hardware wiring (the 9-pin hookup)
Place the Nano and WIZ550io on a breadboard (the author mounts them back-to-back so the USB cable and Ethernet cable both fit nicely), then connect the pins exactly as listed in Figure 2.
One safety note is non-negotiable: do not connect Nano SPI.2 (5V) to the WIZ550io power pins. WIZ550io is a 3.3V device.
2) Update the Ethernet library for W5500/WIZ550io
The author uses WIZnet’s Ethernet library because WIZ550io requires newer W5500 support.
Download WIZ_Ethernet_Library from GitHub.
Copy the Ethernet folder into your Arduino Libraries directory (this overrides the built-in Ethernet library).
Open Libraries/Ethernet/utility/w5100.h and make sure only the correct board define is enabled.
For WIZ550io, the key line is:
Optional (nice quality-of-life): enable the WIZ550io’s assigned MAC address:
3) Smoke test with the built-in WebServer example
Now let’s prove it works.
In Arduino IDE: File → Examples → Ethernet → WebServer
If needed for certain Apple/AirPort networks, change the IP (author example):
Upload, connect Ethernet to your LAN, then open a browser to your IP.
You should see a simple page listing analog input values. Even with nothing connected, it’s perfect as a “does Ethernet work?” test.
Reproduction Guide
Follow these steps exactly, and you’ll be online quickly.
Wire the 9 connections (Figure 2)
Install/override the Ethernet library with WIZnet’s WIZ_Ethernet_Library
Set the correct W5500/WIZ550io define in w5100.h
Upload the WebServer example
Open a browser to your device IP and confirm the page loads
Core Features and Performance
Here’s what this setup gives you:
Compact wired Ethernet on a Nano without a full-size shield
Hardwired TCP/IP offload (W5500 class) for stable socket handling
A fast validation workflow: wiring → library define → WebServer test
Code Snippet
Here’s the one line people most often forget—selecting the correct chip family in w5100.h.
If this is wrong, everything else can look correct and still fail.
Applications and Extensions
Once the WebServer example works, you can build from there:
Add sensors and serve readings over HTTP
Make a tiny REST endpoint for home automation
Push data to an MQTT broker (planned)
Add SD logging on a different platform (planned)
Conclusion
To wrap up: this is a simple, practical recipe for giving an Arduino Nano a reliable Ethernet connection—without the bulk.
WIZ550io keeps the wiring manageable, the footprint small, and the software path familiar through Arduino’s Ethernet examples.