
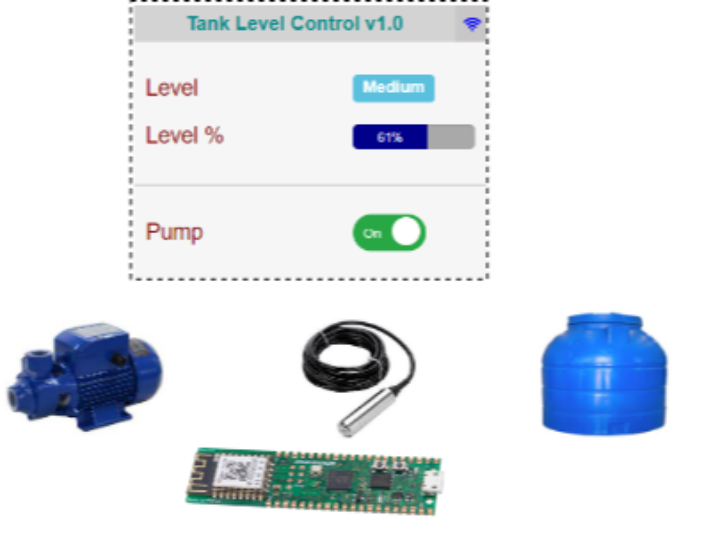
Tank Level Control using WizFi360-EVB-Pico and AWS Services
It is a system to control the water level in a tank and activate a filling pump, with web page, using some Aws services.

WIZnet - WizFi360-EVB-Pico
x 2
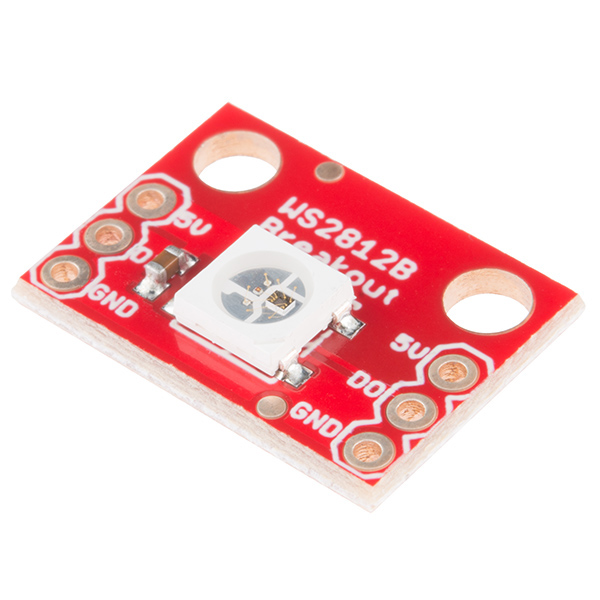
sparkfun - SparkFun RGB LED Breakout - WS2812B
x 2

Raspberry Pi - Raspberry Pi Pico
x 1
With PicProbe firmware
microsoft - Visual Studio 2017
x 1

AmazonWebServices - AWS IoT
x 1
AmazonWebServices - AWS SDK
x 1
WIZnet - WIZnet WizFi360-EVB-Pico-AWS-C
x 1
WIZnet - WIZnet WizFi360-EVB-Pico-C
x 1

AmazonWebServices - AWS S3
x 1

AmazonWebServices - AWS Cognito
x 1
AmazonWebServices - AWS IAM
x 1
Additional components used in this project
Pump module
Resistor 10 Kohms
Capacitor 10 uF 35v
AMS 1117 3.3v DC module
Relay 3.3v optocoupler module
JST 3 pins connector and cable
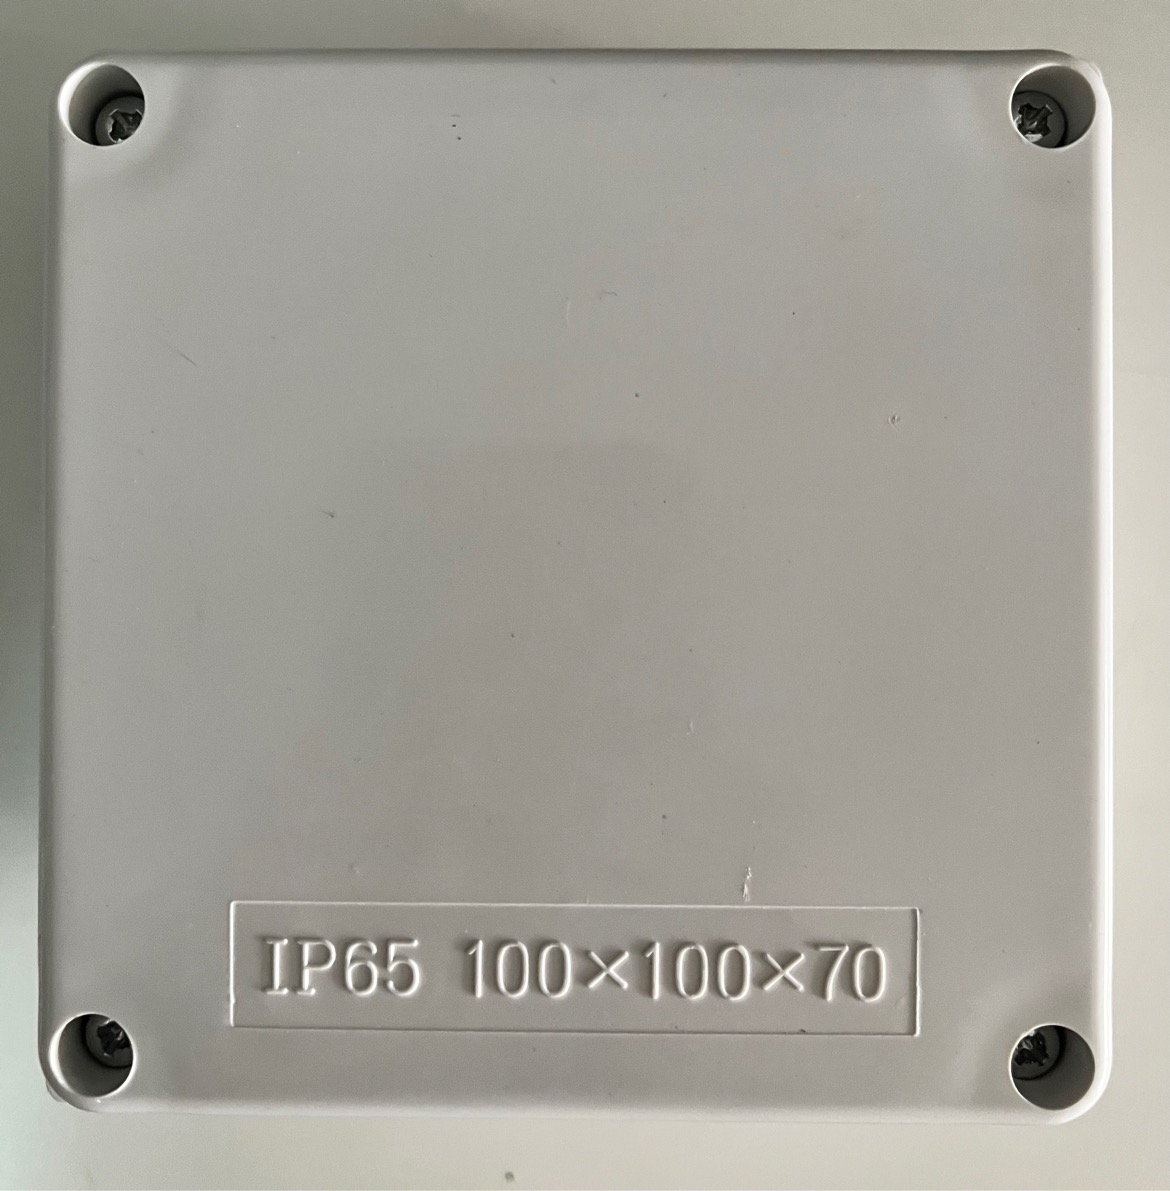
Plastic IP65 Box 100x100x70
5v power supply
Level Module
Resistor 10 Kohms
Capacitor 10 uF 35v
(2) LM2596 DC-DC Adjustable buck converter
MT3608 Adjustable step up module
HW-685 Current to voltage converter module
ADS1115 16 bits 4 channel analog to digital converter
TL-231 or GLT500 level sensor
Plastic IP65 Box 150x110x70
12 volts power supply
Overview
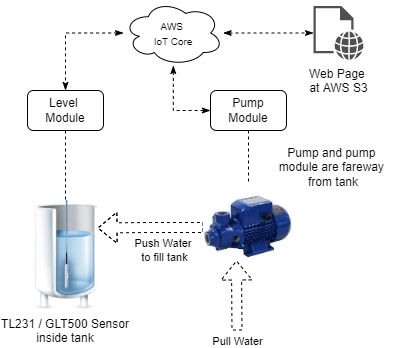
It is a system that allows you to control the water level in a tank.
In places where the filling pump and the main tank are separated, we need devices like these, which allow us to control the water level inside the tank, without having to raise and open the tank.
Inside the tank there is a pressure sensor which captures the data and sends it to a level module and this sends the information to AWS through the secure MQTT protocol.
In AWS, the IoT Core service is used, which allows other devices to be connected.
Additionally, we have the pump module, which, being connected to AWS, is responsible for activating or deactivating the pump, when it receives the respective commands, allowing the filling pump to be remotely activated.
We control both modules through a web page that can be loaded on a mobile device or on the PC.
This page is hosted on AWS using the S3 service.
 |  |
You can see the details in a block diagram.
Install and configure all software and hardware needed
To configure AWS services, web page and firmware for the WizFi360-EVB-Pico, you must do this steps and have some attention points.
AWS
Create AWS IoT Core Thing
AWS IoT Connect / Connect one device
Create a new thing
Thing name : TLC_Control
Platform and SDK : Windows and Node.js
Download connection kit : connect_device_package.zip
Unzip all certificates
At terminal window powershell:
change to dir : connect_device_package
execute : Set-ExecutionPolicy -ExecutionPolicy Bypass -Scope Process
execute : .\start.ps1
All needed certificates were downloaded includes CA root certificate
root-CA.crt
TLC_Control.cert.key
TLC_Control.private.key
Get AWS_IOT_ENDPOINT : get here your aws_iot_endpoint
Things / TLC_Control / Interact / View Settings / Device data endpoint
Get AWS_REGION : your region example us-west-2
Create Cognito Federated Identity
Create new identity pool: TLC_Control_Cognito
Enable access to unauthenticated identities
Identify the IAM roles to use with your new identity pool : Allow
Download sample code plataform Javascript
		// Initialize the Amazon Cognito credentials provider
		AWS.config.region = 'us-west-2'; // Region
		AWS.config.credentials = new AWS.CognitoIdentityCredentials({
    		IdentityPoolId: 'get here your identity_pool_id',
		});
Go IAM Manager
Select Roles
Search Cognito_TLC_Control_CognitoUnauth_Role
Open It, go to permissions policies
Edit policy add “iot:*” to Action, your policy will be like
		{
    		"Version": "2012-10-17",
    		"Statement": [
        		{
            		"Effect": "Allow",
            		"Action": [
                		"mobileanalytics:PutEvents",
                		"cognito-sync:*",
                		"iot:*"
            		],
            		"Resource": [ 	"*"
            		]
        		}
    		]
		}
Web Host using AWS S3
Creates S3 bucket tlcweb
Oregon
ACLs disabled
Block all public access (none)
Bucket Versioning Disable
Default encryption Disable
Select tlcweb bucket / properties / Static website hosting
Enable
Host a static website
Index document : index.html
Download from GitHub (section Documents / GitHub Source Files) web directory
Adjust parameters at dist/index.js
search : ./settings.js
		const AWS_REGION = "us-west-2";
		const AWS_IOT_ENDPOINT = "replace by your aws_iot_endpoint";
		const AWS_COGNITO_IDENTITY_POOL_ID = "replace by your identity_pool_id";
Upload web files to bucket
index.html
dist/index.js
images/*
scripts/*
Get URL from bucket and test web page
Select S3 bucket tlcweb
Properties
Scroll down Static website hosting
Get bucket website endpoint and load the web page in a browser
C Firmware for WizFi360-EVB-Pico used by level and pump modules
Download from GitHub (section Documents / GitHub Source Files) c_firmware directory
Device certificate and key can be set in libraries/TLC_Libs/mqtt_certificate.h
You must enter the root certificate, client certificate and private key
Root certificate uses the RSA 2048 bit key, Amazon Root CA 1, and does not use the public key.
uint8_t mqtt_root_ca[] → root-CA.crt
uint8_t mqtt_client_cert[] → TLC_Control.cert.pem
uint8_t mqtt_private_key[] → TLC_Control.private.key
		```cpp
		uint8_t mqtt_root_ca[] =
		"-----BEGIN CERTIFICATE-----\r\n"
		"...\r\n"
		"-----END CERTIFICATE-----\r\n";

		uint8_t mqtt_client_cert[] =
		"-----BEGIN CERTIFICATE-----\r\n"
		"...\r\n"
		"-----END CERTIFICATE-----\r\n";

		uint8_t mqtt_private_key[] =
		"-----BEGIN RSA PRIVATE KEY-----\r\n"
		"...\r\n"
		"-----END RSA PRIVATE KEY-----\r\n";
		```
TLC_Pump/mqtt_thing.c and TLC_Level/mqtt_thing.c must include your aws iot endpoint domain
		/* AWS IoT */
		#define MQTT_DOMAIN "replace by your aws_iot_endpoint"
libraries/TLC_Libs/socket_startup.c must include your Wifi SSID and Credentials
		#define SSID            "replace by your Wifi SSID"
		#define PASSWORD        "replace by your Wifi password"
Web Page Notes
To create the web page, the sdk AWS IoT Device SDK for Javascript v2 was used. It help you connect your IoT devices to AWS IoT using the MQTT
It is important to download the environment from GitHub.
Locate in the directory where aws-iot-device-sdk-js-v2 is and execute the command "npm install".
Locate in the directory aws-iot-device-sdk-js-v2\samples\browser\pub_sub and there execute “npm install' every time something is changed in the index.ts file.
This will generate your new dist/index.js file and you will need to upload it to AWS S3 service.
Software details
RGB Led Color Codes
Both modules contain a high brightness rgb led Ws2812B which allows us to determine the operating status of the module through colors, if it is connected to Wi-Fi, to AWS, if it is sending or receiving commands or if it has an error.
| RGB Color | Action or Error |
|---|---|
| Red | No wifi - Initial condition trying to connect wifi |
| Green | WiFi connected |
| Blue | AWS IoT connected |
| Cyan - Blue | Module data publish to AWS IoT MQTT |
| Orange | MQTT Error |
| No color | MQTT Connection or Wifi Error |
| Red - Blue | Turn pump On |
| Green - Blue | Turn pump Off |
| Magenta - Blue | Get pump or level status |
Subscribe or Publish topics by module
The web page and each module, communicate with AWS IoT Core using the secure MQTT protocol by subscribing to certain topics and posting messages to them.
Each one of the actions that are handled in each module, the topics, subscribed or publishing and the messages that are sent or received are documented in the following tables.
Web Page
| Action | Topic | Message | Sub / Pub |
|---|---|---|---|
| Load | tlc/pump/value | Status value (On or Off) | subscribe |
| tlc/pump/status | Get | publish | |
| tlc/level/value | Level value | subscribe | |
| tlc/level/status | Get | publish | |
| Button Pump On | tlc/pump/status | On | publish |
| Button Pump Off | tlc/pump/status | Off | publish |
Pump Module
| Action | Topic | Message | Sub / Pub |
|---|---|---|---|
| Pump On | tlc/pump/status | On | subscribe |
| Pump Off | tlc/pump/status | Off | subscribe |
| Get status | tlc/pump/status | Get | subscribe |
| tlc/pump/value | Status value (On or Off) | publish |
Level Module
| Action | Topic | Message | Sub / Pub |
|---|---|---|---|
| Get Level | tlc/level/status | Get | subscribe |
| tlc/level/value | Level value | publish |
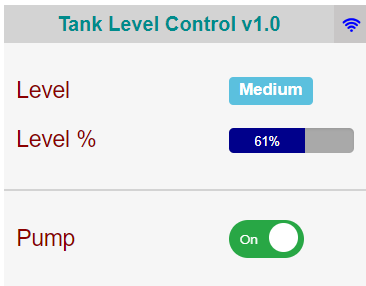
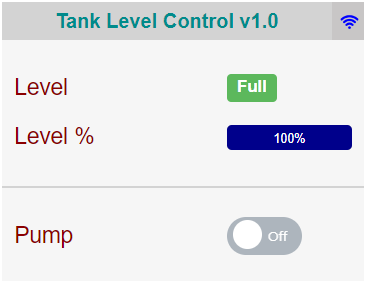
Web Page
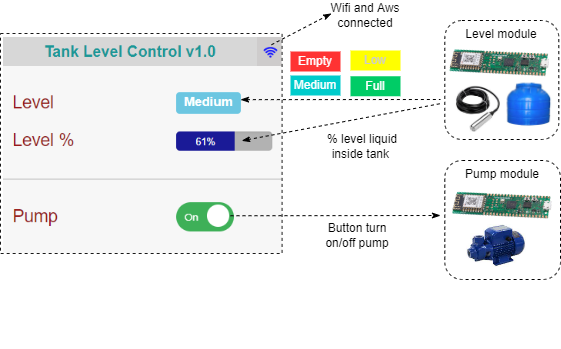
The web page controls the switching on and off of the pump through the Pump button, sending the respective message to the pump control module.
Every 10 seconds the page sends a message for the liquid level reading in the tank and updates the tank fill level % bar. Depending on the level value, it also updates the general empty, low, medium, full level indicator.
When the page is loading and to determine that it is connected to the WAS IoT Core service, we use the signal indicator that changes from gray to blue.
Hardware details
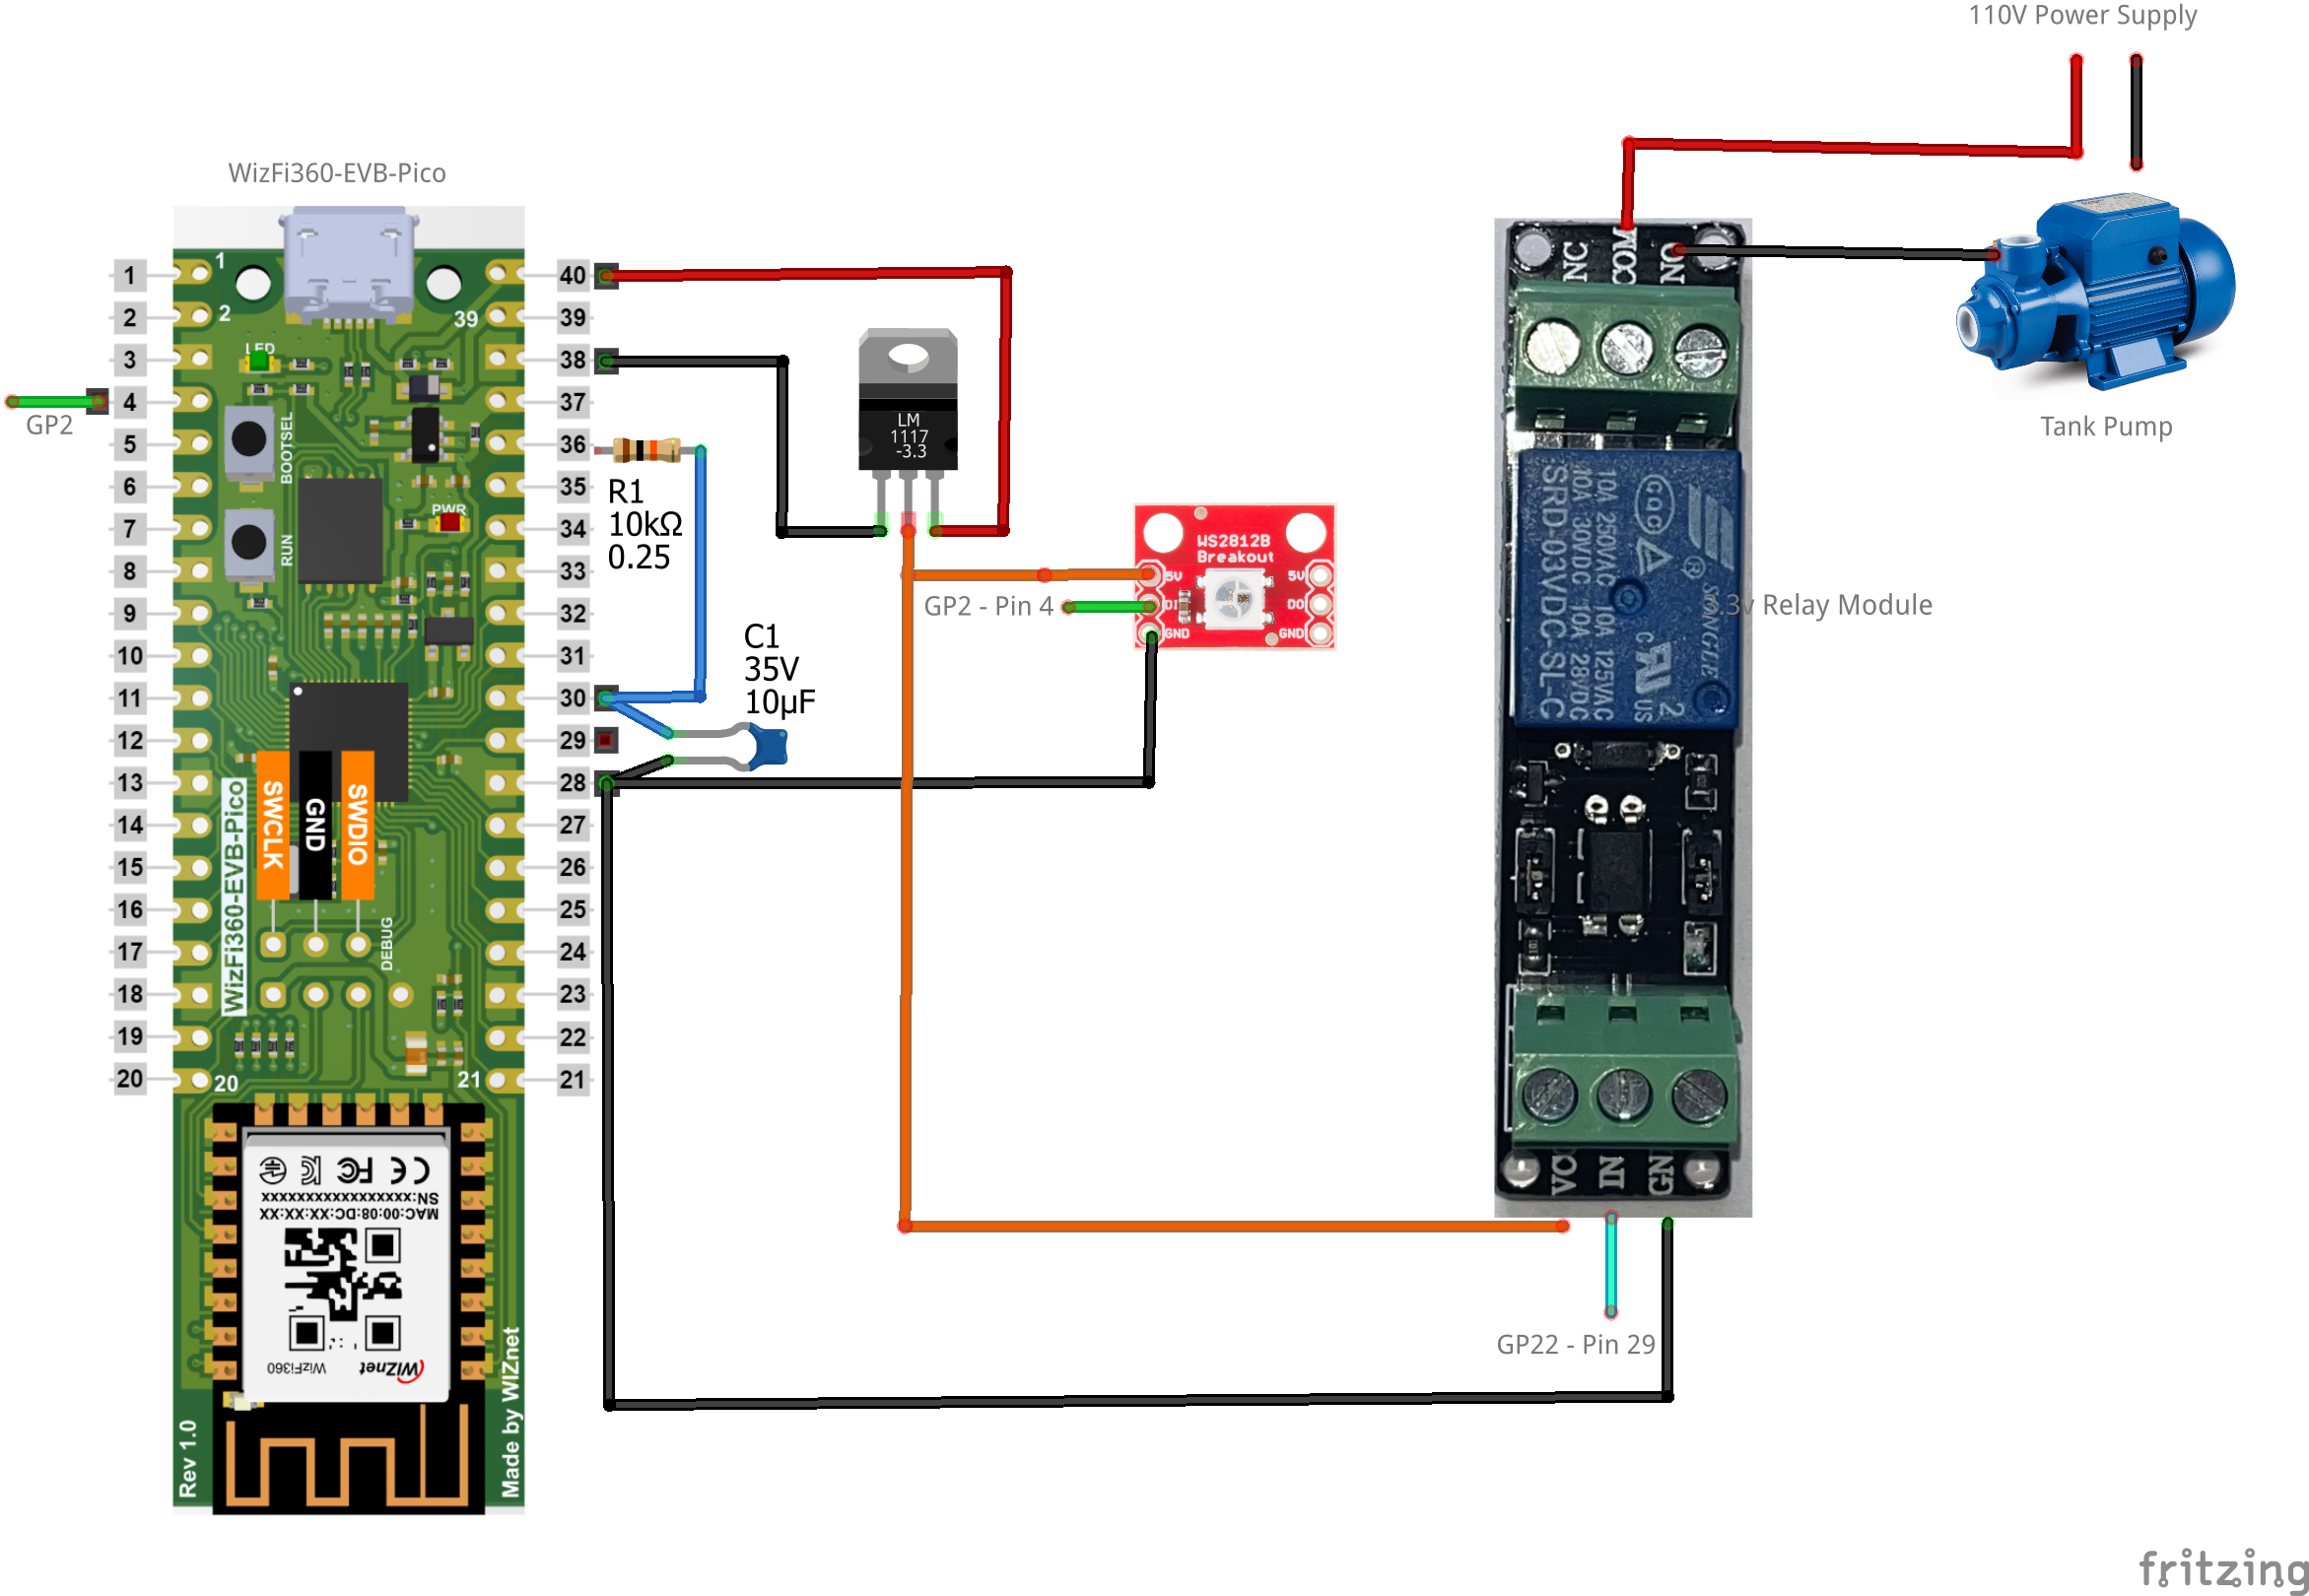
Pump Module
The pump module is in charge of activating or deactivating the pump that is powered by AC 110v and that allows the filling of the tank.
It connects to the Wi-Fi network and from there to the AWS IoT Core services to listen for MQTT messages telling it what action to take.
To activate the pump, a 3.3v relay is used that has its own power supply coming from the 3.3v module.
The WS2812B led allows us to determine what task is being executed or what error is being presented by the module during its operation.
Its power comes from a 5v 3A power adapter with a micro usb port connected to the micro usb input of the WizFi360-EVB-Pico module.
The schematic can be downloaded in the documents section.
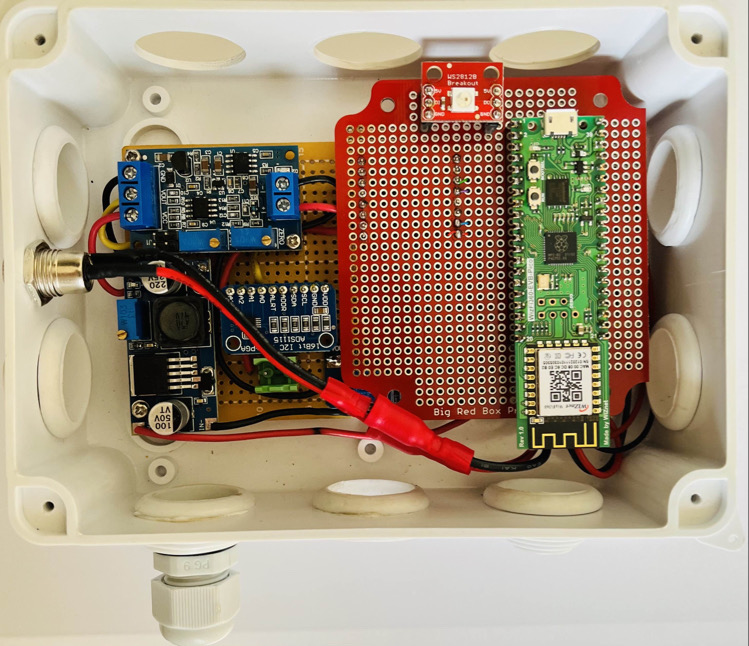
This module is mounted on a prototyping board using stripe cable, and put inside IP65 waterproof box, each of its components can be seen in the following images.
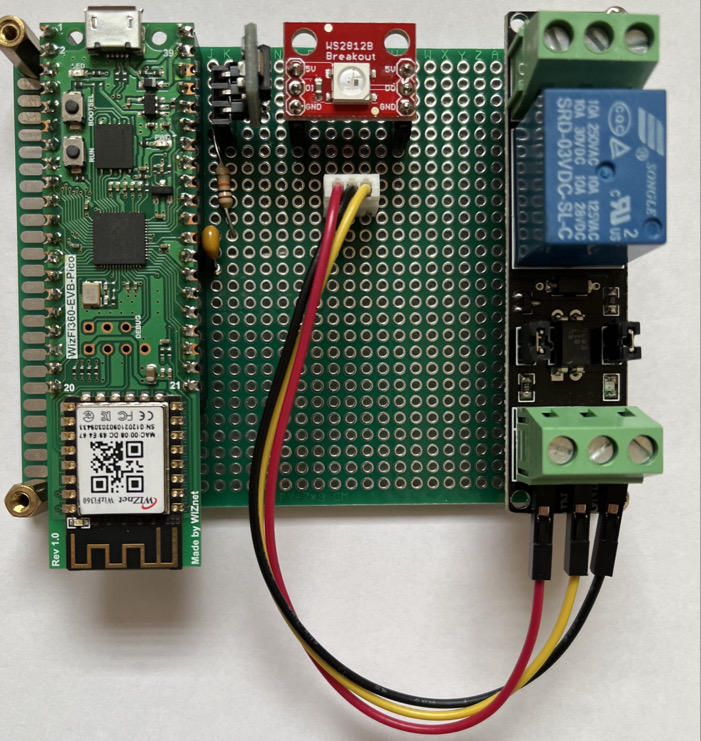 | 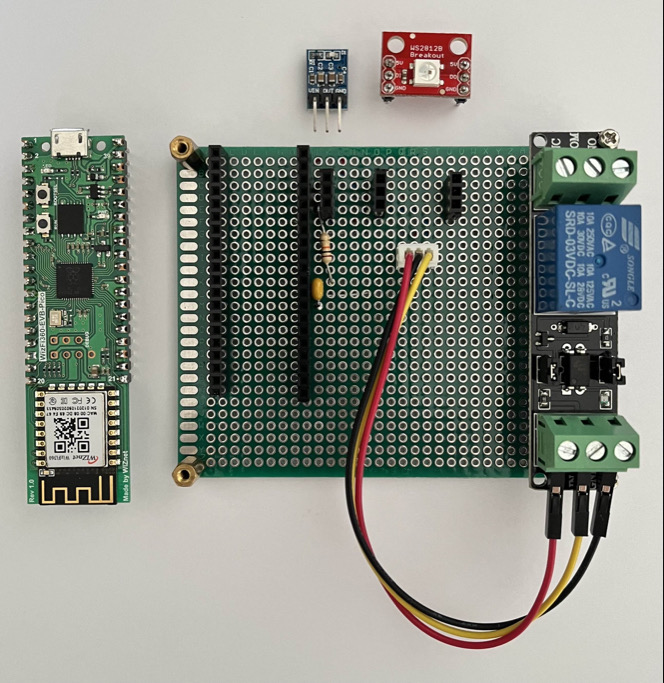 |
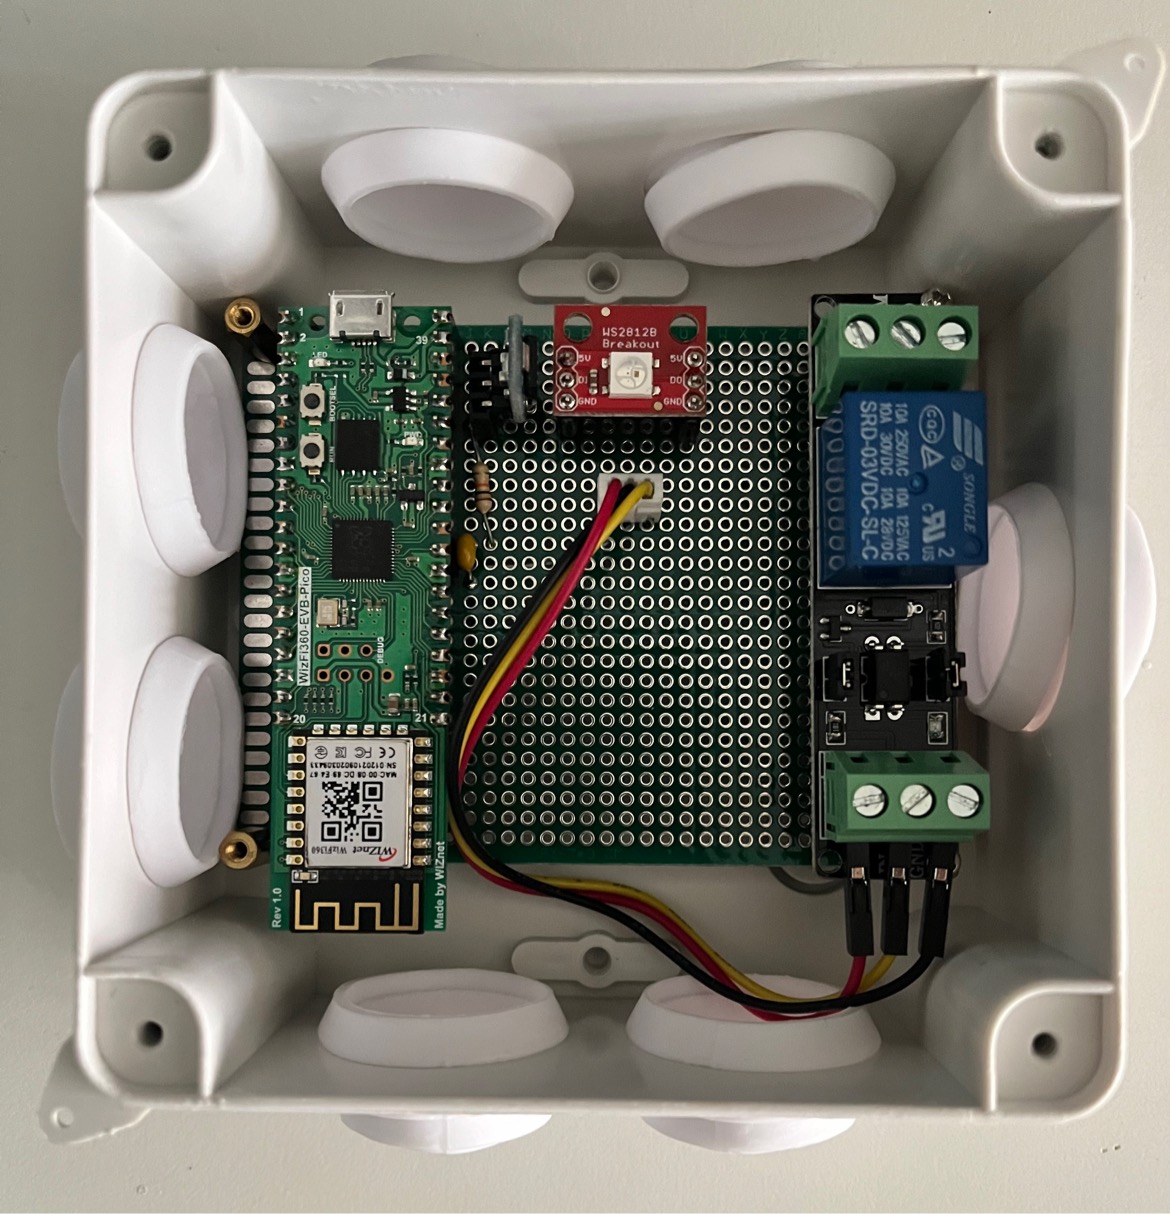 |  |
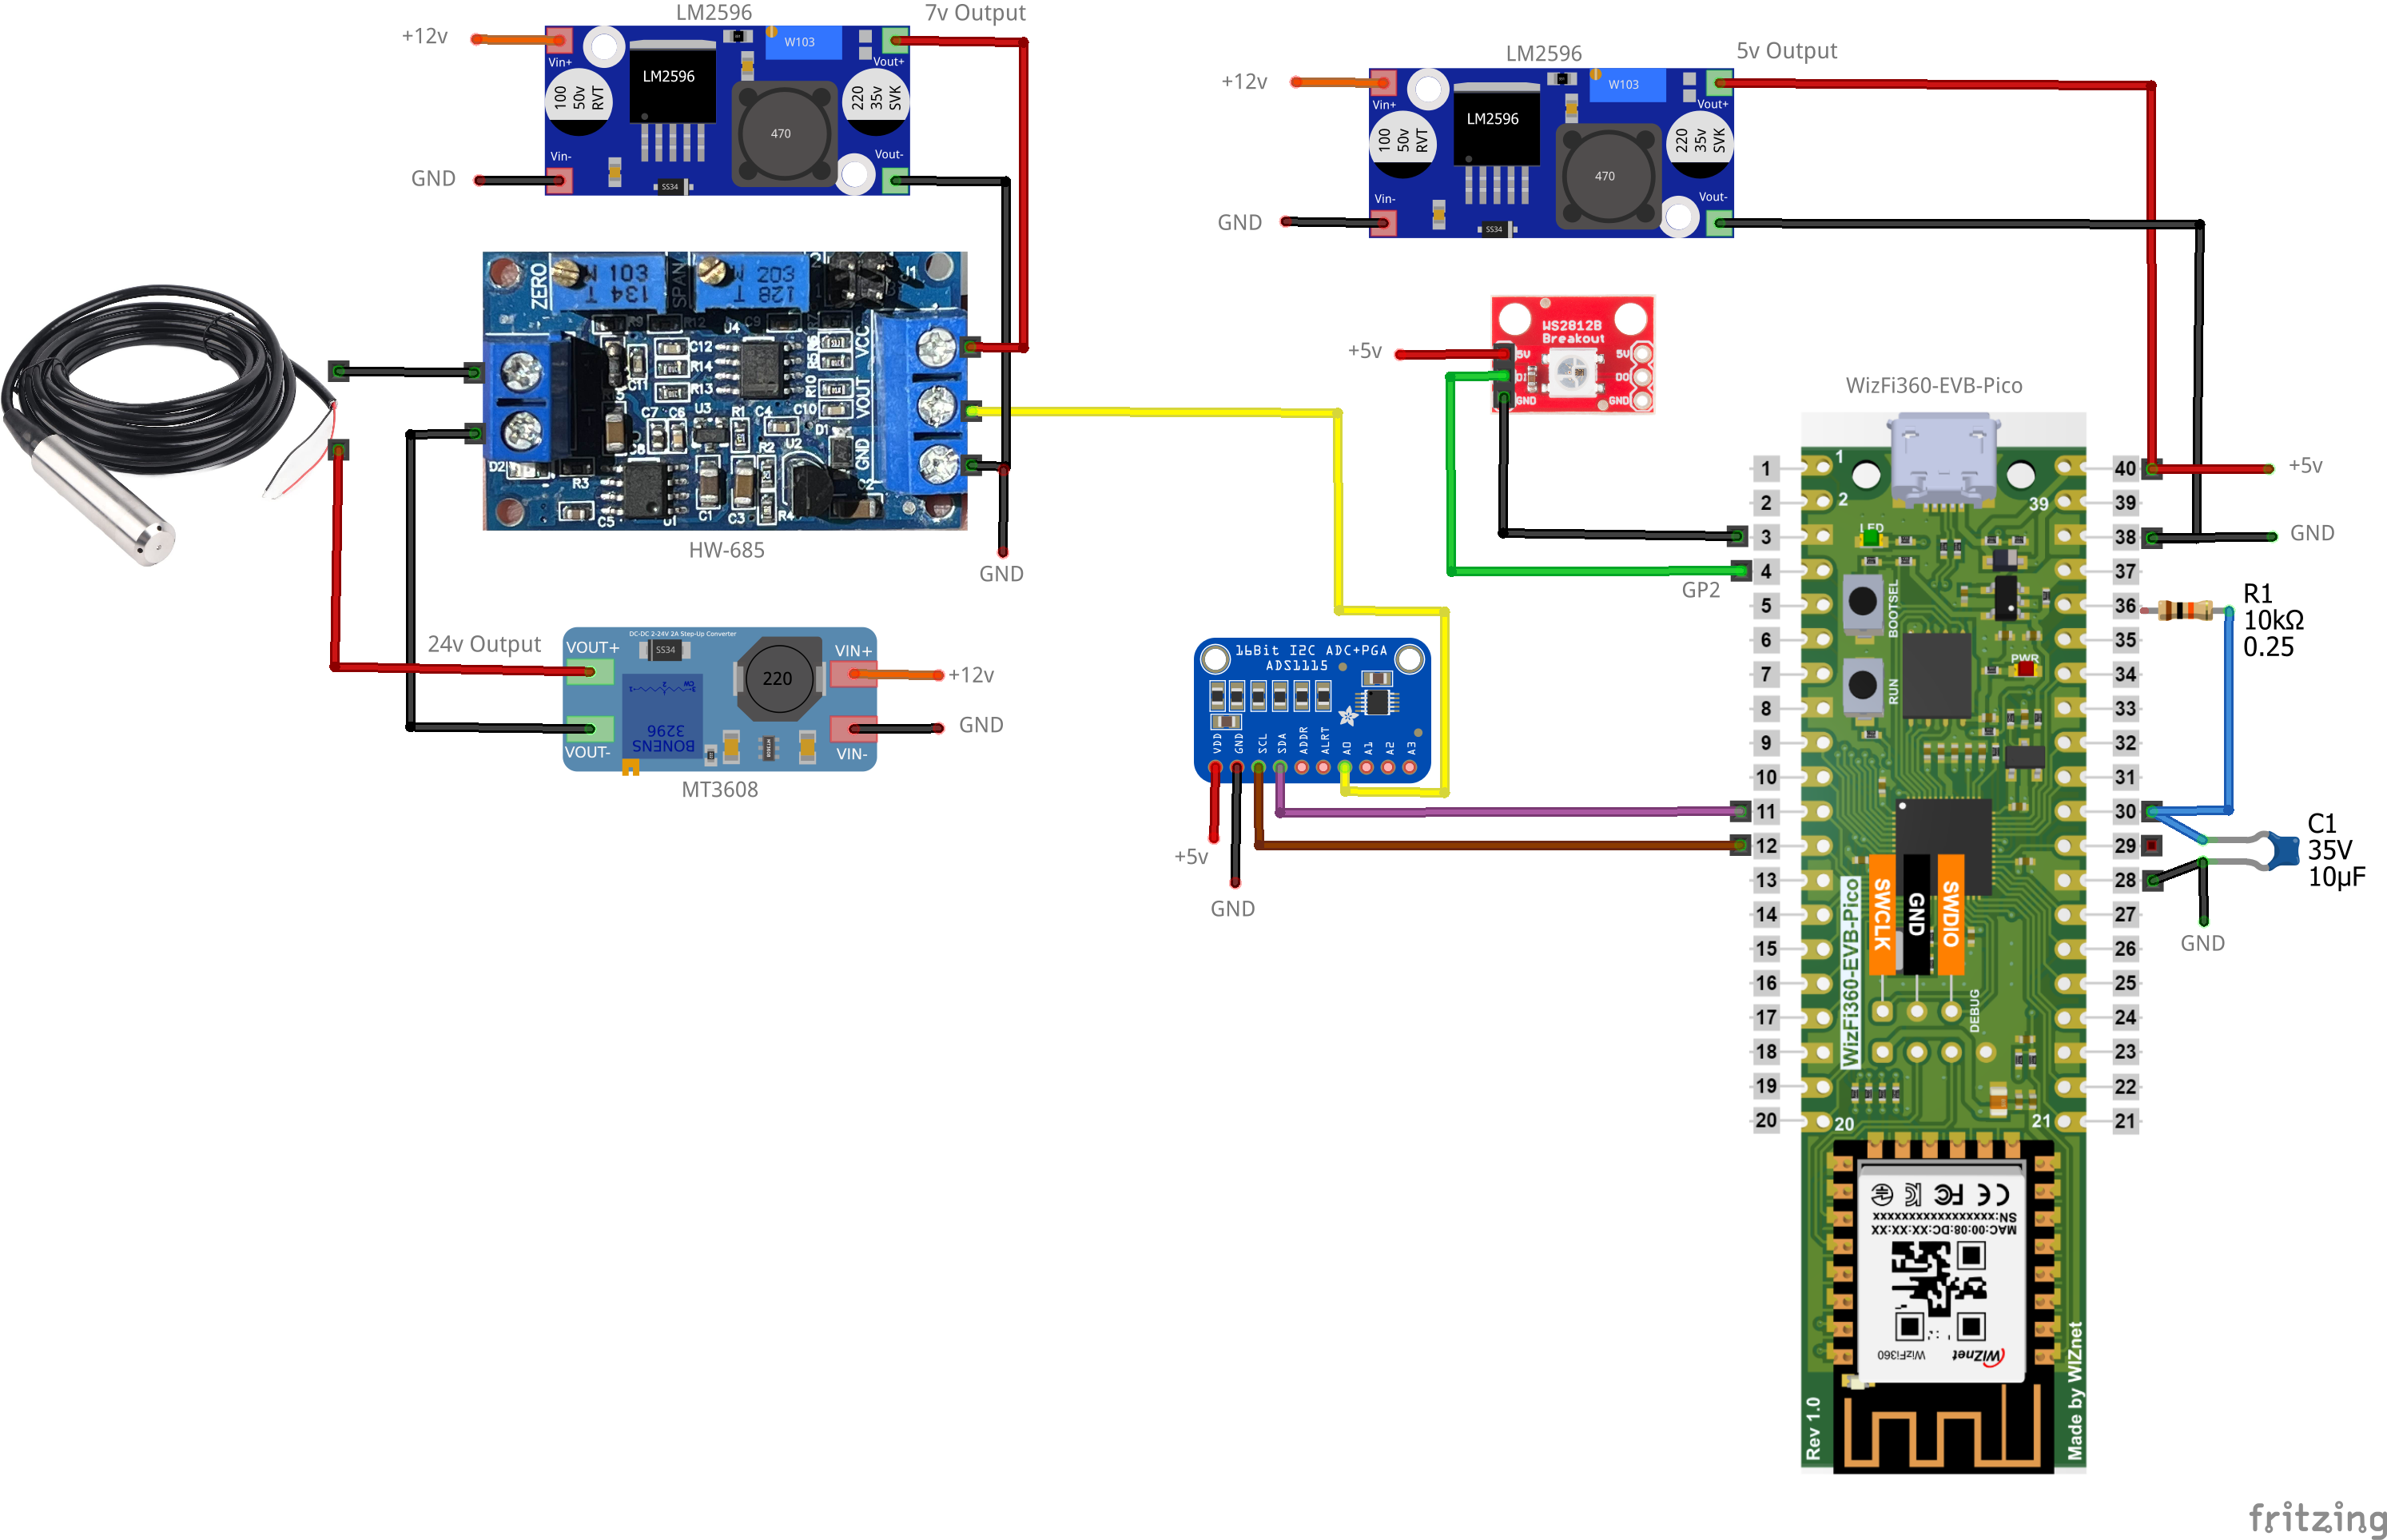
Level Module
As can be seen in the schematic, this module is made up of a HW-685 current-to-voltage converter that is configured for a 7v scale, so it uses an LM2596 adjustable DC-DC power module.
The TL-231 level sensor must be supplied with a 24v voltage, so the MT-3608 module is used to convert the 12v of the main supply into 24v.
The level sensor is connected to the input of the HW-685 module and thus allows obtaining an adequate voltage according to the liquid level in the tank by adjusting the Span potentiometer and the empty level by adjusting the Zero potentiometer.
The output converted into voltage of the HW-685 module is delivered to an Analog to digital converter ADS1115 in order to obtain the binary value through the I2C protocol and deliver it to the WizFi360-EVB-Pico module to process this information and send it to the AWS IoT service Core that will allow the web page connected to this same service to process the value within the necessary range and determine the empty, low, medium or full levels of the tank.
It is important to set the value of full in the constant tank_sensor_full_value in our web module file
dist/index.js
const tank_sensor_full_value = 0.655; //Your set valueThe schematic can be downloaded in the documents section.
All components inside a waterproof box are shown in the following images, with the sensor connected to the module using a 2-pin connector.
Power is provided by an 12v/5A external adapter with plug connector.
 | 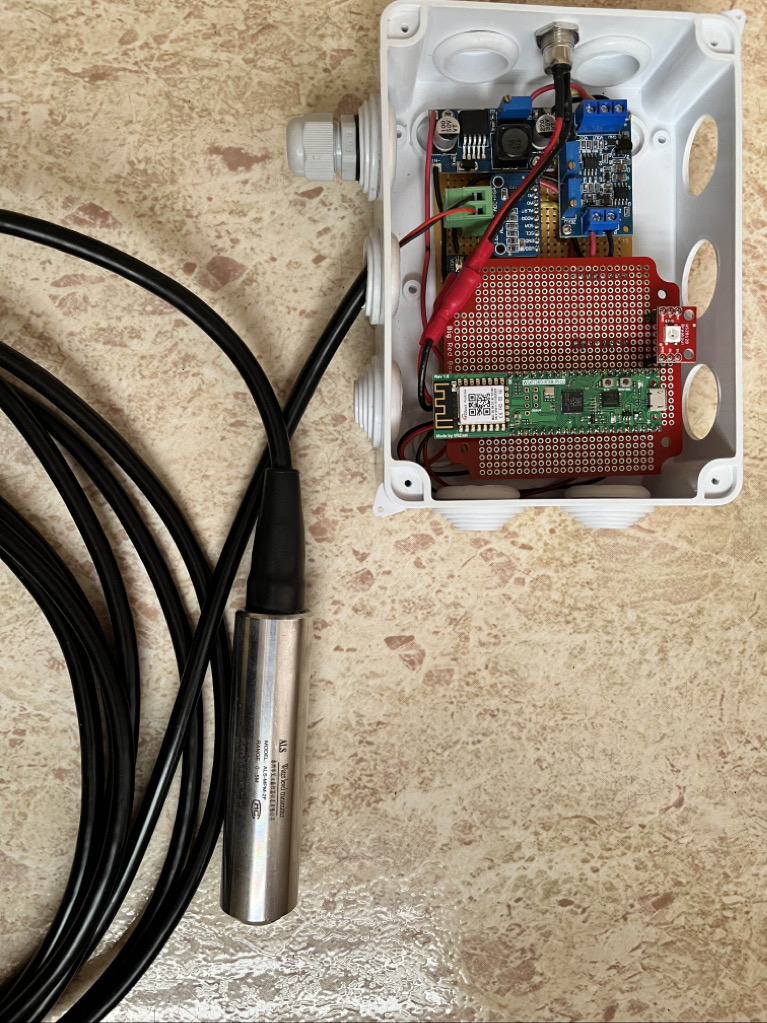 |
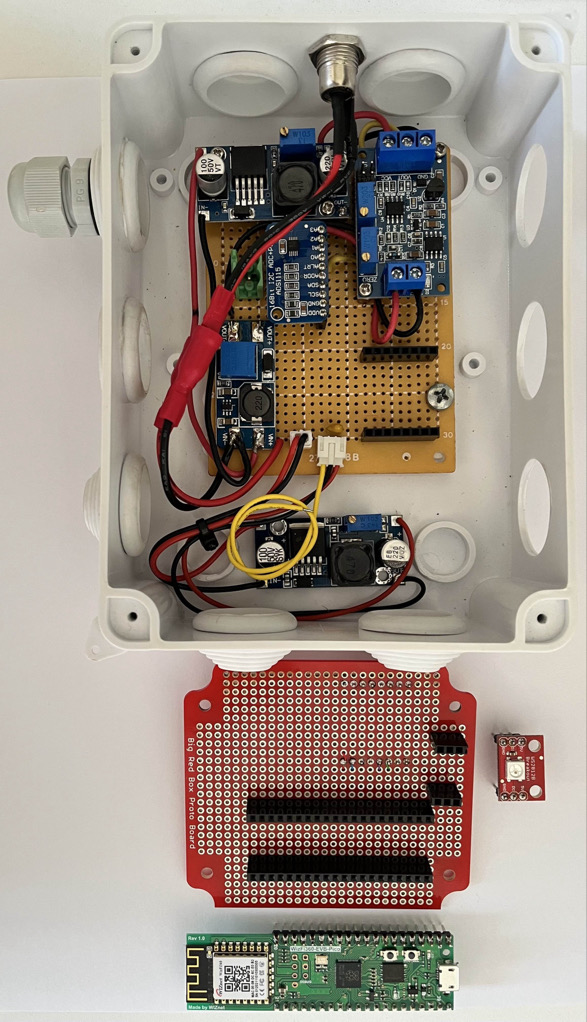 | 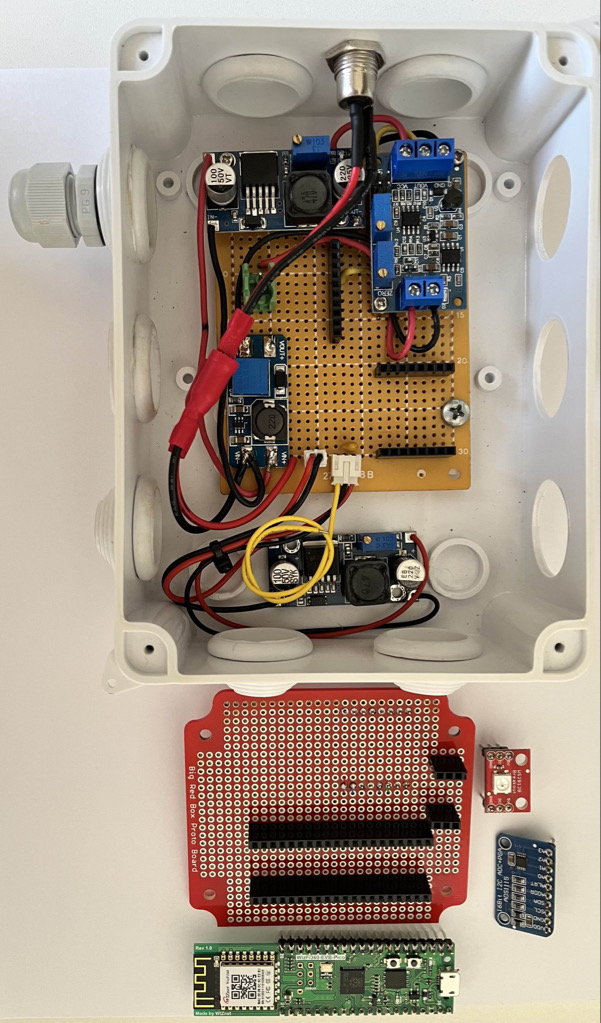 |
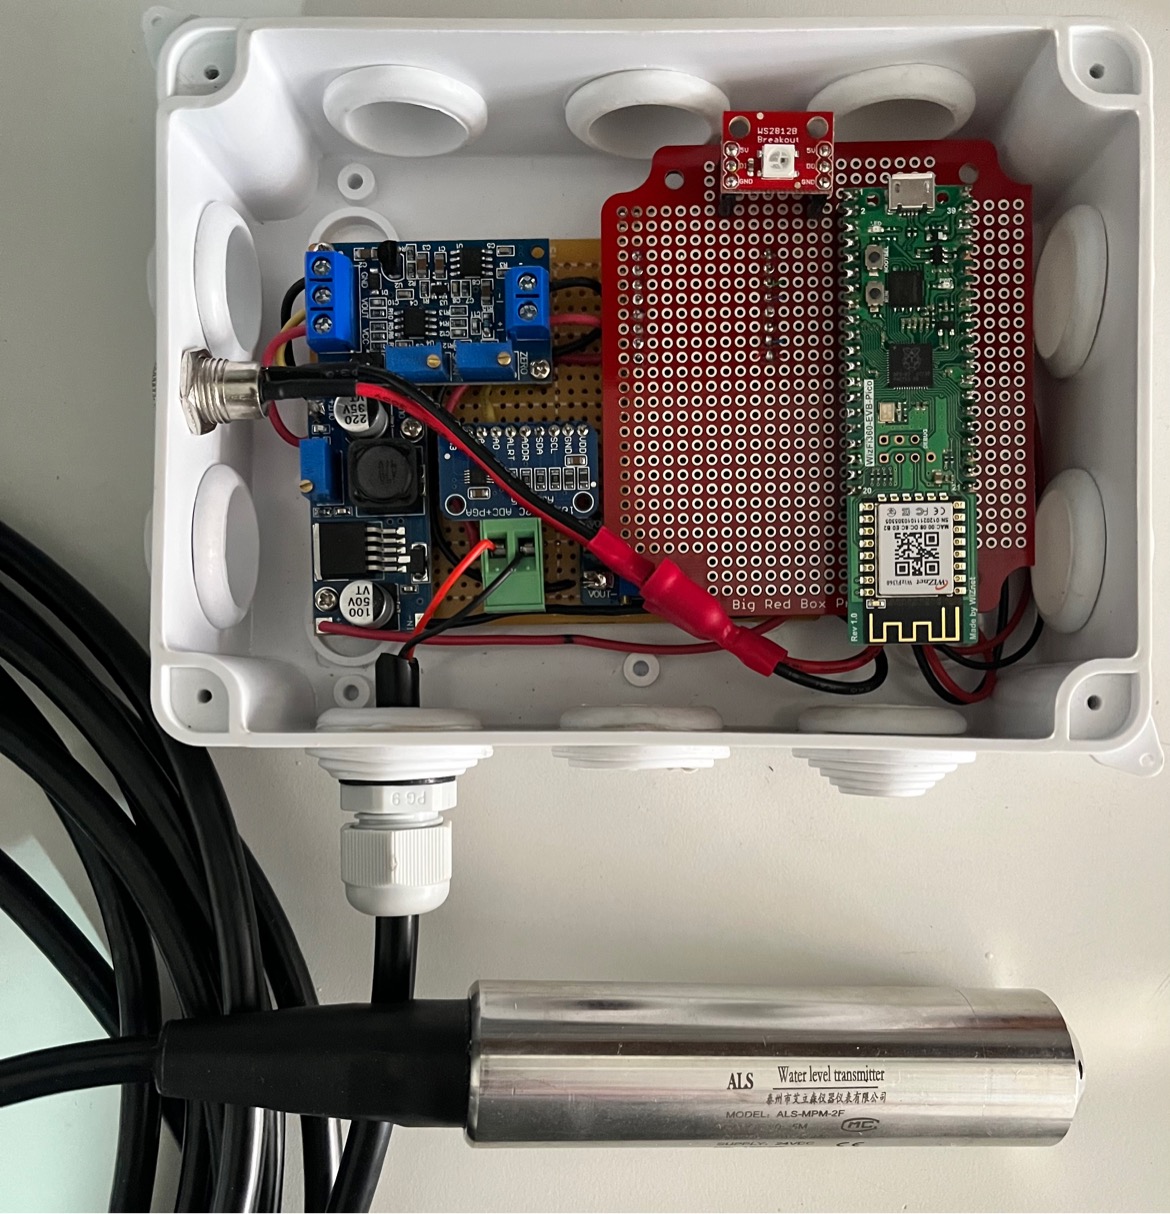 | 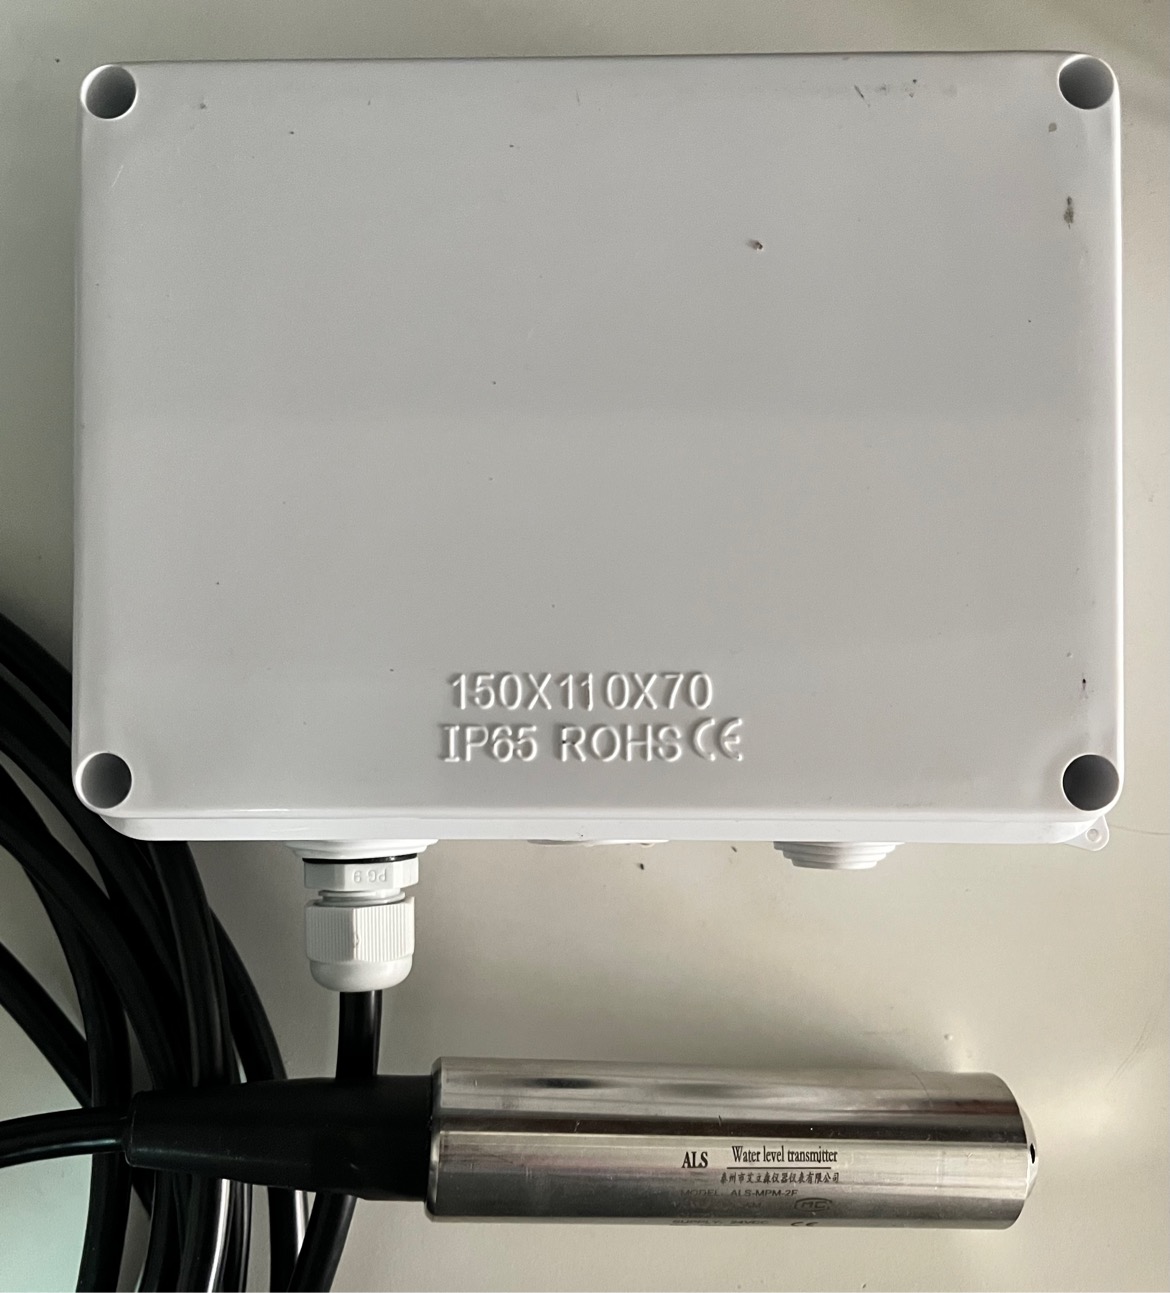 |
PicoProbe Config
To program and debug the WizFi360-EVB-Pico modules, a second Raspberry Pico was used, connected to the Debug port and the Uart port, according to the instructions obtained in the Getting Started with Raspberry Pi Pico guide, Appendix A.
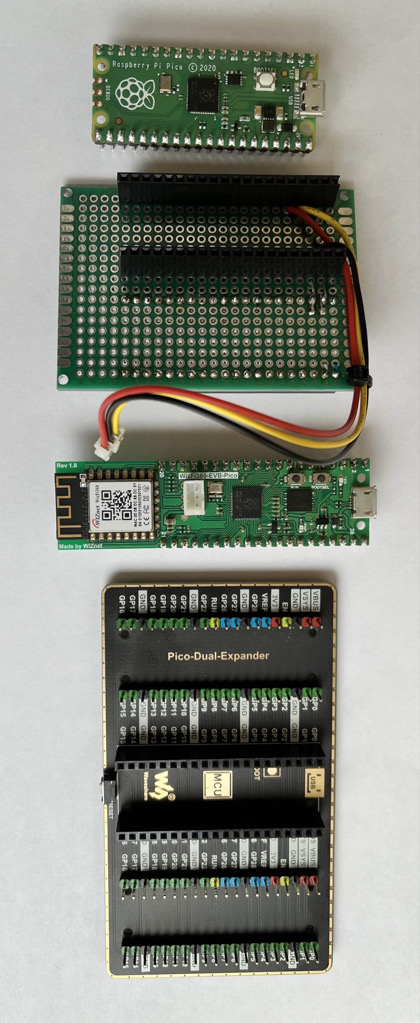
Materials
Raspberry Pico with heads and picoprobe firmware
Solder board
(4) Male 20 pines headers
3 wires for debug connector
Pico dual expander
Connections
Pico  GND -> WizFi360 GND
Pico  GP2 -> WizFi360 SWCLK
Pico  GP3 -> WizFi360 SWDIO
Pico  GP4/UART1 TX -> WizFi360 GP1/UART0 RX
Pico  GP5/UART1 RX -> WizFi360 GP0/UART0 TX
Pico  VSYS -> WizFi360 VSYS
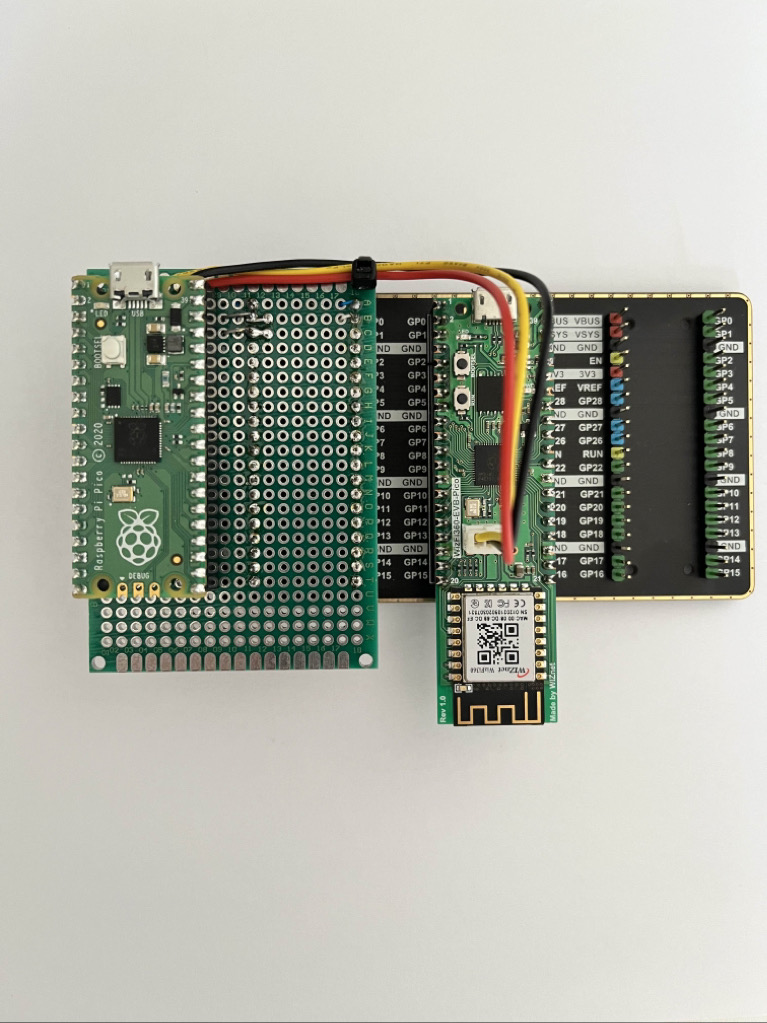 |  |
-
Pump Module Schematic

-
Level Module Schematic
-
Git Hub Source Files
Web Page and WizFi360-EVB-Pico C firmware

-
Pico User Guide
-
WizFi360-EVB-Pico Guide
-
AWS IoT Device SDK for Javascript