
ESP32 Ethernet Router
Turn WT32-ETH01 or ESP32-C3+W5500 into a WiFi uplink → Ethernet LAN router with NAT, DHCP, port forwarding, ACL firewall, WireGuard VPN, and live PCAP capture.
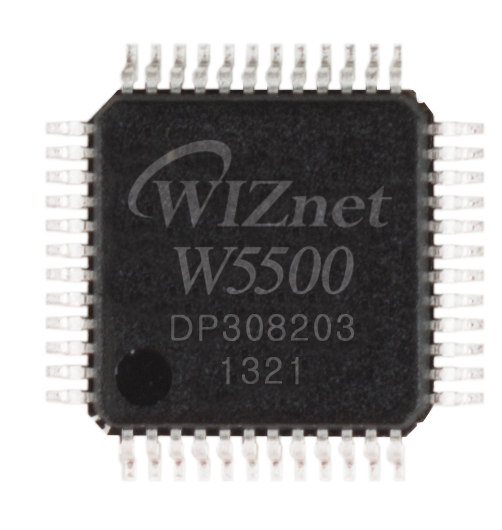
WIZnet - W5500
x 1
1. 개요
이 프로젝트는 ESP32-C3와 W5500 Ethernet 컨트롤러를 이용하여 소형 보드에서 동작하는 완전한 기능의 이더넷 라우터 펌웨어입니다.
ESP32는 WiFi에 STA 모드로 연결되어 uplink(WAN) 역할을 수행하고, W5500은 Ethernet을 통해 downlink(LAN)를 구성합니다. 따라서 Ethernet에 연결된 모든 장치는 별도의 설정 없이 인터넷에 바로 접근할 수 있습니다.
이 프로젝트는 esp32_nat_router를 기반으로 하며, 기존 구조와 달리 uplink 방향이 반대로 구성되어 있습니다:
- WiFi → WAN (인터넷)
- Ethernet → LAN (내부 네트워크)
👉 활용 분야:
- IoT 네트워크 분리
- 홈랩 환경 구축
- WiFi 기반 유선 네트워크 확장
2. 네트워크 구조
- WiFi STA → 상위 네트워크 연결
- Ethernet → LAN 게이트웨이 역할
- 필요 시 WireGuard VPN 사용 가능

3. 지원 하드웨어 (Supported Hardware)
두 가지 구성이 지원됩니다.
✔ Option 1: WT32-ETH01 (고성능)
- ESP32 듀얼코어 240MHz
- LAN8720 PHY 내장
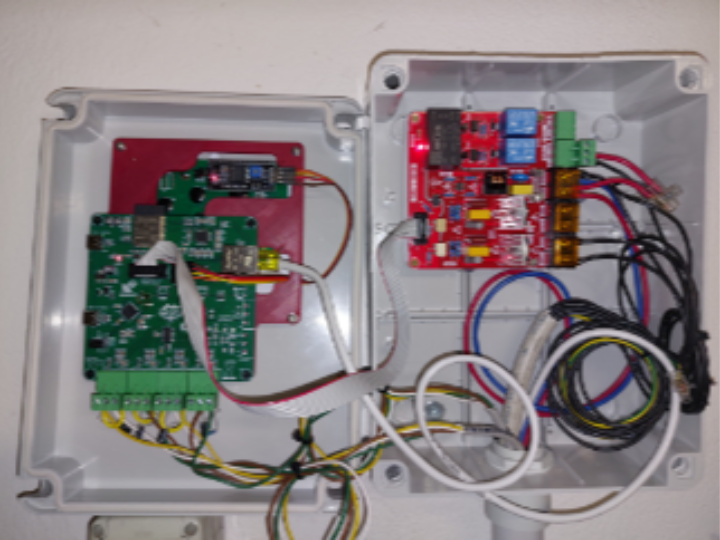
✔ Option 2: ESP32-C3 + W5500 (저비용 / 유연성)
- ESP32-C3 (RISC-V, 160MHz)
- W5500 (SPI 인터페이스)

📌 성능:
- Downstream: 약 4 Mbps
- Upstream: 약 1 Mbps
📌 참고:
- W5500은 최대 250mA 소비 → 외부 3.3V 전원 권장
- WiFi 불안정 시:
set_tx_power 154. 주요 기능 (Key Features)
이 펌웨어는 소형 ESP32에서도 동작하는 고급 네트워크 기능을 제공합니다.

| Feature | Detail |
|---|---|
| WiFi uplink | WPA2-Personal; WPA2-Enterprise (PEAP, TTLS, TLS / 802.1X) |
| Ethernet LAN | Default gateway: 192.168.4.1/24 (configurable) |
| NAT (NAPT) | Enable/disable; routed mode available when NAT is off |
| DHCP server | Configurable pool; up to 16 MAC-based static reservations |
| Port forwarding | TCP/UDP DNAT rules, persisted in NVS |
| Packet firewall | 4 ACL lists × 16 rules: to_esp, from_esp, from_eth, to_eth |
| WireGuard VPN | Kill switch; split-tunnel and route-all modes |
| Live packet capture | PCAP stream to Wireshark via TCP port 19000 |
| Web UI | Full management at http://192.168.4.1 |
| OTA update | Web-based with partition rollback |
| Remote CLI | Password-protected TCP console (default port 2323) |
| Syslog | UDP forwarding to remote syslog server |
| Persistence | All settings in NVS; survive firmware updates; factory reset supported |
하드웨어
WT32-ETH01
- SoC: ESP32 듀얼코어 240MHz
- 플래시: 4MB
- 이더넷 PHY: LAN8720 (내장, MDC GPIO23 / MDIO GPIO18)
- 상태 LED: GPIO2 (변경 가능)
- 시리얼: 115200 bps
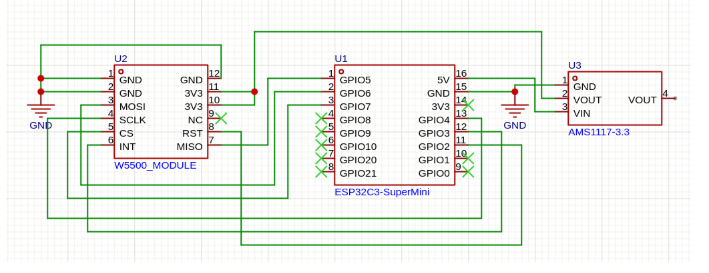
W5500 + ESP32-C3
- SoC: ESP32-C3 싱글코어 RISC-V 160MHz
- 이더넷: W5500 (SPI 연결)
- (MISO=GPIO5, MOSI=GPIO6, SCLK=GPIO4, CS=GPIO7, INT=GPIO3, RST=GPIO2)
- 성능: 다운스트림 ~4Mbps / 업스트림 ~1Mbps
- 주의: W5500 최대 250mA 소비 — 외부 3.3V 전원 사용 필수
- 주의: WiFi가 불안정한 경우 TX 출력을 낮춰보세요:
set_tx_power 15
빌드 및 플래시 방법
WT32-ETH01:
- ESP-IDF v5.x 환경 소싱:
. $IDF_PATH/export.sh - 빌드:
./build_firmware.sh - 플래시:
esptool.py --chip esp32 --port /dev/ttyUSB0 --baud 460800 write_flash 0x1000 firmware/bootloader.bin 0x8000 firmware/partition-table.bin 0xf000 firmware/ota_data_initial.bin 0x20000 firmware/esp32_eth_router.bin
W5500 + ESP32-C3:
- 빌드:
./build_firmware_w5500_c3.sh - 플래시 (SuperMini: USB-JTAG / DevKit-M-1: UART):
idf.py -B build_w5500_c3 -p /dev/ttyACM0 flash monitor
최초 부팅: 115200 bps로 시리얼 연결 후 set_sta MySSID MyPassword를 실행하세요. 이후 이더넷 LAN에 연결된 장치에서 http://192.168.4.1로 웹 UI에 접속할 수 있습니다.
플래시 방법
esptool.py를 사용하여 펌웨어를 플래시합니다:
esptool.py --chip esp32c3 --port COMx --baud 460800 write_flash -z \
0x0 bootloader.bin \
0x8000 partition-table.bin \
0xd000 ota_data_initial.bin \
0x10000 esp32_eth_router.bin
최적화 참고 사항
이 프로젝트에는 여러 성능 최적화가 적용되어 있습니다:
- 최적화된 W5500 SPI 드라이버
- 폴링 오버헤드 최소화
- 인터럽트 기반 처리
커밋 참조: optimized W5500 SPI driver; cpu load
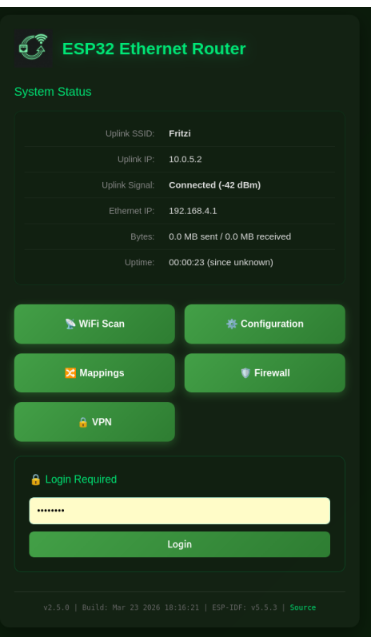
내장 웹 인터페이스
이 프로젝트의 가장 강력한 기능 중 하나는 내장 웹 기반 관리 UI입니다.
다음 주소로 접속할 수 있습니다:
http://192.168.4.1설정
모든 설정은 웹 UI(http://192.168.4.1) 또는 시리얼 / TCP CLI를 통해 변경할 수 있습니다. 주요 CLI 명령어:
| 명령어 | 설명 |
|---|---|
set_sta <ssid> <pass> | WiFi 업링크 인증 정보 설정 |
set_eth_nat off | NAT 비활성화 (라우티드 모드 전환) |
set_tx_power <0–20> | WiFi TX 출력 조정 (dBm × 4) |
set_vpn private_key <key> | WireGuard 개인 키 설정 |
set_vpn public_key <key> | WireGuard 피어 공개 키 설정 |
set_vpn endpoint <host:port> | WireGuard 엔드포인트 설정 |
set_vpn killswitch on | VPN 터널 다운 시 트래픽 차단 |
set_vpn route_all on | 모든 트래픽을 WireGuard로 라우팅 |
pcap promisc | 무차별(promiscuous) 실시간 캡처 활성화 |
pcap acl | ACL 트리거 캡처 활성화 (_monitor 규칙 사용) |
실시간 패킷 캡처
캡처 모드 설정 후, LAN 클라이언트에서 다음 명령을 실행하세요:
c 192.168.4.1 19000 | wireshark -k -i -Wireshark가 열리며 실시간 이더넷 프레임을 수신합니다. pcap acl과 _monitor 방화벽 규칙을 함께 사용하면 특정 트래픽 흐름만 선택적으로 캡처할 수 있습니다.
WireGuard VPN 설정
웹 UI(VPN 페이지) 또는 CLI로 설정합니다:
set_vpn private_key <base64-개인키>
set_vpn public_key  <base64-피어-공개키>
set_vpn endpoint    vpn.example.com:51820
set_vpn killswitch  on
set_vpn route_all on- 킬 스위치 (
on): 터널 다운 시 모든 WAN 트래픽을 차단합니다. - route-all (
on): 모든 트래픽을 WireGuard를 통해 전송합니다.off로 설정하면 split-tunnel 모드로 동작합니다 (특정 서브넷만 터널링).
방화벽 ACL
4개 목록, 각 16개 규칙:
| 목록 | 방향 |
|---|---|
to_esp | ESP32로 향하는 인바운드 트래픽 |
from_esp | ESP32에서 발생하는 아웃바운드 트래픽 |
from_eth | 이더넷 LAN에서 들어오는 인바운드 트래픽 |
to_eth | 이더넷 LAN으로 향하는 아웃바운드 트래픽 |
규칙은 상태 비저장(stateless) 방식입니다. 웹 UI 또는 CLI로 설정합니다. 규칙 이름에 _monitor 접미사를 추가하면 매칭된 패킷에 대해 PCAP 캡처가 트리거됩니다.
FAQ
Q1. esp32_nat_router와 무엇이 다른가요? 기존 esp32_nat_router는 이더넷을 업링크, WiFi AP를 다운링크로 사용합니다. 이 프로젝트는 반대로 WiFi STA를 업링크(인터넷), 이더넷을 다운링크(LAN)로 사용합니다. 레이어 2 이더넷 ↔ WiFi 브리지가 필요한 경우 관련 프로젝트인 esp32_eth_wifi_bridge를 참고하세요.
Q2. NAT 없이 사용할 수 있나요? 가능합니다. set_eth_nat off 후 재부팅하세요. 라우티드 모드에서는 이더넷 클라이언트가 자신의 IP를 유지하며, 라우터는 패킷만 전달합니다. 단, 업스트림 네트워크에 192.168.4.0/24 서브넷에 대한 라우트가 설정되어 있어야 합니다.
Q3. WireGuard VPN은 어떻게 설정하나요? 웹 인터페이스(VPN 페이지) 또는 set_vpn private_key, set_vpn public_key, set_vpn endpoint 등의 CLI 명령으로 설정합니다. set_vpn killswitch on으로 터널 다운 시 비보호 트래픽을 차단하고, set_vpn route_all on으로 모든 트래픽을 터널을 통해 전송할 수 있습니다.
Q4. 실시간 패킷 캡처는 어떻게 동작하나요? pcap promisc로 캡처 모드를 설정한 후, LAN 클라이언트에서 nc 192.168.4.1 19000 | wireshark -k -i -를 실행하면 Wireshark가 열리며 실시간 이더넷 트래픽을 확인할 수 있습니다. pcap acl과 _monitor 규칙을 사용하면 특정 트래픽만 캡처할 수도 있습니다.
Q5. WPA2-Enterprise 기업 WiFi에 어떻게 연결하나요? 웹 인터페이스의 WiFi 설정 메뉴에서 EAP 인증 정보(사용자명, identity, EAP 방식, 인증서)를 설정합니다. PEAP, TTLS, TLS를 지원하며, 클라이언트 장치 설정 변경 없이 802.1X 인증 네트워크에 연결할 수 있습니다.
Q6. W5500 + ESP32-C3에서 WiFi가 불안정한 경우 어떻게 하나요? ESP32-C3 SuperMini의 내장 안테나가 문제인 경우가 많습니다. set_tx_power 15로 TX 출력을 낮춰보세요. W5500 모듈에 독립적인 외부 3.3V 전원이 공급되는지도 확인하세요 (SuperMini 내장 레귤레이터는 250mA를 감당하지 못합니다). 문제가 지속되면 ESP32-C3 SuperMini DIY 안테나 개선 방법을 검색해보세요.
Overview
The ESP32 Ethernet Router is open-source firmware that turns an WT32-ETH01 or ESP32-C3 + W5500 board into a full-featured network router. It uses WiFi as the uplink (connecting to an existing WiFi network as a client) and Ethernet as the downlink (sharing that connection with wired devices on a LAN). All Ethernet clients get transparent Internet access with no special configuration needed.
- WiFi → WAN (uplink)
- Ethernet → LAN (downlink)
👉 This makes it ideal for:
- IoT network segmentation
- Home lab environments
- Portable Ethernet access over WiFi
Derived from the popular esp32_nat_router project, this variant reverses the uplink direction — WiFi is the WAN, Ethernet is the LAN — making it ideal for home labs, IoT segments, and anywhere you need to bridge a wired network to WiFi.
Network topology
WiFi STA connects upstream to any WiFi AP, while the Ethernet port serves as the LAN gateway for all wired clients. An optional WireGuard VPN tunnel can replace or supplement the direct uplink path.
Supported hardware
Two hardware options are supported — the all-in-one WT32-ETH01 for best performance, and the more accessible ESP32-C3 SuperMini with an external W5500 SPI module for IoT-scale deployments.
✔ Option 1: WT32-ETH01 (High Performance)
- ESP32 dual-core @ 240 MHz
- Integrated LAN8720 PHY
✔ Option 2: ESP32-C3 + W5500 (Low-cost, flexible)
- ESP32-C3 (RISC-V, 160 MHz)
- W5500 via SPI interface
📌 Performance (W5500 + C3):
- ~4 Mbps downstream
- ~1 Mbps upstream
Key features
The firmware packs enterprise-grade networking features into a tiny ESP32 board, all configurable via web UI or serial CLI.
Feature list
| Feature | Detail |
|---|---|
| WiFi uplink | WPA2-Personal; WPA2-Enterprise (PEAP, TTLS, TLS / 802.1X) |
| Ethernet LAN | Default gateway: 192.168.4.1/24 (configurable) |
| NAT (NAPT) | Enable/disable; routed mode available when NAT is off |
| DHCP server | Configurable pool; up to 16 MAC-based static reservations |
| Port forwarding | TCP/UDP DNAT rules, persisted in NVS |
| Packet firewall | 4 ACL lists × 16 rules: to_esp, from_esp, from_eth, to_eth |
| WireGuard VPN | Kill switch; split-tunnel and route-all modes |
| Live packet capture | PCAP stream to Wireshark via TCP port 19000 |
| Web UI | Full management at http://192.168.4.1 |
| OTA update | Web-based with partition rollback |
| Remote CLI | Password-protected TCP console (default port 2323) |
| Syslog | UDP forwarding to remote syslog server |
| Persistence | All settings in NVS; survive firmware updates; factory reset supported |
👉 All features are configurable via:
- Web UI (
http://192.168.4.1) - Serial CLI
Hardware
WT32-ETH01
- SoC: ESP32 dual-core 240MHz
- Flash: 4MB
- Ethernet PHY: LAN8720 (integrated, MDC GPIO23 / MDIO GPIO18)
- Status LED: GPIO2 (configurable)
- Serial: 115200 bps
W5500 + ESP32-C3
- SoC: ESP32-C3 single-core RISC-V 160MHz
- Ethernet: W5500 via SPI
- (MISO=GPIO5, MOSI=GPIO6, SCLK=GPIO4, CS=GPIO7, INT=GPIO3, RST=GPIO2)
- Performance: ~4Mbps downstream / ~1Mbps upstream
- Note: W5500 draws up to 250mA — use external 3.3V power supply
- Note: If WiFi is unstable, try lowering TX power:
set_tx_power 15
How to build & flash
WT32-ETH01:
- Source ESP-IDF v5.x:
. $IDF_PATH/export.sh - Build:
./build_firmware.sh - Flash:
esptool.py --chip esp32 --port /dev/ttyUSB0 --baud 460800 write_flash 0x1000 firmware/bootloader.bin 0x8000 firmware/partition-table.bin 0xf000 firmware/ota_data_initial.bin 0x20000 firmware/esp32_eth_router.bin
W5500 + ESP32-C3:
- Build:
./build_firmware_w5500_c3.sh - Flash via USB-JTAG (SuperMini) or UART (DevKit-M-1):
idf.py -B build_w5500_c3 -p /dev/ttyACM0 flash monitor
First boot: Connect via serial at 115200 bps and run set_sta MySSID MyPassword. Then access the web UI at http://192.168.4.1 from a device on the Ethernet LAN.
Flashing Instructions
Flash the firmware using esptool.py:
esptool.py --chip esp32c3 --port COMx --baud 460800 write_flash -z \
0x0 bootloader.bin \
0x8000 partition-table.bin \
0xd000 ota_data_initial.bin \
0x10000 esp32_eth_router.bin
Optimization Notes
This project includes several performance optimizations:
- Optimized W5500 SPI driver
- Reduced polling overhead
- Interrupt-driven processing
Commit reference:
optimized W5500 SPI driver; cpu load
Built-in Web Interface
One of the most powerful aspects of this project is the embedded web-based management UI.
Users can access:
http://192.168.4.1 Configuration
All settings are available via the web UI (http://192.168.4.1) or the serial / TCP CLI. Key CLI commands:
| Command | Description |
|---|---|
set_sta <ssid> <pass> | Set WiFi uplink credentials |
set_eth_nat off | Disable NAT (routed mode) |
set_tx_power <0–20> | Adjust WiFi TX power (dBm × 4) |
set_vpn private_key <key> | Configure WireGuard private key |
set_vpn public_key <key> | Configure WireGuard peer public key |
set_vpn endpoint <host:port> | Set WireGuard endpoint |
set_vpn killswitch on | Block traffic when VPN tunnel is down |
set_vpn route_all on | Route all traffic through WireGuard |
pcap promisc | Enable promiscuous live capture |
pcap acl | Enable ACL-triggered capture (_monitor rules) |
Live Packet Capture
Set capture mode, then run on any LAN client:
nc 192.168.4.1 19000 | wireshark -k -i -Wireshark opens and receives live Ethernet frames. Use pcap acl with _monitor firewall rules to capture only specific traffic flows.
WireGuard VPN Setup
Configure via web UI (VPN page) or CLI:
set_vpn private_key <base64-private-key>
set_vpn public_key  <base64-peer-public-key>
set_vpn endpoint    vpn.example.com:51820
set_vpn killswitch  on
set_vpn route_all on- Kill switch (
on): blocks all WAN traffic when the tunnel is down. - Route-all (
on): tunnels all traffic through WireGuard. Setofffor split-tunnel (only specific subnets).
Firewall ACL
Four lists, 16 rules each:
| List | Direction |
|---|---|
to_esp | Inbound traffic destined for the ESP32 |
from_esp | Outbound traffic originating from ESP32 |
from_eth | Inbound traffic from Ethernet LAN |
to_eth | Outbound traffic to Ethernet LAN |
Rules are stateless. Configure via web UI or CLI. Add _monitor suffix to a rule to trigger PCAP capture on matched packets.
FAQ
Q1. What is the difference between this and esp32_nat_router?
The original esp32_nat_router uses Ethernet as the uplink and WiFi AP as the downlink. This project reverses that: WiFi STA is the uplink (Internet) and Ethernet is the downlink (LAN). If you need a Layer 2 Ethernet ↔ WiFi bridge instead, see the related esp32_eth_wifi_bridge project.
Q2. Can I use this without NAT?
Yes. Disable NAT with set_eth_nat off (requires reboot). In routed mode, Ethernet clients keep their own IP addresses and the router simply forwards packets — provided the upstream network knows the 192.168.4.0/24 subnet.
Q3. How do I set up WireGuard VPN?
Configure the VPN via the web interface (VPN page) or CLI commands like set_vpn private_key, set_vpn public_key, set_vpn endpoint, etc. Enable kill switch (set_vpn killswitch on) to block unprotected traffic when the tunnel is down. Use set_vpn route_all on to send all traffic through the tunnel.
Q4. How does live packet capture work?
Set capture mode with pcap promisc, then on any LAN client run:nc 192.168.4.1 19000 | wireshark -k -i -
Wireshark opens and shows live Ethernet traffic. You can also use ACL-triggered capture (pcap acl) with _monitor rules to capture only specific traffic.
Q5. How do I connect to a WPA2-Enterprise corporate WiFi?
Configure the EAP credentials (username, identity, EAP method, certificate) in the web interface under WiFi Settings. PEAP, TTLS, and TLS are supported, enabling connection to 802.1X-authenticated networks without modifying the client devices.
Q6. The W5500 + ESP32-C3 WiFi is unstable — what can I do?
The ESP32-C3 SuperMini antenna is often problematic. Try lowering TX power: set_tx_power 15. Also ensure the W5500 module has its own external 3.3V supply (the SuperMini's internal regulator cannot handle 250mA). If issues persist, search for DIY antenna fixes for the ESP32-C3 SuperMini.
Key Takeaway
The ESP32 Ethernet Router delivers a surprisingly capable network router from a $5 ESP32 board. With WIZnet W5500 Ethernet, WireGuard VPN, stateful firewall ACLs, live Wireshark capture, and a full web UI, it is a powerful tool for home labs, isolated IoT segments, and portable network testing setups.
Source Code: https://github.com/martin-ger/esp32_ethernet_router
-
esp32_ethernet_router
ESP32 Ethernet Router — WiFi uplink to Ethernet LAN with NAT, WireGuard, Firewall, PCAP
