Project 25a Raspberry PI Zero W board - Shutdown and restart buttons
Project 25a Raspberry PI Zero W board - Shutdown and restart buttons
0
Components
Hardware componentsRaspberry PI Zero W board
x 1
Micro SD card with NOOBS and SD card adapter
x 1
Micro USB power supply (2 A 5V or 5V 3A)
x 1
USB keyboard
x 1
USB Mouse
x 1
TV or PC monitor
x 1
HDMI cable
x 1
T-Cobbler Breakout and GPIO Cable
x 1
Micro USB 2.0 OTG Cable
x 1
Mini HDMI to HDMI Adapter (HDMI to Mini HDMI Adapter)
x 1
Project description
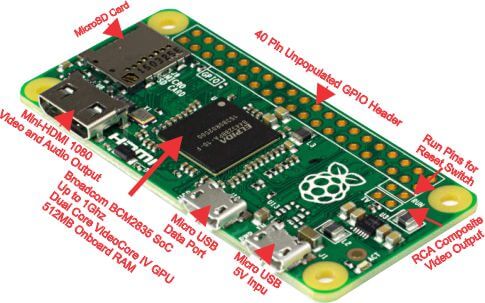
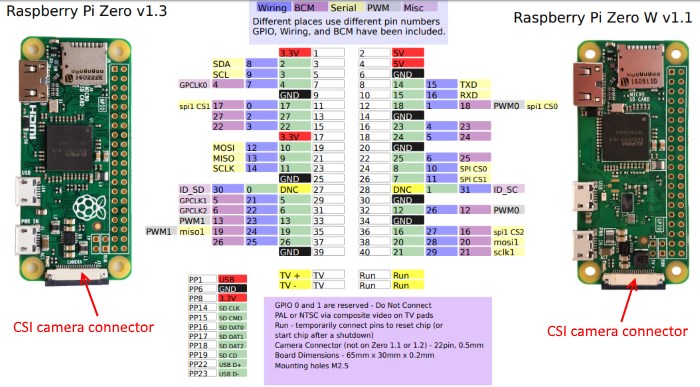
[caption id="" align="alignnone" width="700"]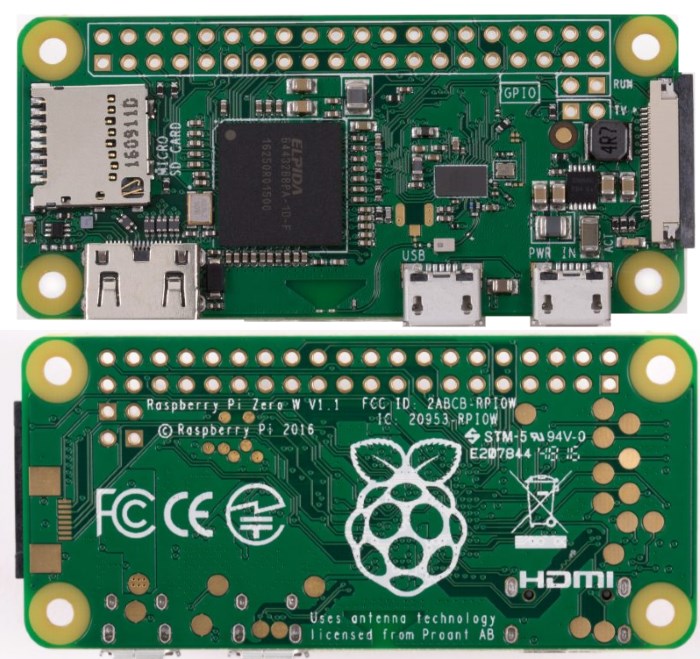 Raspberry PI Zero W board[/caption]
 [caption id="" align="alignnone" width="614"]
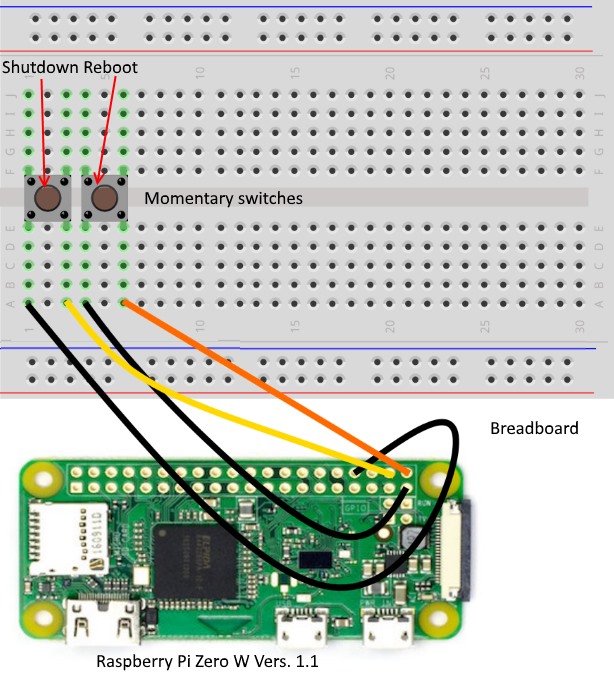 Wiring[/caption]
Step by Step instruction
We recommend using a high-performance SD card for increased stability as well as plugging your device into an external display to see the default application booting up.
1. Setup and preparation
We assume that you have?Windows 10?installed on your PC and?Raspbian OS?installed on your Raspberry Pi Zero W?board.
Wiring[/caption]
Step by Step instruction
We recommend using a high-performance SD card for increased stability as well as plugging your device into an external display to see the default application booting up.
1. Setup and preparation
We assume that you have?Windows 10?installed on your PC and?Raspbian OS?installed on your Raspberry Pi Zero W?board.

Raspberry PI Zero W board[/caption]
[caption id="" align="alignnone" width="614"] Wiring[/caption]
Step by Step instruction
We recommend using a high-performance SD card for increased stability as well as plugging your device into an external display to see the default application booting up.
1. Setup and preparation
We assume that you have?Windows 10?installed on your PC and?Raspbian OS?installed on your Raspberry Pi Zero W?board.
- Do wiring.
- Insert your micro SD card with?Raspbian OS?into the TF card slot on the Raspberry Pi Zero W board. It will only fit one way.
- Connect Raspberry PI Zero W board mini HDMI port to your TV or Monitor HDMI (DVI) port (use HDMI cable and mini HDMI to HDMI adapter and/or HDMI to DVI adapter).
- Make sure that your monitor or TV is turned on, and that you have selected the right input (e.g. HDMI/DVI,? etc).
- Plug in micro USB 2.0 OTG Cable to USB data port of Pi Zero and 4-Port USB 2.0 Hub to micro USB 2.0 OTG Cable.
- Plug in your USB mouse and USB keyboard to 4-Port USB 2.0 Hub.
- If you intend to connect your Raspberry Pi Zero vers 1.2 or vers 1.3 to the internet, connect a WiFi dongle to one of the 4-Port USB 2.0 Hub ports.
- Connect Micro USB power supply to Raspberry PI Zero board micro USB input.
- The Raspberry PI desktop will start up.
- Open?Terminal?window?and type the command:?sudo apt-get update
- Then type the command:?sudo apt-get upgrade -y
- Adding -y to the end of apt-get commands instructs the program to automatically answer yes to any questions rather than waiting for you to type Y or N
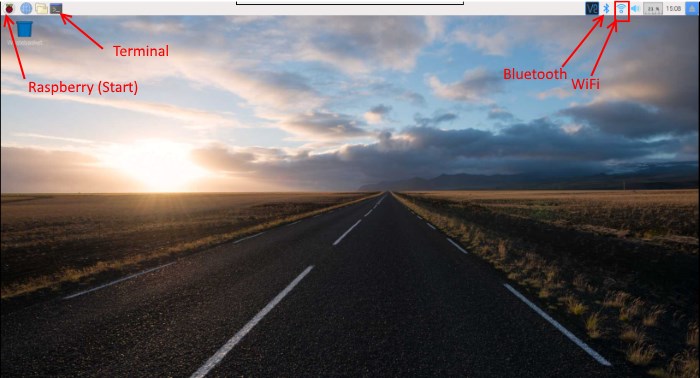

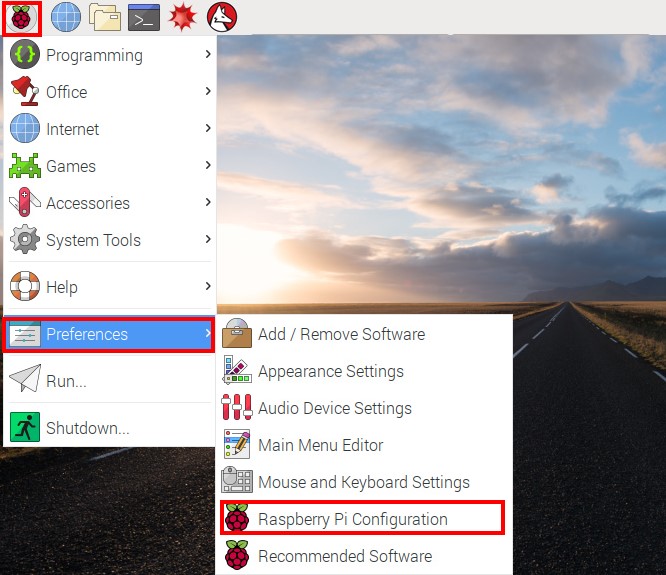
- Open the Raspberry Pi Configuration tool from the main menu. Go to?Raspberry icon->?Preferences?->?Raspberry PI configuration.
- Select?Interfaces?and make sure that all settings are enabled so you will not need to come back to these configuration tool again.
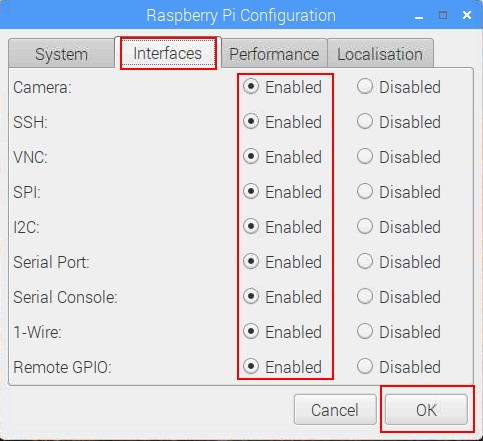
- Click on?OK?button.
- We need to reboot our Raspberry PI. If it will not reboot automatically go to?Terminal. Type this command in the Terminal:?sudo reboot2. Making the program After restart of Raspberry Pi go to the Terminal?and type this command:?sudo nano?shutdownreboot.py

- Copy and paste the code from?shutdownreboot.py?to opened window.?Since it is a Python code, you need to be careful with the Tab characters as it is important to group the instruction as blocks in Python.
- Press Ctrl+X, Y, Enter buttons to save the file.
- Type the command in the Terminal:?sudo python?shutdownreboot.py

-
- When you press first button your Raspberry Pi will be turned off.
- When you press second button your Raspberry Pi will reboot.
- One of the methods to run a script on your Raspberry Pi at startup - use the file?rc.local. In order to have a command or program run when the Raspberry Pi boots, you can add commands to the?rc.local?file. This is especially useful if you want to power up your Raspberry Pi in headless mode (that is without a connected monitor), and have it run a program without configuration or a manual start.
- Type this command in the?Terminal?to open the?rc.local?file if you need to modify it:?sudo nano /etc/rc.local
 Summary
We have learnt?how to shutdown or reboot your Raspberry PI Zero W board without LAN or WiFi or SSH.
Libraries in use
Summary
We have learnt?how to shutdown or reboot your Raspberry PI Zero W board without LAN or WiFi or SSH.
Libraries in use
- RPi.GPIO
- time
- os
- Look for attached code on the begining of this project
