Skip to content

ioNIC Loopback Arduino Example

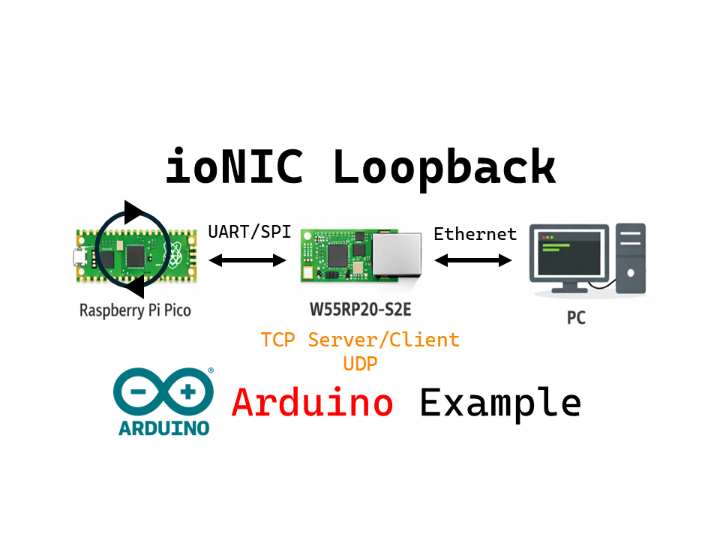
This guide explains how to control the W55RP20-S2E module using a Raspberry Pi Pico and implement network loopback functionality.

Grace_Koo

Published March 18, 2026

ioNIC Loopback Arduino Example

Components

Hardware components
Software Apps and online services

Project description

How to Run Loopback Example

This project uses the Raspberry Pi Pico as the main controller to operate the W55RP20-S2E module. Connect to the W55RP20-S2E module via SPI or UART communication to implement TCP Client, TCP Server, and UDP Loopback functionality.

Supported Communication Methods:

  1. SPI Communication
  2. UART Communication

Supported Loopback Modes:

  • TCP Client Loopback
  • TCP Server Loopback
  • UDP Loopback

Step 1: Prepare Software

Download and install the following software:

Required Software:

Step 2: Hardware Connections

2.1 SPI Mode Connection

When controlling the W55RP20-S2E module via SPI, connect as follows:

Raspberry Pi PicoW55RP20-S2E ModuleDescription

GP4 (SPI0 RX/MISO)

GP3 (SPI_MISO)

Master In Slave Out

GP3 (SPI0 TX/MOSI)

GP4 (SPI_MOSI)

Master Out Slave In

GP2 (SPI0 SCK)

GP2 (SPI_SCK)

Clock Signal

GP5 (SPI0 CSn)

GP5 (SPI_CSn)

Chip Select

GP13

GP13 (SPI_INT)

SPI Master Recv data pending pin

GP26

GP26 (UART_SPI_SEL)

UART/SPI interface select pin
(High:SPI, Low/NC:UART)

3.3V

3V3

Power Supply

GND

GND

Ground

2.2 UART Mode Connection

When controlling the W55RP20-S2E module via UART:

Raspberry Pi PicoW55RP20-S2E ModuleDescription

GP4 (UART1 TX)

GP5 (UART1 RX)

Pico TX → Module RX

GP5 (UART1 RX)

GP4 (UART1 TX)

Pico RX → Module TX

GND

GND

Ground

3.3V

VCC/3V3

Power Supply


Step 3: Arduino IDE Setup

Install Board Support Package

  1. Open Arduino IDE
  2. Go to File → Preferences
  3. Add the following to "Additional Boards Manager URLs": https://github.com/earlephilhower/arduino-pico/releases/download/global/package_rp2040_index.json
  4. Go to Tools → Board → Boards Manager
  5. Search for "Raspberry Pi Pico" and install Raspberry Pi Pico/RP2040 by Earle F. Philhower, III
  6. Select Tools → Board → Raspberry Pi RP2040 Boards → Raspberry Pi Pico

Step 4: Code Examples

Each example provides a .ino file to upload to the Pico.

  1. SPI Communication

     2. UART Communication


Step 5: Upload and Test

5.1 Select Raspberry Pi Pico

  1. Go to Tools → Board → Raspberry Pi RP2040 Boards → Raspberry Pi Pico
  2. Select Tools → Port → Choose your COM port

5.2 Upload Code

  1. Open the desired example .ino file
  2. Modify IP addresses and port numbers as needed
  • TCP Server
  void setup() {
  ... 
  at_set("LI192.168.11.2"); // Local IP
  at_set("SM255.255.255.0");
  at_set("GW192.168.11.1");
  at_set("DS8.8.8.8");
  at_set("LP5000");         // Local port
  ...
  }
  • TCP Client
void setup() {

...
  at_set("LI192.168.11.2"); // Local IP
  at_set("SM255.255.255.0");
  at_set("GW192.168.11.1");
  at_set("DS8.8.8.8");
  at_set("RH192.168.11.100"); // Remote host (server)
  at_set("RP5000");         // Remote port

...
}
  • UDP
void setup() {
... 
  at_set("OP3");            // UDP mode
  at_set("LI192.168.11.2"); // Local IP
  at_set("SM255.255.255.0");
  at_set("GW192.168.11.1");
  at_set("DS8.8.8.8");
  at_set("LP5000");         // Local port
  at_set("RH192.168.11.100"); // Remote host for UDP echo
  at_set("RP5000");         // Remote port
  ...
}

3. Click Upload button or press Ctrl+U

4. Wait for upload to complete

5.3 Open Serial Monitor

  1. Go to Tools → Serial Monitor
  2. Set baud rate to 115200
  3. Verify network information and connection status

Step 6: Testing with Hercules

TCP Client Test

Hercules Server Setup:

  1. Launch Hercules
  2. Select TCP Server tab
  3. Port: 5000
  4. Click Listen
  5. Verify messages from Pico appear
  6. Type response message and click Send

Expected Results:


  • Hercules receives "W55RP20 S2E TCP Server Demo" message
  • Serial Monitor displays Hercules response

TCP Server Test

Hercules Client Setup:

  1. Launch Hercules
  2. Select TCP Client tab
  3. IP: 192.168.11.2 (Pico IP address)
  4. Port: 5000
  5. Click Connect
  6. Type message (e.g., "W55RP20 S2E TCP Server Demo")
  7. Click Send

Expected Results:

  • Serial Monitor displays "W55RP20 S2E TCP Server Demo"
  • Hercules receives echoed message

UDP Test

Hercules UDP Setup:

  1. Launch Hercules
  2. Select UDP tab
  3. Module IP: 192.168.11.2
  4. Module Port: 5000
  5. Local Port: 5000 (or other available port)
  6. Type message (e.g., "W55RP20 S2E TCP Server Demo")
  7. Click Send

Expected Results:

  • Serial Monitor displays "W55RP20 S2E TCP Server Demo"
  • Hercules receives echoed packet

Documents

  • GitHub: WoW-io-Design-Contest

Comments

Comments