
How Blynk Works
This tutorial is mainly to teach you how to start using Blynk and introduce a comprehensive introduction to each function of Blynk, made by
How Blynk Works
Blynk was born for the internet. It can control hardware remotely, display sensor data, store data, graph data and some other cool things.
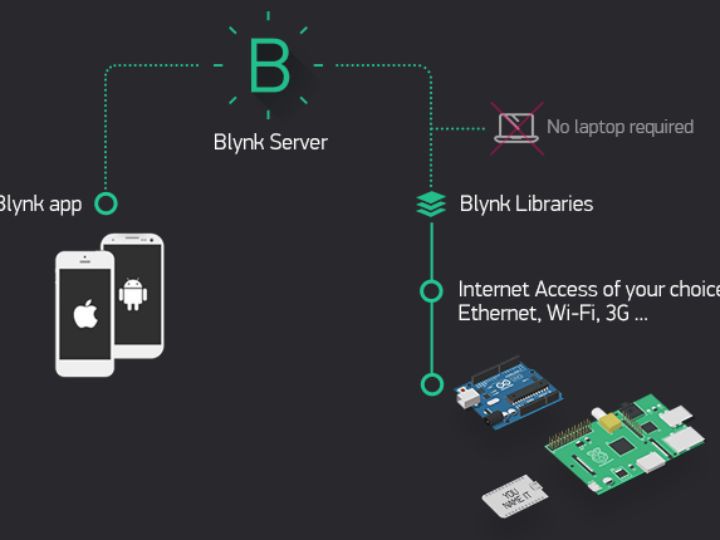
The Blynk platform mainly consists of the following parts:
Think about it: every time you press the blynk control button on your phone, this information will be transmitted to the Blynk cloud server through the network, and the server will then send precise commands to your hardware, and everything happens in an instant. The flow is as shown below. 
characteristic
what to prepare
download
Mobile software download
Clicking the following icon will jump to the software market, google play needs to be accessed scientifically due to non-resistance factors. If you do not have this skill, you can go to our network disk to download.

Library file download
If the library files will not be installed, click here.
Getting started (based on W5100 simple example)
We will make a project to control the LED connected to the Arduino through the Blynk software on the smartphone.
First, connect the LED to the UNO main control board as shown in the figure below.
APP software part
1. Create a Blynk account
After you download and install the Blynk mobile app, you need to create an account of your own. Be sure to use a real email address when creating an account.
2. Create a new project
After you have created your account, create a new project in your account.
3. Choose your hardware
Select the hardware model you are using
4. Project key
A secret key is a unique identifier for the connection between your phone and your hardware. Each new project generates its own secret key. This key will be automatically sent to your mailbox when you create the project. Click on the device option and select a device you are using. Then you will see the key
 Note : Do not share your key with anyone unless you want others to have access to your device. Set the name of your project, click Create, and the project will be generated to generate the secret key. Be sure to check your email.
5. Add plugins
Your project content is currently empty, let's add a button to control our LED. Click anywhere on the interface, and all the optional plugins will pop up. Now we click the button and drag it to the interface position. Each button has its own setting parameters, click the button, you can enter the setting. The most important parameter in the settings is the pin. In the pin sequence, select the pin you are currently connecting the LED to. If your LED is connected to digital pin 8, choose Digital D8.
6. Run the project
When you have finished setting the parameters, click the triangle symbol in the upper right corner, this will turn the project from edit mode to run mode. While in run mode, you can no longer drag and set plugins. You will get a message "Arduino UNO is offline", we will fix this in the next section.
hardware device part
How to use the official example
First you should make sure that you have installed the Blynk library correctly in the Arduino library folder. If not, go back to the previous tutorial to install it. Standard examples will help you quickly connect your hardware to the network. Open the official example from the Arduino compiler, the path is as follows: Let's see an example of Arduino UNO+ Ethernet Shield. (You need UNO and W5100 Ethernet expansion board)
modify key
Find this line from the example
Replace the English inside the double quotes with the secret key you received in your email. It might end up looking like this:
Upload your code to your Arduino board through the compiler, open the serial monitor, and the following information may appear:
Then congratulations, your hardware has successfully connected to the Blynk cloud.
Blynking
Go back to your Blynk APP and click the button you set earlier to light up the connected LED on your board. You can keep trying other examples.
hardware setup
Arduino via USB (no shield)
If you don't have any expansion boards or communication modules, you can still use Blynk - directly via your USB cable.
Arduino via 8266 wireless module


