
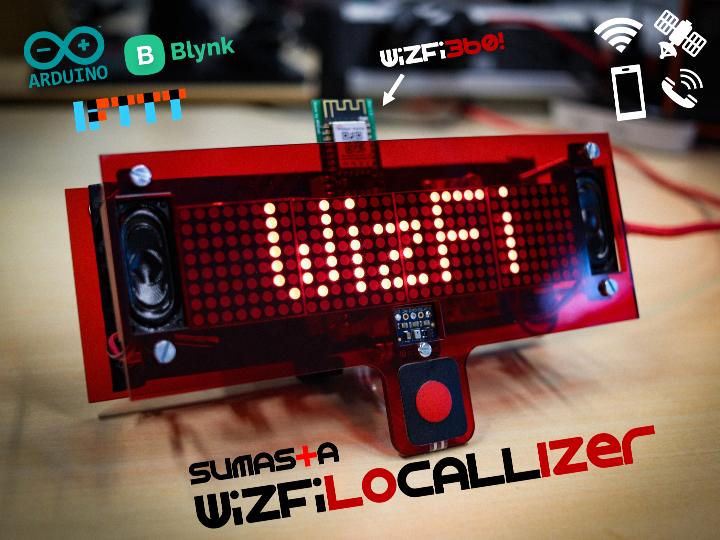
WizFiLoCaLLizer - Your Personal Localizer & a Direct Hotline
A table-top gadget that automatically inform your colleagues or family where you are and let them call you with a single button click!

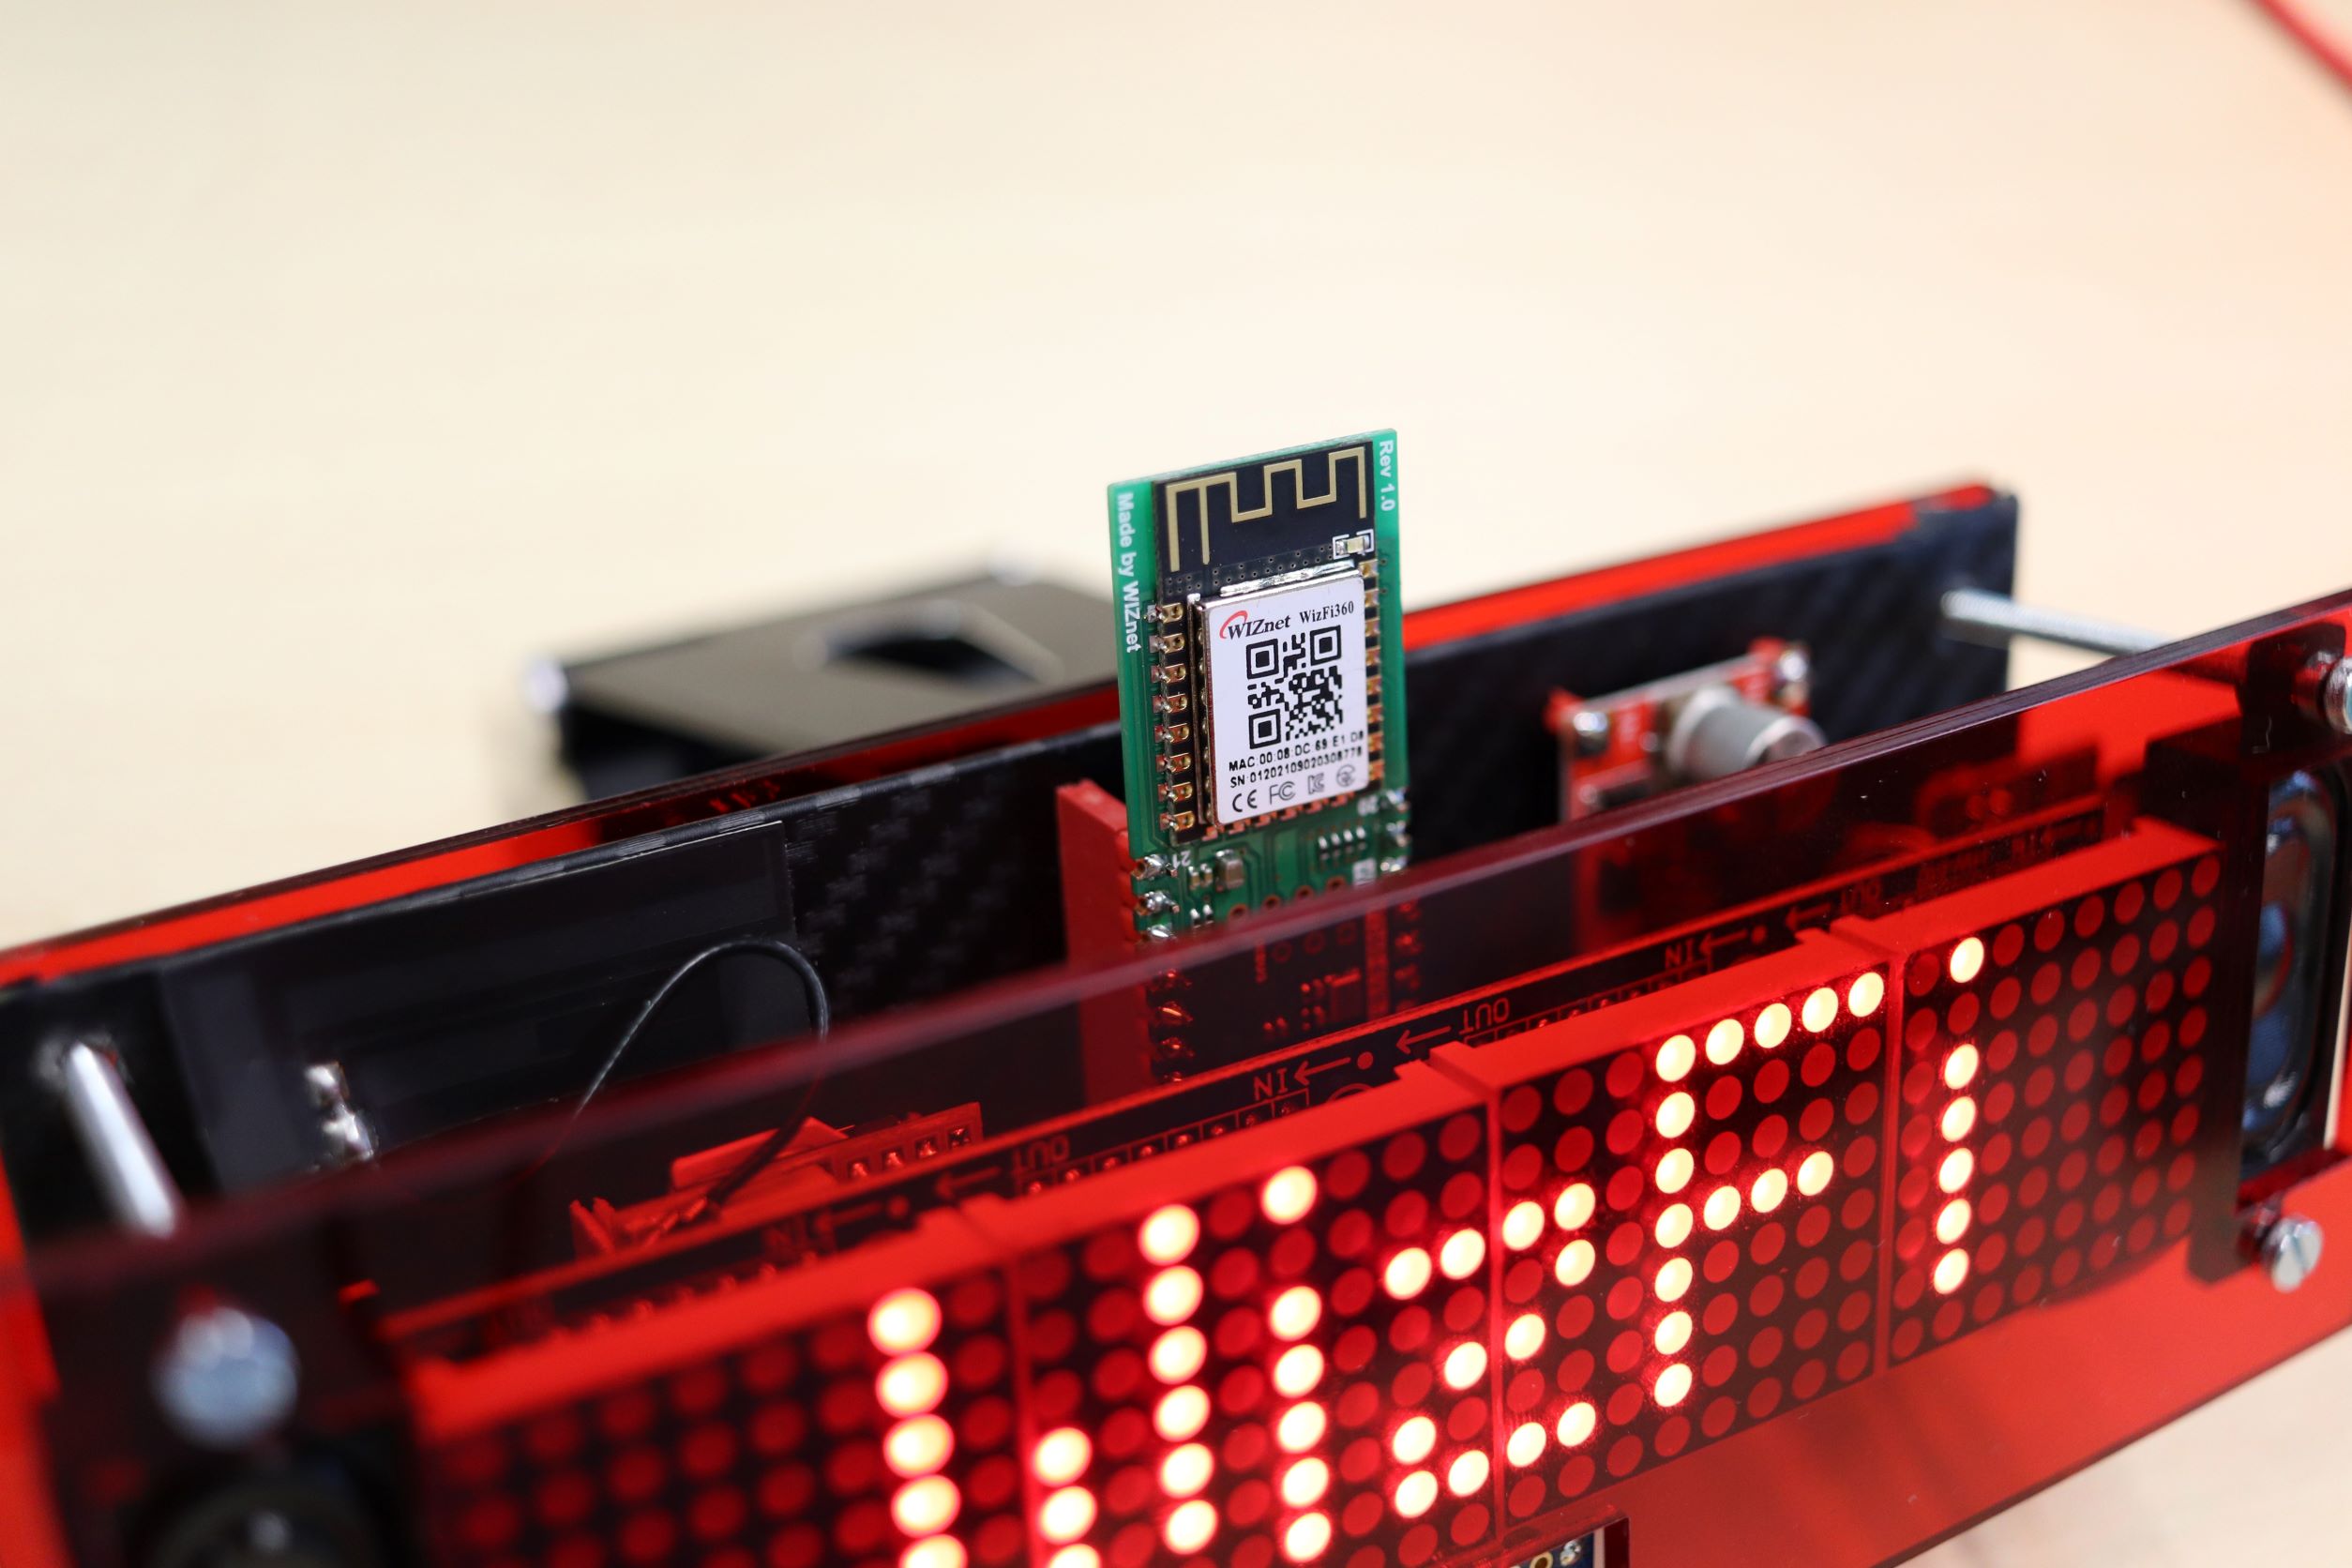
WIZnet - WizFi360-EVB-Pico
x 1
ifttt - Maker service
x 1
blynk - Blynk
x 1

Arduino - Arduino IDE
x 1
Brief Summary
Triggered by the recent corona pandemic where many companies now implement full or hybrid working-from-home and policy, I've built WizFiLoCaLLizer for my office-desk to let my colleagues know where I am at any given time and let them reach me directly with a click-of-a-button. It's been operational on my office-desk for several months now and my colleagues really do love it!
The beauty is that, as this is personalized gadget, you have full control of what, where and when the localization occurs e.g. you're ok to tell your colleagues if you're at home but perhaps you're not comfortable to tell them if you're at your parents home. The trigger conditions and locations are all in your control and all is executed automatically in real-time.
Furthermore WizFiLoCaLLizer allows people to reach your private phone number without disclosing your number in the first place. Very handy if you have separate work and private phone number that you want to keep it to yourself as much as possible.
WizFiLoCaLLizer relies on IFTTT internet service to trigger an action based on the info and the status in your smartphone. For example if you are connected to your home Wi-Fi network then it automatically triggers an action informing that you are currently at home or if you're connected to your car Bluetooth system, it then knows you are on the road. Surely, based on outdoor GPS location you can also defined certain area that you want people to know through the WizFiLoCaLLizer. IFTTT is huge and the limit is only your imagination!
Relaying the information that IFTTT provides, Blynk cloud service is used that bridge the information from the cloud to the WizFiLoCaLLizer device via WiZfi360 Wi-Fi connectivity. Blynk also provide beautiful Web-UI and smartphone apps interface to interact with WizFiLoCaLLizer, such that you can do much more thing like changing the scrolling text speed or sending a custom message.
On top of that, thanks to SIM800L module that is on board, WizFiLoCaLLizer has all the bells-and-whistles to enable a phone call as soon as you press the RED button. The loud-speaker and the microphone are embedded on the unit and ready to go.
At last I've built the WizFiLoCaLLizer in such a way that it is easy to duplicate so that you can build it yourself! I've only used THT components on purpose so you can make it seamlessly even on the breadboard. I've prepared the code in Arduino as well and compile it into in a single .ino file to ease-up your SW installation. More importantly, the online services I've prescribed here are all free (up to certain limit of course). Only sufficient credit for a making a phone call in your sim card is needed :)
More details I provided below, got a questions? feel free to reach me at:
www.sumasta.tech
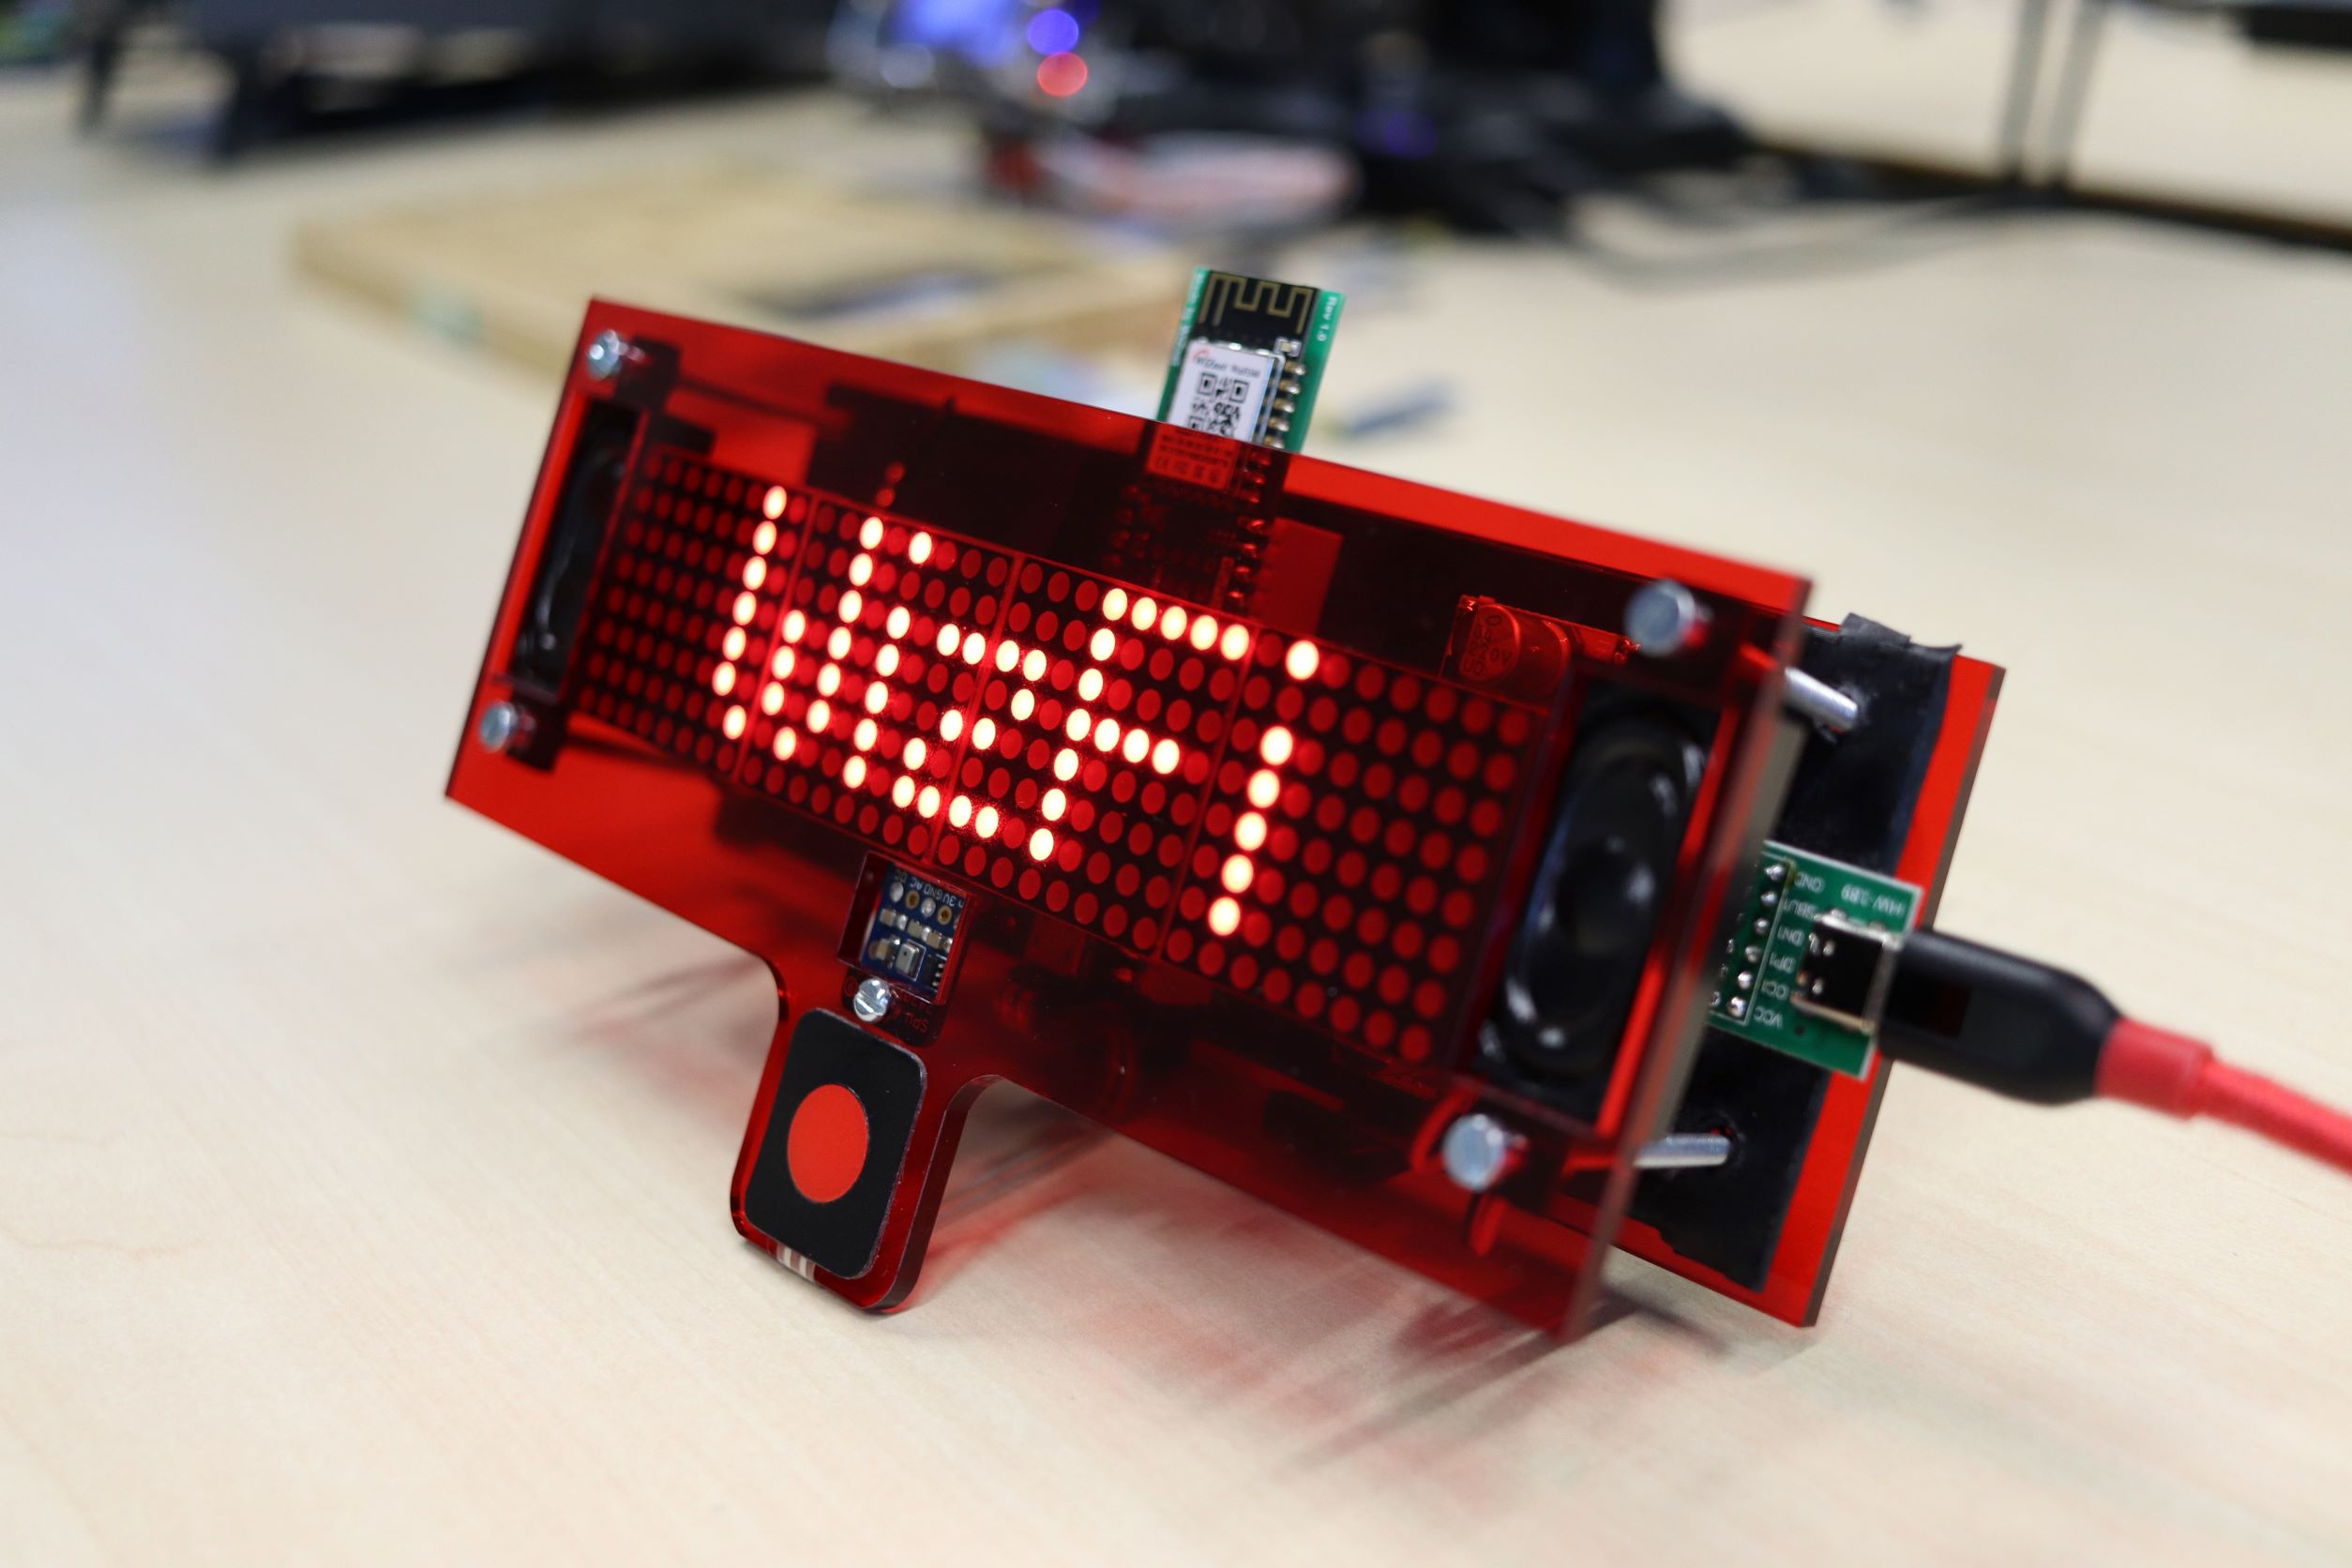
WizFiLoCaLLizer in Action
When your colleagues or family decided to call you, they only need to press the RED button as shown below to reach you instantly.
The location displayed on the WizFiLoCaLLizer automatically changed when a specific state from your smartphone is triggered. In the clip below, the location on the display changes to "in the Office" as soon as my phone Wi-Fi connection to my Office Wi-Fi is established.
Of course, occasionally you'd want to post custom messages on the display, you can do so via Web-UI interface as demonstrated below.
And surely, it can be done as well via Blynk Apps in your smartphone.
Furthermore you can do much more via the Web-UI as shown below you can disable the localization and adjust the scrolling speed of the message.
High-Res Pictures

Working Principle
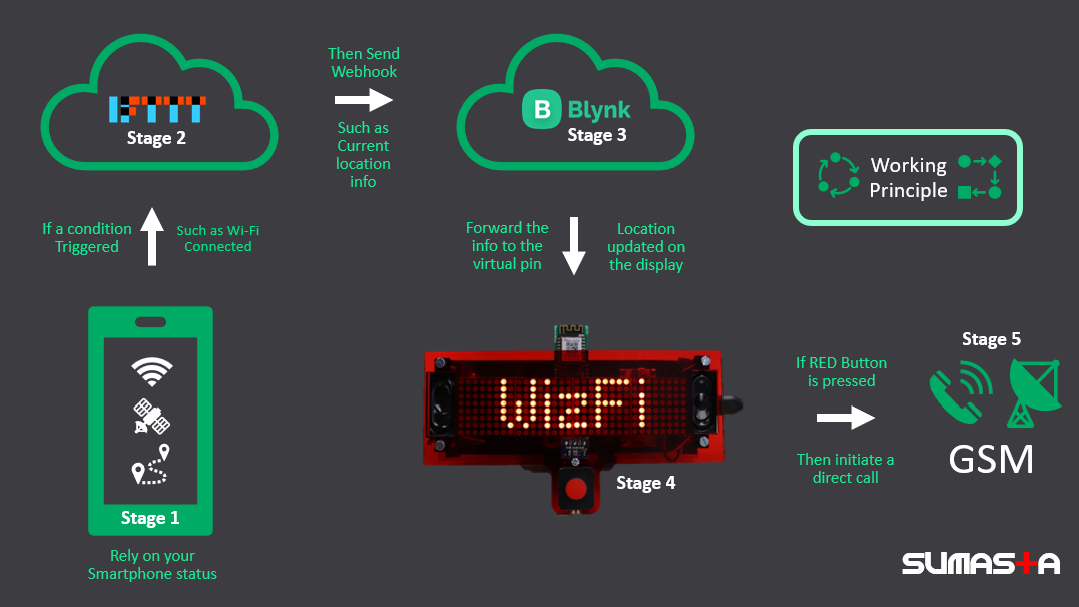
In principle, there are 5 stages of operation implemented in the WizFiLoCaLLizer as depicted on the diagram above. It starts with a trigger from your smartphone that you have with you all the time and it ends up with a direct call to your phone.
- In the first stage, using IFTTT apps in your smartphone you define set of trigger action that you want based on certain condition you specified. For example if you want let people know that you are at home, you can rely on the state of Wi-Fi connection in your phone, if it is connected to your home router, you know very well that this means you are currently at home. Alternatively, you can also define certain geographical area where you want people to know that you are there. If those conditions are met, then IFTTT apps will initiate a trigger action to the IFTTT Cloud.
- In the second stage, the IFTTT service will then send a webhook HTTP request to the Blynk server. The content of the HTTP request is something that you predefined in the IFTTT apps as a text. Which essentially contains the information where you are based on a specific trigger. So if you are at home the HTTP trigger request should then contain "at home", whereas if you are in a car the content of HTTP trigger request can then be "currently driving" for instance.
- In the third stage, when the HTTP request is received by the Blynk server, the Blynk server is then feed the corresponding information to the corresponding virtual pin which is prescribed and programmed in to the WizFiLoCaLLizer hardware. As you can expect the transfer of this information from the server is being performed via WiFi connection thanks to Wiznet WizFi360 module.
- In the fourth stage, when the Blynk virtual pin in the WizFiLoCaLLizer is triggered, a new information to the display is then processed and new location is updated. There are several virtual pins described in the WizFiLoCaLLizer SW which is responsible for different things. For instance one handles the content of the text while other virtual pin holds the information of the scrolling speed.
- At last, when the RED button is pressed, a phone call is initiated to your designated phone number. For the sake of simplicity I implemented single button on the device, but certainly you can expand this to enable much more feature on-board if needed.
Hardware & Schematic
On the hardware component side, most of the parts used and prescribed here are off-the-shelf module you should be able to buy in hobby electronics shop in your country. Worst case you should be able to source it from China's Aliexpress or so. Below mostly I'm providing the purchase link from my favorite local Dutch online/local web-shop tinytronics.nl. Keep in mind that these list are entirely suggestive, you certainly can use alternative parts from different supplier as well. Though you should be aware of what you're doing.
Here's the complete Part-list:
- WizFi360-EVB-Pico (Link)
- SIM800L (Link)
- LED Matrix 32x8 with MAX7219 Module (Link)
- QSKJ DC-DC Adjustable Step-down Buck Converter LM2596 3A (Link)
- Mini Speaker Set (Link)
- Adafruit Silicon MEMS Microphone Breakout - SPW2430 (Link)
- USB-C Connector breakout (Link)
- Membrane Keypad - 1 Button - Red (Link)
- Bulk Capacitor >1000uF (Link)
As you can see, you'll need no more than 10 parts as listed above to build this project. You can either use a protoboard so that you can solder and mount the parts more permanently, or you can also use breadboard to enable the connectivity between the hardware.
The simplified schematic of WizFiLoCaLLizer can be seen below.
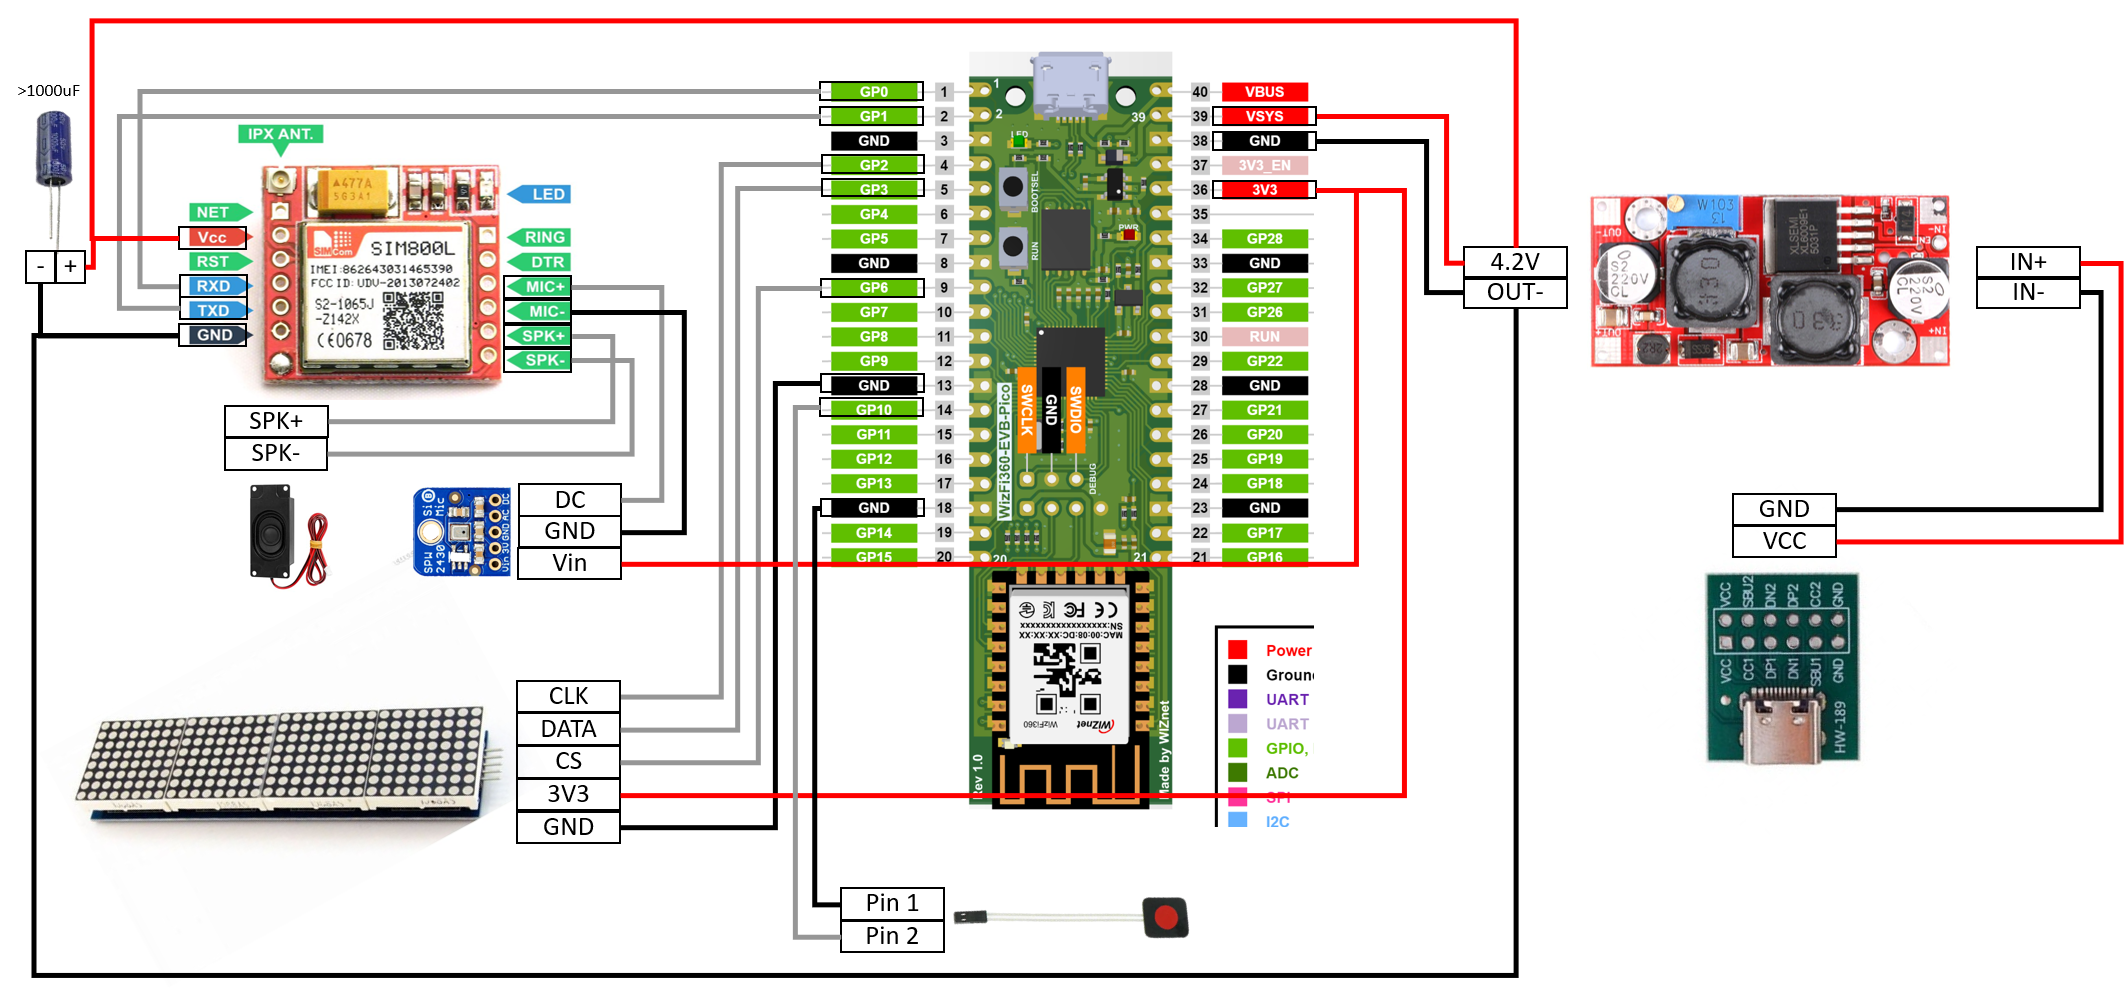
Without much explanation you should be able to duplicate and copy the schematic above without any hassles, however perhaps few important notes I have to mention:
- In my case I use USB-C connector to provide power simply due to personal preference. As you can see on the right side of the diagram above, the VCC goes to the input of the DCDC converter. So that it is important to make sure that the voltage supplied to the connector is >5V. You can certainly use any other type of connector as you preferred.
- On the DCDC buck converter, make sure to set the voltage to 4.2V first before powering and connecting to the system! This can be done by rotating the blue multi-turn potentiometer. Without doing this first, you risk damaging the Wiz module as the output of the DCDC module by default can go as high as the VIN.
- Furthermore, it is also crucial to place an extra bulk capacitor next to the SIM800L as shown in the diagram. The value of the capacitor should be bigger than 1000uF and place as close as possible to the SIM800L. You'll have a lot of instability issue especially when initiating a call without this capacitor.
- Optionally, between SIM800L and the speaker you might need to add audio amplifier as well in case the intensity is not loud enough for you. Some SIM800L module internally connect to SPK2 output pins while other connect to SPK1 output pins of the SIM800L module. In case where the SIM800L module HW you have connects to SPK1 most likely you'll need to add additional audio amplifier in between. The SPK2 output of the SIM800L can drive 8-Ohm speaker directly.
- Lastly in the connection between the microphone and the SIM800L you could add optional capacitor filter as the datasheet prescribed. It is to help with filtering the noise from GSM frequency should it gives you some acoustic noise issue.
Apps and Services
As mentioned above, in other to enable the IoT connectivity between the WizFiLoCaLLizer and the internet, you'll need to use two online services: Blynk and IFTTT. We'll start with setting up Blynk.

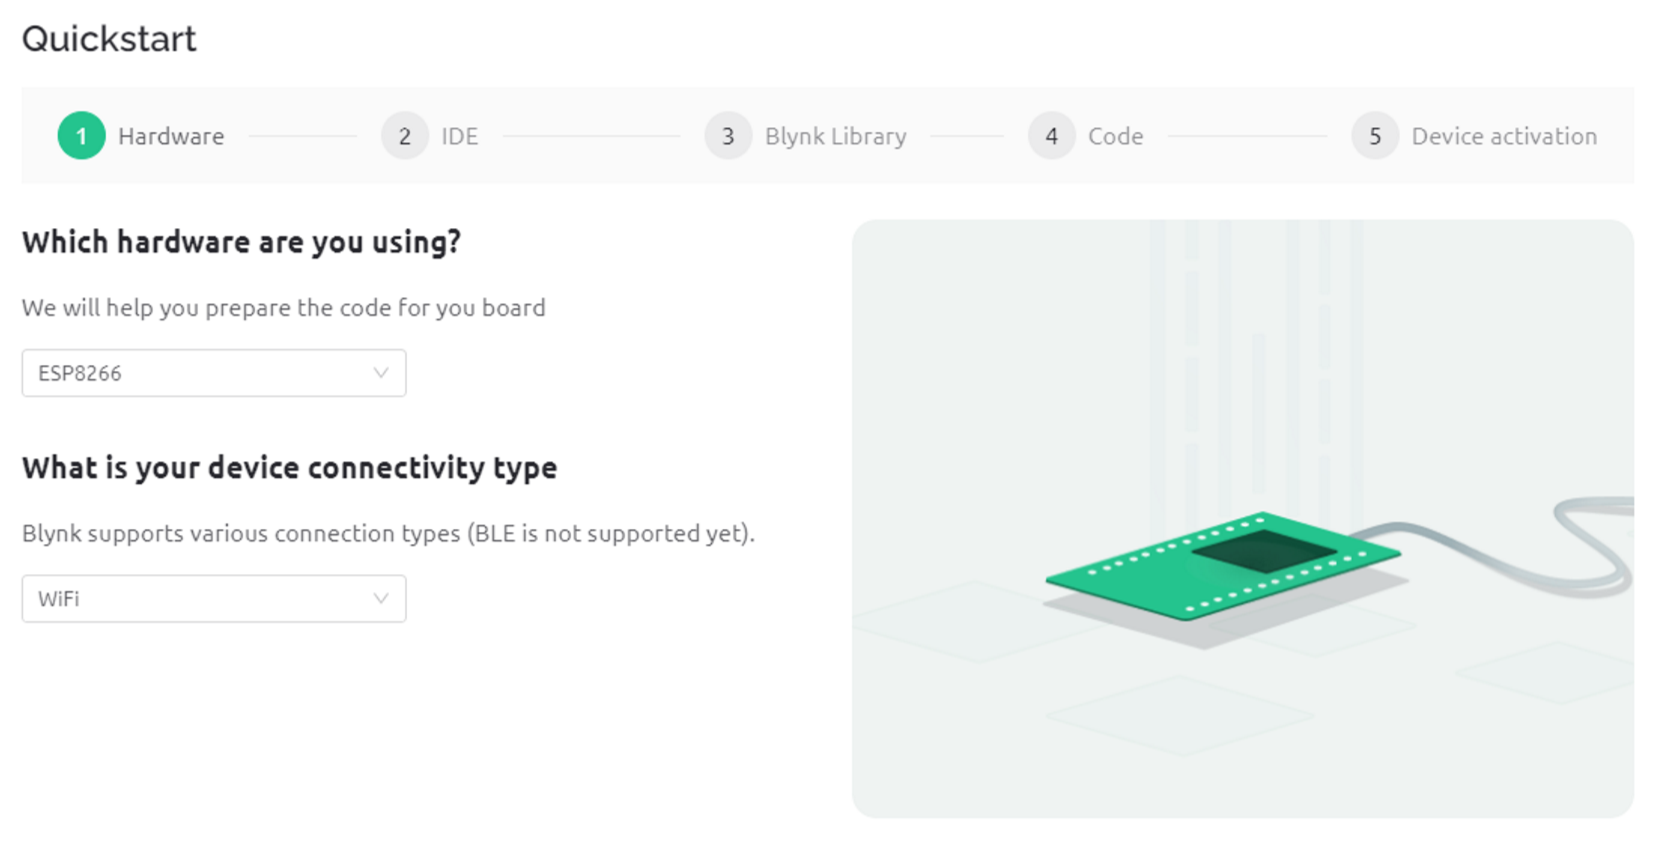
If you have never used Blynk before, you can create account for free on their website and it will guide you through extremely easy getting started procedure. in five simple steps you should be able to connect your WizFi360 to the internet. In short it can be summarized below:
Select ESP8266 option as shown below, Wizfi360 option is currently unavailable there.
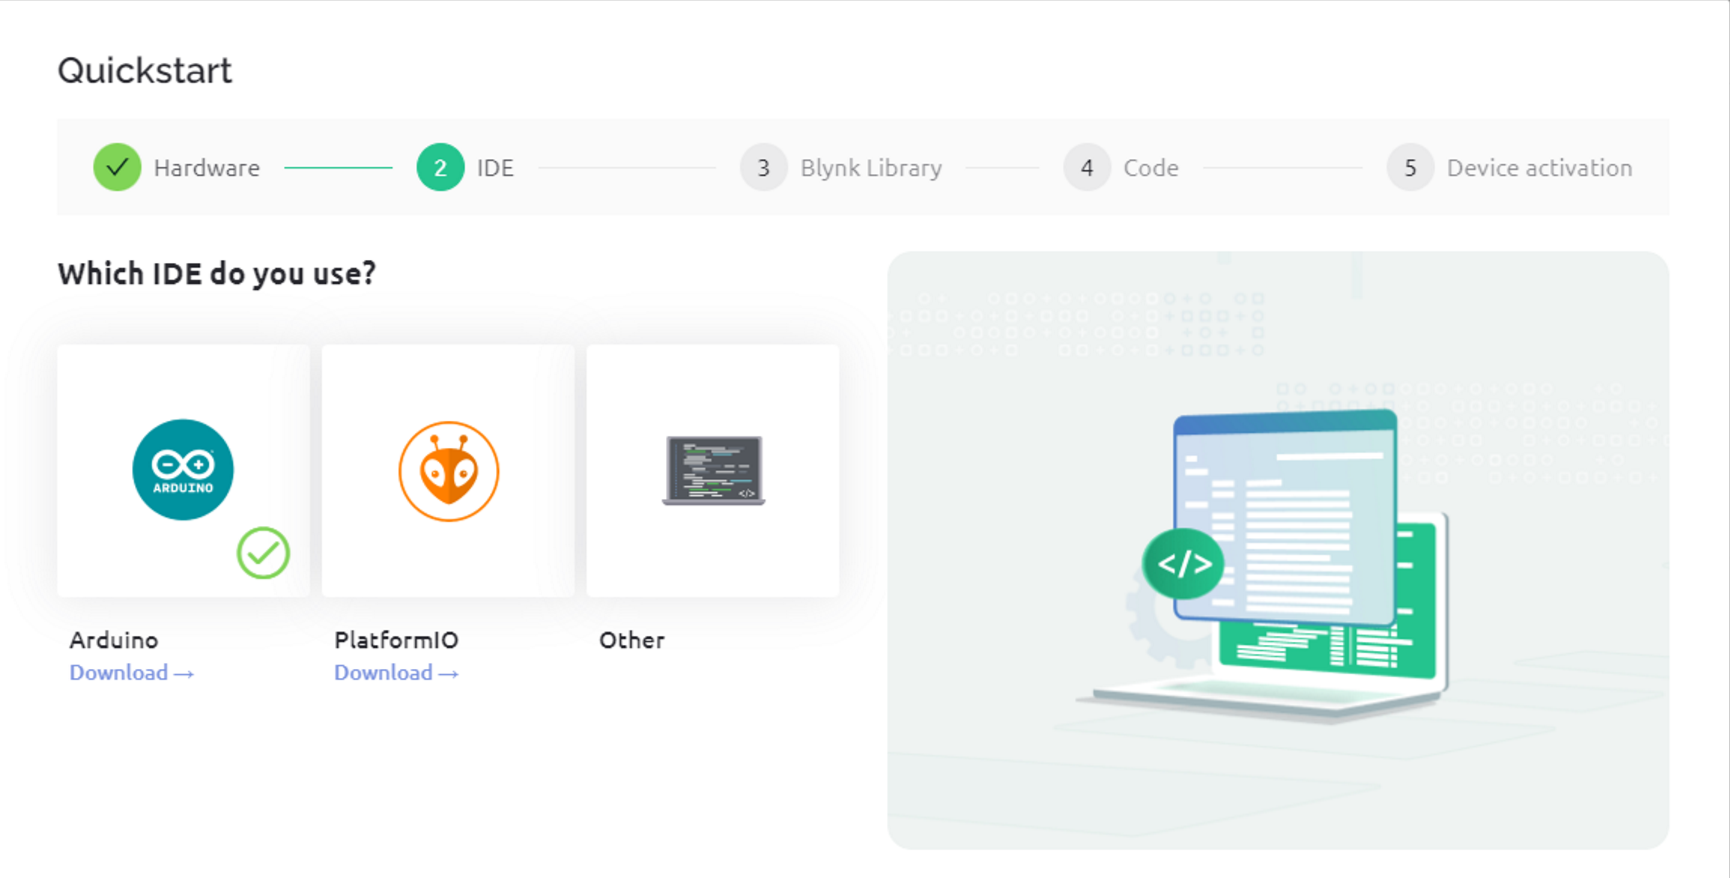
Select Arduino IDE
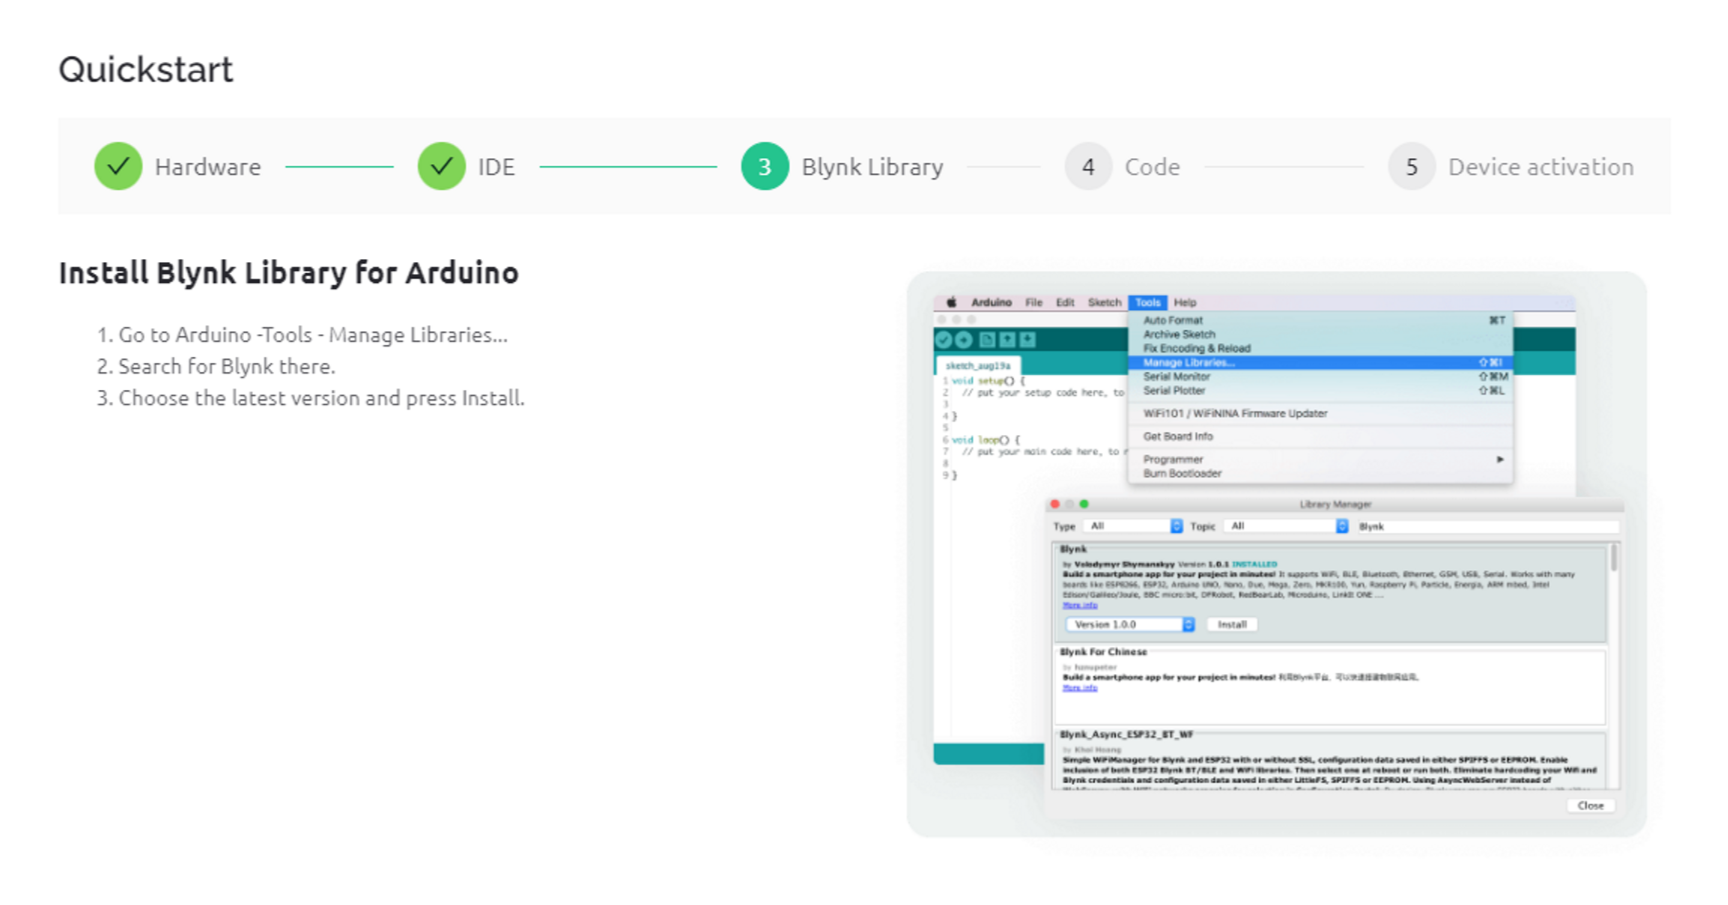
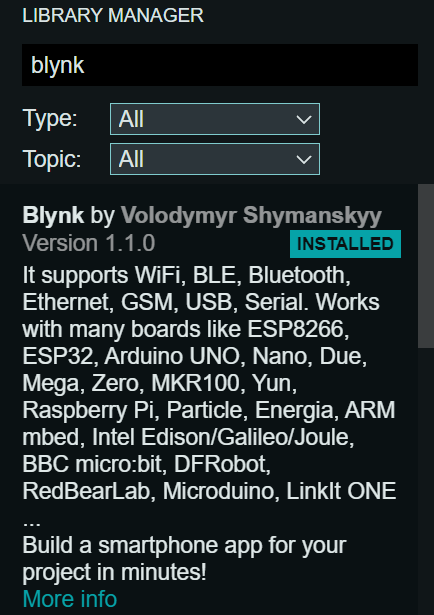
Install Blynk Library in Arduino
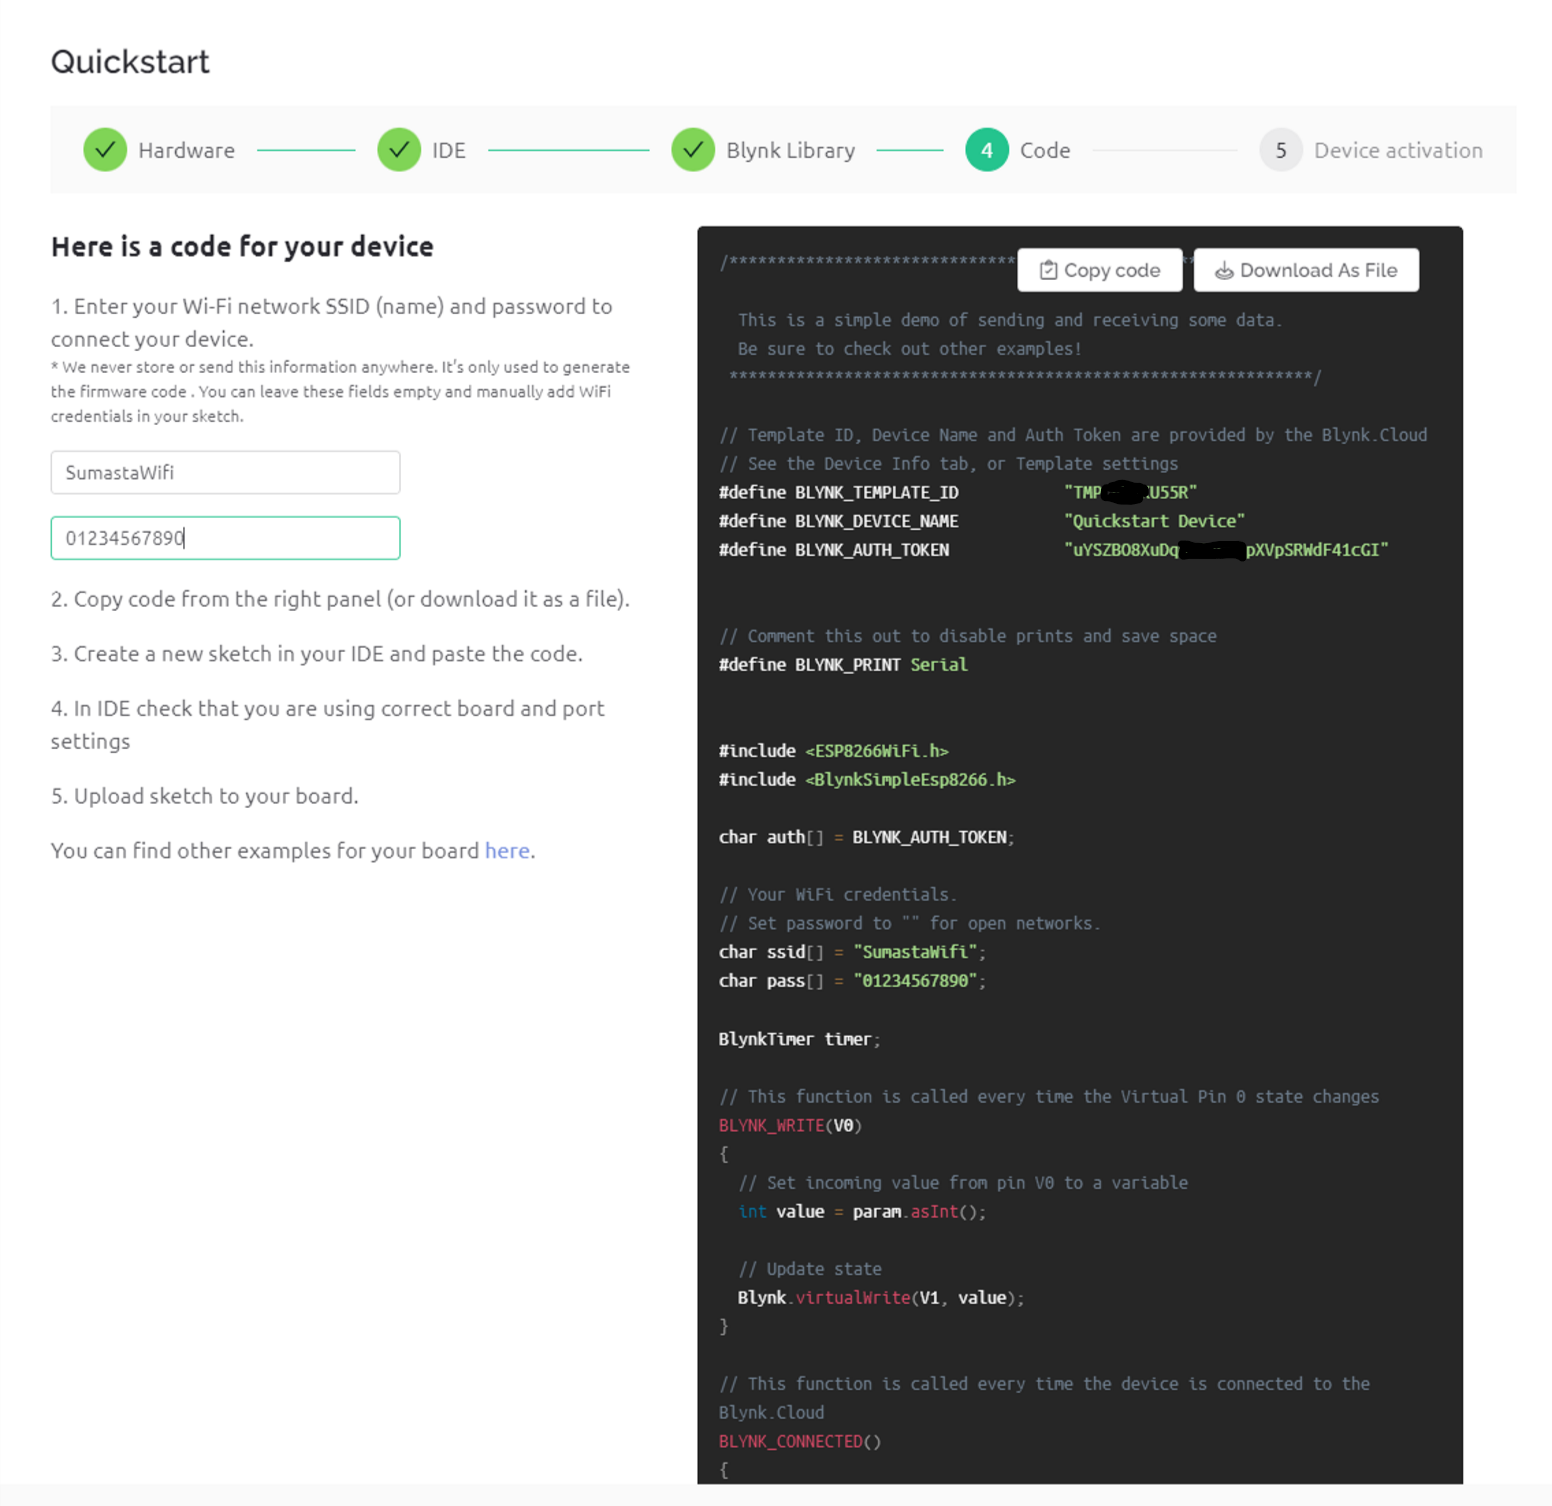
The next step is the most important step as it auto generate some portion of the code. So you should start on the lest side to input the SSID name of your WiFi connection and its password. It will then be copied automatically to the generated code on the right.
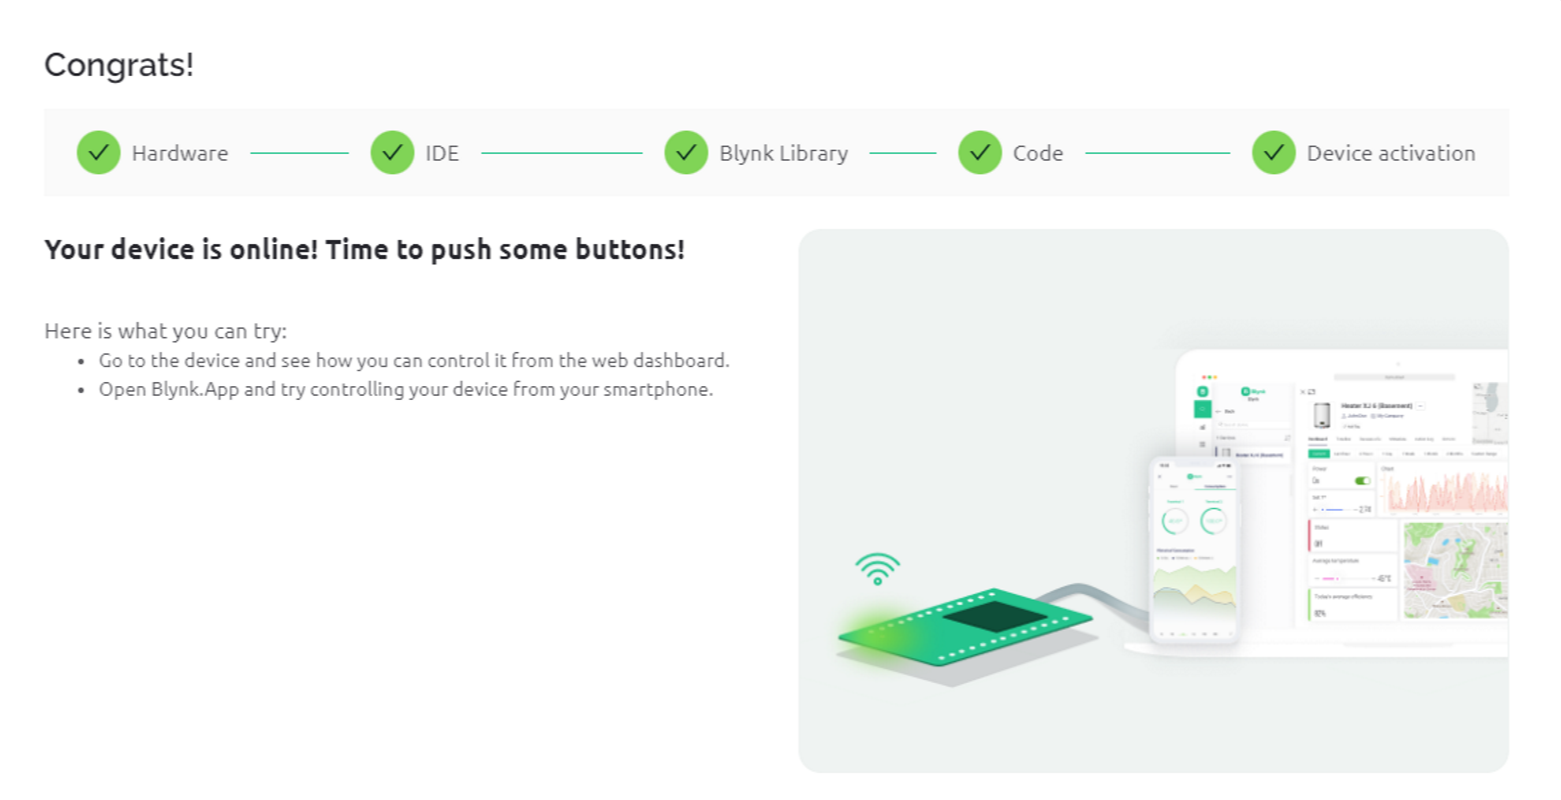
For the sake of initial testing and verification, you can try upload the generated code to the WizFi360 board. If successful you should then see a completion notification on the next window as such:
Furthermore, from the generated code above it is important to keep and copy 5 lines from the generated code which consists of:


The 5 lines above must be copied to the sample code I provided below or from repository. It is important to also delete the old corresponding lines to avoid definition / variable duplicates as well. The BLYNK_AUTH_TOKEN is unique and should be kept private as it is unique identifier of your device.
Furthermore as a part of the Quick-start guide from Blynk, you'll be provided with template dashboard which you can modify and expand. In my case I adapted as such:
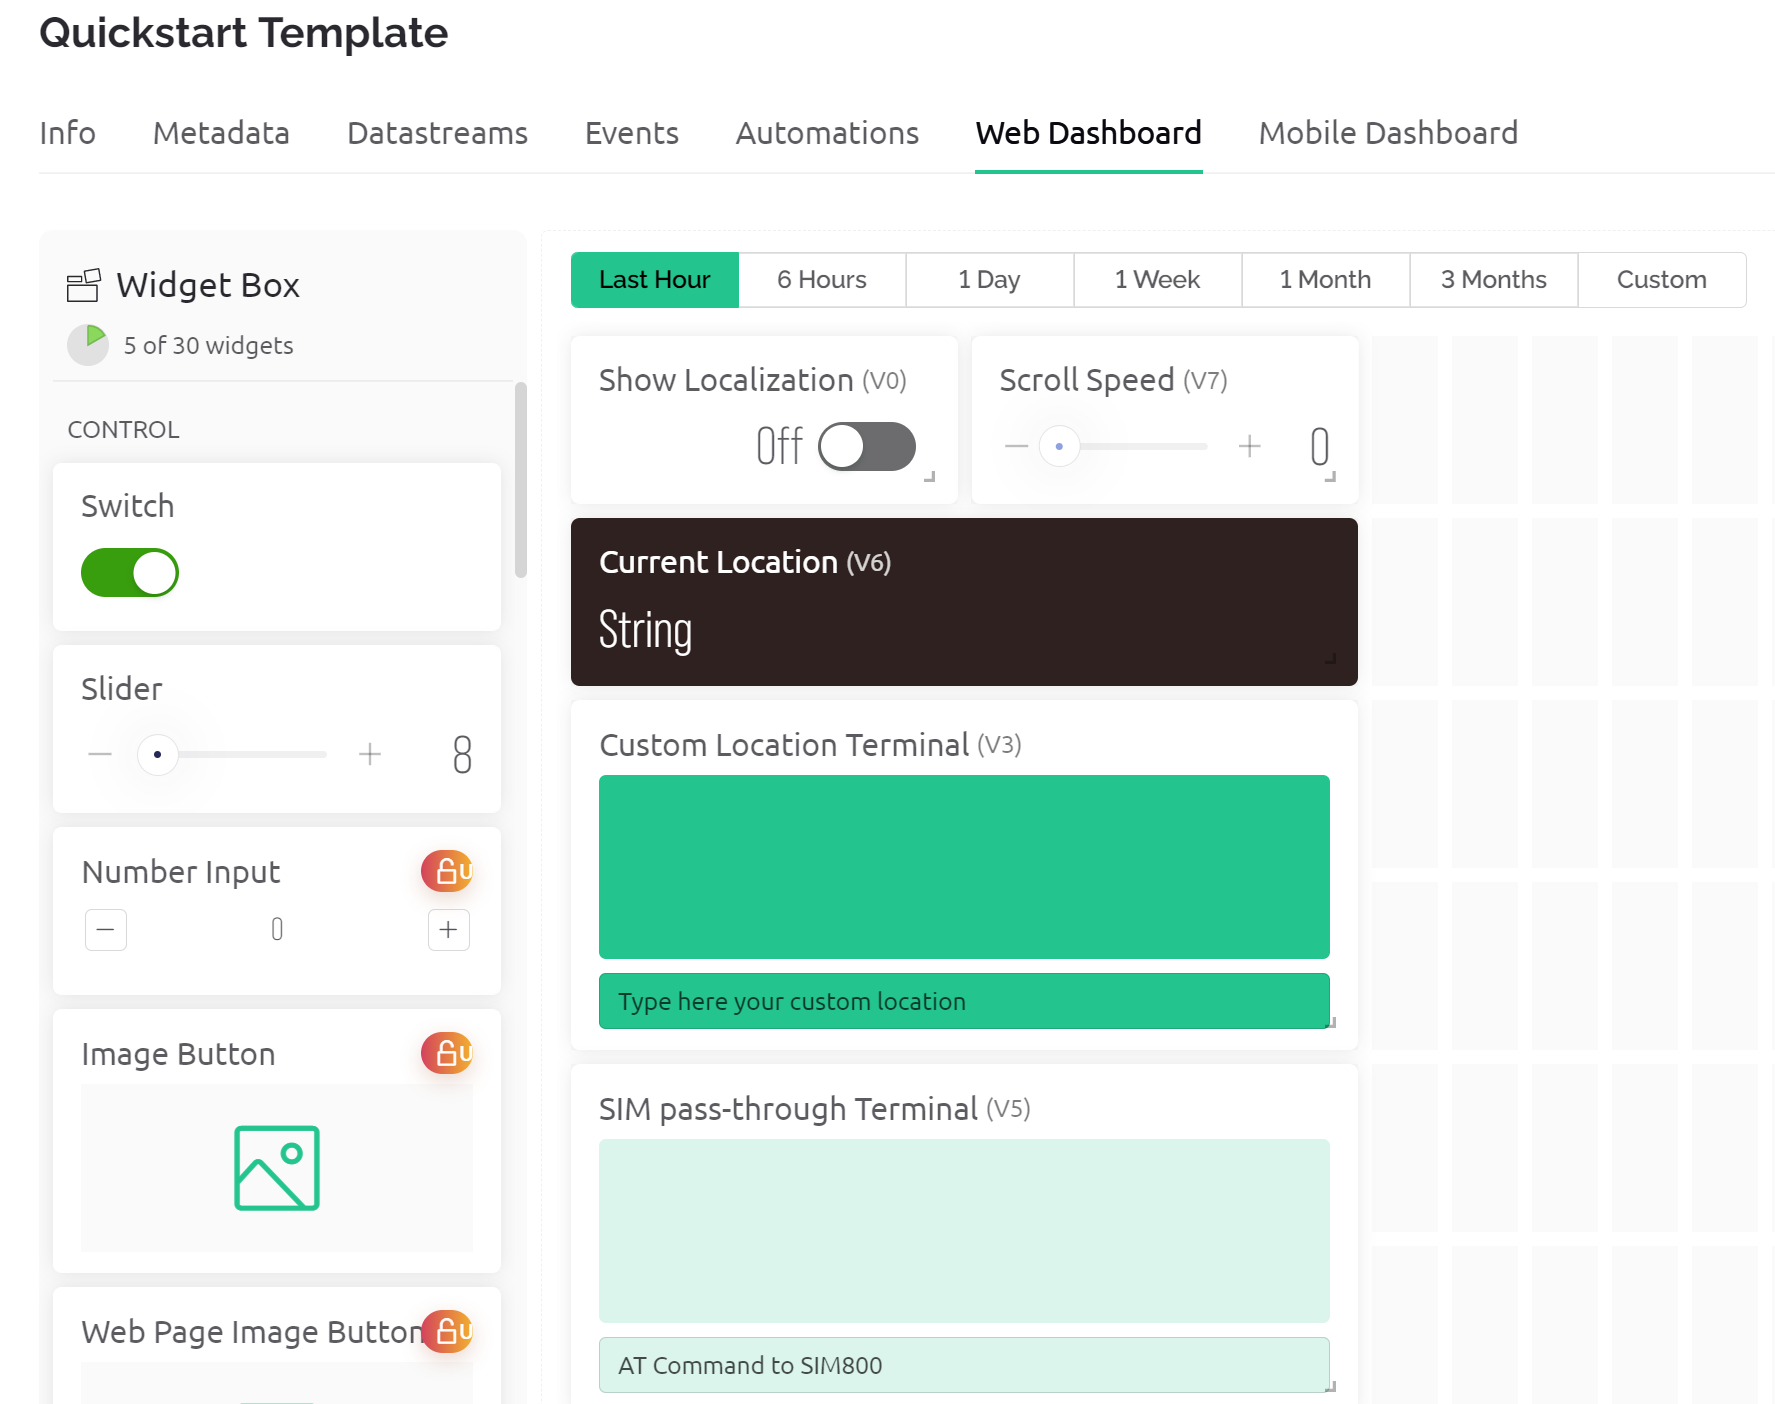
You can place, orient, and resize the way you want, but the most important thing is that the Virtual-Pin numbers associated with the widget must match! As it is hardcoded in my sample code. For example there, the SIM pass-through Terminal I assigned to V5 and you should copy and duplicate it too! An example is below:
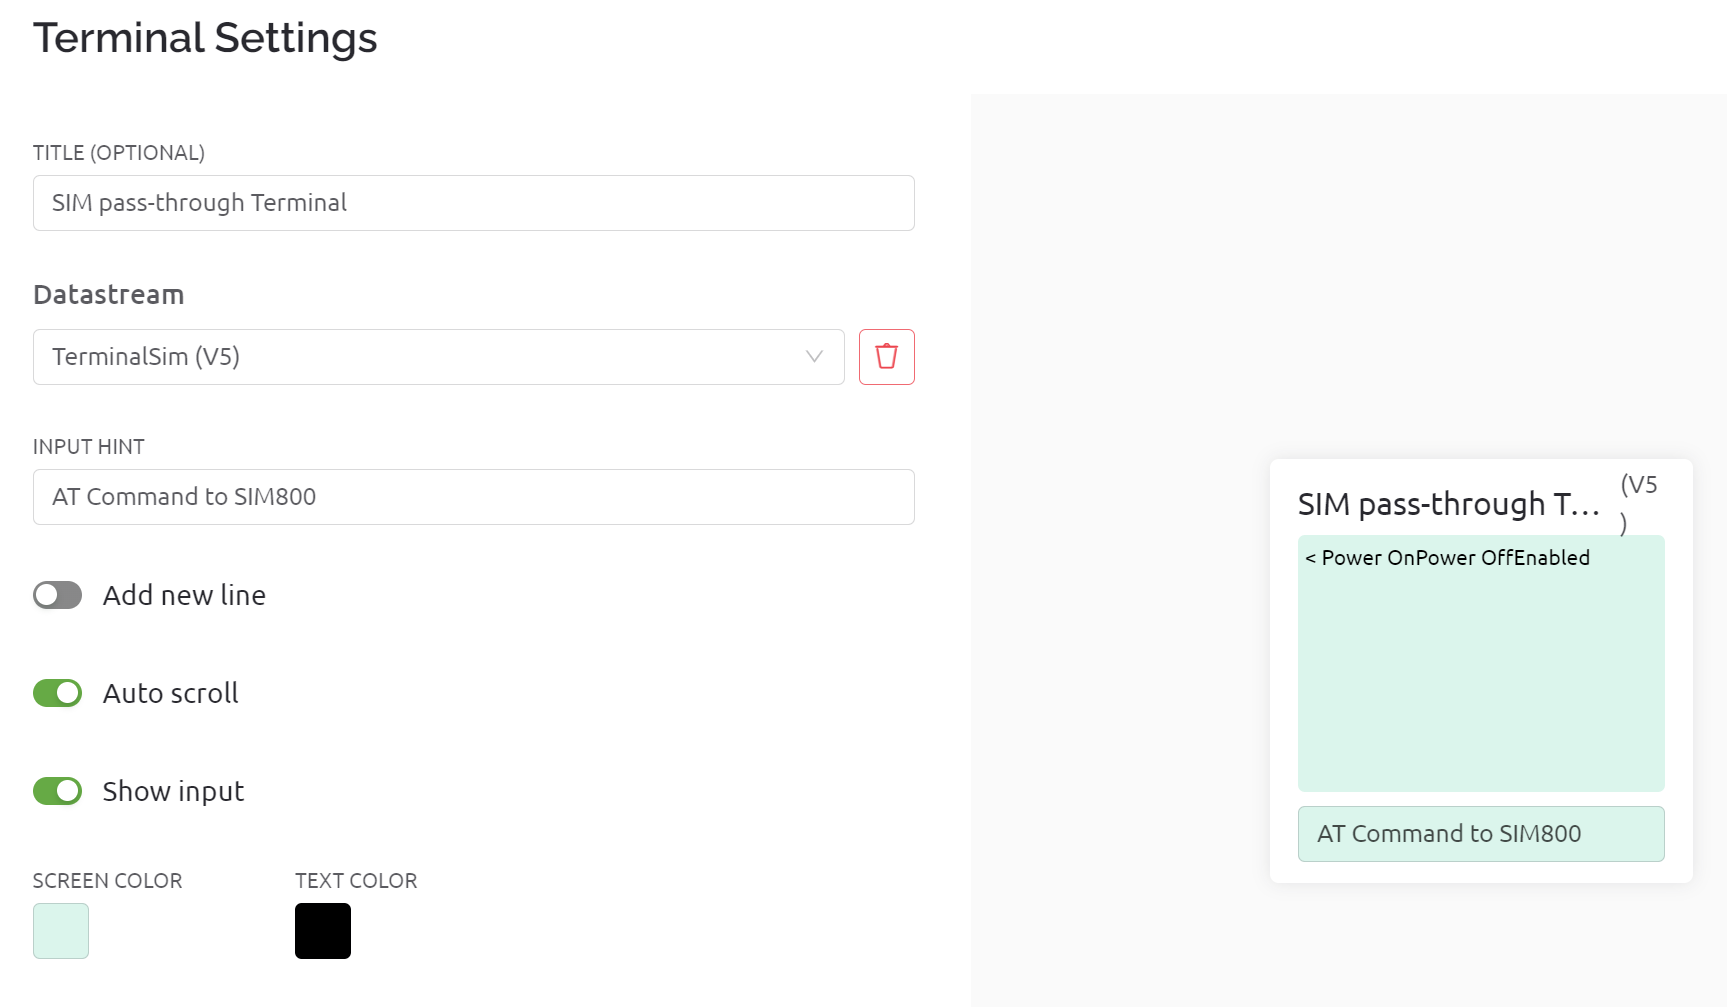
You can create the Data-stream yourself under the widget. In summary the Datastream that I'm using and currently implemented in sample code are:
- V0 -> Button Switch -> For enabling or disabling location function
- V7 -> Slider -> For adjusting the scrolling speed of the display
- V6 -> Label -> For showing the current location as shown on the display
- V3 -> Terminal -> For (manual custom) input text of the location and IFTTT feed
- V5 -> Terminal -> For pass-through AT command to the SIM800 Module
Certainly once you get the hang of using it you can expand it the way you want it!
BTW you should also explore the Blynk Smartphone Apps that you can create essentially with identical process as the web UI.

The next service that you need as mentioned earlier is IFTTT. It is a smartphone app which you should be able to download for free via Apple Store or Play Store. You should be able to make an account for free and create trigger/applets for free as well. IFTTT is essentially an APP/Service that trigger certain action based on certain input trigger. For example in my case here, WizFiLoCaLLizer will show I'm at home as soon as I'm connected to my home WiFi network.
This can be done as the following:
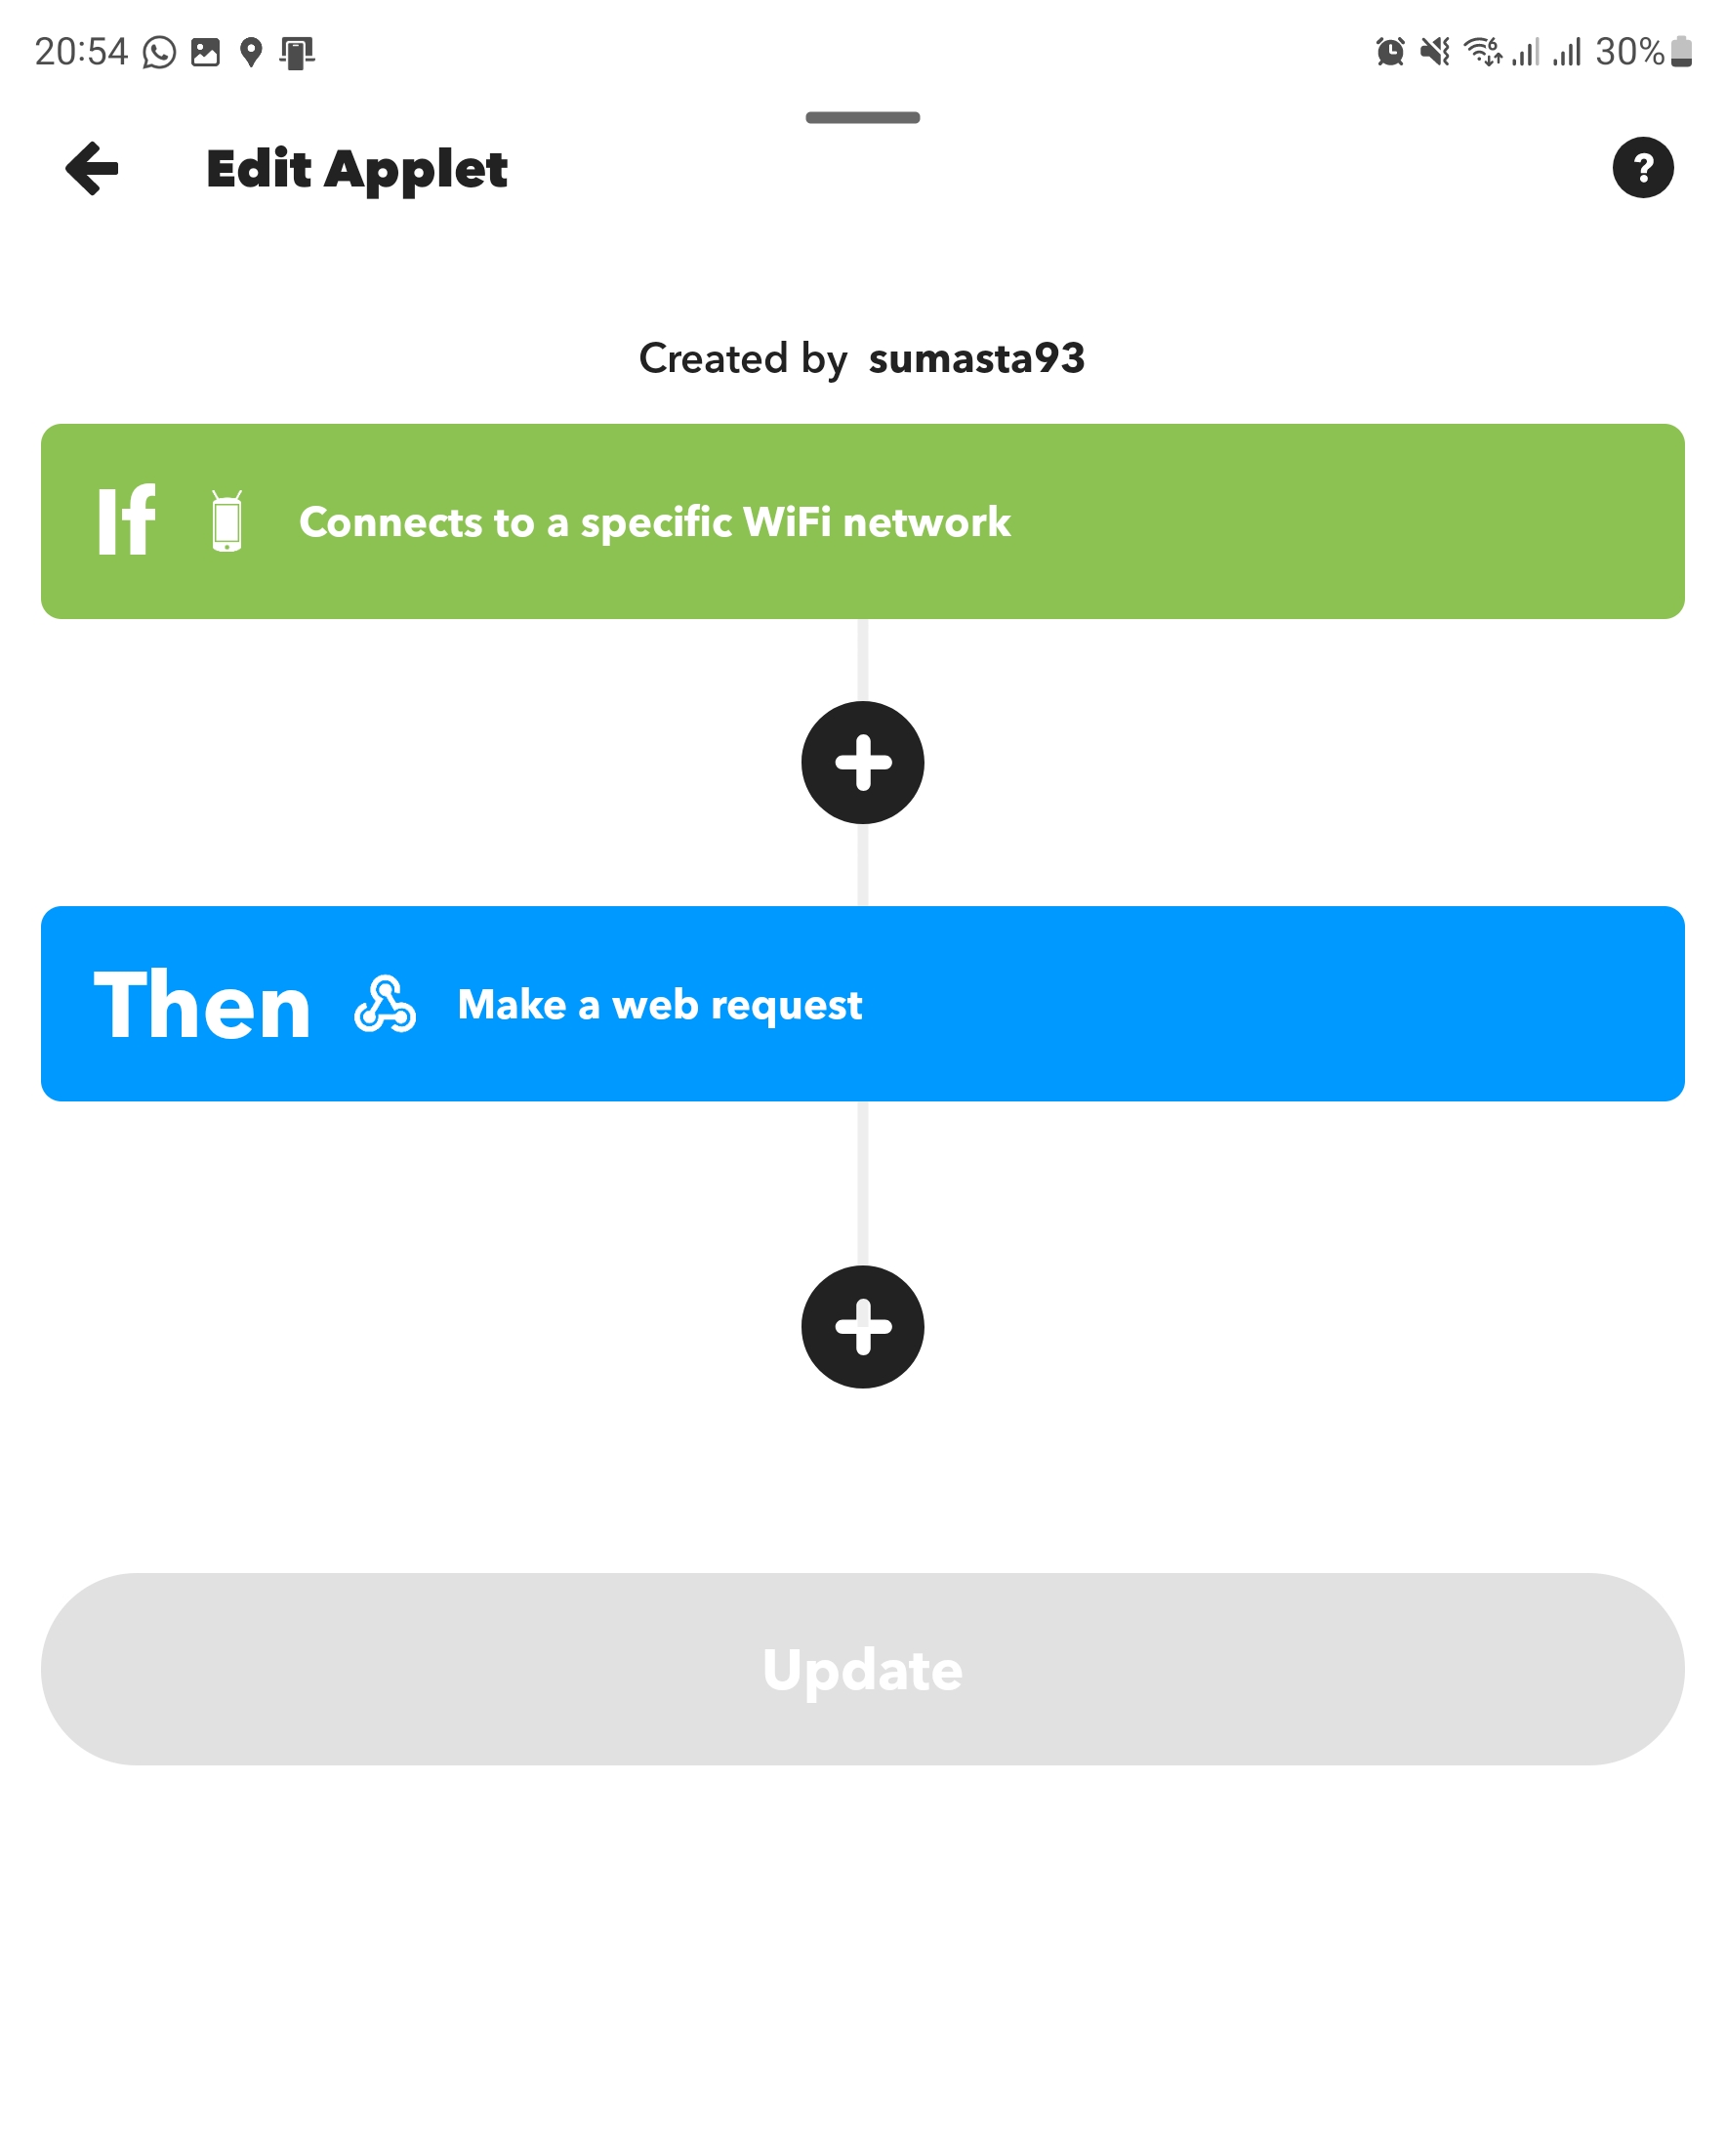
As you can see from the instance above, if my smartphone connect to a specific Wifi network (which is my home WiFi) it will trigger a Web request. This web request is essentially an HTTP request to the Blynk server specifically our device and our specific Data-stream. Example is as below:
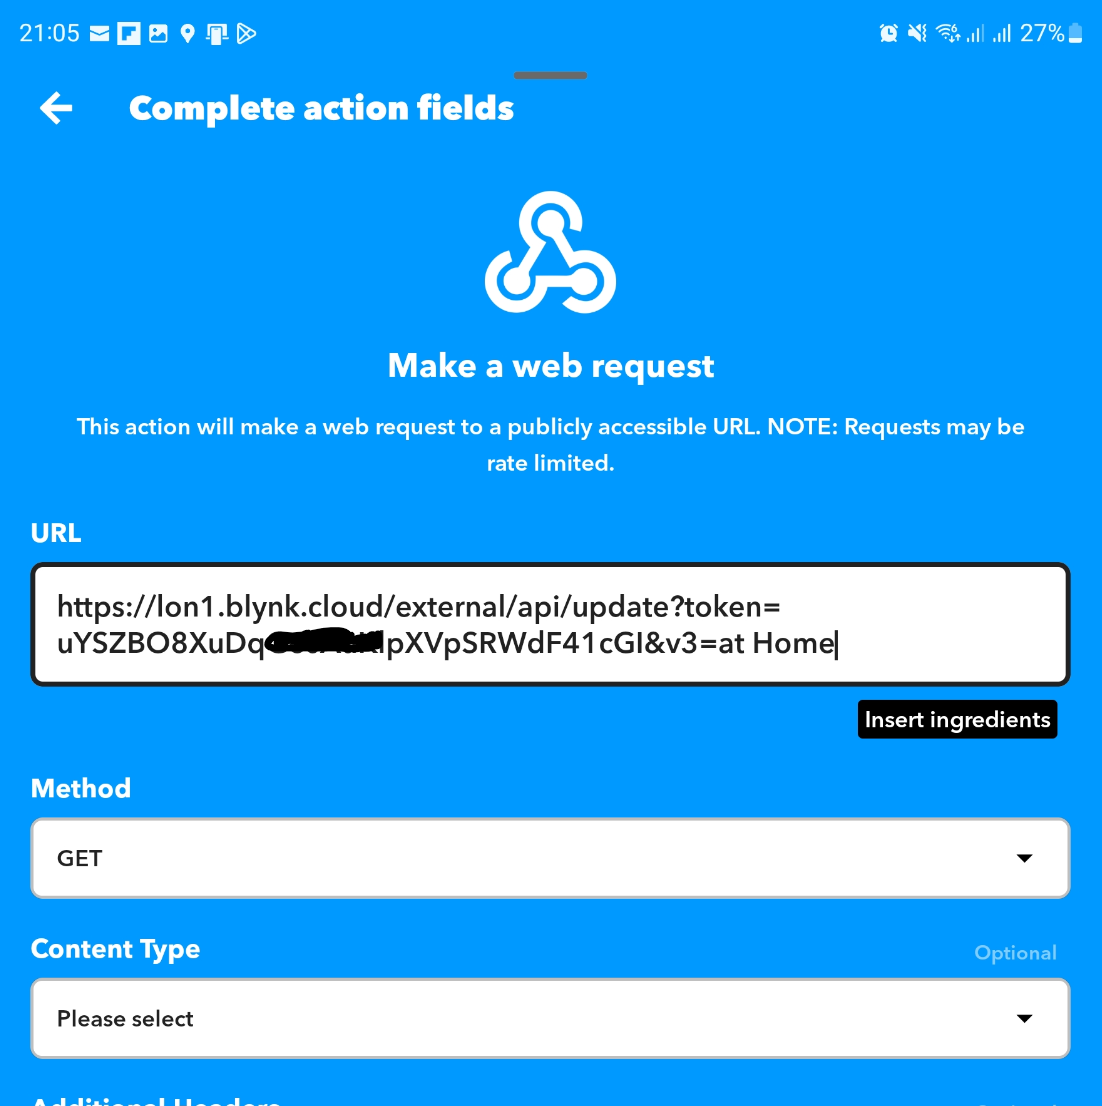
As you can see from the syntax above, the URL request consists of:
URL syntax: https://{server_address}/external/api/update?token={token}&{pin}={value}
In my example case above the details of my server regional address is lon1.
My token starts with uYSZ and ends with cGI
My pin is V3.
my value is at Home.
So in summary what will happen is that as soon as I'm connected to my Home WiFi network, an automatic HTTP request with the syntax above will be send out. The Blynk server will then react accordingly and adjust the value assign to Virtual Pin V3, which in my case handles the location info that is being display on the matrix display.
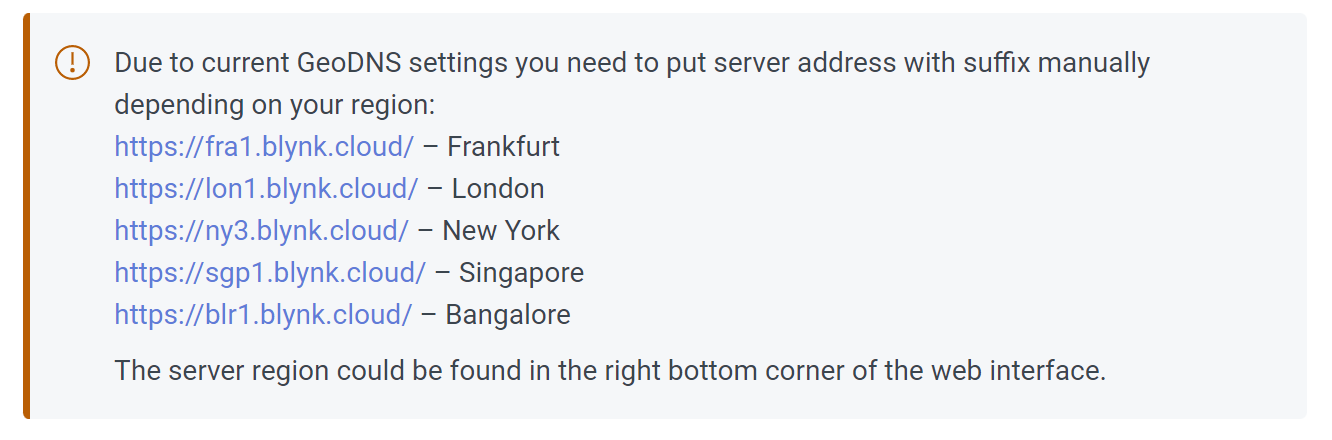
So that's it right! Nothing more nothing less. If you are located outside Europe you might expect different server_address, you can see this post to see to which regional address your device is connected to.
Arduino Code
As the last part of this instruction, I'll guide you through the SW installation part in Arduino. I'm a big fan of PlatformIO, but in this case I decided to port the software into single arduino .ino file for ease of use and installation on your side.
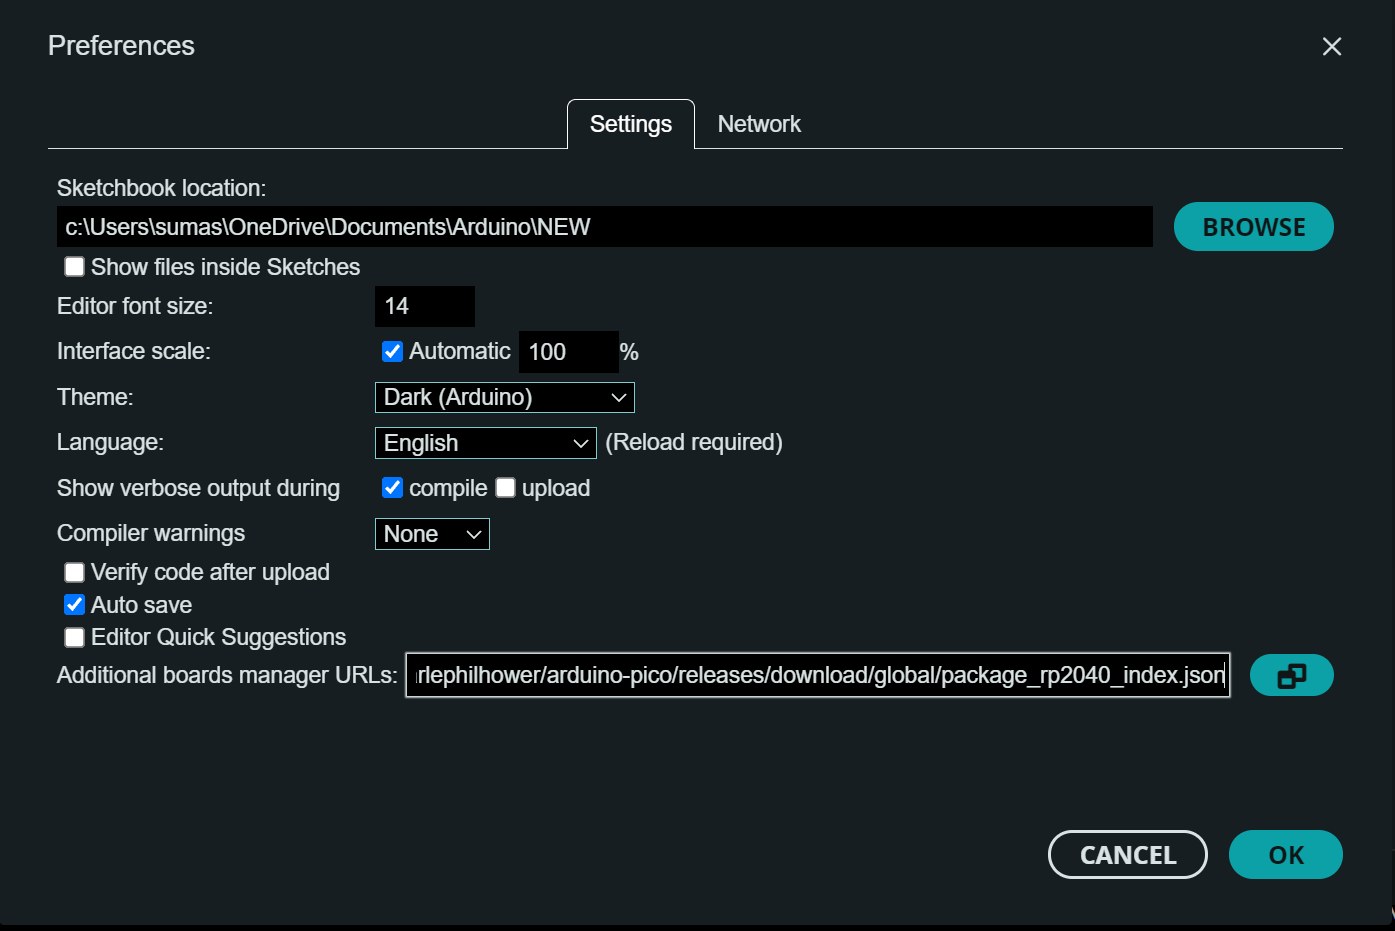
If you have never programmed WizFi360-EVB-Pico with Arduino IDE before, then you should add a line in Arduino Board manager and install it accordingly:
https://github.com/earlephilhower/arduino-pico/releases/download/global/package_rp2040_index.json
Following that then you should go to board manager and should install the Raspberry Pi Pico package by Earle F. Philhower as shown below.
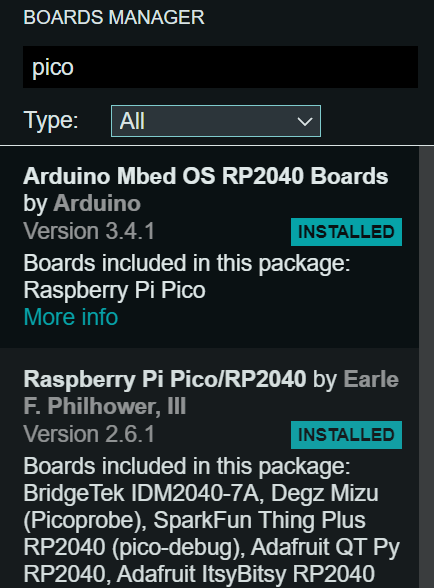
At this point, once installed, you can easily try to run a sample blink.ino code just to check whether you can compile and upload the code successfully to the Wizfi360 Pico board.
The next action is to install several libraries used in my sample code. Those are:
- Blynk Library as shown in the previous instruction steps as well.
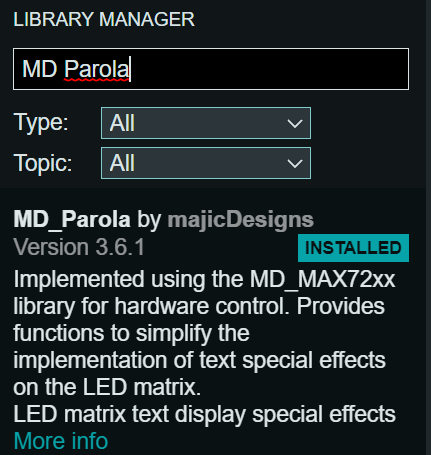
- MD Parola Library for the MAX7219 Matrix display driver
- Third and last one is to install Wizfi360 Arduino Library. Unfortunately as far as I know this library is not available directly in Arduino IDE, so you must get it from Github, download it locally and import it as .zip or copy it to library location of your Arduino.
Once all the libraries have been successfully installed you should be able to run the sample code I provided below. As mentioned above there are 5 lines of the code you should replace and the rest should be ready to go!
Good luck! in case you're stuck and have questions feel free to reach me at www.sumasta.tech.
-
WizFiLoCaLLizer_TemplateCode.ino
Template Basic Code for WizFiLoCaLLizer


-
Schematic
