
Getting Started with W5100S Ethernet Controller and Arduino IDE
W5100S Ethernet controller initialization on the W5100S-EVB-Pico board using Arduino IDE, with network details printed to Serial Monitor.

WIZnet - W5100S-EVB-Pico
x 1

Arduino - Arduino IDE
x 1
If you're looking to work with the W5100S Ethernet controller and W5100S-EVB-Pico board using the Arduino IDE, this article will guide you through the setup and usage process. The W5100S-EVB-Pico is a compact board equipped with all the necessary components to test and develop Ethernet-based applications. The example code provided in this article initializes the Ethernet library, configures the chip select pin, checks the Ethernet controller's status, and prints network configuration details to the Serial Monitor.
Requirements
To get started with the W5100S Ethernet controller and W5100S-EVB-Pico board using the Arduino IDE, you will need the following:
- W5100S-EVB-Pico board
- Arduino IDE with W5100S-EVB-Pico board support and the WIZnet Ethernet library installed
Setup
1. Connect the W5100S-EVB-Pico board to your computer using a USB cable.
2. Open the Arduino IDE and select the "W5100S-EVB-Pico" board from the "Tools" > "Board" menu.
3. Open the "Ethernet_Initialization" sketch provided in this folder.
4. In the sketch, the line Ethernet.init(csPin); initializes the Ethernet library and configures the chip select (CS) pin for the W5100S Ethernet controller on the W5100S-EVB-Pico board. The csPin variable is set to 17, which is the appropriate chip select pin for the W5100S Ethernet controller on the W5100S-EVB-Pico board.
5. Upload the sketch to the W5100S-EVB-Pico board.
Usage
1. Open the Serial Monitor in the Arduino IDE by going to "Tools" > "Serial Monitor."
2. Set the baud rate to 9600 in the Serial Monitor.
3. The sketch will initialize the Ethernet controller, check its status, and print the network configuration, including the MAC address, IP address, subnet mask, and gateway address.
Code
// Include the required libraries for Ethernet communication:
#include <SPI.h>
#include <Ethernet.h>

// Define a unique MAC address for your device. This is a 6-byte identifier:
byte mac[] = {
  0xDE, 0xAD, 0xBE, 0xEF, 0xFE, 0xED
};

// Define a static IP address for your device:
IPAddress ip(192, 168, 1, 177);

// Define the Chip Select (CS) pin for W5100S on W5100S-EVB-Pico:
const int csPin = 17;

void setup() {
  // Initialize serial communication at 9600 baud rate and wait for the port to open:
  Serial.begin(9600);
  while (!Serial) {
    ; // Wait for serial port to connect. Needed for native USB port only.
  }

  // Initialize Ethernet communication with the specified CS pin:
  Ethernet.init(csPin);

  // Start the Ethernet connection using DHCP:
  Serial.println("Starting Ethernet connection...");
  if (Ethernet.begin(mac) == 0) {
    // If DHCP configuration fails, print an error message:
    Serial.println("Failed to configure Ethernet using DHCP");

    // Try to configure Ethernet with the static IP address:
    Ethernet.begin(mac, ip);
  }
  // Wait for a second to allow the Ethernet shield to initialize properly:
  delay(1000);
  // Print a message to indicate that Ethernet initialization is complete:
  Serial.println("Ethernet initialized");

  // Print the network configuration obtained during Ethernet initialization:
  Serial.print("IP address: ");
  Serial.println(Ethernet.localIP()); // Print the device's IP address.
  Serial.print("Subnet mask: ");
  Serial.println(Ethernet.subnetMask()); // Print the device's subnet mask.
  Serial.print("Gateway IP: ");
  Serial.println(Ethernet.gatewayIP()); // Print the gateway IP address.
  Serial.print("DNS server IP: ");
  Serial.println(Ethernet.dnsServerIP()); // Print the DNS server IP address.
}

void loop() {
  // There is nothing to do in the loop for this example.
  // The purpose of this sketch is to initialize the Ethernet connection and display network configuration.
}
Example Output
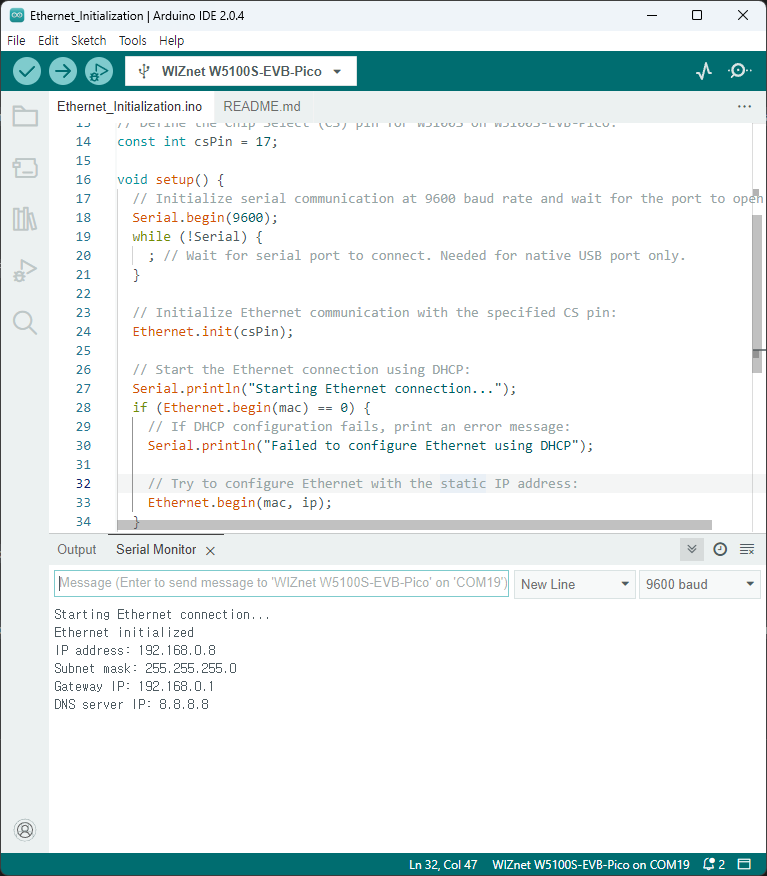
The output on the Serial Monitor should look similar to the following:
Starting Ethernet connection...
Ethernet initialized
IP address: 192.168.0.8
Subnet mask: 255.255.255.0
Gateway IP: 192.168.0.1
DNS server IP: 8.8.8.8
The specific values for the IP address, subnet mask, and gateway address will depend on your network configuration.
result
Notes
This example is a starting point for learning how to initialize the W5100S Ethernet controller and print network configuration details. You can expand on this example by implementing additional Ethernet functionality, such as DHCP IP address assignment, creating web servers or clients, and working with TCP/UDP sockets.
-
Ethernet_Initialization
Ethernet Initialization Example for W5100S-EVB-Pico
