
Flexible Birdhouse Camera System for Multiple Nests
Flexible Birdhouse Camera System for Multiple Nests

새집 안에서 무슨 일이 벌어지고 있을까? 끊임없이 들려오는 새끼 새들의 울음소리는 호기심을 자극합니다. 이 프로젝트는 바로 그 질문에서 출발했습니다. 독일의 메이커 Konrad Wohlfahrt는 여러 개의 새집을 동시에 모니터링할 수 있는 저비용 카메라 시스템을 직접 설계했고, 그 핵심에는 W5500 기반 유선 Ethernet이 있습니다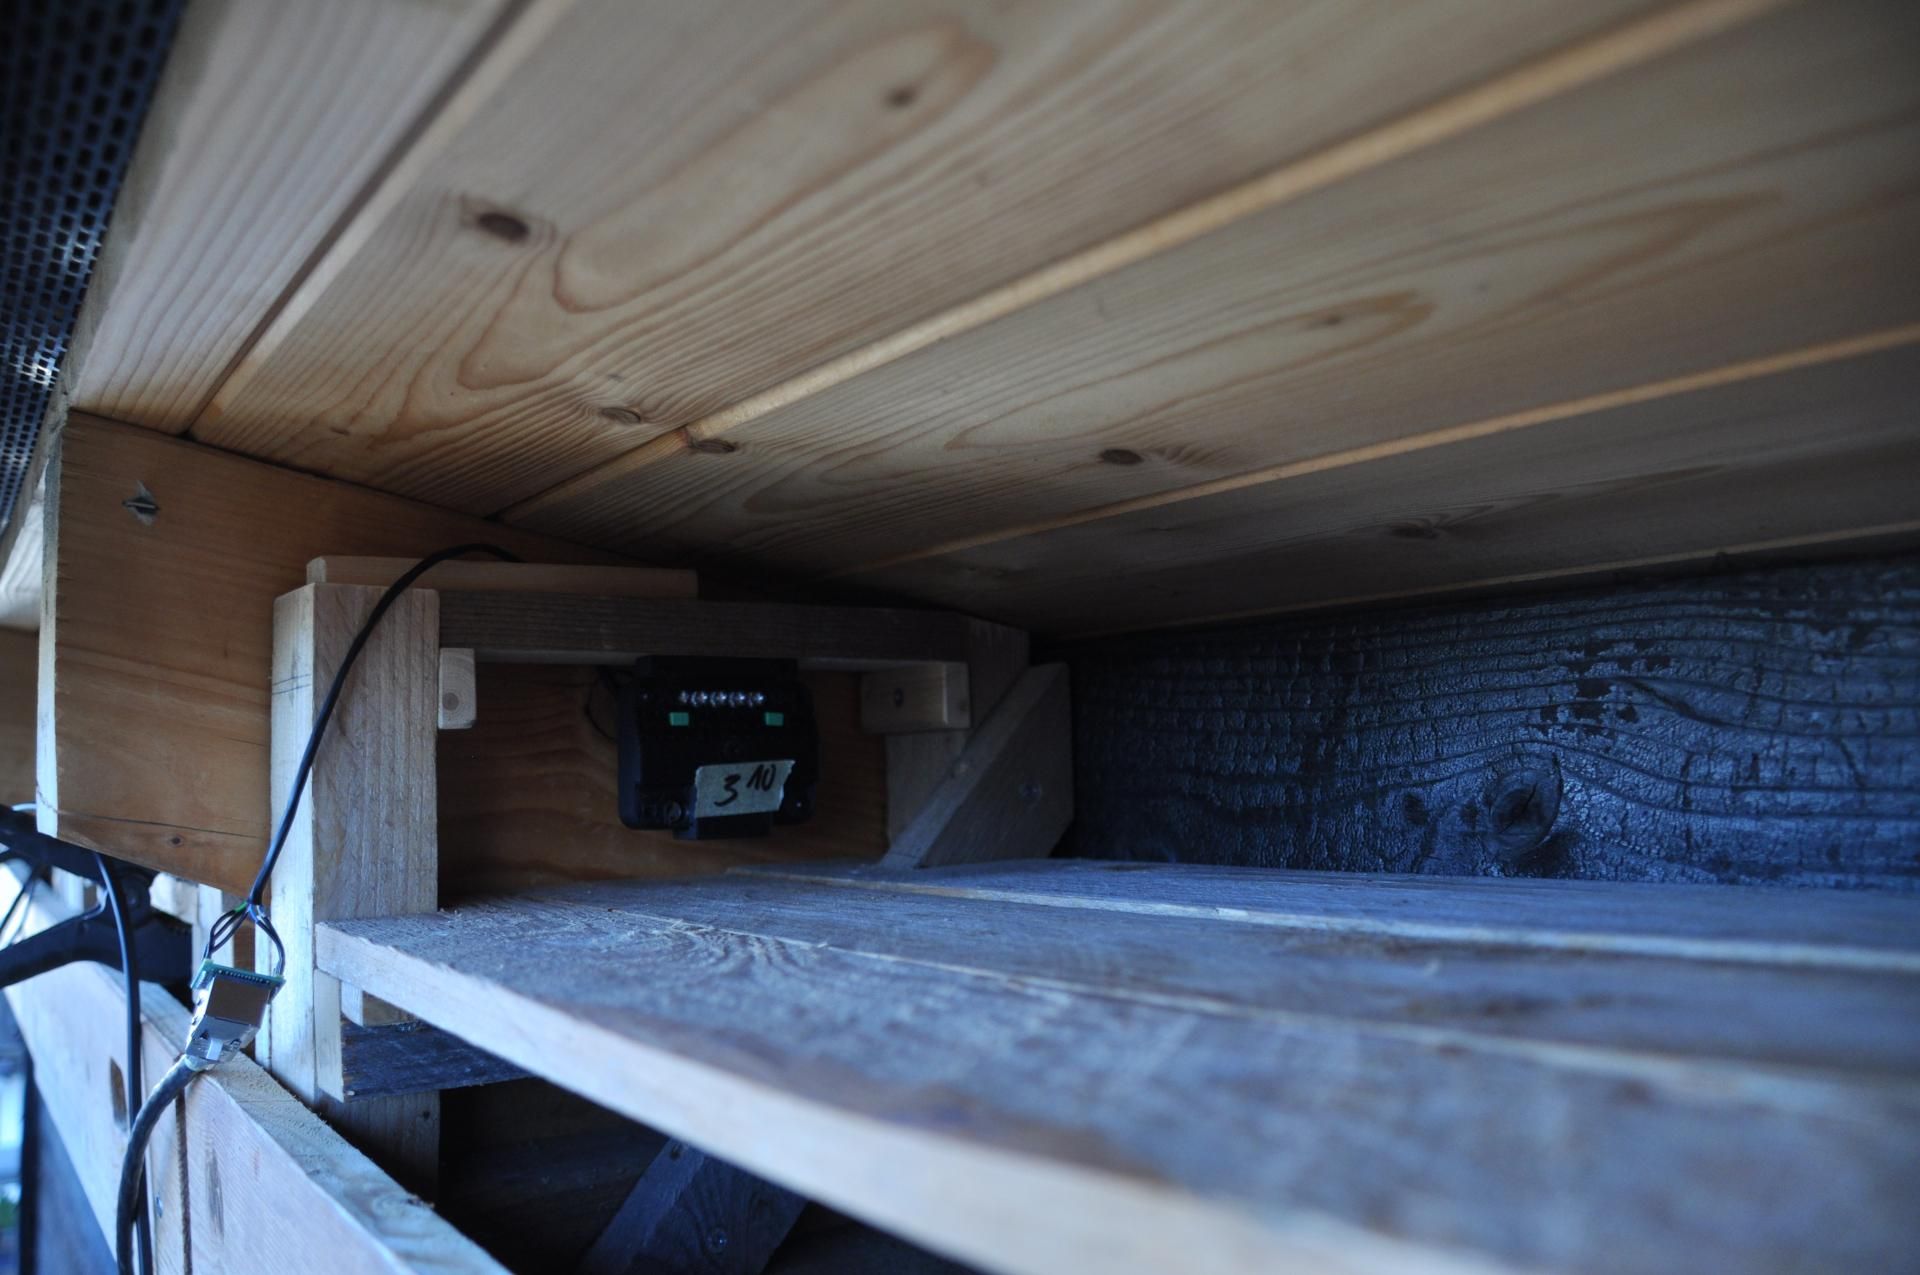
개요: 상용 제품이 해결하지 못한 것
시중에는 새집용 카메라 제품이 이미 많습니다. 일부는 새집에 통합된 형태로, 일부는 독립 모듈로 판매됩니다. 그러나 대부분 단일 유닛 중심 설계이고, Wi-Fi 의존적이며, 가격도 높습니다. 여러 개의 새집을 동시에 관찰하려면 노드당 비용이 낮아야 하고, 설치 환경에 관계없이 안정적으로 동작해야 합니다.
이 프로젝트의 목표는 명확했습니다. 노드당 €15 이하의 비용으로, 다수의 새집을 하나의 웹 인터페이스에서 통합 관리하는 완전한 로컬 네트워크 기반 모니터링 시스템을 만드는 것입니다. 전체 소스코드는 GitHub에 공개되어 있어 누구든 자신의 환경에 맞게 수정하고 확장할 수 있습니다.
시스템 아키텍처
시스템은 크게 두 가지 컴포넌트로 구성됩니다. 각 새집에 설치되는 카메라 노드와, 모든 데이터를 수집하고 웹 인터페이스를 제공하는 Flask 서버입니다.
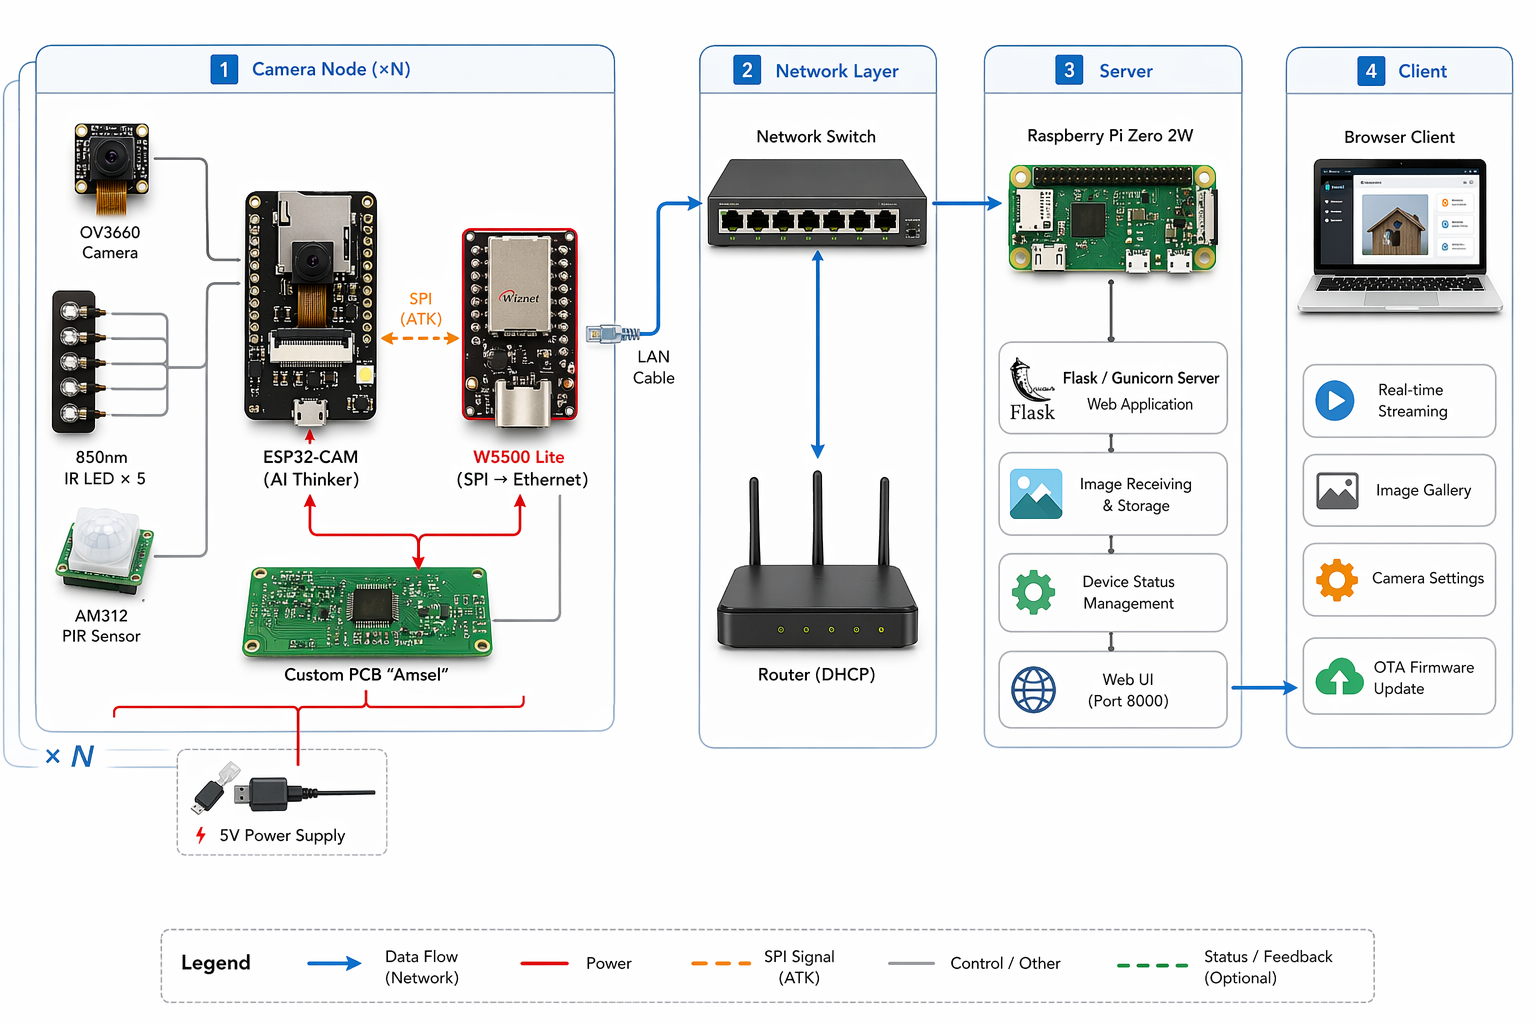
PIR 센서가 움직임을 감지하면 저전력 모드에서 웨이크업 → ESP32-CAM이 이미지를 캡처 → W5500이 TCP/IP를 처리해 Ethernet으로 전송 → 네트워크 스위치를 통해 Raspberry Pi Flask 서버에 저장되는 흐름입니다. 사용자는 브라우저에서 웹 UI에 접속해 이미지 열람, 실시간 스트리밍, OTA 펌웨어 업데이트를 모두 수행할 수 있습니다.
왜 Wi-Fi가 아닌 W5500인가
ESP32-CAM은 Wi-Fi를 내장하고 있습니다. 그런데 이 프로젝트는 Wi-Fi를 쓰지 않습니다. 작성자는 그 이유를 명확히 밝힙니다. 여러 새집이 각기 다른 거리에 분산 설치되는 환경에서는 Wi-Fi 신호 강도와 안정성이 문제가 된다는 것입니다. 실외 환경에서는 장애물, 거리, 전파 간섭이 복합적으로 작용하고, 데이터 손실은 모니터링 시스템에서 치명적입니다.
여기에 더해 기술적으로 중요한 구조적 이유가 있습니다. [추정] ESP32-CAM은 OV3660 카메라의 JPEG 인코딩과 프레임 버퍼 관리에 CPU 리소스를 집중적으로 사용합니다. 이 상황에서 Wi-Fi를 함께 운용하면 ESP32 내부의 **소프트웨어 기반 TCP/IP 스택(lwIP)**까지 MCU가 직접 처리해야 합니다. 영상 처리와 네트워크 스택이 동일한 코어 위에서 경합하는 구조입니다.
W5500은 이 문제를 하드웨어 레벨에서 분리합니다. TCP/IP 처리를 칩 내부에서 오프로딩하므로, ESP32는 카메라 데이터 처리에만 집중할 수 있습니다. SPI 인터페이스로 연결되며 3.3V 단일 전압으로 동작해 ESP32-CAM과의 통합이 간단합니다. 모듈 단가는 약 €4, 신뢰성 높은 유선 연결을 이 비용에 확보할 수 있다는 점이 멀티노드 시스템에서 특히 유효합니다.
카메라 노드: "Amsel" 커스텀 PCB
작성자는 KiCad로 커스텀 PCB를 직접 설계했습니다. 보드 이름은 "Amsel" — 독일어로 블랙버드(blackbird)를 뜻하며, 독일에서 가장 흔한 새 중 하나입니다. 향후 더 작은 변형 보드를 만들 것을 고려해 이 첫 번째 버전에 붙인 이름입니다.
주요 구성 요소:
- ESP32-CAM (AI Thinker): OV2640 또는 OV3660 카메라 모듈 탑재, 약 €6.64
- W5500 Lite: SPI 기반 하드웨어 TCP/IP, 약 €4.15
- AM312 PIR 센서: 움직임 감지 및 저전력 웨이크업 트리거, 약 €1.00
- 850nm IR LED × 5: 새를 방해하지 않는 적외선 야간 조명, GPIO4로 제어
- DS18B20 온도 센서: 새집 내부 온도 모니터링 (현재 핀 충돌로 미작동)
- Through-hole 부품 중심: 초보자도 조립 가능한 설계
Through-hole 부품을 채택한 것은 의도적인 결정입니다. 납땜 난이도를 낮춰 누구든 직접 조립할 수 있도록 한 것으로, 오픈소스 프로젝트의 접근성을 높이는 선택입니다.
노드당 총 비용은 약 €15 (공유 인프라인 Raspberry Pi, LAN 케이블, 스위치 제외). 상용 새집 카메라와 비교하면 현저히 낮은 수준입니다.
PCB 제작: NextPCB

이 프로젝트의 PCB는 NextPCB를 통해 제작되었습니다. NextPCB는 PCB 시제품 제작부터 부품 조립(PCBA)까지 지원하는 중국 기반 전자 제조 플랫폼으로, 160개국 이상에 서비스를 제공합니다.
퍼포드보드(perfboard)는 초기 프로토타입에는 충분하지만, 이 프로젝트처럼 동일한 모듈을 여러 개 제작해야 하는 상황에서는 한계가 있습니다. 배선 오류 위험, 반복 조립의 번거로움, 신뢰성 문제가 복합적으로 발생하기 때문입니다. 커스텀 PCB는 이 모든 문제를 해결하며, 작성자는 NextPCB의 보드 품질과 납기, 가격에 만족했다고 밝혔습니다.
→ NextPCB: https://www.nextpcb.com
Flask 웹서버: 로컬에서 모든 것을 관리
서버는 Raspberry Pi Zero 2W 위에서 동작합니다. 저전력이면서 이 용도에는 충분한 성능을 제공합니다. 운영체제는 Raspberry Pi OS Lite(64-bit) — 그래픽 인터페이스 없이 콘솔 기반으로 운용됩니다. Flask 애플리케이션은 Gunicorn을 통해 서비스되며, systemd로 부팅 시 자동 시작됩니다.
웹 인터페이스의 주요 기능:
- 메인 페이지: 전체 노드의 최신 이미지 32장 및 저장 용량 표시, 디바이스 상태(녹색/노란색/빨간색) 한눈에 확인
- 디바이스 페이지: 노드별 이미지 갤러리(24장 단위), 실시간 스트리밍, 로그 조회
- 설정 및 관리: 카메라 파라미터 조정, 데이터 다운로드, 디바이스 설정 JSON 업로드
- OTA 펌웨어 업데이트: 새집에 물리적으로 접근하지 않고
.bin파일을 네트워크로 업로드
OTA 업데이트는 이 시스템에서 특히 중요한 기능입니다. 새집에 카메라가 설치된 이후에는 물리적 접근이 새를 방해할 수 있기 때문에, 네트워크를 통한 원격 펌웨어 배포가 실용적 운용의 핵심 조건이 됩니다.
WIZnet W5500: 이 시스템의 네트워크 인프라
W5500은 이 프로젝트에서 단순한 부품이 아닙니다. Wi-Fi를 대체하는 네트워크 인프라 그 자체입니다.
- 하드웨어 TCP/IP 오프로딩: TCP, IP, UDP, ICMP 등 네트워크 프로토콜을 칩 내부에서 처리. ESP32-CAM이 영상 처리에만 집중할 수 있는 환경을 만듦
- SPI 인터페이스: ESP32-CAM과 간단하게 연결, 3.3V 단일 전압 동작
- 유선 연결의 안정성: 실외 다중 노드 환경에서 Wi-Fi 신호 변동 없이 일관된 데이터 전송 보장
- 소형 폼팩터: 커스텀 PCB에 통합하기 용이한 크기
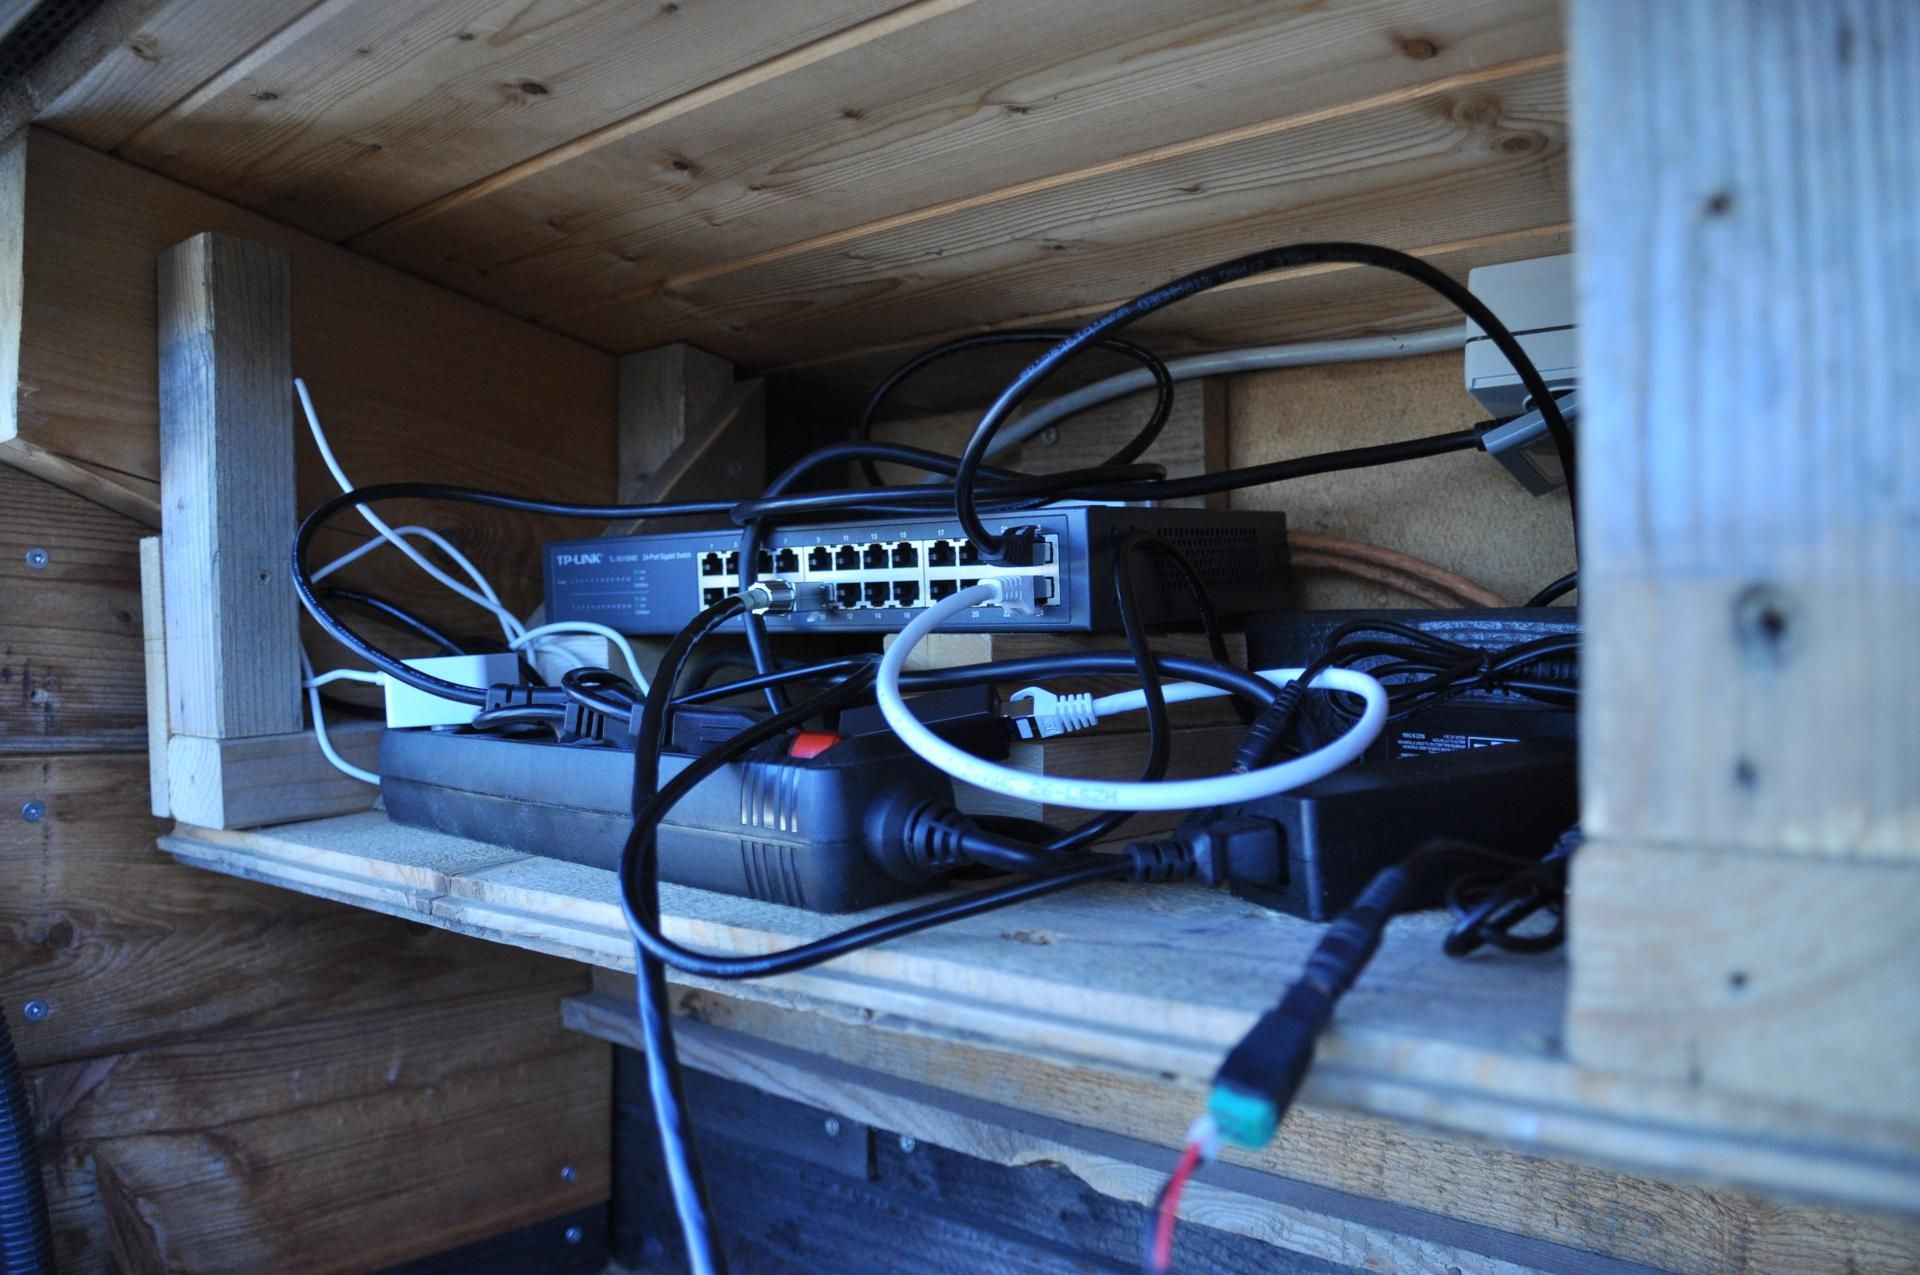
네트워크 구성은 두 가지 방식을 지원합니다. Router 기반(권장) — 모든 노드와 Raspberry Pi를 라우터에 연결하고 DHCP로 IP를 자동 할당하는 방식입니다. RPi DHCP 서버 방식 — Raspberry Pi가 직접 DHCP 서버 역할을 하며 카메라 노드에 IP를 할당합니다. 두 방식 모두 펌웨어의 설정 파일(configuration.h)에서 간단히 전환할 수 있습니다.
현재 전원과 데이터 케이블을 별도로 배선하는 구조지만, 작성자는 PoE(Power over Ethernet) 통합을 향후 과제로 명시하고 있습니다. W5500 기반 유선 인프라 위에 PoE가 더해지면, 단일 LAN 케이블로 전원과 데이터를 동시에 공급하는 더욱 간결한 구조가 완성됩니다.
Raspberry Pi 서버 설정

서버 환경 구성은 간결합니다. Raspberry Pi OS Lite(64-bit) 를 SD카드에 플래시한 뒤, SSH를 활성화하고 부팅합니다. 이후 GitHub에 공개된 서버 레포지토리를 클론하고, Python 가상환경을 구성한 뒤 Gunicorn으로 Flask 앱을 실행합니다. systemd 서비스로 등록해두면 부팅 시 자동으로 서버가 시작되므로 별도의 수동 조작이 필요 없습니다.
서버 레포지토리: https://github.com/KonradWohlfahrt/BirdhouseCameraSystemServer
웹 인터페이스는 포트 8000에서 접근할 수 있으며, 브라우저에서 http://<pi-ip>:8000 또는 http://<hostname>:8000 형식으로 접속합니다.
전체 시스템 연결

네트워크 구성은 두 가지 방식을 지원합니다.
Option A — Router 기반(권장): 모든 카메라 노드와 Raspberry Pi를 공유기에 연결합니다. DHCP로 IP가 자동 할당되며, 펌웨어의 configuration.h에 Raspberry Pi의 IP 주소만 지정하면 됩니다. 가장 간단하고 일반적인 구성입니다.
Option B — RPi DHCP 서버 방식: Raspberry Pi가 직접 DHCP 서버 역할을 수행하며 카메라 노드에 IP를 할당합니다. Raspberry Pi는 Wi-Fi로 상위 네트워크에 연결되고, 카메라 노드는 유선으로 Raspberry Pi에 직접 연결됩니다.
전원은 현재 5V 전원 공급 장치를 LAN 케이블과 별도로 각 노드에 연결하는 방식입니다. 태양광 패널과 배터리 조합도 가능하지만 구성이 복잡해집니다. 모든 연결이 완료되면 Raspberry Pi를 먼저 부팅하고, 이후 카메라 노드에 전원을 인가합니다. 정상 동작 시 노드가 웹 인터페이스 메인 페이지에 자동으로 나타납니다.
비즈니스 가치 및 확장 시나리오
이 프로젝트가 보여주는 구조 — 저비용 MCU + 하드웨어 TCP/IP 오프로딩 + 로컬 서버 통합관리 — 는 새집 모니터링을 넘어 다양한 분야에 적용 가능합니다.
- 스마트 농장: 다수의 축사나 온실에 분산 설치된 카메라 노드를 단일 대시보드로 관리
- 야생동물 연구: 여러 지점에 설치된 트레일 카메라를 유선으로 연결해 안정적인 데이터 수집
- 산업 설비 모니터링: 공장 내 다수의 설비를 저비용 노드로 실시간 영상 감시
- 교육 및 메이커 커뮤니티: 오픈소스 구조로 누구든 복제·확장 가능한 레퍼런스 설계
특히 노드당 €15 수준의 비용 구조는 대규모 배포 시나리오에서 강력한 경쟁력이 됩니다. 기존 상용 솔루션 대비 수 배 낮은 단가로 동등 이상의 기능을 구현할 수 있습니다.
한계 및 개선 방향
이 프로젝트는 현재도 충분히 작동하는 완성된 시스템이지만, 작성자 스스로도 개선 방향을 명확히 인지하고 있습니다.
현재 한계:
- 전원·데이터 분리 배선: 각 노드에 LAN 케이블과 5V 전원 케이블을 별도로 연결해야 해 설치 복잡도가 높음
- SPI 거리 제약: W5500과 ESP32-CAM 간 SPI 배선은 약 30cm 이내로 제한, 모듈 배치 자유도 감소
- 온도 센서 미작동: DS18B20의 핀 충돌(IO0, IO16 모두 점유) 문제로 내부 온도 모니터링 불가
- 수동 저장 관리: 이미지 DB 자동 삭제 기능 없음, 장기 운용 시 주기적 수동 백업 필요
개선 방향:
- PoE 통합: 단일 LAN 케이블로 전원과 데이터를 동시 공급 — 설치 구조를 대폭 단순화하고 유지보수 편의성을 높이는 가장 현실적인 다음 단계
- SMD 부품 전환: PCB 크기를 줄여 더 좁은 새집에도 적용 가능하도록 개선
- 온도 센서 핀 충돌 해결: 소프트웨어 방식의 핀 재구성 또는 PCB 개정을 통한 해결
- 자동 저장 관리: 오래된 이미지 자동 아카이브 또는 삭제 정책 도입
FAQ
Q. 네트워크 구성이 복잡하지 않나요? Router 기반 방식(Option A)을 사용하면 일반 가정용 공유기에 스위치를 연결하는 것만으로 충분합니다. 펌웨어의 configuration.h에 Raspberry Pi의 IP 주소만 입력하면 설정이 완료됩니다. 네트워크 지식이 많지 않아도 따라할 수 있는 수준입니다.
Q. 카메라 노드를 몇 개까지 연결할 수 있나요? 원문에 명시적인 상한선은 없습니다. 네트워크 스위치의 포트 수와 Raspberry Pi 서버의 처리 성능에 따라 결정됩니다. Raspberry Pi Zero 2W는 저전력 경량 서버로, 노드 수가 늘어날수록 더 높은 성능의 서버로 교체하는 것도 고려할 수 있습니다.
Q. Wi-Fi 대신 유선을 쓰면 설치가 어렵지 않나요? LAN 케이블을 물리적으로 배선해야 하는 번거로움은 있습니다. 그러나 실외 다중 노드 환경에서 Wi-Fi의 신호 불안정과 데이터 손실을 감수하는 것보다, 한 번 배선하고 안정적으로 운용하는 쪽이 장기적으로 유리합니다. 향후 PoE가 통합되면 전원 케이블까지 하나로 합쳐져 배선 부담이 크게 줄어들 전망입니다.
Q. ESP32-CAM 외에 다른 카메라 모듈을 사용할 수 있나요? 펌웨어는 OV2640과 OV3660을 공식 지원합니다. 다른 카메라 모듈을 사용할 경우 핀 구성과 초기화 설정을 코드에서 직접 수정해야 합니다. 오픈소스로 공개되어 있어 수정은 가능하지만, 호환성은 사전 검증이 필요합니다.
Q. PoE를 지금 당장 적용할 수 있나요? 현재 설계에는 PoE가 통합되어 있지 않습니다. 별도의 PoE 스플리터를 외부에 추가하는 방식으로 구현할 수는 있지만, 작성자는 이를 향후 PCB 개정 과제로 남겨두었습니다. W5500 기반 유선 인프라가 이미 갖춰져 있으므로, PoE 통합은 기술적으로 자연스러운 다음 단계입니다.
What's actually happening inside a birdhouse? The constant chirping of hungry chicks sparks curiosity, but getting a real look inside is another matter entirely. This project started with exactly that question. German maker Konrad Wohlfahrt designed a low-cost camera system capable of monitoring multiple birdhouses simultaneously — and at the heart of it is a W5500-based wired Ethernet connection.
Overview: What Commercial Products Failed to Solve
There are already plenty of birdhouse camera products on the market. Some are integrated directly into the birdhouse, others are sold as standalone modules. But most share the same limitations: single-unit designs, Wi-Fi dependency, and relatively high price points. Monitoring multiple birdhouses simultaneously demands low per-node costs and reliable operation regardless of installation distance.
The goals of this project were clear. Build a complete, locally-hosted monitoring system for under €15 per node, manageable from a single web interface — with no cloud dependency and no Wi-Fi instability. The full source code is publicly available on GitHub, making it freely adaptable for anyone's needs.
System Architecture
The system consists of two main components: camera nodes installed inside each birdhouse, and a Flask server running on a Raspberry Pi that collects all incoming data and serves the web interface.
When the PIR sensor detects motion, the ESP32-CAM wakes from low-power mode and captures an image. The W5500 handles TCP/IP processing and transmits the data over Ethernet through the network switch to the Raspberry Pi Flask server. Users access everything — image browsing, live streaming, OTA firmware updates — directly from a browser.
Why W5500 Instead of Wi-Fi
The ESP32-CAM has built-in Wi-Fi. This project doesn't use it. The reason is straightforward: in a multi-node deployment where birdhouses are scattered at varying distances, Wi-Fi signal strength and reliability become a real problem. In outdoor environments, obstacles, distance, and RF interference compound each other — and data loss is unacceptable in a monitoring system.
There is also a deeper technical reason worth noting. [Estimated] The ESP32-CAM dedicates significant CPU resources to camera data processing — JPEG encoding and frame buffer management run continuously. If Wi-Fi is active on top of this, the MCU must also handle the software-based TCP/IP stack (lwIP) entirely in firmware. Image processing and network stack handling compete for the same core resources.
W5500 separates these concerns at the hardware level. TCP/IP processing is offloaded inside the chip itself, freeing the ESP32 to focus entirely on camera data. It connects via SPI and operates at 3.3V, making integration with the ESP32-CAM straightforward. At approximately €4 per module, it delivers reliable wired connectivity at a cost that makes sense for multi-node deployments.
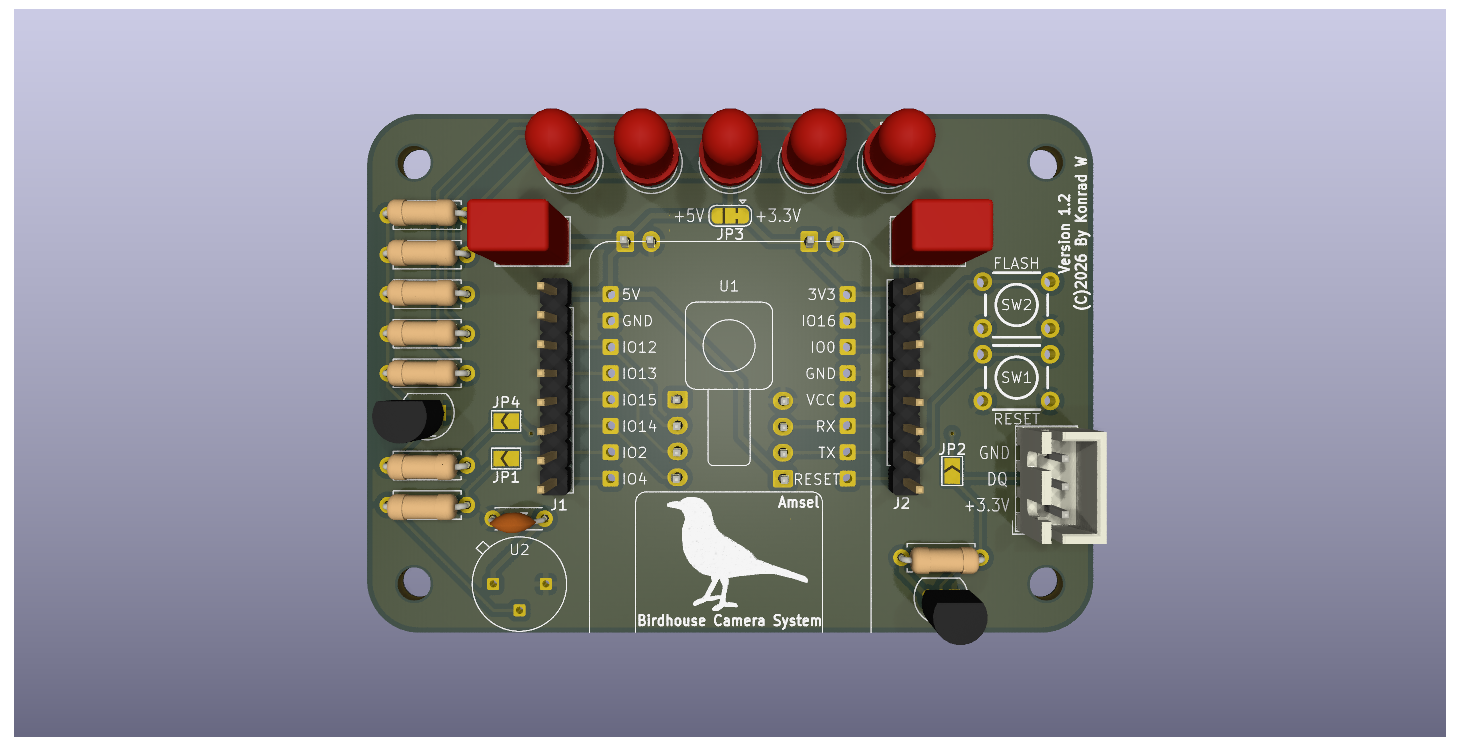
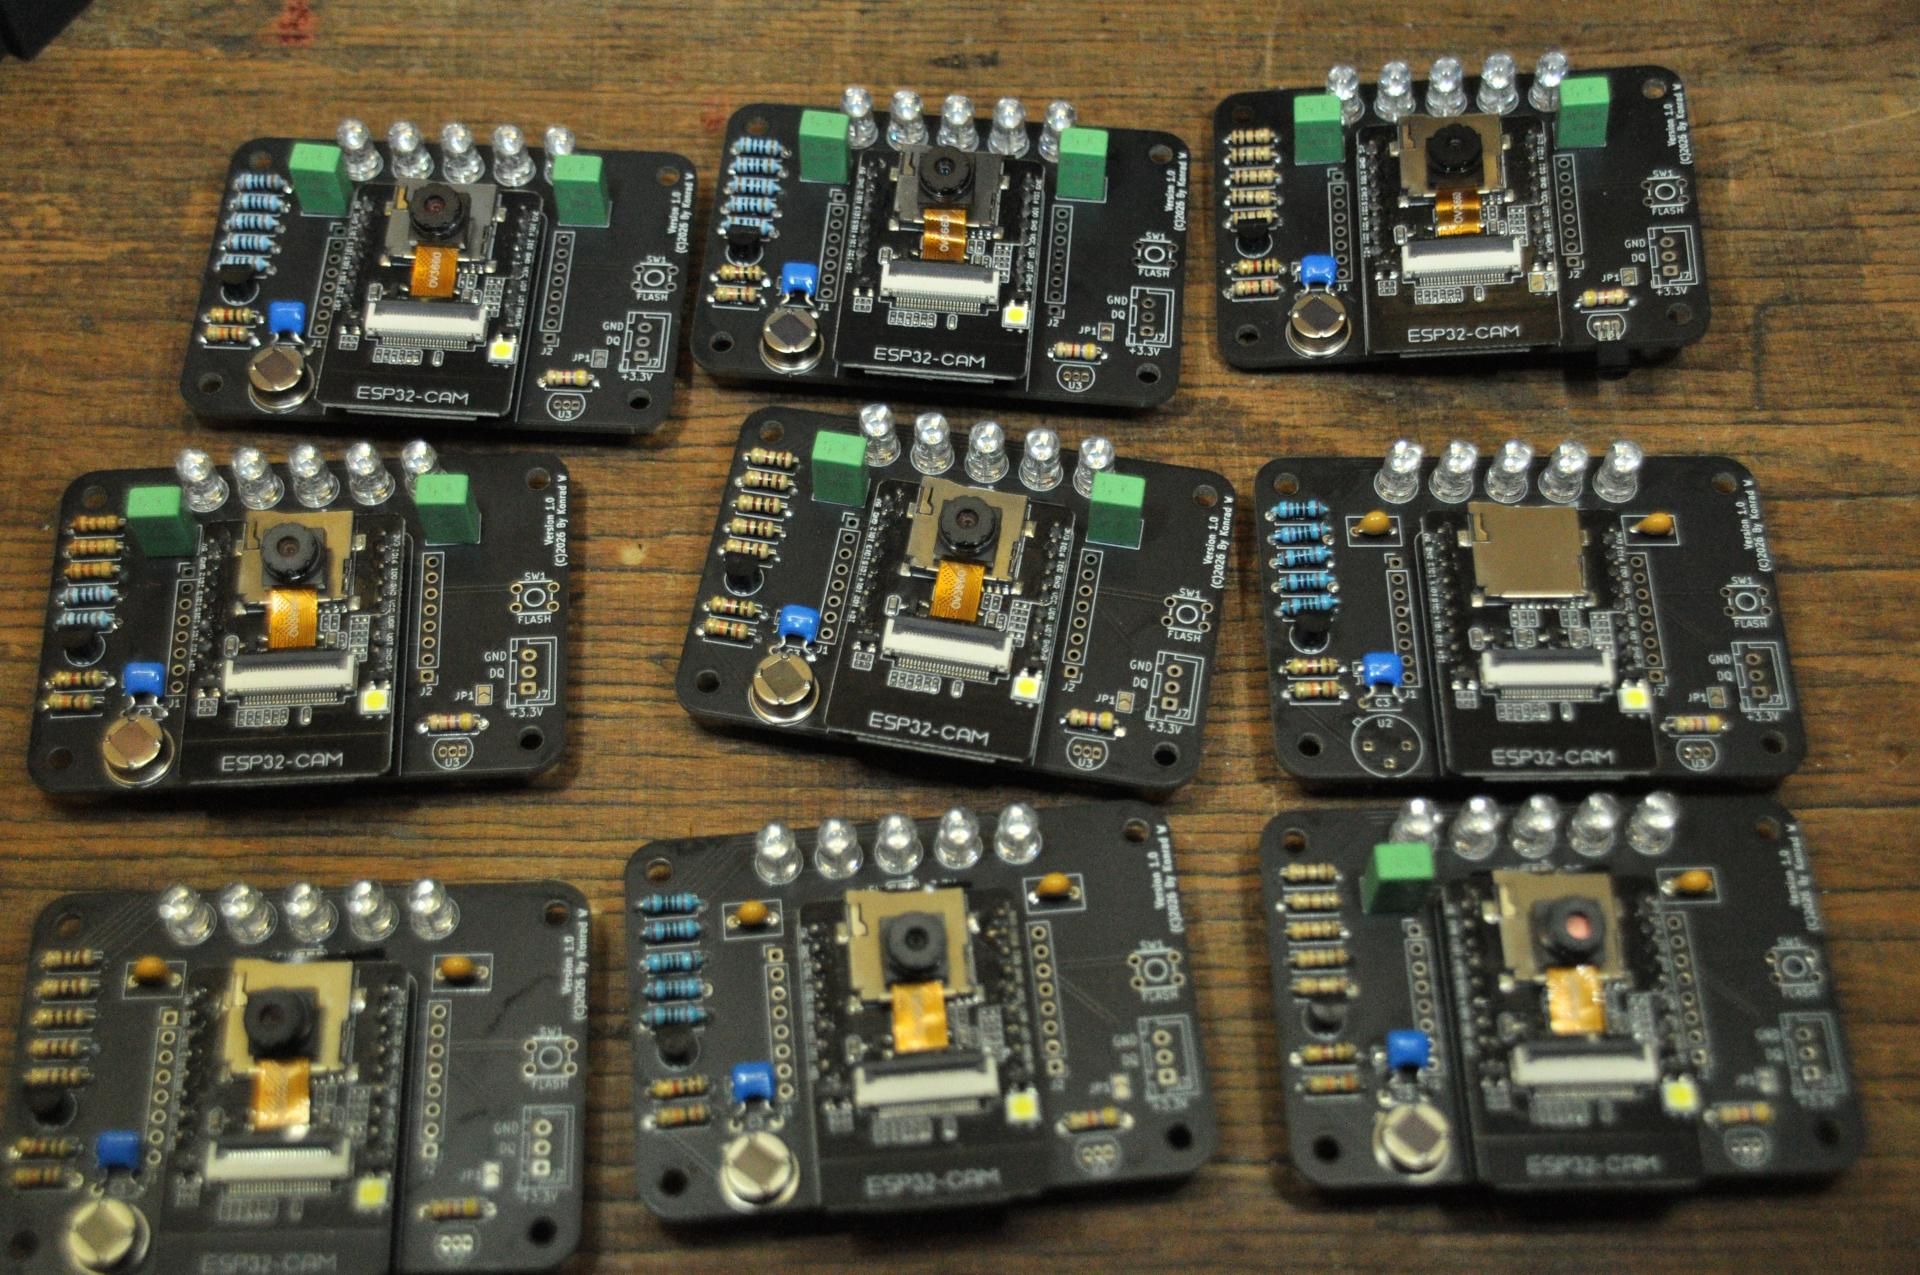
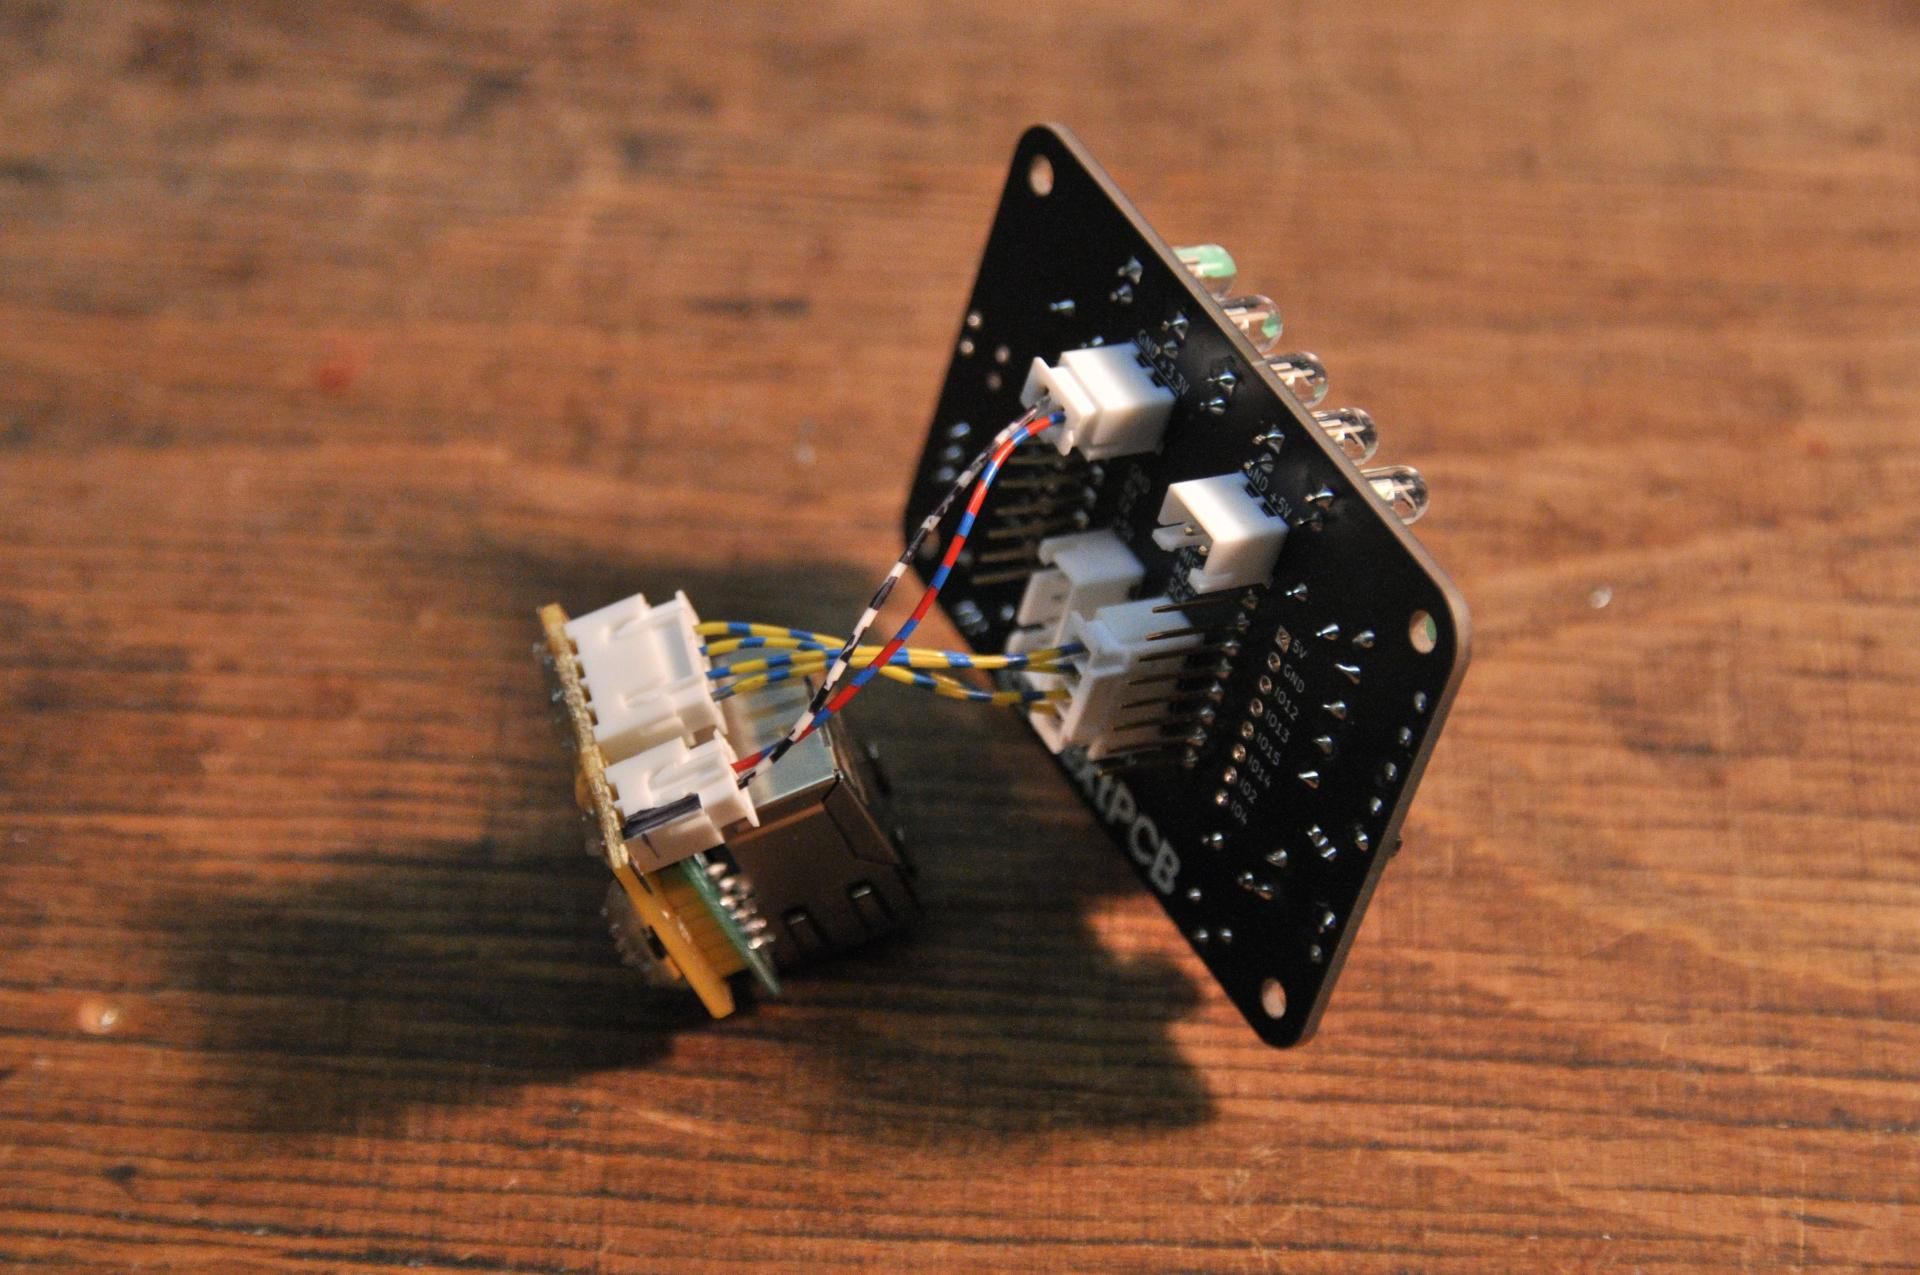
Camera Node: The "Amsel" Custom PCB
📷 [Image needed: Top view of Amsel PCB] → Original image URL: https://www.instructables.com/Flexible-Birdhouse-Camera-System-for-Multiple-Nest/
The author designed a custom PCB using KiCad. The board is named "Amsel" — German for blackbird, one of the most common birds in Germany — with the intention of creating smaller variants in the future for tighter spaces.
Key components:
- ESP32-CAM (AI Thinker): OV2640 or OV3660 camera module, approx. €6.64
- W5500 Lite: Hardware TCP/IP offloading via SPI, approx. €4.15
- AM312 PIR Sensor: Motion detection and low-power wake-up trigger, approx. €1.00
- 850nm IR LED × 5: Infrared night illumination that does not disturb birds, controlled via GPIO4
- DS18B20 Temperature Sensor: Internal birdhouse temperature monitoring (currently non-functional due to pin conflict)
- Through-hole components throughout: Accessible assembly for makers of all skill levels
The choice of through-hole components is deliberate. It lowers the soldering barrier so that anyone can assemble the board — a design philosophy that fits the open-source nature of the project.
Total cost per node is approximately €15, excluding shared infrastructure such as the Raspberry Pi, LAN cables, and network switch. Compared to commercial birdhouse camera products, the difference is significant.
PCB Fabrication: NextPCB
The PCBs for this project were manufactured by NextPCB, a China-based electronics manufacturing platform offering services from PCB prototyping through to full PCBA (PCB Assembly), including SMT, BGA, and through-hole assembly across more than 160 countries.
A perfboard works fine for early prototyping, but when building the same module repeatedly, it becomes impractical. Manual wiring errors accumulate, consistency suffers, and the process does not scale. A custom PCB resolves all of these issues cleanly. The author noted satisfaction with board quality, turnaround time, and pricing — particularly relevant when producing multiple units as this project requires.
→ NextPCB: https://www.nextpcb.com
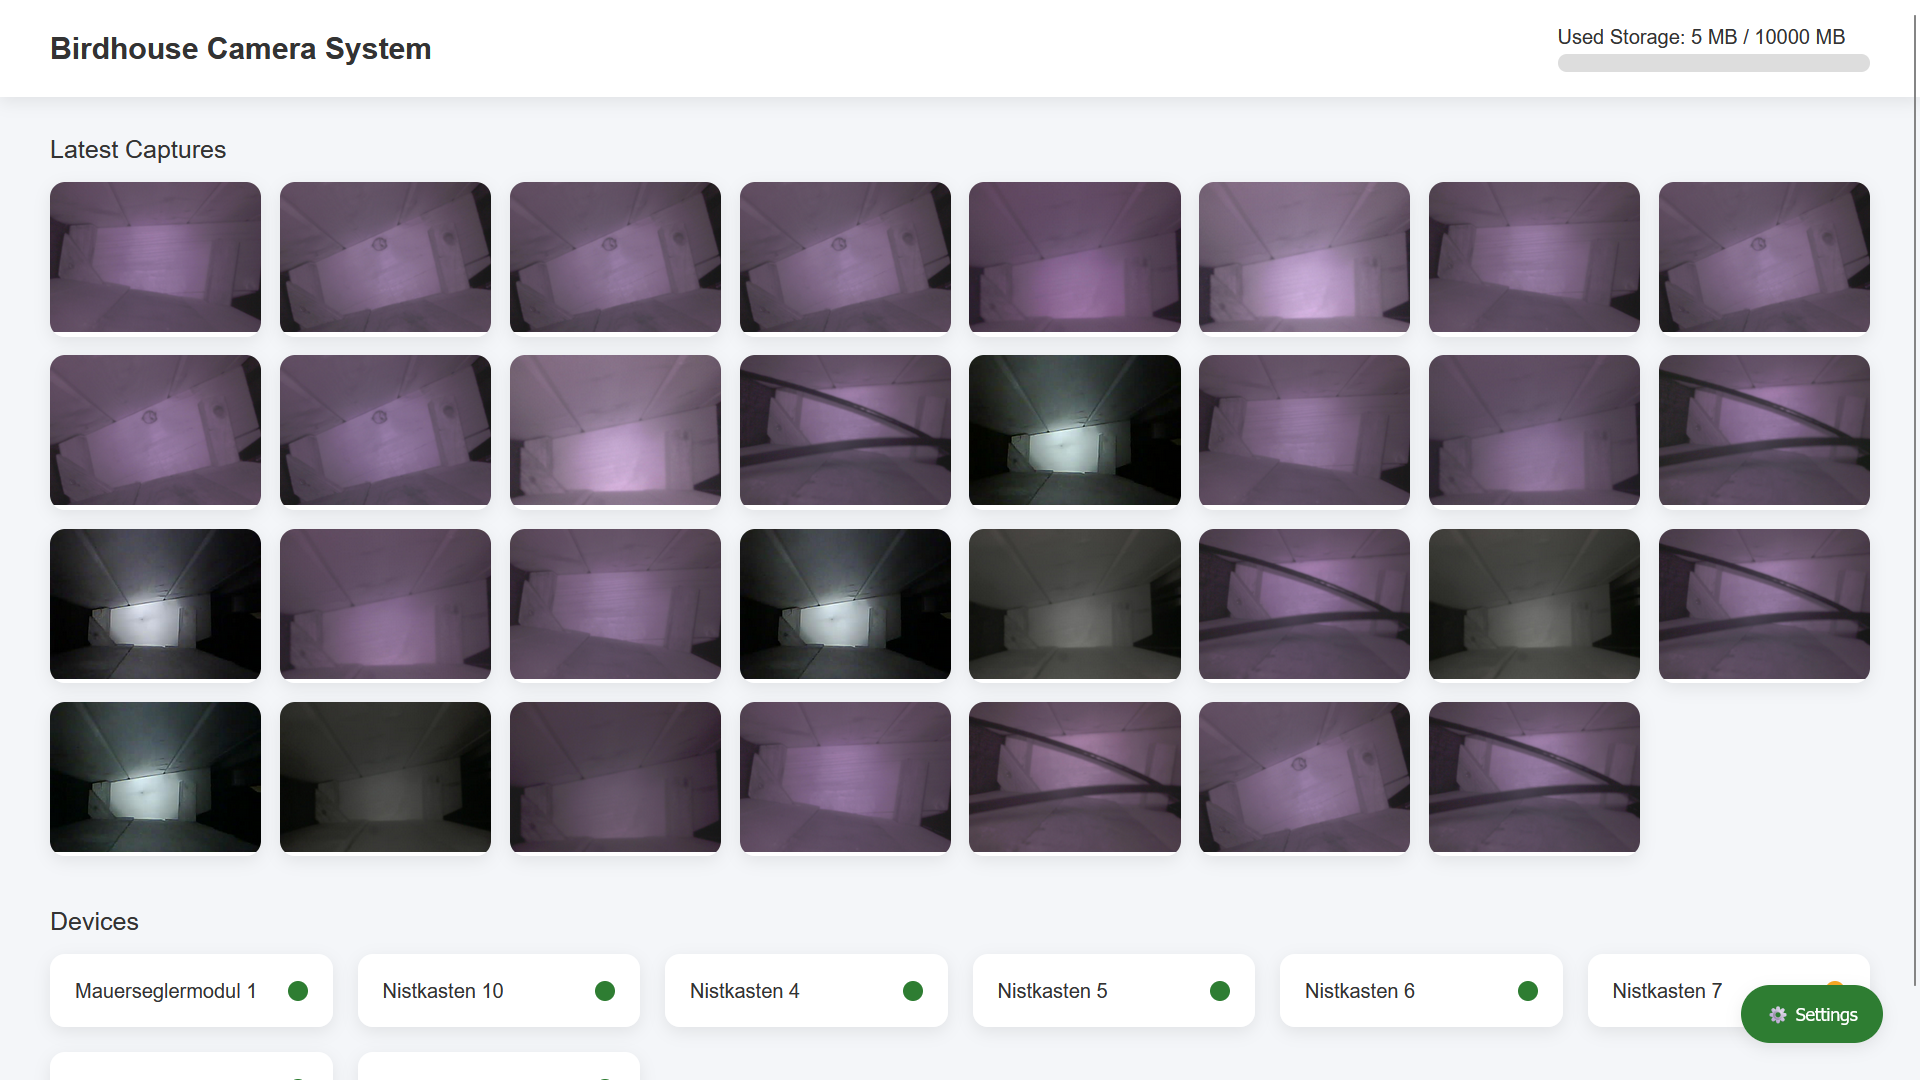
Flask Web Server: Managing Everything Locally
The server runs on a Raspberry Pi Zero 2W — low power consumption, sufficient performance for this application. The operating system is Raspberry Pi OS Lite (64-bit), running headless without a graphical interface. The Flask application is served via Gunicorn and configured as a systemd service that starts automatically on boot.
Key features of the web interface:
- Main Page: Latest 32 images from all nodes, storage usage indicator, per-device status (green / yellow / red)
- Device Page: Per-node image gallery (24 images per page), live stream access, log viewer
- Settings & Management: Camera parameter adjustment, data download, device configuration JSON upload
- OTA Firmware Updates: Upload
.binfiles over the network without physical access to the birdhouse
OTA updates are particularly critical in this context. Once a camera is installed inside a birdhouse, physical access risks disturbing nesting birds. Remote firmware delivery over the network is not a convenience feature here — it is a practical requirement for responsible operation.
WIZnet W5500: The Network Infrastructure of This System
In this project, the W5500 is not just a component. It replaces Wi-Fi entirely as the network infrastructure for every camera node.
- Hardware TCP/IP Offloading: TCP, IP, UDP, and ICMP are processed inside the chip. The ESP32-CAM is freed from network stack overhead and can focus on image processing
- SPI Interface: Simple integration with ESP32-CAM, 3.3V single-voltage operation
- Wired Stability: Consistent data transmission across all outdoor nodes without Wi-Fi signal variation
- Compact Form Factor: Fits cleanly onto the custom PCB alongside other components
The system supports two network configurations. Router-based (recommended) — all nodes and the Raspberry Pi connect to a standard router, with DHCP assigning IP addresses automatically. RPi as DHCP server — the Raspberry Pi itself assigns IPs directly to camera nodes. Both modes are switchable via a single setting in configuration.h.
The current design requires separate power and data cables per node. The author has already identified PoE (Power over Ethernet) integration as the logical next step — delivering both power and data over a single LAN cable. With the W5500-based wired infrastructure already in place, PoE is a natural and straightforward extension.
Setting Up the Raspberry Pi
Server setup is straightforward. Flash Raspberry Pi OS Lite (64-bit) to an SD card, enable SSH, and boot. Clone the server repository from GitHub, set up a Python virtual environment, and launch the Flask app via Gunicorn. Registering it as a systemd service ensures the server starts automatically on every boot with no manual intervention required.
Server repository: https://github.com/KonradWohlfahrt/BirdhouseCameraSystemServer
The web interface is accessible on port 8000. Open a browser and navigate to http://<pi-ip>:8000 or http://<hostname>:8000.
Connecting Everything
Two network configurations are supported.
Option A — Router-based (Recommended): Connect all camera nodes and the Raspberry Pi to a standard router. DHCP assigns IP addresses automatically. The only required configuration is setting the Raspberry Pi's IP address in configuration.h on the firmware side. This is the simplest setup and the one the author uses personally.
Option B — RPi as DHCP Server: The Raspberry Pi acts as a DHCP server, assigning IP addresses directly to the camera nodes over wired Ethernet. The Raspberry Pi itself connects to the wider network via Wi-Fi.
For power, each node currently requires a dedicated 5V power supply running alongside the LAN cable. A solar panel and battery combination is also viable, though it adds complexity. Once all connections are in place, boot the Raspberry Pi first, then power up the camera nodes. When everything is working correctly, nodes will appear automatically on the web interface main page.
Business Value and Expansion Scenarios
The architecture demonstrated here — low-cost MCU + hardware TCP/IP offloading + centralized local server management — extends well beyond birdhouse monitoring.
- Smart Farming: Distributed camera nodes across barns or greenhouses, managed from a single dashboard
- Wildlife Research: Multi-point trail cameras connected over wired Ethernet for reliable, uninterrupted data collection
- Industrial Equipment Monitoring: Low-cost visual monitoring nodes deployed across factory floors
- Maker and Education Communities: An open-source reference design that anyone can replicate, extend, and adapt
The sub-€15 per-node cost structure is a meaningful advantage at scale. Equivalent functionality at a fraction of the cost of commercial solutions makes this architecture worth serious consideration for any multi-node deployment scenario.
Limitations and Improvement Directions
This is a fully functional system, and the author is transparent about where it can go further.
Current Limitations:
- Separate power and data cabling: Each node requires both a LAN cable and a 5V power cable, increasing installation complexity
- SPI distance constraint: Wiring between the W5500 and ESP32-CAM must stay within approximately 30cm, limiting module placement flexibility
- Non-functional temperature sensor: Pin conflicts on IO0 and IO16 prevent DS18B20 operation, leaving internal temperature monitoring incomplete
- Manual storage management: No automatic image deletion; periodic manual backup required for long-term operation
Improvement Directions:
- PoE integration: Combining power and data into a single LAN cable is the most impactful near-term improvement — simplifying installation and reducing cable management overhead significantly
- SMD component transition: Reducing PCB footprint to fit in smaller birdhouse enclosures
- Temperature sensor pin conflict resolution: A software-level workaround or PCB revision to restore DS18B20 functionality
- Automated storage management: Scheduled archiving or deletion policy for long-term deployments
FAQ
Q. Is the network setup complicated? Using the router-based option (Option A), all that's needed is a standard home router and a network switch. Set the Raspberry Pi's IP address in configuration.h and the nodes will connect automatically. No advanced networking knowledge is required.
Q. How many camera nodes can the system support? No hard limit is specified. Practical limits depend on the number of switch ports available and the processing capacity of the Raspberry Pi server. For larger deployments, upgrading to a more powerful server is a straightforward path.
Q. Isn't wired Ethernet harder to install than Wi-Fi? Running LAN cables does add installation effort upfront. However, in an outdoor multi-node environment, the tradeoff is worthwhile — one-time cable installation versus ongoing Wi-Fi instability and data loss. PoE integration in a future revision will further reduce this burden by eliminating the separate power cable entirely.
Q. Can other camera modules be used besides OV2640 and OV3660? The firmware officially supports OV2640 and OV3660. Other modules may work but will require pin configuration and initialization adjustments in the source code. The project is fully open-source, so modifications are possible — though compatibility should be validated before deployment.
Q. Can PoE be added right now? PoE is not integrated into the current PCB design. An external PoE splitter can be added as a workaround, but the author has identified this as a future PCB revision task. With W5500-based wired infrastructure already in place, PoE integration is the natural and technically straightforward next step.
-
git
