
Creating webserver code for the W5100S-EVB-Pico in the Arduino IDE using ChatGPT.
Create a web server with W5100S-EVB-Pico using Arduino IDE. Configure Arduino for RP2040, install Ethernet library, upload the provided code
In this tutorial, we'll learn how to set up a simple web server using the W5100S-EVB-Pico Ethernet module with the Arduino IDE. The W5100S-EVB-Pico is an evaluation board for the W5100S Ethernet controller chip, designed to work with microcontrollers like the Arduino. This guide was created with the help of ChatGPT, an AI language model developed by OpenAI, to provide a step-by-step explanation of the process involved in setting up the web server.
Prerequisites:
- Arduino-compatible board
- W5100S-EVB-Pico Ethernet module
- Arduino IDE installed on your computer
- Basic understanding of Arduino programming
Step 1
Initialize the Arduino IDE Before starting, ensure that you have the Arduino IDE installed on your computer. If you haven't already, you can download it from https://www.arduino.cc/en/software.
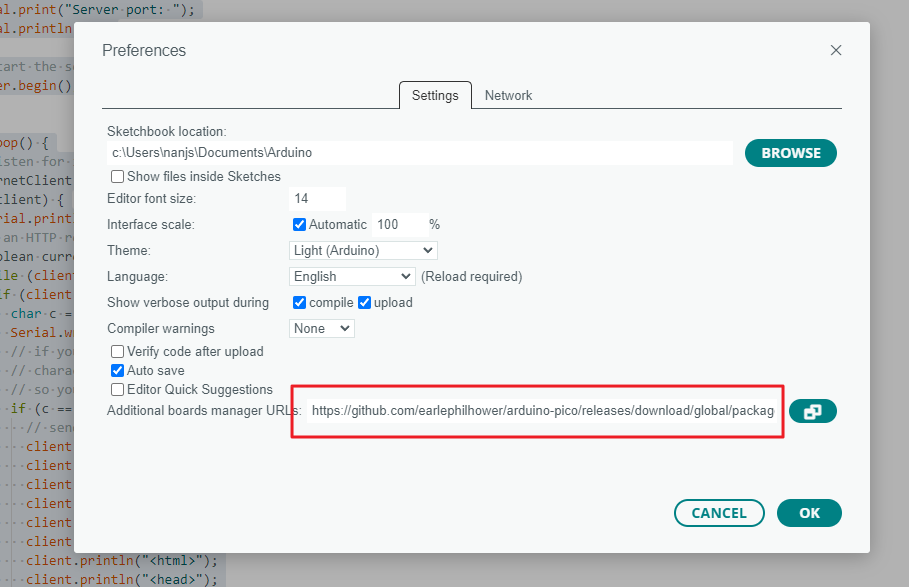
Next, you'll need to add the Additional Boards Manager URL for the Raspberry Pi Pico/RP2040. To do this, follow these steps:
- Open the Arduino IDE
- Click on "File" in the menu bar
- Navigate to "Preferences"
- In the "Settings" tab, find the "Additional Boards Manager URLs" field
- Paste the following URL: https://github.com/earlephilhower/arduino-pico/releases/download/global/package_rp2040_index.json
- Click "OK"
Now, you'll need to install the "Raspberry Pi Pico/RP2040" board and the Ethernet library:
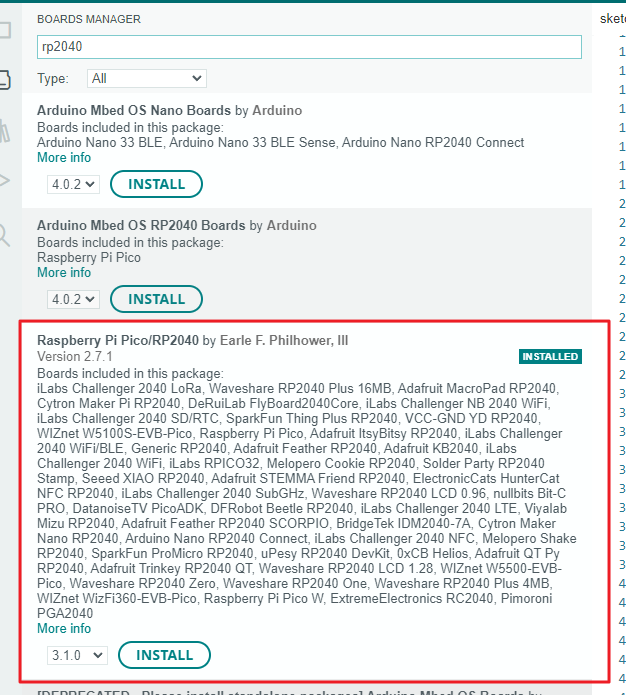
- Open the Arduino IDE
- Click on "Tools" in the menu bar
- Navigate to "Board" and then "Boards Manager"
- In the Boards Manager, search for "Raspberry Pi Pico/RP2040" and click "Install"
For the Ethernet library, download it from https://github.com/WIZnet-ArduinoEthernet/Ethernet and follow these steps to install:
- Open the Arduino IDE
- Click on "Sketch" in the menu bar
- Navigate to "Include Library" and then "Add .ZIP Library"
- Browse to the downloaded Ethernet library ZIP file and click "Open"
Step 2
#include <SPI.h>
#include <Ethernet.h>

// Enter the MAC address and initialize the Ethernet instance
byte mac[] = {0xDE, 0xAD, 0xBE, 0xEF, 0xFE, 0xED};
IPAddress ip;
EthernetServer server(80);

void setup() {
  Serial.begin(9600);
  while (!Serial) {
    ; // wait for serial port to connect. Needed for native USB port only
  }

  Ethernet.init(17); // Initialize the Ethernet library and set the SS pin to 17

  // start the Ethernet connection:
  if (Ethernet.begin(mac) == 0) {
    Serial.println("Failed to configure Ethernet using DHCP");
    // no point in carrying on, so do nothing forevermore:
    for (;;)
      ;
  }
  // print your local IP address and the server port:
  Serial.print("IP address: ");
  ip = Ethernet.localIP();
  Serial.println(ip);
  Serial.print("Server port: ");
  Serial.println(80);

  // start the server
  server.begin();
}

void loop() {
  // listen for incoming clients
  EthernetClient client = server.available();
  if (client) {
    Serial.println("new client");
    // an HTTP request ends with a blank line
    boolean currentLineIsBlank = true;
    while (client.connected()) {
      if (client.available()) {
        char c = client.read();
        Serial.write(c);
        // if you've gotten to the end of the line (received a newline
        // character) and the line is blank, the HTTP request has ended,
        // so you can send a reply
        if (c == '\n' && currentLineIsBlank) {
          // send a standard HTTP response header
          client.println("HTTP/1.1 200 OK");
          client.println("Content-Type: text/html");
          client.println("Connection: close");
          client.println("Refresh: 5"); // refresh the page automatically every 5 sec
          client.println();
          client.println("<!DOCTYPE HTML>");
          client.println("<html>");
          client.println("<head>");
          client.println("<title>W5100S-EVB-Pico Web Server</title>");
          client.println("</head>");
          client.println("<body>");
          client.println("<h1>Hello from W5100S-EVB-Pico Web Server!</h1>");
          client.println("</body>");
          client.println("</html>");
          break;
        }
        if (c == '\n') {
          // you're starting a new line
          currentLineIsBlank = true;
        } else if (c != '\r') {
          // you've gotten a character on the current line
          currentLineIsBlank = false;
        }
      }
    }
    // give the web browser time to receive the data
    delay(1);
    // close the connection:
    client.stop();
    Serial.println("client disconnected");
  }
}
- Include the necessary libraries (SPI and Ethernet).
- Define a MAC address and initialize the Ethernet instance.
- Set up the EthernetServer object with the desired port number (e.g., 80).
- In the setup() function, initialize the Serial communication and Ethernet library with the correct SS pin.
- Use the Ethernet.begin() function to establish a connection via DHCP.
- Print the local IP address and server port to the Serial Monitor.
- Begin the server using the server.begin() method.
- In the loop() function, listen for incoming clients and handle HTTP requests by sending an appropriate response header and HTML content.
Step 3
Uploading the Code Connect your Arduino-compatible board to your computer using a USB cable, and follow these steps to upload the code:
- Open the Arduino IDE
- Paste your web server code into the editor
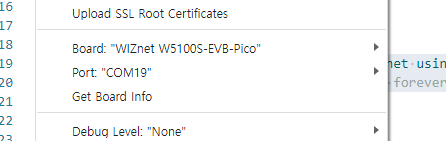
- Select your board from the "Tools" menu under "Board"
- Choose the correct COM port from the "Tools" menu under "Port"
- Click the "Upload" button (right arrow icon)
Step 4
Testing the Web Server After uploading the code, open the Serial Monitor in the Arduino IDE. You should see the IP address and server port displayed. Enter the IP address into the address bar of your web browser, and you should see your custom message displayed on the page.
Conclusion
In this tutorial, we've demonstrated how to set up a simple web server using the W5100S-EVB-Pico Ethernet module with the Arduino IDE. This guide was created with the assistance of ChatGPT, an AI language model developed by OpenAI, to provide an easy-to-follow, step-by-step explanation of the process involved in setting up the web server. If you find any misinformation, please let us know so we can correct it. By following these instructions, you can now integrate this knowledge into your own projects or use it as a starting point for more advanced web server applications. Happy coding!