
ArduinoIDE環境でW5500-EVB-PICOを使う サンプルスケッチ
ArduinoIDE環境でW5500-EVB-PICOを使う サンプルスケッチ
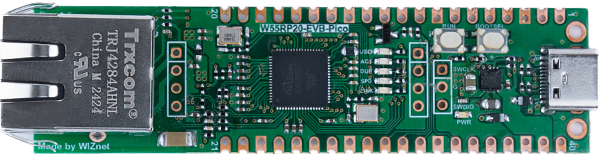
WIZnet - W55RP20-EVB-Pico
x 1
W5500-EVB-PICO는 RP2040 기반 개발 보드에 W5500 Ethernet 컨트롤러를 통합하여 유선 네트워크 기능을 제공하는 플랫폼입니다. 보드 구조는 Raspberry Pi Pico 계열과 유사하지만, Ethernet 인터페이스가 추가되어 네트워크 기반 임베디드 시스템 개발이 가능합니다.
Arduino IDE에서 RP2040 보드를 사용하는 개발자는 W5500-EVB-PICO 역시 동일한 환경에서 사용할 수 있습니다. 다만 일부 Arduino 예제는 특정 하드웨어 구성을 전제로 작성되어 있기 때문에, 실제 보드에서 동작시키기 위해서는 몇 가지 설정 및 확인 절차가 필요합니다.
이 문서는 Arduino IDE 환경에서 W5500-EVB-PICO를 사용하기 위한 기본 설정과 함께, 실제 개발 과정에서 발생했던 문제와 해결 방법을 정리한 참고 가이드입니다.
Arduino IDE 개발 환경 설정
W5500-EVB-PICO를 Arduino IDE에서 사용하려면 먼저 보드를 올바르게 선택해야 합니다.
설정 절차는 다음과 같습니다.
1. Arduino IDE 실행
2. 메뉴에서 다음 경로로 이동
Tools → Board → Raspberry Pi RP2040 Boards3. 다음 보드를 선택
WIZnet W5500-EVB-PICO4. USB로 보드를 PC에 연결
5. 다음 메뉴에서 시리얼 포트 선택
Tools → Serial Port보드와 시리얼 포트가 올바르게 설정되면 Arduino 스케치를 컴파일하고 업로드할 수 있습니다.
시리얼 포트 인식 문제와 해결 방법
초기 설정 과정에서 Arduino IDE에 시리얼 포트가 나타나지 않는 경우가 발생할 수 있습니다. 이는 보드가 운영체제에서 정상적으로 인식되지 않았을 때 발생합니다.
이 문제를 해결하기 위한 일반적인 절차는 다음과 같습니다.
- 보드를 BOOTSEL 모드로 진입시킵니다.
- 장치가 USB 저장 장치로 마운트됩니다.
- UF2 형식의 펌웨어 파일을 준비합니다. (예: Blink UF2)
- UF2 파일을 장치 드라이브에 복사합니다.
- 필요한 경우 가상 COM 포트 드라이버를 설치하거나 업데이트합니다.
- 보드의 RUN 버튼을 눌러 재부팅합니다.
- 이후 Arduino IDE에서 시리얼 포트가 나타나는지 확인합니다.
이 과정을 통해 장치가 정상적인 USB 시리얼 장치로 인식될 수 있습니다.
Ethernet 연결 문제와 NIC Reset 처리
Ethernet 관련 스케치를 실행했음에도 불구하고 네트워크에서 PING이 응답하지 않는 경우가 발생할 수 있습니다.
이 문제는 Ethernet 컨트롤러의 NIC Reset 핀 상태와 관련될 수 있습니다.
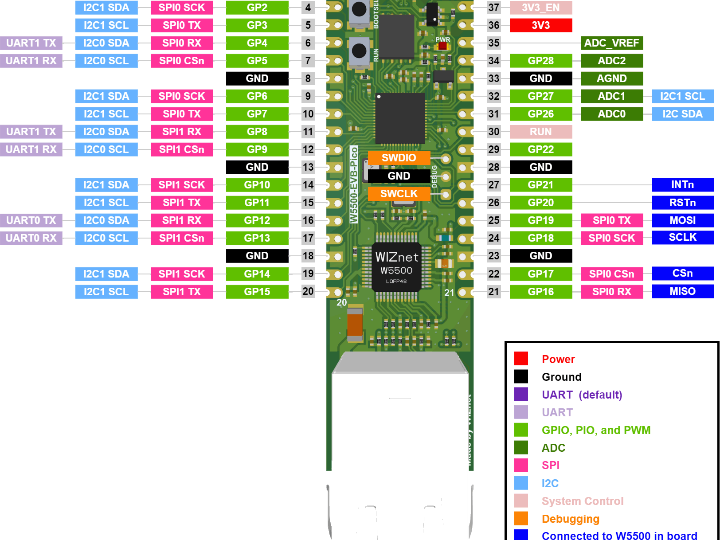
W5500-EVB-PICO 보드에서는 다음과 같이 연결되어 있습니다.
- GP20 → NIC Reset
이 핀이 LOW 상태로 유지되면 Ethernet 컨트롤러가 Reset 상태에 머물 수 있으며, 이 경우 네트워크 초기화가 정상적으로 이루어지지 않습니다.
이를 방지하기 위해 Ethernet 초기화 전에 Reset 상태를 해제해야 합니다.
예시 코드:
pinMode(GP20, OUTPUT);
digitalWrite(GP20, HIGH);
이 코드는 Ethernet.begin() 호출 전에 실행되어야 합니다.
이렇게 하면 Ethernet 컨트롤러가 정상적으로 초기화되고 네트워크 통신이 가능해집니다.
W5500-EVB-PICO용 예제 스케치
Arduino 환경에서 W5500-EVB-PICO 전용 예제는 많지 않습니다. 따라서 기존 Arduino 예제를 기반으로 보드에 맞게 수정하거나 동작 여부를 확인하는 과정이 필요합니다.
문서에서는 이러한 예제들을 정리하여 기록하고 있으며, 이를 통해 보드 동작 확인 및 개발 초기 테스트에 활용할 수 있습니다.
예제 01 — Blink 스케치
가장 기본적인 테스트 예제는 Blink 프로그램입니다. 이 예제는 보드가 정상적으로 동작하는지 확인하는 데 사용됩니다.
W5500-EVB-PICO 보드에서는 온보드 LED가 다음 핀에 연결되어 있습니다.
GP25Arduino 환경에서는 이 LED가 다음 상수에 매핑됩니다.
LED_BUILTIN따라서 Arduino에서 제공되는 기본 Blink 예제를 그대로 사용할 수 있습니다.
이 예제를 실행하면 다음 사항을 확인할 수 있습니다.
- Arduino IDE에서 보드가 정상적으로 인식되는지
- 스케치 업로드가 정상적으로 이루어지는지
- 마이크로컨트롤러가 정상적으로 동작하는지
Ethernet 기능을 테스트하기 전에 Blink 예제를 통해 기본 동작을 먼저 확인하는 것이 좋습니다.
WIZnet Insight
W5500-EVB-PICO는 RP2040 기반 시스템에서 Ethernet 네트워크 기능을 구현할 수 있도록 설계된 개발 보드입니다. W5500 Ethernet 컨트롤러를 통해 유선 네트워크 연결을 지원하며, Arduino IDE와 같은 일반적인 개발 환경에서도 사용할 수 있습니다.
이 보드는 임베디드 개발자가 RP2040 기반 프로젝트에서 Ethernet 통신을 구현하거나 네트워크 기반 장치를 실험하고 개발하는 데 활용될 수 있는 플랫폼입니다.
비즈니스 가치 및 활용 가능성
이 문서는 주로 설정 및 문제 해결 중심의 가이드이지만, 다음과 같은 개발 가능성을 보여줍니다.
Ethernet 기반 프로토타이핑
Arduino 환경에서 Ethernet 네트워크 기능을 빠르게 테스트할 수 있습니다.
RP2040 플랫폼 확장
기존 RP2040 프로젝트에 유선 네트워크 기능을 추가할 수 있습니다.
네트워크 기반 임베디드 장치 개발
센서 시스템, 데이터 수집 장치, 네트워크 모니터링 장치 등 다양한 응용 분야에 활용 가능합니다.
개발자 참고 자료
실제 사용 과정에서 발생한 문제와 해결 방법을 정리한 실용적인 참고 문서로 활용할 수 있습니다.
FAQ
Q1. W5500-EVB-PICO는 Arduino IDE에서 사용할 수 있습니까?
가능합니다. Arduino IDE에서 RP2040 보드 목록 중 WIZnet W5500-EVB-PICO를 선택하면 사용할 수 있습니다.
Q2. Arduino IDE에서 시리얼 포트가 나타나지 않는 이유는 무엇입니까?
보드가 USB 장치로 제대로 인식되지 않았을 가능성이 있습니다. BOOTSEL 모드와 UF2 파일을 이용해 장치를 다시 인식시키는 방법을 사용할 수 있습니다.
Q3. Ethernet 스케치를 실행했지만 PING이 응답하지 않습니다. 왜 그런가요?
NIC Reset 핀이 LOW 상태로 유지되면 Ethernet 컨트롤러가 초기화되지 않을 수 있습니다.
Q4. NIC Reset 문제는 어떻게 해결할 수 있습니까?
Ethernet 초기화 전에 GP20 핀을 HIGH로 설정하여 Reset 상태를 해제해야 합니다.
Q5. 보드 테스트를 위해 가장 먼저 실행해야 할 예제는 무엇입니까?
기본적인 하드웨어 동작을 확인하기 위해 Blink 예제를 실행하는 것이 권장됩니다.
W5500-EVB-PICO is an RP2040-based development board designed to enable Ethernet connectivity through the W5500 network controller. The board follows the form factor and development approach of Raspberry Pi Pico-class boards while adding a wired network interface.
Developers who use Arduino IDE with RP2040 boards can also use W5500-EVB-PICO. However, because Arduino examples are typically designed for general hardware configurations, some additional steps may be required when using this specific board.
This documentation records the practical process of using the board in Arduino IDE, including configuration procedures and troubleshooting notes observed during testing.
Arduino IDE Setup
To use W5500-EVB-PICO in Arduino IDE, the board must first be selected from the RP2040 board family.
Typical configuration steps include:
1. Open Arduino IDE.
2. Navigate to:
Tools → Board → Raspberry Pi RP2040 Boards3. Select:
WIZnet W5500-EVB-PICO4. Connect the board via USB.
5. Choose the corresponding Serial Port from:
Tools → Serial PortOnce the correct board and port are selected, Arduino sketches can be compiled and uploaded to the device.
Serial Port Recognition Issues
During initial setup, developers may encounter situations where the serial port does not appear in Arduino IDE.
This issue can occur when the board is not properly recognized by the operating system. The document describes a procedure that may help recover the connection.
Typical steps include:
- Enter BOOTSEL mode on the board.
- The device mounts as a USB mass storage device.
- Prepare a UF2 firmware file (such as a Blink example).
- Copy the UF2 file to the mounted drive.
- Install or update the virtual COM port driver if required.
- Press the RUN button on the board.
- After rebooting, the serial port should appear in Arduino IDE.
This process ensures the device is properly recognized as a USB serial device.
Ethernet Connectivity Issue and NIC Reset Handling
Another issue described during testing is that Ethernet sketches may run but the device does not respond to PING requests on the network.
In some cases, this behavior can be related to the NIC reset line.
On W5500-EVB-PICO:
- GP20 is connected to the NIC Reset pin of the Ethernet controller.
If this pin remains in a LOW state, the network controller may stay in reset mode, preventing normal network initialization.
To ensure the controller operates correctly, the reset line should be released before Ethernet initialization.
A practical approach described in the documentation is:
pinMode(GP20, OUTPUT);
digitalWrite(GP20, HIGH);
This operation should be executed before calling Ethernet.begin() in the sketch.
By ensuring the reset pin is released, the Ethernet controller can initialize properly and respond to network requests.
Example Sketch Collection for W5500-EVB-PICO
The author notes that there are relatively few Arduino sketches specifically prepared for W5500-EVB-PICO.
To address this, several example sketches are organized and modified so they can run correctly on the board. These examples serve as references for developers who want to verify hardware operation or begin experimenting with networking features.
The collection focuses on adapting standard Arduino examples to match the hardware configuration of W5500-EVB-PICO.
Example: Blink Sketch
The first example provided is the classic Blink program used to verify basic board functionality.
On W5500-EVB-PICO:
- The onboard LED is connected to GPIO25 (GP25).
In Arduino sketches, this LED is mapped to the constant:
LED_BUILTINTherefore, the standard Arduino Blink example can be used without modification. Uploading and running this example allows developers to confirm that:
- The board is recognized by Arduino IDE
- Sketch uploads function correctly
- The microcontroller is running properly
This simple verification step is recommended before attempting more complex Ethernet examples.
WIZnet Insight
W5500-EVB-PICO demonstrates how Ethernet functionality can be integrated into RP2040-based embedded systems using WIZnet technology. By combining the RP2040 microcontroller with the W5500 Ethernet controller, the board provides a platform where developers can build wired network applications within familiar development environments such as Arduino IDE.
In practice, the board enables experimentation with Ethernet-enabled embedded systems while maintaining compatibility with common development workflows.
Business Value and Practical Applications
Although the documentation focuses on setup and troubleshooting, the development workflow shown here highlights several practical benefits:
1. Rapid Ethernet prototyping
Developers can quickly test wired networking applications using Arduino-based sketches.
2. RP2040 ecosystem expansion
The board extends RP2040 projects beyond USB or wireless communication to include Ethernet connectivity.
3. Embedded networking experimentation
Engineers and makers can explore Ethernet-based embedded devices such as monitoring systems, controllers, or data collectors.
4. Developer troubleshooting reference
The documented setup and troubleshooting steps provide practical guidance for users encountering similar issues.
FAQ
Q1. Can W5500-EVB-PICO be used with Arduino IDE?
Yes. The board can be selected from the Raspberry Pi RP2040 board family within Arduino IDE.
Q2. Why does the serial port sometimes not appear?
The device may not be properly recognized by the operating system. Entering BOOTSEL mode and loading a UF2 file can help restore proper USB recognition.
Q3. Why does the Ethernet sketch run but PING does not respond?
The Ethernet controller may remain in reset if the NIC reset pin is held low.
Q4. How can the NIC reset issue be resolved?
Set the reset pin high before initializing the Ethernet interface in the Arduino sketch.
Q5. What is the first test recommended for the board?
Running the Blink sketch confirms that the board is correctly recognized and that the upload process works properly.