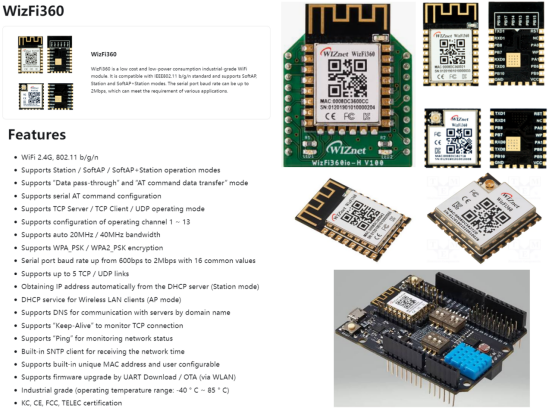
Full AT command drive, no complex TCP stack on MCU; supports 5 concurrent TCP/UDP links, 7×24h stable LAN online, OTA remote upgrade, industrial temp range -40℃~85℃
Generic Electronic Module Manufacturer - WS2812 Dual RGB LED Module
x 1
Dual addressable RGB LED, display distinct light animations for each AI working state including idle, running, error and completed
Analog Devices - MAX98357A I2S Audio Amplifier
x 1
I2S digital audio power amplifier, drive speaker for TTS voice prompt
Sound output unit, broadcast voice status alert from TTS audio
Generic Electronic Module Manufacturer - Vibration Motor & Vibration Sensor
x 1
Tactile vibration reminder, trigger vibration when AI task error occurs
Generic Power Module Manufacturer - Lithium Battery Charge Management Module
x 1
Manage lithium battery charging, power supply for whole desktop device
3D Printing Open Source - 3D Printed Enclosure with M3 Screws Hardware Kit
x 1
Custom housing for all circuit boards, assemble all hardware together
Software Apps and online services
micropython - MicroPython
x 1
Run firmware on RP2040 to control WiFi, LED, audio and vibration hardware
Python Software Foundation - Python 3
x 1
PC-side TCP client daemon, capture AI task status and transmit data over LAN
Anthropic - Claude Code Plugin
x 1
Hook tool to capture real-time running status of AI coding tasks
Autodesk - 3D CAD Modeling Software
x 1
Design 3D printable enclosure model for the desktop indicator hardware
PROJECT DESCRIPTION
Step-by-Step Guide to Building an AI Operating Status Indicator [Fully Open-Source Breakdown]
0. Background
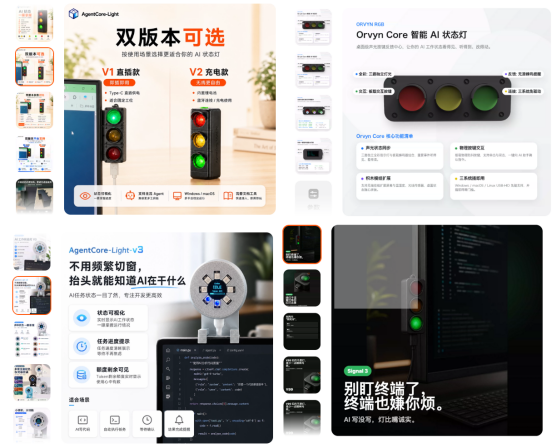
Recently I've come across quite a few AI status indicator products of the same type, some in the shape of traffic lights, others in a minimalist disc design. Essentially, they all free up developers' line of sight, so you don' t have to stare at the terminal waiting for the AI to finish running tasks. As for myself, I started working on products in this very direction a long time ago — a desktop status ornament specifically tailored for Claude Code, which has evolved from the earliest Bluetooth version all the way to the current WiFi version.
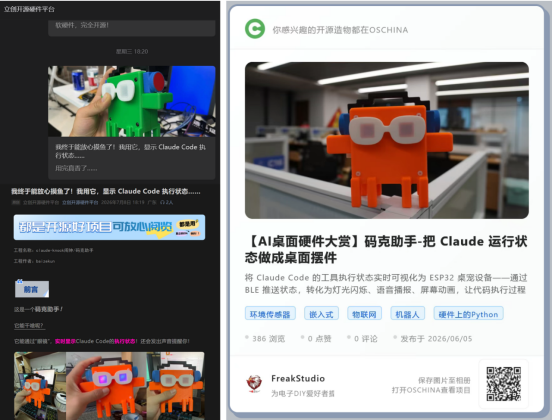
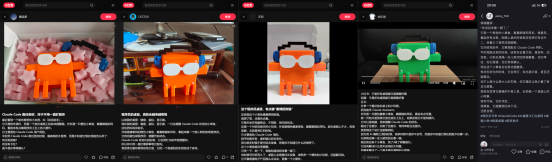
After finishing it, I uploaded the complete project to the LCSC Open Source Hardware Platform and Open Source China, making all the software and hardware files fully open source without holding anything back. To my surprise, it received a pretty positive response: quite a few DIY enthusiasts built it following the tutorial, and many others put forward optimization suggestions, which actually helped me refine the solution into a more complete one.
To be honest, this tool was originally just built for my own use, so I’m really surprised that it’s been recognized by so many people.
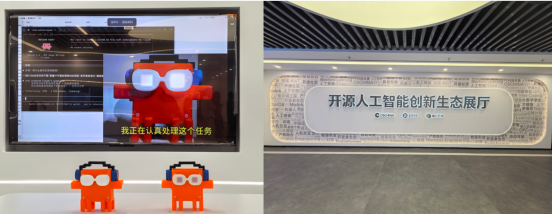
When we brought it to the Pudong Software Park Hackathon site, it attracted quite a lot of attention. Many people who tried it out said that finally, they no longer had to switch back to the terminal every dozen seconds to check on things.
In this article, we will break down and discuss the complete implementation details from scratch, including why we chose the WizFi360-EVB-Pico as the core, what pitfalls we encountered with the WiFi TCP solution, and how to use the firmware and host computer in coordination. All codes, schematics and 3D files are fully open-sourced, so anyone who wants to replicate this can just follow the instructions to make it.
I. Project Introduction
Simply put, it is a desktop status indicator that connects to the daemon on your computer via WiFi. Every time Claude performs an operation — reading a file, running a command, searching for code — the status will be pushed to this small device in real time.
Different statuses correspond to different light indications: blue means idle and on standby, cyan flowing lights indicate ongoing execution, slow flashing yellow light means pending approval, fast flashing green light means the task is completed, and alternating flashing red light indicates an error has occurred. Each status is also equipped with TTS voice announcement, with adjustable timbre and speaking speed.
What makes it so practical? When running batch tasks, you can freely step away to get coffee or slack off browsing the web, and just come back once you hear the "task completed" alert. When you switch to another window to look up information, the yellow light will turn on with a voice prompt saying "please check the terminal", letting you know to switch back to confirm. If you're coding late at night and don't want the screen to be bright, you can still keep track of the progress just by listening to the voice notifications.
Put simply, it extends the working state of AI from your mouse clicks to the range of your peripheral vision and the sounds picked up by your ears.
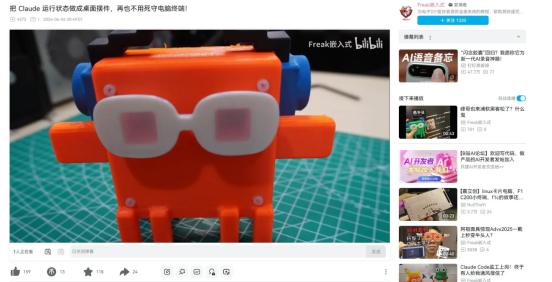
All software and hardware of this project are fully open-source. The repository, demo video, and introduction page are all available here for anyone who wants to replicate it directly:
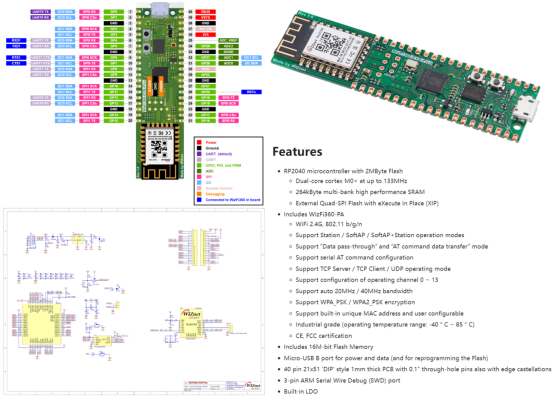
The core carrier of this entire project is the integrated development board WizFi360-EVB-Pico launched by the original manufacturer WIZnet, which integrates both the RP2040 dual-core main controller and the industrial-grade WizFi360 WiFi module on a single board. This eliminates the hassle of separately pairing a WiFi module and performing wiring and radio frequency debugging, making it highly suitable for building IoT desktop gadgets.
Development Board Resources: https://docs.wiznet.io/Product/Chip/Chip_Related_modules/wizfi360-evb-pico
On-board hardware core parameters:
RP2040 main control unit: dual-core Cortex-M0+, with a maximum clock speed of 133MHz, integrated 2MB Flash and 264KB high-speed SRAM, natively supports MicroPython, and has an extremely low flashing threshold; hold down the BOOTSEL button and plug in the USB, then directly drag the. uf2 firmware into the popped-up virtual USB drive to complete the flashing, no additional tools such as esptool are required.
Built-in WizFi360 WiFi module: It communicates via UART AT commands with a baud rate of 115200. The RP2040 only needs to send commands through the serial port to complete network configuration, TCP server/Client creation, and data transmission and reception, which is equivalent to outsourcing the WiFi function to the module so that the main controller only focuses on service logic.
Hardware expansion resources: 40-pin standard DIP pins, complete SPI/I2S/UART peripherals, industrial wide temperature range of -40℃ to 85℃, support for multi-links of TCP Server/Client/UDP, built-in unique factory MAC address, and compatible with LAN static IP fixation solutions.
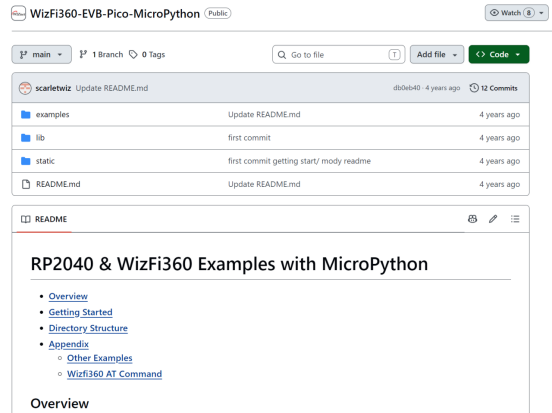
This is the official complete supporting MicroPython development repository, which comes with built-in AT command encapsulation, TCP communication, and a full set of sample codes for WiFi network configuration. The WiFi connection and frame parsing logic in our project are all secondary developments based on this official lib, with compatibility and stability guaranteed by the original manufacturer.
The WizFi360 equipped on this board is a low-cost industrial serial port WiFi module that supports 2.4G 802.11 b/g/n, is compatible with Station/SoftAP/Blend Mode, supports up to 5 concurrent TCP/UDP persistent connections, and features a maximum serial port baud rate of 2Mbps. Its biggest advantage lies in being fully driven by AT commands: there is no need for the main controller to run complex TCP protocol stacks, and all processes including network handshake, data forwarding, keep-alive, and DHCP IP acquisition are handled entirely by the module itself.It supports OTA remote upgrade, Keep-Alive heartbeat, and PING network detection simultaneously, and can stay stably online in the local area network for a long time, which perfectly meets our requirement of 7×24-hour monitoring of TCP port 57321.
The complete hardware engineering package of the entire device (including schematics, PCB, BOM, and 3D enclosure model) has been fully open-sourced and uploaded to the OSHWHub (LCSC Open Source Platform) under the MIT open source license, allowing anyone to freely download, replicate, and make secondary modifications.
Project open source address: https://oshwhub.com/baizekun/project_svwkrlfc
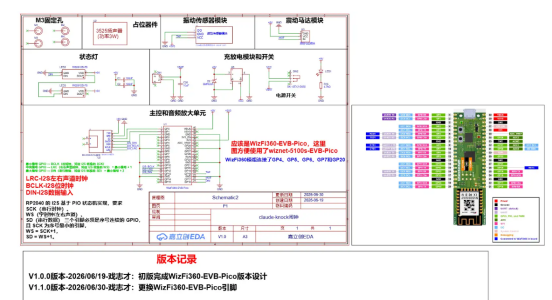
The complete device circuit is designed with peripheral expansion based on the WizFi360-EVB-Pico, and the division of the complete circuit module is as follows:
Main control communication unit: The serial port of the WizFi360 module is connected to GP4/GP5 of the RP2040, with the reset pin connected to GP20; a reserved 8192-Byte serial receive buffer is configured to address the issue of WiFi bulk data Packet loss;
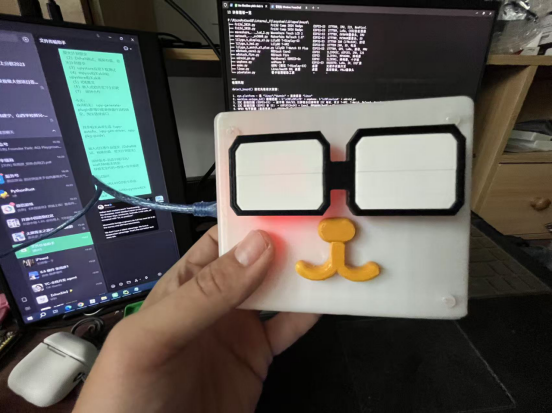
Status light unit: GP16 is equipped with WS2812 dual RGB lights, which correspond to the two-color status indication of the glasses;
I2S Audio Unit: Equipped with MAX98357A audio power amplifier, I2S clock pins GP11/GP12/GP13, and supports TTS voice announcement via an externally connected 3W speaker;
Interactive feedback unit: GP18 vibration sensor, GP17 vibration motor, supporting tap-triggered voice and vibration alerts for status changes;
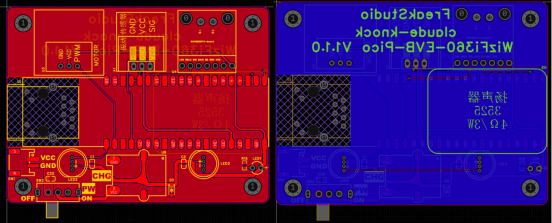
Power supply unit: Built-in charge-discharge management module + hardware power switch, supporting offline power supply of lithium batteries. The project has undergone two iterations of V1.0 and V1.1, optimizing pin allocation and wiring impedance, and solving the problems of serial port communication interference and audio background noise.
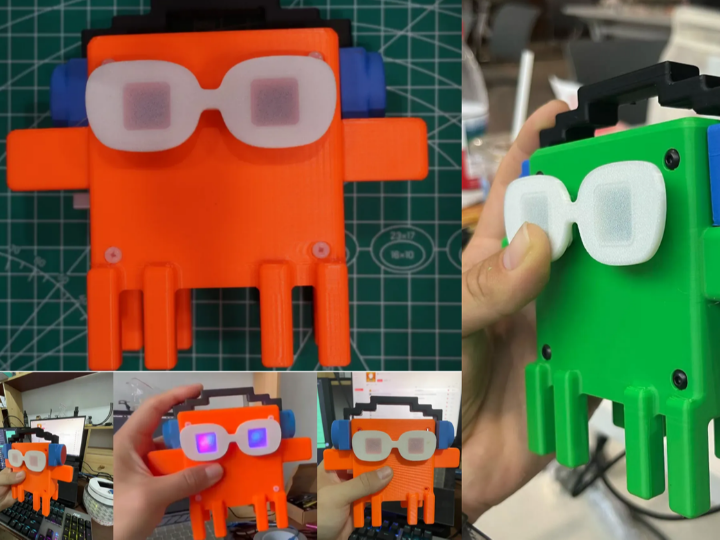
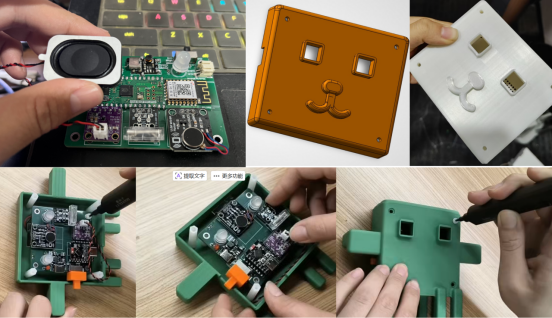
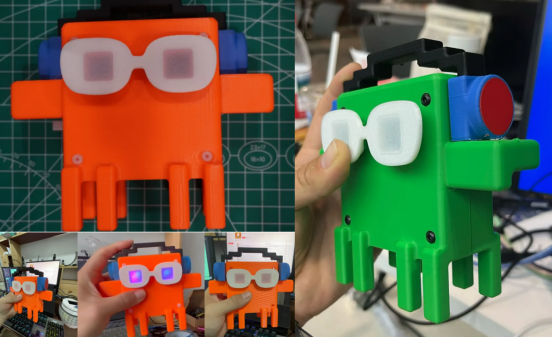
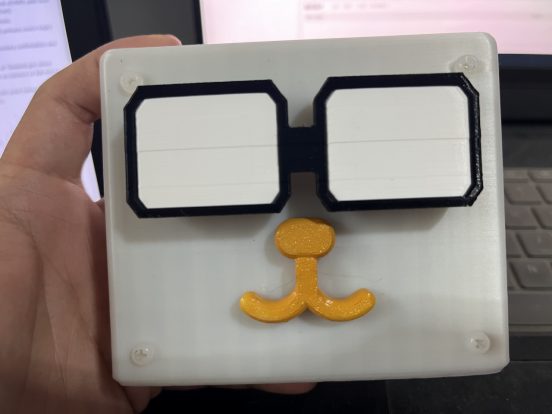
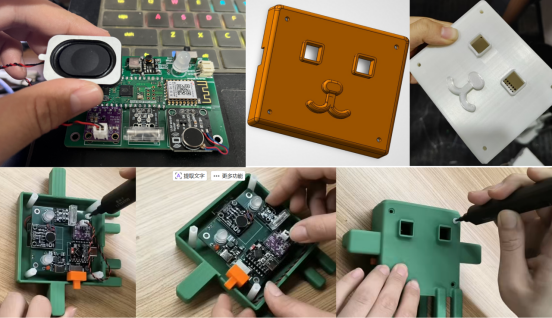
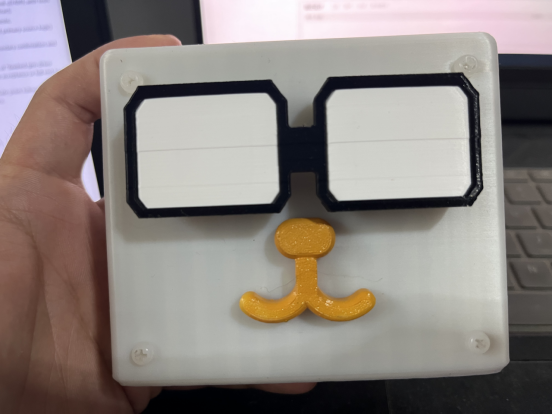
The complete device is equipped with a full set of 3D-printed housing models, which feature an iconic cartoon figurine design. The housing consists of an upper cover and a lower cover, with pre-reserved speaker sound outlets, light transmission windows, power switch, vibration motor mounting positions, and screw holes that are precisely aligned with the PCB, allowing assembly without secondary mold modification after printing.
The assembly process is extremely simple: first solder the speaker and vibration motor to the reserved terminals on the PCB, fix the WizFi360-EVB-Pico in the positioning slot of the motherboard, connect the rechargeable battery, then snap on the 3D-printed casing and tighten the M3 fixing screws to complete the entire device assembly, which can be quickly finished even by beginners.
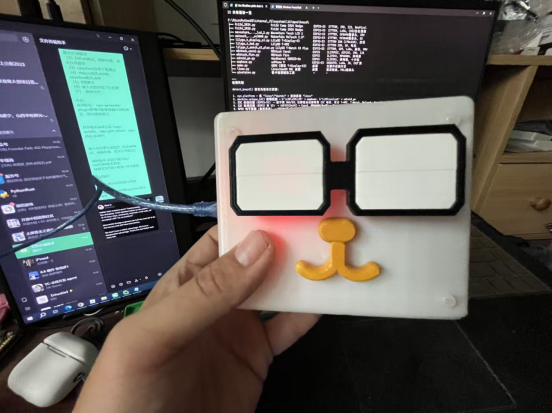
Once assembled, it becomes a desktop ornament. Placed on your workstation desk, after being powered on and connected to the internet, the WS2812 glasses light will synchronize the running status of Claude Code in real time, paired with multi-dimensional reminders via voice and vibration, eliminating the need to frequently switch computer windows to check the terminal.
3. Working Principle of the Software
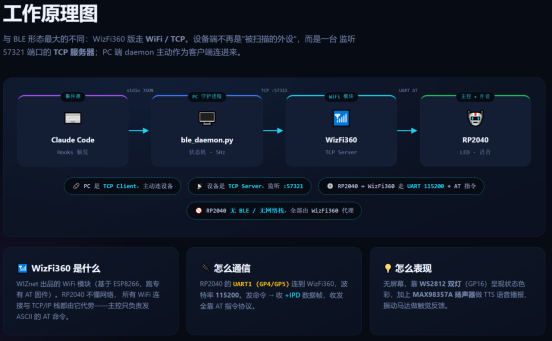
Most similar AI status ornaments on the market adopt the BLE Bluetooth solution, which has drawbacks such as short transmission distance, disconnection when blocked by walls, and the requirement for the computer to actively broadcast and scan. This WiFi version completely switches to a TCP long connection architecture, with the logic redesigned in reverse: the WizFi360 on the device side acts as a TCP server after power-on, fixedly listening on port 57321; the daemon process on the computer side acts as a TCP Client to initiate connections actively. As long as the two are on the same local area network, status signals can be stably received anywhere in the entire house. The entire link has a clear division of responsibilities:
Claude Code triggers various tool Hook events and outputs standard JSON data streams;
PC ble_daemon. py Aggregates and throttles daemon states, and forwards them via TCP;
The WizFi360 WiFi module receives network data and forwards it to the RP2040 main controller via UART AT commands;
The RP2040 parses data and drives the WS2812 LED strip, TTS voice module and vibration motor to complete status feedback.
To illustrate the core logic of device networking, in transport. py, the connect () function encapsulates the entire process of WizFi360 network configuration plus AT command flow for enabling the TCP server:
Upon power-on, the device automatically executes AT commands for network configuration, reads the local static IP, and starts the multi-connection TCP service. The entire process is scheduled asynchronously by MicroPython without blocking the lighting and voice tasks.
Key design highlights: The RP2040 itself does not process any network protocol stack; all WiFi network configuration, TCP connections, and data transmission/reception are entirely handled by the WizFi360 module as a proxy. The main controller only needs to send AT commands to complete all network operations, significantly reducing the complexity of firmware development. Hardware serial port wiring: RP2040 UART1 (GP4/GP5) is connected to WizFi360, with a fixed baud rate of 115200.Peripheral outputs rely on the dual-channel WS2812 LEDs of GP16, the I2S audio power amplifier, and the vibration motor to realize multi-sensory reminders.
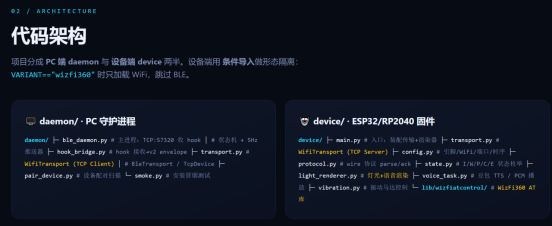
The project code is inherently divided into two major modules: the PC-side daemon and the device-side RP2040 MicroPython firmware, which implements form isolation via the compile condition VARIANT=="wizfi360". The WiFi version automatically skips BLE-related code to reduce the firmware size.
① PC-side daemon process
ble_daemon. py: The main finite-state machine, which aggregates all Claude session states at a frequency of 5Hz and performs priority throttling to avoid frequent screen flickering;
hook_bridge. py: Receives native Claude Hook JSON and encapsulates it into a v2 communication envelope in a standardized manner;
WifiTransport: TCP Client communication layer, which actively connects to port 57321 of the hardware device;
pair_device. py: A tool for LAN device scanning and IP pairing;
smoke. py: A script for device online self-check and Smoke Testing.
② RP2040 Firmware on the Device Side
main. py: the program entry, responsible for hardware initialization, as well as scheduler of the transmitter and renderer;
transport. py: Wraps WizFi360 AT commands, serving as the core module for TCP server creation and network frame parsing;
protocol. py: v6 wire Communication Protocol parsing, ACK response logic;
state. py: The device-side finite-state machine, which defines 5 modes: idle / running / pending approval / completed / error;
light_renderer. py: renders dynamic lighting effects, and refreshes the status light synchronously at 20FPS;
voice_task. py: A TTS voice broadcast task that invokes the PCM audio to drive the speaker;
vibration. py: Controls the vibration motor and provides haptic feedback for status changes;
lib/wizfiatcontrol/: A complete set of AT command driver library for WizFi360.
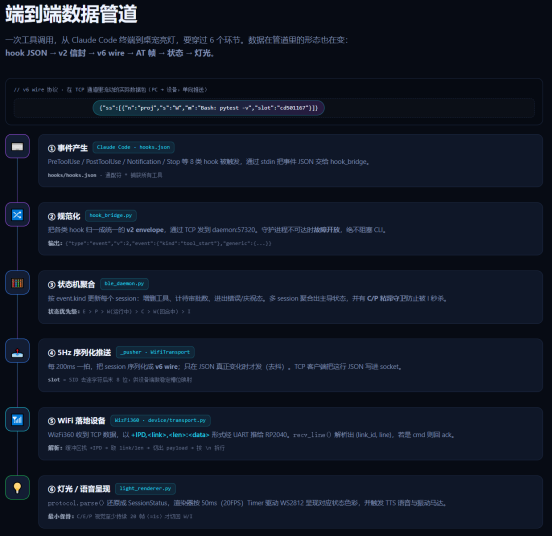
From the moment a tool call is executed by Claude to the moment the desktop ornament lights up, the complete data goes through 6 layers of transformation, with data formats encapsulated and parsed step by step: Native Hook JSON → v2 standardized envelope → v6 wire binary frame → WizFi360 AT + IPD data frame → RP2040 state enumeration → light/voice dynamic effect
Event generation: Claude's built-in hooks capture 8 types of events including PreToolUse, PostToolUse, and Stop, and output JSON via standard stdin push;
Standardized encapsulation: hook_bridge is uniformly encapsulated into v2 envelope data packets to mask the differences in event formats across different tools;
Status aggregation throttling: The daemon refreshes the global session status at 5Hz and sets priorities (error reporting > pending approval > running > idle) to prevent a flood of events from cluttering the screen in a short period of time;
Serialized push: The status is packaged once every 200ms into the v6 wire lightweight protocol, and then pushed to the hardware via TCP in one-way mode;
WiFi hardware implementation analysis: The WizFi360 receives TCP data packets and forwards them to the RP2040 via + IPD serial port frames; the code extracts the payload from the messy AT serial port echo, and parses the link number and status data.
Multi-sensory presentation: The state is sent to the renderer, which synchronously outputs RGB lighting animations, TTS speech, and vibration feedback.
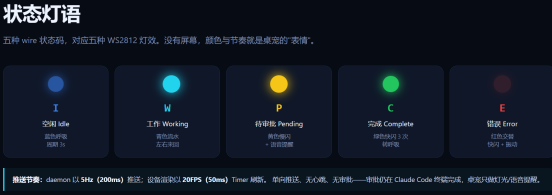
The project defines 5 sets of standard business statuses, each corresponding to a dedicated light color, dynamic effect, and voice prompt:
IDLE (Idle): Slow blue breathing light, device in standby;
WORKING (Running): Cyan flowing gradient, indicating that the AI is executing code / reading files;
Pending (Awaiting Approval): Slow yellow flashing, with voice announcement "Please check the terminal";
COMPLETE Task completed: The green indicator flashes rapidly 3 times in a row, and the voice broadcasts "Task completed!";
ERROR Execution Error: Alternating red and blue flashing, with synchronous vibration alert from the motor.
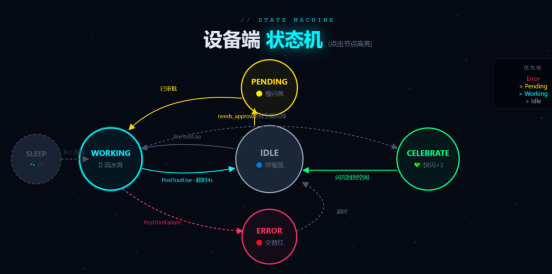
The device is equipped with a complete finite-state machine, which strictly defines the state transition logic and priorities: ERROR > PENDING > WORKING > IDLE > CELEBRATE
If an approval event is received during operation, the state directly transitions to PENDING;
Capture errors at any stage and forcibly trigger high-priority ERROR alerts;
Upon completion, the tool automatically enters the COMPLETE celebration animation, and reverts to the IDLE standby state once the animation ends.
Automatically enter sleep mode when no events are pushed for a long time to reduce power consumption.
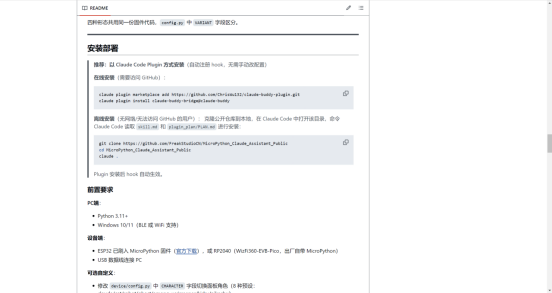
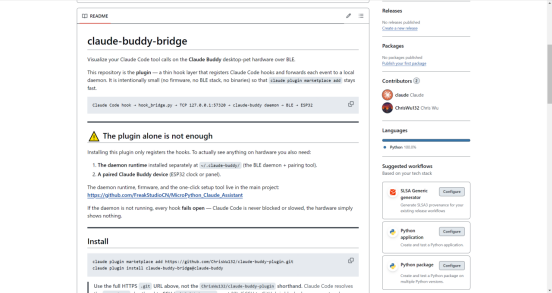
The entire solution relies on the open-source claude-buddy-plugin to implement automatic Hook registration, eliminating the need to manually modify the Claude configuration file:
Online Installation: Directly pull the plugin repository from the Claude Extension Marketplace, and complete the deployment with one click;
Offline installation: You can clone the project source code in a network-free environment and run the local installation command in the Claude terminal; after the plugin is installed, the event forwarding logic will be automatically mounted, and all AI operations will be pushed to the local daemon in real time without any additional configuration throughout the process.
Claude plugin link: https://github.com/ChrisWu132/claude-buddy-plugin
4. Supporting Tools
Why develop a dedicated one-click GUI configuration tool separately?
Lower the threshold for replication and mask cross-platform discrepancies. This project supports 4 sets of hardware solutions simultaneously (WizFi360 WiFi version, ESP32-C3 clock version, ESP32-S3 screen Panel/D-Shell version), which feature completely different main controllers, Communication Protocols, and flashing methods: the RP2040 relies on dragging and dropping uf2 files, the ESP32 depends on esptool, WiFi requires network configuration and static IP assignment, and BLE demands Bluetooth scanning and pairing, making it highly error-prone for beginners to manually enter commands. The unified GUI tool encapsulates the differentiated operations of multiple sets of hardware, eliminating the need to distinguish between command lines or consult programming instructions, and supporting fully visualized point-and-click operations throughout the process.
Automate tedious pre-processing tasks to avoid unnecessary pitfalls
The project involves a large number of repetitive operations such as TTS speech PCM creatives, pixel character animation resources, static IP allocation for WiFi, serial port scanning, and TCP pairing verification. If all operations are performed manually:
You need to call the Doubao API on your own to process the voice, convert its sampling rate, and place it in the specified assets directory;
For the Wi-Fi version, you need to manually check for idle IP addresses on the LAN and enter them into the device configuration.
When upgrading the firmware each time, distinguish between initial flashing and incremental upgrade, and check the corresponding erase option; the tool completes all operations automatically, avoiding frequent bugs such as misplaced files, IP conflicts, and incompatible audio sampling rates.
Complete usage process: hardware selection → voice/character creatives generation → firmware flashing → LAN TCP pairing → backend bridging startup → log debugging. All functions are integrated into a single exe program, eliminating the need to simultaneously open multiple terminals, serial port tools, and speech synthesis web pages.
It also has a built-in device log reading function. When the lighting/voice function fails to work properly, you can directly capture the running logs for troubleshooting, eliminating the need for a serial port debugging tool.
Catering to both beginners and developers, with two usage modes available
Absolute beginner-friendly: Operate entirely via mouse clicks, no prior Python environment setup or command line expertise required;
Advanced users: the underlying layer retains the Python script entry, which can be launched via python -m setup_tool in the command line to customize secondary development automated programming scripts.
The overall design logic of the tool is as follows:
Layered and modular design with linearly progressive workflow: Project directory selection → hardware form factor selection → resource creatives generation/import → flashing parameter configuration → one-click flashing → device pairing → bridging operation and debugging. Branching and shunting are implemented for different hardware forms: selecting WizFi360 automatically switches to WiFi TCP link and disables BLE-related logic; selecting ESP32 series automatically switches to serial port flashing and Bluetooth pairing processes, with irrelevant configuration items automatically hidden on the interface to reduce information interference.
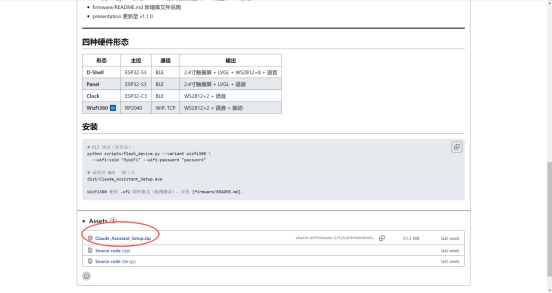
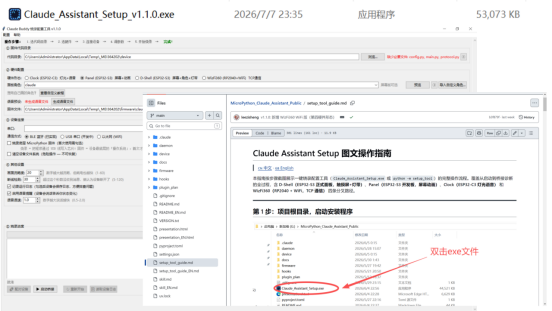
Extract the open-source repository of the project, then double-click Claude_Assistant_Setup. exe to launch the graphical tool. In the first step, you must select the device firmware folder within the repository; the program will automatically read the built-in firmware and voice resource directories, verify the project integrity, and a green checkmark will appear once the directory is confirmed valid.
When you select "WizFi360 (RP2040+ WiFi TCP)" in the hardware radio button, the interface will automatically switch to the WiFi configuration panel. Enter the WiFi name and password of your home router, and the tool will automatically write the WiFi credentials into the device firmware during the flashing phase. The communication mode will be automatically locked to Ethernet WiFi, and the Bluetooth-related configuration items will be disabled, distinguishing the operation logic from the ESP32 Bluetooth version.
The project's lighting and voice prompt function relies on PCM audio files with a fixed sampling rate. The tool is pre-installed with the Doubao speech synthesis plugin: after entering the Open Platform key, you can freely switch between male and female voices, adjust the speaking rate and intonation, generate broadcast audio with one click, and the audio will be automatically saved to the firmware assets resource folder, eliminating the need for manual audio format conversion.
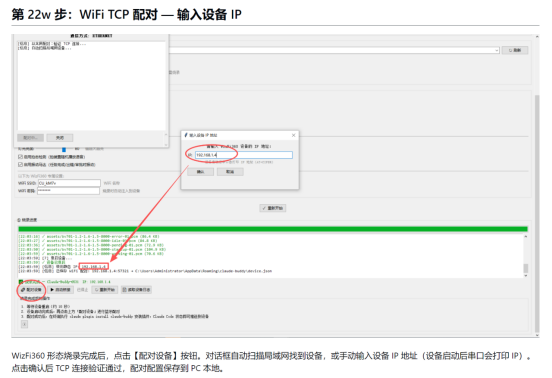
After the device restarts and connects to the network, tap the [Pair Device] button in the bottom left corner:
The tool automatically scans port 57321 of the entire LAN to detect online WizFi360 hardware.
Automatically filter unoccupied static IPs, write them into the device configuration, so that the device permanently fixes this IP without the need to re-search for it every time it restarts;
After the TCP connectivity check passes, the IP and port configurations will be saved to a JSON file on the local computer, which will be automatically read when the tool is launched next time, eliminating the need for repeated pairing.
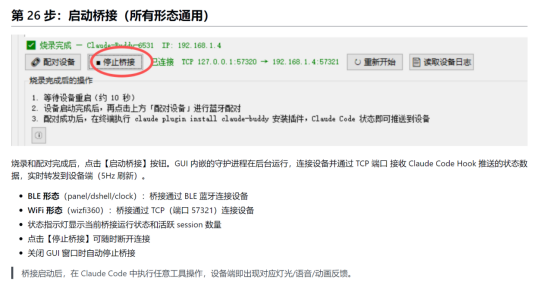
After pairing is complete, click [Start Bridging], and the GUI-embedded daemon will run persistently in the background:
The Wi-Fi version continuously receives Hook statuses pushed by Claude Code via TCP port 57321;
Transmit status data to hardware in real time at a frequency of 5Hz, and synchronously drive lights, audio and vibration;
The interface displays the bridging connection status and the number of currently active AI sessions in real time;
It supports stopping bridging at any time and reading device operation logs for troubleshooting; when the software window is closed, the background daemon will be terminated automatically, with no residual process occupying ports in the background.
V. Conclusion and Extension
What started as a simple attempt to solve my own minor pain point of "switching terminals every dozen seconds" eventually evolved into a complete WiFi-enabled solution. Along the way, I stumbled into numerous pitfalls with both hardware and software, and also developed some general insights for building this type of desktop AI status hardware. Here, I have consolidated the design concepts, pitfalls to avoid, and potential expansion directions, so that whether you want to replicate and modify the design or build a similar product from scratch, you can save yourself a lot of detours.
5.1 Core Design Concept: Essentially an "Attention Burden Reduction Tool"
The most common pitfall when developing this kind of product is cramming in features and stacking up specs, only to end up with a jack-of-all-trades that masters none. In fact, its core positioning is crystal clear: to translate the digital status on the screen into a physical form that sits on your desk, conveying information with the lowest possible cognitive overhead. Centered on this core, there are several non-negotiable design principles to adhere to:
Minimalist status design for instant recognition: Avoid creating a dozen different statuses or complex lighting patterns. Users should be able to distinguish "running / pending approval / completed / error" at a glance with their peripheral vision. Since color is the most efficient way to differentiate, we only retain 5 core statuses, distinguished by solid colors plus simple animations.
Multi-sensory redundancy adapts to different scenarios: the three feedback channels of light, voice and vibration are not gimmicks, but scenario-specific complements. You can check the light when focusing on coding, listen to the voice when switching to look up information, and turn on vibration for late-night overtime work to avoid disturbing others — there is always a way that won't interrupt your work rhythm.
Unified connection logic to reduce learning costs: From the earliest Bluetooth version to the current WiFi version, we have always adhered to the logic of "PC actively connects to devices", so users don't need to adjust their operation mindset when switching versions. Even when the underlying Communication Protocol is changed from BLE to TCP, the operation process on the user side remains almost unchanged.
The bottom line of privacy must not be crossed: all status data only circulates within the local area network, never goes to the cloud, there is no backend server, and no user data is collected. For the developer community, this is more important than adding ten extra features.
5.2 Notes for Development Implementation & Pitfall Avoidance Experience
When it comes to the actual implementation from 0 to 1, there are far more hidden pitfalls in the details than anticipated. Let me break this down from a few of the most critical dimensions:
Hardware Development Pitfall Avoidance:
Fault tolerance is a must for the parsing of serial port WiFi modules: for AT-command based WiFi modules like the WizFi360, the data output via the serial port is not a clean data packet, but is mixed with AT echo, redundant Byte, and packet sticking, and link number race conditions will also occur with multiple TCP links. We ran into the pitfalls of Packet loss and parsing chaos at the very beginning, and only managed to achieve stable long-term connections after we expanded the serial port receive buffer to 8192 Bytes and implemented complete header and footer checking as well as exception discarding logic.
A static IP is the baseline for a quality WiFi version experience: if DHCP is used by default, the device's IP may change every time it restarts, forcing users to re-discover and pair the device on every use, which completely ruins the experience. It is critical to automatically scan the subnet, assign an available IP, and write it to the device firmware during the flashing process to lock the address in place, ensuring that pairing only needs to be done once and remains valid permanently.
A 2-in-1 development board saves you the hassle of building circuits from scratch: don’t skimp on a few bucks by buying a main controller and WiFi module separately to design your own PCB. Hidden pitfalls like RF trace routing and antenna matching can take half a month to debug without relevant experience. Official integrated boards such as the WizFi360-EVB-Pico have proven stability, so for small projects and open-source projects, prioritize mature solutions and focus your energy on core functions.
Notes for software development:
Throttling and debouncing must be implemented for status updates: Claude's Hook events are triggered extremely frequently, and without throttling, the indicator light will flicker several times per second, which will cause severe eye fatigue. We have implemented 5Hz status aggregation, coupled with a priority ranking (error > pending approval > running > idle), where high-priority events can directly cut in the queue, which not only ensures that important reminders are not delayed, but also avoids the problem of random flickering of the indicator light.
Be meticulous about firmware size: the RP2040 has limited Flash space, and it is easy to exceed the limit when voice creatives, driver libraries and service code are crammed together. We have implemented conditional compile, in which the Wi-Fi version directly removes all BLE-related code, and the voice is also compressed into PCM format with 8000 sampling rate to reserve space for user-defined content.
The upper computer tool must be well-equipped with proper exception fallback: users have highly diverse network environments, and issues like IP conflicts, firewall blocks, and failure to detect devices via subnet scanning are common occurrences. The tool must definitely incorporate fallback features such as exception prompts, manual IP entry, and log export, so that users will not be left at a loss when encountering error messages.
5.3 Precision Control Over Details in Product Form Design
As a desktop ornament, the details of its appearance and interaction directly determine whether it will be kept in use on the desk for a long time or end up as electronic waste gathering dust.
Strike just the right balance of presence: it shouldn't be so bulky that it clutters up your desk, nor so tiny that it's easily overlooked. At roughly the size of a palm, it sits unobtrusively beside your monitor, functioning both as a practical tool and a stylish desk decor piece.
The lighting must be properly softened: direct-emitting RGB LED beads are extremely harsh to the eyes, and a sudden flash of them while coding late at night can leave you dazzled. It is essential to add a frosted lampshade and implement diffuse reflection, so that the light is soft and non-glaring, making it suitable for long-term daily use.
The interaction on the device side should be as simple as possible: just a power switch is enough, and all configuration, pairing, and parameter modification are completed via the tool on the computer side. The more user-friendly the device side is, the lower the threshold for getting started, truly achieving plug-and-play functionality.
Leave ample modification room for DIY enthusiasts: Open-source projects must leave room for users to unleash their creativity. The enclosure is designed as a standard 3D-printed part with reserved universal mounting holes, and all hardware pins are routed out, making it easy for users to change colors, add sensors, or alter the shape, so that the community can come up with more diverse and creative uses.
5.4 Scalable Directions: Beyond Claude State Prompts
The underlying framework of this solution boasts strong versatility and can be extended into a wide range of gameplay forms and configurations:
Multi-AI tool adaptation: Currently, only Claude Code is supported, and integration with all AI coding tools with Hook capabilities such as Cursor, GPT, and Tongyi Lingma can be extended in the future to build a universal AI development status indicator.
Multi-device collaborative networking: Multiple devices can be deployed within the same LAN, with one placed in the study, one in the living room, and one in the bedroom respectively. When running long tasks, you can receive notifications no matter where you go, without having to stay glued to your computer.
Hardware feature expansion: add a small screen to display specific task names and error summaries; install temperature and humidity sensors that double as desktop environment monitors; integrate an NFC module to enable quick pairing with just a tap from a smartphone.
Morphological style variants: It currently features a cartoon figurine design, which can be fully adapted into different styles such as minimalist traffic lights, pixel blocks, trendy figurines, etc. , to fit diverse desktop setups and aesthetic preferences.
Extension of team collaboration scenarios: Build a lightweight server relay, so that the task status of every member of the development team can be synchronized to a public dashboard, and the team can see at a glance who is running a compile, who is waiting for approval, and who has encountered an error.
Finally, I want to say that this kind of small desktop hardware has never been some cutting-edge technology. Its core lies in identifying a tiny pain point in developers' daily work and solving it in a hardware-based way. Turning the abstract code status on the screen into visible, audible and tangible feedback right on your desk is a pretty interesting thing in itself. All the hardware and software materials are fully open source, so feel free to modify them and create more interesting versions.
Documents
Full Project Source Code, Firmware & GUI Setup Tool
Contains RP2040 MicroPython firmware, PC TCP daemon, Claude hook plugin, GUI flashing tool, 3D STL models stored in docs folder
Hardware Schematic, PCB Layout & Complete BOM
Full open-source hardware design, circuit diagram, PCB files and component list under MIT license