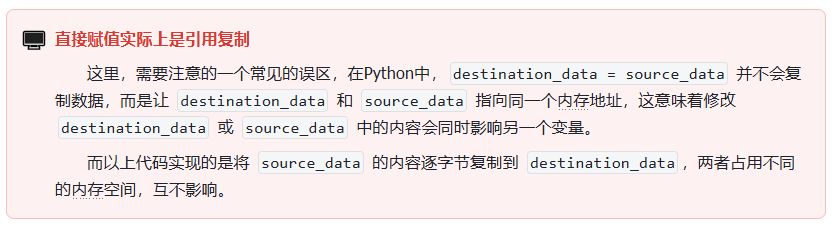
RP2040 Memory‑to‑Memory DMA in MicroPython Beginner Tutorial
RP2040 MicroPython DMA memory‑to‑memory transfer, code and benchmark
提示:无法直接保存文件到桌面。复制全部下方文本,粘贴记事本,另存为
rp2040_DMA_MemoryToMemory_Demo.txt,编码 UTF‑8,保存位置选桌面。图片/GIF链接完整保留;VS Code / Typora 打开并联网可渲染图片,记事本只会显示图片链接源码。已经移除全部 #、* 符号。
Source code can be found in the resource package under elegance‑devkit v1\Demo\66 DMA_MemoryToMemory folder.
The example below uses DMA to copy data from a source array to a destination array. The CPU does not handle byte‑by‑byte copying, lowering CPU load and improving transfer efficiency. It also benchmarks DMA transfer speed against array‑slice copy performance.
Sample code:
# Python env   : MicroPython v1.23.0
# -*- coding: utf-8 -*-
# @Time    : 2024/9/7 10:50 AM
# @Author  : Li Qingshui
# @File    : main.py
# @Description : DMA experiment, memory‑to‑memory transfer
# ======================================== Import related modules =========================================
# Import DMA controller from rp2 library
from rp2 import DMA
# Import addressof function to get memory address of objects
from uctypes import addressof
# Import array module for array creation
from array import array
# Import time‑related modules
import time
# ======================================== Global variables ============================================
# Create source‑data array, type unsigned 32‑bit integer (I), initialized with values
# 1024 elements ranging from 0 to 1023
source_data = array("I", range(1024))
# Create destination array, initialized to zero, same length as source array
destination_data = array("I", [0] * len(source_data))
# ======================================== Function definitions ============================================
# ======================================== Custom classes ============================================
# ======================================== Initialization ==========================================
# 3‑second power‑on delay
time.sleep(3)
# Print debug message indicating main program start
print("FreakStudio: DMA Memory to Memory Test ")
# Initialize DMA object
dma = DMA()
# Pack DMA control register, size=2 means 32‑bit word transfer
ctrl = dma.pack_ctrl(size=2)
# Configure DMA control register and transfer parameters
dma.config(
    read=addressof(source_data),        # Source memory address
    write=addressof(destination_data),  # Destination memory address
    count=len(source_data),             # Transfer element count
    ctrl=ctrl,      # Control register configuration
    trigger=False   # Do NOT start transfer immediately
)
# ======================================== Main program ==========================================
# Print debug information and start DMA transfer
print("Start DMA")
# Benchmark DMA transfer speed
# Record start timestamp
start_time = time.ticks_us()
# Activate DMA transfer
dma.active(1)
# Poll until DMA completes, dma.count equals zero when finished
while dma.count > 0:
    pass
# Record end timestamp
end_time = time.ticks_us()
# Calculate elapsed time
dma_time = time.ticks_diff(end_time, start_time)
print("DMA Transfer Time (us): ", dma_time)
# Print debug message for transfer completion
print("DMA Finished")
# Print source and destination arrays to verify transfer correctness
print("Source Data: ", source_data)
print("Destination Data: ", destination_data)
# Benchmark array slice copy speed
start_time = time.ticks_us()
destination_data[:] = source_data[:]
end_time = time.ticks_us()
array_time = time.ticks_diff(end_time, start_time)
print("Array Slice Copy Time (us): ", array_time)
Two arrays are created:
source_data: array holding 1024 elements of type unsigned 32‑bit integer. Each element occupies 4 bytes; values range from 0 to 1023.
destination_data: receives data transferred by DMA. All elements initialize to zero and share the same length as source_data.
Configure the DMA‑channel instance:
Set DMA control register via pack_ctrl method: size=2 selects 32‑bit data transfers. This helper method assembles control‑register bit‑fields for transfer width, direction and other settings. You can inspect full configuration with the unpack_ctrl method.

In this configuration read‑address and write‑address auto‑increment are enabled, no interrupt on every transfer, interrupt triggers only after count reaches zero, per‑transfer data width is four bytes (32‑bit).
Call dma.config() to set DMA transfer parameters: source address points to memory location of source_data, destination address points to memory location of destination_data. Transfer element count matches source‑array length, use control value generated by pack_ctrl, 32‑bit transfer width, and do not auto‑trigger transfer.
trigger=True means DMA transfer starts immediately after config call.
trigger=False means you must manually launch transfer with dma.active(1). Both are software‑based ways to start DMA.
Inside main program, after DMA is activated, poll dma.count > 0 to detect completion. dma.count returns remaining‑transfer‑element count; transfer finishes when this value reaches zero. Finally print source and destination arrays to verify memory copy result.
Elapsed time for DMA transfer is measured and printed. Then benchmark the array slice copy operation.
Firmware flash output example:
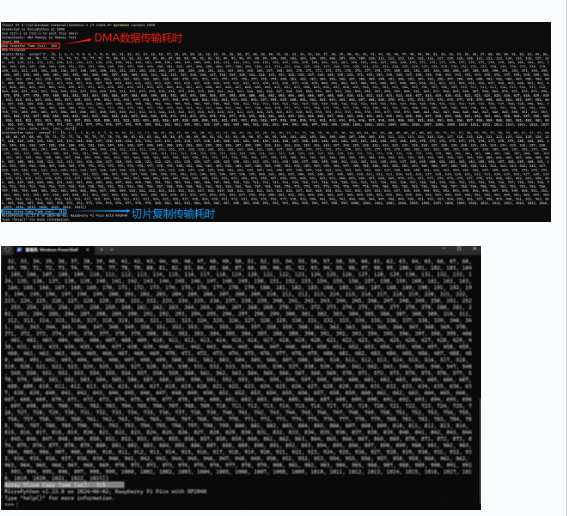
Memory‑to‑memory DMA copy succeeds. For 1024 elements DMA takes 104 µs, while array‑slice copy takes 314 µs. DMA shows significant speed advantage for large‑volume data movement. When element count increases to 4096, DMA consumes 110 µs and slice copy consumes 923 µs; performance gap becomes even larger.