



MicroPython W5500 HTTP‑Server Tutorial: Web One‑Click LED Control
Build W5500 HTTP server to control LED from web page.
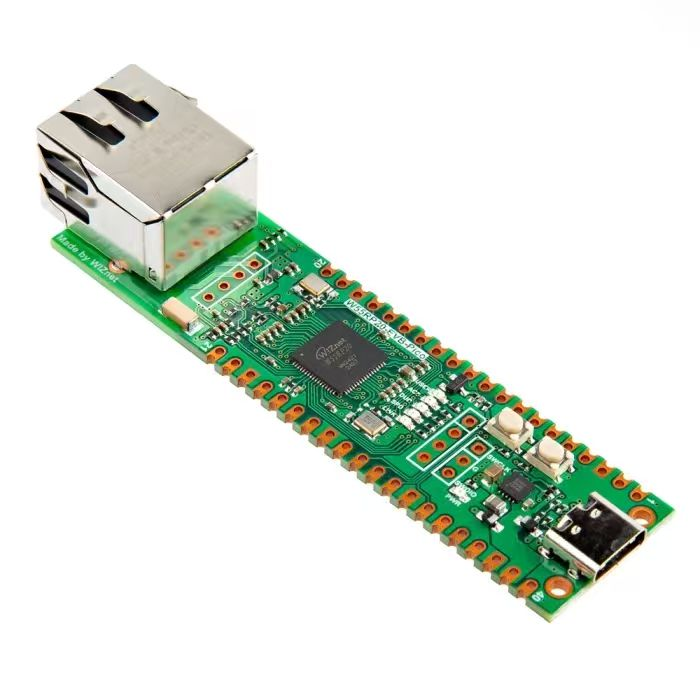
HTTP Server Experiment
When implementing an HTTP server with Raspberry Pi Pico and W5500 module, follow these steps:
Establish connection The web browser(client) and web server build a virtual "socket" over TCP connection. This socket acts as the communication channel between client and server.
Send request The client sends HTTP requests through this socket, commonly GET or POST methods. GET requests are used to fetch resources; POST requests are used to submit data.
Server processing After receiving the request, the server locates and reads corresponding resources(such as HTML files) according to the request URL. For POST requests, the server also parses form data contained in the request body.
Return response The server sends resource data back to the client via socket in the form of HTTP response. The response includes HTTP header information and actual HTML file content.
Close connection After data exchange finishes, client and server close the TCP connection.
The source code below can be found in the provided resource package under elegance‑devkit v1\Demo\47 ETH_HTTP_Server.
In the sample code below, we build a simple HTTP server and control the onboard LED on the development board through web pages. The code is shown below:
# Python env   : MicroPython v1.23.0 on Wiznet W5500
# -*- coding: utf-8 -*-
# @Time    : 2024/8/8 10:33 PM
# @Author  : Li Qingshui
# @File    : main.py
# @Description : Ethernet experiment for HTTP server test
# ======================================== Import related modules ========================================
# Import hardware‑related modules
from machine import Pin,SPI
# Import time‑related modules
import time
# Import network‑related modules
import network
# Import socket module for creating and managing network connections
from usocket import socket
# ======================================== Global variables ============================================
# Device IP address
ip = '192.168.1.20'
sn = '255.255.255.0'
gw = '192.168.1.1'
dns= '8.8.8.8'
# Tuple object for network configuration
netinfo=(ip, sn, gw, dns)
# LED status flags
on_flag = 0
off_flag = 0
blink_flag = 0
# ======================================== Function definitions ============================================
# Initialize network connection
def w5x00_init() -> 'network.WIZNET5K':
    """
    Initialize network.WIZNET5K instance, set static IP and bring‑up network connection.
    Returns:
        network.WIZNET5K: Initialized and connected network.WIZNET5K instance.
    Raises:
        None: This function does not throw exceptions.
    """
    # Declare global variable
    global netinfo
    # Initialize SPI object
    spi = SPI(0, 2_000_000, mosi=Pin(19), miso=Pin(16), sck=Pin(18))
    # Instantiate network.WIZNET5K, pass chip‑select pin CS and reset pin RST
    nic = network.WIZNET5K(spi, Pin(17), Pin(20))
    # Activate network interface
    nic.active(True)
    # Apply static‑IP settings
    nic.ifconfig(netinfo)
    # Block until network link becomes available
    while not nic.isconnected():
        time.sleep(1)
        # Print register debug information
        print(nic.regs())
    # Print applied network parameters
    print('ip :', nic.ifconfig()[0])
    print('sn :', nic.ifconfig()[1])
    print('gw :', nic.ifconfig()[2])
    print('dns:', nic.ifconfig()[3])
    # Return WIZNET5K instance
    return nic

def web_page() -> str:
    """
    Generate web‑page content, dynamically render text according to LED status.
    Returns:
        str: Generated HTML page content.
    Raises:
        None: This function does not throw exceptions.
    """
    # Declare global led variable
    global led
    # Generate display text based on LED status flags
    if on_flag == 1:
        led_state = "ON"
    elif off_flag == 1:
        led_state = "OFF"
    else:
        led_state = "BLINK"
    # Generate HTML page content with dynamic LED status
    html = """
    <!DOCTYPE html>
    <html lang="en">
    <head>
    <meta charset="UTF-8">
    <meta http‑equiv="X‑UA‑Compatible" content="IE=edge">
    <meta name="viewport" content="width=device‑width, initial‑scale=1.0">
    <title> Freak Studio Raspberry Pi Pico Web Server Test </title>
    <style>
        body {
            background‑color: #2c3e50;
            color: #ecf0f1;
            font‑family: Arial, sans‑serif;
            text‑align: center;
            margin‑top: 50px;
        }
        h1 {
            color: #e74c3c;
            font‑size: 3em;
        }
        h2 {
            color: #3498db;
            font‑size: 2em;
        }
        .button {
            background‑color: #27ae60;
            border: none;
            color: white;
            padding: 15px 32px;
            text‑align: center;
            text‑decoration: none;
            display: inline‑block;
            font‑size: 16px;
            margin: 4px 2px;
            cursor: pointer;
            border‑radius: 12px;
            transition: background‑color 0.3s ease;
        }
        .button:hover {
            background‑color: #2ecc71;
        }
        .button2 {
            background‑color: #e74c3c;
            border: none;
            color: white;
            padding: 15px 32px;
            text‑align: center;
            text‑decoration: none;
            display: inline‑block;
            font‑size: 16px;
            margin: 4px 2px;
            cursor: pointer;
            border‑radius: 12px;
            transition: background‑color 0.3s ease;
        }
        .button2:hover {
            background‑color: #c0392b;
        }
        .button3 {
            background‑color: #90448e;
            border: none;
            color: white;
            padding: 15px 32px;
            text‑align: center;
            text‑decoration: none;
            display: inline‑block;
            font‑size: 16px;
            margin: 4px 2px;
            cursor: pointer;
            border‑radius: 12px;
            transition: background‑color 0.3s ease;
        }
        .button3:hover {
            background‑color: #c0392b;
        }
    </style>
    </head>
    <body>
    <div>
    <H1>Freak Studio Raspberry Pi Pico Web Server Test</H1>
    <h2>Control LED</h2>
    <p>PICO LED state: <strong>""" + led_state + """</strong></p>
    <p><a href="/?led=on"><button class="button">ON</button></a></p>
    <p><a href="/?led=off"><button class="button button2">OFF</button></a></p>
    <p><a href="/?led=blink"><button class="button button3">BLINK</button></a></p>
    </div>
    </body>
    </html>
    """
    # Return assembled HTML content
    return html

def web_server() -> None:
    """
    Run web server, handle client requests and control LED status.
    Returns:
        None: This function returns nothing.
    Raises:
        None: This function does not throw exceptions.
    """
    # Declare global ip variable
    global ip
    # Global LED status flags
    global on_flag, off_flag, blink_flag
    # Create socket object
    s = socket()
    # Bind to IP address and port 80
    s.bind((ip, 80))
    # Listen for up to 5 client connections
    s.listen(5)
    while True:
        # Accept incoming client connection
        conn, addr = s.accept()
        # Print client IP and port information
        print('Connect from %s' % str(addr))
        # Receive client request data, max 1024 bytes
        request = conn.recv(1024)
        # Convert request bytes to string
        request = str(request)
        # Print received request content
        print('Content = %s' % request)
        # Locate LED‑ON command inside request string
        led_on = request.find('/?led=on')
        # Locate LED‑OFF command inside request string
        led_off = request.find('/?led=off')
        # Locate LED‑BLINK command inside request string
        led_blink = request.find('/?led=blink')
        # Turn on LED if ON command is found
        if led_on == 6:
            print("LED ON")
            led.value(1)
            on_flag = 1
            off_flag = 0
            blink_flag = 0
        # Turn off LED if OFF command is found
        if led_off == 6:
            print("LED OFF")
            led.value(0)
            on_flag = 0
            off_flag = 1
            blink_flag = 0
        # Trigger LED blink if BLINK command is found
        if led_blink == 6:
            print("LED BLINK")
            for i in range(3):
                led.value(1)
                time.sleep(0.2)
                led.value(0)
                time.sleep(0.2)
            on_flag = 0
            off_flag = 0
            blink_flag = 1
        # Build HTML response content
        response = web_page()
        # Send HTTP response headers
        conn.send('HTTP/1.1 200 OK\n')
        conn.send('Connection: close\n')
        conn.send('Content‑Type: text/html\n')
        conn.send('Content‑Length: %s\n\n' % len(response))
        # Send HTML page body
        conn.send(response)
        # Close client connection
        conn.close()
# ======================================== Custom classes ============================================
# ======================================== Initialization ==========================================
# 3‑second power‑on delay for hardware stabilization
time.sleep(3)
# Print debug banner
print("FreakStudio : Using W5x00 Ethernet to do HTTP Server test")
# Configure GPIO25 as output pin for LED control
led = Pin(25, Pin.OUT)
# Initialize W5500 module
nic = w5x00_init()
# ======================================== Main program ===========================================
# Start web‑server service
web_server()
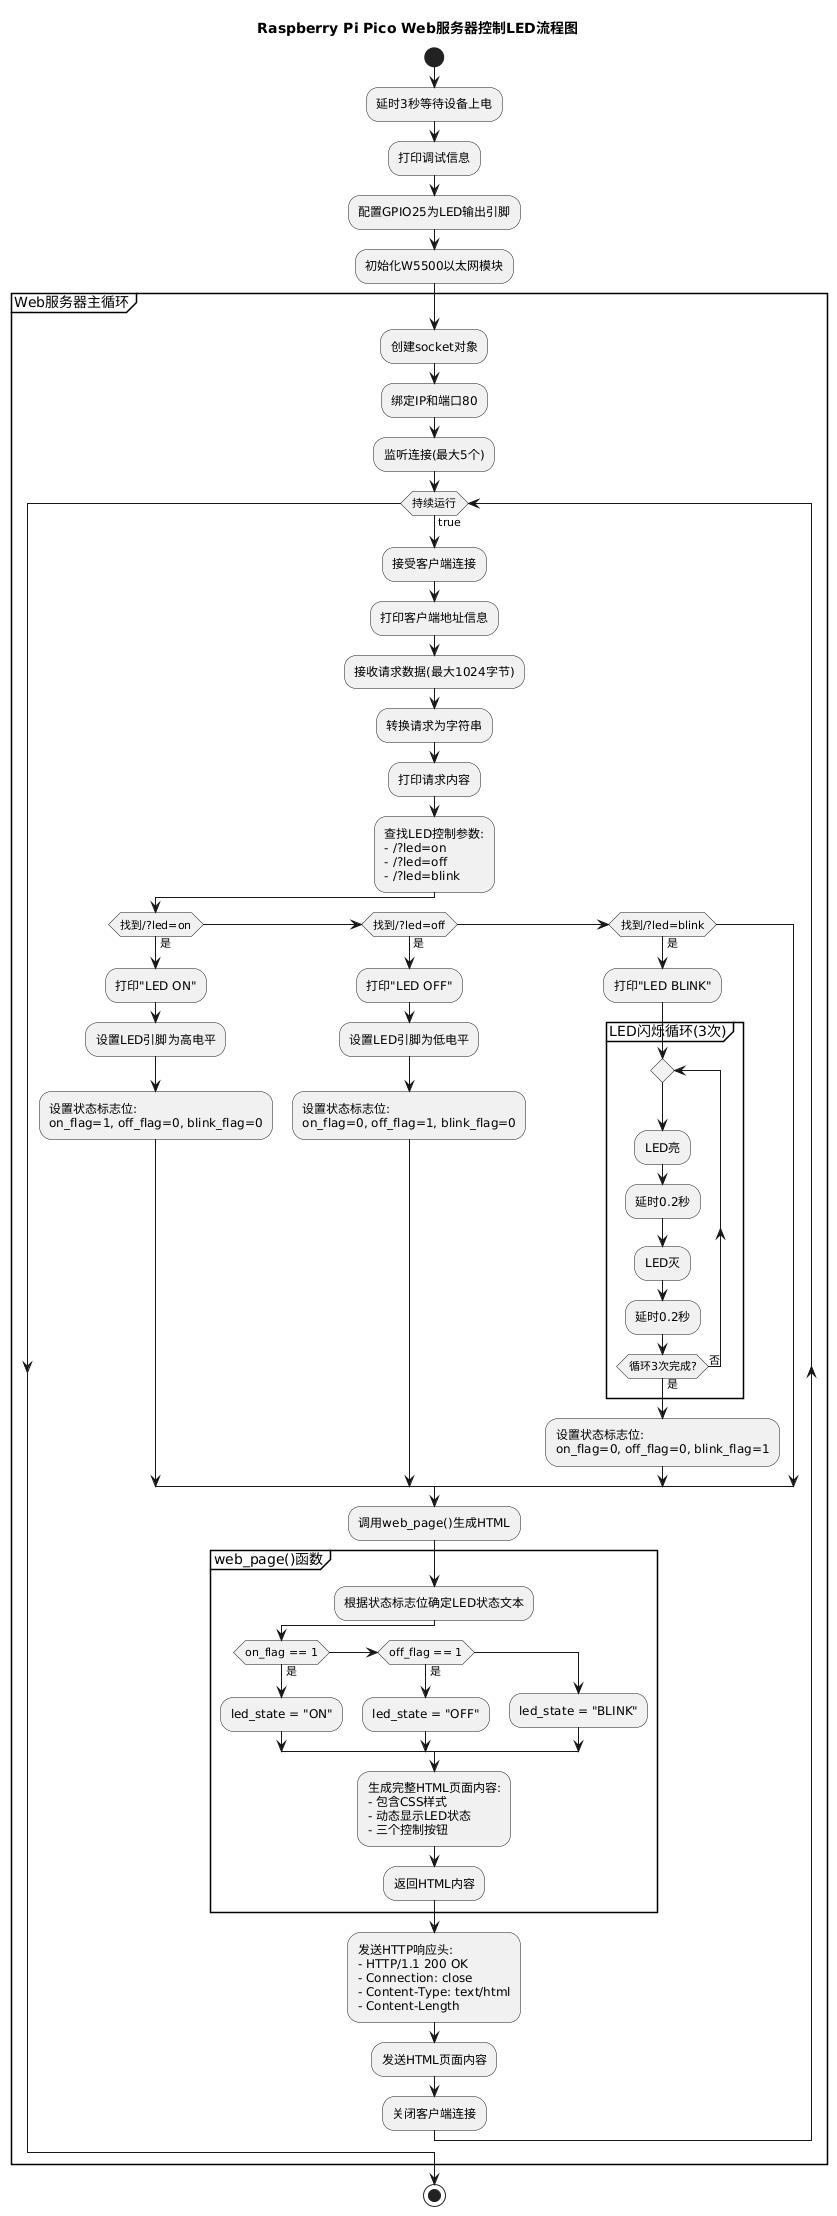
The basic workflow is described below:
Initialize network interface Call w5x00_init() to initialize network interface, configure IP address and bring‑up connection.
Create web server Define web_server() function, create socket object, bind to IP address and port 80, listen for up to 5 client connections.
Process client requests Inside web_server(), accept client connections, read request payload, and control LED status according to request content.
Generate web‑page content Call web_page() to build HTML content, dynamically render page based on LED status.
Send HTTP response Transmit assembled HTML content as HTTP response back to client.
Close connection Close client socket after finishing request processing.
Inside web_page() function we generate an HTML web page. Users can control LED status by clicking buttons on the page. Three buttons are provided: ON, OFF and BLINK for turning on, turning off and blinking the LED respectively. In the HTML source code, these operations are implemented:
Use multi‑line string ("""...""") to write HTML source code of the webpage. HTML markup contains fundamental webpage structure including <!DOCTYPE html> declaration, <html>, <head> and <body> tags. Embedded CSS styles are used for page appearance, including background color, font style and button styling. Three major buttons are implemented as <a> tags with href attribute defining request path triggered on mouse click:
ON button Triggers request path /?led=on when clicked.
OFF button Triggers request path /?led=off when clicked.
BLINK button Triggers request path /?led=blink when clicked.
When users click these buttons, the web server receives corresponding HTTP requests and executes LED actions: turn‑on, turn‑off or blink.
Inside web_server() function, these steps are performed:
- Create server socket
s = socket()Create socket object for server‑side network communication.s.bind((ip, 80))Bind socket to IP address and port 80, so the server accepts incoming HTTP requests on this endpoint.s.listen(5)Set maximum pending client connection queue size to 5. - Enter main loop and wait for client connections
while TrueInfinite loop to keep server running and accept new clients.conn, addr = s.accept()Block and wait for client connection.connis connection handle,addrstores client IP and port number.print('Connect from %s' % str(addr))Print peer client IP and port information. - Process client request
request = conn.recv(1024)Receive up to 1024 bytes of incoming HTTP request data.request = str(request)Convert raw byte request to string for parsing.print('Content = %s' % request)Print the full received request content. - Parse and handle LED control commands
led_on = request.find('/?led=on')Find offset position of LED‑ON substring in request string.led_off = request.find('/?led=off')Find offset position of LED‑OFF substring.led_blink = request.find('/?led=blink')Find offset position of LED‑BLINK substring.
According to incoming client request:
LED ON When ON command position equals 6, execute led.value(1) to turn LED on. Set on_flag = 1, reset off_flag and blink_flag to 0.
LED OFF When OFF command position equals 6, execute led.value(0) to turn LED off. Set off_flag = 1, reset on_flag and blink_flag to 0.
LED BLINK When BLINK command position equals 6, blink LED three times with 0.2‑second interval. Set blink_flag = 1, reset on_flag and off_flag to 0.
- Generate and send HTTP response
response = web_page()Invokeweb_page()to build HTML page reflecting current LED status. Send HTTP response headers:conn.send('HTTP/1.1 200 OK\n')Send status line indicating successful request processing.conn.send('Connection: close\n')Notify client to close TCP connection after response.conn.send('Content‑Type: text/html\n')Declare response MIME type as HTML text.conn.send('Content‑Length: %s\n\n' % len(response))Tell client total byte length of HTML body content. Send HTML page content:conn.send(response)Transmit assembled HTML webpage payload. - Close connection
conn.close()Terminate current client connection and wait for next incoming request.
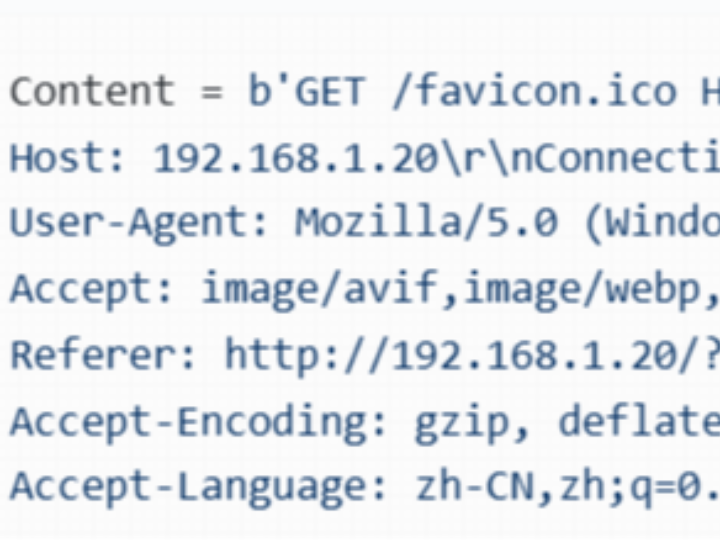
Sample raw HTTP request payload:
Content = b'GET /favicon.ico HTTP/1.1\r\n
Host: 192.168.1.20\r\nConnection: keep‑alive\r\n
User‑Agent: Mozilla/5.0 (Windows NT 10.0; Win64; x64) AppleWebKit/537.36 (KHTML, like Gecko) Chrome/127.0.0.0 Safari/537.36 Edg/127.0.0.0\r\n
Accept: image/avif,image/webp,image/apng,image/svg+xml,image/*,*/*;q=0.8\r\n
Referer: http://192.168.1.20/?led=off\r\n
Accept‑Encoding: gzip, deflate\r\n
Accept‑Language: zh‑CN,zh;q=0.9,en;q=0.8,en‑GB;q=0.7,en‑US;q=0.6\r\n\r\n'
Field explanations:
GET /favicon.ico HTTP/1.1 HTTP GET request method. /favicon.ico is requested resource path, usually browser website icon. HTTP/1.1 denotes protocol version.
Host: 192.168.1.20 Specifies target server IP‑address or domain name. In this example it is 192.168.1.20.
Connection: keep‑alive Client prefers persistent connection, allowing multiple HTTP requests over single TCP connection to reduce handshake overhead.
User‑Agent: Mozilla/5.0 (Windows NT 10.0; Win64; x64) AppleWebKit/537.36 (KHTML, like Gecko) Chrome/127.0.0.0 Safari/537.36 Edg/127.0.0.0 User‑agent string tells server which client software is sending the request; here it represents Chrome‑based Edge browser.
Accept: image/avif,image/webp,image/apng,image/svg+xml,image/*,*/*;q=0.8 Lists content MIME‑types client can accept together with quality priorities. Prefers AVIF, WebP, APNG images, then general images with quality factor 0.8.
Referer: http://192.168.1.20/?led=off Referrer page URL indicating from which page user navigates to current request.
Accept‑Encoding: gzip, deflate Declares supported compression formats so server may send compressed payload for faster transfer.
Accept‑Language: zh‑CN,zh;q=0.9,en;q=0.8,en‑GB;q=0.7,en‑US;q=0.6 Lists preferred human languages for response content; Simplified Chinese has highest priority followed by variants of English.
The source code uses conditional blocks like below to detect LED control commands:
# Turn on LED if ON command substring is found
if led_on == 6:
    ...
# Turn off LED if OFF command substring is found
if led_off == 6:
    ...
# Trigger LED blink if BLINK command substring is found
if led_blink == 6:
    ...
This is because the starting index of substrings such as /?led=on inside the full request string equals exactly 6.
Overall workflow diagram:
Flash firmware and open serial terminal. Sample output is shown below:
Enter device IP‑address in web‑browser address bar, the webpage displays as below:
Click the ON button. The onboard LED lights up and corresponding log prints on serial terminal:

Other buttons work correctly as well:

Important note: LED‑blink logic uses blocking execution. While the blinking sequence is running, button clicks will not take effect until the blinking procedure completes.