67 Serial Protocol Analysis: R60ABD1 Radar Driver Design in MicroPython
This tweet introduces the basic characteristics and working principle of stepper motors.
COMPONENTS
PROJECT DESCRIPTION
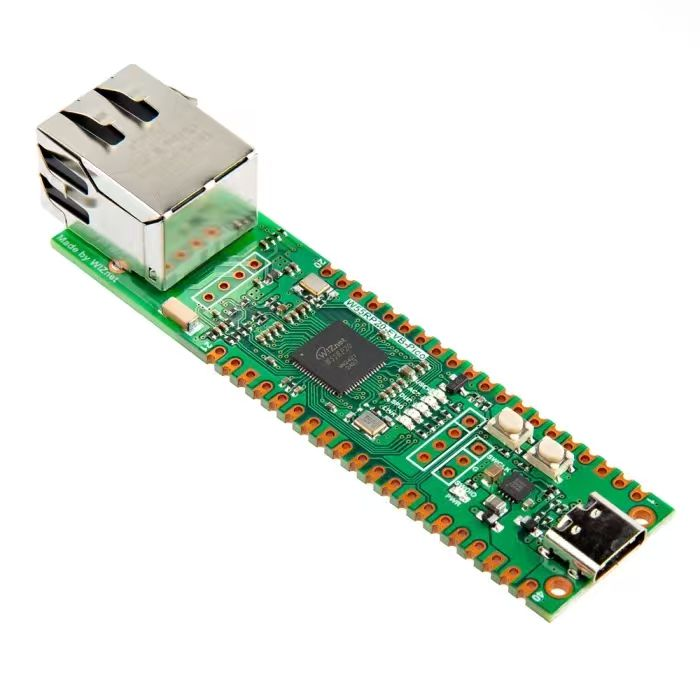
【Preliminary Note】The original hardware example in this article was written based on the RP2040. The actual hardware used in this hands-on demonstration features the W55RP20 as the main controller chip. The circuit logic and UF2 flashing operation principles are universally applicable, with only the main controller model differing. The original chip model mentioned in the circuit descriptions below is provided for reference purposes only.
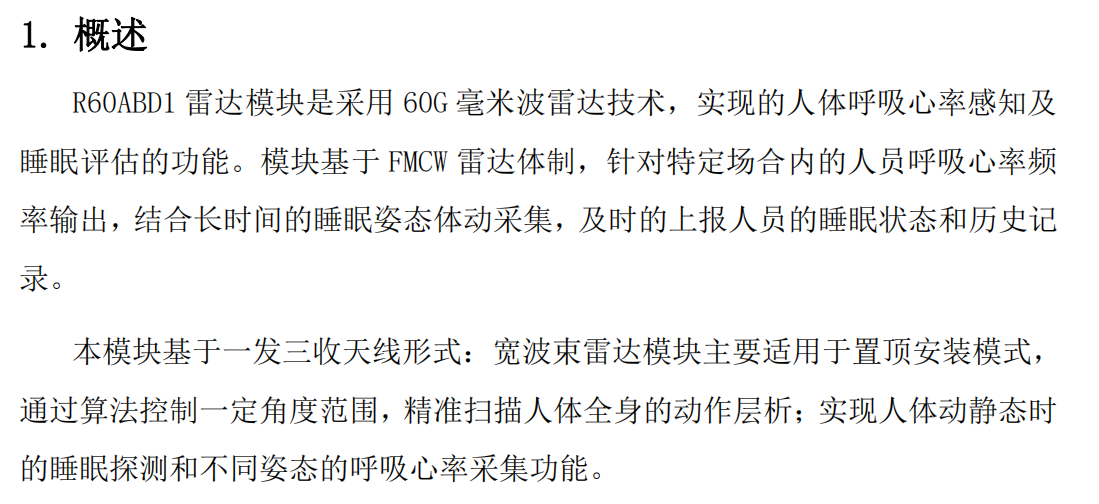
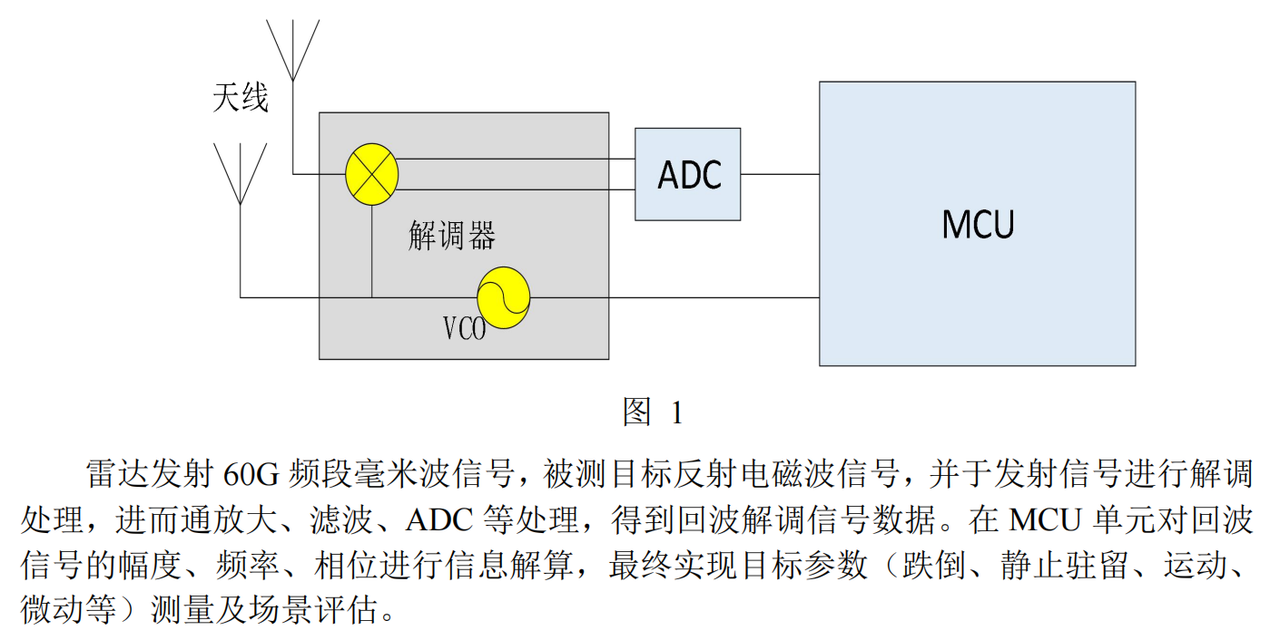
I. Analysis of Core Information in the R60ABD1 Datasheet
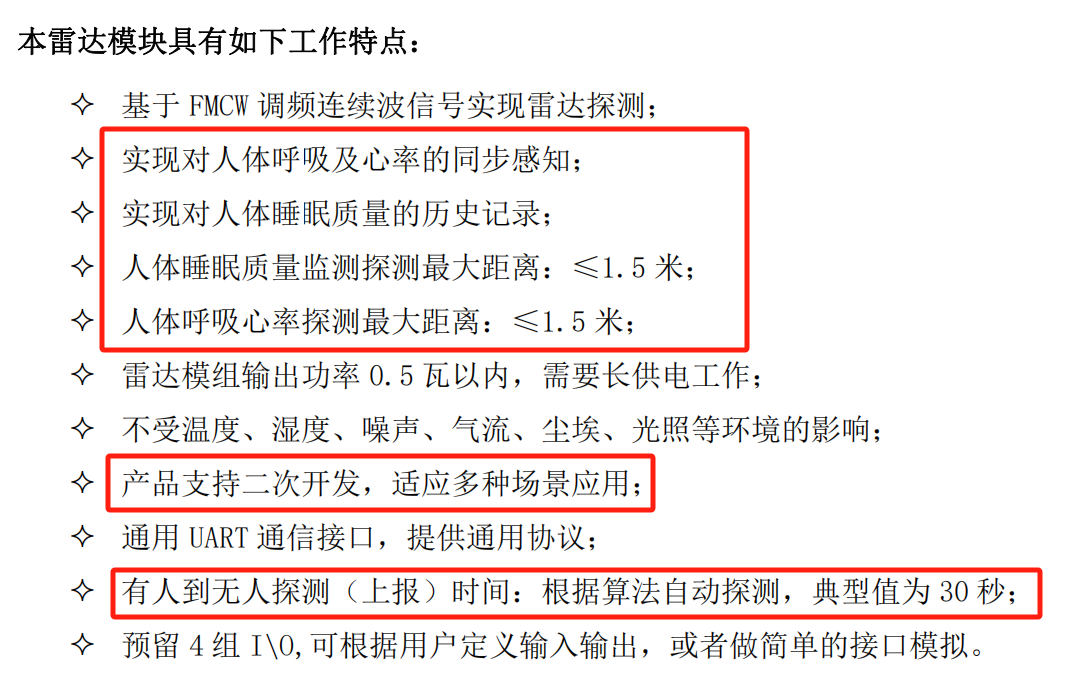
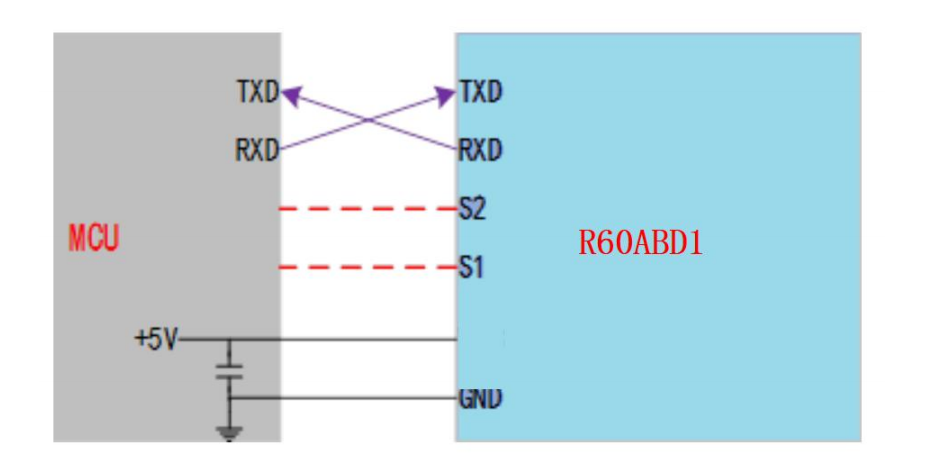
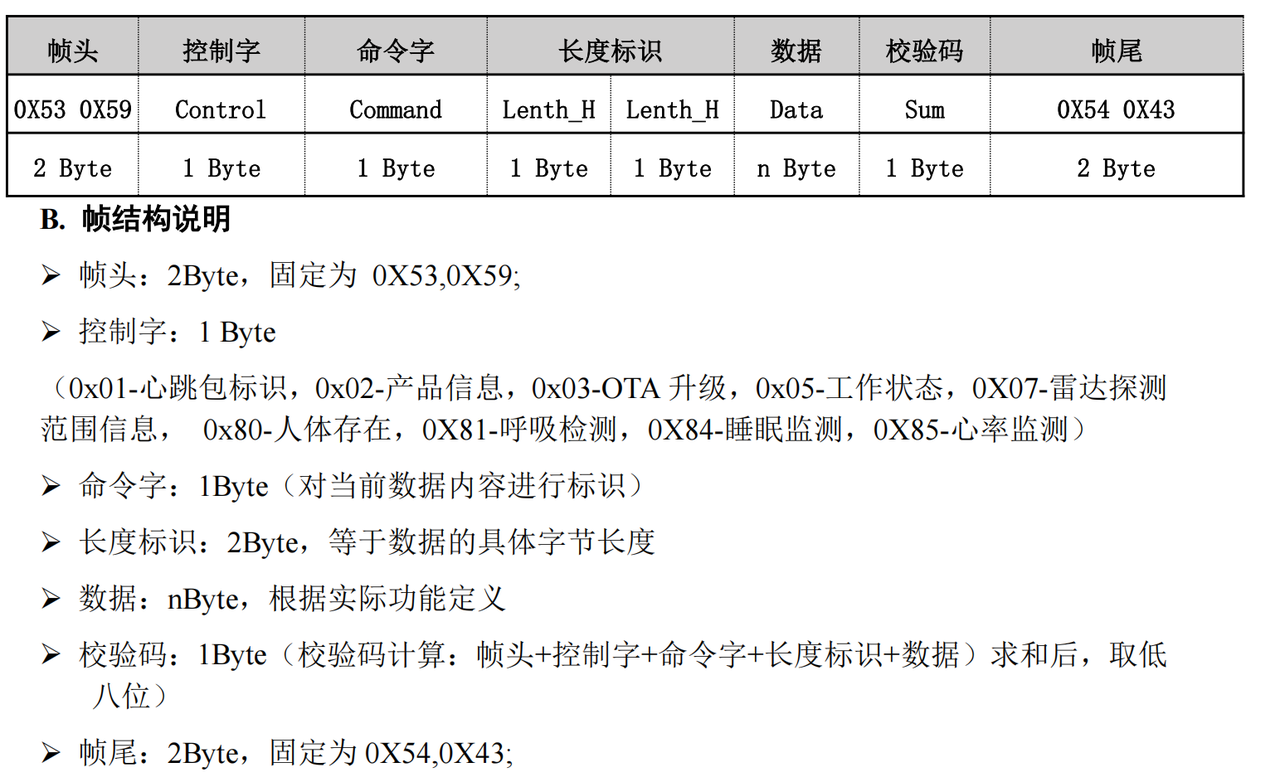
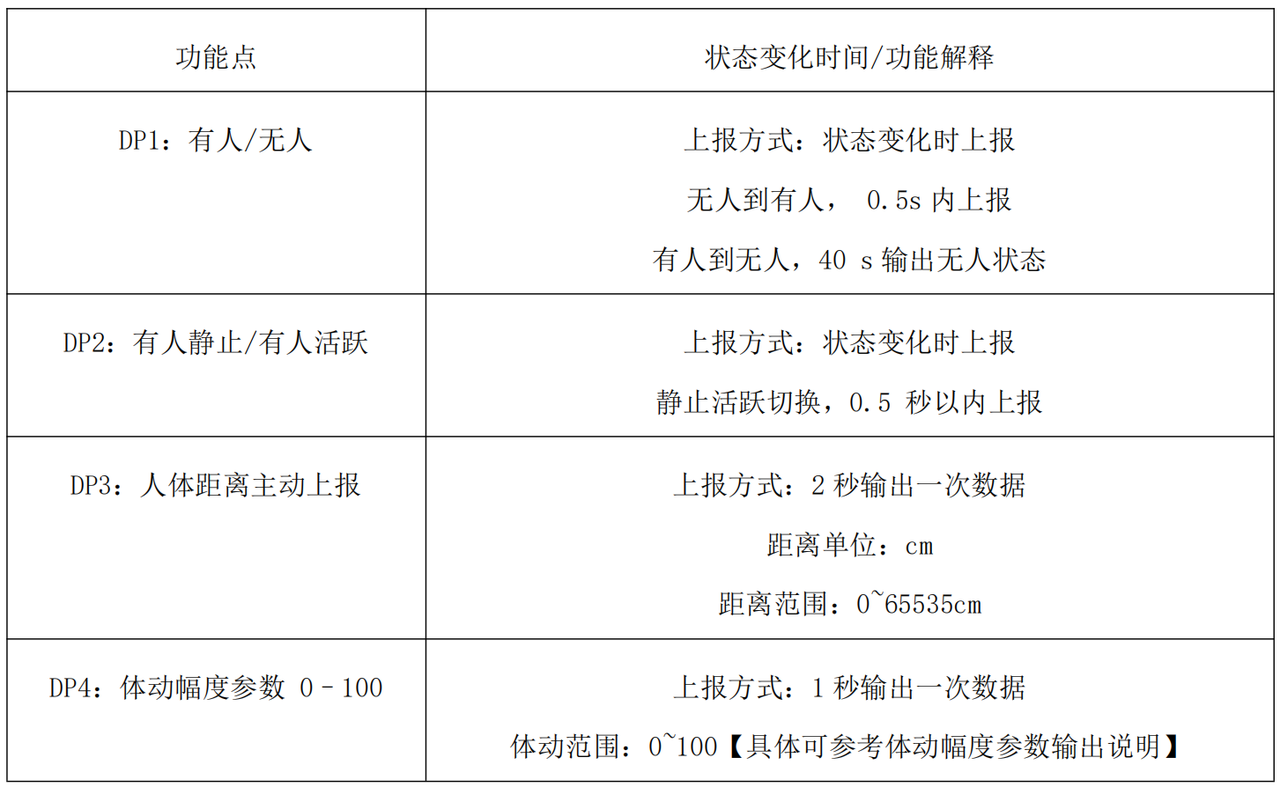
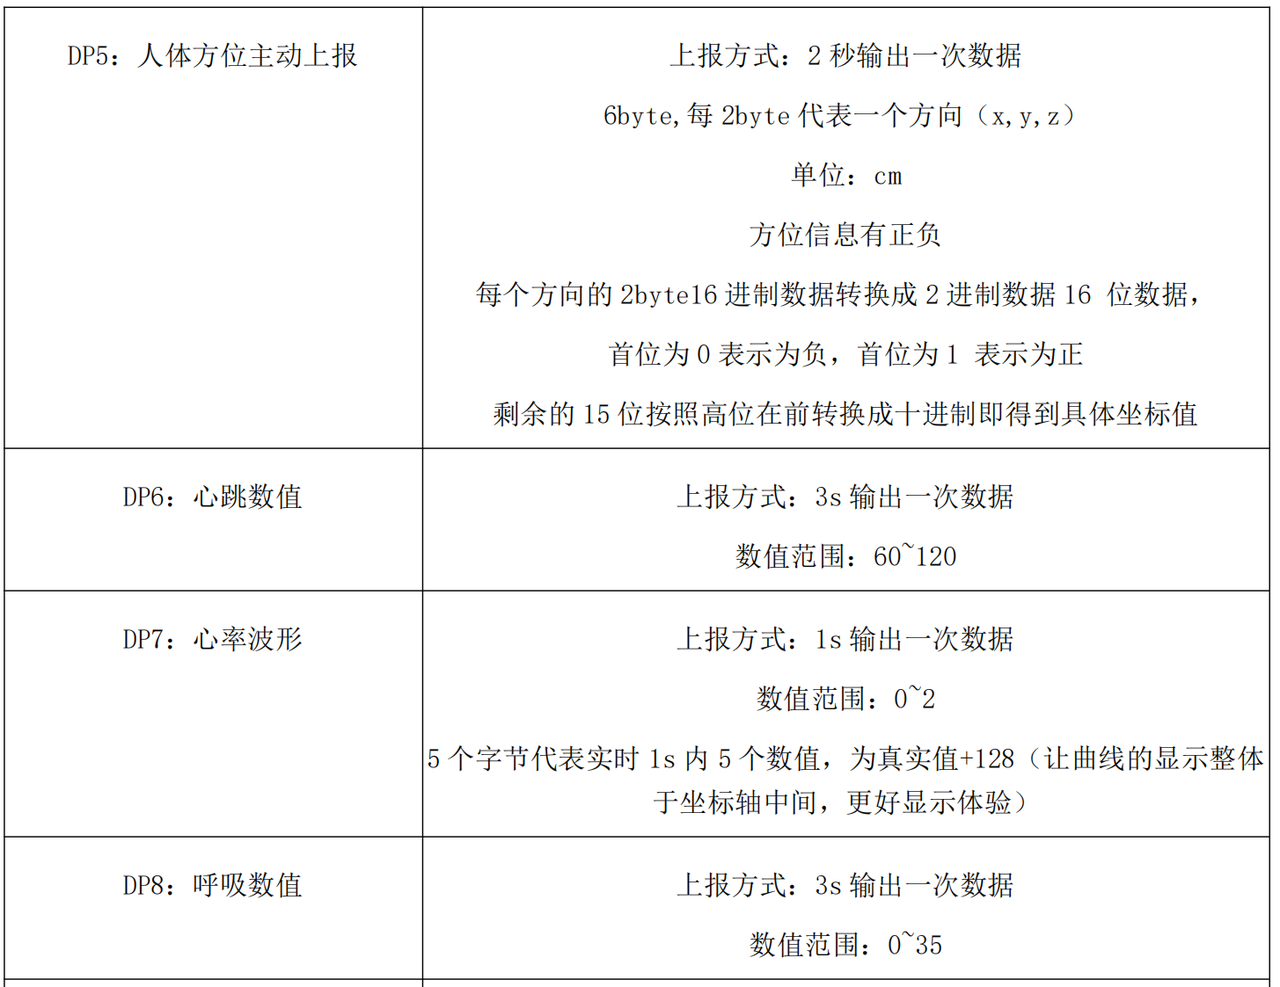
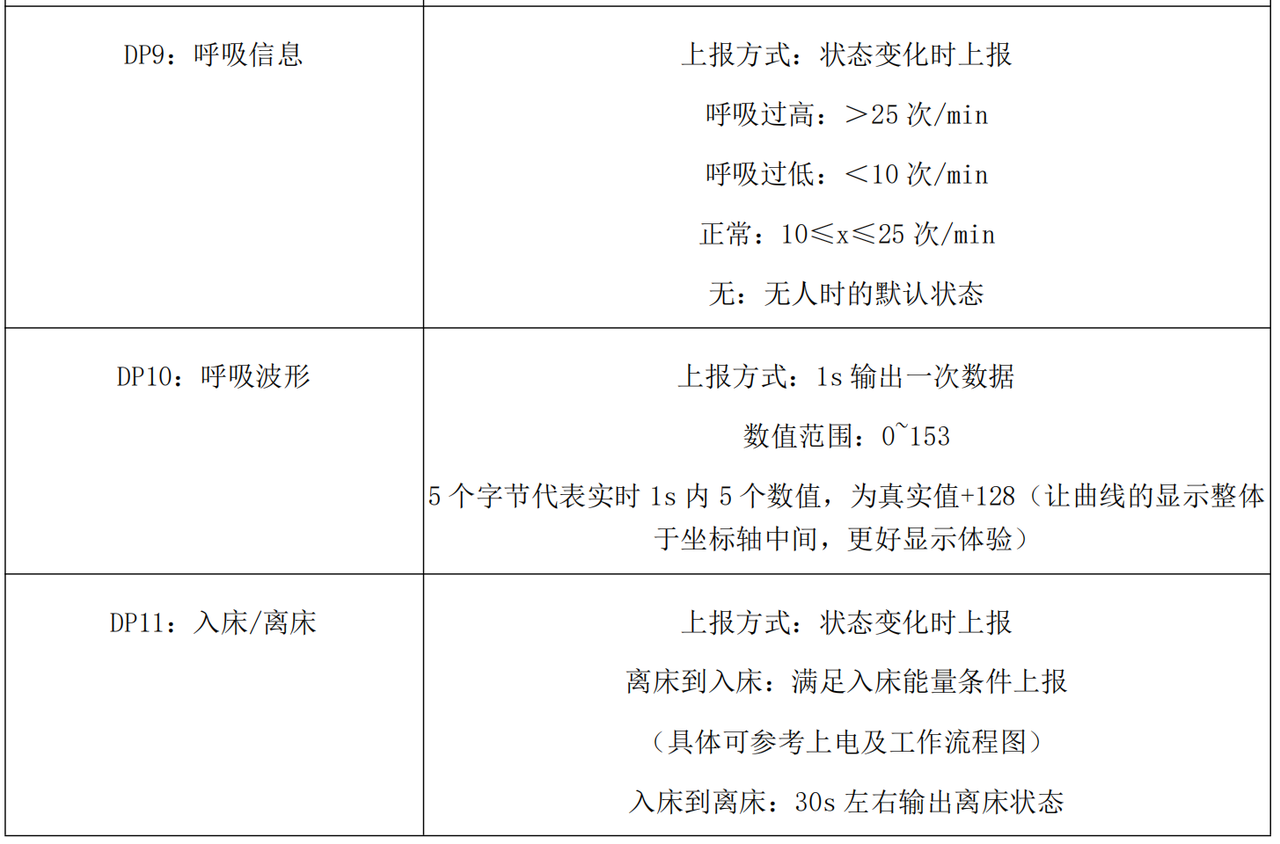
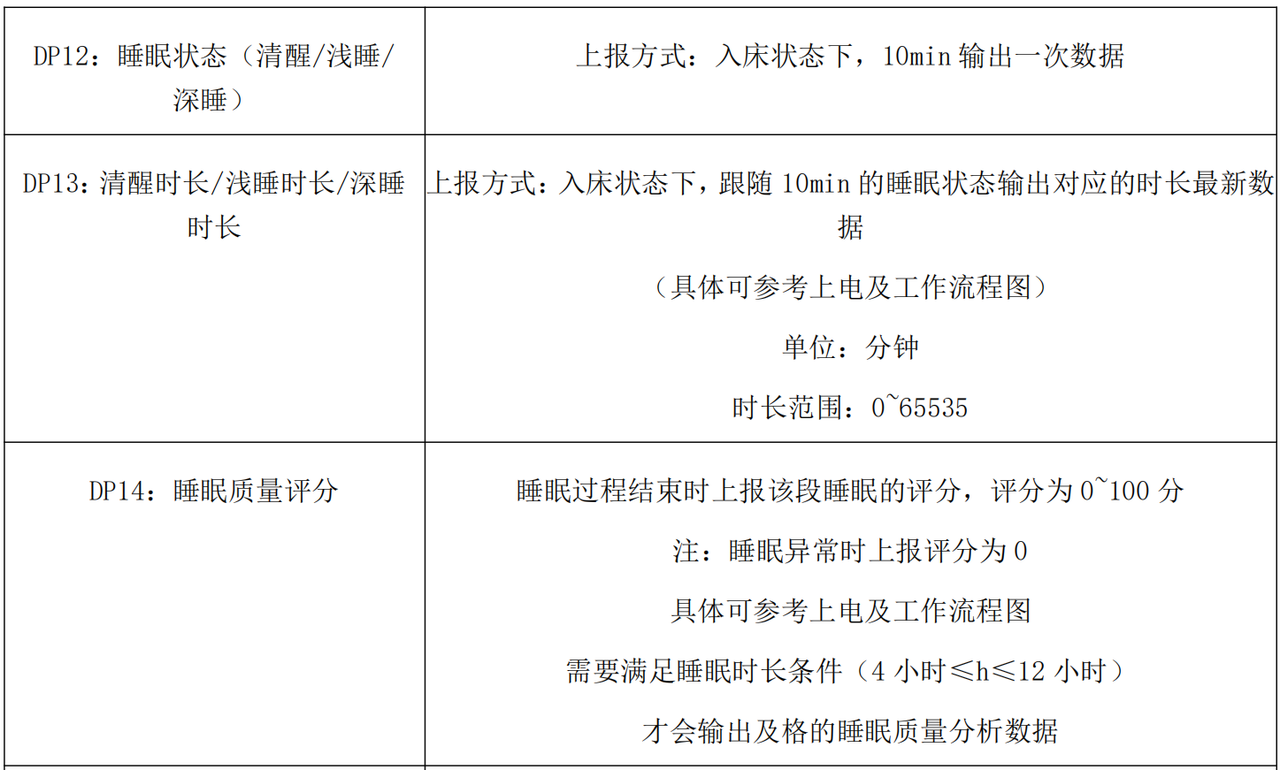
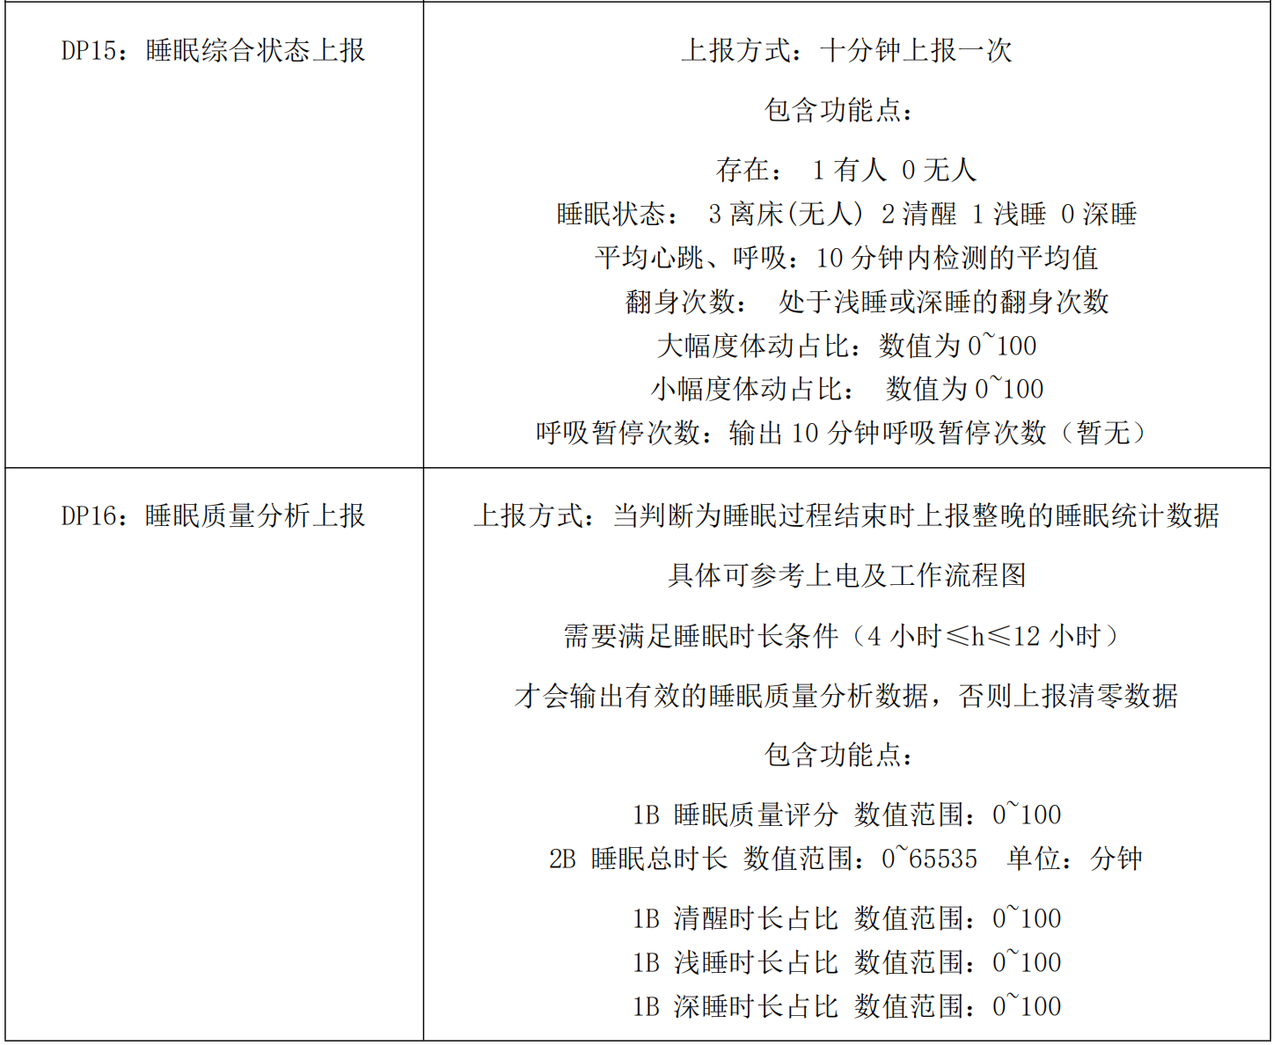
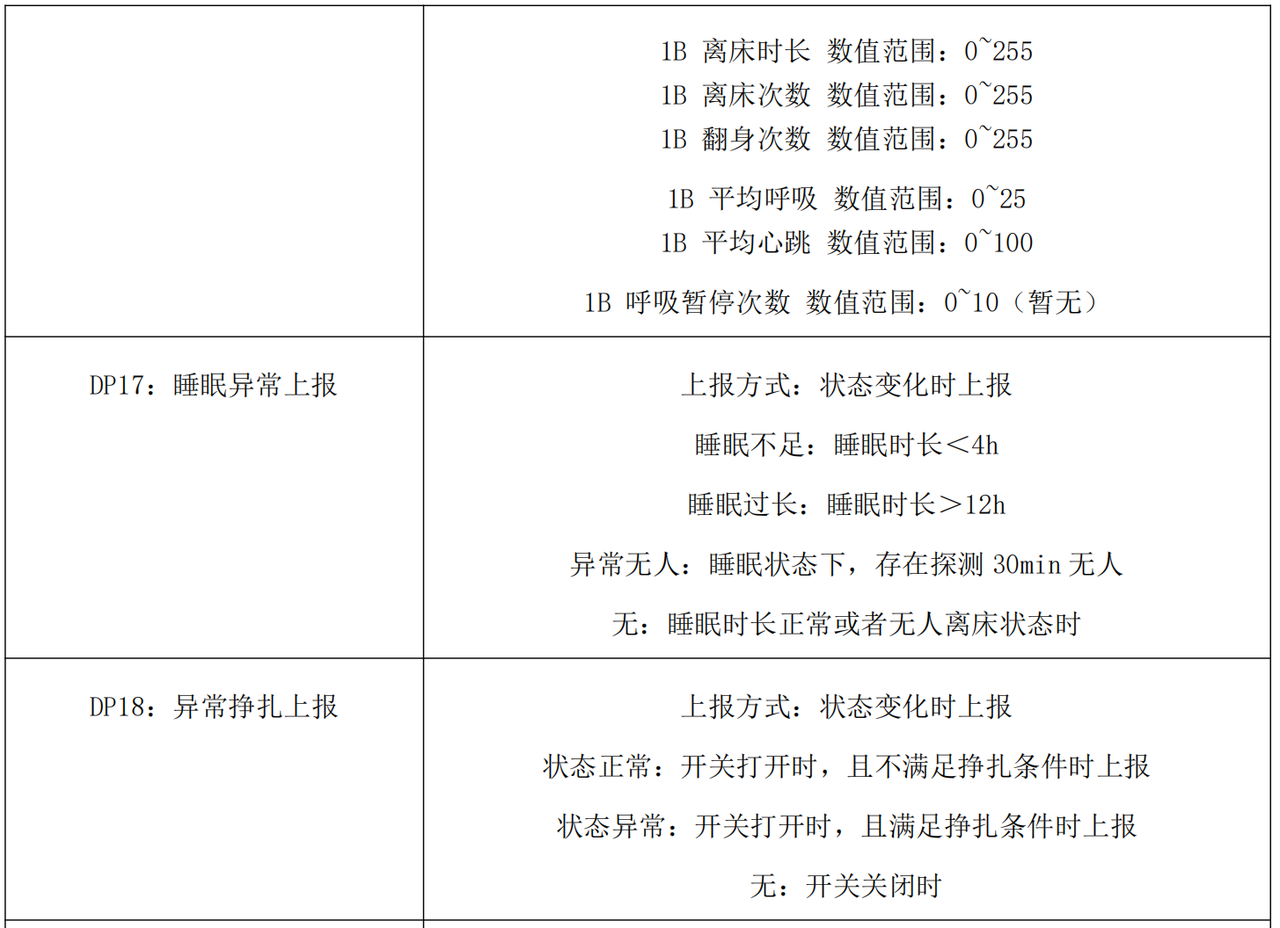
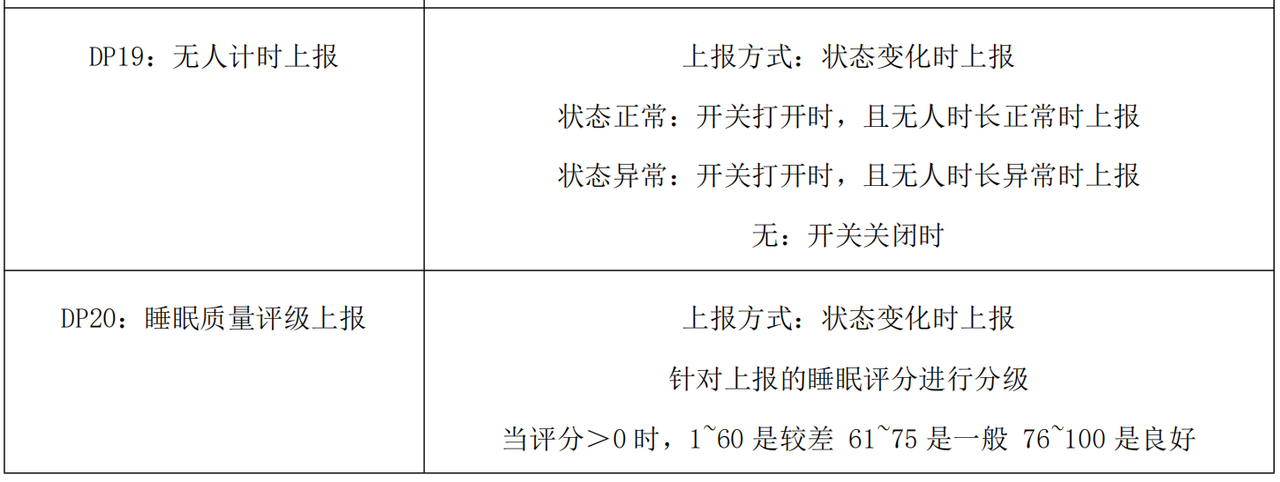
Here, first of all, we need to refer to the relevant manual, from which we can see that it provides a UART interface and adopts a custom serial port protocol:
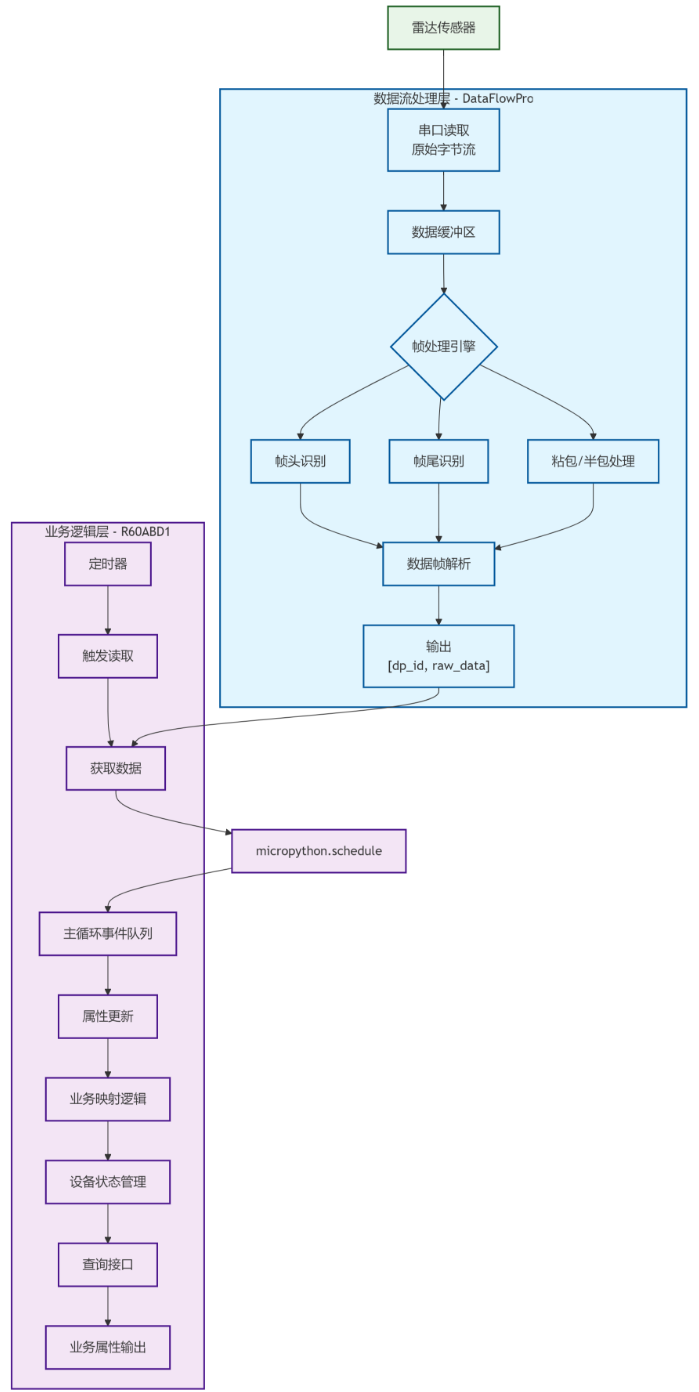
Based on this protocol, we can perform a layered design from the protocol parsing layer and the business logic layer to implement a MicroPython driver that supports Modularization and is easy to maintain:
At the protocol parsing layer, the frame extraction logic shall be implemented first as follows: locate the start of a frame by reading serial port data in a loop and matching the fixed frame header 0X53 0X59; then determine the number of bytes to be read subsequently according to the "length identifier" field (2 bytes, consisting of Lenth_H and Lenth_L, which represents the byte length of the data segment); finally verify the frame tail 0X54 0X43 to ensure the integrity of the entire frame data and avoid frame truncation and frame sticking problems.
At the business logic layer, the control instructions of the device (such as sending instructions to "configure the respiration monitoring mode" and "query the device status") and data application interfaces (such as acquiring the respiration rate in real time, judging the human presence status, and analyzing the sleep monitoring results) are encapsulated, so that the upper-layer business code does not need to pay attention to the details of the underlying protocol, and only needs to call the encapsulated methods to complete device interaction and data application.
Relevant agreements are available at:
Next, based on this layered architecture, we will walk you through step by step how to implement the separation design of data and business logic in the MicroPython driver.
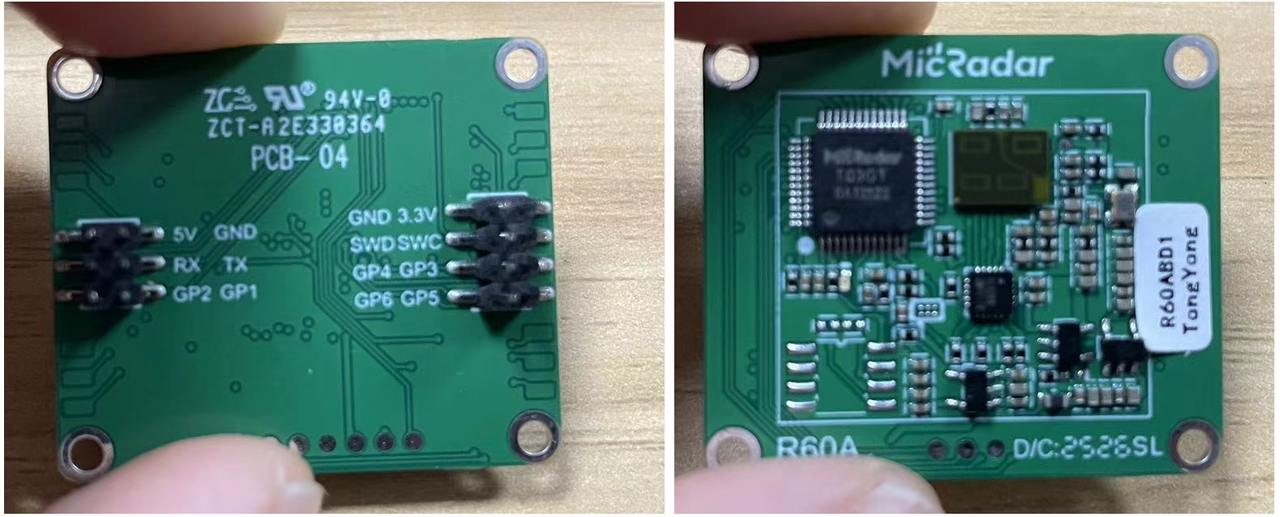
II. Hardware Connection and Construction of Debugging Environment (Necessary Preparatory Step)
When dealing with any device based on a custom serial port protocol (such as the R60ABD1 respiratory sleep monitoring radar), two "preliminary verification procedures" must be completed first before starting secondary development — this is not an optional step, but the key to avoiding the later predicament of "the code logic is correct but it never works properly":
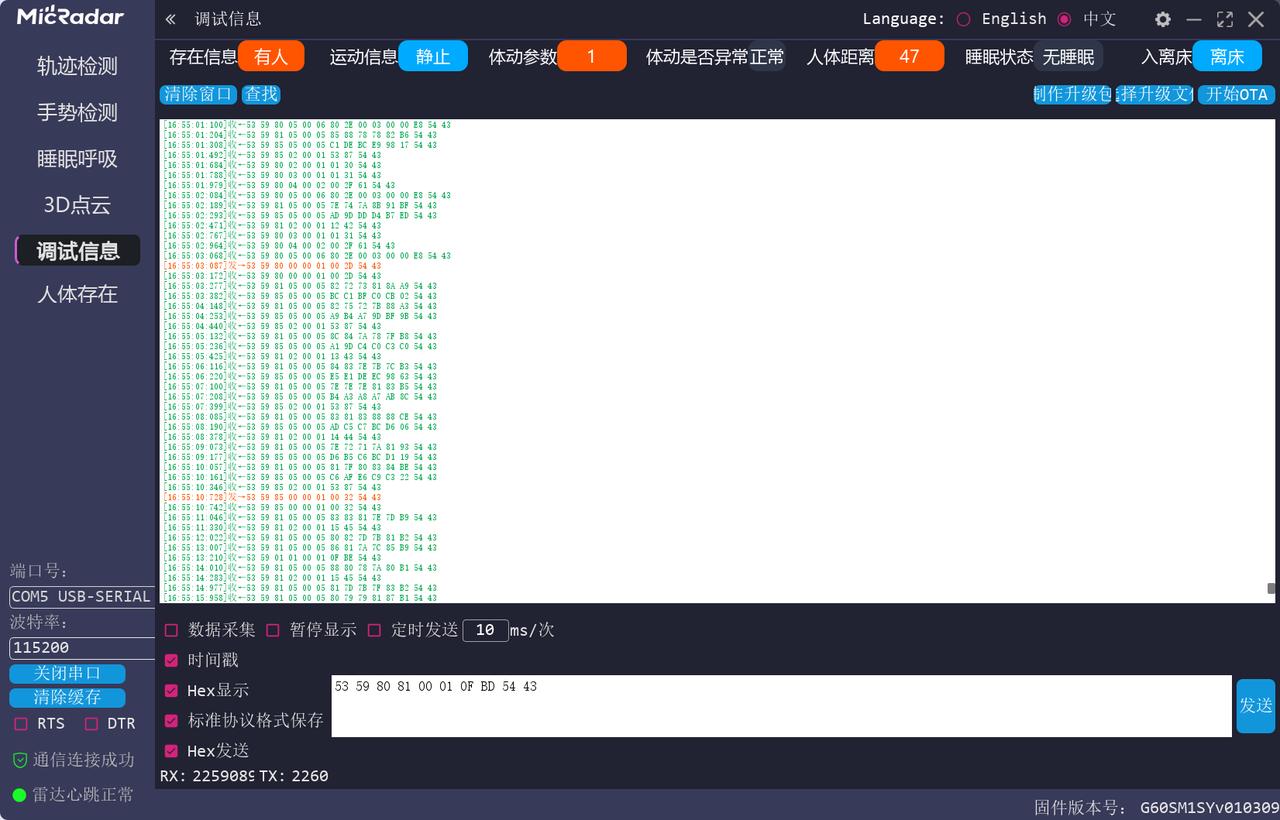
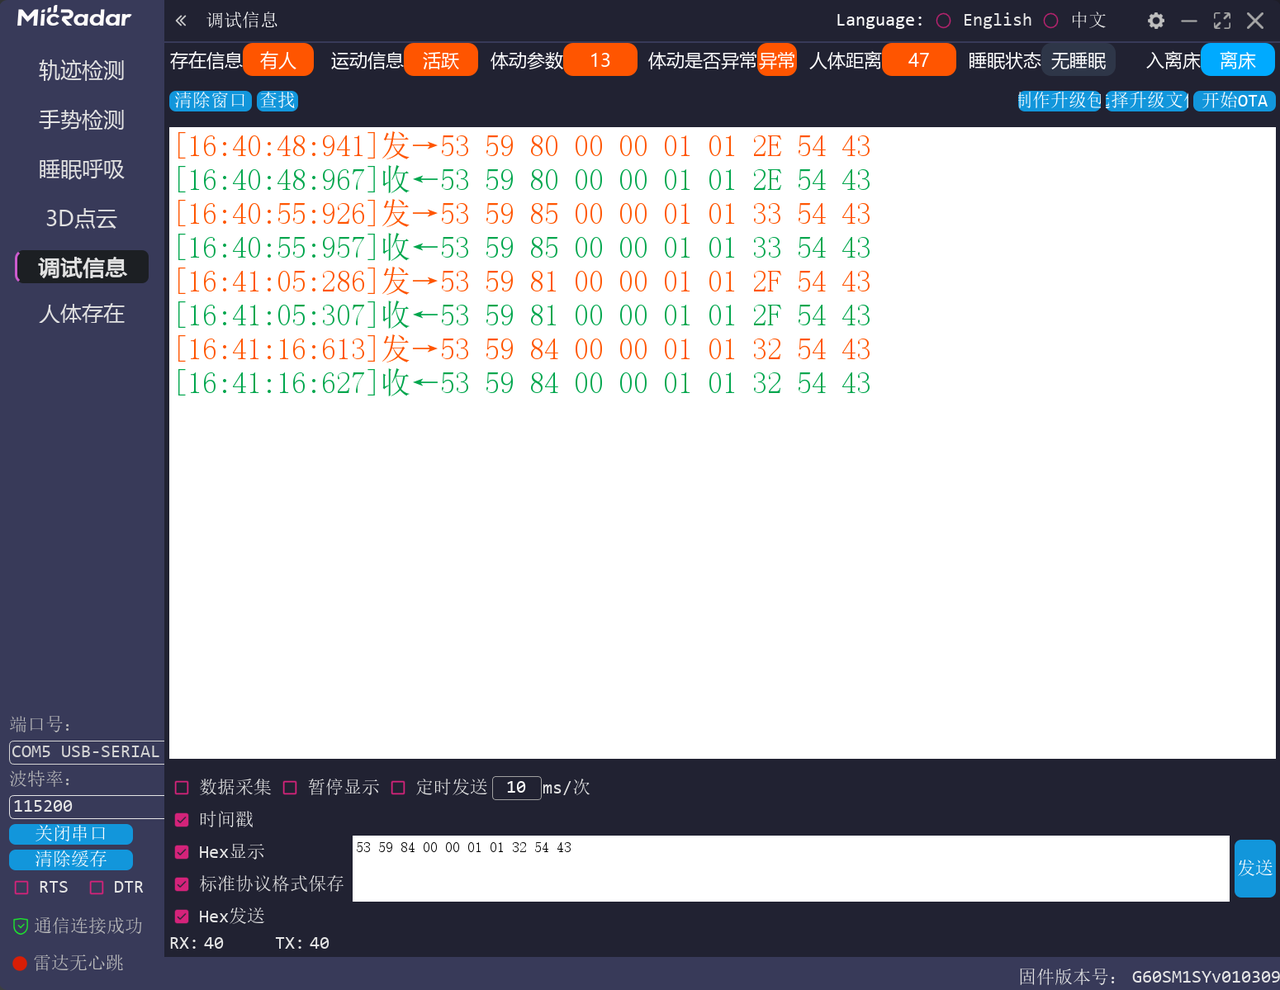
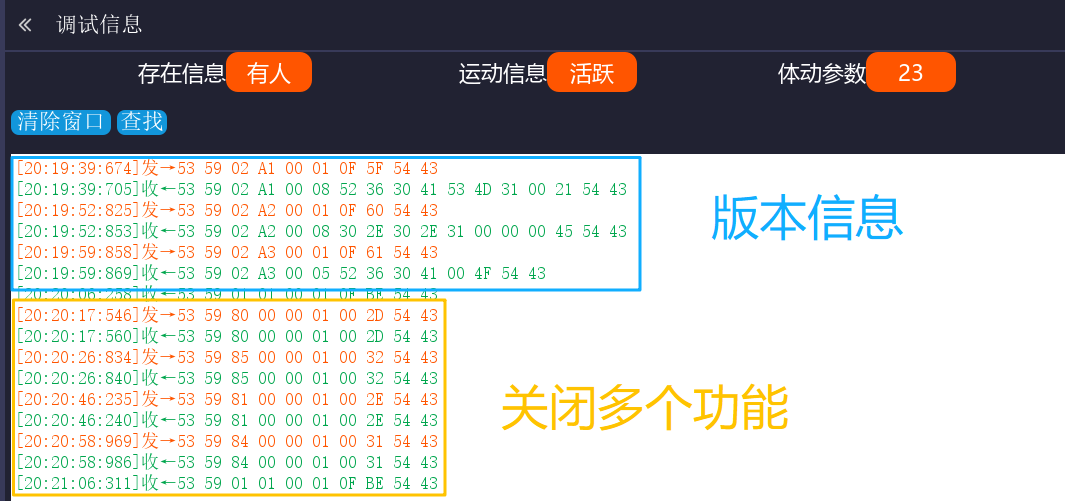
Practical testing via serial port helper on a per-command basis: The description of the serial port protocol in the device manual (such as command format, response rules, and data frame structure) is essentially a "theoretical convention". However, in actual development, affected by firmware version iterations, production batch differences, and even clerical errors in documentation, there may be discrepancies between the "manual description" and the "actual device behavior". The core value of the serial port helper lies in verifying the authenticity of protocol details through the most direct "send-receive" interaction. Specific operations need to be carried out around three dimensions:
Instruction Integrity Verification: Manually assemble each instruction in the format defined in the manual (frame header, control word, command word, parameters, check code, frame tail), such as the "enable respiration monitoring" instruction for R60ABD1 0x53 0x59 0x01 0x01 0x00 0x00 [check code] 0x54 0x43). After sending it via the serial port assistant, focus on observing whether the returned frame meets expectations — whether the frame header is correct (e. g. 0x53 0x59), whether the frame tail matches (e. g. the manual states 0x54 0x43 while the actual measurement may be 0x54 0x44), and whether the length field is consistent with the number of bytes in the data segment (to avoid frame loss in subsequent parsing caused by length calculation errors).
Response Logic Verification: Test whether the cause-and-effect relationship of "command-response" forms a closed loop. For example, after sending the command "configure the sampling rate to 10Hz", observe whether the frequency of the device's output data actually changes to 10Hz; after sending the command "query the device version number", check whether the bytes of the returned data segment can resolve valid version information (such as the ASCII code corresponding to V1.2.3).If "no response to the sent command" or "response irrelevant to the command" occurs, priority shall be given to troubleshooting the wiring (whether TX/RX are reversely connected), baud rate (whether it is consistent with the device's default value, for example, R60ABD1 may use 115200), and check mode (whether the check code is omitted or the calculation rule is incorrect).
Validation of Check Mechanism Effectiveness: Deliberately destroy the integrity of the command (e. g., modify the value of a certain byte, tamper with the check code), and observe whether the device refuses to respond or returns an error frame after sending — this can verify whether the device's check logic takes effect. For example, the check rule of R60ABD1 is "the lower 8 bits of the cumulative sum of all bytes from the frame header to the data segment". If the device still responds normally after modifying a certain byte in the data segment, it indicates that the check mechanism may not be enabled or the manual description is incorrect, and the parsing logic needs to be adjusted according to the actual measurement results.
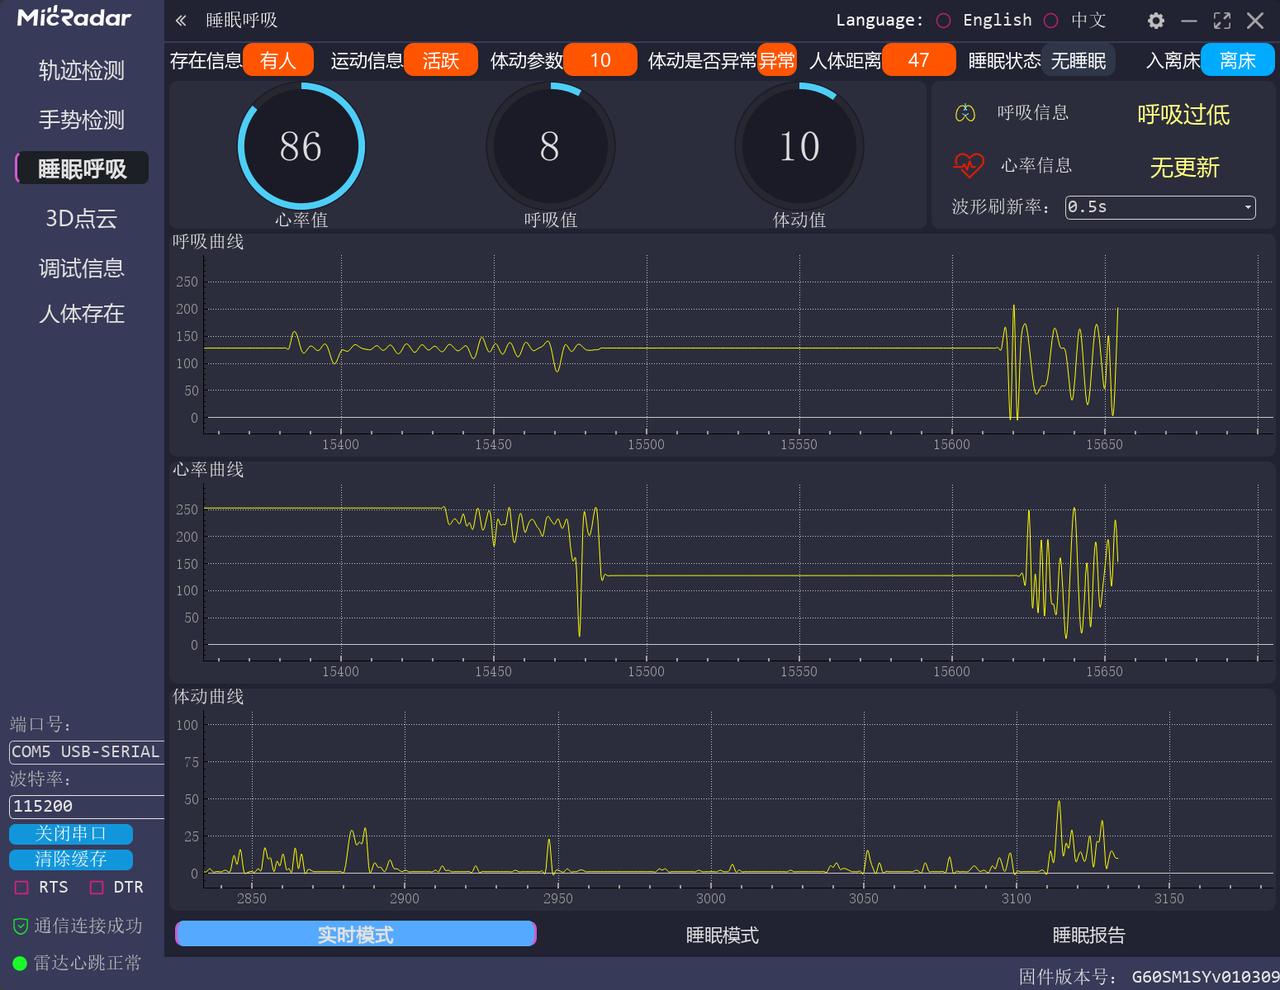
Dig into Official Host Tools: The host tools provided by device manufacturers are officially verified "standard interaction templates", whose value goes far beyond merely "visually displaying data" — they can also serve as an "anchor-like reference" for driver development. Specifically, host tools can be leveraged from three dimensions:
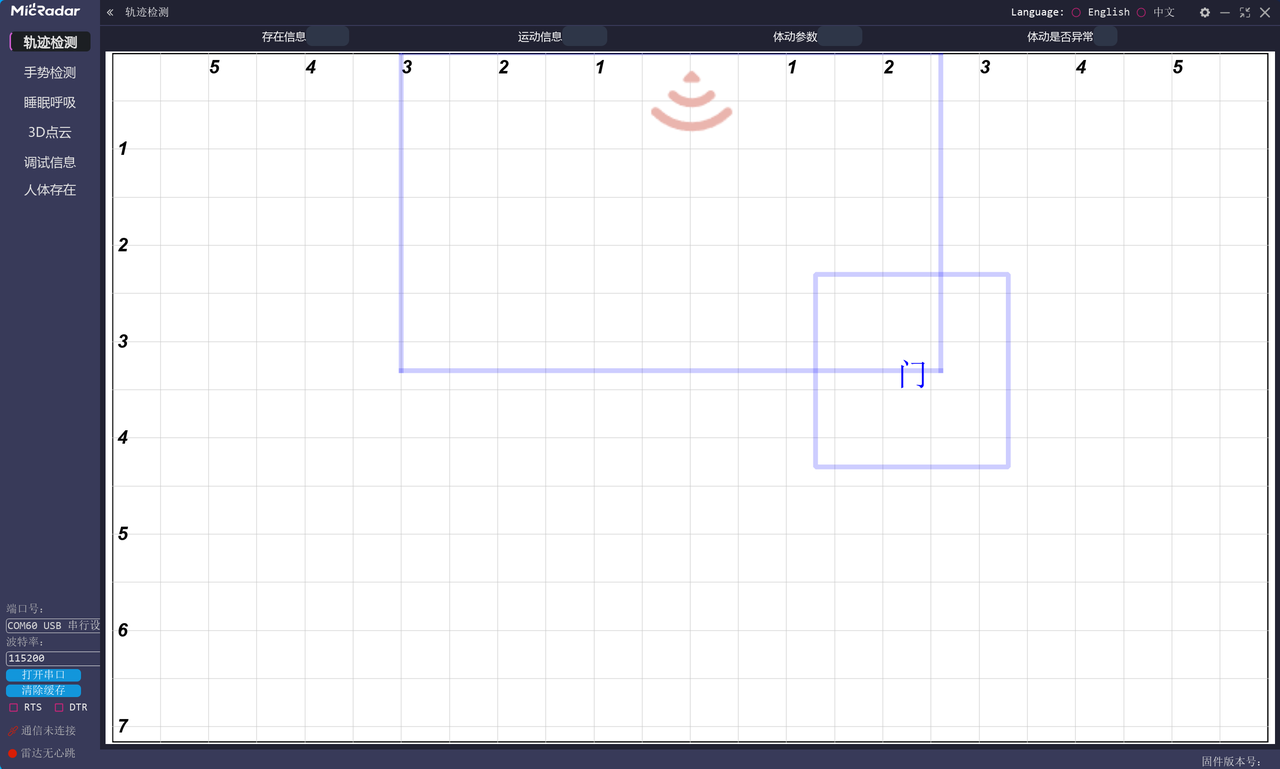
Device Basic Status Confirmation: By checking whether the host computer can connect to the device normally and display real-time data (such as the respiratory rate and heart rate curve of R60ABD1), problems at the hardware level can be quickly ruled out — if the host computer works normally, it means that the power supply (whether the voltage is stable at 3.3V), serial port wiring (whether the levels match, to avoid burning the 3.3V device due to connection to 5V), and the device itself (whether it is faulty) are all normal, and subsequent development can focus on software logic; on the contrary, if the host computer also cannot communicate, hardware connections shall be checked first.
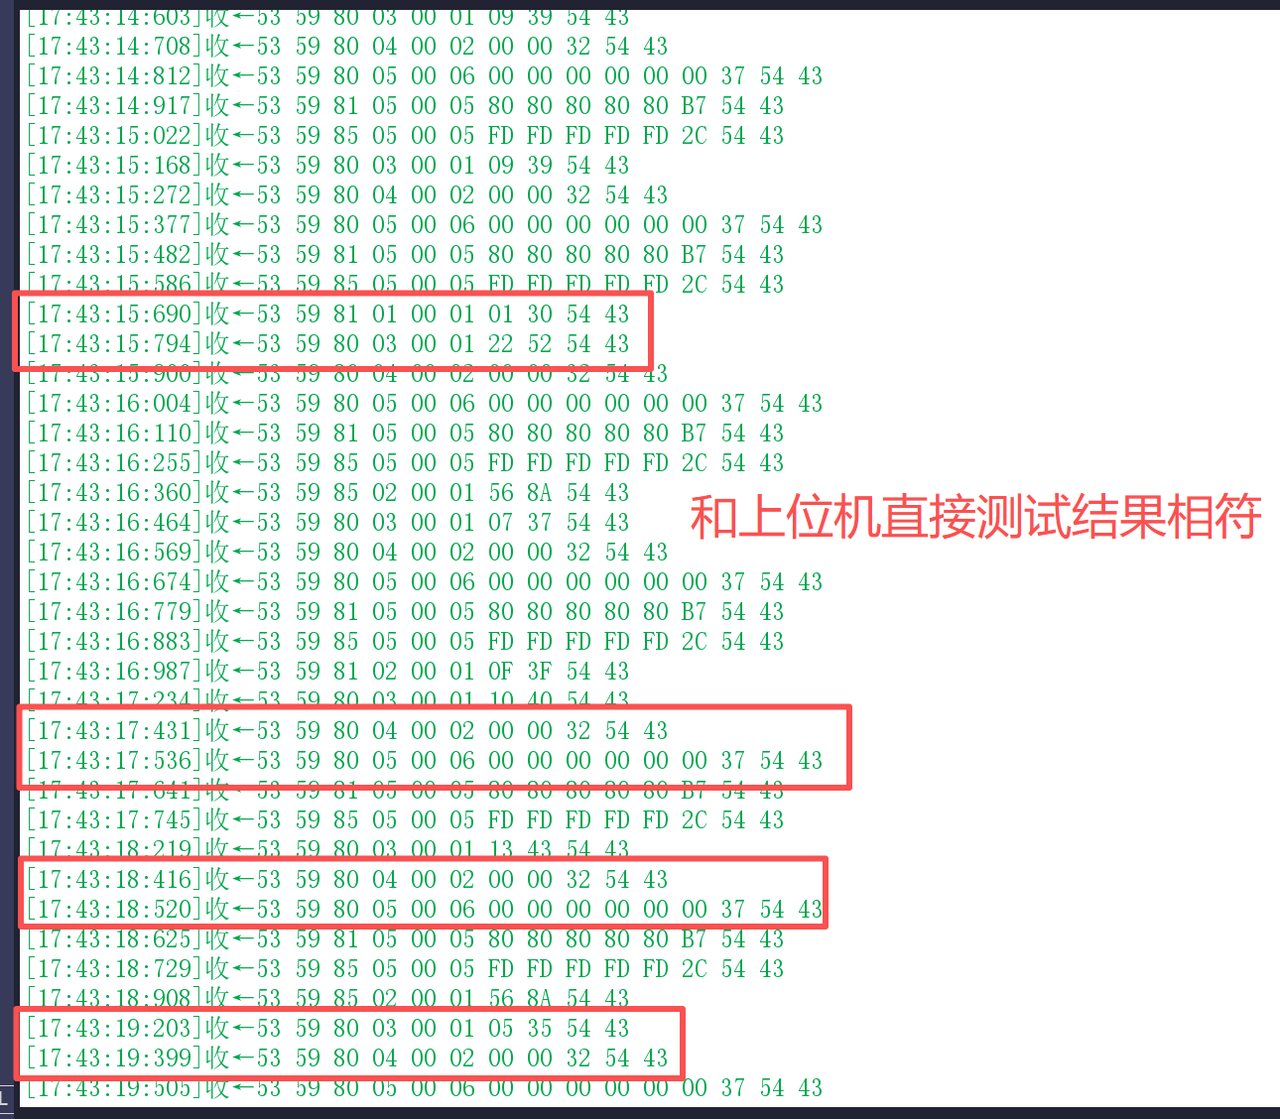
Raw Data Log Comparison: Some host computers support the "serial port data log" function, which can record every byte of raw data sent and received by the device. For example, after enabling the sleep monitoring mode of R60ABD1, the complete data frame sequence output by the device will be recorded in the host computer log. Compare these raw frames with the frames received via a serial port assistant: if they match, the data receiving link is normal, and the parsing error is most likely a logic issue; if they do not match, check the serial port parameters (e. g., whether the stop bit is 1 bit) or the caching mechanism (whether data loss is caused by slow receiving speed).
Reverse Engineering of Protocol Details: When the description of a certain field in the manual is ambiguous, you can perform this "phenomenon-to-data" deduction through reverse mapping based on the visual results of the host computer, which is more efficient and accurate than relying solely on the manual.
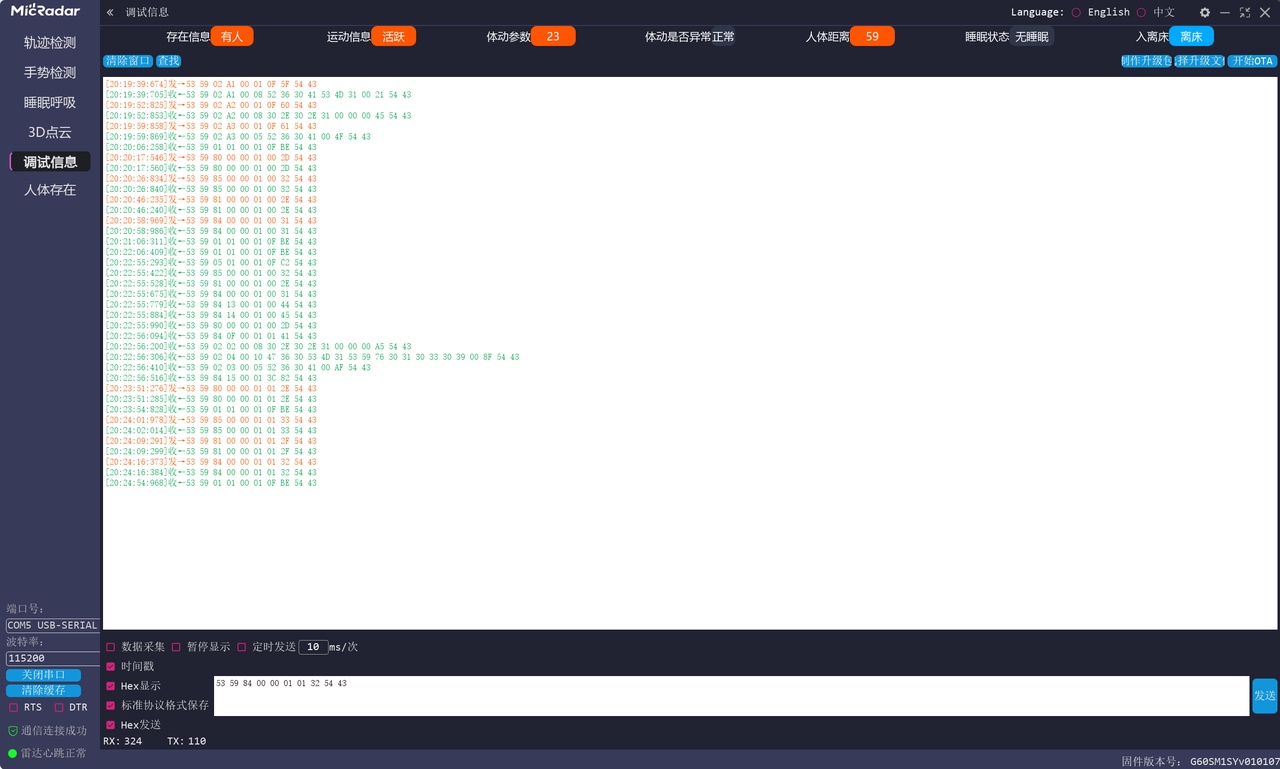
Here, we can find its host computer at the following URL:
Shallow and Slow Breath Interpretation Settings (Default Value 0x0A): The value ranges from 10 to 20 (0x0A to 0x14); if other values are used to replace the data field, the checksum shall be recalculated.
During the actual testing process, we have identified the following issues that require attention in the subsequent driver code development, and I have documented the details of these issues along with their specific version numbers here.
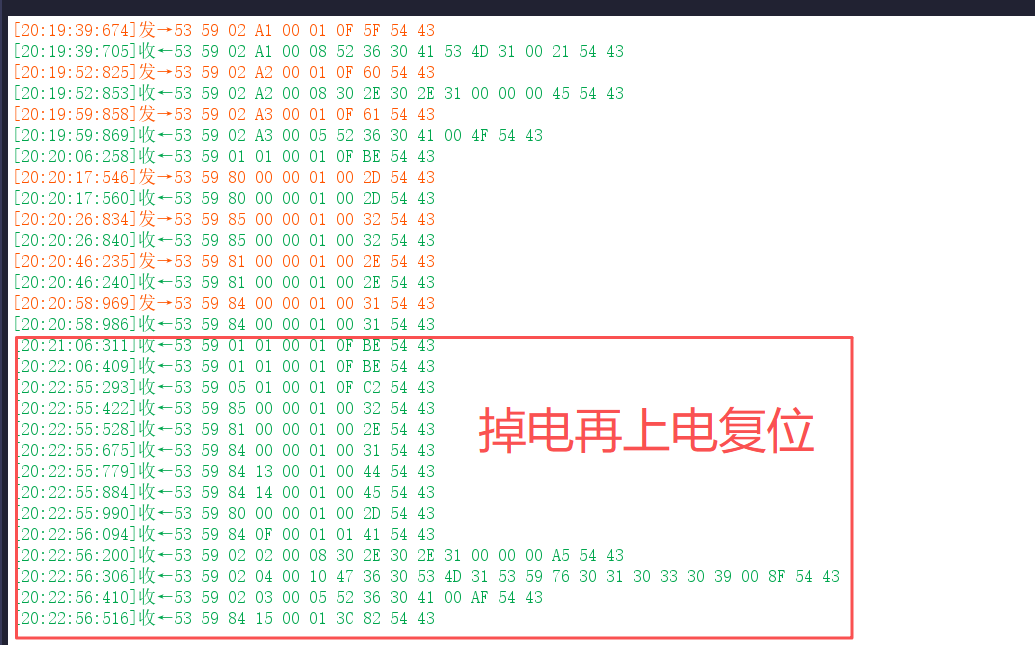
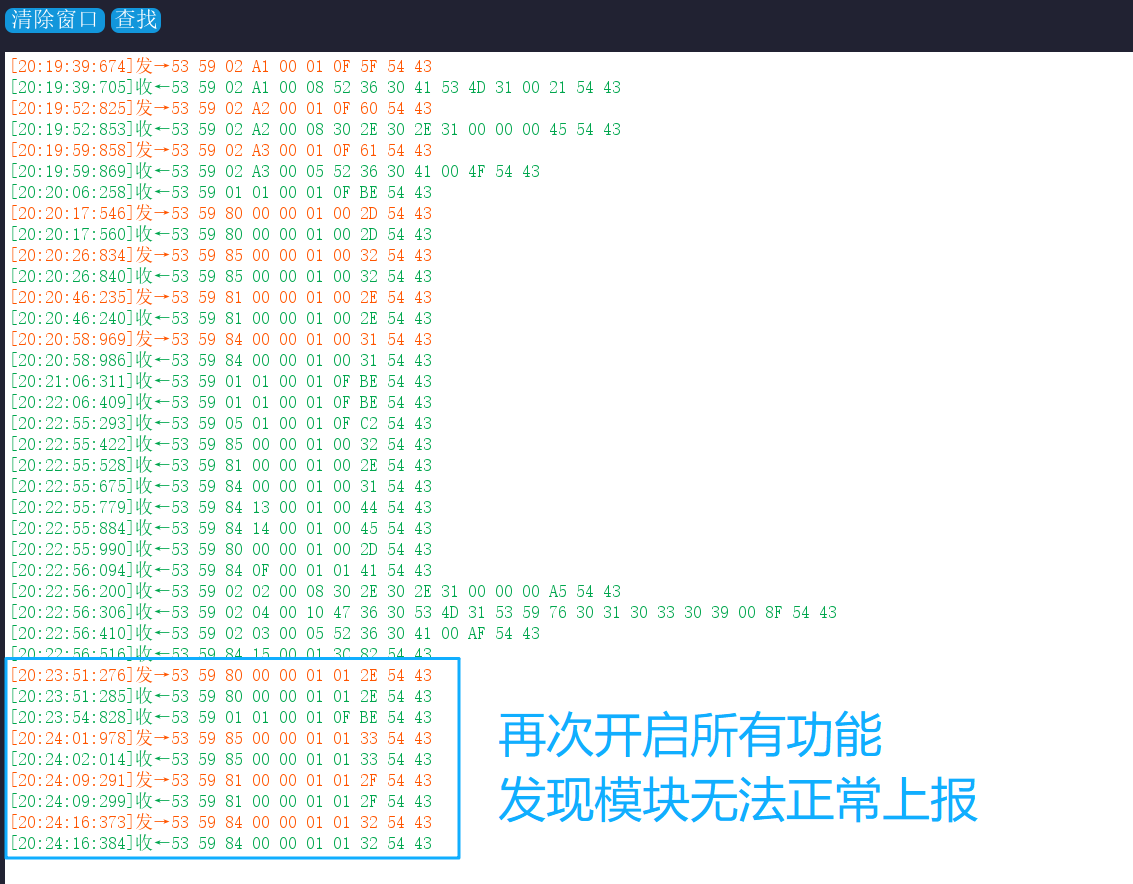
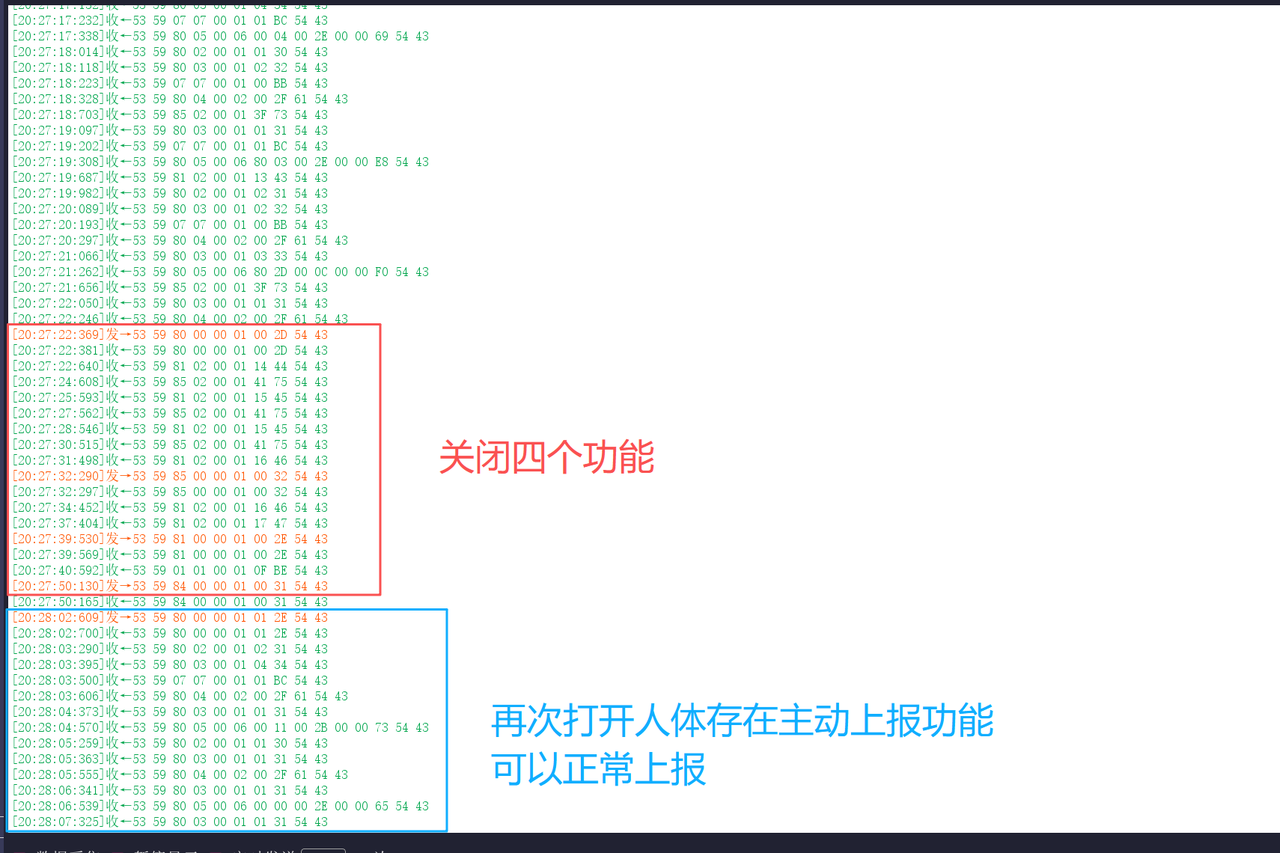
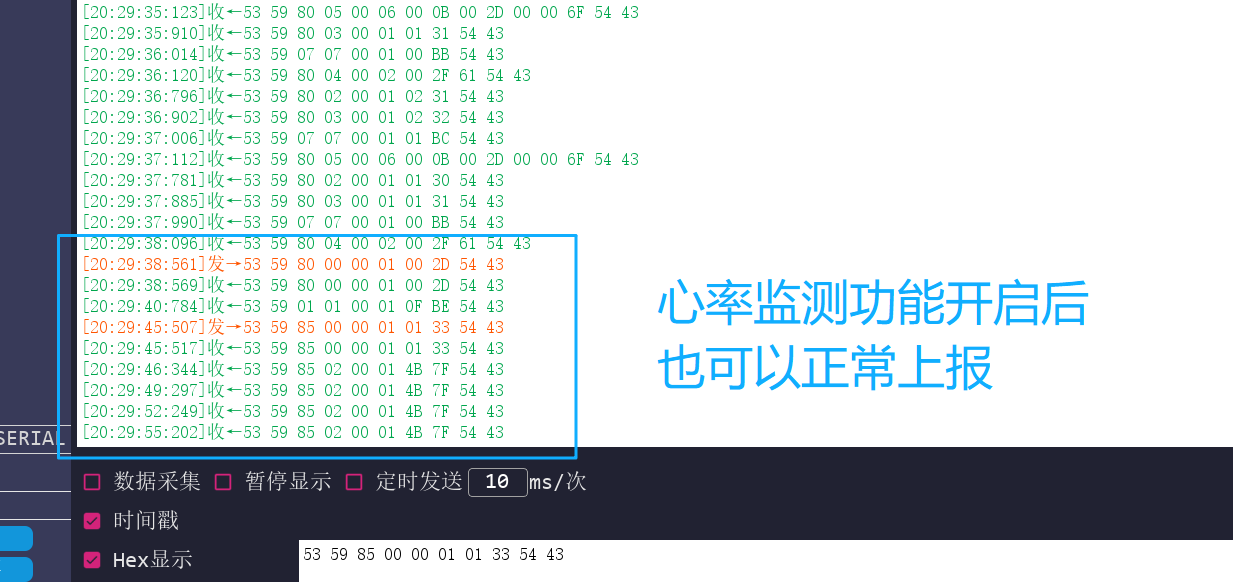
2.2.1 After disabling the four active reporting functions and restarting the device, no data response is generated when any single function is enabled separately
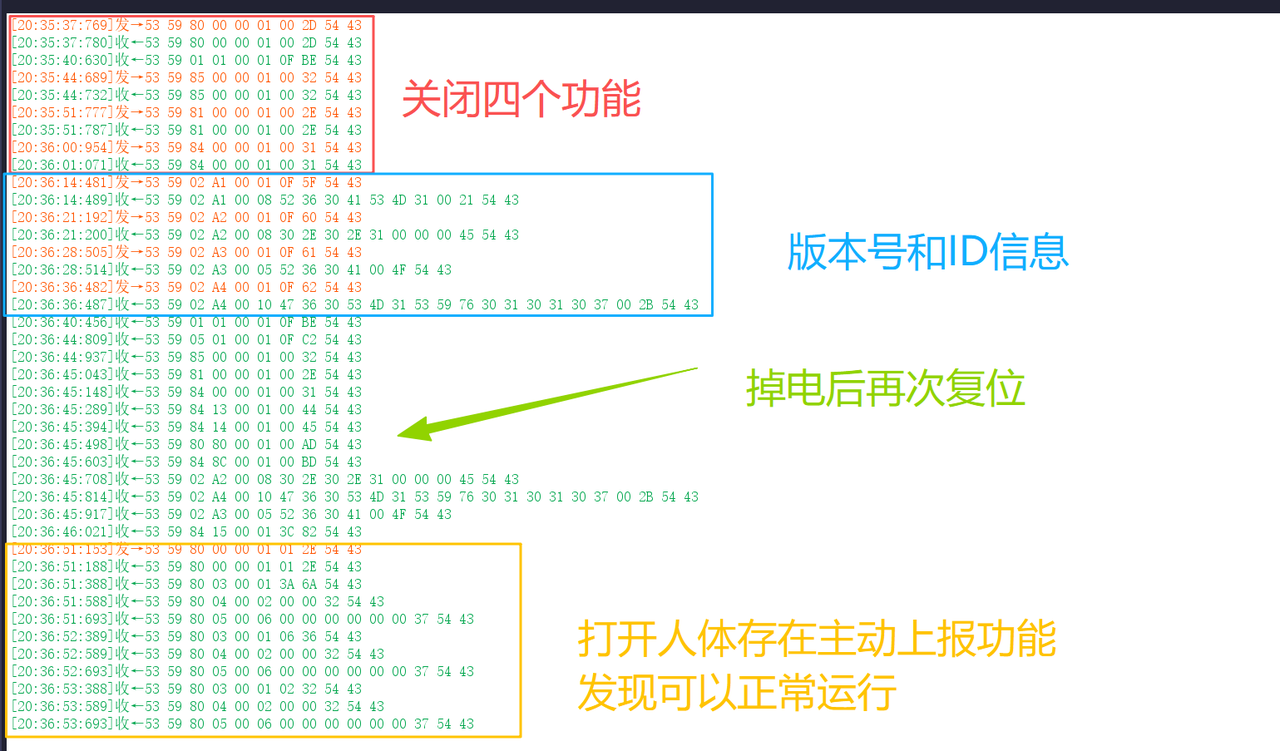
An abnormal operation sequence has been identified on the new firmware version (G60SM1SYv010309):
N-th operation: After sequentially disabling the active reporting of the four functions of human presence, heart rate, respiration and sleep, power off the millimeter-wave radar module and then power it on again.
The (N+ 1) th operation: After the module restarts, if any single function is enabled individually at this point, the corresponding active reporting data cannot be received.
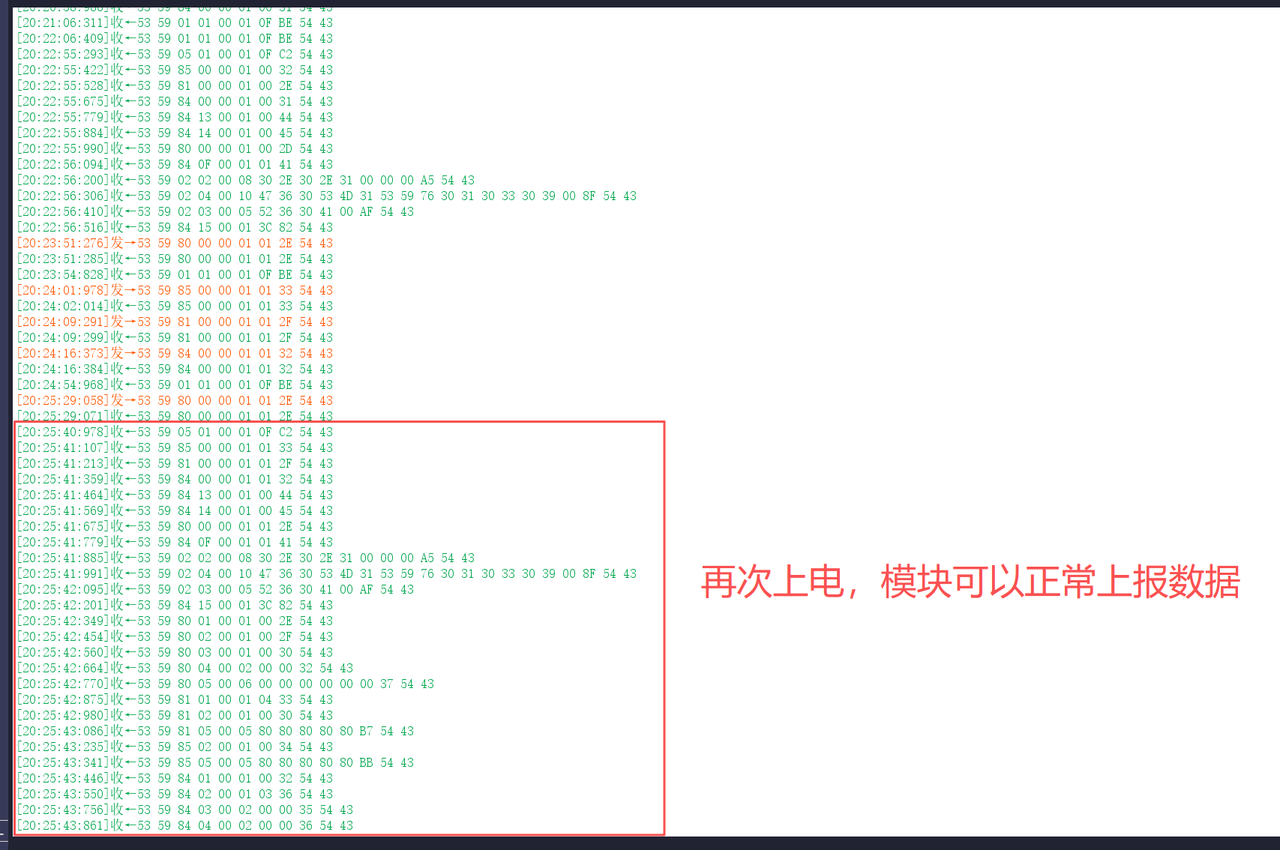
The (N+ 2)-th operation: Enable all the active reporting functions of the four features, and then power off and restart the module again. After that, all active reporting functions resume normal operation, and any expected response can be obtained by enabling or disabling a single function arbitrarily within this power-on cycle.
The following is the testing procedure conducted on the new firmware (G60SM1SYv010309):
The following are the same tests conducted on the old firmware version (G60SM1SYv010107):
It can be seen that when all active reporting functions are disabled, the module fails to properly initialize its functional finite-state machine or configuration registers during the power-off and restart process, causing the system to enter an abnormal "silent" state of functions.
Here, the author speculates that the root cause may stem from a flaw in the firmware's state management logic. The detailed analysis is as follows:
Configuration storage and loading exception:
Speculation: The enable status flag of the device may be stored in non-volatile memory. When all functions are turned off, what is stored might be a special "all-off" status value. When the module loads this configuration during the next boot, the firmware may incorrectly parse this status as "do not report anything" instead of "wait for user instruction", thus blocking all reporting channels.
Corroboration: Only after "enabling all of them again" and restarting, when the stored status is updated, can the system return to normal. This indicates that the correct configuration was successfully loaded after the second restart.
Functional finite-state machine deadlock:
Speculation: Each reporting function may share a common enable logic or hardware resource. When all functions are disabled, this logic may erroneously enter a sleep or locked state. At this point, enabling a single function individually via instructions cannot effectively trigger the unlocking of the finite-state machine. In contrast, enabling all functions simultaneously sends a sufficiently strong "global wake-up" signal that resets the entire finite-state machine.
Low-level driver or Middleware vulnerabilities:
Speculation: There may be a boundary condition vulnerability in the underlying driver or Middleware that manages the core functions of the radar sensor. When it detects that no active reporting functions require servicing, it may completely shut down Data Acquisition or interrupt service routines. Reactivating this acquisition process requires a higher-level initialization command (i. e., "enable all") rather than a switch command for a single function.
2.2.2 The response when the unattended timing function is enabled is inconsistent with the description in the manual
An abnormal operation sequence was detected on the new firmware (G60SM1SYv010309), with the version information as follows:
Slave device reply acknowledgment frame: 53 59 84 14 00 01 01.. .(returned as-is, serving as confirmation of successful operation)
Observed actual behavior:
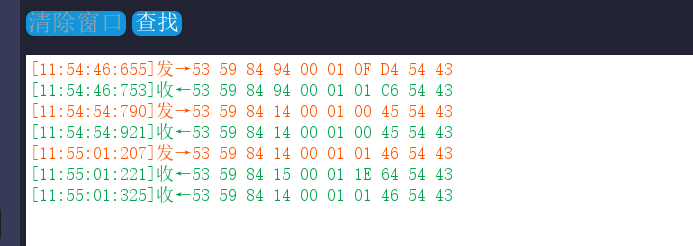
Setting instruction issued by the host: 53 59 84 14 00 01 01 46 54 43 (enable the unattended timing function)
The slave device has replied with two messages:
Article 1:53 59 84 15 00 01 1E 64 54 43 (This is a response to command word 0x15 —— "Unmanned Duration Query", and the data 1E indicates that the duration is 30 minutes)
Article 2:53 59 84 14 00 01 01 46 54 43 (This is the correct acknowledgment frame for the setup command as described in the manual)
This behavior does not conform to the typical "command-response" mode; when the unattended timing function is enabled, the firmware automatically triggers a query operation for the unattended timing duration internally.
2.2.3 Setting the Sleep Cut-off Duration the response does not match the description in the manual
On the new firmware (G60SM1SYv010309), an abnormal operation sequence was detected, with the version information as follows:
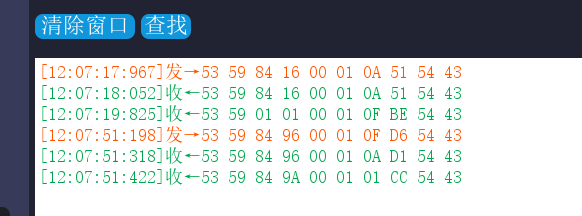
The issue is as follows: after setting the sleep timeout duration, an inconsistency is observed between the actual communication sequence during query operations and the description in the manual:
First reply: 53 59 84 96 00 01 0A D1 54 43 (Expected query response, the data 0A indicates that the sleep timeout duration is 10 minutes).
Second response: 53 59 84 9A 00 01 01 CC 54 43 (unexpected response, corresponding to command word 0x9A, i. e. response to "struggle state interpretation query", data 01 indicates medium sensitivity).
After the sleep deadline query, the device additionally returned a response frame of "struggle state judgment", while the host did not send this query command.
III. Overall Architecture Design of MicroPython Driver
3.1 Overall Architecture Design
The overall architecture adopts the design concept of "separation of data parsing and business logic", and its core consists of two components: DataFlowProcessor and R60ABD1, which realize Modularization collaboration through clear division of responsibilities:
DataFlowProcessor focuses on the underlying processing of the "data pipeline": it is responsible for reading the original ByteFlow from the serial port, maintaining buffers to handle packet sticking and packet splitting issues, splitting out complete data frames through frame header and frame tail identifiers, and parsing from the frames the DP identifier (Data Point ID) and corresponding raw data, and finally outputs a structure of (dp_id, raw_data).This component does not involve any business logic at all; for example, it does not handle mappings such as " dp_id = 1 corresponding to occupied/unoccupied status", and is only responsible for data flow and format extraction, achieving complete decoupling from business logic. This design brings significant value to reuse — if replacing sensors of the same series (with consistent basic protocols such as frame header and frame tail, only with different DP definitions), this component can be directly reused, and only the upper-layer business logic needs to be modified.
The R60ABD1 component focuses on service attribute management: it holds an instance of DataFlowProcessor, triggers the data reading process via a timer, and after receiving the output (dp_id, raw_data), is responsible for converting the raw data into specific service attributes (for example, mapping raw_data= 0x01 to "occupied state"), and provides a concise attribute query interface (such as obtaining the current human presence status, heart rate value, etc.).The two collaborate through a combinatorial relationship, making the overall logic clearer and more streamlined, which aligns with the concept of "functional Modularization" in embedded development.
In addition, the micropython. schedule mechanism is introduced in the design to ensure system stability: timer callbacks belong to the interrupt context. If property updates (_update_properties, which may involve memory operations or complex calculations) are executed directly in them, problems such as interrupt nesting and resource contention are likely to occur, and even system crashes may be caused. Instead, schedule will put the update operation into the event queue of the main loop and execute it at an appropriate time, thus avoiding the risks of the interrupt context.
For the sticky packets or half packets appearing in the buffer, considering that the radar outputs real-time monitoring data, there is no need to retain historical incomplete frames, and they can be directly discarded. This processing method can simplify the buffer logic, avoid complex frame recovery mechanisms, and meanwhile, since real-time data will be continuously output, subsequent complete frames can be supplemented quickly without affecting the continuity of monitoring.
3.2 Design and Performance Verification of the DataFlowProcessor Class
In R60ABD1 respiratory sleep monitoring millimeter-wave radar MicroPython driver development, the decoupled design of the data parsing layer and the business logic layer is the key to ensuring code maintainability and performance. The following elaborates on its design and implementation logic from three dimensions: timing period determination, DataFlowProcessor functional architecture, and performance test verification.
3.2.1 Determination of Timer Call Cycle: Matching the Data Output Frequency of the Device
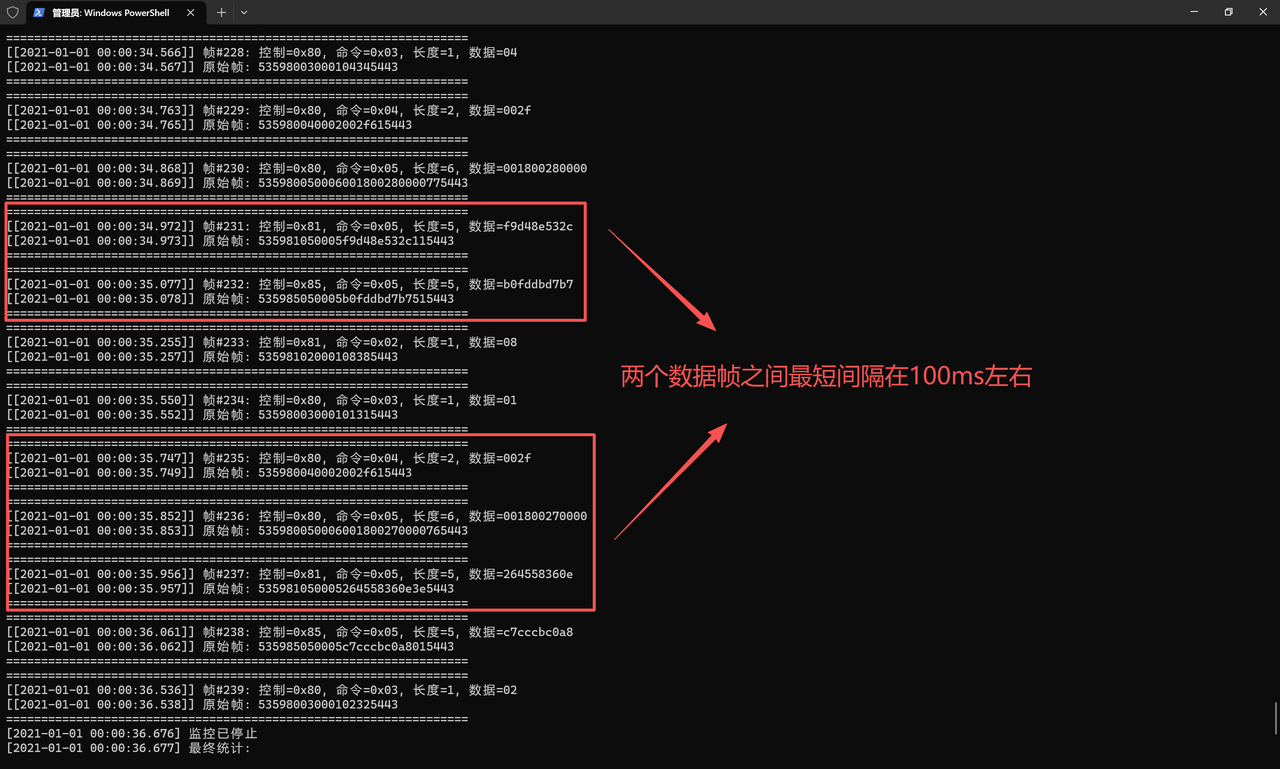
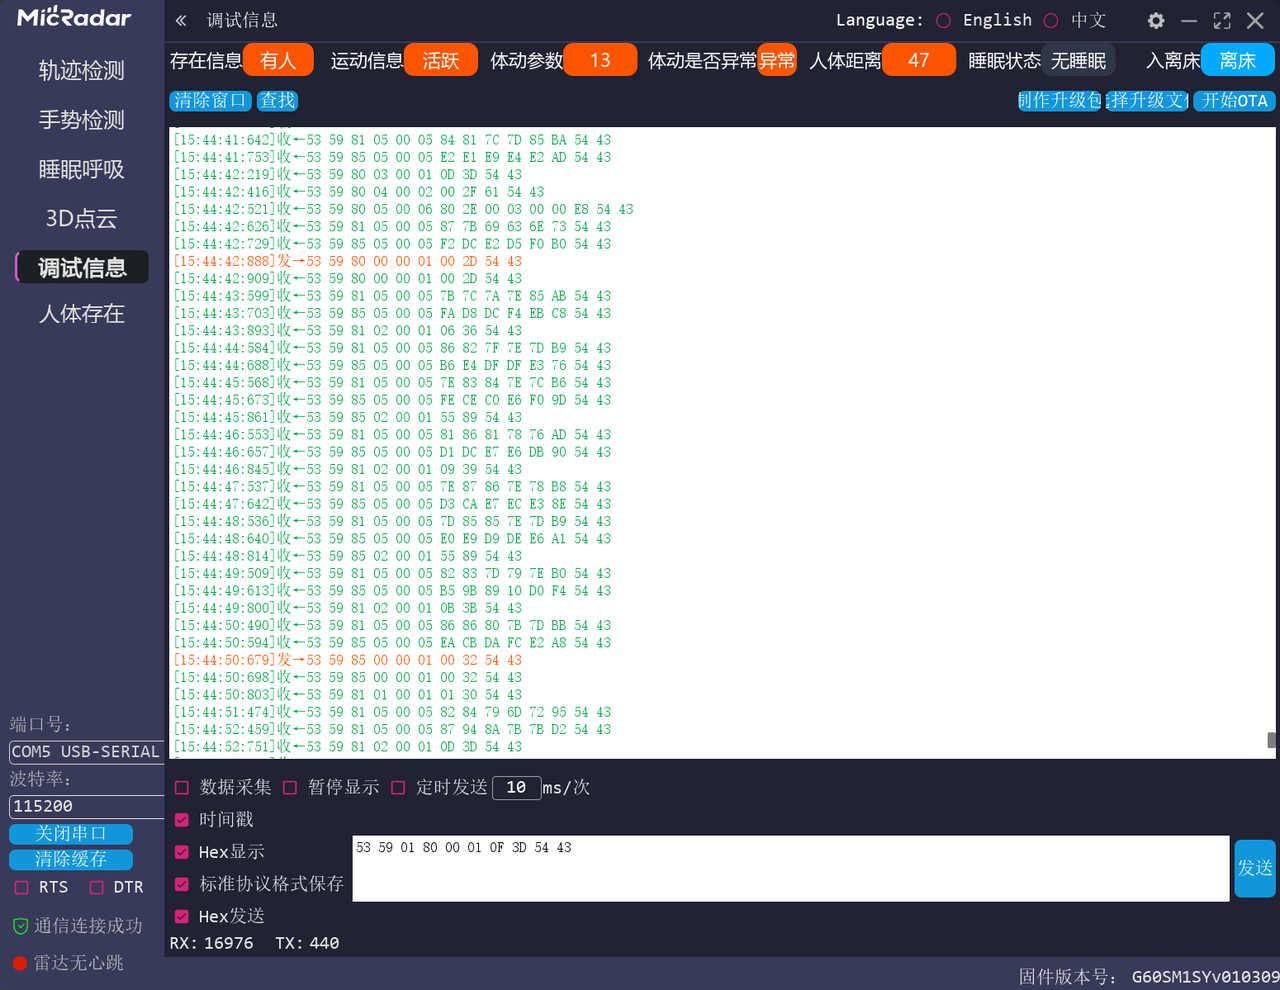
To ensure no loss or backlog of serial port data, it is necessary to first clarify the data frame output interval of the device. Through real-time data monitoring of R60ABD1 via the serial port assistant, it is found that the minimum interval between two data frames is approximately 100ms (in the active reporting scenario, the minimum interval is about 30ms in the command-response mode).
Based on this, the timer trigger cycle configured to work with DataFlowProcessor instances shall be set to less than 100ms (e. g., 50ms). This setup not only enables timely reading of data from the serial port buffer but also avoids excessive system resource consumption caused by overly frequent triggers, thereby achieving efficient and lossless data acquisition.
3.2.2 DataFlowProcessor Class: The Core Component for Decoupling Data Pipelines from Business Logic
DataFlowProcessor class serves as the core of the "data parsing layer", dedicated to serial data transmission and protocol parsing, and is completely decoupled from business logic (such as "mapping respiratory rate to specific values"). Its design follows the Modularization concept of "high cohesion and low coupling", and the following description will be elaborated from attribute definition and method functions two aspects.
3.2.2.2.2 Auxiliary Parsing Method for Frame Header, Length, Frame Tail and CRC
The relevant methods are as follows:
_find_header (start_pos): Linearly search for the frame header in the buffer 0x53 0x59 to locate the start position of a frame;
_parse_data_length (length_pos): parse the "data length" field in big-endian format to determine the number of bytes in the data segment;
_validate_trailer (frame_data): Verify the frame trailer 0x54 0x43 to ensure the integrity of the frame structure;
_validate_crc (frame_data): Calculate the sum of all bytes from the frame header to the data segment, compare the lower 8 bits with the CRC field in the frame to filter out invalid frames;
_parse_single_frame (frame_data): Parses a complete frame into fields such as "frame header, control word, command word, data, CRC, frame tail", and encapsulates them into a dictionary for return.
3.2.2.2.3 Instruction Sending and Tool Methods
The relevant methods are as follows:
build_and_send_frame (control_byte, command_byte, data): Assembles a command frame in accordance with the protocol format (comprising frame header, control word, command word, length, data, CRC and frame tail) and sends it via the serial port, supporting device configuration such as switching the monitoring mode;
get_stats (): Returns statistics on data flow, including the number of bytes received, parsed frames, and various errors, for debugging purposes.
clear_buffer (): Clears the buffer, used during exception recovery or reconnection scenarios.
3.2.2.2.4 Complete Code
As shown below:
# Python env   : MicroPython v1.23.0
# -*- coding: utf-8 -*-
# @Time    : 2025/11/4 下午6:38
# @Author  : 李清水
# @File    : data_flow_processor.py
# @Description : 用于处理R60ABD1雷达设备串口通信协议的数据流处理器类相关代码
# @License : CC BY-NC 4.0

# ======================================== 导入相关模块 =========================================

# ======================================== 全局变量 ============================================

# ======================================== 功能函数 ============================================

# ======================================== 自定义类 ============================================

class DataFlowProcessor:
    """
    R60ABD1 雷达设备串口通信协议的数据流处理器类。
    负责处理雷达设备的串口数据通信,包括数据帧的接收、解析、校验和发送。

    Attributes:
        uart (UART): 串口通信实例,用于数据收发。
        buffer (bytearray): 数据缓冲区,用于存储接收到的原始字节数据。
        stats (dict): 数据流转与解析统计信息字典,包含:
            total_bytes_received (int): 总接收字节数
            total_frames_parsed (int): 总解析帧数
            crc_errors (int): CRC校验错误次数
            frame_errors (int): 帧结构错误次数
            invalid_frames (int): 无效帧次数
        max_buffer_size (int): 缓冲区最大容量限制。

    Methods:
        __init__(uart): 初始化数据流处理器。
        read_and_parse(): 读取串口数据并解析完整帧。
        _find_header(start_pos=0): 在缓冲区中查找帧头位置。
        _parse_data_length(length_pos): 解析数据长度(大端格式)。
        _validate_trailer(frame_data): 验证帧尾。
        _validate_crc(frame_data): 验证CRC校验码。
        _parse_single_frame(frame_data): 解析单个数据帧。
        get_stats(): 获取数据流转与解析统计信息。
        clear_buffer(): 清空缓冲区。
        build_and_send_frame(control_byte, command_byte, data=b''): 构建并发送数据帧。
        _calculate_crc(data_bytes): 计算CRC校验码。

    ==========================================
    Data flow processor class for R60ABD1 radar device UART communication protocol.
    Handles UART data communication for radar devices, including data frame reception,
    parsing, validation, and transmission.

    Attributes:
        uart (UART): UART communication instance for data transmission and reception.
        buffer (bytearray): Data buffer for storing received raw byte data.
        stats (dict): Data flow and parsing statistics dictionary containing:
            total_bytes_received (int): Total bytes received
            total_frames_parsed (int): Total frames parsed
            crc_errors (int): CRC validation error count
            frame_errors (int): Frame structure error count
            invalid_frames (int): Invalid frame count
        max_buffer_size (int): Maximum buffer capacity limit.

    Methods:
        __init__(uart): Initialize data flow processor.
        read_and_parse(): Read UART data and parse complete frames.
        _find_header(start_pos=0): Find frame header position in buffer.
        _parse_data_length(length_pos): Parse data length (big-endian format).
        _validate_trailer(frame_data): Validate frame trailer.
        _validate_crc(frame_data): Validate CRC checksum.
        _parse_single_frame(frame_data): Parse single data frame.
        get_stats(): Get data flow and parsing statistics.
        clear_buffer(): Clear buffer.
        build_and_send_frame(control_byte, command_byte, data=b''): Build and send data frame.
        _calculate_crc(data_bytes): Calculate CRC checksum.
    """
    def __init__(self, uart):
        """
        初始化数据流处理器。

        Args:
            uart (UART): 已初始化的串口实例,用于数据收发。

        Returns:
            None

        Note:
            - 初始化时创建空缓冲区和统计信息字典。
            - 定义帧结构相关常量,包括帧头、帧尾、各字段长度等。
            - 设置缓冲区最大容量为128字节,防止内存溢出。

        ==========================================

        Initialize data flow processor.

        Args:
            uart (UART): Initialized UART instance for data transmission and reception.

        Returns:
            None

        Note:
            - Creates empty buffer and statistics dictionary during initialization.
            - Defines frame structure constants including header, trailer, field lengths, etc.
            - Sets maximum buffer capacity to 128 bytes to prevent memory overflow.
        """
        self.uart = uart
        self.buffer = bytearray()
        self.stats = {
            'total_bytes_received': 0,
            'total_frames_parsed': 0,
            'crc_errors': 0,
            'frame_errors': 0,
            'invalid_frames': 0
        }

        self.max_buffer_size = 128

        # 帧结构常量定义
        self.HEADER = bytes([0x53, 0x59])
        self.TRAILER = bytes([0x54, 0x43])
        self.HEADER_LEN = 2
        self.CONTROL_LEN = 1
        self.COMMAND_LEN = 1
        self.LENGTH_LEN = 2
        self.CRC_LEN = 1
        self.TRAILER_LEN = 2
        self.MIN_FRAME_LEN = self.HEADER_LEN + self.CONTROL_LEN + self.COMMAND_LEN + self.LENGTH_LEN + self.CRC_LEN + self.TRAILER_LEN

    def read_and_parse(self):
        """
        读取串口数据并解析完整帧。

        Args:
            无

        Returns:
            list: 解析成功的数据帧列表,每个元素为解析后的帧字典。
            []: 无完整帧或解析失败时返回空列表。

        Raises:
            Exception: 底层串口操作可能抛出的异常会向上传播。

        Note:
            - 每次读取最多32字节数据,避免阻塞时间过长。
            - 采用滑动窗口方式处理缓冲区,逐步解析完整帧。
            - 自动处理CRC校验和帧结构验证,统计各类错误信息。
            - 方法执行期间会更新统计信息,调用get_stats()可获取最新状态。

        ==========================================

        Read UART data and parse complete frames.

        Args:
            None

        Returns:
            list: List of successfully parsed data frames, each element is a parsed frame dictionary.
            []: Returns empty list when no complete frames or parsing fails.

        Raises:
            Exception: Underlying UART operations may raise exceptions that propagate upward.

        Note:
            - Reads up to 32 bytes per call to avoid long blocking times.
            - Uses sliding window approach to process buffer and gradually parse complete frames.
            - Automatically handles CRC validation and frame structure verification, statistics various error types.
            - Updates statistics during execution, call get_stats() to get latest status.
        """
        # 读取串口数据
        data = self.uart.read(32)
        if not data:
            return []

        # 更新统计信息
        self.stats['total_bytes_received'] += len(data)

        # 检查缓冲区大小
        if len(self.buffer) > self.max_buffer_size:
            self.clear_buffer()

        # 将数据添加到缓冲区
        self.buffer.extend(data)

        frames = []
        processed_bytes = 0

        while len(self.buffer) - processed_bytes >= self.MIN_FRAME_LEN:
            # 查找帧头
            header_pos = self._find_header(processed_bytes)
            if header_pos == -1:
                # 没有找到更多帧头,跳出循环
                break

            # 从找到的帧头位置开始
            current_pos = header_pos

            # 检查是否有足够数据解析长度字段
            if current_pos + self.HEADER_LEN + self.CONTROL_LEN + self.COMMAND_LEN + self.LENGTH_LEN > len(self.buffer):
                break

            # 解析数据长度(大端格式)
            length_pos = current_pos + self.HEADER_LEN + self.CONTROL_LEN + self.COMMAND_LEN
            data_len = self._parse_data_length(length_pos)

            # 计算完整帧长度
            total_frame_len = self.HEADER_LEN + self.CONTROL_LEN + self.COMMAND_LEN + self.LENGTH_LEN + data_len + self.CRC_LEN + self.TRAILER_LEN

            # 检查是否有完整的帧
            if current_pos + total_frame_len > len(self.buffer):
                break

            # 提取完整帧数据
            frame_end = current_pos + total_frame_len
            frame_data = self.buffer[current_pos:frame_end]

            # 验证帧尾
            if not self._validate_trailer(frame_data):
                self.stats['frame_errors'] += 1
                # 帧尾错误,跳过这个帧头,继续查找下一个
                processed_bytes = current_pos + 1
                continue

            # 验证CRC
            if not self._validate_crc(frame_data):
                self.stats['crc_errors'] += 1
                # CRC错误,跳过这个帧,继续查找下一个
                processed_bytes = current_pos + total_frame_len
                continue

            # 解析单帧
            parsed_frame = self._parse_single_frame(frame_data)
            if parsed_frame:
                frames.append(parsed_frame)
                self.stats['total_frames_parsed'] += 1
            else:
                self.stats['invalid_frames'] += 1

            # 移动到下一帧
            processed_bytes = current_pos + total_frame_len

        # 清理已处理的数据
        if processed_bytes > 0:
            self.buffer = self.buffer[processed_bytes:]

        return frames

    def _find_header(self, start_pos=0):
        """
        在缓冲区中查找帧头位置。

        Args:
            start_pos (int): 起始搜索位置,默认为0。

        Returns:
            int: 找到的帧头位置索引,未找到返回-1。

        Note:
            - 帧头为固定字节序列 [0x53, 0x59]。
            - 搜索范围从start_pos到缓冲区末尾-1(需要连续两个字节)。
            - 采用线性搜索算法,时间复杂度O(n)。

        ==========================================

        Find frame header position in buffer.

        Args:
            start_pos (int): Starting search position, defaults to 0.

        Returns:
            int: Found header position index, returns -1 if not found.

        Note:
            - Frame header is fixed byte sequence [0x53, 0x59].
            - Search range from start_pos to buffer end-1 (requires two consecutive bytes).
            - Uses linear search algorithm with O(n) time complexity.
        """
        for i in range(start_pos, len(self.buffer) - 1):
            if self.buffer[i] == self.HEADER[0] and self.buffer[i + 1] == self.HEADER[1]:
                return i
        return -1

    def _parse_data_length(self, length_pos):
        """
        解析数据长度(大端格式)。

        Args:
            length_pos (int): 长度字段在缓冲区中的起始位置。

        Returns:
            int: 解析出的数据长度值,解析失败返回0。

        Note:
            - 长度字段采用大端格式存储:高字节在前,低字节在后。
            - 需要确保length_pos+1不超出缓冲区范围。
            - 返回值为数据部分的实际字节长度。

        ==========================================

        Parse data length (big-endian format).

        Args:
            length_pos (int): Starting position of length field in buffer.

        Returns:
            int: Parsed data length value, returns 0 if parsing fails.

        Note:
            - Length field uses big-endian format: high byte first, low byte last.
            - Ensures length_pos+1 does not exceed buffer bounds.
            - Return value is the actual byte length of data portion.
        """
        if length_pos + 1 >= len(self.buffer):
            return 0
        # 大端格式:高字节在前,低字节在后
        return (self.buffer[length_pos] << 8) | self.buffer[length_pos + 1]

    def _validate_trailer(self, frame_data):
        """
        验证帧尾。

        Args:
            frame_data (bytes|bytearray): 完整帧数据。

        Returns:
            bool: 帧尾验证通过返回True,否则返回False。

        Note:
            - 帧尾为固定字节序列 [0x54, 0x43]。
            - 检查帧数据最后两个字节是否匹配帧尾。
            - 帧尾验证失败表明帧结构不完整或数据损坏。

        ==========================================

        Validate frame trailer.

        Args:
            frame_data (bytes|bytearray): Complete frame data.

        Returns:
            bool: Returns True if trailer validation passes, False otherwise.

        Note:
            - Frame trailer is fixed byte sequence [0x54, 0x43].
            - Checks if last two bytes of frame data match trailer.
            - Trailer validation failure indicates incomplete frame structure or data corruption.
        """
        if len(frame_data) < 2:
            return False
        return (frame_data[-2] == self.TRAILER[0] and
                frame_data[-1] == self.TRAILER[1])

    def _validate_crc(self, frame_data):
        """
        验证CRC校验码。

        Args:
            frame_data (bytes|bytearray): 完整帧数据。

        Returns:
            bool: CRC验证通过返回True,否则返回False。

        Note:
            - CRC校验范围:帧头到数据部分(不包括CRC字节和帧尾)。
            - 计算方式:对校验数据求和后取低8位。
            - CRC位于帧数据倒数第3个字节位置。

        ==========================================

        Validate CRC checksum.

        Args:
            frame_data (bytes|bytearray): Complete frame data.

        Returns:
            bool: Returns True if CRC validation passes, False otherwise.

        Note:
            - CRC check range: from header to data portion (excluding CRC byte and trailer).
            - Calculation method: sum check data and take lower 8 bits.
            - CRC is located at the third last byte of frame data.
        """
        if len(frame_data) < 3:
            return False

        # 计算校验和(不包括CRC字节和帧尾)
        data_to_check = frame_data[:-3]
        calculated_crc = sum(data_to_check) & 0xFF
        received_crc = frame_data[-3]

        return calculated_crc == received_crc

    def _parse_single_frame(self, frame_data):
        """
        解析单个数据帧。

        Args:
            frame_data (bytes|bytearray): 完整帧数据。

        Returns:
            dict|None: 解析成功返回帧信息字典,解析失败返回None。

        Raises:
            Exception: 解析过程中发生异常时记录错误信息。

        Note:
            - 按协议格式依次解析:帧头→控制字→命令字→长度字段→数据→CRC→帧尾。
            - 返回字典包含所有解析出的字段和原始数据。
            - 解析失败会记录到invalid_frames统计中。

        ==========================================

        Parse single data frame.

        Args:
            frame_data (bytes|bytearray): Complete frame data.

        Returns:
            dict|None: Returns frame information dictionary on success, None on failure.

        Raises:
            Exception: Records error information when exceptions occur during parsing.

        Note:
            - Parses sequentially according to protocol format: header→control→command→length→data→CRC→trailer.
            - Return dictionary contains all parsed fields and raw data.
            - Parsing failures are recorded in invalid_frames statistics.
        """
        try:
            pos = 0

            # 解析帧头 (2字节)
            header = bytes(frame_data[pos:pos + 2])
            pos += 2

            # 控制字 (1字节)
            control_byte = frame_data[pos]
            pos += 1

            # 命令字 (1字节)
            command_byte = frame_data[pos]
            pos += 1

            # 长度标识 (2字节)
            data_length = (frame_data[pos] << 8) | frame_data[pos + 1]
            pos += 2

            # 数据 (n字节)
            data_end = pos + data_length
            if data_end > len(frame_data) - 3:  # -3 为CRC(1)+帧尾(2)
                return None
            data = bytes(frame_data[pos:data_end])
            pos = data_end

            # CRC (1字节)
            crc = frame_data[pos]
            pos += 1

            # 帧尾 (2字节)
            trailer = bytes(frame_data[pos:pos + 2])

            # 构建解析结果
            parsed_frame = {
                'header': header,
                'control_byte': control_byte,
                'command_byte': command_byte,
                'data_length': data_length,
                'data': data,
                'crc': crc,
                'trailer': trailer,
                'raw_data': bytes(frame_data)
            }

            return parsed_frame

        except Exception as e:
            print(f"Frame parsing error: {e}")
            return None

    def get_stats(self):
        """
        获取数据流转与解析统计信息。

        Args:
            无

        Returns:
            dict: 包含所有统计信息的字典副本。

        Note:
            - 返回统计信息的深拷贝,防止外部修改影响内部数据。
            - 统计信息包括:接收字节数、解析帧数、各类错误计数等。

        ==========================================

        Get data flow and parsing statistics.

        Args:
            None

        Returns:
            dict: Dictionary containing all statistics information (copy).

        Note:
            - Returns deep copy of statistics to prevent external modifications affecting internal data.
            - Statistics include: received bytes, parsed frames, various error counts, etc.
        """
        return self.stats.copy()

    def clear_buffer(self):
        """
        清空缓冲区。

        Args:
            无

        Returns:
            None

        Note:
            - 将缓冲区重置为空bytearray。
            - 通常在缓冲区过大或需要重新开始解析时调用。

        ==========================================

        Clear buffer.

        Args:
            None

        Returns:
            None

        Note:
            - Resets buffer to empty bytearray.
            - Typically called when buffer is too large or need to restart parsing.
        """
        self.buffer = bytearray()

    def build_and_send_frame(self, control_byte, command_byte, data=b''):
        """
        构建并发送数据帧。

        Args:
            control_byte (int): 控制字,1字节无符号整数。
            command_byte (int): 命令字,1字节无符号整数。
            data (bytes): 数据部分,默认为空字节。

        Returns:
            bytes|None: 构建好的完整帧数据(用于调试),发送失败返回None。

        Raises:
            Exception: 帧构建或发送过程中发生异常时记录错误信息。

        Note:
            - 按照协议格式构建完整帧:帧头→控制字→命令字→长度→数据→CRC→帧尾。
            - 自动计算数据长度和CRC校验码。
            - 通过串口发送构建好的帧数据。

        ==========================================

        Build and send data frame.

        Args:
            control_byte (int): Control byte, 1-byte unsigned integer.
            command_byte (int): Command byte, 1-byte unsigned integer.
            data (bytes): Data portion, defaults to empty bytes.

        Returns:
            bytes|None: Built complete frame data (for debugging), returns None on send failure.

        Raises:
            Exception: Records error information when exceptions occur during frame building or sending.

        Note:
            - Builds complete frame according to protocol format: header→control→command→length→data→CRC→trailer.
            - Automatically calculates data length and CRC checksum.
            - Sends built frame data via UART.
        """
        try:
            # 帧头
            header = self.HEADER

            # 控制字和命令字
            control = bytes([control_byte])
            command = bytes([command_byte])

            # 数据长度(大端格式)
            data_length = len(data)
            length_bytes = bytes([(data_length >> 8) & 0xFF, data_length & 0xFF])

            # 组装除CRC和帧尾的部分
            frame_without_crc = header + control + command + length_bytes + data

            # 计算CRC
            crc = self._calculate_crc(frame_without_crc)

            # 帧尾A
            trailer = self.TRAILER

            # 完整帧
            complete_frame = frame_without_crc + bytes([crc]) + trailer

            # 发送帧
            self.uart.write(complete_frame)

            return complete_frame

        except Exception as e:
            print(f"Frame building and sending error: {e}")
            return None

    def _calculate_crc(self, data_bytes):
        """
        计算CRC校验码。

        Args:
            data_bytes (bytes): 需要计算CRC的数据字节序列。

        Returns:
            int: 计算出的CRC校验码(1字节)。

        Note:
            - 校验码计算:对输入数据所有字节求和后,取低8位。
            - 此CRC算法为简单求和校验,适用于基本错误检测。
            - CRC校验范围通常为帧头到数据部分。

        ==========================================

        Calculate CRC checksum.

        Args:
            data_bytes (bytes): Data byte sequence for CRC calculation.

        Returns:
            int: Calculated CRC checksum (1 byte).

        Note:
            - Checksum calculation: sum all input data bytes and take lower 8 bits.
            - This CRC algorithm uses simple sum check, suitable for basic error detection.
            - CRC check range typically from header to data portion.
        """
        return sum(data_bytes) & 0xFF

# ======================================== 初始化配置 ==========================================

# ========================================  主程序  ===========================================
3.2.3 Performance Verification
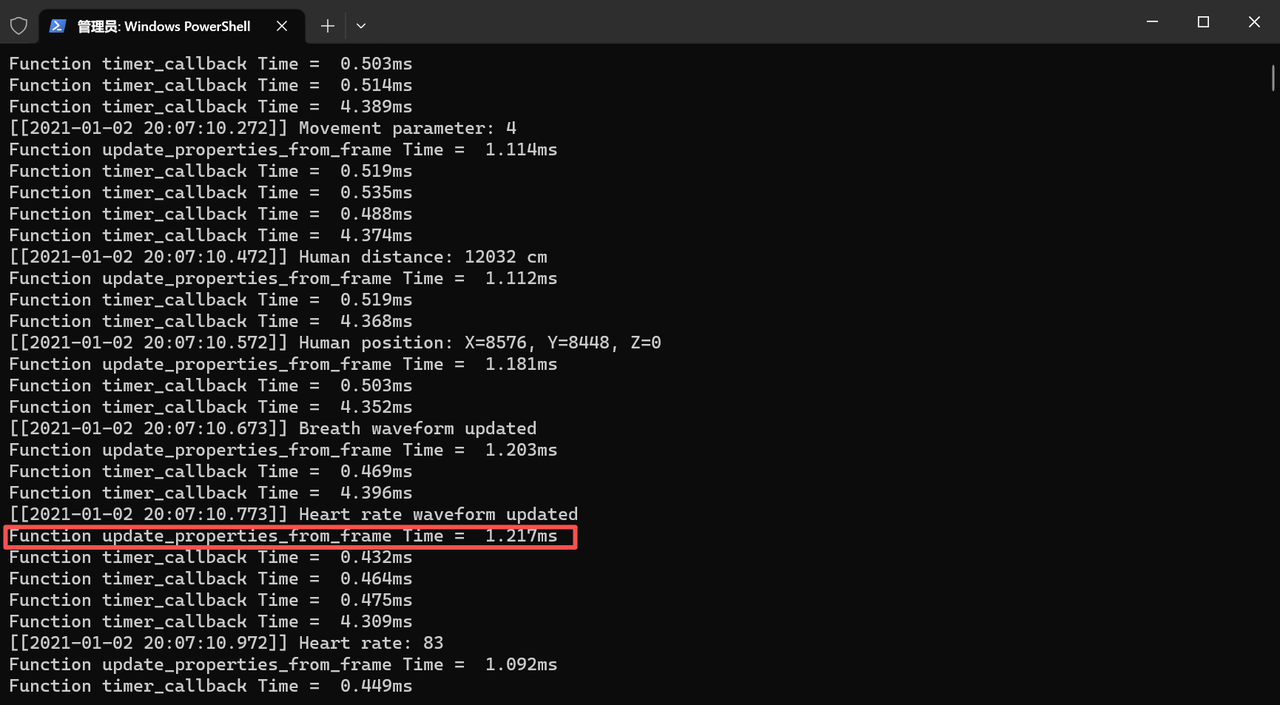
To ensure DataFlowProcessor the reliability of the DataFlowProcessor in the MicroPython environment, verification needs to be conducted in terms of parsing time consumption.
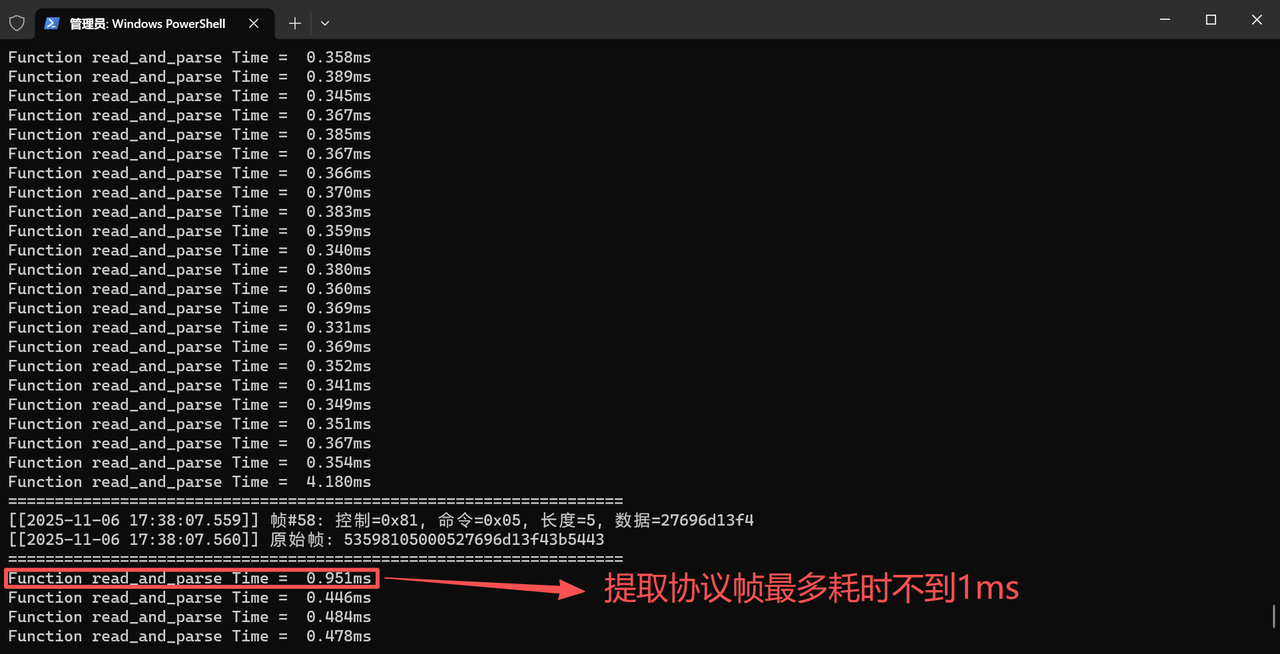
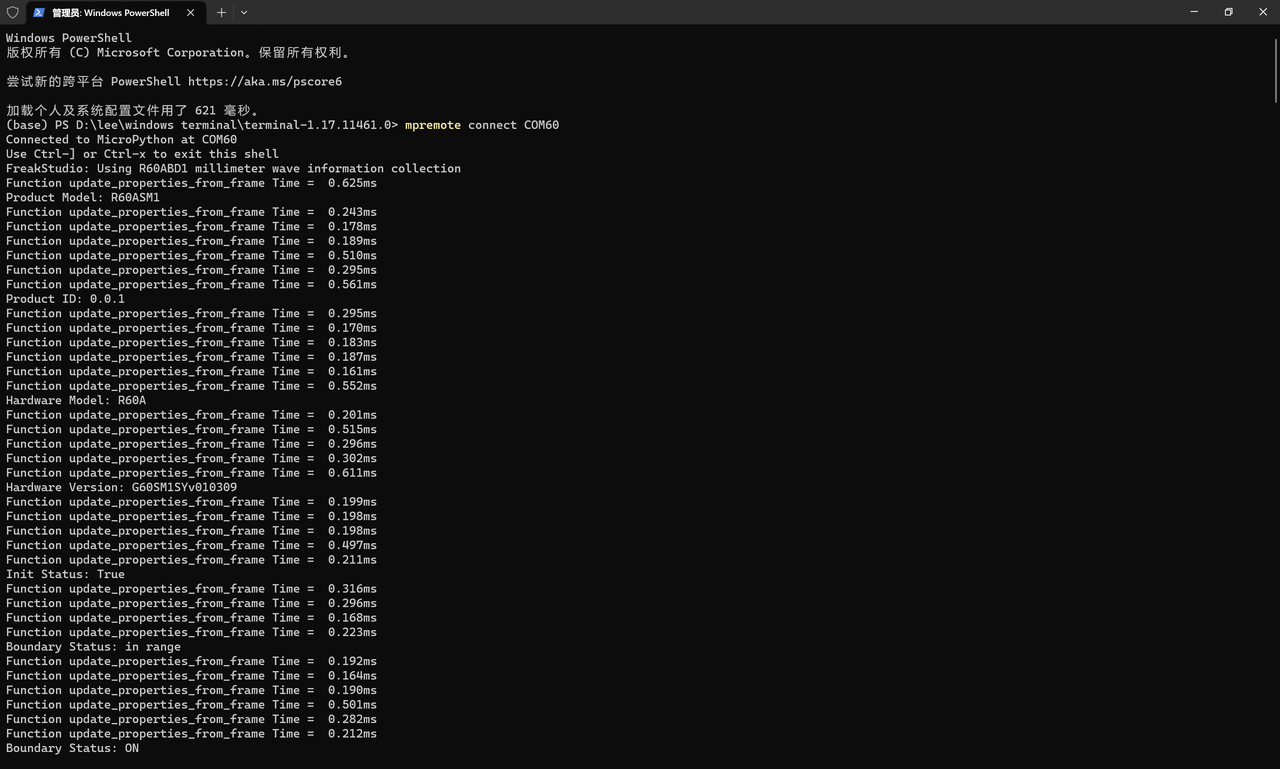
By inserting time statistics into the read_and_parse () method, it is found that the time consumed for parsing a single frame is less than 1ms at maximum, which is far smaller than the shortest interval (100ms) between data frames. This means that even in the interpreted execution environment of MicroPython, this component can process data in a timely manner without causing data backlog or loss due to parsing time consumption.
3.3 R60ABD1 Class Design: Modularization Encapsulation of the Business Logic Layer
R60ABD1 class, as the core of the business logic layer, is responsible for mapping the raw data parsed by DataFlowProcessor into readable business attributes (such as respiratory rate, heart rate, sleep status, etc.) and providing device control interfaces. Its design follows the principle of "functional Modularization and clear state", and the following description will be expanded from four dimensions: instance attributes, class attributes and constants, private parsing methods, and test verification.
3.3.1 Instance Attribute Design: Layered Isolation by Functional Module
Based on the description in the manual, we first summarize what the instance attributes include:
To make the business logic clearer and more maintainable, the instance attributes of R60ABD1 are designed in layers according to functional domains, and the attributes of each module focus on specific business scenarios:
These attributes are used for global device control (such as initialization and retry policies), and serve as the foundation for ensuring stable device operation.
These attributes are used for device health assessment and identity identification, helping developers quickly locate device status (such as whether the device is initialized and whether the firmware version is compatible).
3.3.1.3 Radar Detection and Human Presence Attributes
These attributes serve as the core carrier for sleep monitoring, which characterize sleep health from multiple dimensions including "status → duration → quality → abnormalities".
These attributes are used for the underlying management of device interactions (such as process querying and timer scheduling) and are transparent to upper-layer services.
3.3.2 Class Attributes and Constants: Centralized Definition of Business Rules
To avoid hard-coding and improve code readability, R60ABD1 encapsulates business rules, instruction types and state mappings via class attributes and constants:
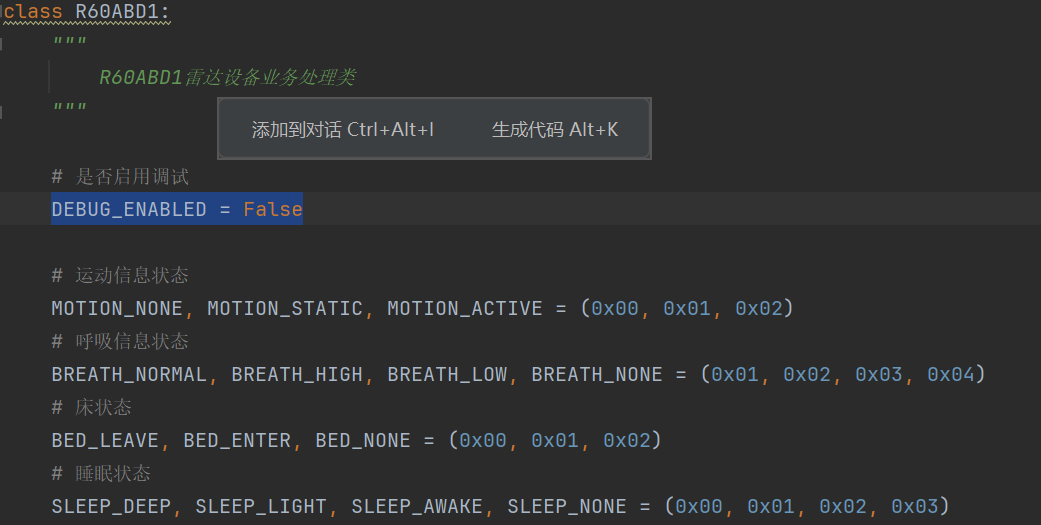
These constants centralize the mapping from "numerical values to business meanings", for example MOTION_ACTIVE directly corresponds to "human body active state", so as to avoid literals scattered in the code.
This type of mapping table serves as the translation layer that maps "business instructions to underlying protocols". For instance, when the business layer invokes the "query product model" function, it can directly obtain the corresponding serial port frame parameters via translation layer, for example, when the business layer calls "query product model", it can directly obtain the corresponding serial port frame parameters through COMMAND_MAP without needing to concern itself with protocol details.
3.3.3 Private parsing method: conversion from raw data to business attributes
R60ABD1 converts the raw bytes parsed by DataFlowProcessor into business attributes through a series of private methods, which focus on "data format parsing" and are decoupled from business logic:
3.3.3.1 Human Body Position Analysis (Signed 16-bit Special Format)
def _parse_human_position_data(self, data_bytes):
    """解析人体方位数据(6字节:X(2B)、Y(2B)、Z(2B)),支持特殊符号位格式"""
    if len(data_bytes) != 6:
        return (0, 0, 0)
    x = self._parse_signed_16bit_special(data_bytes[0:2])
    y = self._parse_signed_16bit_special(data_bytes[2:4])
    z = self._parse_signed_16bit_special(data_bytes[4:6])
    return (x, y, z)

def _parse_signed_16bit_special(self, two_bytes):
    """解析特殊有符号16位数据(首位为符号位,后15位为数值)"""
    if len(two_bytes) != 2:
        return 0
    unsigned_value = (two_bytes[0] << 8) | two_bytes[1]
    sign_bit = (unsigned_value >> 15) & 0x1
    magnitude = unsigned_value & 0x7FFF
    return -magnitude if sign_bit else magnitude
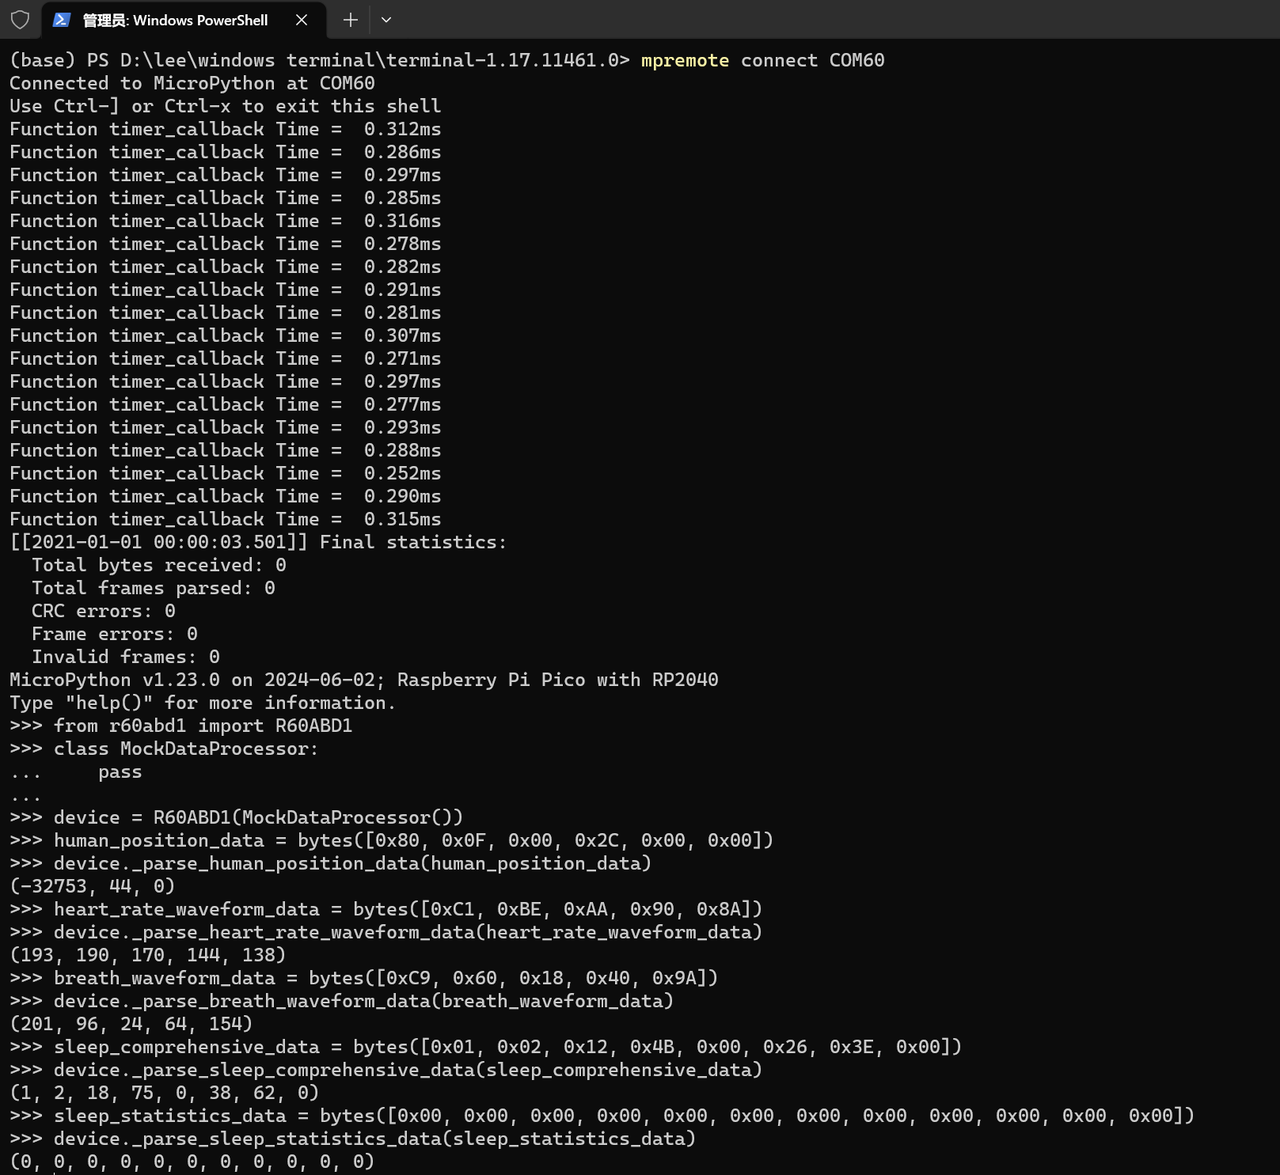
For example, the original bytes 0x80 0x0F will be parsed as -32753 (with a sign bit of 1 and a value bit of 0x000F), which accurately restores the sign and magnitude of human body coordinates.
3.3.3.2 Waveform Data Analysis (General Logic for Heart Rate and Respiration)
These methods directly map raw bytes to waveform values (e. g., 0xC1 → 193), providing fundamental data for upper-layer functions such as "waveform visualization".
3.3.3.3 Sleep Data Analysis (Comprehensive Status and Statistical Information)
Such methods decompose complex sleep data into readable business indicators; for example, "total sleep duration" is formed by concatenating two bytes of big-endian data.
3.3.3.4 Product and Firmware Information Parsing (String Processing)
def _parse_product_info_data(self, data_bytes):
    """解析产品信息(含空字节的字符串处理)"""
    try:
        if R60ABD1.DEBUG_ENABLED:
            print(f"[Parse] Raw product data: {data_bytes}, hex: {data_bytes.hex()}")
        # 截取空字节前的有效部分
        if b'\x00' in data_bytes:
            null_index = data_bytes.index(b'\x00')
            valid_data = data_bytes[:null_index]
        else:
            valid_data = data_bytes
        return (valid_data.decode('utf-8', errors='ignore').strip(),)
    except Exception as e:
        if R60ABD1.DEBUG_ENABLED:
            print(f"[Parse] Product info parse error: {e}, data: {data_bytes}")
        return ("",)

def _parse_firmware_version_data(self, data_bytes):
    """解析固件版本(逻辑与产品信息一致)"""
    try:
        if R60ABD1.DEBUG_ENABLED:
            print(f"[Parse] Raw firmware data: {data_bytes}, hex: {data_bytes.hex()}")
        if b'\x00' in data_bytes:
            null_index = data_bytes.index(b'\x00')
            valid_data = data_bytes[:null_index]
        else:
            valid_data = data_bytes
        return (valid_data.decode('utf-8', errors='ignore').strip(),)
    except Exception as e:
        if R60ABD1.DEBUG_ENABLED:
            print(f"[Parse] Firmware version parse error: {e}, data: {data_bytes}")
        return ("",)
Such methods handle the scenario of "strings with null bytes" to ensure that information such as product models and firmware versions can be correctly parsed as Python strings.
3.3.4 Test and Verification of Parsing Logic: Correctness Validation in REPL Environment
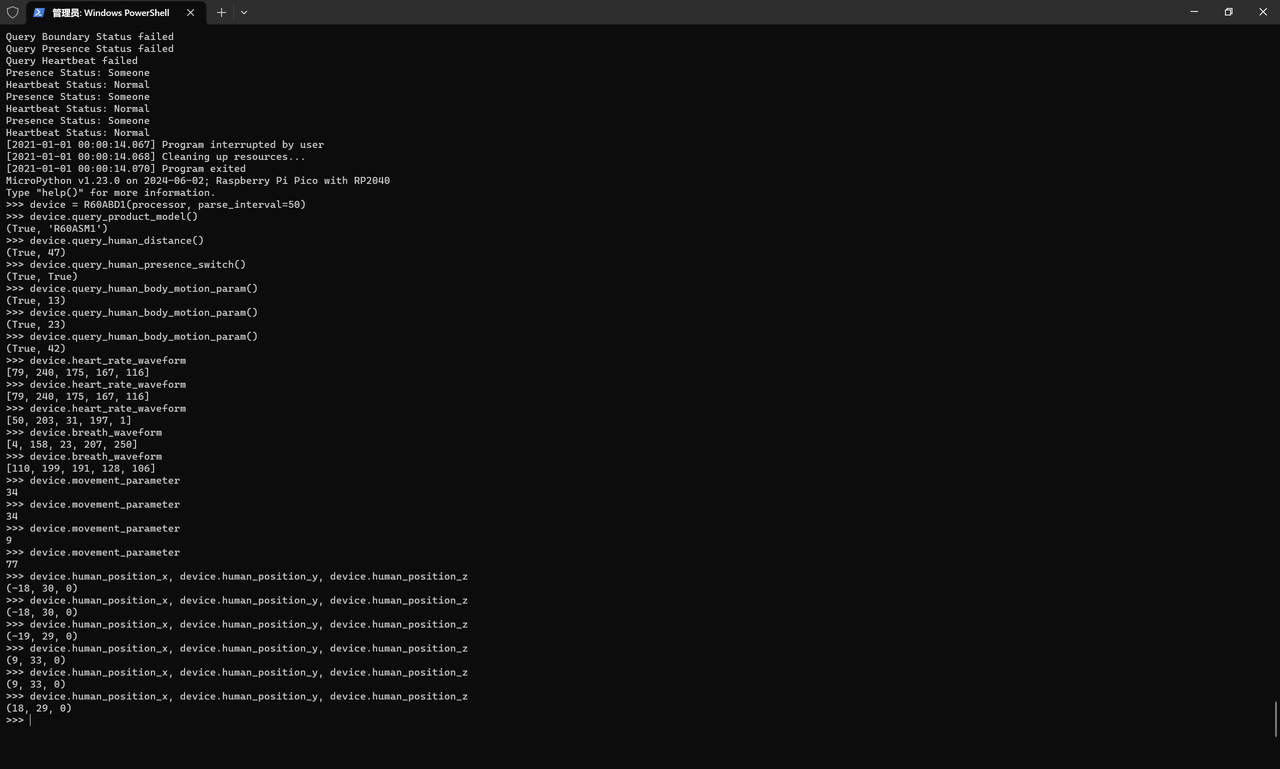
To ensure the reliability of the parsing method, it is necessary to conduct the test in the REPL environment of MicroPython for data consistency testing to verify whether the conversion from "raw bytes to business attributes" meets expectations:
Through the above tests, it can be verified that all parsing methods can accurately convert raw bytes into business attributes, which lays a solid foundation for the subsequent update_properties_from_frame method implementation.
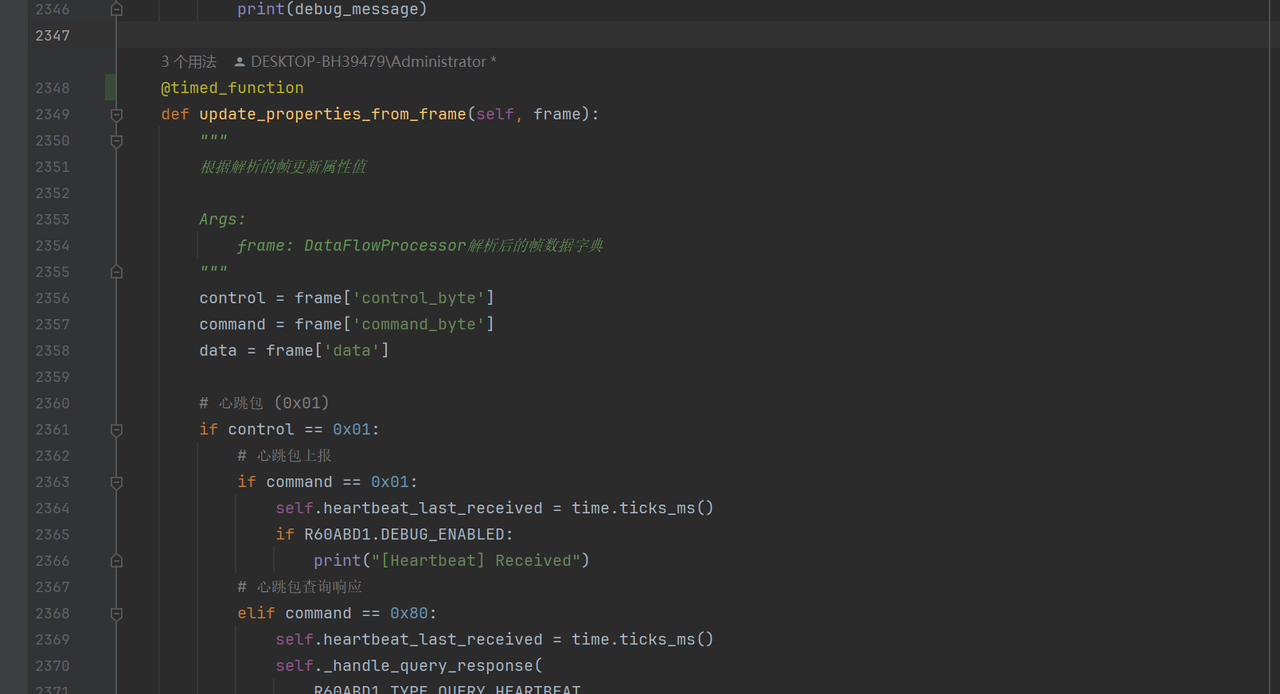
3.3.5 update_properties_from_frame Method: Entry for Service Property Update
update_properties_from_frame is the R60ABD1 class's core method that bridges the "Data Parsing Layer" and the "Business Logic Layer", which is responsible for mapping the raw frame data parsed by DataFlowProcessor into readable business attributes, and implementing hierarchical and real-time updates of these attributes.
3.3.5.1 Objective of Method Design: The "Translator" from Data to Business
This method undertakes the responsibility for translating and updating "original frame data → service attributes", serving as a "bridge" for the business logic layer to perceive device status. It receives DataFlowProcessor -output frame dictionaries, and through control word and command word combination judgment, converts byte data into structured service attributes (such as respiration rate, heart rate, human presence status, etc.), ultimately supporting upper-layer applications such as device health monitoring and status analysis.
3.3.5.2 Hierarchical Strategy for Attribute Update Timing: Matching Data Frequency
To strike a balance between "real-time performance" and "resource consumption", it is recommended that developers calling the driver library process attribute updates in layers according to the data output frequency:
High-frequency data (<100ms): such as human presence status and motion status. This type of data changes rapidly, so attributes need to be updated immediately to ensure that the business layer perceives environmental changes in real time.
Medium-frequency data (1–3 s): such as respiratory/heart rate waveforms and motion parameters. This type of data is used for trend analysis (e. g., waveform visualization), with a relatively slower update frequency but a requirement for guaranteed data integrity.
Low-frequency data (>10s): such as sleep status and quality score. This type of data is an aggregated indicator with a long update interval, which can be processed in one go upon receiving the frame.
3.3.5.3 Specific Implementation of the Method: Modularization Branch Parsing
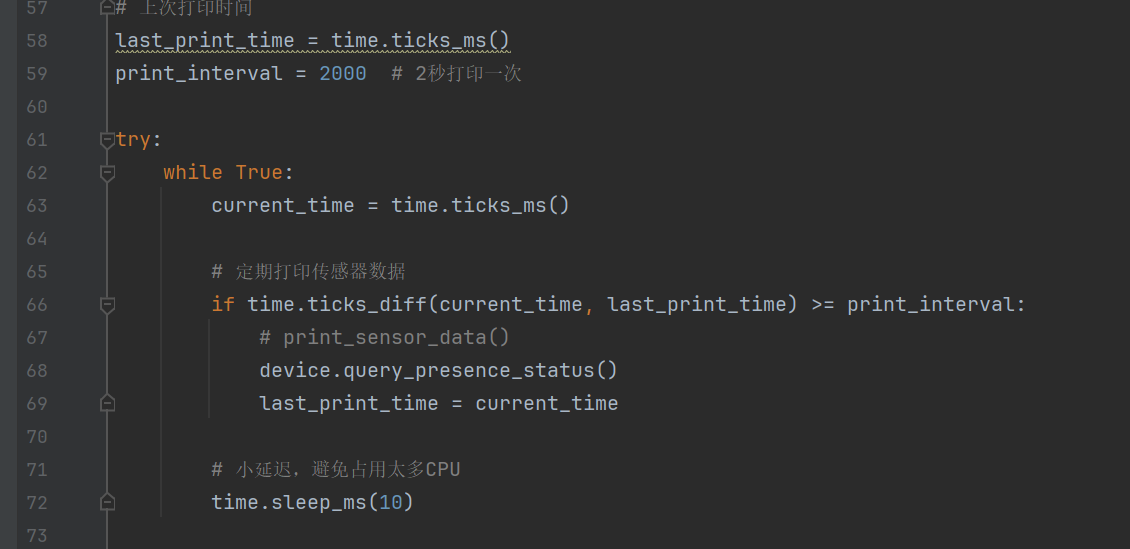
Here, to quickly test the feasibility, we conduct the test in mian. py, using global variables to simulate attribute values, and in the relevant functions, through control word + command word combination judgment, route different types of frame data to the update logic of the corresponding attributes:
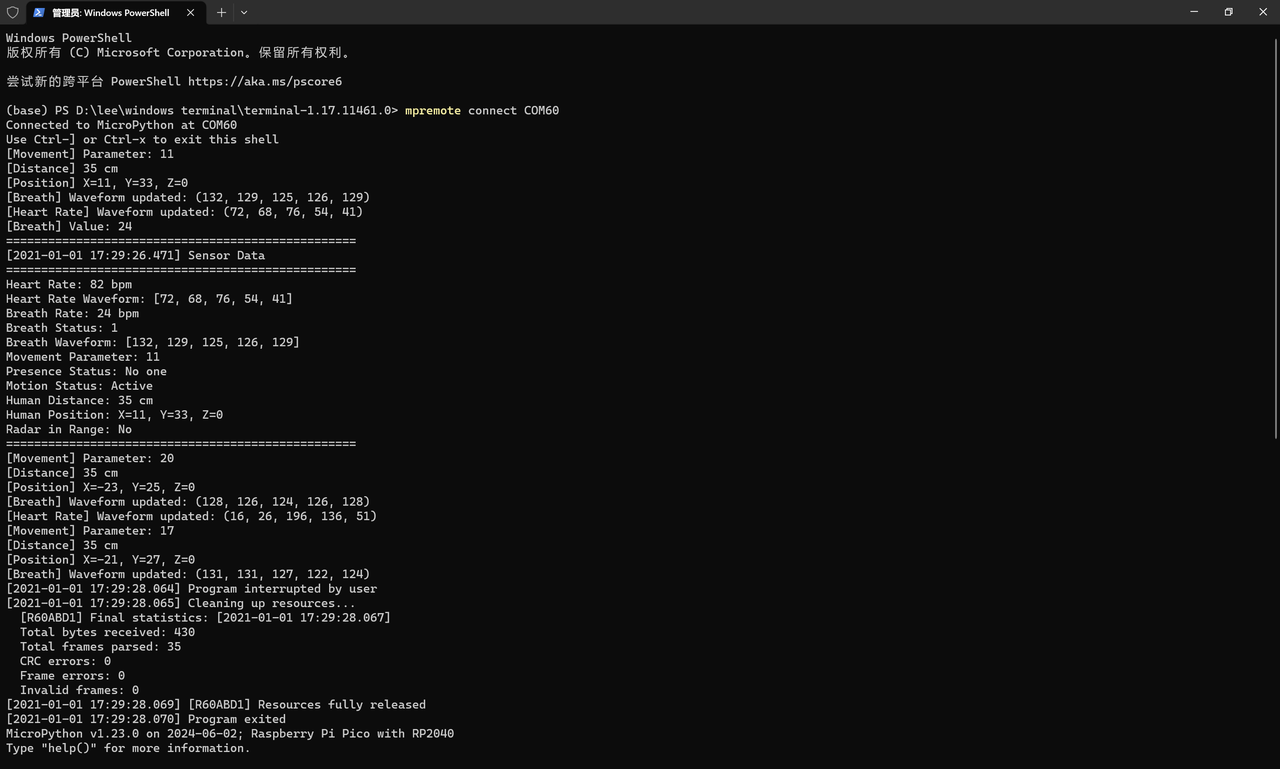
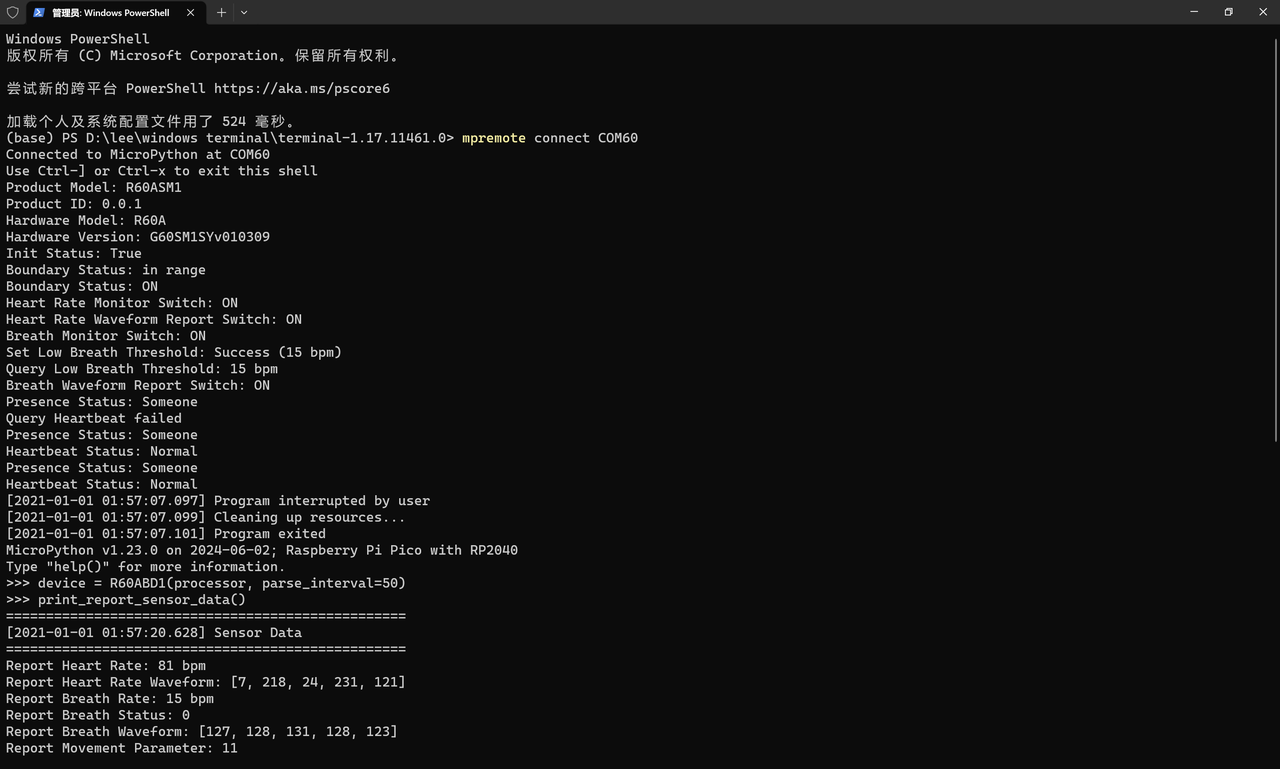
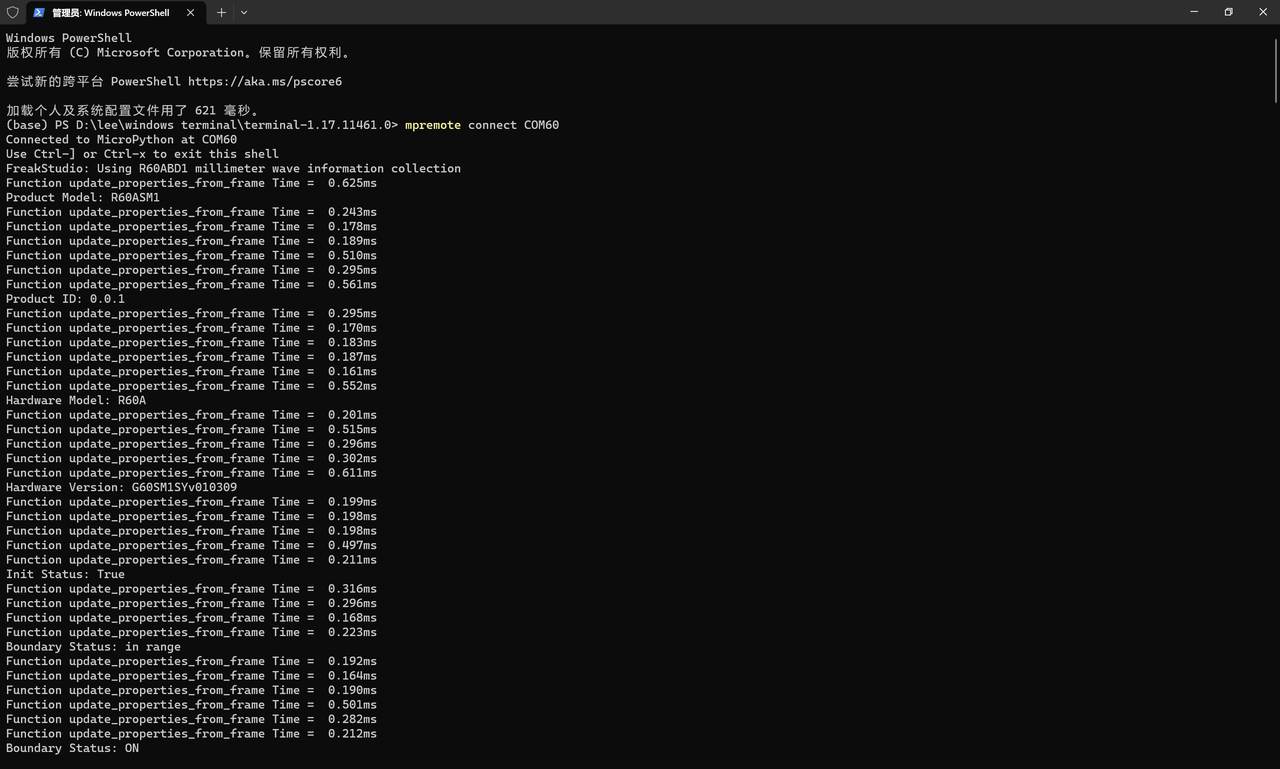
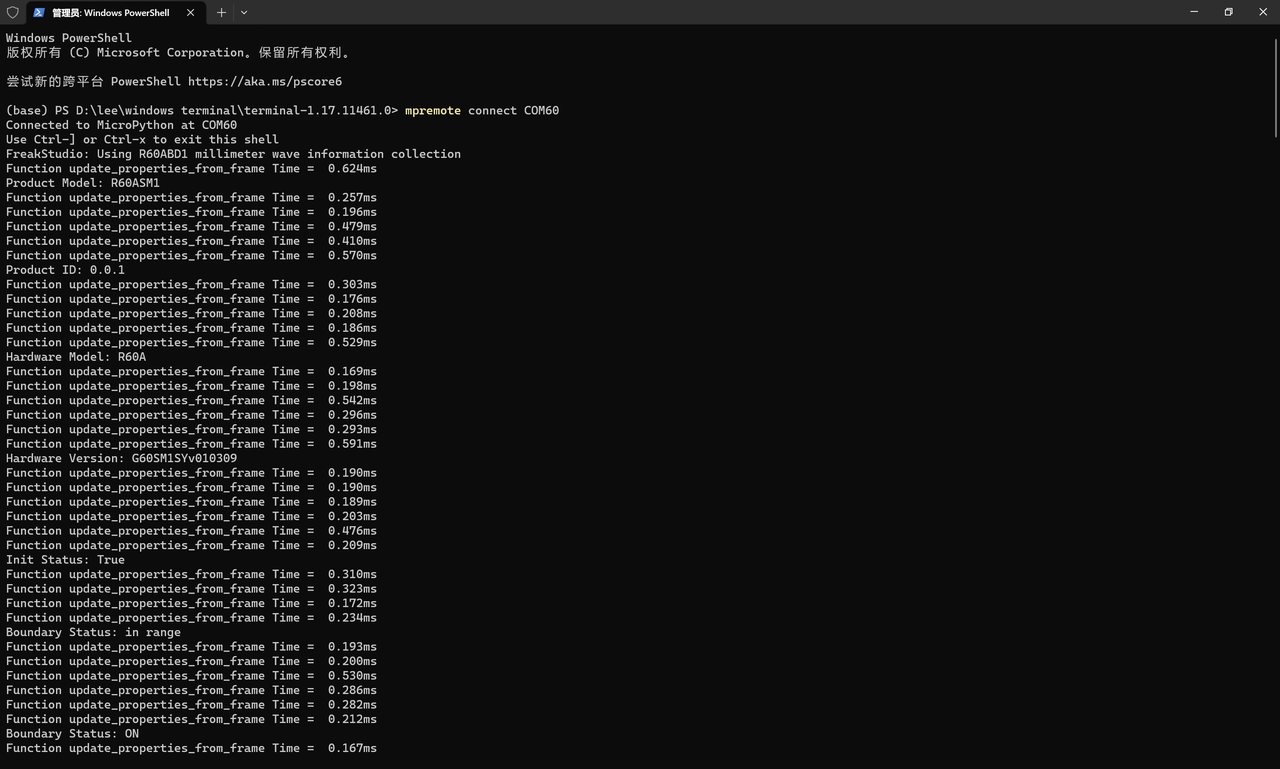
It is found during runtime that normal parsing is achievable, and the same applies to code interruption:
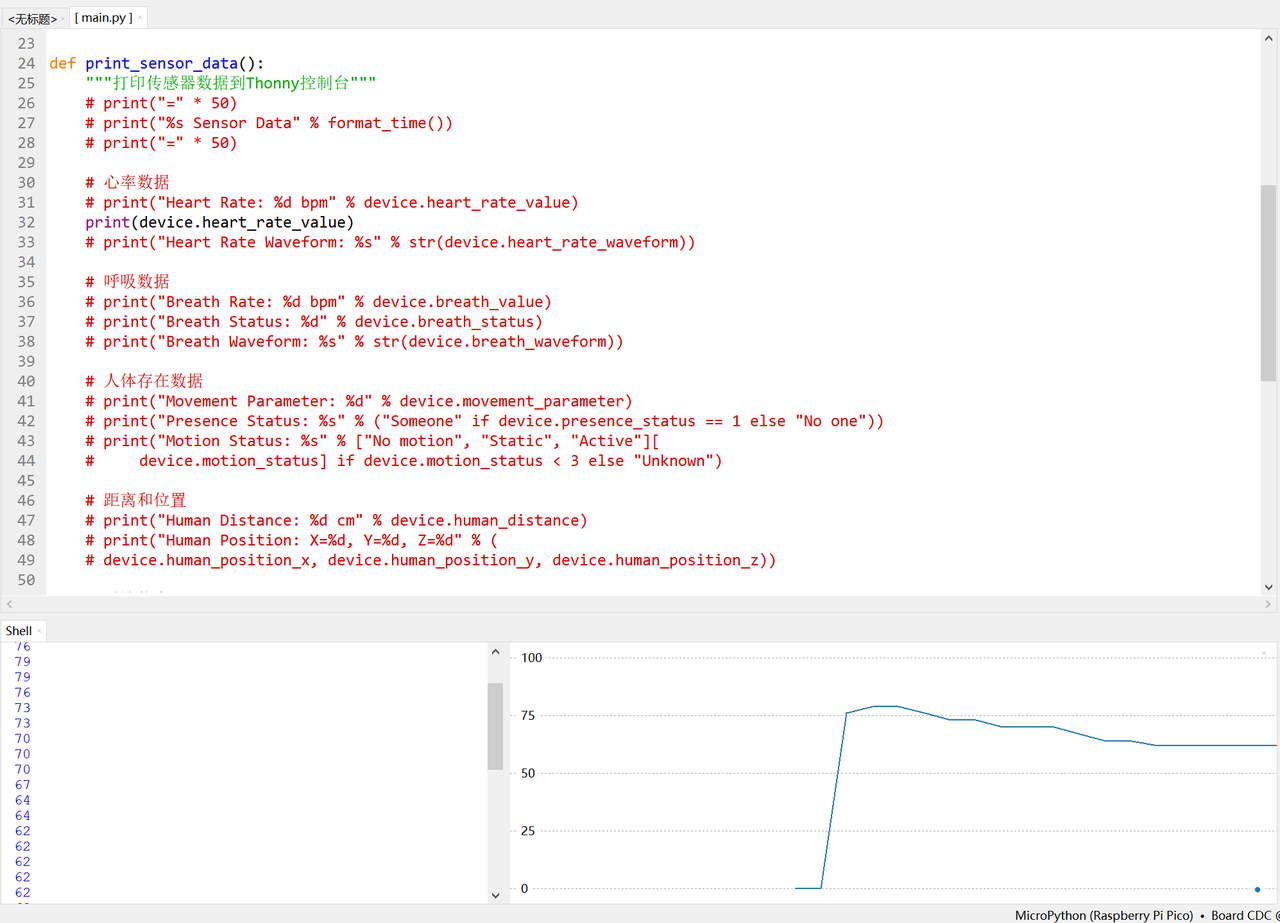
3.3.5.5 Actual Operation Verification: Data Consistency and Visualization
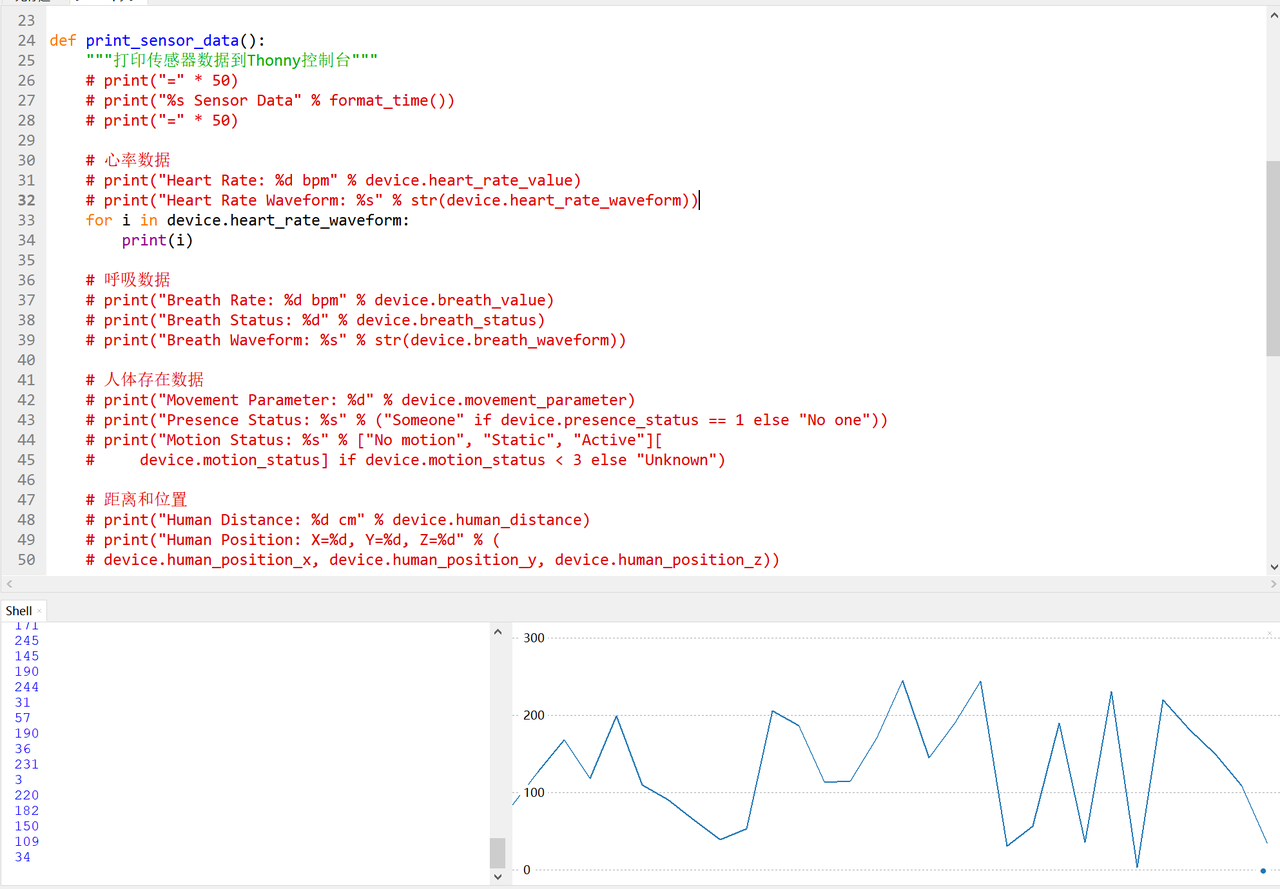
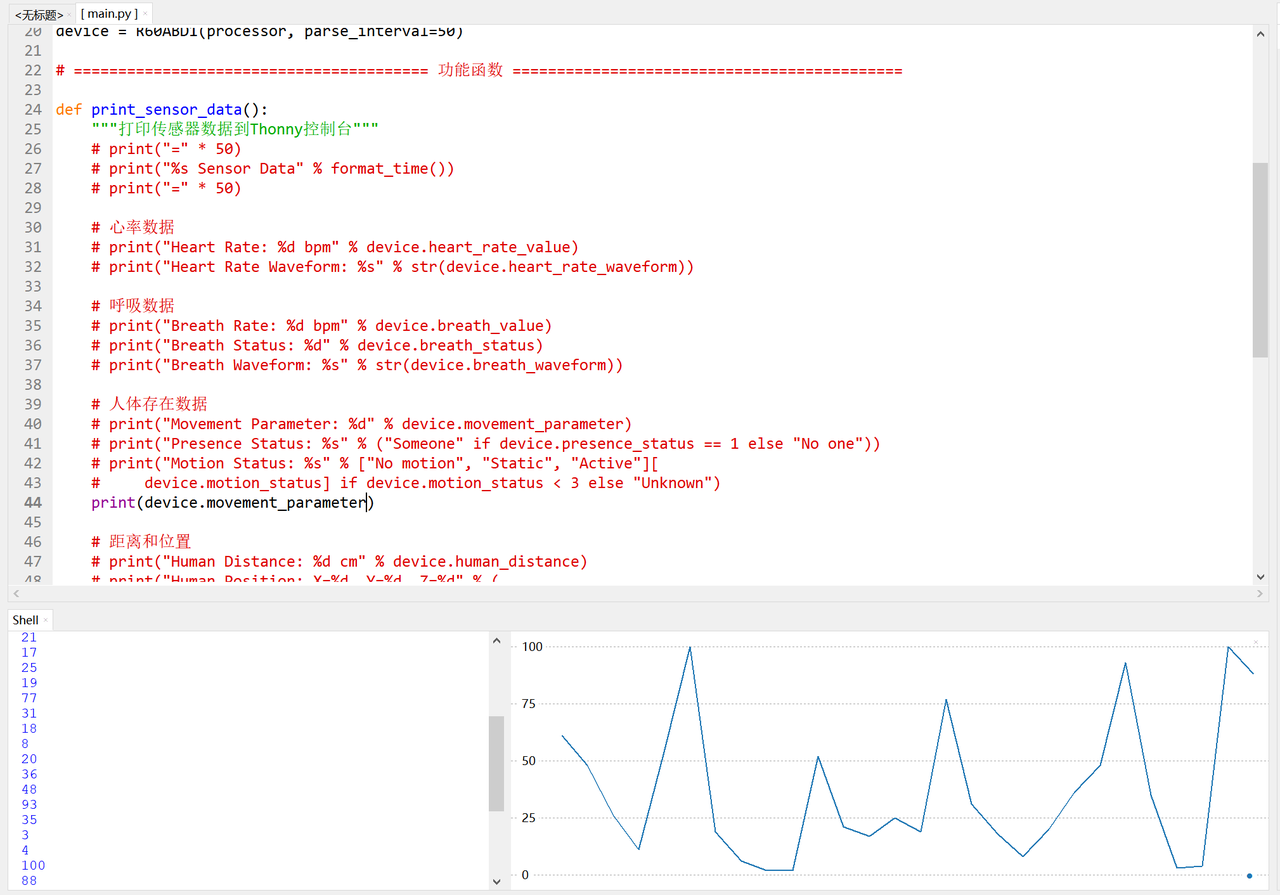
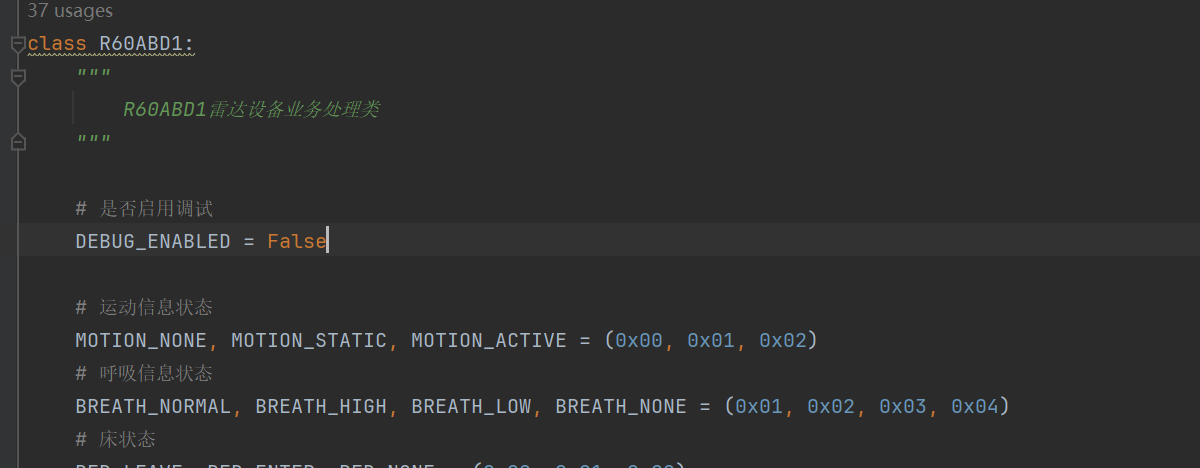
Next, let's take a look at the value change curve in Thonny (you need to set DEBUG_ENABLED = False at this point):
Meanwhile, it should be noted that here we only output one type of values at a time for easier viewing:
3.3.6 Design and Implementation of Command Response Logic: Interactive Processing of Active Query/Setting/Enable Commands
In the R60ABD1 class's business logic layer, the command response logic is responsible for handling the interaction process of "actively issuing an instruction → receiving the device's response → updating attributes / returning results", and serves as the core module for implementing functions such as "device control, information query, and parameter configuration".
3.3.6.1 Design Objectives and Core Ideas
Business scenarios addressed:
Device Information Query: such as obtaining the product model, firmware version, hardware model, etc. ;
Function switch control: such as enabling/disabling human presence monitoring, respiration monitoring, heart rate monitoring, etc. ;
Dynamic parameter configuration: such as setting gentle respiration threshold, unattended duration, struggle sensitivity, etc. ;
Equipment Status Diagnosis: such as querying the status of heartbeat packets, initialization completion status, radar detection range, etc.
Core Design Concept:
The finite-state machine pattern manages the query lifecycle by tracking the complete process of _query_in_progress, _query_response_received and other attributes, covering "initiate query → wait for response → process result → clean up state";
Reuse the parsing logic: The structure of the query response frame is completely identical to that of the active report frame, therefore the update_properties_from_frame method is reused for parsing to avoid code redundancy;
Hardware FIFO ensures data reliability: The UART hardware FIFO (32 bytes) of the Raspberry Pi Pico automatically caches response data, and combined with the read_and_parse method of timer callback, it ensures no data loss;
Timeout retry mechanism: Through the max_retries and retry_delay parameters, it copes with unstable serial communication scenarios and improves the reliability of command execution.
3.3.6.2 Return Parameter Design Specification: A "Status + Result" Binary Tuple Mode Based on Device Response
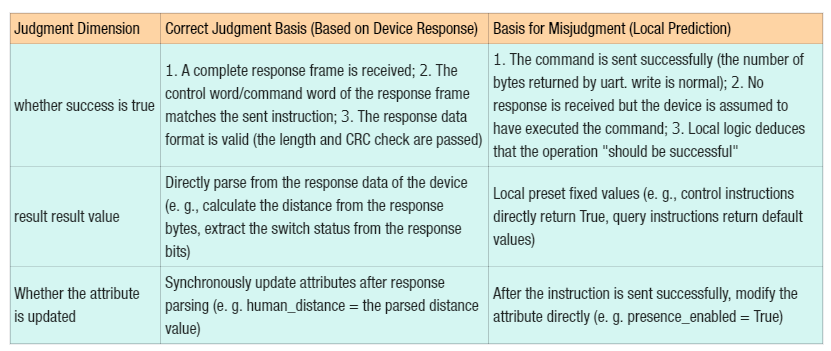
The return parameter design of the command response logic shall strictly comply with the tuple specification of "response success status + actual result", and the three items of "whether successful", "return value content" and "whether the attribute is updated" shall all take the real response returned by the device as the only judgment basis — results shall not be deduced through non-device response information such as "instruction sent successfully" and "local logic prediction", so as to ensure that the returned data is completely consistent with the real status of the device.
3.3.6.2.1 Unified Format Requirements for Return Parameters
The return value of all active instruction interaction methods (query, setting, and control types) must be a tuple (success: bool, result: Any), and the definitions of each field are as follows:
Success : Boolean value, True means receiving a valid response from the device and completing the parsing (the response frame format is legal, the control word/command word matches the instruction), False means timeout, response mismatch, parsing failure and other abnormal scenarios;
result: Dynamic type, returns the corresponding result according to the instruction type:
Query commands (such as query_human_distance): return parsed device data (such as distance values, switch statuses, product model strings);
Control commands (e. g. enable_human_presence): return a boolean value indicating "whether the control takes effect" as the device response confirmation;
Configuration commands (e. g. set_low_breath_threshold): return the parameter value after configuration confirmed in the device response;
Exception scenario: result is None.
3.3.6.2.2 Core Judgment Basis: Equipment Response is the Only Data Source
Whether it is the boolean status of success, the actual value of result, or the update of business attributes, all must be judged strictly based on the response frame data returned by the device, and any local logic prediction is prohibited:
3.3.6.2.3 Example of Return Parameters for Different Types of Instructions
Query instruction: returns the "parsed device data"
Take query_human_distance as an example, the return value is strictly parsed based on the device response; if there is no response, then success= False, result= None:
Control command: Return the "valid status confirmed by the device"
Take enable_human_presence as an example, result is not the locally preset True, but the status of "whether the switch takes effect" extracted from the device response:
Configuration class command: return the "configuration parameters confirmed by the device"
Take set_low_breath_threshold as an example: result is the post-configuration threshold confirmed in the device response, which ensures that the configuration has actually taken effect:
Consistency: All command response methods return data in a unified format, eliminating the need for upper-layer calls to adapt to the return logic of different types of instructions (e. g., uniformly use success to determine validity, and use result to extract specific results);
Reliability: It serves as the sole judgment criterion based on device responses, which avoids hidden issues such as "commands are sent successfully but not executed by the device" and "inconsistency between local status and device status";
Debuggability: It enables quick troubleshooting of issues such as "command unresponsive" and "response mismatch" via the status, and allows direct acquisition of the device's real feedback through the status, and allows direct acquisition of the device's real feedback through the result, facilitating problem diagnosis;
Compatibility: The unified format provides standardized interfaces for subsequent function extensions (such as batch instruction execution and exception retry mechanism), reducing the integration cost of upper-layer systems.
3.3.6.3 Implementation of Blocking Query Method: Taking Existence Information Query as an Example
In the R60ABD1 class, add the following attributes to track the lifecycle of queries:
Next, we take existence information query as an example to illustrate the design and implementation of the blocking query method:
    def query_presence_status(self, timeout=200):
        """
        查询存在信息状态(阻塞式)

        Args:
            timeout: 超时时间,单位毫秒

        Returns:
            tuple: (查询状态, 存在状态信息)
                - 查询状态: True-查询成功, False-查询失败
                - 存在状态信息: 0-无人, 1-有人 (查询成功时有效)
        """
        if self._query_in_progress:
            if R60ABD1.DEBUG_ENABLED:
                print("[Query] Another query in progress, aborting")
            return False, None

        try:
            original_running = self._is_running
            self._is_running = False  # 临时禁用定时器,避免数据竞争

            # 初始化查询状态
            self._query_in_progress = True
            self._query_response_received = False
            self._query_result = None
            self._current_query_type = R60ABD1.TYPE_QUERY_HUMAN_EXISTENCE_INFO

            # 构造查询指令帧
            header = bytes([0x53, 0x59])
            control = bytes([0x80])
            command = bytes([0x81])
            length = bytes([0x00, 0x01])
            data = bytes([0x0F])

            crc_data = header + control + command + length + data
            crc = self._calculate_crc(crc_data)
            query_frame = crc_data + bytes([crc]) + bytes([0x54, 0x43])

            # 发送指令
            self.data_processor.uart.write(query_frame)
            if R60ABD1.DEBUG_ENABLED:
                print(f"[Query] Presence status query sent: {query_frame.hex()}")

            # 等待响应
            start_time = time.ticks_ms()
            while not self._query_response_received:
                if time.ticks_diff(time.ticks_ms(), start_time) >= timeout:
                    if R60ABD1.DEBUG_ENABLED:
                        print("[Query] Presence status query timeout")
                    return False, None
                time.sleep_us(100)  # 微秒级延迟,避免CPU占用
                frames = self.data_processor.read_and_parse()
                for frame in frames:
                    self.update_properties_from_frame(frame)

            return True, self._query_result
        except Exception as e:
            if R60ABD1.DEBUG_ENABLED:
                print(f"[Query] Presence status query error: {e}")
            return False, None
        finally:
            # 清理查询状态并恢复定时器
            self._query_in_progress = False
            self._query_response_received = False
            self._query_result = None
            self._current_query_type = None
            try:
                self._is_running = original_running
            except NameError:
                pass
Based on the same design concept, it can be extended to heartbeat query, product information query, initialization status query and other methods, for example:
Add to the original active reporting parsing logic the identification and processing branch for query response frames to ensure that attribute updates are synchronized with query results:
def update_properties_from_frame(self, frame):
    control = frame['control_byte']
    command = frame['command_byte']
    data = frame['data']

    # ... 原有主动上报帧处理逻辑(系统、存在、呼吸、心率等)...

    # 人体存在检测(查询响应分支)
    elif control == 0x80 and command == 0x81:
        if data and len(data) > 0:
            presence_value = data[0]
            self.presence_status = presence_value

            # 匹配当前查询类型,更新查询结果
            if (self._query_in_progress and
                    self._current_query_type == R60ABD1.TYPE_QUERY_HUMAN_EXISTENCE_INFO and
                    not self._query_response_received):
                self._query_result = presence_value
                self._query_response_received = True
                if R60ABD1.DEBUG_ENABLED:
                    print(f"[Query] Presence status response: {'Someone' if presence_value else 'No one'}")
In this way, the query response frame updates both the service attributes and the query results simultaneously, thus realizing the effect of "one parsing, dual purposes".
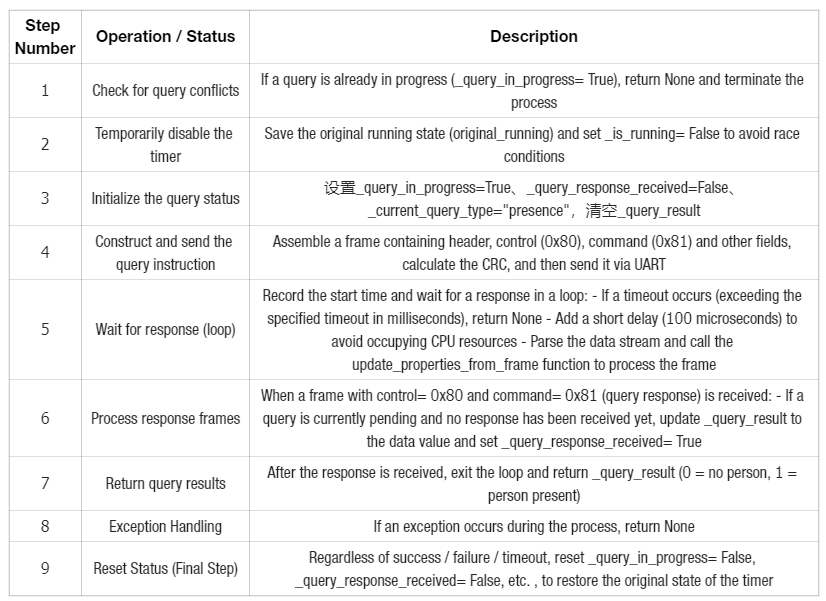
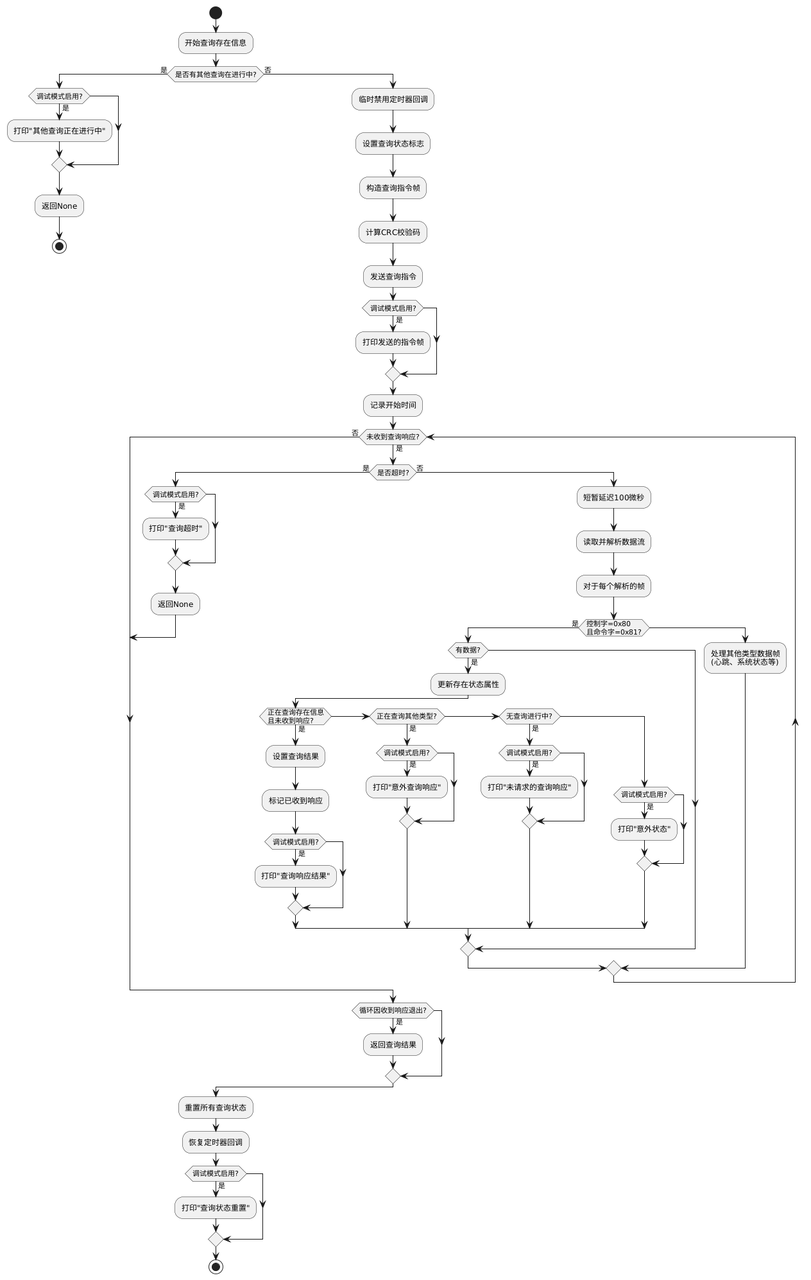
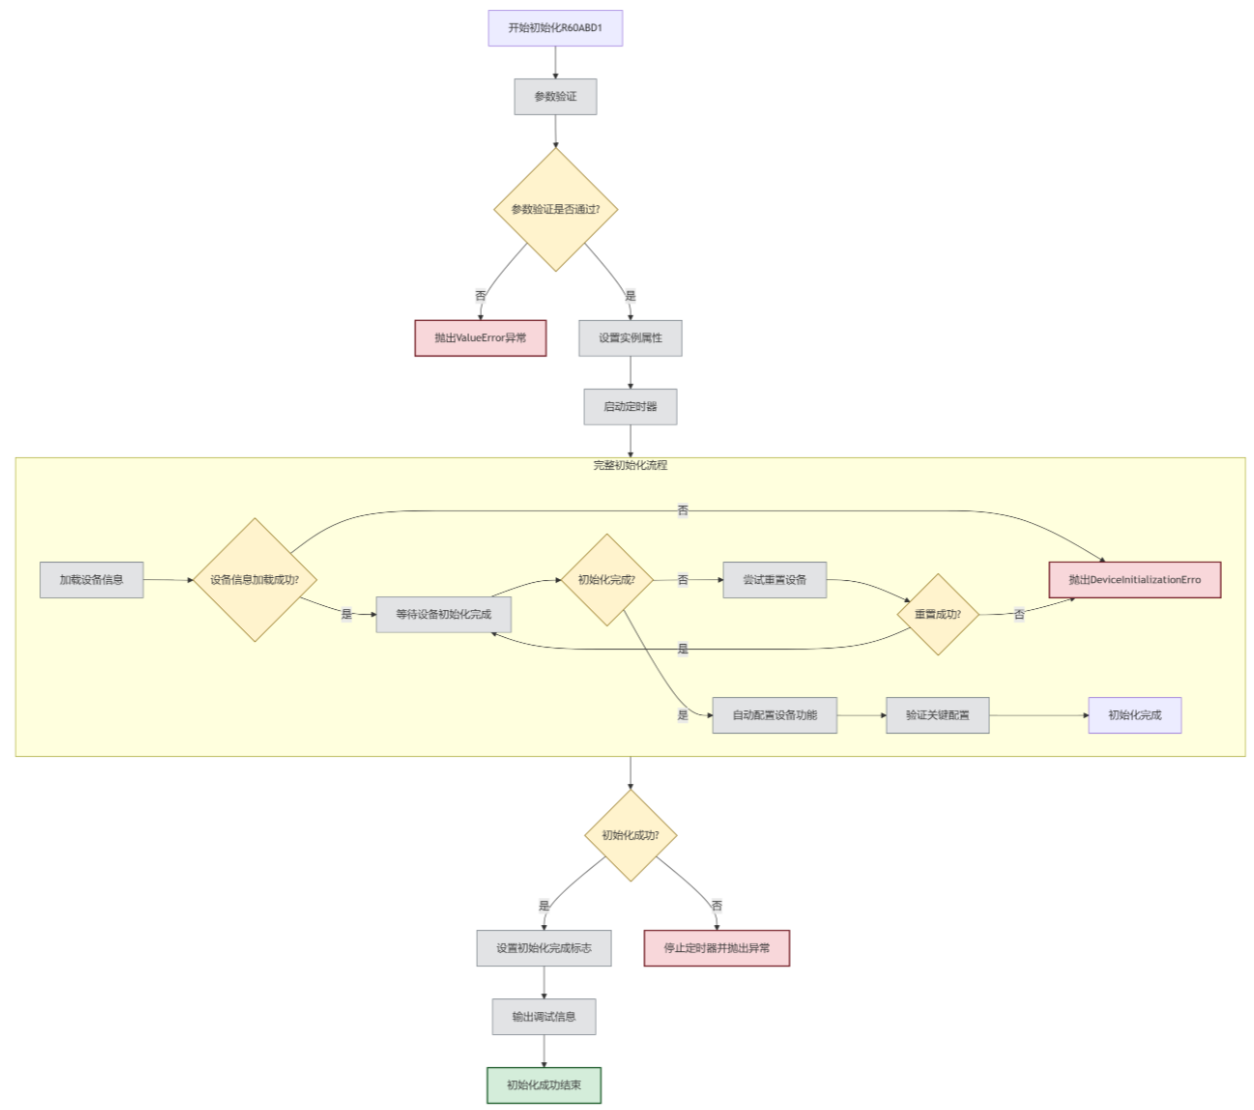
The overall process is shown in the following table and figure:
3.3.6.5 Test Verification: Compatibility of Query and Active Reporting
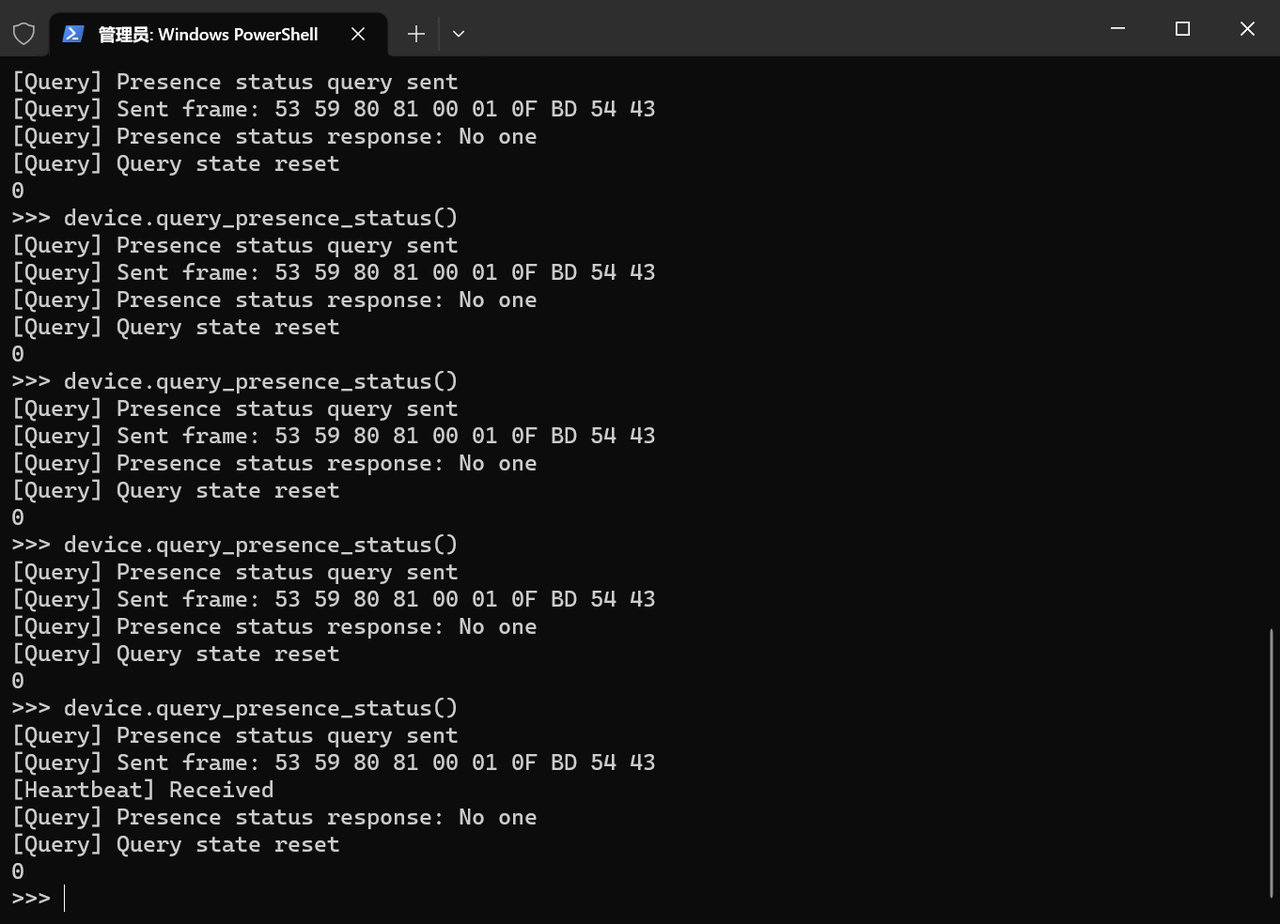
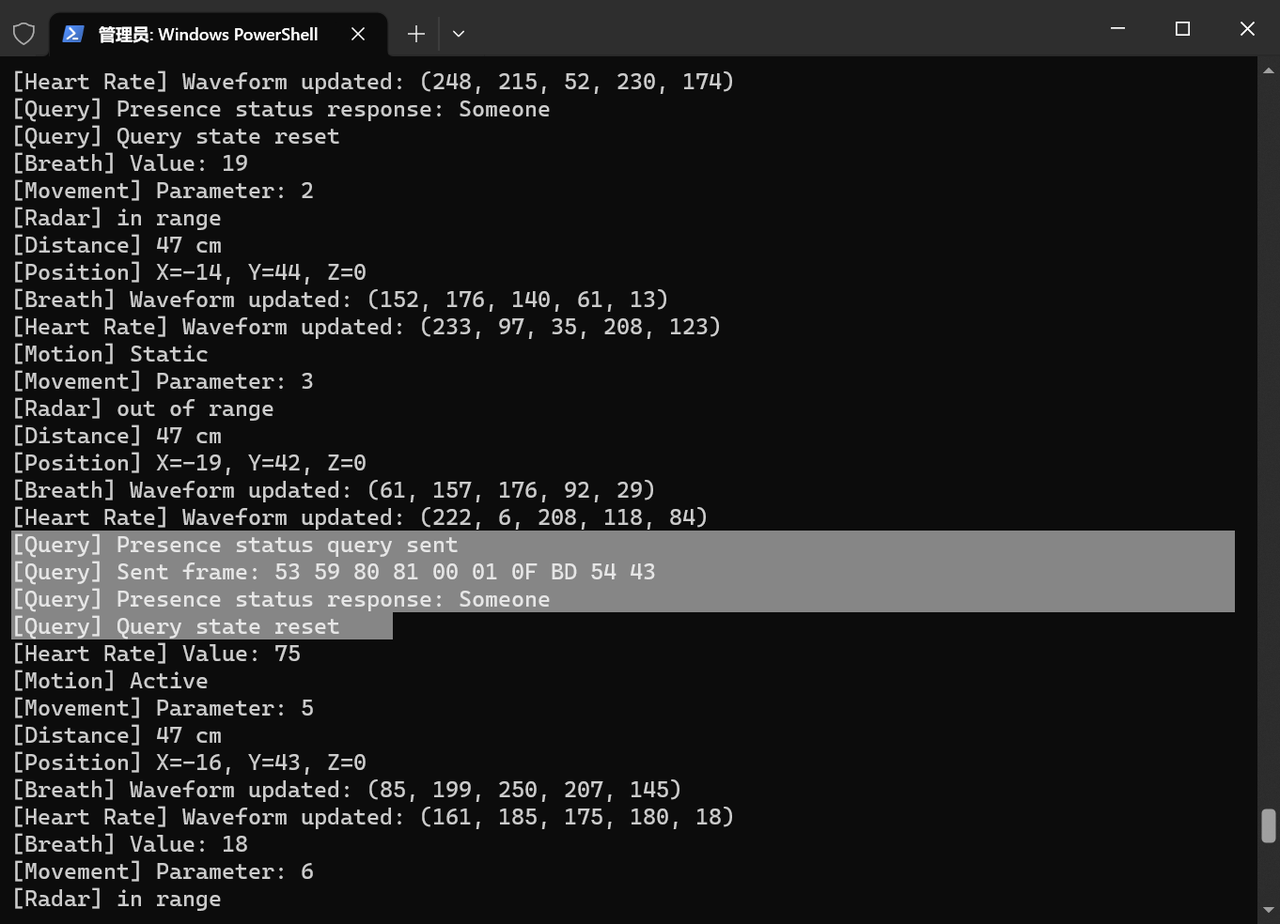
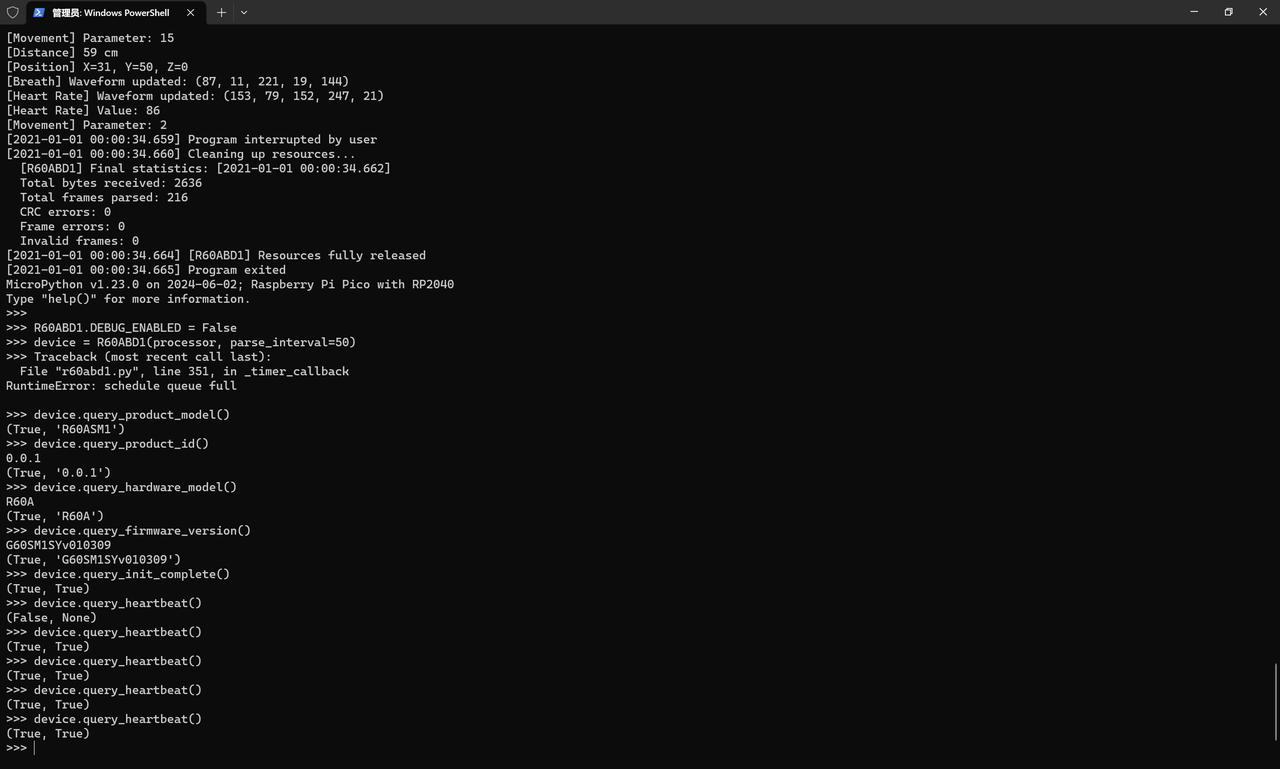
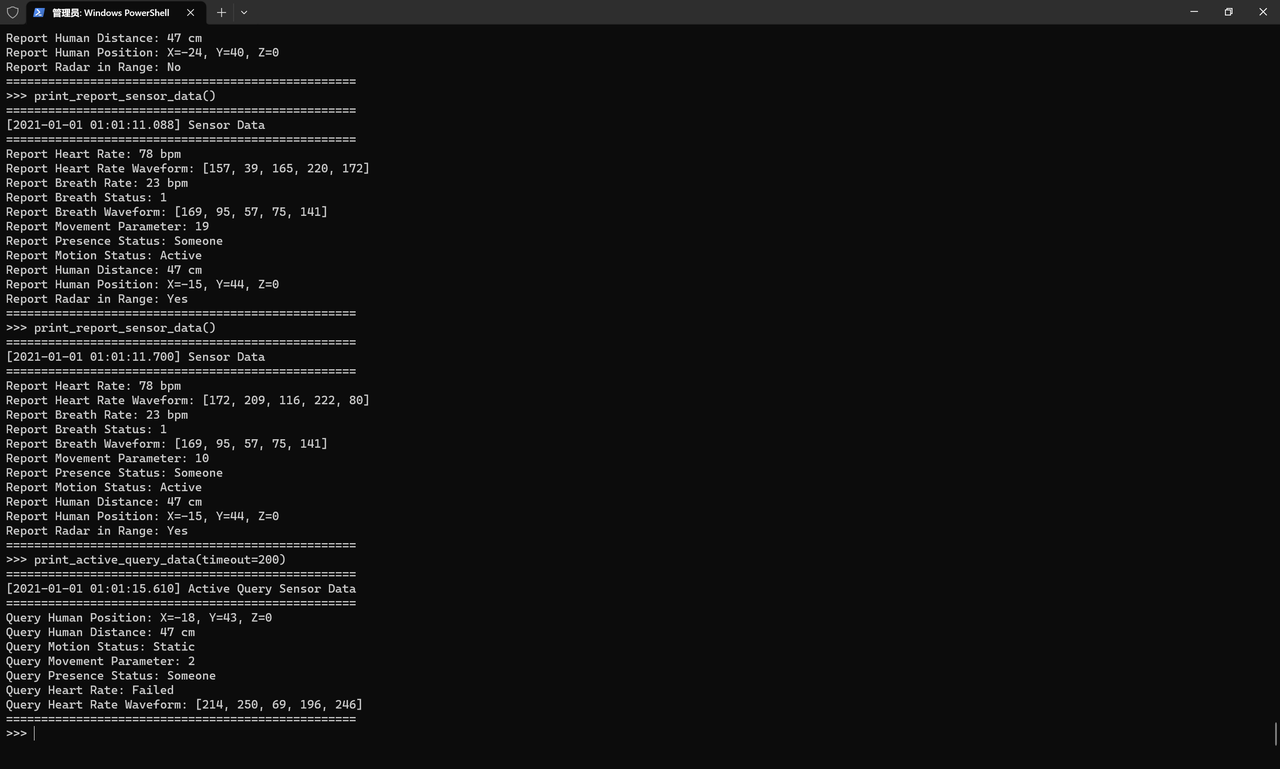
Next, we will first test whether this method can perform normal parsing when there is no reported information (excluding heartbeat packets):
Scenario 1: Disable active reporting, only test the query function
Operation: Disable the active reporting functions for human presence, heart rate, respiration and sleep;
Test: Call query_presence_status in the REPL, and verify that the returned result is consistent with the actual status of the device (occupied / unoccupied).
Scenario 2: Enable active reporting to verify the parallelism of query and reporting
Operation: Enable all active reporting functions, and call the query method (such as query_firmware_version) at the same time;
Test: Observe main. py output, verify that the actively reported data is parsed correctly, and meanwhile the query command can return the correct result (e. g. firmware version string).
First, disable the functions of human presence active reporting, heart rate monitoring, respiration monitoring and sleep monitoring:
Next, we will fully enable active data reporting to check whether normal parsing can be achieved (and modify main. py at the same time):
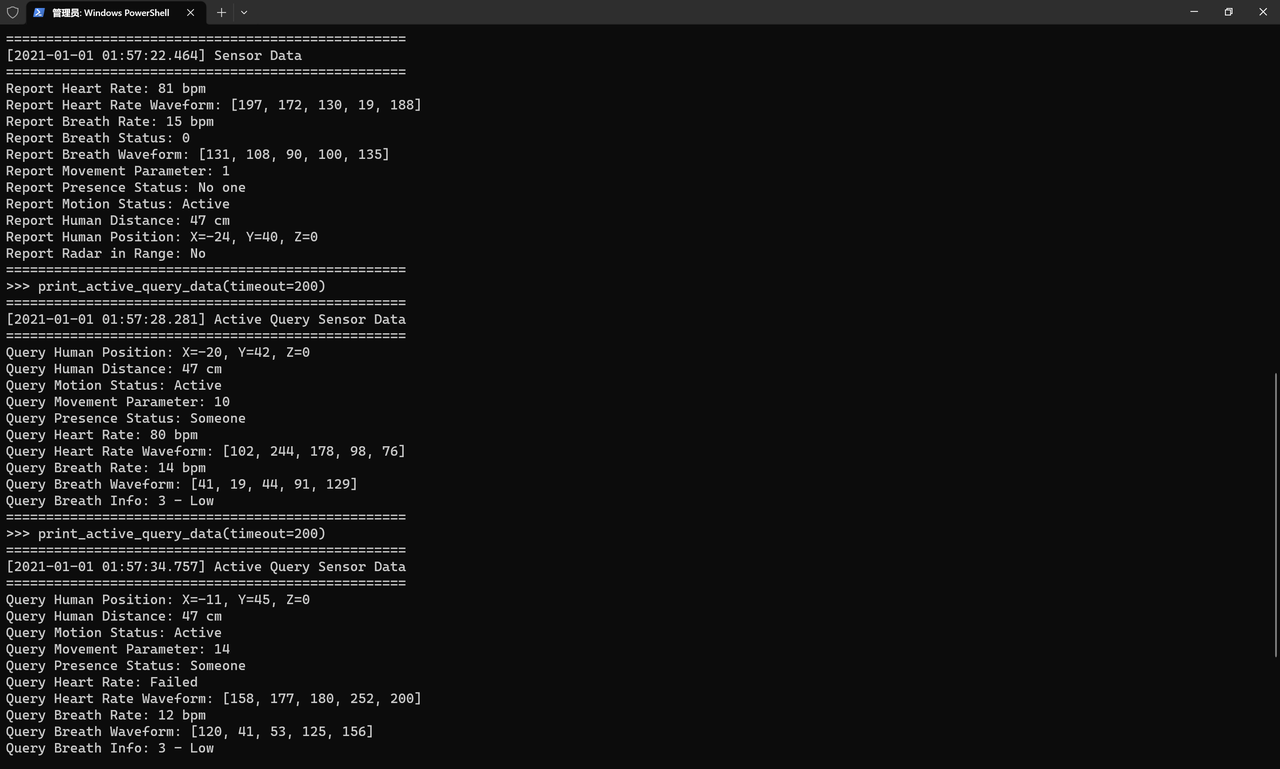
As you can see, the normal parsing works without issues:
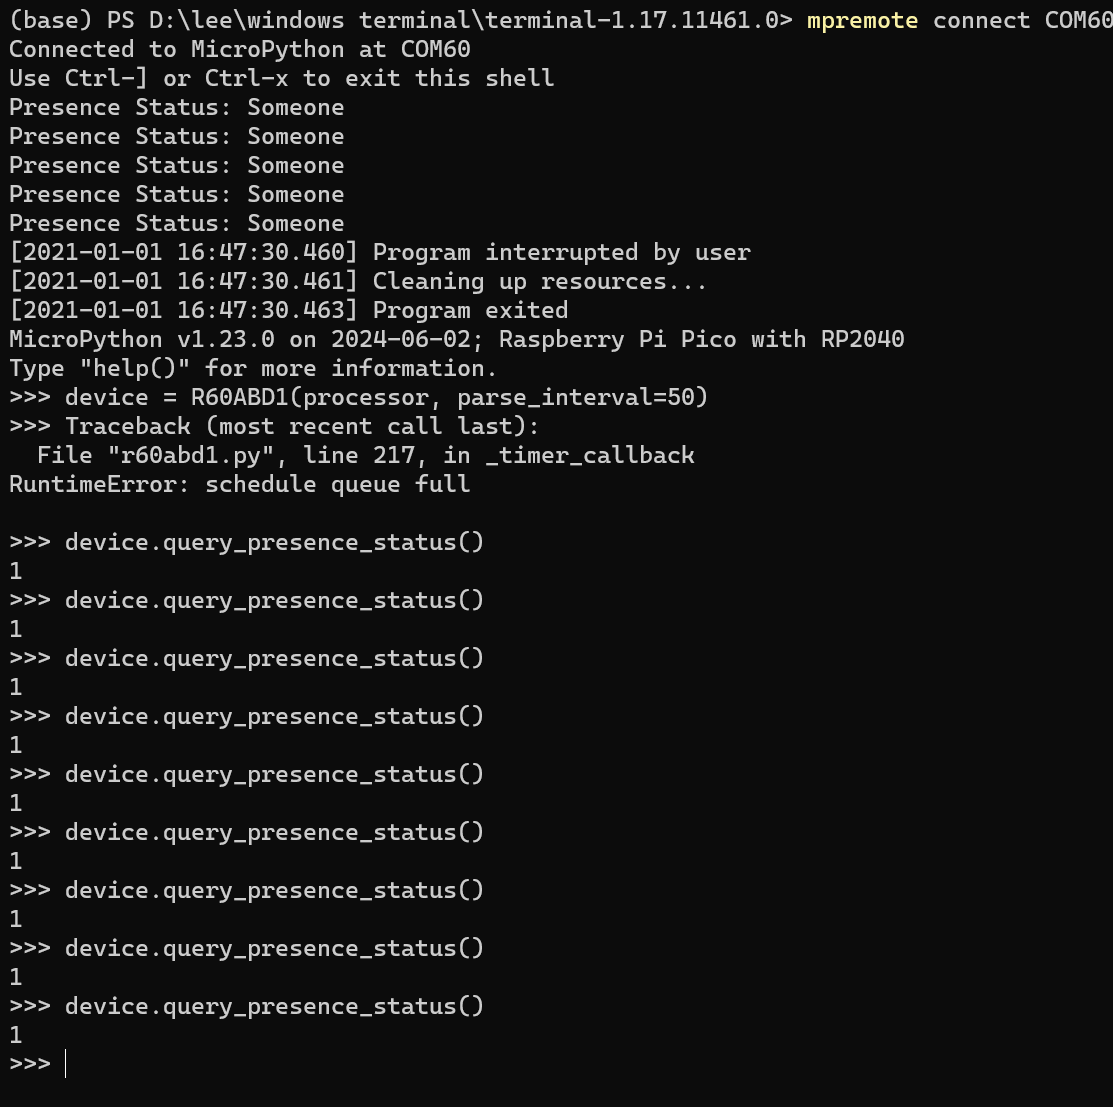
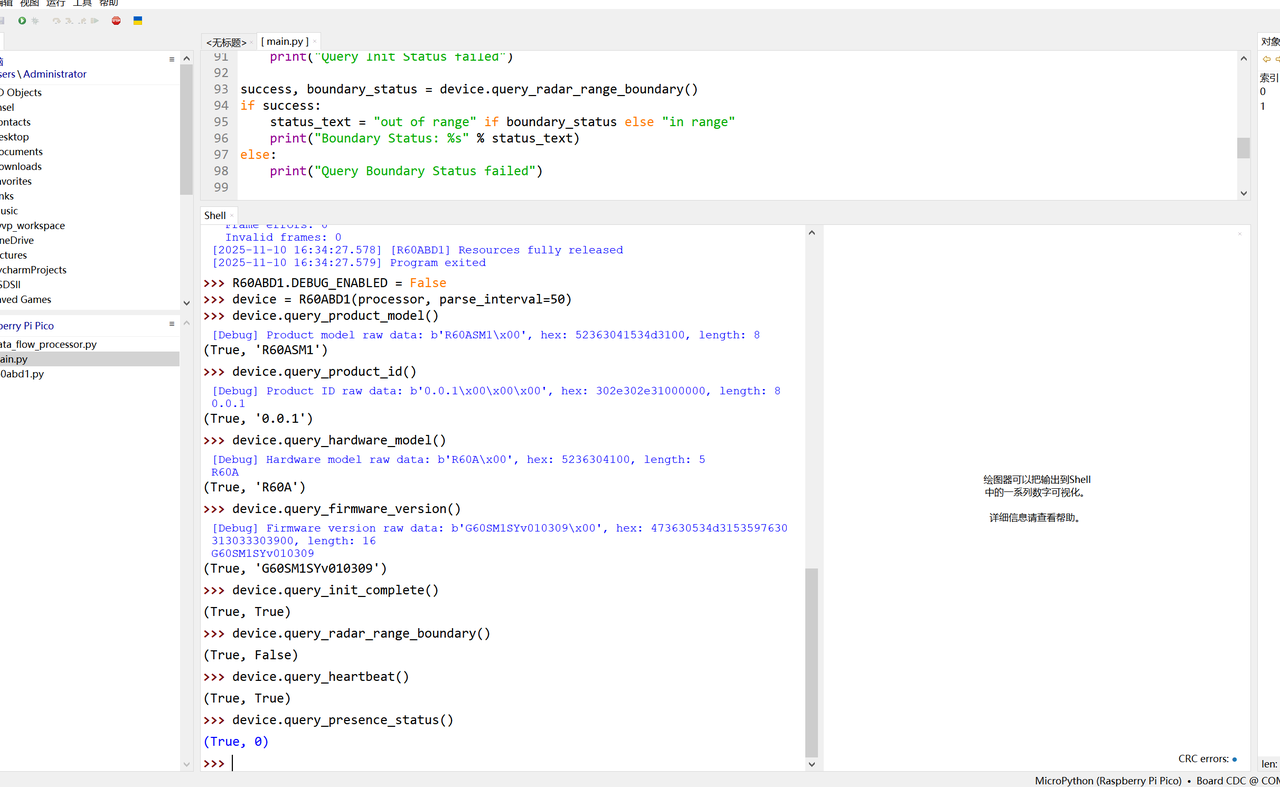
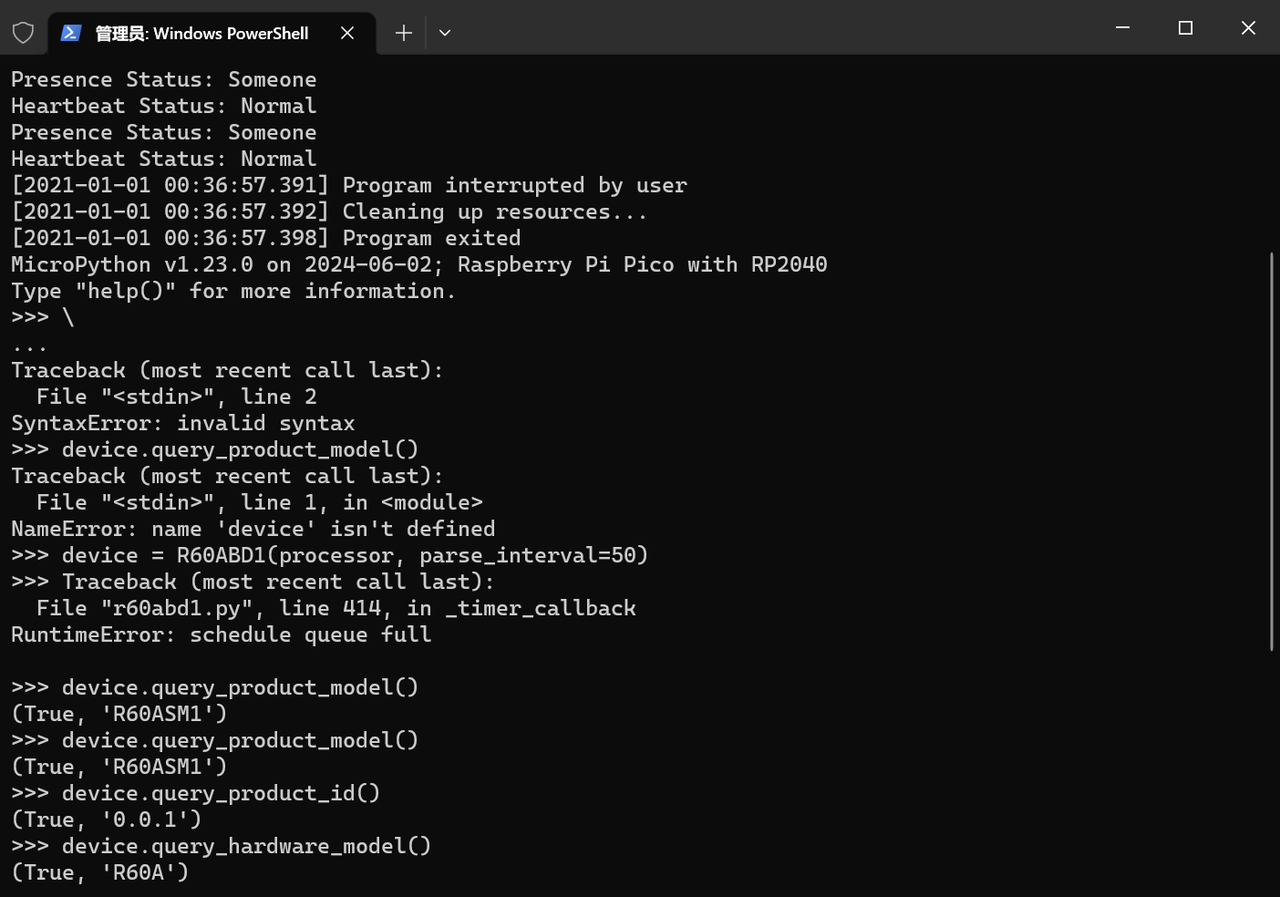
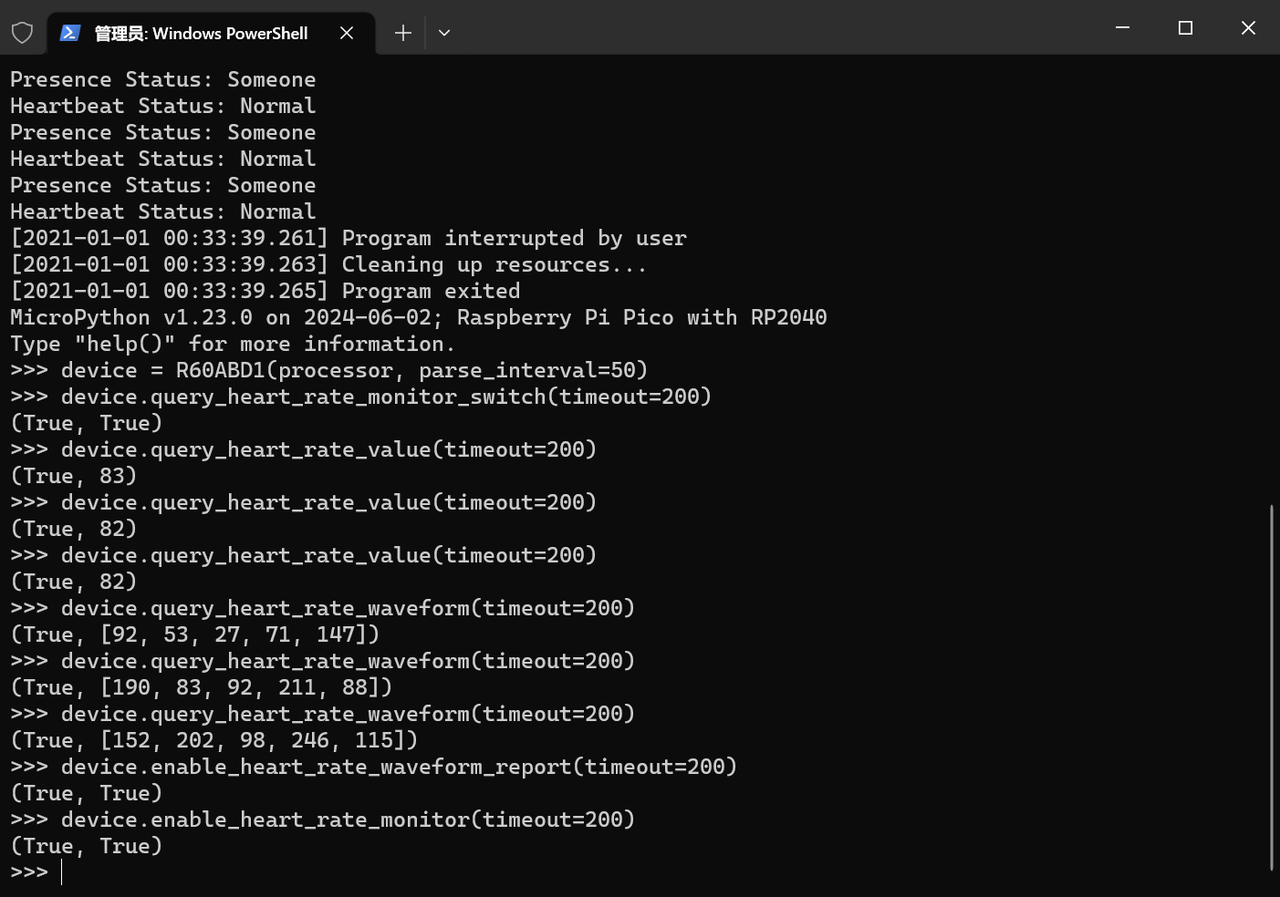
We disable the debug attribute, reflash the code, and press Ctrl+ C in advance to exit the main loop. The test results in the REPL are as follows:
3.3.6.6 Design of Class Attribute Constants: The Mapping Bridge Between Protocols and Services
In the R60ABD1 class, a large number of class attributes (such as TYPE_QUERY_HEARTBEAT, MOTION_STATIC, etc.) are not defined out of thin air, but rather the abstraction and encapsulation of the device Communication Protocol. These constants serve as a critical bridge connecting "underlying protocol values" and "upper-layer business logic", and their design aims to address the core issues in embedded device communication: "poor readability of protocol values and tight coupling between business logic and hardware":
Sources of Constants: The "Translation" of Device Protocols
The Communication Protocol of the millimeter-wave radar module (such as frame structure, status values, and command types) is usually defined in hexadecimal values (for example, 0x01 means "person detected", 0x80 means "presence information query command"). Directly using these values in the code will lead to:
Poor readability: if status == 0x01 cannot intuitively express the meaning of "occupied status";
Low maintainability: global modification of all hard-coded values is required when updating the protocol;
High error-proneness: Duplication or confusion of values may lead to logical errors.
Therefore, the essence of class attribute constants is to "translate" the values in the protocol into human-readable identifiers. For example:
In the protocol , 0x00 indicates "no motion" and is mapped to MOTION_NONE;
In the protocol , 0x81 indicates "an information query instruction exists", which is mapped to TYPE_QUERY_HUMAN_EXISTENCE_INFO.
Classification and Design Logic of Constants
By function, class attribute constants can be divided into two categories, both strictly following the principle of "one-to-one correspondence with protocols":
① Status value constants: Describe the service status of a device, and are used to define various statuses returned by the device (such as motion status, respiration status, sleep status, etc.), for example:
② Instruction type constants: Identify instructions for active interaction, which are used to define the types of all active query/control instructions (such as querying product model, enabling heart rate monitoring, etc.), for example:
The core values of constants are as follows:
Decouple Services from Hardware: Isolate protocol details via constants, so that business logic does not need to directly process hexadecimal values, thus reducing reliance on hardware protocols;
Improving code maintainability: When updating the protocol, only the mapping relationship between constants and values needs to be modified, and there is no need to adjust the business logic code;
Enhancing readability and collaboration efficiency: if status == MOTION_STATIC is if status == 0x01 more intuitive, facilitating team collaboration and later-stage debugging;
Reduce errors: avoid typos caused by hard-coded values (such as writing 0x0F incorrectly as 0xF0), and ensure logical correctness through the uniqueness of constant names.
3.3.6.7 Extension and Verification of Basic Instruction Query Methods
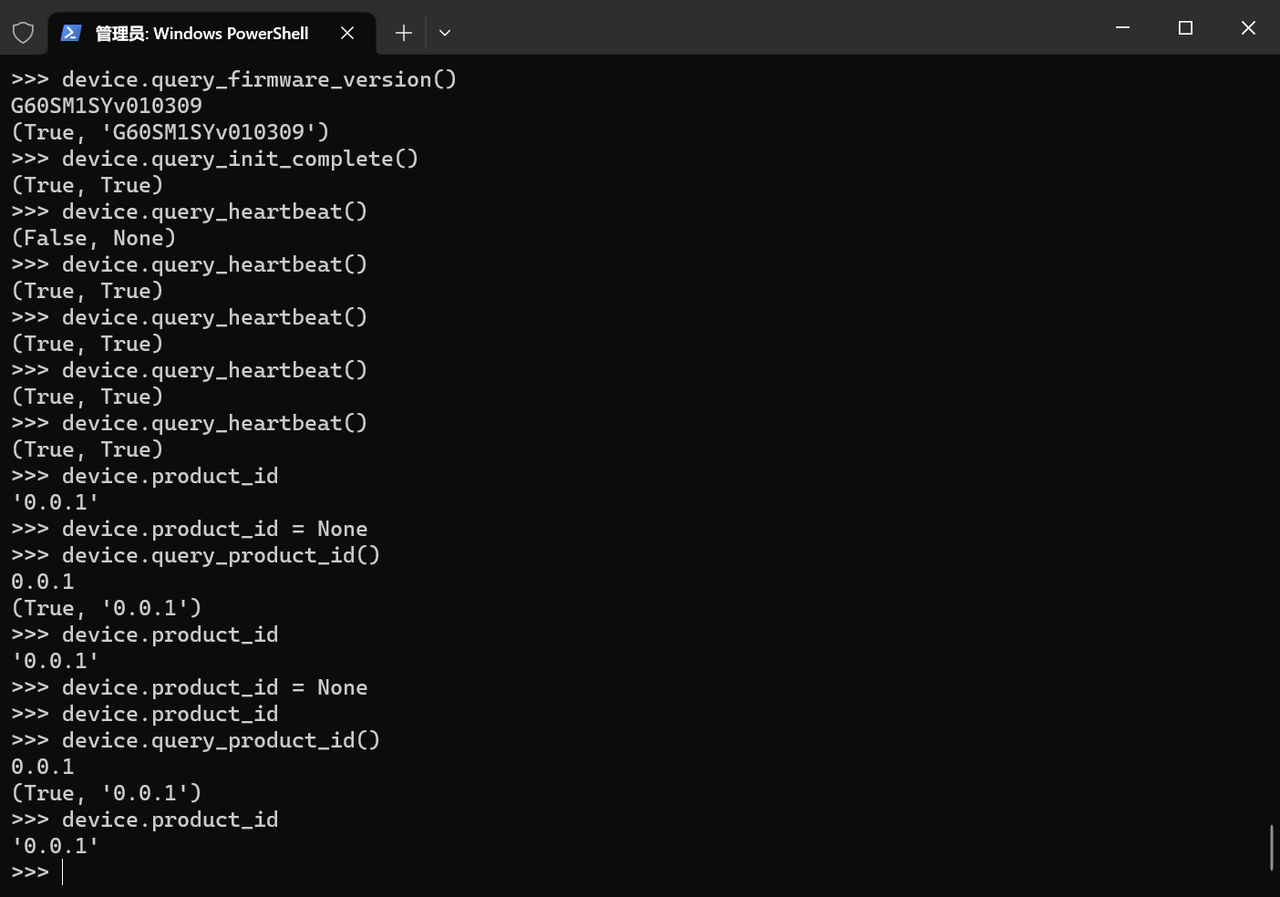
Within the overall framework of command response logic, targeting basic command scenarios including heartbeat monitoring, module reset, product information query, system initialization detection, and radar range diagnosis, we have extended a series of query methods. These methods follow the unified process of "status management → command construction → response waiting → attribute update", and realize the linkage between response frames and business attributes via update_properties_from_frame, so as to ensure the integrity and reliability of device interaction.
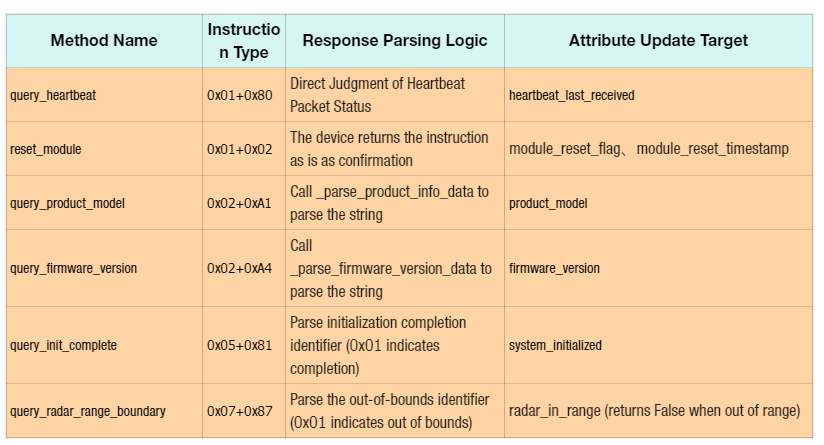
All basic instruction query methods are based on the architecture extension of query_presence_status, and the core differences are reflected in three dimensions: instruction type (control word + command word), response parsing logic, and attribute update target
方法名
指令类型
响应解析逻辑
属性更新目标
query_heartbeat
0x01+0x80
心跳包状态直接判断
heartbeat_last_received
reset_module
0x01+0x02
设备原样返回指令作为确认
module_reset_flag、module_reset_timestamp
query_product_model
0x02+0xA1
调用_parse_product_info_data解析字符串
product_model
query_firmware_version
0x02+0xA4
调用_parse_firmware_version_data解析字符串
firmware_version
query_init_complete
0x05+0x81
解析初始化完成标识(0x01为完成)
system_initialized
query_radar_range_boundary
0x07+0x87
解析越界标识(0x01为越界)
radar_in_range(越界则为False)
Taking query_heartbeat as an example, its core logic is "construct a heartbeat query instruction → wait for a response → update the heartbeat timestamp and query results", which avoids concurrent queries through state management to ensure the atomicity of instruction execution:
To support the query response of basic commands, it is necessary to add in update_properties_from_frame the command type matching and property update branch. Taking "heartbeat query response" and "product model query response" as examples, the linkage of "response frame → property → query result" is implemented:
def update_properties_from_frame(self, frame):
    control = frame['control_byte']
    command = frame['command_byte']
    data = frame['data']

    # 心跳查询响应:更新心跳时间戳与查询结果
    if control == 0x01 and command == 0x80:
        self.heartbeat_last_received = time.ticks_ms()
        if self._query_in_progress and self._current_query_type == self.TYPE_QUERY_HEARTBEAT:
            self._query_result = True
            self._query_response_received = True

    # 产品型号查询响应:解析字符串并更新产品型号属性
    elif control == 0x02 and command == 0xA1:
        product_info = self._parse_product_info_data(data)[0]
        self.product_model = product_info
        if self._query_in_progress and self._current_query_type == self.TYPE_QUERY_PRODUCT_MODEL:
            self._query_result = product_info
            self._query_response_received = True
    # ... 其他指令响应分支同理扩展 ...
Currently the complete code for the R60ABD1 class is shown below:
# Python env :
# -*- coding: utf-8 -*-
# @Time : 2025/11/4 下午5:35
# @Author : 李清水
# @File : r60abd1.py
# @Description :
from machine import Timer
import time
import micropython
def format_time():
"""格式化当前时间为 [YYYY-MM-DD HH:MM:SS.sss] 格式"""
t = time.localtime()
ms = time.ticks_ms() % 1000
return f"[{t[0]}-{t[1]:02d}-{t[2]:02d} {t[3]:02d}:{t[4]:02d}:{t[5]:02d}.{ms:03d}]"
# 计时装饰器,用于计算函数运行时间
def timed_function(f: callable, *args: tuple, **kwargs: dict) -> callable:
"""
计时装饰器,用于计算并打印函数/方法运行时间。
Args:
f (callable): 需要传入的函数/方法
args (tuple): 函数/方法 f 传入的任意数量的位置参数
kwargs (dict): 函数/方法 f 传入的任意数量的关键字参数
Returns:
callable: 返回计时后的函数
"""
myname = str(f).split(' ')[1]
def new_func(*args: tuple, **kwargs: dict) -> any:
t: int = time.ticks_us()
result = f(*args, **kwargs)
delta: int = time.ticks_diff(time.ticks_us(), t)
print('Function {} Time = {:6.3f}ms'.format(myname, delta / 1000))
return result
return new_func
class R60ABD1:
"""
R60ABD1雷达设备业务处理类
"""
# 是否启用调试
DEBUG_ENABLED = True
# R60ABD1雷达设备业务处理类中各种状态值和配置选项的常量
# 运动信息状态
MOTION_NONE, MOTION_STATIC, MOTION_ACTIVE = (0x00, 0x01, 0x02)
# 呼吸信息状态
BREATH_NORMAL, BREATH_HIGH, BREATH_LOW, BREATH_NONE = (0x01, 0x02, 0x03, 0x04)
# 床状态
BED_LEAVE, BED_ENTER, BED_NONE = (0x00, 0x01, 0x02)
# 睡眠状态
SLEEP_DEEP, SLEEP_LIGHT, SLEEP_AWAKE, SLEEP_NONE = (0x00, 0x01, 0x02, 0x03)
# 睡眠异常信息
SLEEP_ANOMALY_NONE, SLEEP_ANOMALY_SHORT, SLEEP_ANOMALY_LONG, SLEEP_ANOMALY_NO_PERSON = (0x03, 0x00, 0x01, 0x02)
# 睡眠质量级别
SLEEP_QUALITY_NONE, SLEEP_QUALITY_GOOD, SLEEP_QUALITY_NORMAL, SLEEP_QUALITY_POOR = (0x00, 0x01, 0x02, 0x03)
# 异常挣扎状态
STRUGGLE_NONE, STRUGGLE_NORMAL, STRUGGLE_ABNORMAL = (0x00, 0x01, 0x02)
# 无人计时状态
NO_PERSON_TIMING_NONE, NO_PERSON_TIMING_NORMAL, NO_PERSON_TIMING_ABNORMAL = (0x00, 0x01, 0x02)
# 挣扎状态判读灵敏度
SENSITIVITY_LOW, SENSITIVITY_MEDIUM, SENSITIVITY_HIGH = (0x00, 0x01, 0x02)
# R60ABD1雷达设备指令类型常量,用于标识不同的查询和控制操作
# 基础指令信息查询和设置类型
# 心跳包查询
TYPE_QUERY_HEARTBEAT = 0
# 模组复位指令
TYPE_MODULE_RESET = 1
# 产品型号查询
TYPE_QUERY_PRODUCT_MODEL = 2
# 产品 ID 查询
TYPE_QUERY_PRODUCT_ID = 3
# 硬件型号查询
TYPE_QUERY_HARDWARE_MODEL = 4
# 固件版本查询
TYPE_QUERY_FIRMWARE_VERSION = 5
# 初始化是否完成查询
TYPE_QUERY_INIT_COMPLETE = 6
# 雷达探测范围越界状态查询
TYPE_QUERY_RADAR_RANGE_BOUNDARY = 7
# 人体存在指令信息查询和设置类型
# 打开人体存在功能
TYPE_CONTROL_HUMAN_PRESENCE_ON = 8
# 关闭人体存在功能
TYPE_CONTROL_HUMAN_PRESENCE_OFF = 9
# 查询人体存在开关状态
TYPE_QUERY_HUMAN_PRESENCE_SWITCH = 10
# 存在信息查询
TYPE_QUERY_HUMAN_EXISTENCE_INFO = 11
# 运动信息查询
TYPE_QUERY_HUMAN_MOTION_INFO = 12
# 体动参数查询
TYPE_QUERY_HUMAN_BODY_MOTION_PARAM = 13
# 人体距离查询
TYPE_QUERY_HUMAN_DISTANCE = 14
# 人体方位查询
TYPE_QUERY_HUMAN_DIRECTION = 15
# 心率监测指令信息查询和设置类型
# 打开心率监测功能
TYPE_CONTROL_HEART_RATE_MONITOR_ON = 16
# 关闭心率监测功能
TYPE_CONTROL_HEART_RATE_MONITOR_OFF = 17
# 查询心率监测开关状态
TYPE_QUERY_HEART_RATE_MONITOR_SWITCH = 18
# 打开心率波形上报开关
TYPE_CONTROL_HEART_RATE_WAVEFORM_REPORT_ON = 19
# 关闭心率波形上报开关
TYPE_CONTROL_HEART_RATE_WAVEFORM_REPORT_OFF = 20
# 查询心率波形上报开关状态
TYPE_QUERY_HEART_RATE_WAVEFORM_REPORT_SWITCH = 21
# 心率数值查询
TYPE_QUERY_HEART_RATE_VALUE = 22
# 心率波形查询
TYPE_QUERY_HEART_RATE_WAVEFORM = 23
# 呼吸监测指令信息查询和设置类型
# 打开呼吸监测功能
TYPE_CONTROL_BREATH_MONITOR_ON = 24
# 关闭呼吸监测功能
TYPE_CONTROL_BREATH_MONITOR_OFF = 25
# 查询呼吸监测开关状态
TYPE_QUERY_BREATH_MONITOR_SWITCH = 26
# 设置低缓呼吸判读阈值
TYPE_SET_LOW_BREATH_THRESHOLD = 27
# 查询低缓呼吸判读阈值
TYPE_QUERY_LOW_BREATH_THRESHOLD = 28
# 呼吸信息查询
TYPE_QUERY_BREATH_INFO = 29
# 呼吸数值查询
TYPE_QUERY_BREATH_VALUE = 30
# 打开呼吸波形上报开关
TYPE_CONTROL_BREATH_WAVEFORM_REPORT_ON = 31
# 关闭呼吸波形上报开关
TYPE_CONTROL_BREATH_WAVEFORM_REPORT_OFF = 32
# 查询呼吸波形上报开关状态
TYPE_QUERY_BREATH_WAVEFORM_REPORT_SWITCH = 33
# 呼吸波形查询
TYPE_QUERY_BREATH_WAVEFORM = 34
# 睡眠监测指令信息查询和设置类型
# 打开睡眠监测功能
TYPE_CONTROL_SLEEP_MONITOR_ON = 35
# 关闭睡眠监测功能
TYPE_CONTROL_SLEEP_MONITOR_OFF = 36
# 查询睡眠监测开关状态
TYPE_QUERY_SLEEP_MONITOR_SWITCH = 37
# 打开异常挣扎状态监测
TYPE_CONTROL_ABNORMAL_STRUGGLE_ON = 38
# 关闭异常挣扎状态监测
TYPE_CONTROL_ABNORMAL_STRUGGLE_OFF = 39
# 查询异常挣扎状态开关
TYPE_QUERY_ABNORMAL_STRUGGLE_SWITCH = 40
# 查询异常挣扎状态
TYPE_QUERY_ABNORMAL_STRUGGLE_STATUS = 41
# 设置挣扎状态判读灵敏度
TYPE_SET_STRUGGLE_SENSITIVITY = 42
# 查询挣扎状态判读灵敏度
TYPE_QUERY_STRUGGLE_SENSITIVITY = 43
# 打开无人计时功能
TYPE_CONTROL_NO_PERSON_TIMING_ON = 44
# 关闭无人计时功能
TYPE_CONTROL_NO_PERSON_TIMING_OFF = 45
# 查询无人计时功能开关
TYPE_QUERY_NO_PERSON_TIMING_SWITCH = 46
# 设置无人计时时长
TYPE_SET_NO_PERSON_TIMING_DURATION = 47
# 查询无人计时时长
TYPE_QUERY_NO_PERSON_TIMING_DURATION = 48
# 设置睡眠截止时长
TYPE_SET_SLEEP_END_DURATION = 49
# 查询睡眠截止时长
TYPE_QUERY_SLEEP_END_DURATION = 50
# 入床/离床状态查询
TYPE_QUERY_BED_STATUS = 51
# 睡眠状态查询
TYPE_QUERY_SLEEP_STATUS = 52
# 清醒时长查询
TYPE_QUERY_AWAKE_DURATION = 53
# 浅睡时长查询
TYPE_QUERY_LIGHT_SLEEP_DURATION = 54
# 深睡时长查询
TYPE_QUERY_DEEP_SLEEP_DURATION = 55
# 睡眠质量评分查询
TYPE_QUERY_SLEEP_QUALITY_SCORE = 56
# 睡眠综合状态查询
TYPE_QUERY_SLEEP_COMPREHENSIVE_STATUS = 57
# 睡眠异常查询
TYPE_QUERY_SLEEP_ANOMALY = 58
# 睡眠统计查询
TYPE_QUERY_SLEEP_STATISTICS = 59
# 睡眠质量评级查询
TYPE_QUERY_SLEEP_QUALITY_LEVEL = 60
def __init__(self, data_processor, parse_interval=50,presence_enabled=True, heart_rate_enabled=True,
breath_monitoring_enabled=True, sleep_monitoring_enabled=True):
"""
初始化R60ABD1实例
Args:
data_processor: DataFlowProcessor实例
presence_enabled: 是否开启人体存在信息监测
heart_rate_enabled: 是否开启心率监测
breath_monitoring_enabled: 是否开启呼吸监测
sleep_monitoring_enabled: 是否开启睡眠监测
"""
if parse_interval > 200:
raise ValueError("parse_interval must be less than 200ms")
self.data_processor = data_processor
self.parse_interval = parse_interval
# 添加运行状态标志
self._is_running = False
# ============================ 1. 系统级属性 ============================
# 心跳包监控
self.heartbeat_last_received = 0 # 最后接收心跳包时间戳(ms)
self.heartbeat_timeout_count = 0 # 心跳超时累计次数
self.heartbeat_interval = 0 # 实际心跳间隔统计(ms)
# 系统状态
self.system_initialized = False # 初始化完成状态(True/False)
self.system_initialized_timestamp = 0 # 初始化完成时间戳(ms)
self.module_reset_flag = False # 模组复位状态标记
self.module_reset_timestamp = 0 # 模组复位时间戳(ms)
# 产品信息
self.product_model = "" # 产品型号(字符串)
self.product_id = "" # 产品ID(字符串)
self.hardware_model = "" # 硬件型号(字符串)
self.firmware_version = "" # 固件版本(字符串)
# ============================ 2. 雷达探测属性 ============================
# 位置状态
self.radar_in_range = False # 是否在探测范围内
# ============================ 3. 人体存在检测属性 ============================
# 基本状态
self.presence_enabled = presence_enabled # 人体存在功能开关
# 存在状态
self.presence_status = 0 # 0:无人, 1:有人
# 运动状态
self.motion_status = 0 # 0:无, 1:静止, 2:活跃
# 量化数据
self.movement_parameter = 0 # 体动参数(0-100)
self.human_distance = 0 # 人体距离(0-65535 cm)
self.human_position_x = 0 # X坐标(有符号)
self.human_position_y = 0 # Y坐标(有符号)
self.human_position_z = 0 # Z坐标(有符号)
# ============================ 4. 呼吸监测属性 ============================
# 功能配置
self.breath_monitoring_enabled = breath_monitoring_enabled # 呼吸监测开关
self.breath_waveform_enabled = False # 呼吸波形上报开关
self.low_breath_threshold = 10 # 低缓呼吸阈值(10-20次/min)
# 监测数据
self.breath_status = 0 # 1:正常, 2:过高, 3:过低, 4:无
self.breath_value = 0 # 呼吸数值(0-35次/分)
self.breath_waveform = [0, 0, 0, 0, 0] # 5个字节的波形数据
# ============================ 5. 心率监测属性 ============================
# 功能配置
self.heart_rate_enabled = heart_rate_enabled # 心率监测开关
self.heart_rate_waveform_enabled = False # 心率波形上报开关
# 监测数据
self.heart_rate_value = 0 # 心率数值(60-120)
self.heart_rate_waveform = [0, 0, 0, 0, 0] # 5个字节的波形数据
# ============================ 6. 睡眠监测属性 ============================
# 基础状态
self.sleep_monitoring_enabled = sleep_monitoring_enabled # 睡眠监测开关
self.bed_status = 0 # 0:离床, 1:入床, 2:无
self.sleep_status = 0 # 0:深睡, 1:浅睡, 2:清醒, 3:无
# 时长统计
self.awake_duration = 0 # 清醒时长(分钟)
self.light_sleep_duration = 0 # 浅睡时长(分钟)
self.deep_sleep_duration = 0 # 深睡时长(分钟)
# 睡眠质量
self.sleep_quality_score = 0 # 睡眠质量评分(0-100)
self.sleep_quality_rating = 0 # 睡眠质量评级
# 综合状态
self.sleep_comprehensive_status = {} # 包含8个字段的字典
self.sleep_anomaly = 0 # 睡眠异常状态
self.abnormal_struggle_status = 0 # 异常挣扎状态
self.no_person_timing_status = 0 # 无人计时状态
# 配置参数
self.abnormal_struggle_enabled = False # 异常挣扎开关
self.no_person_timing_enabled = False # 无人计时开关
self.no_person_timing_duration = 30 # 无人计时时长
self.sleep_cutoff_duration = 120 # 睡眠截止时长
self.struggle_sensitivity = 1 # 挣扎灵敏度
# 查询状态管理
self._query_in_progress = False # 是否有查询在进行中
self._query_response_received = False # 是否收到查询响应
self._query_result = None # 查询结果
self._current_query_type = None # 当前查询类型
self._query_timeout = 200 # 默认查询超时时间(ms)
self.timer = Timer(-1)
self._start_timer()
def _start_timer(self):
"""启动定时器"""
self._is_running = True
self.timer.init(period=self.parse_interval, mode=Timer.PERIODIC, callback=self._timer_callback)
def _timer_callback(self, timer):
"""
定时器回调函数,定期解析数据帧
Args:
timer: 定时器实例
"""
if not self._is_running:
return
# 调用DataFlowProcessor的解析方法
frames = self.data_processor.read_and_parse()
# 对每个解析到的帧使用micropython.schedule进行异步处理
for frame in frames:
# 使用micropython.schedule安全地调用属性更新方法
micropython.schedule(self.update_properties_from_frame, frame)
def _calculate_crc(self, data_bytes):
"""
计算CRC校验码
校验码计算:帧头+控制字+命令字+长度标识+数据 求和后,取低八位
Args:
data_bytes: 字节序列或字节数组
Returns:
int: CRC校验码
"""
return sum(data_bytes) & 0xFF
def _parse_human_position_data(self, data_bytes):
"""
解析人体方位数据 (6字节: X(2B), Y(2B), Z(2B))
位置信息有正负:16位数据,最高位为符号位,剩余15位为数据位
Returns:
tuple: (x, y, z) 坐标值,单位cm
"""
if len(data_bytes) != 6:
return (0, 0, 0)
x = self._parse_signed_16bit_special(data_bytes[0:2])
y = self._parse_signed_16bit_special(data_bytes[2:4])
z = self._parse_signed_16bit_special(data_bytes[4:6])
return (x, y, z)
def _parse_signed_16bit_special(self, two_bytes):
"""
解析有符号16位数据(特殊格式:首位符号位 + 后15位数值位)
最高位为符号位,0=正数,1=负数,剩余15位为数值
Args:
two_bytes: 2字节的字节序列(大端序)
Returns:
int: 有符号16位整数
"""
if len(two_bytes) != 2:
return 0
# 组合成16位无符号整数(大端序)
unsigned_value = (two_bytes[0] << 8) | two_bytes[1]
# 提取符号位和数值
sign_bit = (unsigned_value >> 15) & 0x1 # 最高位为符号位
magnitude = unsigned_value & 0x7FFF # 低15位为数值
# 根据符号位确定正负
if sign_bit == 1: # 负数
return -magnitude
else: # 正数
return magnitude
def _parse_heart_rate_waveform_data(self, data_bytes):
"""
解析心率波形数据 (5字节)
5个字节代表实时1s内5个数值,波形为正弦波数据,中轴线为128
Returns:
tuple: 5个波形数据值 (v1, v2, v3, v4, v5),数值范围0-255
"""
if len(data_bytes) != 5:
return (128, 128, 128, 128, 128)
return (
data_bytes[0],
data_bytes[1],
data_bytes[2],
data_bytes[3],
data_bytes[4]
)
def _parse_sleep_comprehensive_data(self, data_bytes):
"""
解析睡眠综合状态数据 (8字节)
Returns:
tuple: (存在, 睡眠状态, 平均呼吸, 平均心跳, 翻身次数, 大幅度体动占比, 小幅度体动占比, 呼吸暂停次数)
"""
if len(data_bytes) != 8:
return (0, 0, 0, 0, 0, 0, 0, 0)
return (
data_bytes[0], # 存在: 1有人 0无人
data_bytes[1], # 睡眠状态: 3离床 2清醒 1浅睡 0深睡
data_bytes[2], # 平均呼吸: 10分钟内检测的平均值
data_bytes[3], # 平均心跳: 10分钟内检测的平均值
data_bytes[4], # 翻身次数: 处于浅睡或深睡的翻身次数
data_bytes[5], # 大幅度体动占比: 0~100
data_bytes[6], # 小幅度体动占比: 0~100
data_bytes[7] # 呼吸暂停次数: 10分钟呼吸暂停次数
)
def _parse_sleep_statistics_data(self, data_bytes):
"""
解析睡眠统计信息数据 (12字节)
Returns:
tuple: (睡眠质量评分, 睡眠总时长, 清醒时长占比, 浅睡时长占比, 深睡时长占比,
离床时长, 离床次数, 翻身次数, 平均呼吸, 平均心跳, 呼吸暂停次数)
"""
if len(data_bytes) != 12:
return (0, 0, 0, 0, 0, 0, 0, 0, 0, 0, 0)
# 解析2字节的睡眠总时长
total_sleep_duration = (data_bytes[1] << 8) | data_bytes[2]
return (
data_bytes[0], # 睡眠质量评分: 0~100
total_sleep_duration, # 睡眠总时长: 0~65535分钟
data_bytes[3], # 清醒时长占比: 0~100
data_bytes[4], # 浅睡时长占比: 0~100
data_bytes[5], # 深睡时长占比: 0~100
data_bytes[6], # 离床时长: 0~255
data_bytes[7], # 离床次数: 0~255
data_bytes[8], # 翻身次数: 0~255
data_bytes[9], # 平均呼吸: 0~25
data_bytes[10], # 平均心跳: 0~100
data_bytes[11] # 呼吸暂停次数: 0~10
)
def _parse_breath_waveform_data(self, data_bytes):
"""
解析呼吸波形数据 (5字节)
5个字节代表实时1s内5个数值,波形为正弦波数据,中轴线为128
Returns:
tuple: 5个波形数据值 (v1, v2, v3, v4, v5),数值范围0-255
"""
if len(data_bytes) != 5:
return (128, 128, 128, 128, 128)
return (
data_bytes[0],
data_bytes[1],
data_bytes[2],
data_bytes[3],
data_bytes[4]
)
def _parse_product_info_data(self, data_bytes):
"""
解析产品信息数据 (可变长度字符串)
正确处理包含空字节的字符串
"""
try:
if R60ABD1.DEBUG_ENABLED:
print(f"[Parse] Raw product data: {data_bytes}, hex: {data_bytes.hex()}")
# 找到第一个空字节的位置,截取有效部分
if b'\x00' in data_bytes:
# 找到第一个空字节,截取之前的部分
null_index = data_bytes.index(b'\x00')
valid_data = data_bytes[:null_index]
if R60ABD1.DEBUG_ENABLED:
print(f"[Parse] After null removal: {valid_data}, hex: {valid_data.hex()}")
else:
valid_data = data_bytes
# 解码为字符串 - 移除关键字参数
# MicroPython 的 decode 方法不支持 errors='ignore' 关键字参数
product_info = valid_data.decode('utf-8').strip()
if R60ABD1.DEBUG_ENABLED:
print(f"[Parse] Decoded product info: '{product_info}'")
return (product_info,)
except Exception as e:
# 如果解码失败,尝试其他方式
if R60ABD1.DEBUG_ENABLED:
print(f"[Parse] Product info parse error: {e}, data: {data_bytes}")
# 尝试使用 ascii 解码作为备选方案
try:
product_info = valid_data.decode('ascii').strip()
if R60ABD1.DEBUG_ENABLED:
print(f"[Parse] ASCII decoded product info: '{product_info}'")
return (product_info,)
except:
return ("",)
def _parse_firmware_version_data(self, data_bytes):
"""
解析固件版本数据 (可变长度字符串)
正确处理包含空字节的字符串
"""
try:
if R60ABD1.DEBUG_ENABLED:
print(f"[Parse] Raw firmware data: {data_bytes}, hex: {data_bytes.hex()}")
# 找到第一个空字节的位置,截取有效部分
if b'\x00' in data_bytes:
# 找到第一个空字节,截取之前的部分
null_index = data_bytes.index(b'\x00')
valid_data = data_bytes[:null_index]
if R60ABD1.DEBUG_ENABLED:
print(f"[Parse] After null removal: {valid_data}, hex: {valid_data.hex()}")
else:
valid_data = data_bytes
# 解码为字符串 - 移除关键字参数
version = valid_data.decode('utf-8').strip()
if R60ABD1.DEBUG_ENABLED:
print(f"[Parse] Decoded firmware version: '{version}'")
return (version,)
except Exception as e:
# 如果解码失败,尝试其他方式
if R60ABD1.DEBUG_ENABLED:
print(f"[Parse] Firmware version parse error: {e}, data: {data_bytes}")
# 尝试使用 ascii 解码作为备选方案
try:
version = valid_data.decode('ascii').strip()
if R60ABD1.DEBUG_ENABLED:
print(f"[Parse] ASCII decoded firmware version: '{version}'")
return (version,)
except:
return ("",)
def query_heartbeat(self, timeout=200):
"""
查询心跳包(阻塞式)
Args:
timeout: 超时时间,单位毫秒
Returns:
tuple: (查询状态, 心跳状态)
- 查询状态: True-查询成功, False-查询失败
- 心跳状态: True-心跳正常, False-心跳异常 (查询成功时有效)
"""
# 检查查询状态,避免多个查询同时进行
if self._query_in_progress:
if R60ABD1.DEBUG_ENABLED:
print("[Query] Another query in progress, aborting")
return False, None
try:
# 保存原始定时器状态并临时禁用定时器,避免数据竞争
original_running = self._is_running
self._is_running = False
# 设置查询状态标志
self._query_in_progress = True
self._query_response_received = False
self._query_result = None
self._current_query_type = R60ABD1.TYPE_QUERY_HEARTBEAT
# 构造心跳包查询指令帧
header = bytes([0x53, 0x59]) # 帧头
control = bytes([0x01]) # 控制字:系统指令
command = bytes([0x80]) # 命令字:心跳包查询
length = bytes([0x00, 0x01]) # 数据长度:1字节
data = bytes([0x0F]) # 固定数据
# 计算CRC校验码
crc_data = header + control + command + length + data
crc = self._calculate_crc(crc_data)
trailer = bytes([0x54, 0x43]) # 帧尾
query_frame = crc_data + bytes([crc]) + trailer
# 发送查询指令
self.data_processor.uart.write(query_frame)
if R60ABD1.DEBUG_ENABLED:
print("[Query] Heartbeat query sent")
# 打印发送的指令帧用于调试
frame_hex = ' '.join(['{:02X}'.format(b) for b in query_frame])
print(f"[Query] Sent frame: {frame_hex}")
# 等待设备响应
start_time = time.ticks_ms()
while not self._query_response_received:
# 检查是否超时
if time.ticks_diff(time.ticks_ms(), start_time) >= timeout:
if R60ABD1.DEBUG_ENABLED:
print("[Query] Heartbeat query timeout")
return False, None
# 短暂延迟避免过度占用CPU
time.sleep_us(100)
# 继续处理数据流,确保响应能被解析
frames = self.data_processor.read_and_parse()
for frame in frames:
self.update_properties_from_frame(frame)
# 返回查询结果:成功状态和心跳状态
return True, self._query_result
except Exception as e:
# 异常处理:打印错误信息并返回失败状态
if R60ABD1.DEBUG_ENABLED:
print(f"[Query] Heartbeat query error: {e}")
return False, None
finally:
# 清理查询状态,确保资源正确释放
self._query_in_progress = False
self._query_response_received = False
self._query_result = None
self._current_query_type = None
# 恢复定时器状态
try:
self._is_running = original_running
except NameError:
pass # 如果original_running未定义,保持当前状态
if R60ABD1.DEBUG_ENABLED:
print("[Query] Heartbeat query state reset")
def reset_module(self, timeout=500):
"""
模组复位(阻塞式)
Args:
timeout: 超时时间,单位毫秒(复位需要较长时间,默认500ms)
Returns:
bool: True-复位成功, False-复位失败
"""
if self._query_in_progress:
if R60ABD1.DEBUG_ENABLED:
print("[Query] Another query in progress, aborting")
return False
try:
# 保存原始定时器状态并临时禁用定时器
original_running = self._is_running
self._is_running = False
# 设置复位查询状态
self._query_in_progress = True
self._query_response_received = False
self._query_result = None
self._current_query_type = R60ABD1.TYPE_MODULE_RESET
# 构造模组复位指令帧
header = bytes([0x53, 0x59]) # 帧头
control = bytes([0x01]) # 控制字:系统指令
command = bytes([0x02]) # 命令字:模组复位
length = bytes([0x00, 0x01]) # 数据长度:1字节
data = bytes([0x0F]) # 固定数据
# 计算CRC校验码
crc_data = header + control + command + length + data
crc = self._calculate_crc(crc_data)
trailer = bytes([0x54, 0x43]) # 帧尾
query_frame = crc_data + bytes([crc]) + trailer
# 发送复位指令
self.data_processor.uart.write(query_frame)
if R60ABD1.DEBUG_ENABLED:
print("[Query] Module reset command sent")
frame_hex = ' '.join(['{:02X}'.format(b) for b in query_frame])
print(f"[Query] Sent frame: {frame_hex}")
# 等待复位响应(设备会原样返回指令作为确认)
start_time = time.ticks_ms()
while not self._query_response_received:
if time.ticks_diff(time.ticks_ms(), start_time) >= timeout:
if R60ABD1.DEBUG_ENABLED:
print("[Query] Module reset timeout")
return False
time.sleep_us(100)
frames = self.data_processor.read_and_parse()
for frame in frames:
self.update_properties_from_frame(frame)
# 返回复位结果
return self._query_result
except Exception as e:
if R60ABD1.DEBUG_ENABLED:
print(f"[Query] Module reset error: {e}")
return False
finally:
# 清理查询状态
self._query_in_progress = False
self._query_response_received = False
self._query_result = None
self._current_query_type = None
# 恢复定时器状态
try:
self._is_running = original_running
except NameError:
pass
if R60ABD1.DEBUG_ENABLED:
print("[Query] Module reset state reset")
def query_product_model(self, timeout=200):
"""
查询产品型号(阻塞式)
Args:
timeout: 超时时间,单位毫秒
Returns:
tuple: (查询状态, 产品型号)
- 查询状态: True-查询成功, False-查询失败
- 产品型号: 字符串 (查询成功时有效)
"""
if self._query_in_progress:
if R60ABD1.DEBUG_ENABLED:
print("[Query] Another query in progress, aborting")
return False, None
try:
# 保存原始定时器状态并临时禁用定时器
original_running = self._is_running
self._is_running = False
# 设置产品型号查询状态
self._query_in_progress = True
self._query_response_received = False
self._query_result = None
self._current_query_type = R60ABD1.TYPE_QUERY_PRODUCT_MODEL
# 构造产品型号查询指令帧
header = bytes([0x53, 0x59]) # 帧头
control = bytes([0x02]) # 控制字:产品信息
command = bytes([0xA1]) # 命令字:产品型号查询
length = bytes([0x00, 0x01]) # 数据长度:1字节
data = bytes([0x0F]) # 固定数据
# 计算CRC校验码
crc_data = header + control + command + length + data
crc = self._calculate_crc(crc_data)
trailer = bytes([0x54, 0x43]) # 帧尾
query_frame = crc_data + bytes([crc]) + trailer
# 发送查询指令
self.data_processor.uart.write(query_frame)
if R60ABD1.DEBUG_ENABLED:
print("[Query] Product model query sent")
frame_hex = ' '.join(['{:02X}'.format(b) for b in query_frame])
print(f"[Query] Sent frame: {frame_hex}")
# 等待产品型号响应
start_time = time.ticks_ms()
while not self._query_response_received:
if time.ticks_diff(time.ticks_ms(), start_time) >= timeout:
if R60ABD1.DEBUG_ENABLED:
print("[Query] Product model query timeout")
return False, None
time.sleep_us(100)
frames = self.data_processor.read_and_parse()
for frame in frames:
self.update_properties_from_frame(frame)
# 返回查询结果:成功状态和产品型号字符串
return True, self._query_result
except Exception as e:
if R60ABD1.DEBUG_ENABLED:
print(f"[Query] Product model query error: {e}")
return False, None
finally:
# 清理查询状态
self._query_in_progress = False
self._query_response_received = False
self._query_result = None
self._current_query_type = None
# 恢复定时器状态
try:
self._is_running = original_running
except NameError:
pass
if R60ABD1.DEBUG_ENABLED:
print("[Query] Product model query state reset")
def query_product_id(self, timeout=200):
"""
查询产品ID(阻塞式)
Args:
timeout: 超时时间,单位毫秒
Returns:
tuple: (查询状态, 产品ID)
- 查询状态: True-查询成功, False-查询失败
- 产品ID: 字符串 (查询成功时有效)
"""
if self._query_in_progress:
if R60ABD1.DEBUG_ENABLED:
print("[Query] Another query in progress, aborting")
return False, None
try:
original_running = self._is_running
self._is_running = False
self._query_in_progress = True
self._query_response_received = False
self._query_result = None
self._current_query_type = R60ABD1.TYPE_QUERY_PRODUCT_ID
# 构造产品ID查询指令
header = bytes([0x53, 0x59])
control = bytes([0x02])
command = bytes([0xA2])
length = bytes([0x00, 0x01])
data = bytes([0x0F])
crc_data = header + control + command + length + data
crc = self._calculate_crc(crc_data)
trailer = bytes([0x54, 0x43])
query_frame = crc_data + bytes([crc]) + trailer
self.data_processor.uart.write(query_frame)
if R60ABD1.DEBUG_ENABLED:
print("[Query] Product ID query sent")
frame_hex = ' '.join(['{:02X}'.format(b) for b in query_frame])
print(f"[Query] Sent frame: {frame_hex}")
# 等待响应
start_time = time.ticks_ms()
while not self._query_response_received:
if time.ticks_diff(time.ticks_ms(), start_time) >= timeout:
if R60ABD1.DEBUG_ENABLED:
print("[Query] Product ID query timeout")
return False, None
time.sleep_us(100)
frames = self.data_processor.read_and_parse()
for frame in frames:
self.update_properties_from_frame(frame)
return True, self._query_result
except Exception as e:
if R60ABD1.DEBUG_ENABLED:
print(f"[Query] Product ID query error: {e}")
return False, None
finally:
self._query_in_progress = False
self._query_response_received = False
self._query_result = None
self._current_query_type = None
try:
self._is_running = original_running
except NameError:
pass
if R60ABD1.DEBUG_ENABLED:
print("[Query] Product ID query state reset")
def query_hardware_model(self, timeout=200):
"""
查询硬件型号(阻塞式)
Args:
timeout: 超时时间,单位毫秒
Returns:
tuple: (查询状态, 硬件型号)
- 查询状态: True-查询成功, False-查询失败
- 硬件型号: 字符串 (查询成功时有效)
"""
if self._query_in_progress:
if R60ABD1.DEBUG_ENABLED:
print("[Query] Another query in progress, aborting")
return False, None
try:
original_running = self._is_running
self._is_running = False
self._query_in_progress = True
self._query_response_received = False
self._query_result = None
self._current_query_type = R60ABD1.TYPE_QUERY_HARDWARE_MODEL
# 构造硬件型号查询指令
header = bytes([0x53, 0x59])
control = bytes([0x02])
command = bytes([0xA3])
length = bytes([0x00, 0x01])
data = bytes([0x0F])
crc_data = header + control + command + length + data
crc = self._calculate_crc(crc_data)
trailer = bytes([0x54, 0x43])
query_frame = crc_data + bytes([crc]) + trailer
self.data_processor.uart.write(query_frame)
if R60ABD1.DEBUG_ENABLED:
print("[Query] Hardware model query sent")
frame_hex = ' '.join(['{:02X}'.format(b) for b in query_frame])
print(f"[Query] Sent frame: {frame_hex}")
# 等待响应
start_time = time.ticks_ms()
while not self._query_response_received:
if time.ticks_diff(time.ticks_ms(), start_time) >= timeout:
if R60ABD1.DEBUG_ENABLED:
print("[Query] Hardware model query timeout")
return False, None
time.sleep_us(100)
frames = self.data_processor.read_and_parse()
for frame in frames:
self.update_properties_from_frame(frame)
return True, self._query_result
except Exception as e:
if R60ABD1.DEBUG_ENABLED:
print(f"[Query] Hardware model query error: {e}")
return False, None
finally:
self._query_in_progress = False
self._query_response_received = False
self._query_result = None
self._current_query_type = None
try:
self._is_running = original_running
except NameError:
pass
if R60ABD1.DEBUG_ENABLED:
print("[Query] Hardware model query state reset")
def query_firmware_version(self, timeout=200):
"""
查询固件版本(阻塞式)
Args:
timeout: 超时时间,单位毫秒
Returns:
tuple: (查询状态, 固件版本)
- 查询状态: True-查询成功, False-查询失败
- 固件版本: 字符串 (查询成功时有效)
"""
if self._query_in_progress:
if R60ABD1.DEBUG_ENABLED:
print("[Query] Another query in progress, aborting")
return False, None
try:
original_running = self._is_running
self._is_running = False
self._query_in_progress = True
self._query_response_received = False
self._query_result = None
self._current_query_type = R60ABD1.TYPE_QUERY_FIRMWARE_VERSION
# 构造固件版本查询指令
header = bytes([0x53, 0x59])
control = bytes([0x02])
command = bytes([0xA4])
length = bytes([0x00, 0x01])
data = bytes([0x0F])
crc_data = header + control + command + length + data
crc = self._calculate_crc(crc_data)
trailer = bytes([0x54, 0x43])
query_frame = crc_data + bytes([crc]) + trailer
self.data_processor.uart.write(query_frame)
if R60ABD1.DEBUG_ENABLED:
print("[Query] Firmware version query sent")
frame_hex = ' '.join(['{:02X}'.format(b) for b in query_frame])
print(f"[Query] Sent frame: {frame_hex}")
# 等待响应
start_time = time.ticks_ms()
while not self._query_response_received:
if time.ticks_diff(time.ticks_ms(), start_time) >= timeout:
if R60ABD1.DEBUG_ENABLED:
print("[Query] Firmware version query timeout")
return False, None
time.sleep_us(100)
frames = self.data_processor.read_and_parse()
for frame in frames:
self.update_properties_from_frame(frame)
return True, self._query_result
except Exception as e:
if R60ABD1.DEBUG_ENABLED:
print(f"[Query] Firmware version query error: {e}")
return False, None
finally:
self._query_in_progress = False
self._query_response_received = False
self._query_result = None
self._current_query_type = None
try:
self._is_running = original_running
except NameError:
pass
if R60ABD1.DEBUG_ENABLED:
print("[Query] Firmware version query state reset")
def query_init_complete(self, timeout=200):
"""
查询初始化是否完成(阻塞式)
Args:
timeout: 超时时间,单位毫秒
Returns:
tuple: (查询状态, 初始化状态)
- 查询状态: True-查询成功, False-查询失败
- 初始化状态: True-已完成, False-未完成 (查询成功时有效)
"""
if self._query_in_progress:
if R60ABD1.DEBUG_ENABLED:
print("[Query] Another query in progress, aborting")
return False, None
try:
original_running = self._is_running
self._is_running = False
self._query_in_progress = True
self._query_response_received = False
self._query_result = None
self._current_query_type = R60ABD1.TYPE_QUERY_INIT_COMPLETE
# 构造初始化完成查询指令
header = bytes([0x53, 0x59])
control = bytes([0x05])
command = bytes([0x81])
length = bytes([0x00, 0x01])
data = bytes([0x0F])
crc_data = header + control + command + length + data
crc = self._calculate_crc(crc_data)
trailer = bytes([0x54, 0x43])
query_frame = crc_data + bytes([crc]) + trailer
self.data_processor.uart.write(query_frame)
if R60ABD1.DEBUG_ENABLED:
print("[Query] Init complete query sent")
frame_hex = ' '.join(['{:02X}'.format(b) for b in query_frame])
print(f"[Query] Sent frame: {frame_hex}")
# 等待响应
start_time = time.ticks_ms()
while not self._query_response_received:
if time.ticks_diff(time.ticks_ms(), start_time) >= timeout:
if R60ABD1.DEBUG_ENABLED:
print("[Query] Init complete query timeout")
return False, None
time.sleep_us(100)
frames = self.data_processor.read_and_parse()
for frame in frames:
self.update_properties_from_frame(frame)
return True, self._query_result
except Exception as e:
if R60ABD1.DEBUG_ENABLED:
print(f"[Query] Init complete query error: {e}")
return False, None
finally:
self._query_in_progress = False
self._query_response_received = False
self._query_result = None
self._current_query_type = None
try:
self._is_running = original_running
except NameError:
pass
if R60ABD1.DEBUG_ENABLED:
print("[Query] Init complete query state reset")
def query_radar_range_boundary(self, timeout=200):
"""
查询雷达探测范围越界状态(阻塞式)
Args:
timeout: 超时时间,单位毫秒
Returns:
tuple: (查询状态, 越界状态)
- 查询状态: True-查询成功, False-查询失败
- 越界状态: True-越界, False-正常范围内 (查询成功时有效)
"""
if self._query_in_progress:
if R60ABD1.DEBUG_ENABLED:
print("[Query] Another query in progress, aborting")
return False, None
try:
original_running = self._is_running
self._is_running = False
self._query_in_progress = True
self._query_response_received = False
self._query_result = None
self._current_query_type = R60ABD1.TYPE_QUERY_RADAR_RANGE_BOUNDARY
# 构造雷达探测范围查询指令
header = bytes([0x53, 0x59])
control = bytes([0x07])
command = bytes([0x87])
length = bytes([0x00, 0x01])
data = bytes([0x0F])
crc_data = header + control + command + length + data
crc = self._calculate_crc(crc_data)
trailer = bytes([0x54, 0x43])
query_frame = crc_data + bytes([crc]) + trailer
self.data_processor.uart.write(query_frame)
if R60ABD1.DEBUG_ENABLED:
print("[Query] Radar range boundary query sent")
frame_hex = ' '.join(['{:02X}'.format(b) for b in query_frame])
print(f"[Query] Sent frame: {frame_hex}")
# 等待响应
start_time = time.ticks_ms()
while not self._query_response_received:
if time.ticks_diff(time.ticks_ms(), start_time) >= timeout:
if R60ABD1.DEBUG_ENABLED:
print("[Query] Radar range boundary query timeout")
return False, None
time.sleep_us(100)
frames = self.data_processor.read_and_parse()
for frame in frames:
self.update_properties_from_frame(frame)
return True, self._query_result
except Exception as e:
if R60ABD1.DEBUG_ENABLED:
print(f"[Query] Radar range boundary query error: {e}")
return False, None
finally:
self._query_in_progress = False
self._query_response_received = False
self._query_result = None
self._current_query_type = None
try:
self._is_running = original_running
except NameError:
pass
if R60ABD1.DEBUG_ENABLED:
print("[Query] Radar range boundary query state reset")
def query_presence_status(self, timeout=200):
"""
查询存在信息状态(阻塞式)
Args:
timeout: 超时时间,单位毫秒
Returns:
tuple: (查询状态, 存在状态信息)
- 查询状态: True-查询成功, False-查询失败
- 存在状态信息: 0-无人, 1-有人 (查询成功时有效)
"""
# 检查是否已有查询在进行中
if self._query_in_progress:
if R60ABD1.DEBUG_ENABLED:
print("[Query] Another query in progress, aborting")
return False, None
try:
# 临时禁用定时器回调,避免竞争
original_running = self._is_running
self._is_running = False
# 设置查询状态
self._query_in_progress = True
self._query_response_received = False
self._query_result = None
self._current_query_type = R60ABD1.TYPE_QUERY_HUMAN_EXISTENCE_INFO
# 构造并发送查询指令
header = bytes([0x53, 0x59])
control = bytes([0x80])
command = bytes([0x81])
length = bytes([0x00, 0x01])
data = bytes([0x0F])
crc_data = header + control + command + length + data
crc = self._calculate_crc(crc_data)
trailer = bytes([0x54, 0x43])
query_frame = crc_data + bytes([crc]) + trailer
self.data_processor.uart.write(query_frame)
if R60ABD1.DEBUG_ENABLED:
print("[Query] Presence status query sent")
# 调试信息:打印发送的指令
frame_hex = ' '.join(['{:02X}'.format(b) for b in query_frame])
print(f"[Query] Sent frame: {frame_hex}")
# 等待响应
start_time = time.ticks_ms()
while not self._query_response_received:
# 检查超时
if time.ticks_diff(time.ticks_ms(), start_time) >= timeout:
if R60ABD1.DEBUG_ENABLED:
print("[Query] Presence status query timeout")
return False, None
# 短暂延迟,避免完全占用CPU
time.sleep_us(100)
# 继续处理数据流(确保响应能被解析)
frames = self.data_processor.read_and_parse()
for frame in frames:
self.update_properties_from_frame(frame)
# 返回查询结果
return True, self._query_result
except Exception as e:
if R60ABD1.DEBUG_ENABLED:
print(f"[Query] Presence status query error: {e}")
return False, None
finally:
# 重置所有查询状态
self._query_in_progress = False
self._query_response_received = False
self._query_result = None
self._current_query_type = None
# 安全地恢复定时器状态
try:
self._is_running = original_running
except NameError:
# 如果 original_running 未定义,保持定时器运行状态不变
pass
if R60ABD1.DEBUG_ENABLED:
print("[Query] Query state reset")
def update_properties_from_frame(self, frame):
"""
根据解析的帧更新属性值
Args:
frame: DataFlowProcessor解析后的帧数据字典
"""
control = frame['control_byte']
command = frame['command_byte']
data = frame['data']
# 心跳包 (0x01)
if control == 0x01:
# 心跳包上报
if command == 0x01:
self.heartbeat_last_received = time.ticks_ms()
if R60ABD1.DEBUG_ENABLED:
print("[Heartbeat] Received")
# 心跳包查询响应
elif command == 0x80:
# 更新心跳包最后接收时间
self.heartbeat_last_received = time.ticks_ms()
# 处理心跳包查询响应
if (self._query_in_progress and
self._current_query_type == R60ABD1.TYPE_QUERY_HEARTBEAT and
not self._query_response_received):
# 设置查询结果为心跳正常
self._query_result = True
self._query_response_received = True
if R60ABD1.DEBUG_ENABLED:
print("[Query] Heartbeat response received")
# 当前正在进行其他类型的查询,但收到了心跳包响应
elif self._query_in_progress and self._current_query_type != R60ABD1.TYPE_QUERY_HEARTBEAT:
if R60ABD1.DEBUG_ENABLED:
print(f"[Heartbeat] Unexpected query response during {self._current_query_type} query")
# 没有查询在进行,但收到了查询响应
elif not self._query_in_progress:
if R60ABD1.DEBUG_ENABLED:
print("[Heartbeat] Unsolicited query response")
# 模组复位响应
elif command == 0x02:
# 模组复位成功,设备原样返回指令作为确认
if (self._query_in_progress and
self._current_query_type == R60ABD1.TYPE_MODULE_RESET and
not self._query_response_received):
# 更新模组复位状态和时间戳
self.module_reset_flag = True
self.module_reset_timestamp = time.ticks_ms()
self._query_result = True # 复位成功
self._query_response_received = True
if R60ABD1.DEBUG_ENABLED:
print("[Query] Module reset response received")
# 当前正在进行其他类型的查询,但收到了模组复位响应
elif self._query_in_progress and self._current_query_type != R60ABD1.TYPE_MODULE_RESET:
if R60ABD1.DEBUG_ENABLED:
print(f"[Reset] Unexpected query response during {self._current_query_type} query")
# 没有查询在进行,但收到了查询响应
elif not self._query_in_progress:
if R60ABD1.DEBUG_ENABLED:
print("[Reset] Unsolicited query response")
# 产品信息指令 (0x02)
elif control == 0x02:
# 产品型号查询响应
if command == 0xA1:
if data:
# 解析产品型号数据
product_info = self._parse_product_info_data(data)[0]
# 更新产品型号属性
self.product_model = product_info
# 处理产品型号查询响应
if (self._query_in_progress and
self._current_query_type == R60ABD1.TYPE_QUERY_PRODUCT_MODEL and
not self._query_response_received):
# 设置查询结果为产品型号字符串
self._query_result = product_info
self._query_response_received = True
if R60ABD1.DEBUG_ENABLED:
print(f"[Query] Product model response: {product_info}")
# 当前正在进行其他类型的查询,但收到了产品型号响应
elif self._query_in_progress and self._current_query_type != R60ABD1.TYPE_QUERY_PRODUCT_MODEL:
if R60ABD1.DEBUG_ENABLED:
print(
f"[Product Model] Unexpected query response during {self._current_query_type} query: {product_info}")
# 没有查询在进行,但收到了查询响应
elif not self._query_in_progress:
if R60ABD1.DEBUG_ENABLED:
print(f"[Product Model] Unsolicited query response: {product_info}")
# 产品ID查询响应
elif command == 0xA2:
if data:
# 解析产品ID数据
product_id = self._parse_product_info_data(data)[0]
# 更新产品ID属性
self.product_id = product_id
print(product_id)
# 处理产品ID查询响应
if (self._query_in_progress and
self._current_query_type == R60ABD1.TYPE_QUERY_PRODUCT_ID and
not self._query_response_received):
# 设置查询结果为产品ID字符串
self._query_result = product_id
self._query_response_received = True
if R60ABD1.DEBUG_ENABLED:
print(f"[Query] Product ID response: {product_id}")
# 当前正在进行其他类型的查询,但收到了产品ID响应
elif self._query_in_progress and self._current_query_type != R60ABD1.TYPE_QUERY_PRODUCT_ID:
if R60ABD1.DEBUG_ENABLED:
print(
f"[Product ID] Unexpected query response during {self._current_query_type} query: {product_id}")
# 没有查询在进行,但收到了查询响应
elif not self._query_in_progress:
if R60ABD1.DEBUG_ENABLED:
print(f"[Product ID] Unsolicited query response: {product_id}")
# 硬件型号查询响应
elif command == 0xA3:
if data:
# 解析硬件型号数据
hardware_model = self._parse_product_info_data(data)[0]
# 更新硬件型号属性
self.hardware_model = hardware_model
print(hardware_model)
# 处理硬件型号查询响应
if (self._query_in_progress and
self._current_query_type == R60ABD1.TYPE_QUERY_HARDWARE_MODEL and
not self._query_response_received):
# 设置查询结果为硬件型号字符串
self._query_result = hardware_model
self._query_response_received = True
if R60ABD1.DEBUG_ENABLED:
print(f"[Query] Hardware model response: {hardware_model}")
# 当前正在进行其他类型的查询,但收到了硬件型号响应
elif self._query_in_progress and self._current_query_type != R60ABD1.TYPE_QUERY_HARDWARE_MODEL:
if R60ABD1.DEBUG_ENABLED:
print(
f"[Hardware Model] Unexpected query response during {self._current_query_type} query: {hardware_model}")
# 没有查询在进行,但收到了查询响应
elif not self._query_in_progress:
if R60ABD1.DEBUG_ENABLED:
print(f"[Hardware Model] Unsolicited query response: {hardware_model}")
# 固件版本查询响应
elif command == 0xA4:
if data:
# 解析固件版本数据
firmware_version = self._parse_firmware_version_data(data)[0]
# 更新固件版本属性
self.firmware_version = firmware_version
print(firmware_version)
# 处理固件版本查询响应
if (self._query_in_progress and
self._current_query_type == R60ABD1.TYPE_QUERY_FIRMWARE_VERSION and
not self._query_response_received):
# 设置查询结果为固件版本字符串
self._query_result = firmware_version
self._query_response_received = True
if R60ABD1.DEBUG_ENABLED:
print(f"[Query] Firmware version response: {firmware_version}")
# 当前正在进行其他类型的查询,但收到了固件版本响应
elif self._query_in_progress and self._current_query_type != R60ABD1.TYPE_QUERY_FIRMWARE_VERSION:
if R60ABD1.DEBUG_ENABLED:
print(
f"[Firmware] Unexpected query response during {self._current_query_type} query: {firmware_version}")
# 没有查询在进行,但收到了查询响应
elif not self._query_in_progress:
if R60ABD1.DEBUG_ENABLED:
print(f"[Firmware] Unsolicited query response: {firmware_version}")
# 系统初始化状态 (0x05)
elif control == 0x05:
# 初始化完成信息
if command == 0x01:
if data and len(data) > 0:
self.system_initialized = (data[0] == 0x01)
self.system_initialized_timestamp = time.ticks_ms()
if R60ABD1.DEBUG_ENABLED:
status = "completed" if self.system_initialized else "not completed"
print(f"[System] Initialization {status}")
# 初始化完成查询响应
elif command == 0x81:
if data and len(data) > 0:
# 解析初始化状态:0x01表示已完成
init_status = (data[0] == 0x01)
# 更新系统初始化状态
self.system_initialized = init_status
# 处理初始化完成查询响应
if (self._query_in_progress and
self._current_query_type == R60ABD1.TYPE_QUERY_INIT_COMPLETE and
not self._query_response_received):
# 设置查询结果为初始化状态
self._query_result = init_status
self._query_response_received = True
if R60ABD1.DEBUG_ENABLED:
status_text = "completed" if init_status else "not completed"
print(f"[Query] Init complete response: {status_text}")
# 当前正在进行其他类型的查询,但收到了初始化完成响应
elif self._query_in_progress and self._current_query_type != R60ABD1.TYPE_QUERY_INIT_COMPLETE:
status_text = "completed" if init_status else "not completed"
if R60ABD1.DEBUG_ENABLED:
print(
f"[Init Complete] Unexpected query response during {self._current_query_type} query: {status_text}")
# 没有查询在进行,但收到了查询响应
elif not self._query_in_progress:
if R60ABD1.DEBUG_ENABLED:
status_text = "completed" if init_status else "not completed"
print(f"[Init Complete] Unsolicited query response: {status_text}")
# 雷达探测范围 (0x07)
elif control == 0x07:
# 位置越界状态上报
if command == 0x07:
if data and len(data) > 0:
self.radar_in_range = (data[0] == 0x01)
if R60ABD1.DEBUG_ENABLED:
status = "in range" if self.radar_in_range else "out of range"
print(f"[Radar] {status}")
# 位置越界状态查询响应
elif command == 0x87:
if data and len(data) > 0:
# 解析越界状态:0x01表示越界
boundary_status = (data[0] == 0x01)
# 更新雷达探测范围状态(越界表示不在范围内)
self.radar_in_range = not boundary_status
# 处理雷达探测范围查询响应
if (self._query_in_progress and
self._current_query_type == R60ABD1.TYPE_QUERY_RADAR_RANGE_BOUNDARY and
not self._query_response_received):
# 设置查询结果为越界状态(True表示越界)
self._query_result = boundary_status
self._query_response_received = True
if R60ABD1.DEBUG_ENABLED:
status_text = "out of range" if boundary_status else "in range"
print(f"[Query] Radar range boundary response: {status_text}")
# 当前正在进行其他类型的查询,但收到了雷达范围响应
elif self._query_in_progress and self._current_query_type != R60ABD1.TYPE_QUERY_RADAR_RANGE_BOUNDARY:
status_text = "out of range" if boundary_status else "in range"
if R60ABD1.DEBUG_ENABLED:
print(
f"[Radar Range] Unexpected query response during {self._current_query_type} query: {status_text}")
# 没有查询在进行,但收到了查询响应
elif not self._query_in_progress:
if R60ABD1.DEBUG_ENABLED:
status_text = "out of range" if boundary_status else "in range"
print(f"[Radar Range] Unsolicited query response: {status_text}")
# 人体存在检测 (0x80)
elif control == 0x80:
if command == 0x01: # 存在信息
if data and len(data) > 0:
self.presence_status = data[0]
if R60ABD1.DEBUG_ENABLED:
status_text = "No one" if self.presence_status == 0 else "Someone"
print(f"[Presence] {status_text}")
elif command == 0x81: # 存在信息(查询响应)
if data and len(data) > 0:
presence_value = data[0]
# 更新属性
self.presence_status = presence_value
# 处理查询响应
# 情况1:当前正在进行存在信息查询,且尚未收到响应
if (self._query_in_progress and
self._current_query_type == R60ABD1.TYPE_QUERY_HUMAN_EXISTENCE_INFO and
not self._query_response_received):
self._query_result = presence_value
self._query_response_received = True
if R60ABD1.DEBUG_ENABLED:
status_text = "No one" if presence_value == 0 else "Someone"
print(f"[Query] Presence status response: {status_text}")
# 情况2:当前正在进行其他类型的查询,但收到了存在信息响应
elif self._query_in_progress and self._current_query_type != R60ABD1.TYPE_QUERY_HUMAN_EXISTENCE_INFO:
status_text = "No one" if presence_value == 0 else "Someone"
print(f"[Presence] Unexpected query response during {self._current_query_type} query: {status_text}")
# 情况3:没有查询在进行,但收到了查询响应
elif not self._query_in_progress:
if R60ABD1.DEBUG_ENABLED:
status_text = "No one" if presence_value == 0 else "Someone"
print(f"[Presence] Unsolicited query response: {status_text}")
# 情况4:其他情况(理论上不应该到达这里)
else:
if R60ABD1.DEBUG_ENABLED:
status_text = "No one" if presence_value == 0 else "Someone"
print(f"[Presence] Unexpected state in query response handling, query response: {status_text}")
elif command == 0x02: # 运动信息
if data and len(data) > 0:
self.motion_status = data[0]
if R60ABD1.DEBUG_ENABLED:
status_text = ["No motion", "Static", "Active"][
self.motion_status] if self.motion_status < 3 else "Unknown"
print(f"[Motion] {status_text}")
elif command == 0x03: # 体动参数
if data and len(data) > 0:
self.movement_parameter = data[0]
if R60ABD1.DEBUG_ENABLED:
print(f"[Movement] Parameter: {self.movement_parameter}")
elif command == 0x04: # 人体距离
if data and len(data) >= 2:
self.human_distance = (data[0] << 8) | data[1]
if R60ABD1.DEBUG_ENABLED:
print(f"[Distance] {self.human_distance} cm")
elif command == 0x05: # 人体方位
if data and len(data) == 6:
x, y, z = self._parse_human_position_data(data)
self.human_position_x = x
self.human_position_y = y
self.human_position_z = z
if R60ABD1.DEBUG_ENABLED:
print(f"[Position] X={x}, Y={y}, Z={z}")
# 呼吸监测 (0x81)
elif control == 0x81:
if command == 0x01: # 呼吸状态
if data and len(data) > 0:
self.breath_status = data[0]
if R60ABD1.DEBUG_ENABLED:
status_text = ["Normal", "High", "Low", "None"][
self.breath_status - 1] if 1 <= self.breath_status <= 4 else "Unknown"
print(f"[Breath] Status: {status_text}")
elif command == 0x02: # 呼吸数值
if data and len(data) > 0:
self.breath_value = data[0]
if R60ABD1.DEBUG_ENABLED:
print(f"[Breath] Value: {self.breath_value}")
elif command == 0x05: # 呼吸波形
if data and len(data) == 5:
waveform = self._parse_breath_waveform_data(data)
self.breath_waveform = list(waveform)
if R60ABD1.DEBUG_ENABLED:
print(f"[Breath] Waveform updated: {waveform}")
# 心率监测 (0x85)
elif control == 0x85:
if command == 0x02: # 心率数值
if data and len(data) > 0:
self.heart_rate_value = data[0]
if R60ABD1.DEBUG_ENABLED:
print(f"[Heart Rate] Value: {self.heart_rate_value}")
elif command == 0x05: # 心率波形
if data and len(data) == 5:
waveform = self._parse_heart_rate_waveform_data(data)
self.heart_rate_waveform = list(waveform)
if R60ABD1.DEBUG_ENABLED:
print(f"[Heart Rate] Waveform updated: {waveform}")
# 睡眠监测 (0x84)
elif control == 0x84:
if command == 0x01: # 入床/离床状态
if data and len(data) > 0:
self.bed_status = data[0]
if R60ABD1.DEBUG_ENABLED:
status_text = ["Leave bed", "Enter bed", "None"][
self.bed_status] if self.bed_status < 3 else "Unknown"
print(f"[Bed] Status: {status_text}")
elif command == 0x02: # 睡眠状态
if data and len(data) > 0:
self.sleep_status = data[0]
if R60ABD1.DEBUG_ENABLED:
status_text = ["Deep sleep", "Light sleep", "Awake", "None"][
self.sleep_status] if self.sleep_status < 4 else "Unknown"
print(f"[Sleep] Status: {status_text}")
elif command == 0x03: # 清醒时长
if data and len(data) >= 2:
self.awake_duration = (data[0] << 8) | data[1]
if R60ABD1.DEBUG_ENABLED:
print(f"[Sleep] Awake duration: {self.awake_duration} min")
elif command == 0x04: # 浅睡时长
if data and len(data) >= 2:
self.light_sleep_duration = (data[0] << 8) | data[1]
if R60ABD1.DEBUG_ENABLED:
print(f"[Sleep] Light sleep duration: {self.light_sleep_duration} min")
elif command == 0x05: # 深睡时长
if data and len(data) >= 2:
self.deep_sleep_duration = (data[0] << 8) | data[1]
if R60ABD1.DEBUG_ENABLED:
print(f"[Sleep] Deep sleep duration: {self.deep_sleep_duration} min")
elif command == 0x06: # 睡眠质量评分
if data and len(data) > 0:
self.sleep_quality_score = data[0]
if R60ABD1.DEBUG_ENABLED:
print(f"[Sleep] Quality score: {self.sleep_quality_score}")
elif command == 0x0C: # 睡眠综合状态
if data and len(data) == 8:
comprehensive_data = self._parse_sleep_comprehensive_data(data)
# 更新到字典属性
self.sleep_comprehensive_status = {
'presence': comprehensive_data[0],
'sleep_status': comprehensive_data[1],
'avg_breath': comprehensive_data[2],
'avg_heart_rate': comprehensive_data[3],
'turnover_count': comprehensive_data[4],
'large_movement_ratio': comprehensive_data[5],
'small_movement_ratio': comprehensive_data[6],
'apnea_count': comprehensive_data[7]
}
if R60ABD1.DEBUG_ENABLED:
print(f"[Sleep] Comprehensive status updated")
elif command == 0x0D: # 睡眠质量分析/统计信息
if data and len(data) == 12:
stats_data = self._parse_sleep_statistics_data(data)
# 更新对应的睡眠统计属性
self.sleep_quality_score = stats_data[0]
if R60ABD1.DEBUG_ENABLED:
# 注意:stats_data[1]是总睡眠时长,需要根据实际情况决定如何分配
print(f"[Sleep] Statistics updated")
elif command == 0x0E: # 睡眠异常
if data and len(data) > 0:
self.sleep_anomaly = data[0]
if R60ABD1.DEBUG_ENABLED:
status_text = ["Short sleep (<4h)", "Long sleep (>12h)", "No person anomaly", "Normal"][
self.sleep_anomaly] if self.sleep_anomaly < 4 else "Unknown"
print(f"[Sleep] Anomaly: {status_text}")
elif command == 0x10: # 睡眠质量评级
if data and len(data) > 0:
self.sleep_quality_rating = data[0]
if R60ABD1.DEBUG_ENABLED:
status_text = ["None", "Good", "Normal", "Poor"][
self.sleep_quality_rating] if self.sleep_quality_rating < 4 else "Unknown"
print(f"[Sleep] Quality rating: {status_text}")
elif command == 0x11: # 异常挣扎状态
if data and len(data) > 0:
self.abnormal_struggle_status = data[0]
if R60ABD1.DEBUG_ENABLED:
status_text = ["None", "Normal", "Abnormal"][
self.abnormal_struggle_status] if self.abnormal_struggle_status < 3 else "Unknown"
print(f"[Sleep] Struggle status: {status_text}")
elif command == 0x12: # 无人计时状态
if data and len(data) > 0:
self.no_person_timing_status = data[0]
if R60ABD1.DEBUG_ENABLED:
status_text = ["None", "Normal", "Abnormal"][
self.no_person_timing_status] if self.no_person_timing_status < 3 else "Unknown"
print(f"[Sleep] No person timing: {status_text}")
def close(self):
"""
停止定时器,解析剩余数据帧,输出统计信息
"""
# 停止定时器
self._is_running = False
self.timer.deinit()
# 是否有查询在进行中
self._query_in_progress = False
# 是否收到查询响应
self._query_response_received = False
# 查询结果
self._query_result = None
# 当前查询类型
self._current_query_type = None
# 解析剩余数据帧
try:
frames = self.data_processor.read_and_parse()
for frame in frames:
self.update_properties_from_frame(frame)
except Exception as e:
raise Exception(f"Failed to deinitialize timer: {str(e)}")
# 获取并输出统计信息
try:
stats = self.data_processor.get_stats()
if R60ABD1.DEBUG_ENABLED:
print(" [R60ABD1] Final statistics: %s" % format_time())
print(" Total bytes received: %d" % stats['total_bytes_received'])
print(" Total frames parsed: %d" % stats['total_frames_parsed'])
print(" CRC errors: %d" % stats['crc_errors'])
print(" Frame errors: %d" % stats['frame_errors'])
print(" Invalid frames: %d" % stats['invalid_frames'])
except Exception as e:
raise Exception(f"Failed to get statistics: {str(e)}")
# 清空缓冲区
try:
self.data_processor.clear_buffer()
except Exception as e:
raise Exception(f"Failed to clear buffer: {str(e)}")
if R60ABD1.DEBUG_ENABLED:
print("%s [R60ABD1] Resources fully released" % format_time())
The code of the main. py file corresponding to the relevant test is shown below:
To verify the usability of the function, we first disable the active reporting features for human presence, heart rate, respiration and sleep before conducting the test.
In REPL, call the following methods in sequence: query_product_model, query_heartbeat, query_radar_range_boundary, and verify that the returned results are consistent with the actual device status (e. g., query_product_model returns R60ASM1, query_heartbeat returns (True, True)).
Then enable all active reporting functions, and call query_firmware_version and other query methods at the same time to verify whether the passive response data frames can be processed correctly when there are multiple active reporting data:
Observe main. py output, verify that the actively reported data (such as heart rate waveform, respiratory status) is parsed normally, and meanwhile confirm that the query command can return correct results (such as firmware version G60SM1SYv010309).
3.3.7 Reconstruction of the Business-Driven Layer: Frame Encapsulation, Instruction Decoupling and Response Unification
As radar functions have been gradually enriched (ranging from basic heartbeat monitoring to multi-dimensional monitoring such as human presence, heart rate, respiration, and sleep), the original business-driven code structure has gradually exposed its shortcomings: the frame construction logic is repeated in dozens of query/setting methods, the instruction types are strongly coupled with underlying protocol values (control words, command words), and there is a large amount of redundancy in the response processing logic of different instructions. These problems have led to a sharp increase in code maintenance costs — adding a new instruction requires repeatedly writing frame construction and response processing code, and modifying protocol parameters requires globally searching for hard-coded hexadecimal values, which is extremely prone to omissions or errors.
To address the above issues, we adopt a three-layer refactoring strategy of " unified frame encapsulation + instruction mapping decoupling + response logic normalization ", which upgrades the business-driven layer from "procedural piling" to "Modularization design", significantly improving the maintainability, scalability and reliability of the code.
3.3.7.1 Unified Encapsulation of Frame Transmission
Prior to refactoring, each query/set method (such as query_heartbeat, reset_module) had to independently construct data frames, involving repetitive logic including header splicing, length calculation, CRC checksum, and trailer appending. This decentralized implementation not only resulted in code redundancy (repeated code accounted for over 40%), but also easily triggered protocol errors due to manual operations such as length calculation and CRC computation — for instance, mismatches between the length byte and actual data length, or CRC check failures that caused the device to reject the frame.
Encapsulate the entire frame construction process into the DataFlowProcessor class's build_and_send_frame method to realize automated processing from "parameter input" to "frame transmission". The core logic of this method is as follows:
Before refactoring, instruction types (e. g., "query product model", "enable heart rate monitoring") are directly coupled with underlying protocol values (control word, command word). For instance, the control word for "query product model" 0x02 and command word 0xA1 are directly hardcoded in the query_product_model method. This design leads to the following issues:
New instructions require the frame parameters to be rewritten repeatedly;
When the protocol is updated (e. g., the command word is changed), all associated methods need to be modified globally, which makes omissions extremely likely;
Poor code readability (hexadecimal values are difficult to intuitively understand their meaning).
Design a COMMAND_MAP dictionary to establish a mapping relationship between "instruction type constants" and "frame parameters (control word, command word, default data)", so as to decouple logic and values. The core structure is as follows:
3.3.7.3 Unification of Query Response Logic:_handle_query_response method
Before refactoring, the update_properties_from_frame method features highly duplicated response processing logic for different instructions. For instance, both "heartbeat query response" and "product model query response" require judgment on three scenarios:
The response matches the current query;
The response does not match the current query (concurrency conflict);
Response received without query (active reporting).
This repetition leads to verbose code (a single method exceeding 1000 lines), and the scenario judgment logic for different instructions may vary (e. g., some instructions omit exception response handling), which hides potential bugs.
Extract the _handle_query_response method, abstract the processing logic of the three response scenarios into general logic, and adapt to different instructions through parameterization. The core implementation is as follows:
def _handle_query_response(self, expected_type, response_data, response_name):
    # 场景1:响应与当前查询类型匹配(正常流程)
    if (self._query_in_progress and  # 存在正在进行的查询
        self._current_query_type == expected_type and  # 响应类型匹配
        not self._query_response_received):  # 尚未收到响应
        self._query_result = response_data  # 记录结果
        self._query_response_received = True  # 标记响应已收到
        if R60ABD1.DEBUG_ENABLED:
            query_name = self.QUERY_NAME_MAP.get(expected_type, f"Unknown({expected_type})")
            print(f"[Query] {query_name} response received: {response_data}")

    # 场景2:响应与当前查询类型不匹配(并发冲突)
    elif self._query_in_progress and self._current_query_type != expected_type:
        if R60ABD1.DEBUG_ENABLED:
            current_query = self.QUERY_NAME_MAP.get(self._current_query_type, f"Unknown({self._current_query_type})")
            print(f"[Query] Unexpected {response_name} response during {current_query} query: {response_data}")

    # 场景3:无查询时收到响应(设备主动上报)
    elif not self._query_in_progress:
        if R60ABD1.DEBUG_ENABLED:
            print(f"[Query] Unsolicited {response_name} response: {response_data}")
In update_properties_from_frame, you only need to call this method with a single line of code to complete the response processing, for example:
# 产品型号查询响应处理(重构后)
if control == 0x02 and command == 0xA1 and data:
    product_model = self._parse_product_info_data(data)[0]
    self.product_model = product_model  # 更新属性
    self._handle_query_response(
        expected_type=TYPE_QUERY_PRODUCT_MODEL,
        response_data=product_model,
        response_name="Product Model"
    )
3.3.7.4 Test Verification After Refactoring
Here, we need to verify whether the refactored code can normally process query instructions simultaneously when the device actively reports data.
The test results are confirmed to be correct.
3.3.7.5 The attribute update of the business-driven layer strictly follows the principle of "single source of truth + response-driven"
The attribute update of the business-driven layer must adhere to the dual cores of "single source of truth" and "response-driven": the single source of truth is limited to the real response data returned by the radar device, and the response-driven mechanism requires all attribute modifications to be executed only when the update_properties_from_frame method parses the device response; upper-layer query/control methods (such as enable_human_presence and query_human_distance) are only responsible for sending commands, and must not predict results or modify attributes based on local logic such as "command sent successfully", so as to fundamentally avoid state inconsistency issues.
An example of an incorrect implementation is as follows: the upper-layer control method will actively modify the attribute after the command is sent successfully without waiting for confirmation from the device, for instance:
def enable_human_presence(self, timeout=200):
    success, result = self._execute_operation(R60ABD1.TYPE_CONTROL_HUMAN_PRESENCE_ON, timeout=timeout)
    if success:  # 仅判断指令发送成功,未等设备响应确认
        self.presence_enabled = True  # 预判修改属性,存在风险
    return success, result
The problem with this design is that "command sent successfully" does not mean the device has actually executed it (for example, device hardware failure, command received successfully but execution failed), in which case presence_enabled= True the local status may be inconsistent with the actual status of the device, and it will conflict with the attribute modification based on the device response in update_properties_from_frame, thus undermining data uniqueness.
For control-type methods, the upper-layer control method completely strips off the attribute modification logic, only focuses on instruction sending, and all state updates rely on device responses:
The only entry point for attribute updates is in update_properties_from_frame when parsing device responses:
# 人体存在开关控制响应解析(唯一属性修改点)
if control == 0x80 and command == 0x00 and data:
    switch_status = (data[0] == 0x01)  # 以设备响应数据为唯一依据
    self.presence_enabled = switch_status  # 仅在此处修改属性
    # 匹配响应与操作类型,更新查询结果
    if data[0] == 0x01:
        self._handle_query_response(R60ABD1.TYPE_CONTROL_HUMAN_PRESENCE_ON, True, "Human Presence ON")
    else:
        self._handle_query_response(R60ABD1.TYPE_CONTROL_HUMAN_PRESENCE_OFF, True, "Human Presence OFF")
Query methods also follow the principle of "not modifying attributes", and only send query instructions via _execute_operation, with attribute updates driven by parsing the device's response, for example:
When the device returns a distance query response, update_properties_from_frame parses the data and updates the properties, while synchronizing the query results via _handle_query_response:
# 人体距离查询响应解析(唯一属性修改点)
if control == 0x80 and command == 0x84 and data and len(data) >= 2:
    distance = (data[0] << 8) | data[1]  # 解析设备响应的真实距离数据
    self.human_distance = distance  # 仅在此处修改属性
    self._handle_query_response(
        R60ABD1.TYPE_QUERY_HUMAN_DISTANCE,
        distance,
        "Human Distance"
    )
The core value of this principle lies in ensuring that the local attribute status is fully synchronized with the actual status of the radar equipment, so as to avoid the deviation between "local prediction" and "actual equipment condition". Meanwhile, through the unique entry for attribute modification, status changes can be traced (each attribute update corresponds to a clear equipment response), providing a reliable data foundation for subsequent functions such as status monitoring and abnormal alarm.
4. Integration, Optimization and Related Testing of Driver Code
The core of driver code integration lies in realizing " configurable initialization, full-process fault tolerance, and traceable testing ", which ensures the reliability, ease of use and low resource occupancy of driver classes by optimizing the parameter design of initialization methods, strengthening the exception handling mechanism, and improving the coverage of test scripts. The following elaboration will be carried out from three aspects: initialization optimization, test script implementation and performance analysis.
4.1 Optimized Design of Initialization Method: Configuration, Fault Tolerance and Traceability
The original initialization method had issues such as "fixed function configuration, weak exception handling, and difficult state tracing". The optimized initialization method takes " parameterized configuration, full-process retry, traceable errors " as its core, supports flexible configuration of all radar functions, and improves the initialization success rate through an exception mechanism and retry logic.
4.1.1 Core Optimization Points and Design Principles
Here, we first need to add some configurable parameters to the initialization method to cover all core functions of the radar, allowing developers to flexibly enable or disable functions and adjust parameters according to business requirements without modifying the underlying code:
Function switch category: heart rate waveform reporting, respiratory waveform reporting, abnormal struggle monitoring, unattended timing, etc. ;
Configuration error records: Pass _configuration_errors list to trace failed items;
Automatic Retry: Critical operations (such as device reset and function configuration) support automatic retry.
# 自定义异常类
class DeviceInitializationError(Exception):
    """设备初始化错误异常"""
    pass

# 应用代码示例
try:
    device = R60ABD1(processor, parse_interval=300)
    # 获取初始化状态与错误信息
    init_status = device.get_configuration_status()
    if init_status['initialization_complete']:
        print("初始化成功!")
        print(f"设备型号:{init_status['device_info']['product_model']}")
    else:
        print(f"初始化部分失败,错误项:{init_status['configuration_errors']}")
except DeviceInitializationError as e:
    print(f"初始化失败:{e}")
    # 输出:Device initialization failed: Failed to load Product Model
The optimized initialization process consists of 5 steps, forming a closed loop of "parameter verification → device information reading → initialization waiting → automatic configuration → configuration verification". The sample process is as follows:
The _execute_with_retry method provides a retry mechanism for critical operations to improve the success rate:
def _execute_with_retry(self, operation, operation_name, timeout=200):
    for attempt in range(self.max_retries + 1):
        try:
            success, result = operation(timeout=timeout)
            if success:
                return True
            if attempt < self.max_retries:
                time.sleep_ms(self.retry_delay)
        except Exception as e:
            if attempt < self.max_retries:
                time.sleep_ms(self.retry_delay)
            else:
                print(f"{operation_name}重试{self.max_retries+1}次失败:{e}")
    return False

# 调用示例:读取产品型号(失败自动重试3次)
success = self._execute_with_retry(self.query_product_model, "Load Product Model")
4.1.2 Complete Code Example for the Initialization Section
The complete code is as follows:
# 自定义异常类
class DeviceInitializationError(Exception):
    """设备初始化错误异常"""
    pass

def __init__(self, data_processor, parse_interval=200,
             presence_enabled=True,
             heart_rate_enabled=True, heart_rate_waveform_enabled=False,
             breath_monitoring_enabled=True, breath_waveform_enabled=False,
             sleep_monitoring_enabled=True,
             abnormal_struggle_enabled=False, struggle_sensitivity=1,
             no_person_timing_enabled=False, no_person_timing_duration=30,
             sleep_cutoff_duration=120,
             max_retries=3, retry_delay=100, init_timeout=5000):
    """
    初始化R60ABD1实例

    Args:
        data_processor: DataFlowProcessor实例
        parse_interval: 数据解析间隔,单位毫秒 (建议50-200ms)
        presence_enabled: 是否开启人体存在信息监测
        heart_rate_enabled: 是否开启心率监测
        heart_rate_waveform_enabled: 是否开启心率波形主动上报
        breath_monitoring_enabled: 是否开启呼吸监测
        breath_waveform_enabled: 是否开启呼吸波形主动上报
        sleep_monitoring_enabled: 是否开启睡眠监测
        abnormal_struggle_enabled: 是否开启异常挣扎监测
        struggle_sensitivity: 挣扎灵敏度 (0=低, 1=中, 2=高)
        no_person_timing_enabled: 是否开启无人计时功能
        no_person_timing_duration: 无人计时时长 (30-180分钟)
        sleep_cutoff_duration: 睡眠截止时长 (5-120分钟)
        max_retries: 最大重试次数
        retry_delay: 重试延迟时间,单位毫秒
        init_timeout: 初始化超时时间,单位毫秒

    Raises:
        ValueError: 参数验证失败
        DeviceInitializationError: 设备初始化失败
    """
    # 参数验证
    self._validate_init_parameters(
        parse_interval, struggle_sensitivity, no_person_timing_duration,
        sleep_cutoff_duration, max_retries, retry_delay, init_timeout
    )

    if parse_interval > 500:
        raise ValueError("parse_interval must be less than 500ms")

    self.data_processor = data_processor
    self.parse_interval = parse_interval
    self.max_retries = max_retries
    self.retry_delay = retry_delay
    self.init_timeout = init_timeout

    # 添加运行状态标志
    self._is_running = False
    self._initialization_complete = False
    self._configuration_errors = []

    # ============================= 系统级属性 ============================

    # 心跳包监控
    # 最后接收心跳包时间戳(ms)
    self.heartbeat_last_received = 0
    # 心跳超时累计次数
    self.heartbeat_timeout_count = 0
    # 实际心跳间隔统计(ms)
    self.heartbeat_interval = 0

    # 系统状态
    # 初始化完成状态(True/False)
    self.system_initialized = False
    # 初始化完成时间戳(ms)
    self.system_initialized_timestamp = 0
    # 模组复位状态标记
    self.module_reset_flag = False
    # 模组复位时间戳(ms)
    self.module_reset_timestamp = 0

    # 产品信息
    # 产品型号(字符串)
    self.product_model = ""
    # 产品ID(字符串)
    self.product_id = ""
    # 硬件型号(字符串)
    self.hardware_model = ""
    # 固件版本(字符串)
    self.firmware_version = ""

    # ============================ 雷达探测属性 ============================

    # 位置状态
    # 是否在探测范围内
    self.radar_in_range = False

    # =========================== 人体存在检测属性 ==========================

    # 基本状态
    # 人体存在功能开关
    self.presence_enabled = presence_enabled
    # 存在状态
    # 0:无人, 1:有人
    self.presence_status = 0
    # 运动状态
    # 0:无, 1:静止, 2:活跃
    self.motion_status = 0

    # 量化数据
    # 体动参数(0-100)
    self.movement_parameter = 0
    # 人体距离(0-65535 cm)
    self.human_distance = 0
    # X坐标(有符号)
    self.human_position_x = 0
    # Y坐标(有符号)
    self.human_position_y = 0
    # Z坐标(有符号)
    self.human_position_z = 0

    # ============================= 呼吸监测属性 ===========================

    # 功能配置
    # 呼吸监测开关
    self.breath_monitoring_enabled = breath_monitoring_enabled
    # 呼吸波形上报开关
    self.breath_waveform_enabled = False
    # 低缓呼吸阈值(10-20次/min)
    self.low_breath_threshold = 10

    # 监测数据
    # 1:正常, 2:过高, 3:过低, 4:无
    self.breath_status = 0
    # 呼吸数值(0-35次/分)
    self.breath_value = 0
    # 5个字节的波形数据
    self.breath_waveform = [0, 0, 0, 0, 0]

    # ============================= 心率监测属性 ============================

    # 功能配置
    # 心率监测开关
    self.heart_rate_enabled = heart_rate_enabled
    # 心率波形上报开关
    self.heart_rate_waveform_enabled = False

    # 监测数据
    # 心率数值(60-120)
    self.heart_rate_value = 0
    # 5个字节的波形数据
    self.heart_rate_waveform = [0, 0, 0, 0, 0]

    # ============================ 睡眠监测属性 ============================

    # 基础状态
    # 睡眠监测开关
    self.sleep_monitoring_enabled = sleep_monitoring_enabled

    # 入床/离床状态
    # 0:离床, 1:入床, 2:无
    self.bed_status = 0
    # 睡眠状态
    # 0:深睡, 1:浅睡, 2:清醒, 3:无
    self.sleep_status = 0

    # 时长统计
    # 清醒时长(分钟)
    self.awake_duration = 0
    # 浅睡时长(分钟)
    self.light_sleep_duration = 0
    # 深睡时长(分钟)
    self.deep_sleep_duration = 0

    # 睡眠质量
    # 睡眠质量评分(0-100)
    self.sleep_quality_score = 0
    # 睡眠质量评级
    self.sleep_quality_rating = 0

    # 综合状态
    # 包含8个字段的字典
    self.sleep_comprehensive_status = {}
    # 睡眠异常状态
    self.sleep_anomaly = 0
    # 异常挣扎状态
    self.abnormal_struggle_status = 0
    # 无人计时状态
    self.no_person_timing_status = 0

    # 配置参数
    # 异常挣扎开关
    self.abnormal_struggle_enabled = abnormal_struggle_enabled
    # 无人计时开关
    self.no_person_timing_enabled = no_person_timing_enabled
    # 无人计时时长
    self.no_person_timing_duration = no_person_timing_duration
    # 睡眠截止时长
    self.sleep_cutoff_duration = sleep_cutoff_duration
    # 挣扎灵敏度
    self.struggle_sensitivity = struggle_sensitivity

    # 查询状态管理
    # 是否有查询在进行中
    self._query_in_progress = False
    # 是否收到查询响应
    self._query_response_received = False
    # 查询结果
    self._query_result = None
    # 当前查询类型
    self._current_query_type = None
    # 默认查询超时时间(ms)
    self._query_timeout = 200

    # 内部使用的定时器
    self._timer = Timer(-1)

    try:
        # 启动定时器
        self._start_timer()

        # 执行完整的初始化流程
        self._complete_initialization()

        self._initialization_complete = True

        if R60ABD1.DEBUG_ENABLED:
            print(f"[Init] R60ABD1 initialized successfully")
            status = self.get_configuration_status()
            print(f"[Init] Configuration errors: {len(status['configuration_errors'])}")
            print(f"[Init] Product: {self.product_model} v{self.firmware_version}")

    except Exception as e:
        # 初始化失败,停止定时器
        self._is_running = False
        if hasattr(self, '_timer'):
            self._timer.deinit()
        raise DeviceInitializationError(f"Device initialization failed: {str(e)}")

def _validate_init_parameters(self, parse_interval, struggle_sensitivity,
                              no_person_timing_duration, sleep_cutoff_duration,
                              max_retries, retry_delay, init_timeout):
    """验证初始化参数"""
    if parse_interval > 500 or parse_interval < 10:
        raise ValueError("parse_interval must be between 10ms and 500ms")

    if struggle_sensitivity not in [self.SENSITIVITY_LOW, self.SENSITIVITY_MEDIUM, self.SENSITIVITY_HIGH]:
        raise ValueError("struggle_sensitivity must be 0 (low), 1 (medium), or 2 (high)")

    if no_person_timing_duration < 30 or no_person_timing_duration > 180 or no_person_timing_duration % 10 != 0:
        raise ValueError("no_person_timing_duration must be between 30-180 minutes in steps of 10")

    if sleep_cutoff_duration < 5 or sleep_cutoff_duration > 120:
        raise ValueError("sleep_cutoff_duration must be between 5-120 minutes")

    if max_retries < 0 or max_retries > 10:
        raise ValueError("max_retries must be between 0 and 10")

    if retry_delay < 0 or retry_delay > 1000:
        raise ValueError("retry_delay must be between 0ms and 1000ms")

    if init_timeout < 1000 or init_timeout > 30000:
        raise ValueError("init_timeout must be between 1000ms and 30000ms")

def _complete_initialization(self):
    """
    完整的初始化流程

    Raises:
        DeviceInitializationError: 初始化失败
    """
    start_time = time.ticks_ms()

    # 步骤1: 读取设备基本信息
    device_info_loaded = self._load_device_information()
    if not device_info_loaded:
        raise DeviceInitializationError("Failed to load device information")

    # 步骤2: 检查并等待设备初始化完成
    init_success = self._wait_for_device_initialization()
    if not init_success:
        # 尝试重启设备
        if R60ABD1.DEBUG_ENABLED:
            print("[Init] Device not initialized, attempting reset...")
        reset_success = self._reset_and_wait_for_initialization()
        if not reset_success:
            raise DeviceInitializationError("Device initialization failed even after reset")

    # 步骤3: 配置设备功能
    self._auto_configure_device()

    # 步骤4: 验证关键功能配置
    self._verify_critical_configuration()

    elapsed_time = time.ticks_diff(time.ticks_ms(), start_time)
    if R60ABD1.DEBUG_ENABLED:
        print(f"[Init] Initialization completed in {elapsed_time}ms")

def _load_device_information(self):
    """
    加载设备基本信息

    Returns:
        bool: 是否成功加载所有设备信息
    """
    info_queries = [
        ("Product Model", self.query_product_model),
        ("Product ID", self.query_product_id),
        ("Hardware Model", self.query_hardware_model),
        ("Firmware Version", self.query_firmware_version)
    ]

    all_success = True
    for info_name, query_func in info_queries:
        success = self._execute_with_retry(query_func, f"Load {info_name}")
        if not success:
            all_success = False
            self._configuration_errors.append(f"Failed to load {info_name}")
            if R60ABD1.DEBUG_ENABLED:
                print(f"[Init] Warning: Failed to load {info_name}")

    return all_success

def _wait_for_device_initialization(self, timeout=None):
    """
    等待设备初始化完成

    Args:
        timeout: 超时时间,单位毫秒

    Returns:
        bool: 设备是否初始化完成
    """
    if timeout is None:
        timeout = self.init_timeout

    start_time = time.ticks_ms()

    while time.ticks_diff(time.ticks_ms(), start_time) < timeout:
        success, init_status = self.query_init_complete(timeout=500)
        if success and init_status:
            if R60ABD1.DEBUG_ENABLED:
                print("[Init] Device initialization confirmed")
            return True

        # 短暂延迟后重试
        time.sleep_ms(200)

    if R60ABD1.DEBUG_ENABLED:
        print("[Init] Device initialization timeout")
    return False

def _reset_and_wait_for_initialization(self):
    """
    重置设备并等待初始化完成

    Returns:
        bool: 重置和初始化是否成功
    """
    # 发送复位指令
    reset_success = self._execute_with_retry(
        self.reset_module,
        "Reset Device",
        timeout=1000
    )

    if not reset_success:
        return False

    # 等待3秒让设备重启
    if R60ABD1.DEBUG_ENABLED:
        print("[Init] Waiting 3 seconds for device reset...")
    time.sleep(3)

    # 重新等待初始化完成
    return self._wait_for_device_initialization(timeout=10000)  # 10秒超时

def _auto_configure_device(self):
    """
    自动配置设备功能
    """
    configuration_steps = []

    # 基础功能配置
    if self.presence_enabled:
        configuration_steps.append(("Enable Human Presence", self.enable_human_presence))
    else:
        configuration_steps.append(("Disable Human Presence", self.disable_human_presence))

    # 心率监测配置
    if self.heart_rate_enabled:
        configuration_steps.append(("Enable Heart Rate Monitor", self.enable_heart_rate_monitor))
        if self.heart_rate_waveform_enabled:
            configuration_steps.append(
                ("Enable Heart Rate Waveform Report", self.enable_heart_rate_waveform_report))
        else:
            configuration_steps.append(
                ("Disable Heart Rate Waveform Report", self.disable_heart_rate_waveform_report))
    else:
        configuration_steps.append(("Disable Heart Rate Monitor", self.disable_heart_rate_monitor))

    # 呼吸监测配置
    if self.breath_monitoring_enabled:
        configuration_steps.append(("Enable Breath Monitor", self.enable_breath_monitor))
        if self.breath_waveform_enabled:
            configuration_steps.append(("Enable Breath Waveform Report", self.enable_breath_waveform_report))
        else:
            configuration_steps.append(("Disable Breath Waveform Report", self.disable_breath_waveform_report))
    else:
        configuration_steps.append(("Disable Breath Monitor", self.disable_breath_monitor))

    # 睡眠监测配置
    if self.sleep_monitoring_enabled:
        configuration_steps.append(("Enable Sleep Monitor", self.enable_sleep_monitor))

        # 异常挣扎配置
        if self.abnormal_struggle_enabled:
            configuration_steps.append(("Enable Abnormal Struggle Monitor", self.enable_abnormal_struggle_monitor))
            # 设置挣扎灵敏度
            configuration_steps.append(("Set Struggle Sensitivity",
                                        lambda: self.set_struggle_sensitivity(self.struggle_sensitivity)))
        else:
            configuration_steps.append(
                ("Disable Abnormal Struggle Monitor", self.disable_abnormal_struggle_monitor))

        # 无人计时配置
        if self.no_person_timing_enabled:
            configuration_steps.append(("Enable No Person Timing", self.enable_no_person_timing))
            # 设置无人计时时长
            configuration_steps.append(("Set No Person Timing Duration",
                                        lambda: self.set_no_person_timing_duration(self.no_person_timing_duration)))
        else:
            configuration_steps.append(("Disable No Person Timing", self.disable_no_person_timing))

        # 设置睡眠截止时长
        configuration_steps.append(("Set Sleep End Duration",
                                    lambda: self.set_sleep_end_duration(self.sleep_cutoff_duration)))
    else:
        configuration_steps.append(("Disable Sleep Monitor", self.disable_sleep_monitor))

    # 执行配置步骤
    for step_name, step_function in configuration_steps:
        success = self._execute_with_retry(step_function, step_name)
        if not success:
            self._configuration_errors.append(f"Failed to {step_name}")
            if R60ABD1.DEBUG_ENABLED:
                print(f"[Init] Warning: {step_name} failed")

def _verify_critical_configuration(self):
    """
    验证关键配置是否成功
    """
    critical_verifications = []

    # 验证设备初始化状态
    critical_verifications.append(("Device Initialization", self.query_init_complete))

    # 验证雷达范围状态
    critical_verifications.append(("Radar Range", self.query_radar_range_boundary))

    # 根据启用的功能添加验证
    if self.presence_enabled:
        critical_verifications.append(("Presence Detection", self.query_human_presence_switch))

    if self.heart_rate_enabled:
        critical_verifications.append(("Heart Rate Monitor", self.query_heart_rate_monitor_switch))

    if self.breath_monitoring_enabled:
        critical_verifications.append(("Breath Monitor", self.query_breath_monitor_switch))

    if self.sleep_monitoring_enabled:
        critical_verifications.append(("Sleep Monitor", self.query_sleep_monitor_switch))

    # 执行验证
    for verify_name, verify_func in critical_verifications:
        success, result = verify_func(timeout=500)
        if not success:
            self._configuration_errors.append(f"Verification failed: {verify_name}")
            if R60ABD1.DEBUG_ENABLED:
                print(f"[Init] Warning: {verify_name} verification failed")

def _execute_with_retry(self, operation, operation_name, timeout=200):
    """
    带重试的执行操作
    """
    for attempt in range(self.max_retries + 1):
        try:
            success, result = operation(timeout=timeout)
            if success:
                return True

            if attempt < self.max_retries:
                time.sleep_ms(self.retry_delay)

        except Exception as e:
            if attempt < self.max_retries:
                time.sleep_ms(self.retry_delay)
            else:
                if R60ABD1.DEBUG_ENABLED:
                    print(f"[Init] {operation_name} failed after {self.max_retries + 1} attempts: {e}")

    return False

def get_configuration_status(self):
    """
    获取设备配置状态
    """
    return {
        'initialization_complete': self._initialization_complete,
        'configuration_errors': self._configuration_errors.copy(),
        'device_info': {
            'product_model': self.product_model,
            'product_id': self.product_id,
            'hardware_model': self.hardware_model,
            'firmware_version': self.firmware_version
        },
        'current_settings': {
            'presence_enabled': self.presence_enabled,
            'heart_rate_enabled': self.heart_rate_enabled,
            'heart_rate_waveform_enabled': self.heart_rate_waveform_enabled,
            'breath_monitoring_enabled': self.breath_monitoring_enabled,
            'breath_waveform_enabled': self.breath_waveform_enabled,
            'sleep_monitoring_enabled': self.sleep_monitoring_enabled,
            'abnormal_struggle_enabled': self.abnormal_struggle_enabled,
            'struggle_sensitivity': self.struggle_sensitivity,
            'no_person_timing_enabled': self.no_person_timing_enabled,
            'no_person_timing_duration': self.no_person_timing_duration,
            'sleep_cutoff_duration': self.sleep_cutoff_duration
        }
    }
The complete steps are as follows:
4.2 Test Script: Full Function Coverage and Rapid Verification
main. py, as a supporting test script, implements three core functions: initialization verification, function testing, and data monitoring. The sample code covers key test scenarios, facilitating developers to quickly verify the reliability of the driver.
4.2.1 Core Dimensions and Implementation Approaches of Test-Driven Libraries
The testing of the driver library shall cover the entire lifecycle of "initialization → function call → data interaction → resource release", and in combination with the main. py code, the specific test dimensions and implementation are as follows:
4.2.2.1 Device Reset and Initialization Waiting
Initialization is the foundation for the driver library to operate, which requires verifying "parameter legitimacy, normal device communication, and validity of configuration items".
4.2.2.2 Functional Interface Test: Covers all types of interfaces including query, control and configuration
The core value of the driver library lies in providing reliable functional interfaces, which shall be tested in the category of " query type → control type → configuration type " to ensure that the input and output of each interface meet the expectations.
Query-type interface testing (acquisition of device status / data)
Query-type interfaces (such as query_human_distance, query_heart_rate_value) need to verify whether they can correctly return device data, and whether they return (False, None) upon failure.
Check whether the return value type and range upon success conform to the documentation (e. g., the distance is an integer ranging from 0 to 65535 cm);
On failure success is False, result is None;
Whether the interface is compatible with timeout parameters (e. g., when timeout= 200, a failure will be returned if there is no response after 200ms).
Control Interface Testing (Switch Function)
Control interfaces (such as enable_human_presence, enable_sleep_monitor) shall be verified to "properly control device functions", and the status changes shall be confirmable via query interfaces.
def test_control_interfaces():
    # 测试开启人体存在监测
    success, _ = device.enable_human_presence()
    assert success, "开启人体存在监测失败"

    # 验证功能是否生效(通过查询接口确认)
    success, status = device.query_human_presence_switch()
    assert success and status is True, "人体存在监测未实际开启"
    print("人体存在监测开启成功并验证通过")

    # 测试关闭人体存在监测
    success, _ = device.disable_human_presence()
    assert success, "关闭人体存在监测失败"

    success, status = device.query_human_presence_switch()
    assert success and status is False, "人体存在监测未实际关闭"
    print("人体存在监测关闭成功并验证通过")

test_control_interfaces()
The test key points are as follows:
After the control command is sent successfully, use the corresponding query interface (e. g. query_human_presence_switch) to verify whether the status has actually changed;
When control fails (e. g., the device does not support this function), success is False.
Configuration Class Interface Testing (Parameter Adjustment)
Configuration class interfaces (such as set_struggle_sensitivity, set_no_person_timing_duration) need to verify that "parameters can be correctly written to the device", and the configured value shall be returned during query.
Whether to return a failure when the configuration parameters are outside the valid range (e. g., the struggle sensitivity only supports 0/1/2);
After successful configuration, verify that the return value via the query interface is consistent with the configured value.
4.2.2.3 Real-time Data Monitoring Test: Verify Active Reporting and Attribute Synchronization
The device actively reports real-time data (such as heart rate waveform and respiratory status), and it is necessary to verify whether the update_properties_from_frame method of the driver library can correctly parse and update the properties.
# 实时上报数据监控(来自main.py的核心逻辑)
def test_realtime_data():
    last_print = time.ticks_ms()
    print_interval = 2000  # 每2秒打印一次实时属性
    try:
        while time.ticks_diff(time.ticks_ms(), last_print) < 10000:  # 监控10秒
            current = time.ticks_ms()
            if time.ticks_diff(current, last_print) >= print_interval:
                # 打印驱动类属性(验证主动上报数据是否同步)
                print(f"\n实时属性({time.strftime('%H:%M:%S')}):")
                print(f"存在状态:{'有人' if device.presence_status == 1 else '无人'}")
                print(f"呼吸频率:{device.breath_value}bpm")
                print(f"心率波形:{device.heart_rate_waveform}")
                last_print = current
            time.sleep_ms(10)
    except KeyboardInterrupt:
        pass

test_realtime_data()
The test key points are as follows:
Whether the driver-type attributes (such as presence_status, breath_value) are updated in real time along with the data reported by the device;
Check whether the length and format of waveform data (e. g. heart_rate_waveform) comply with the protocol (e. g. 5-byte list).
4.3 Performance Testing and System Resource Analysis
The core objective of performance testing is to verify that the driver library in embedded environments (such as Raspberry Pi Pico) features reasonable resource usage, real-time performance and stability, so as to ensure it can operate reliably for a long time without affecting other functions of the system.
Embedded systems (such as Raspberry Pi Pico) have limited CPU and memory resources, and performance defects in driver libraries may lead to the following issues:
System laggy: High CPU usage causes delayed response of other tasks (such as network communication and user interaction);
Data loss: Unreasonable parsing interval or excessively long processing time results in the failure to process the data reported by the device in a timely manner;
Reduced stability: Prolonged operation under high load may lead to issues such as memory leaks and timer anomalies;
Insufficient real-time performance: Scenarios such as health monitoring and anomaly alerting are sensitive to data update latency, and substandard performance will undermine the effectiveness of relevant functions.
Based on the features of the driver library, the following indicators require key attention:
Core Method Execution Time: update_properties_from_frame is the core method for the driver library to parse device data, and its execution time directly affects CPU usage.
Indicator Definition: Time consumed for parsing a single device data frame (unit: ms);
Key Value:
Average value: Reflects the average load during long-term operation;
Maximum value: reflects the load peak in the worst-case scenario;
Distribution range: Whether frequent long-tail latency exists (e. g., occasionally exceeding 1ms).
Real-time Performance: The update latency of device data shall meet the requirements of the business scenario.
Indicator Definition: The time difference from when the device reports data to when the driver library properties are updated;
Influencing Factors: parse interval (parse_interval) and the execution time of update_properties_from_frame.
Stability (Long-term Performance): The driver library shall be capable of stable operation for at least 24 hours without issues such as memory leaks or functional degradation.
Indicator Definition:
Memory usage change: whether it keeps increasing over time;
Functional validity: Verify whether the query/control interface can still work properly after long-time operation;
Number of abnormal restarts: Whether the system restart was caused by performance issues.
Here, we mainly test the parsing time of the update_properties_from_frame method under different data parsing cycles. Adjusting different data parsing cycles here is equivalent to adjusting the "timer interval", namely the parse_interval parameter (unit: milliseconds): the driver library will automatically call the parse_interval milliseconds update_properties_from_frame method via a timer at regular intervals, to read the latest sensor data (such as heart rate, respiratory waveform, human presence status, etc.) from the device, parse it and update it to the properties.
For example:
parse_interval= 50 indicates that data is parsed every 50 milliseconds;
parse_interval= 200 indicates that data is parsed once every 200 milliseconds.
Sensor data (such as heart rate fluctuations and human motion status) changes dynamically, and the timer interval determines the sensitivity of the driver library to collect these changes:
Too short interval (e. g., 50ms): Data is updated every 50ms, which can quickly capture subtle changes (such as a sudden rise in heart rate or slight body movement), and is suitable for scenarios with high real-time requirements (such as abnormal struggle monitoring);
Excessively long interval (e. g., 200ms): This increases data update latency, which may cause you to miss critical short-term changes (such as sudden apnea), but it can reduce resource consumption.
Meanwhile, the device continuously sends data frames to the driver library, and these data will be temporarily stored in the buffer first:
Too short interval (e. g., 50ms): The buffer data is processed before sufficient data is accumulated, resulting in a small amount of data per processing (possibly only 1-2 frames), while frequent calls may lead to an inefficient "processing-waiting" cycle;
Excessively long interval (e. g., 200ms): The buffer may accumulate multiple frames of data (e. g., 4-5 frames), which increases the amount of data processed in a single run and may prolong the single execution time (e. g., from 0.2ms to 0.6ms). However, since the call frequency is reduced, the overall resource usage is more optimized.
To accurately quantify update_properties_from_frame the execution time of the method, we have applied a timing decorator to this method:
# 计时装饰器,用于计算函数运行时间
def timed_function(f: callable, *args: tuple, **kwargs: dict) -> callable:
    """
    计时装饰器,用于计算并打印函数/方法运行时间。

    Args:
        f (callable): 需要传入的函数/方法
        args (tuple): 函数/方法 f 传入的任意数量的位置参数
        kwargs (dict): 函数/方法 f 传入的任意数量的关键字参数

    Returns:
        callable: 返回计时后的函数
    """
    myname = str(f).split(' ')[1]

    def new_func(*args: tuple, **kwargs: dict) -> any:
        t: int = time.ticks_us()
        result = f(*args, **kwargs)
        delta: int = time.ticks_diff(time.ticks_us(), t)
        print('Function {} Time = {:6.3f}ms'.format(myname, delta / 1000))
        return result

    return new_func
timed_function decorator’s core logic is to record timestamps before and after a method call, calculate the difference and convert it to milliseconds for printing. When applied to update_properties_from_frame, a time-consuming log similar to the following will be output each time a device data frame is parsed:
Function update_properties_from_frame Time = 0.287ms
Function update_properties_from_frame Time = 0.164ms
Function update_properties_from_frame Time = 0.625ms
...
By collecting a large volume of log data, we conducted a statistical analysis on the performance metrics under three typical parsing intervals of 50ms, 100ms, and 200ms.
The test results with a timer interval of 50 ms are as follows:
The test results when the timer interval is 100 ms are as follows:
The test results when the timer interval is 200 ms are as follows:
The test results of different data parsing are as follows:
50ms interval: In high-real-time scenarios, the minimum execution time of the method is 0.164ms, the maximum is 0.625ms, and the average is 0.3ms; the average CPU usage is 0.6%, the worst-case CPU usage is 1.25%, and the system time margin ranges from 98.75% to 99.4%.
100ms interval: In a balanced scenario, the minimum execution time is 0.161ms, the maximum is 0.529ms, and the average is 0.26ms; the average CPU usage is 0.26%, the worst-case CPU usage is 0.529%, and the time margin increases to 99.74%.
200ms interval: In low-power scenarios, the minimum execution time is 0.155ms, the maximum is 0.624ms, and the average is 0.27ms; the average CPU usage is 0.135%, the worst-case CPU usage is 0.312%, and the time margin reaches 99.865%, which falls into the "ultra-light load" category.