
Web Radio Dowload + local mp3 playing on W5100S-EVB-PICO 2
A device which connects to web radio urls and dowload mp3 files for local sound play.
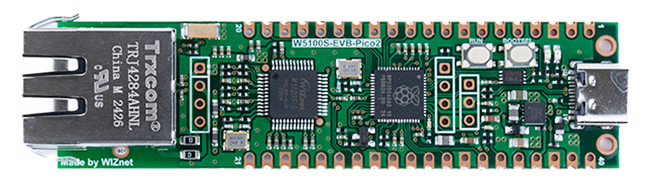
WIZnet - W5100S-EVB-Pico2
x 1
Introduction
This project is to demostrate how W5100S EVB Pico 2 can be used with MP3 URL links or Web Radio Links to download their file and play the sound with the board.
In the following article, you will learn how to use storage, audioout, audiomp3 and auidomixer library in CircuitPython and understand how to obtain the streaming URL from Web Radios using our browser, and combining them together you will get a device that can download mp3 files and play songs.
You will need the following hardwares to start the project.
Before starting the project, make sure to follow this video to set up the board to be used in CircuitPython. Download the library zip file from CircuitPython Website and unzip the following files to the lib folder of the microcontroller.
adafruit_wiznet5k, adafruit_connection_manager, adafruit_requests, adafruit_ticks
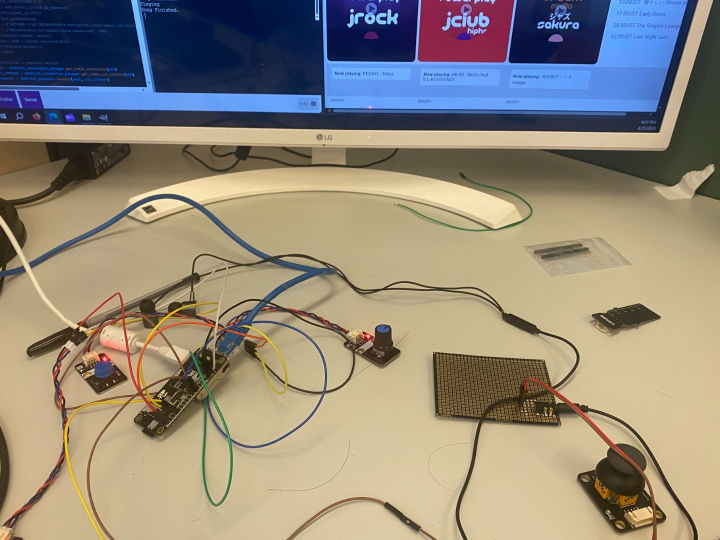
Connection Diagram
_rdhpzAIp4U.jpg?auto=compress%2Cformat&w=740&h=555&fit=max)
Obtaining Stream URL
Go to your desired web radio station website and after playing the radio in that website, you can go to the inspect tab of your browser and go to network activity to find the URL that the website is sending request to.
E.g.
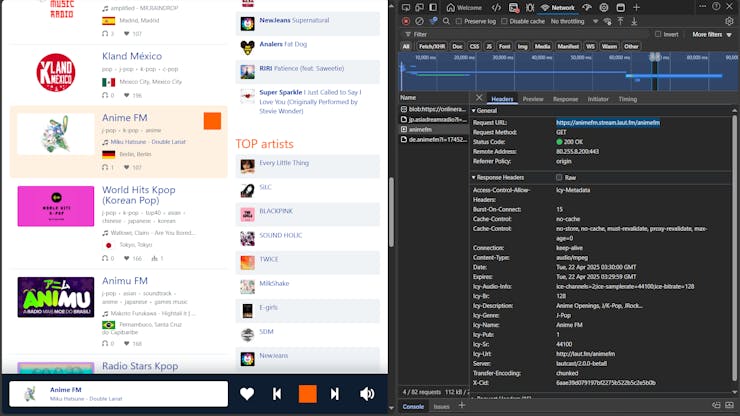
As you can see, when im playing the radio on Microsoft Edge, there is a link which the webiste send GET request to. As I have searched through most of the radios, the Content-Type are usually in MPEG format, which means that the audio transmitted is in MP3 format. Then, we can use GET in the program and use CircuitPython libraries to decode these data for playing the audio
Note that not all radio urls are available to use. You may encounter errors such as audios being cut when using request.get(stream = True) with response.iter_content or the endpoint URL only allows 60s of connection. Therefore, it is better to do trial and error on the URL before saving the mp3
CircuitPython Code
Since we will be connecting to the internet, you will need to set up the ethernet interface and create the request session in CiruictPython by the following code.
import board
import time
from digitalio import DigitalInOut, Direction # Direction will be used later
from adafruit_wiznet5k.adafruit_wiznet5k import WIZNET5K
import adafruit_wiznet5k.adafruit_wiznet5k_socketpool as socketpool
import adafruit_requests
import adafruit_connection_manager

# Initialize spi interface
import busio
cs = DigitalInOut(board.GP17)
spi_bus = busio.SPI(board.GP18, MOSI=board.GP19, MISO=board.GP16)

# Initialize ethernet interface with DHCP
eth = WIZNET5K(spi_bus, cs)

# #Initialize a requests session
pool = adafruit_connection_manager.get_radio_socketpool(eth)
ssl_context = adafruit_connection_manager.get_radio_ssl_context(eth)
requests = adafruit_requests.Session(pool, ssl_context)
The following sections will be seperated into few parts, which are the SD card section, GET audio data section, and PLAY audio section with MP3 Decoder provided by CircuitPython and audio Mixer for volume control.
1. Connecting SD card to your board.
CircuitPython has prebuilt storage library of sdcardio and storage to read and write data to the microcontroller drive or the external sd card reader.
Using the other SPI interface provided on the board, connect the following pins to build an SPI connection with the SD card readaer.
Module <-> board
SCS <-> SPI1 CSn
SDO/MISO <-> SPI1 Rx
SDI/MOSI <-> SPI1 Tx
CLK <-> SPI1 SCK
Then, use the following code to mount the external storage to the board on CircuitPython.
# Add the following imports on the import section of the code
import sdcardio
import storageio

# Mounting SD Card
spi_bus_2 = busio.SPI(board.GP14, MOSI=board.GP15, MISO=board.GP12)
sd = sdcardio.SDCard(spi_bus_2, board.GP13)
vfs = storage.VfsFat(sd)
storage.mount(vfs, '/sd')

# Check directory using os library
# import os
# print(os.listdir('/sd'))
Although in the file system, you might not find the external drive on the file explorer or the folder in CircuitPython, but you can check if you can read any files using os library and list the directory under /sd.
2. Getting Audio Data from the given Stream URL
First, we set a file path to save our audio data and initialize a bytearray for storing the audio data and writing to the file.
I also included a button variable to stop the downloading process.
The new_file variable is used to determine if we want to rewrote the whole file or append new data to the end of the file
# Path of MP3 file
path_mp3 = "/sd/YOUR_FILE_NAME_HERE.mp3"
data_list = bytearray()
new_file = True

button = DigitalInOut(board.GP0)
button.direction = button.direction.INPUT
Next we send a request to the given server. In my program, I have listed several URLs that allow user to access and download with the microcontroller.
# Add more if you want. Vocaloid, Anime, JapanHits and JSakura will not have cut audio but the remaining links may have cut audio in their output MP3 file as they only allow 60 seconds of connection and if you reconnect, the new data will not from the end of the previous file.

available_url = {
    "JapanHits": "https://cast1.torontocast.com/JapanHits",
    "JSakura" : "https://cast1.torontocast.com/jsakura",
    "Anime" : "https://animefm.stream.laut.fm/animefm",
    "Future Groove": "https://streamer.radio.co/s4b3dafa6d/listen",
    "Vocaloid": "https://vocaloid.radioca.st/stream",
    "J-Pop Project Radio": "https://15113.live.streamtheworld.com/SAM10AAC139.mp3?dist=onlineradiobox",
    "HK Latino Radio" : "https://stream-174.zeno.fm/rvd3ef4x2tzuv?zt=eyJhbGciOiJIUzI1NiJ9.eyJzdHJlYW0iOiJydmQzZWY0eDJ0enV2IiwiaG9zdCI6InN0cmVhbS0xNzQuemVuby5mbSIsInJ0dGwiOjUsImp0aSI6IlYxV1pQMXJKUjFxQzF0RjNXbHZfZWciLCJpYXQiOjE3NDQ4NzkyNzgsImV4cCI6MTc0NDg3OTMzOH0.sPoNJiFDXzP9sZZuvjRt-eUzSX9r2cgZvUPXHe-4pN4",
    "Dubstep" : "https://s2.radio.co/s30844a0f4/listen",
    "house" : "https://streaming.radio.co/s06bd9d805/listen",
    "EDM Session" : "https://s2.radio.co/s30844a0f4/listen"
}
Make an request GET method with stream = True and check the status code of the connection to ensure we have connected to the endpoint.
r = requests.get(available_url["EDM Session"],headers = {'Connection': 'keep-alive'}, stream = True)
if r.status_code == 200:
    # Save Audio Data Here

else:
    print("Server Unavaliable")
    print(r.status_code)
If the status is successful, we use response.iter_content(1024) to read 1024 bytes of data every iteration.
# Inside if r.status_code == 200:
start_time = time.time()
try:
    for chunk in r.iter_content(1024):
           try:
                data_list.extend(chunk)
                if button.value == 0:         # Check if I press button or not
                        power = False
                        break
           except MemoryError:                # Data_list max memory reached
                if new_file:                  # See if I wrote this file before or not
                    with open(path_mp3, "wb") as f:
                        f.write(data_list)
                    new_file = False
                else:
                    with open(path_mp3, "ab") as f:
                        f.write(data_list)
                # Reset data_list for next iteration
                data_list = bytearray()
                data_list.extend(chunk)      # Add back the previous chunk

                # For checking latency only since start of request
                end_time = time.time()
                latency = end_time - start_time
                print("Latency Write Same Chunk: ", latency, "s. ")
except OSError:

# This may occur when I use Keyboard Interrupt or sometimes error in r.iter_content. Therefore, it is better write saved data to the file first before calling a new request.

        if new_file:
           with open(path_mp3, "wb") as f:
                f.write(data_list)
           new_file = False
        else:
           with open(path_mp3, "ab") as f:
                f.write(data_list)
           # Reset data_list for next iteration
           data_list = bytearray()
           data_list.extend(chunk)
# Renew request if possible. I included this section because Im still thinking ways to store the audio data wihtout losing audio data from ending the previous response.
# r.close()
# r = requests.get(available_url["EDM Session"],headers = {'Connection': 'keep-alive'},stream = True)

# Save remaining chunks inside Data_List if we press the quit button.
if new_file:
   with open(path_mp3, "wb") as f:
         f.write(data_list)
   new_file = False
else:
   with open(path_mp3, "ab") as f:
         f.write(data_list)

# Check total latency
end_time = time.time()
print("Latency Request: ", end_time - start_time, "s.")
Lastly, remember to close the request after using the http GET method.
# Outside if r.status_code == 200:
r.close()
r = None

# You can comment this section if you don't want to listen to the saved audio file after downloading.
import sys
sys.exit()
3. Playing MP3 file with volume control
There are a few libraries that you can use to play audio on CircuitPython. In our current set up, we will be using MP3 Decoder to decode the audio file from the Streaming source and use Mixer to control the volume of the playback audio.
Before coding the project, I have set up a control knob to control the volume.
I have also added an extra button to stop the pause and resume the audio.
#Add import to top section
from analogio import AnalogIn
knob = AnalogIn(board.A1)     # Located at GP27
button2 = DigitalInOut(board.GP3)
button2.direction = button2.direction.INPUT
Next, we can start decoding the MP3 file and play the audio.
Decoding MP3 file is complicated, but CircuirtPython has provided tools for us to allow MP3 files to be played as audio from their libraries.
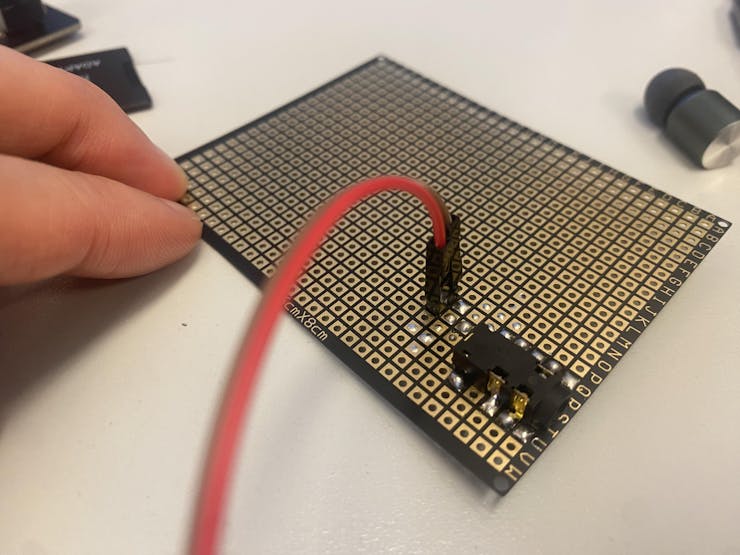
I have attached a pre-built headphone jack module to the GP26 port of the board. The module only supports allow the left channel to play sound.
For reference, you can go to this GitHub link and build your own module.
from audiomp3 import MP3Decoder
from audiopwnio import PWNAudioOut as AudioOut
audio - AudioOut(board.A0)    # Located at GP26
Before playing the audio, I initialized some variables to store the states to pause/reusme the audio.
# initialize variable for resuming/pausing
state = True # True to resume, False to pause
previous_state = None # Track the previous state of the button
After checking whether the song file exist using os.stat, we can start playing the audio.
There are a few important key point to remember before playing the audio.
1. In audiomixer.Mixer, the buffer size is required as the default buffer size will make the audio play with buzz sounds. If you encounter this problem, you can try changing this value
2. According to my reserach, the human hearing does not follow a linear scale of perception of sound, so I used this formula to change the volume of the audio.
if os.stat(path_mp3):
    mp3 = open(path_mp3, "rb")
    decoder = MP3Decoder(mp3)
    import audiomixer
    mixer = audiomixer.Mixer(voice_count = 1, sample_rate = decoder.sample_rate, channel_count = decoder.channel_count, bits_per_sample = decoder.bits_per_sample, samples_signed = True, buffer_size = 1024*2)

    decoder.file = open(path_mp3,"rb")
    while True:

        # Press the button 1 to start playing the audio
        if not button.value:
            audio.play(mixer)
            mixer.voice[0].play(decoder)
            while mixer.playing:
                # Check if button 2 decide to pause song or not.
                if button2.value == 0 and previous_state == True:
                    state = not state
                    if state :
                        print("Resume")
                        audio.resume()
                    else:
                        print("Pause")
                        audio.pause()
                # Changing audio volume based on human hearing scale
                v = ((round(knob.value,-2) - 800) / (65500 - 800)) ** 0.6

                # If the knob value too small, the type will become complex.
                if not isinstance(v, complex):
                    mixer.voice[0].level = v
                else:
                    mixer.voice[0].level = 0

                # Update the previous state of the button 2
                previous_state = button2.value
                time.sleep(.1)
        time.sleep(.1)
    decoder.file.close()
    mp3.close()
Now, you should be able to listen the downloaded audio retrieved from your sd card.
Conclusion
This is the end of the project. I hope by this project, you learn how to read and write to sd card, play audio using audiomp3 and audiomixer from CircuitPython, and know how to obtain streaming data using request get with r.iter_content function.
If you are interested in the prebuilt board, you can find the hackster io link here which talks about the development process and functionalities of the board.
Thank you for reading and I hope you enjoyed the content.
-
code
