W55RP20-EVB-MKR Module MicroPython Practice (3) - TCP Client Communication
This is the 3rd article in the WIZnet W55RP20 chip MicroPython tutorial series, written based on the latest official firmware.
COMPONENTS
PROJECT DESCRIPTION
W55RP20-EVB-MKR Module MicroPython Practice (3) - TCP Client Communication
This is the 3rd article in the WIZnet W55RP20 chip MicroPython tutorial series, written based on the latest official firmware. All code has been practically verified and can be directly flashed and run.Copyright Notice: This is an original technical article by WIZnet. Please indicate the source when reprinting.
Preface
In the previous practical tutorial, we completed the DHCP automatic networking test for the W55RP20-EVB-MKR, where the development board can automatically obtain an IP address through the router and successfully connect to the local network.
After completing basic networking, the next step is to proceed with actual data communication testing.
This article will introduce TCP Client communication. After the development board obtains an IP address via DHCP, it will act as a TCP Client to actively connect to the TCP Server on the computer. After the computer sends test data, the development board will receive the data and send back a response.
TCP is a connection-oriented reliable transport protocol, suitable for scenarios that require stable data transmission, such as device status reporting, sensor data uploading, and remote control command interaction.
The W55RP20 integrates a hardware TCP/IP protocol stack, and combined with MicroPython's socket interface, TCP Client communication can be implemented with minimal code, without the need to manually handle low-level TCP protocol details.
After reading this article, you will master:
The basic relationship between TCP Client and TCP Server
How to start a TCP Server testing tool on the computer
How to have the W55RP20-EVB-MKR actively connect to a TCP Server
How to receive data sent from the computer via TCP
How to echo the received data back to the computer
Common troubleshooting methods when TCP Client communication fails
Series Tutorial Learning Path
This series consists of 16 articles, progressively covering the full process from basic networking to industrial-grade applications:
Article 1: Static IP Configuration and Network Basics
Article 2: DHCP Automatic Networking and Network Diagnostics
Article 3: TCP Client Communication (This Article)
Article 4: TCP Server Communication
Article 5: UDP Unicast Data Communication
Article 6: UDP Multicast/Broadcast Data Communication
Article 7: DNS Domain Name Resolution
Article 8: NTP - Getting Time from the Network
Article 9: HTTP Client Requests
Article 10: HTTP Server Setup
Article 11: HTTP Protocol and OneNET Platform Data Cloud Upload
Article 12: MQTT Protocol Basic Communication Verification
Article 13: MQTT Protocol Integration with Alibaba Cloud Platform
Article 14: MQTT Protocol Integration with OneNET Platform
Article 15: MQTT Protocol Integration with ThingSpeak Platform
Article 16: Modbus Industrial Protocol Communication
It is recommended to bookmark this series and follow the tutorials step by step. All code will be同步 updated to the official Gitee repository.
In embedded Ethernet communication, a device can not only act as a TCP Server waiting for connections, but also as a TCP Client actively connecting to a server.
TCP Client typically runs on the device side, where the device actively connects to a host computer, server, or cloud platform. After the connection is successfully established, bidirectional data communication can occur between the client and the server.
1.1 What is TCP
TCP, fully known as Transmission Control Protocol, is commonly referred to as 传输控制协议 in Chinese.
TCP is a connection-oriented reliable transport protocol. Before formally transmitting data, both communicating parties need to establish a connection first; after the connection is established, both parties can perform stable data sending and receiving.
The characteristics of TCP can be summarized as:
Characteristic
Description
Connection-oriented
A connection needs to be established before communication
Reliable transmission
Suitable for application scenarios requiring stable transmission
Bidirectional communication
After the connection is established, both the client and server can send and receive data
Widely used
Commonly used in host computer communication, server communication, cloud communication, and other scenarios
1.2 Relationship Between TCP Client and TCP Server
TCP communication typically consists of two roles: Client and Server.
Role
Description
TCP Server
Listens on a specified IP and port, waiting for client connections
TCP Client
Actively connects to the TCP Server's IP and port
After connection established
Both parties can send and receive data
In simple terms:
TCP Server: Starts first, waits for client connections
TCP Client: Actively connects to TCP Server
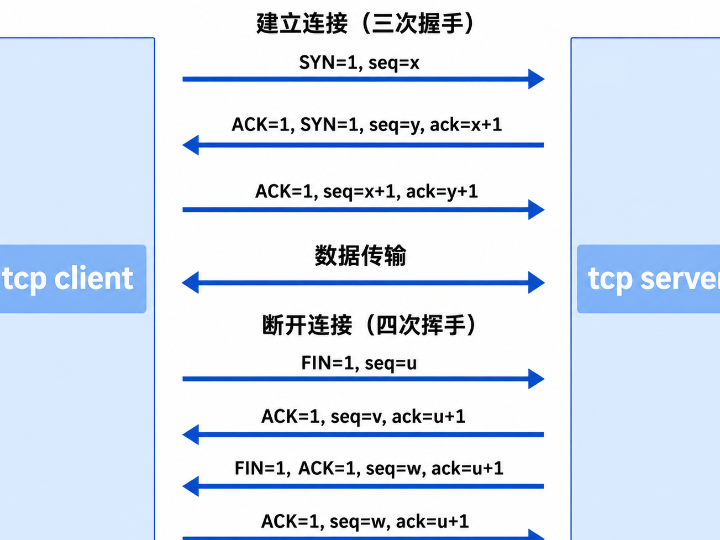
1.3 TCP Client Workflow
The communication process of TCP Client is shown in the following diagram:
From the flow, it can be seen that the core of TCP Client is: creating a Socket, actively connecting to the server, and performing data sending and receiving after the connection is successful.
1.4 Advantages of TCP Client
TCP Client communicates based on the TCP protocol, featuring reliable, ordered, and bidirectional communication, making it suitable for embedded network applications that require stable connections.
Advantage
Description
Active connection
The device can actively connect to a host computer, server, or cloud platform
Stable communication
Data sending and receiving based on reliable TCP connection
Bidirectional communication
After the connection is established, both Client and Server can send and receive data
Easy to debug
Communication results can be quickly verified using tools like SocketTester
Widely used
Suitable for data uploading, remote control, device status reporting, and other scenarios
For embedded devices, TCP Client is commonly used in scenarios where "the device actively connects to a server." For example, after powering on, the device actively connects to a host computer or cloud server, and then uploads data or receives control commands sent by the server.
Used as TCP Server on the computer to wait for the development board to connect
2.2 Hardware Preparation
As shown in the figure, the physical image of the W55RP20-EVB-MKR development board.
The following hardware needs to be prepared:
W55RP20-EVB-MKR development board × 1
USB data cable (must support data transmission, pure charging cables cannot be used) × 1
Standard Ethernet cable × 1
Router or switch × 1
W55RP20-EVB-MKR has an onboard Ethernet interface, no additional soldering or wiring of other components is needed, it is plug-and-play.This greatly reduces the probability of wiring errors and hardware failures.
3 Flashing W55RP20 Dedicated MicroPython Firmware
W55RP20 is fully compatible with the Raspberry Pi Pico UF2 firmware flashing method, which is simple to operate and does not require an additional programmer:
Press and hold the BOOTSEL button on the W55RP20-EVB-MKR
Connect the development board to the computer using a Micro USB data cable
After the computer recognizes a USB drive named RPI-RP2, release the BOOTSEL button
Drag and drop the downloaded W55RP20_firmware.uf2 firmware file into the USB drive
The development board will automatically restart, and the firmware flashing is complete
Note: If the computer does not recognize the RPI-RP2 USB drive, please try replacing the USB data cable, re-plugging the development board, or changing the computer's USB port.
4 Hardware Connection and Development Environment Configuration
4.1 Hardware Connection
The connection of W55RP20-EVB-MKR is very simple, requiring only two steps:
Connect the development board to the computer using a USB data cable, for power supply, code flashing, and serial debugging
Connect the Ethernet interface of the development board to the LAN port of the router using an Ethernet cable
As shown in the figure, the hardware connection schematic diagram
4.2 Thonny Development Environment Configuration
Open Thonny software, click the top menu bar "Run" → "Configure Interpreter"
Switch to the "Interpreter" tab
Select MicroPython (generic) from the "Interpreter" dropdown list
Select the serial port corresponding to W55RP20-EVB-MKR from the "Port" dropdown list (usually displayed as Board CDC @ COMx)
Check "Restart interpreter before running code" and "Synchronize device's real-time clock"
Click "OK" to complete the configuration
If the development board does not appear in the port list, please try:
Re-plug the USB data cable
Replace with a USB data cable that supports data transmission
Close other software occupying the serial port (such as Serial Assistant, Arduino IDE, etc.)
Re-flash the MicroPython firmware
5 SocketTester Configuration
The computer needs to start a TCP Server first, waiting for the development board to connect.
After opening SocketTester, configure it as follows:
Parameter
Setting
Protocol
TCP server
Local IP address
192.168.1.119
Listen port number
8082
Decode as
ASCII
Encode as
ASCII
After configuration is complete, click the listen button to put the computer into TCP Server waiting for connection state.
Note: Local IP address needs to be set to the IP address of the computer's current local network, which is 192.168.1.119 in this experiment.Listen port number needs to be consistent with PC_PORT in the development board code, which is 8082 in this experiment.
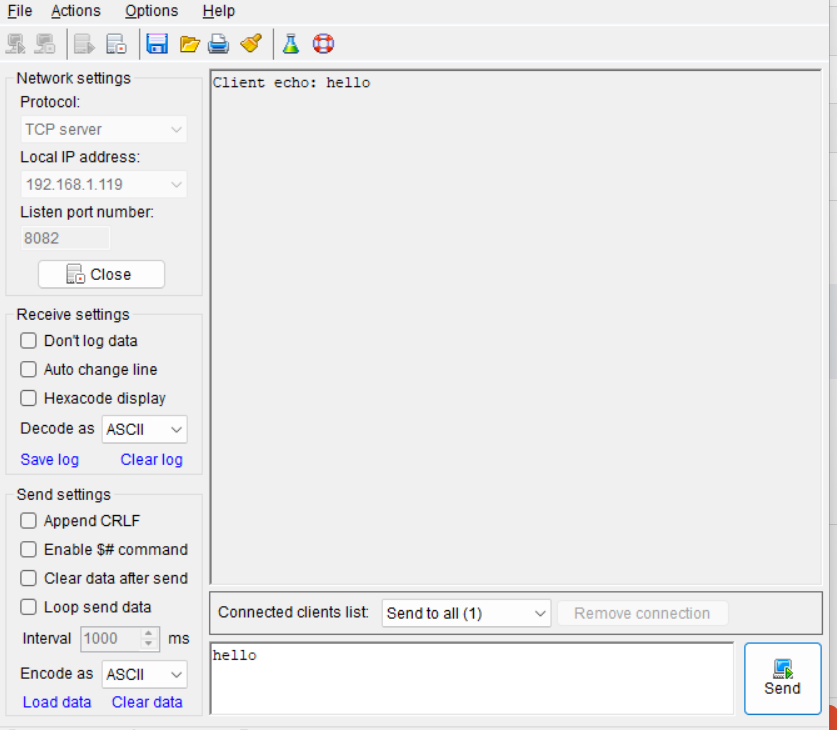
The SocketTester configuration interface is shown in the following figure:
6 TCP Client Example Code
6.1 Complete Code
Open the TCP Client example file, or enter the following code in Thonny:
fromwiznet_initimportwiznet importusocketassocket importtime # Initialize W55RP20-EVB-MKR network # dhcp=True means automatically obtaining IP address through the router nic = wiznet("W55RP20-EVB-MKR", dhcp=True) # Print the development board's current IP address print("IP:", nic.ifconfig()[0]) # IP address and listening port of the computer's TCP Server PC_IP = "192.168.1.119" PC_PORT = 8082 whileTrue: s = None try: # Create TCP Socket s = socket.socket() # Actively connect to the computer's TCP Server print("Preparing to connect to computer...") s.connect((PC_IP, PC_PORT)) print("Connected to computer, waiting for data from computer...") whileTrue: # Receive data sent from the computer, maximum 1024 bytes data = s.recv(1024) # If no data is received, the computer may have disconnected ifnotdata: print("Computer actively disconnected") break # Print the received data print("Received command:", data) # Compose reply data reply = b"Client echo: "+data # Send reply data to the computer's TCP Server s.send(reply) print("Replied:", reply) exceptExceptionase: # If connection fails or communication exception occurs, print exception information print("Connection failed or disconnected:", repr(e)) try: # Close the current Socket ifs: s.close() except: pass # Wait 2 seconds before retrying the connection time.sleep(2)
6.2 Key Function Description
The core functions of TCP Client in this example are as follows:
Function/Statement
Purpose
socket.socket()
Create TCP Socket
s.connect((PC_IP, PC_PORT))
Actively connect to the computer's TCP Server
s.recv(1024)
Receive data sent by the server
s.send(reply)
Send reply data to the server
s.close()
Close the current Socket
Among them, connect() will actively connect to the computer's TCP Server, and recv() will block and wait for the computer to send data.
7 Running Results and Communication Verification
After completing the SocketTester configuration and running the TCP Client example program, you can observe the communication results through the Thonny Shell and SocketTester window.
7.1 Thonny Serial Output Results
After running the program, the Thonny Shell outputs the following:
>>> %Run -c $EDITOR_CONTENT MPY: soft reboot Waiting for the network to connect... Waiting for the network to connect... Waiting for the network to connect... Waiting for the network to connect... MAC Address: 02:90:86:88:4d:56 IP Address: ('192.168.1.123', '255.255.255.0', '192.168.1.1', '202.96.134.33') IP: 192.168.1.123 Preparing to connect to computer... Connection failed or disconnected: OSError(104,) Preparing to connect to computer... Connected to computer, waiting for data from computer... Received command: b'hello' Replied: b'Client echo: hello'
From the running results, it can be seen that the development board obtained the IP address 192.168.1.123 via DHCP, and actively connected to the computer's TCP Server.
The computer's SocketTester acts as TCP Server, with the listening address and port:
192.168.1.119:8082
Subsequently, the computer sent hello, the development board received b'hello', and sent back b'Client echo: hello', indicating that TCP Client communication was successful.
Note: The initial Connection failed or disconnected: OSError(104,) usually occurs because the computer's TCP Server has not yet fully entered the listening state, or the previous connection has not been fully released. The program will automatically reconnect after 2 seconds, and once the connection is successful, data can be sent and received normally.
7.2 SocketTester Reception Results
In the SocketTester send box on the computer, enter:
hello
After clicking Send, the development board will receive this data and send back:
Client echo: hello
The SocketTester reception window shows:
Client echo: hello
The actual running effect is shown in the following figure, with the Thonny running log on the left and the SocketTester TCP Server data send/receive window on the right.
From the screenshot, it can be seen that the development board has successfully connected to the computer's TCP Server, and completed the hello data reception and Client echo: hello echo verification.
7.3 TCP Client Communication Video Demonstration
The following video demonstrates the process of W55RP20-EVB-MKR acting as a TCP Client connecting to the computer's TCP Server and completing data echo.
8 Common Issues One-Stop Troubleshooting Guide
8.1 TCP Server Not Started on Computer
Problem Phenomenon
Troubleshooting Steps
Development board keeps printing Connection failed or disconnected
<div align="left">1. Confirm that SocketTester has selected TCP server2. Confirm that the computer has clicked the listen button3. Confirm that SocketTester shows a listening state4. Confirm that the port number is consistent with PC_PORT in the code</div>
8.2 Incorrect PC_IP or Port
Problem Phenomenon
Troubleshooting Steps
Development board cannot connect to computer
<div align="center"><div align="left" style="display:inline-block;">1. Confirm that PC_IP is the computer's current local network IP2. Confirm that PC_PORT is consistent with SocketTester's listening port3. Confirm that the computer and development board are connected to the same router4. Confirm that the computer firewall is not blocking TCP connections</div></div>
The computer IP and port in this article's code are:
PC_IP = "192.168.1.119"
PC_PORT = 8082
If your computer IP or port is different, you need to modify them according to the actual situation.
8.3 OSError(104) Occurs
If you see the following during operation:
Connection failed or disconnected: OSError(104,)
This usually indicates that the TCP connection was closed by the peer, or the computer's TCP Server is not yet ready.
You can try:
Confirm that SocketTester has started listening
Close and reopen SocketTester
Rerun the development board program
Wait for the program to automatically reconnect
Check if there is a previous connection that has not been fully released
If a successful reconnection occurs later, and the following appears normally:
Connected to computer, waiting for data from computer...
Received command: b'hello'
Replied: b'Client echo: hello'
Then TCP Client communication has succeeded.
8.4 Program Stuck at recv()
The following in the code:
data = s.recv(1024)
is a blocking wait for receiving data.
If the computer does not send data, the program will stay here indefinitely. This is normal behavior and is not a crash.
Solutions:
Enter data in the SocketTester send box, for example hello
Confirm that Connected clients list is set to Send to all (1)
Click Send
Check if Thonny prints the received data
8.5 Computer Cannot Receive Reply
If the development board has received data but the computer's SocketTester does not show a reply, you can check:
Whether SocketTester has checked Don't log data
Whether the SocketTester reception area has been cleared
Whether Decode as is set to ASCII
Whether the development board code has executed s.send(reply)
Whether the TCP connection has already been disconnected
When the computer normally receives a reply, it should display:
Client echo: hello
9 W55RP20 Core Advantages Comparison
To give you a more intuitive understanding of the value of W55RP20, we compared the three mainstream embedded Ethernet solutions:
Comparison Dimension
W55RP20 Integrated Solution
External PHY Chip Solution
External Serial-to-Ethernet Module Solution
BOM Cost
Low(Single chip)
Medium-High(MCU + Module + Peripheral components)
High
PCB Area
Small(Only Ethernet port circuitry needed)
Large(Need to reserve chip and routing space)
High
Development Difficulty
Low(One line of code for networking)
Medium-High(Debug protocol stack, write drivers)
Low
Network Stability
Extremely High(WIZnet has focused on hardware TCP/IP protocol stack for 25 years)
Variable(Requires high expertise from R&D personnel, familiarity with protocol stack and network development to debug stably)
Variable(Depends on R&D company's capability level)
CPU Resource Usage
0%(Protocol stack network processing entirely handled by hardware)
Over 50%(Protocol stack runs entirely on MCU, occupying related resources)
0%
Hardware Socket Count
8 independent hardware Sockets
Depends on MCU capability, theoretically supports multiple channel expansion
Generally single-channel transparent transmission
Network Throughput
Up to 15Mbps
Depends on MCU capability
Approximately 3-5Mbps
Interface Ease of Use
Single chip integration
MCU needs MII/RMII interfaces
TTL interface
Deployment Difficulty
Low(Mature MicroPython firmware, most application layer protocols have library files, can be flexibly added and deployed)
High(Application layer protocols require manual porting of open-source libraries for adaptation)
Depends on module integration, unimplemented features require self-encapsulation and parsing
10 Typical Application Scenarios
The W55RP20 chip integrates Ethernet functionality and, combined with its industrial-grade stability, is very suitable for the following application scenarios:
Industrial Data Acquisition Gateway: Simplify on-site deployment, achieve stable uploading of sensor data
Remote Monitoring Terminal: Used for remote monitoring of equipment status in factories, server rooms, substations, and other environments
Serial-to-Ethernet Device: Quickly upgrade traditional RS232/RS485 serial devices to Ethernet devices
Smart Building Node: Used for network control of lighting, HVAC, access control, and other building equipment
Industrial PLC Expansion Module: Add Ethernet communication capability to PLCs, enabling remote programming and data acquisition
Article Summary
Starting from the basic principles of the TCP protocol, this article systematically introduced how to implement TCP Client communication based on the W55RP20-EVB-MKR development board. With the support of the WIZnet hardware TCP/IP protocol stack and MicroPython's socket interface, only a small amount of code is needed to complete the entire process of the development board actively connecting to a TCP Server, receiving data, and sending echo responses, laying a solid foundation for advanced applications such as TCP Server, UDP communication, and MQTT cloud connectivity.
Reviewing the core points of this article:
TCP Protocol Principles: Understood the core characteristics of TCP as a connection-oriented reliable transport protocol — a connection must be established before communication, bidirectional data sending and receiving is supported after connection, suitable for embedded network applications requiring stable transmission
TCP Client and Server Relationship: Mastered the role division in TCP communication where the Client actively connects and the Server waits for connections, as well as the typical application pattern of the development board as a Client actively connecting to a host computer or server
SocketTester Configuration: Completed the configuration of the TCP Server testing tool on the computer, including protocol selection, IP address and port settings, ensuring consistency with the development board code parameters
TCP Client Code Implementation: Used socket.socket() to create a Socket, connect() to actively connect to the server, recv() to receive data, send() to send replies, and ensured communication reliability through exception handling and automatic reconnection mechanisms
Communication Result Verification: Verified bidirectionally through Thonny serial output and SocketTester reception window, confirming that the development board successfully received data from the computer and echoed Client echo: hello, TCP Client communication function is complete
Fault Troubleshooting: Summarized troubleshooting methods for five categories of common issues: TCP Server not started, incorrect IP/port, OSError(104) connection disconnect, recv() blocking wait, and computer unable to receive reply
After mastering the TCP Client communication technology in this article, your embedded device already has the core capability to actively connect to a server and perform bidirectional data interaction. The next article will move on to learning TCP Server communication, implementing the communication mode where the development board listens on a port and waits for client connections.
11 Series Preview and Resource Access
11.1 Series Preview
The next tutorial will cover TCP Server Communication in W55RP20 MicroPython development.
Unlike TCP Client which actively connects to a server, TCP Server will listen on a specified port on the development board, waiting for the computer or other clients to actively connect.


The following hardware needs to be prepared: