
W55RP20-EVB-MKR MicroPython Tutorial (7):Quick DNS Domain Resolution
This is Part 7 of the WIZnet W55RP20 MicroPython tutorial series, written based on the latest official firmware
This is Part 7 of the WIZnet W55RP20 MicroPython tutorial series, written based on the latest official firmware. All code has been tested and verified — ready to flash and run. Copyright Notice: This is an original technical article by WIZnet. Please credit the source when reprinting.
Foreword
In the previous tutorial, we completed UDP multicast/broadcast development, enabling batch communication across multiple devices on a LAN. In real-world IoT projects, however, devices need not only LAN communication but also the ability to access public internet servers — which requires DNS domain resolution.
When we combine the WIZnet W5500 network module with MicroPython and the Raspberry Pi Pico, the development potential is amplified further. This module features a built-in hardware TCP/IP stack, making network connectivity and domain resolution on embedded devices remarkably easy. Whether for data transmission, remote control, or building IoT applications, they provide robust support.
The W55RP20 integrates a hardware TCP/IP stack. Pair it with the MicroPython development environment, and you can achieve stable DNS resolution with just a few lines of code — no need to worry about low-level socket details, effortlessly converting domain names to IP addresses.
After completing this tutorial, you will master:
Core principles and workflow of the DNS protocol
Setting up the W55RP20-EVB-MKR development environment and flashing firmware
Minimal code for domain resolution — converting domain names to IP addresses
Testing and verifying DNS resolution, plus common troubleshooting
Core advantages of WIZnet hardware TCP/IP stack chips
Tutorial Series Learning Path
This series consists of 16 parts, covering the full journey from basic networking to industrial-grade applications:
Part 1: Static IP Configuration & Networking Basics
Part 2: DHCP Auto-Networking & Network Diagnostics
Part 3: TCP Client Communication
Part 4: TCP Server Communication
Part 5: UDP Unicast Data Communication
Part 6: UDP Multicast & Broadcast Data Communication
Part 7: DNS Domain Resolution (this article)
Part 8: NTP — Getting Time from the Network
Part 9: HTTP Client Requests
Part 10: Building an HTTP Server
Part 11: HTTP Protocol & OneNET Cloud Data Upload
Part 12: MQTT Protocol — Basic Communication Verification
Part 13: MQTT Protocol & Alibaba Cloud Integration
Part 14: MQTT Protocol & OneNET Platform Integration
Part 15: MQTT Protocol & ThingSpeak Platform Integration
Part 16: Modbus Industrial Protocol Communication
Bookmark this series and follow along step by step. All code will be synced to the official Gitee repository.
Table of Contents
1 DNS Domain Resolution Principles
1.4 Typical DNS Application Scenarios
3 Flashing W55RP20-EVB-MKR MicroPython Firmware
4 Hardware Connection & Development Environment Setup
5.3 Extension: DNS Configuration with Static IP
6 Execution Results & Verification
6.2 DNS Resolution Verification Methods
7 One-Stop Troubleshooting Guide
7.3 Network Connection & DNS Resolution Issues
8 WIZnet Hardware TCP/IP Stack — Core Advantages Comparison
9 Typical Application Scenarios
11 Upcoming Tutorials & Resources
1. DNS Domain Resolution Principles
1.1 Introduction to DNS
DNS (Domain Name System) is a core service of the Internet. It is a distributed database that maps domain names to IP addresses, allowing users to conveniently access the Internet without needing to remember machine-readable numeric IP strings.
On the Internet, every computer has a unique identifier called an IP address. However, IP addresses are composed of numbers and are not easy for people to remember. That's why we typically use domain names to visit websites.
In simple terms, the core function of DNS is to "convert domain names into IP addresses" — acting as the Internet's "address book," enabling people to quickly find corresponding network devices through easy-to-remember domain names.
1.2 DNS Workflow
The complete DNS resolution workflow on the W55RP20-EVB-MKR module is as follows:
Board powers on → initializes SPI interface → activates the W55RP20-EVB-MKR network module
Automatically obtains network parameters via DHCP (IP address, subnet mask, gateway, DNS server address)
User enters the target domain name; the program calls the DNS resolution function
The board sends a domain resolution request to the DNS server
The DNS server queries the IP address corresponding to the domain and returns the resolution result
The board receives the resolution result, extracts the IP address, and prints it — DNS resolution complete
The resolved IP address can then be used for TCP/UDP communication, web access, and more
1.3 Core Advantages of DNS
Easy to remember: People find it much easier to remember word/phrase-based domain names than complex numeric IP addresses
High flexibility: Websites can change server IP addresses without notifying users — simply update the DNS server record, and users can still access via the original domain
Load balancing: DNS can resolve a single domain to multiple IP addresses, distributing load across multiple servers to improve website availability and performance
Enhanced security: Through DNSSEC (Domain Name System Security Extensions), DNS spoofing attacks can be prevented, ensuring the authenticity of resolution results
1.4 Typical DNS Application Scenarios
| Scenario | Description |
|---|---|
| Web browsing | Access websites via domain names without memorizing IP addresses |
| Mail servers query the recipient's mail server IP via DNS | |
| Network communication | Embedded devices resolve domains to connect to remote servers (e.g., IoT platforms) |
| Online gaming / VoIP | Resolve game server or peer device IP addresses via DNS |
| Cloud service access | Access services like AWS, Azure via domain names without worrying about IP changes |
2. Prerequisites
2.1 Software Preparation
| Software | Version Requirement | Download Link | Description |
|---|---|---|---|
| Thonny | 4.0 or later | Thonny Official Download | Lightweight MicroPython IDE — supports code editing, flashing, and serial debugging. Beginner-friendly |
| W55RP20-EVB-MKR MicroPython Firmware | Latest stable | WIZnet Official Firmware Download | Purpose-built for W55RP20-EVB-MKR, pre-integrated with WIZnet hardware drivers and TCP/IP stack |
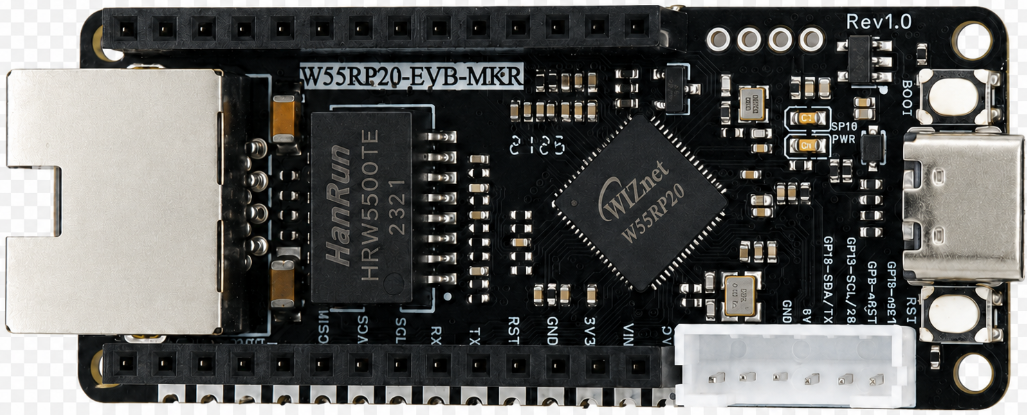
2.2 Hardware Preparation
Prepare the following hardware:
W55RP20-EVB-MKR development board × 1
Micro USB data cable (must support data transfer — charging-only cables will not work) × 1
Standard Ethernet cable × 1
Router/switch with DHCP enabled × 1
Tip: The W55RP20-EVB-MKR module already integrates all Ethernet-related components — no additional soldering or jumper wires needed. Combined with the RP2040 board, you can quickly set up a development environment, significantly reducing wiring errors and hardware failure probability.
3. Flashing W55RP20-EVB-MKR MicroPython Firmware
The W55RP20-EVB-MKR module is fully compatible with the Raspberry Pi Pico UF2 firmware flashing method. Follow these steps:
Press and hold the BOOTSEL button on the RP2040 board
Connect the board to your computer using the Micro USB data cable
Once the computer recognizes a USB drive named RPI-RP2, release the BOOTSEL button
Drag the downloaded .uf2 firmware file into the RPI-RP2 drive
The board will automatically reboot — firmware flashing is complete
Note: If your computer does not recognize the
RPI-RP2drive, try reconnecting the USB cable, using a different data-capable USB cable, switching to another USB port (prefer USB 2.0 ports), or trying another computer.
4. Hardware Connection & Development Environment Setup
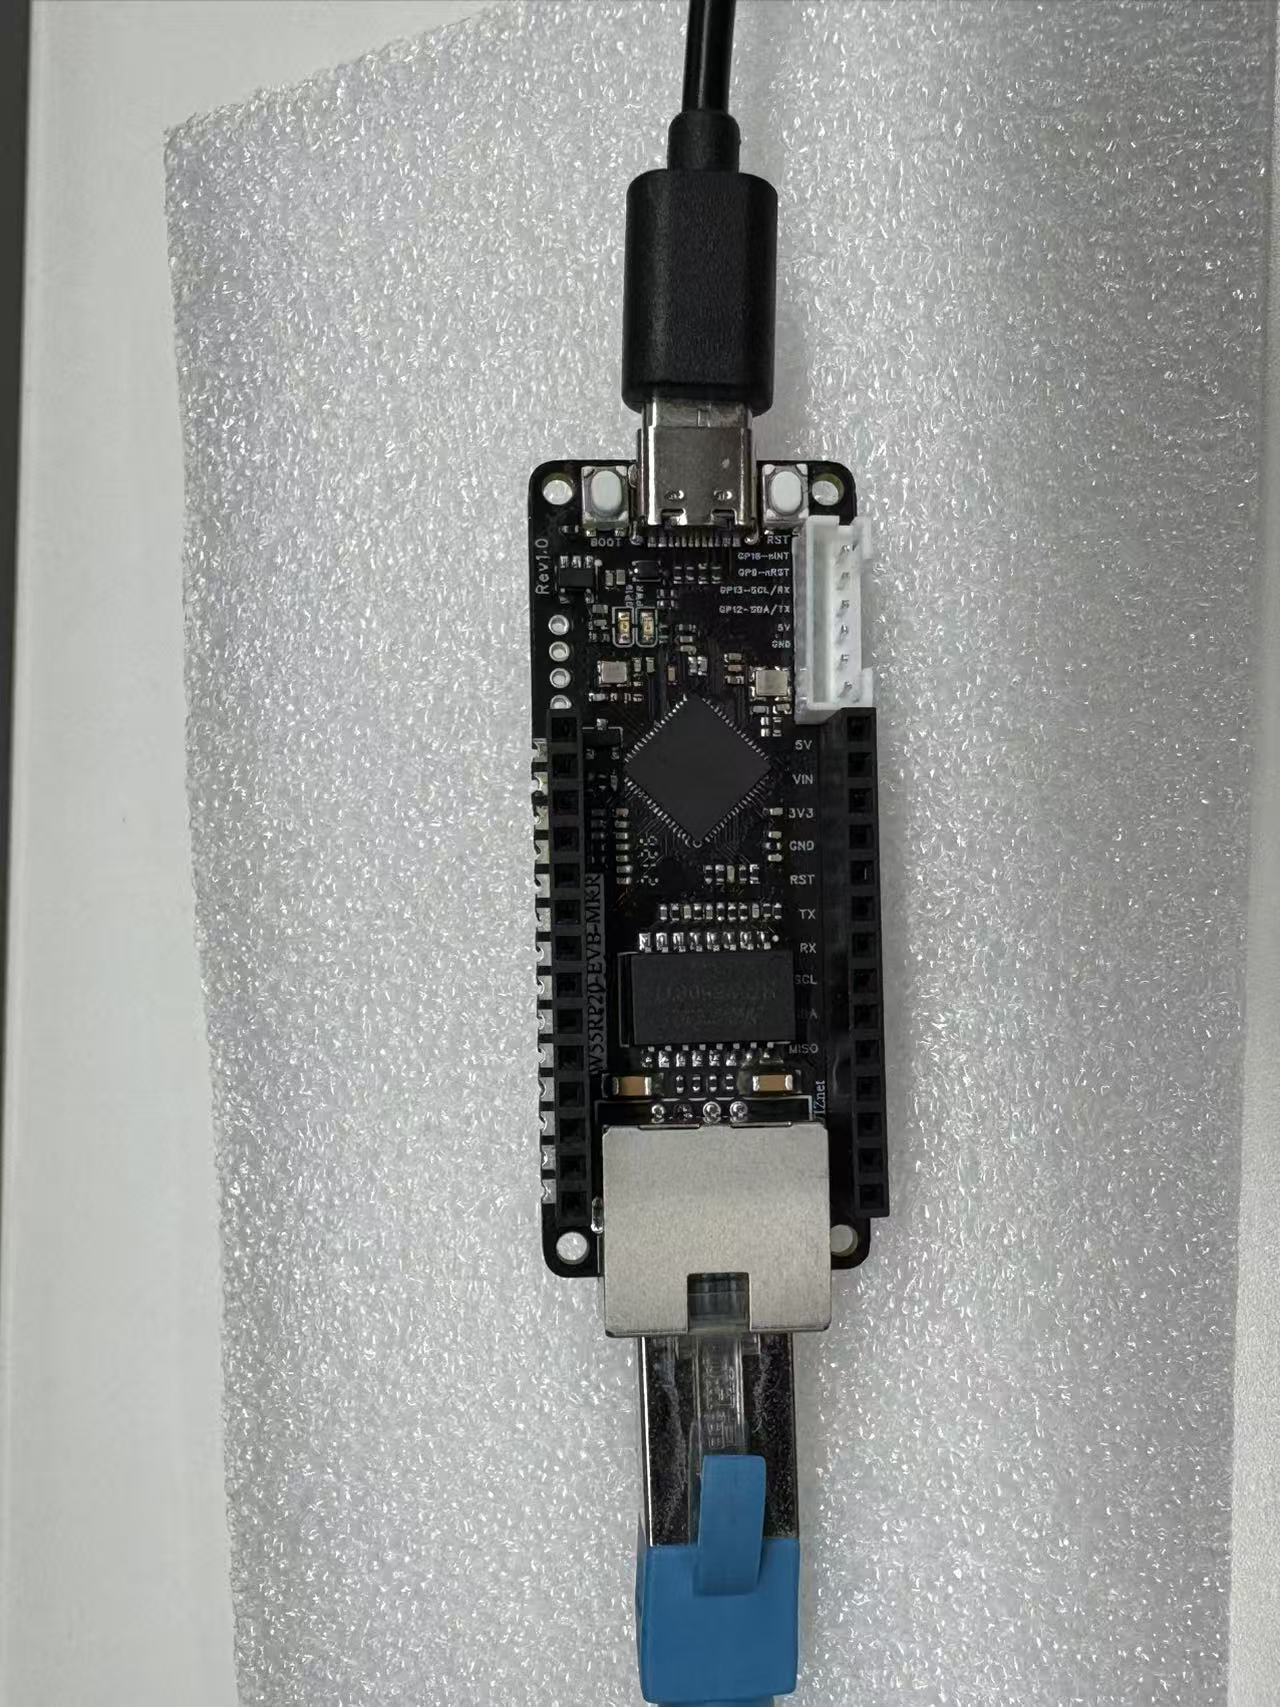
4.1 Hardware Connection
Connecting the W55RP20-EVB-MKR is extremely simple — just two steps:
Use the Micro USB data cable to connect the RP2040 board to your computer (for power, code flashing, and serial debugging)
Use the Ethernet cable to connect the W55RP20-EVB-MKR module's Ethernet port to the router's LAN port
If using a discrete module (e.g., W5100S/W5500 IO module + RP2040), connect according to the SPI pin mapping in the module's hardware manual.
4.2 Thonny IDE Configuration
Open Thonny, click the top menu: "Run" → "Configure Interpreter"
Switch to the "Interpreter" tab
Select MicroPython (generic) from the "Interpreter" dropdown
Select the COM port corresponding to W55RP20-EVB-MKR from the "Port" dropdown (typically shown as Board CDC @ COMx)
Check "Restart interpreter before running code" and "Sync device's real-time clock"
Click "OK" to complete configuration
If the board does not appear in the port list, try:
Reconnecting the USB data cable
Using a different data-capable USB cable
Closing other software that occupies the serial port (serial monitors, Arduino IDE, etc.)
Re-flashing the MicroPython firmware
Installing the Raspberry Pi Pico USB driver
5. Core Code Walkthrough
The W55RP20-EVB-MKR module's MicroPython library has already encapsulated all low-level details. Implementing DNS resolution requires only a small amount of core code — no need to write complex low-level drivers or protocol parsing logic. The code is ready to flash and run.
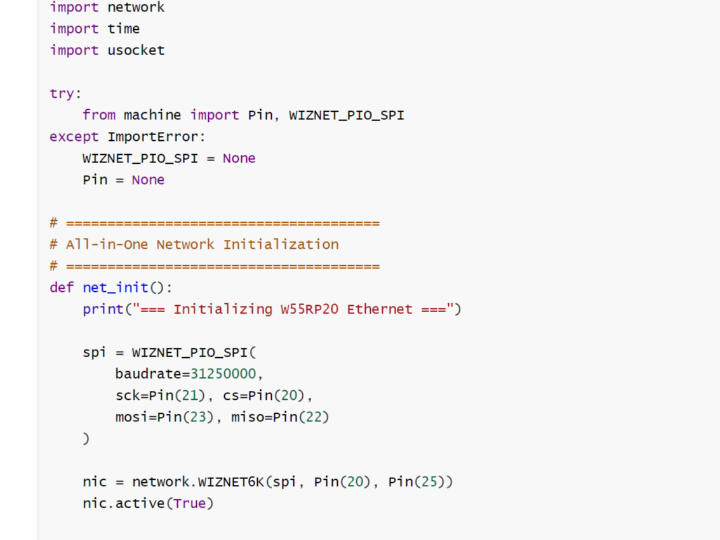
5.1 Complete Code
import network
import time
import usocket
try:
from machine import Pin, WIZNET_PIO_SPI
except ImportError:
WIZNET_PIO_SPI = None
Pin = None
# ======================================
# All-in-One Network Initialization
# ======================================
def net_init():
print("=== Initializing W55RP20 Ethernet ===")
spi = WIZNET_PIO_SPI(
baudrate=31250000,
sck=Pin(21), cs=Pin(20),
mosi=Pin(23), miso=Pin(22)
)
nic = network.WIZNET6K(spi, Pin(20), Pin(25))
nic.active(True)
# Public DNS configuration
nic.ifconfig((
"192.168.1.100", # Static IP
"255.255.255.0", # Subnet mask
"192.168.1.1", # Gateway
"114.114.114.114" # DNS
))
while not nic.isconnected():
print("Waiting for network connection...")
time.sleep(1)
print("Network connected")
print("IP:", nic.ifconfig()[0])
print("DNS:", nic.ifconfig()[3])
return nic
# ======================================
# All-in-One Domain Resolution
# ======================================
def resolve(host):
print(f"\nResolving: {host}")
for i in range(3): # Auto-retry up to 3 times
try:
addr = usocket.getaddrinfo(host, 80)[0][-1][0]
print(f"Success: {addr}")
return addr
except:
print(f" Retry {i+1}...")
time.sleep(1)
print("Resolution failed")
return None
# ======================================
# Main: Test all domains
# ======================================
def main():
net_init()
domains = [
"www.baidu.com",
"api.thingspeak.com",
"mqtt.thingspeak.com",
"www.taobao.com",
"www.google.com"
]
for d in domains:
resolve(d)
time.sleep(1)
print("\n=== All-in-One DNS Resolution Complete ===")
if __name__ == "__main__":
main()
5.2 Key Code Steps Explained
Library imports: Import four core libraries — usocket (DNS resolution), Pin/SPI (hardware control), network (network module), time (delays)
Network initialization: Initialize the SPI interface with specified baud rate and pin mapping matching the hardware wiring; create a WIZNET6K network object binding SPI, CS, and RST pins; configure static IP and DNS server address (114.114.114.114 is a public DNS in China); wait for the network connection to succeed and print network parameters for easy debugging
DNS resolution: Call usocket.getaddrinfo with domain name and port; built-in 3-retry mechanism for improved success rate; extract the IP address from the result and return as a string
Main function: Define a list of domains to resolve (customizable); call the DNS resolution function sequentially and print results
5.3 Extension: DNS Configuration with Static IP
If your development environment has no DHCP (e.g., no router), you need to manually configure a static IP and DNS server address. Simply modify the ifconfig static IP configuration line:
# Static IP format: (IP address, subnet mask, gateway, DNS server address)
# Adjust according to your actual network environment. Recommended public DNS:
# e.g., 8.8.8.8 (Google DNS), 114.114.114.114 (China public DNS)
nic.ifconfig(('192.168.1.20', '255.255.255.0', '192.168.1.1', '114.114.114.114'))
Note: The static IP must be in the same subnet as your computer/server; otherwise, DNS resolution and network communication will fail.
6. Execution Results & Verification
6.1 Serial Output Results
Flash the code to the W55RP20-EVB-MKR module, open the Shell window at the bottom of Thonny, and click the Run button (or press F5). You should see output similar to the following, indicating successful DNS resolution:
MPY: soft reboot
=== Initializing W55RP20 Ethernet ===
Waiting for network connection...
Waiting for network connection...
Network connected
IP: 192.168.1.100
DNS: 114.114.114.114
Resolving: www.baidu.com
Success: 183.2.172.177
Resolving: www.taobao.com
Success: 59.36.64.97
Resolving: www.google.com
Success: 69.171.235.22
=== All-in-One DNS Resolution Complete ===Notes:
Resolved IP addresses may vary slightly depending on network environment and DNS server — this is normal
When a single domain corresponds to multiple server addresses, different resolutions at different times may return different IPs (DNS round-robin / CDN intelligent resolution), which does not affect actual access
6.2 DNS Resolution Verification Methods
After resolution, verify correctness using either of the following methods:
Method 1: Ping the resolved IP from your computer
Open Command Prompt (Windows) or Terminal (Mac/Linux)
Enter: ping <resolved IP> (e.g., ping 183.2.172.177)
If you receive replies like the following, the resolution is correct and the network is reachable:
Reply from 183.2.172.177: bytes=32 time=50ms TTL=64
Reply from 183.2.172.177: bytes=32 time=48ms TTL=64
Reply from 183.2.172.177: bytes=32 time=52ms TTL=64
In practice, the reply IP when pinging the same domain may change — this is normal:
One domain ↔ multiple server addresses: Large websites/services typically deploy multiple servers and use DNS round-robin, CDN, or intelligent resolution to route users to the lowest-latency, nearest node
Domain resolution is essentially "domain → IP mapping": Regardless of which IP is returned, they all point to the same service and do not affect actual access
Method 2: Resolve a different domain
Modify the domains list in the main function (e.g., replace with other domain names), re-run the program, and check whether new IP addresses are correctly resolved — verifying the stability of the DNS resolution functionality.
7. One-Stop Troubleshooting Guide
7.1 Flashing Issues
| Symptom | Troubleshooting Steps |
|---|---|
Computer does not recognize the RPI-RP2 drive | 1. Ensure BOOTSEL is held down BEFORE plugging in the USB cable 2. Try a different data-capable USB cable 3. Try a different USB port (prefer USB 2.0) 4. Try another computer |
| Board unresponsive after dragging firmware | 1. Confirm you downloaded W55RP20-EVB-MKR-specific firmware, not generic Pico firmware 2. Re-flash the firmware, ensuring the cable is not disconnected during transfer 3. Check USB power stability — avoid insufficient power supply |
7.2 Port Recognition Issues
| Symptom | Troubleshooting Steps |
|---|---|
| Board port not showing in Thonny | 1. Reconnect the USB cable, ensuring a firm connection 2. Close other software occupying the serial port (serial monitors, Arduino IDE, etc.) 3. Check Device Manager for a Board CDC device; if absent, install the Raspberry Pi Pico USB driver 4. Re-flash the MicroPython firmware 5. Try a different USB cable or USB port |
7.3 Network Connection & DNS Resolution Issues
| Symptom | Troubleshooting Steps |
|---|---|
| "Configuring DHCP" persists, unable to obtain IP | 1. Check that the Ethernet cable is firmly plugged in and the port LED is blinking 2. Ensure the cable is connected to the router's LAN port, not the WAN port 3. Confirm DHCP is enabled on the router 4. Try a different router LAN port or Ethernet cable 5. Restart the router and the board 6. Switch to static IP configuration and manually set network parameters |
| IP address shows 0.0.0.0 | 1. Perform the network connection troubleshooting steps above 2. Verify that SPI, CS, and RST pin configurations in code match the hardware wiring 3. Confirm you are using W55RP20-EVB-MKR-specific firmware 4. Re-flash firmware and restart the board |
| DNS resolution fails with errors | 1. Verify the DNS server address is correctly configured (DHCP auto or static) 2. Check network connectivity between the board and DNS server (try pinging the DNS server) 3. Confirm the domain name is entered correctly (no typos, no extra spaces) 4. Try a different public DNS server (e.g., 8.8.8.8, 114.114.114.114) 5. Check that the network is functional and the router can access the Internet |
| Computer cannot ping the resolved IP | 1. Ensure the computer and board are connected to the same router (same subnet) 2. Temporarily disable the computer's firewall and antivirus 3. Verify the resolved IP is correct and matches what the board printed 4. Restart the board and computer 5. Check Ethernet cable connection and port health |
8. WIZnet Hardware TCP/IP Stack — Core Advantages Comparison
To give you a clearer picture of the value W5500 hardware TCP/IP stack chips bring to DNS resolution and network communication, we compare three mainstream embedded Ethernet solutions:
| Comparison Dimension | W5500 Hardware TCP/IP Stack | External PHY Chip | External Serial-to-Ethernet Module |
|---|---|---|---|
| BOM Cost | Medium (MCU + network module, no extra components) | Medium-High (MCU + PHY chip + peripheral components) | High |
| PCB Area | Small (Highly integrated module, only module mounting space needed) | Large (Chip, routing space, and peripheral circuitry required) | Medium |
| Development Difficulty | Low (MicroPython firmware encapsulates low-level details; one line of code for networking) | Medium-High (Requires debugging TCP/IP stack, writing low-level drivers; high R&D skill needed) | Low |
| Network Stability | Very High (WIZnet — 25 years focused on hardware TCP/IP; strong anti-interference; stable DNS resolution) | Variable (Depends on developers' TCP/IP stack and network expertise) | Variable (Depends on module vendor's R&D capability and product quality) |
| CPU Resource Usage | 0% (TCP/IP stack fully handled by hardware; zero MCU resource consumption) | 50%+ (TCP/IP stack runs on MCU, consuming significant CPU and memory) | 0% |
| Hardware Socket Count | W5500: 8 independent hardware sockets, supporting concurrent multi-connection | Depends on MCU capability; theoretically supports multi-channel expansion | Typically single-channel transparent transmission |
| Network Throughput | W5500 up to 15 Mbps; fast and smooth DNS resolution | Depends on MCU capability; generally lower than hardware stack solutions | ~3–5 Mbps |
| Interface Ease-of-Use | SPI interface, simple wiring, compatible with most MCUs, supports high-speed communication | Requires MCU with MII/RMII dedicated interfaces; limited compatibility | TTL serial interface |
| Deployment Difficulty | Low (Mature MicroPython firmware; application-layer protocol libraries available; flexible deployment) | High (Application-layer protocols require manual porting of open-source libraries; high debugging cost) | Medium |
The W55RP20-EVB-MKR development board comes with an onboard Ethernet interface, making it ideal for rapid Ethernet functionality verification.
For DNS resolution examples specifically, the W55RP20-EVB-MKR board offers these advantages: no extra Ethernet module connections needed, no complex low-level driver configuration — just a few lines of MicroPython code to complete DNS resolution. Plus, the hardware TCP/IP stack consumes zero MCU resources, making network communication more stable and reliable.
9. Typical Application Scenarios
The W55RP20-EVB-MKR module, combining MicroPython's rapid development advantages with WIZnet hardware TCP/IP stack stability, is well-suited for the following DNS-based embedded and IoT application scenarios:
Industrial data acquisition gateways: Simplify on-site deployment; enable stable upload of sensor, PLC, and other device data
Remote monitoring terminals: For remote device status monitoring and data transmission in factories, server rooms, substations, etc.
Serial-to-Ethernet devices: Quickly upgrade traditional RS232/RS485 serial devices (meters, sensors) to Ethernet-enabled devices
IoT nodes: For network connectivity of smart appliances, smart buildings, etc., enabling remote control and cloud data upload
Embedded learning & development: Ideal for beginners learning embedded networking — quickly master DNS, TCP/UDP, HTTP, and other network protocols
Small servers: Build simple HTTP Servers and TCP Servers for LAN communication between devices
10. Summary
This article started from DNS domain resolution principles and systematically introduced how to quickly implement automatic domain-to-IP conversion using the W55RP20-EVB-MKR development board. With the WIZnet hardware TCP/IP stack, DNS resolution can be achieved with just a few lines of MicroPython code, laying a solid foundation for subsequent public internet communication applications such as HTTP requests and MQTT cloud connectivity.
Key takeaways from this article:
DNS Protocol Principles: Understood DNS as the "Internet's address book" — converting human-readable domain names into machine-readable IP addresses, and grasped the complete DNS query workflow
Development Environment Setup: Completed W55RP20-EVB-MKR firmware flashing and Thonny IDE configuration
DNS Resolution Code Implementation: Used the usocket.getaddrinfo function for domain resolution with a built-in 3-retry mechanism, supporting batch resolution of multiple domains
DNS Configuration with Static IP: Mastered manual DNS server configuration in environments without DHCP, improving code deployment compatibility
Resolution Result Verification: Used both computer ping and domain-switching methods to fully validate DNS resolution correctness, and understood that IP variations due to DNS round-robin / CDN are normal
Troubleshooting: Summarized troubleshooting methods for flashing, port recognition, network connection, and DNS resolution issues
Solution Comparison: Compared W5500 hardware TCP/IP stack, external PHY chip, and serial-to-Ethernet module — the W55RP20's 8 hardware sockets and 0% CPU usage offer standout advantages in scenarios requiring concurrent network requests
Once you master the DNS resolution techniques in this article, your embedded devices will have the core capability to access public internet servers. The next tutorial will dive into NTP network time synchronization, adding precise timekeeping to your devices.
11. Upcoming Tutorials & Resources
11.1 Series Preview
The next tutorial will cover NTP — Getting Time from the Network with W55RP20-EVB-MKR MicroPython, where you will learn about:
NTP protocol principles
Network time synchronization workflow
Local time calibration
Scheduled synchronization and other key mechanisms
Master the core ability to obtain accurate network time on embedded devices, laying the foundation for log timestamping, scheduled task execution, and IoT device timing control
11.2 Resources
Complete code for this article: WIZnet Pico MicroPython Example Project
W55RP20 chip datasheet: WIZnet Official Resources Page
If this article helped you, please like, bookmark, and follow — your support keeps us going!
If you have any questions, feel free to leave a comment — we'll respond as soon as possible.