
W55MH32 Tri-mode Free Control: Mini Program, Button, and Web Page Selection
W55MH32 Tri-mode Free Control: Mini Program, Button, and Web Page Selection
W55MH32 Tri-Mode Free Control: Mini Program/Button/Web Page Selection Available
In industrial automation, smart home, and other fields, are you still struggling with complex multi-chip solutions for adding Ethernet remote control functionality to traditional MCUs? These solutions require a series of components such as an MCU, Ethernet PHY, and network protocol stack, resulting in complex designs, large PCB areas, high BOM costs, and stability challenges.
Now, there's a better solution. Based on the W55MH32 single-chip Ethernet MCU, we use this chip to write code to implement a relay solution. With the power of a single chip, we achieve powerful network functionality comparable to multi-chip solutions, making product networking design simpler than ever before.
## 1. Core Project Value and Implementation Results
Precise on/off control of relays is achieved through three methods: local button, web page, and WeChat mini program, meeting operational needs in different scenarios.
### Supports three control mode switching:
- *Local Button*: Instant physical operation on the device, suitable for emergency on-site control or rapid debugging.
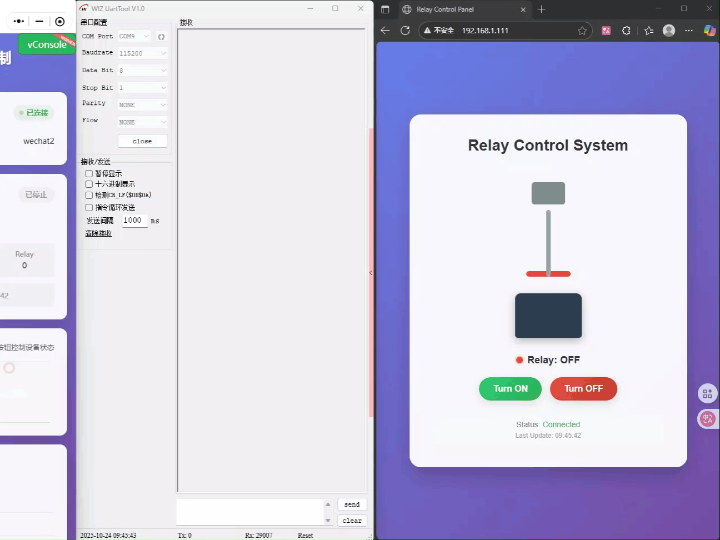
- *Web Control*: Access the device IP via a browser for remote operation through a visual interface, suitable for centralized management of multiple relays.
- *Mini Program Control*: Relying on Alibaba Cloud servers, remote control is available anytime, anywhere via mobile devices, suitable for mobile and unattended scenarios.
Based on an Ethernet + Alibaba Cloud architecture, communication is stable with low latency and rapid command execution response.
*Core Verification*: Verified the high applicability of the W55MH32 in Ethernet relay control scenarios, demonstrating outstanding compatibility and stability across multiple control modes.
In short: Relay on/off states can be flexibly controlled using local buttons, a computer webpage, or a mobile mini program, making it practical for both industrial equipment start/stop and smart home automation.
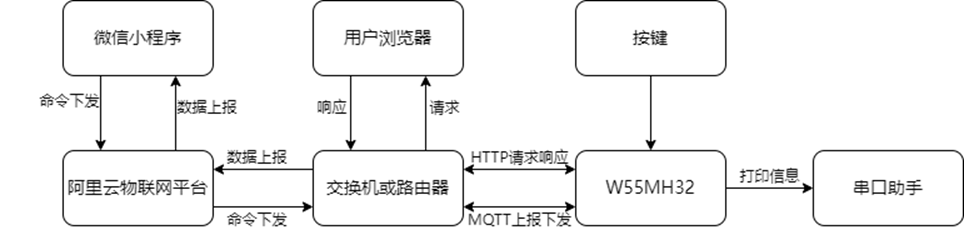
## Solution Diagram
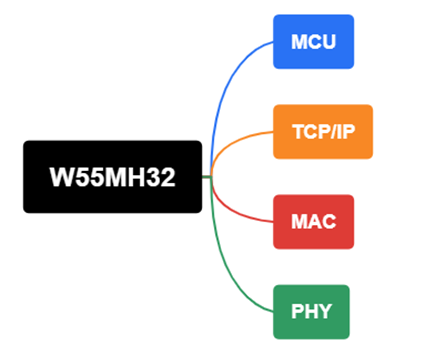
The W55MH32 single-chip integrates a TCP/IP protocol stack and MAC+PHY, eliminating the need for external network chips.
Ordinary solutions require multiple chips to function, while the W55MH32 can directly replace these chips. Furthermore, ordinary solutions use a TCP/IP software protocol stack, which is more difficult to learn and adjust. The W55MH32 uses a hardware TCP/IP protocol stack, requiring only simple configuration to achieve data exchange.
## 2. Communication Architecture Description
The communication process of the entire system is clear and easy to understand, supporting three control modes. While these modes may seem complex, their core control is actually handled independently by a single W55MH32 microcontroller, greatly simplifying hardware design and reducing overall costs:
1. WeChat Mini Program Control (Remote)
- The WeChat Mini Program sends control commands (relay switch)
- The commands are sent to the Alibaba Cloud platform via the MQTT protocol
- The cloud platform forwards the commands
- The W55MH32 parses the sent commands and then executes the corresponding actions
- Device status is reflected through a serial port assistant and a web interface
2. Web Control (LAN)
- The user enters the device's IP address in a browser to access the device's local web server
- Clicking the control button on the web interface
- The browser triggers an HTTP GET request, which is sent directly to the W55MH32 on the device
- The W55MH32 parses the parameters in the HTTP request and directly executes the corresponding relay actions
- Device status can be updated in real time on the web interface and feedback can be provided via serial port assistant and WeChat mini-program.
3. Local Buttons
- The user directly presses the physical button on the circuit board.
- The button action triggers an external interrupt of the W55MH32.
- The W55MH32 firmware immediately detects the button event without going through any network protocol stack.
- The main control chip directly changes the control pin level of the relay to execute the switching action, achieving millisecond-level response.
- The action result can be directly confirmed via serial port assistant, web interface, and WeChat mini-program.
## 3. Why Choose W55MH32? Core Advantages of the Single-Chip Solution
1. Greatly Simplified Design and Reduced Costs
- Traditional Solution: MCU + Ethernet Controller/PHY + Network Protocol Stack (Software Integration or External Chip), complex design, many components.
- W55MH32 Solution: Single-chip integration of Cortex-M3 core, TCP/IP protocol stack, MAC, and PHY. Only RJ45 is directly exposed, significantly reducing hardware design complexity and BOM cost.
2. Stable Performance and Rapid Response
- Hardware-based network processing is more efficient and stable than software protocol stacks. The project verified low latency and high reliability under MQTT communication.
3. Rapid Development and Well-Developed Ecosystem
- Provides a wealth of examples (such as MQTT and HTTP Server involved in this project), lowering the development threshold and accelerating product launch cycles.
4. Application Scenarios
- *Industrial Sector*: Remote start/stop and status monitoring of factory equipment.
- *Smart Building*: Remote centralized control of building lighting and air conditioning systems.
- *Agricultural IoT*: Automated management of greenhouse irrigation and ventilation equipment.
- *Smart Home*: Remote control and intelligent management of home appliances.
5. Project Environment
5.1 Software Preparation
- Development Environment: Keil uVision 5
- Debugging Tool: WIZ UartTool
- Mini Program Development: WeChat Developer Tools
- Cloud Platform: Alibaba Cloud
5.2 Hardware Preparation
- W55MH32L-EVB
- RJ45 Ethernet Cable
## 6. Alibaba Cloud Platform Operation
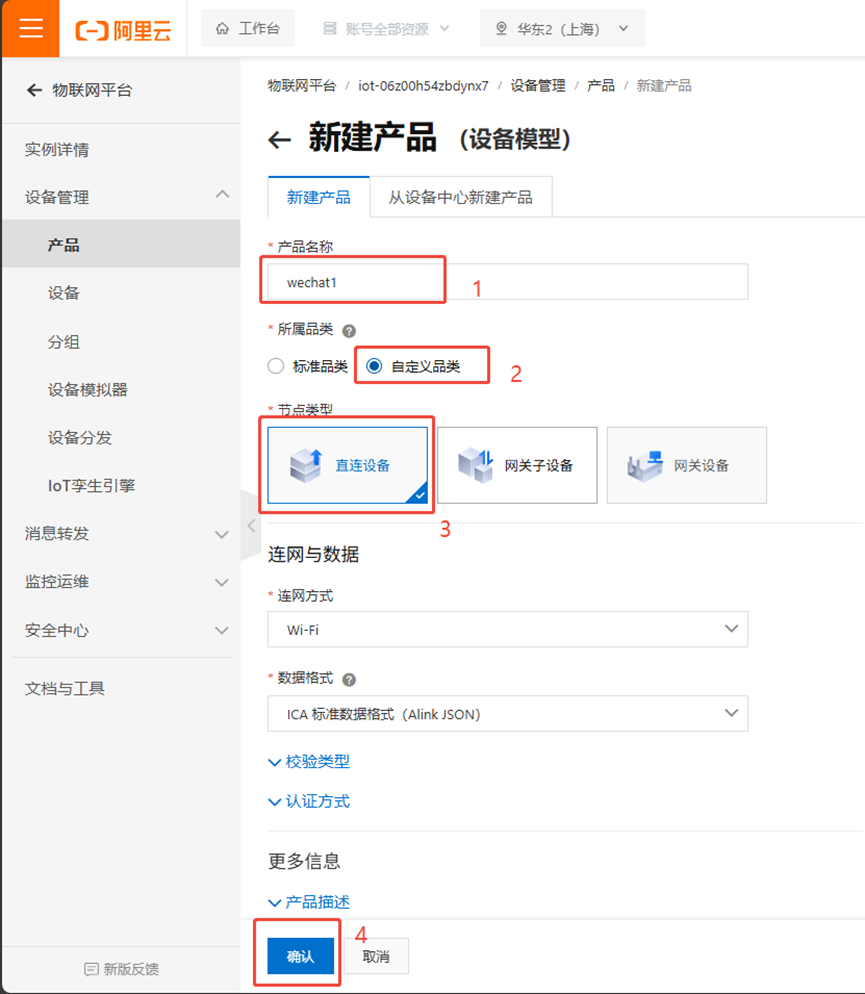
### 6.1 Creating a Product
\1. First, click "Products," then click "Create Product."
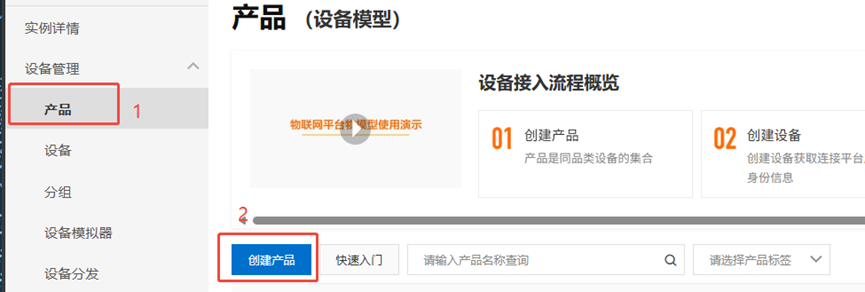
\2. Then, fill in the product name, select according to the image below, and confirm.
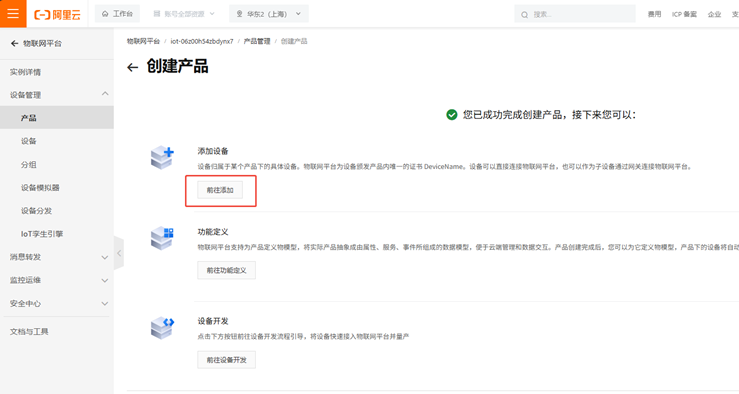
\3. Click "Add Device."
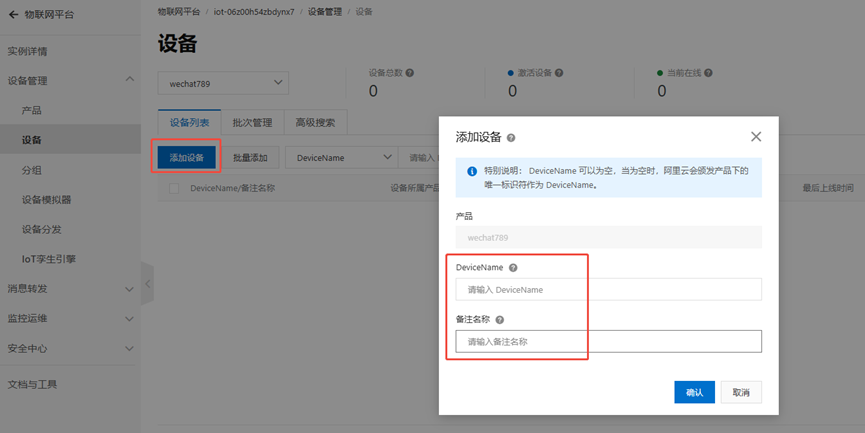
4. Click "Add Device." You can choose and fill in the device name and remarks yourself. This step needs to be repeated twice to add two devices: one for the mini-program and one for the W55MH32. Make sure they are clearly distinguishable and named accordingly.
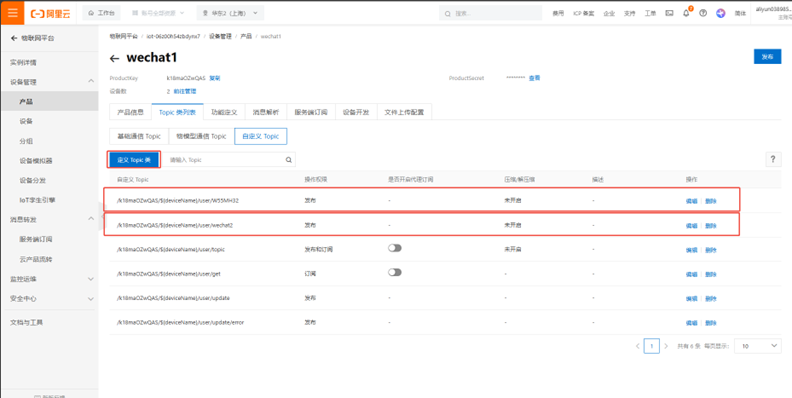
5. Click "Product." Under the "Custom Topic Class," define two topics: one for the W55MH32 and one for the mini-program.
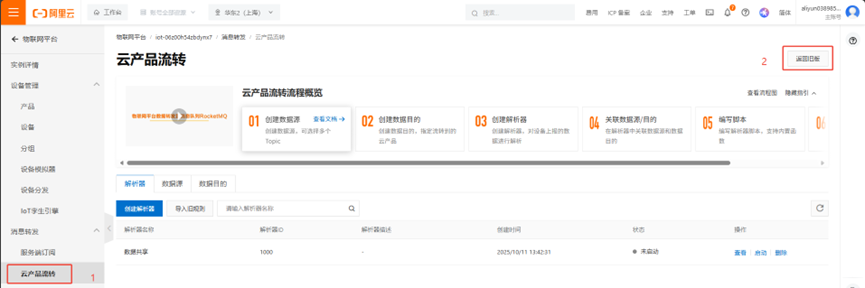
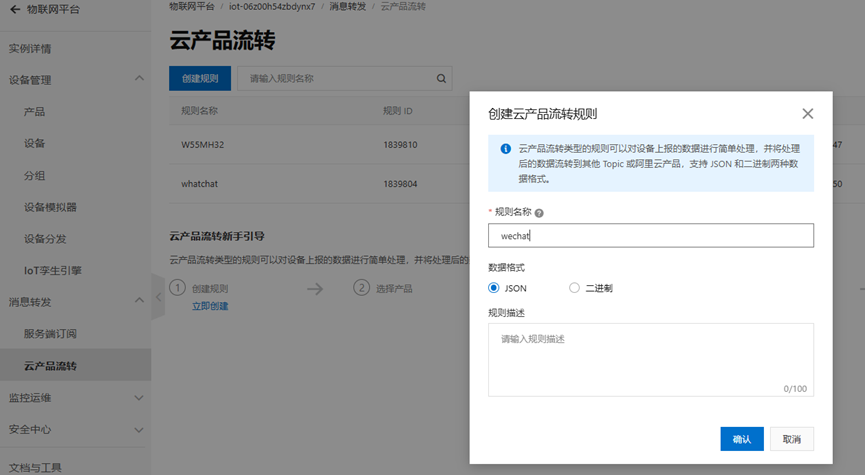
6. First, click "Cloud Product Flow," then click "Return to Old Version."
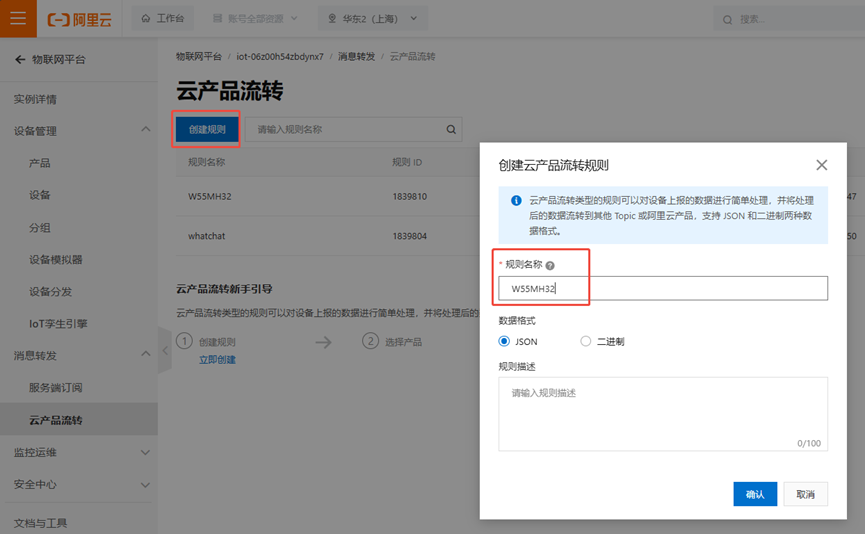
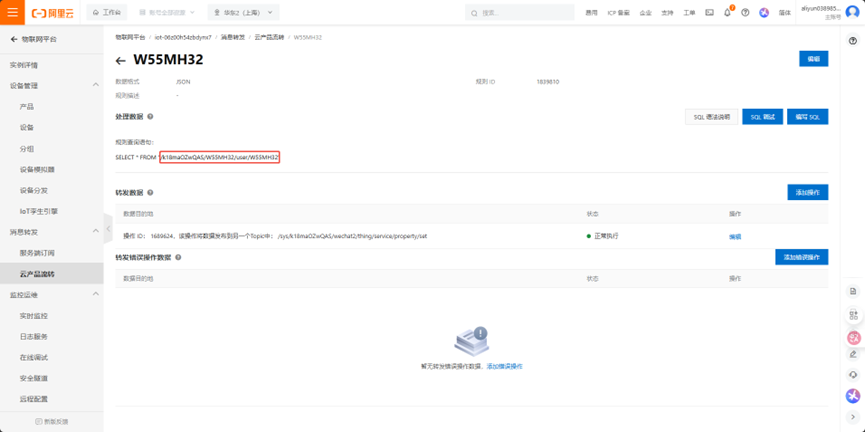
7. Click "Create Rule" and enter a rule name.
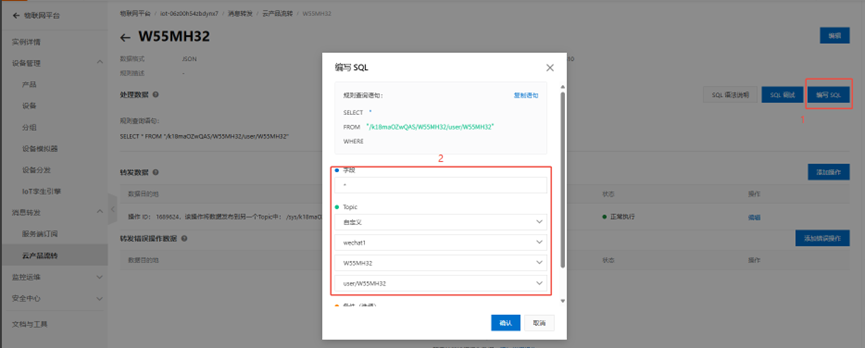
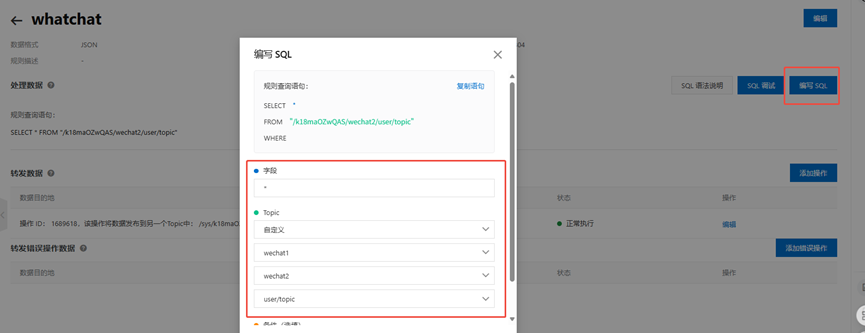
8. First, click "Edit SQL," then fill in the information as shown in the image.
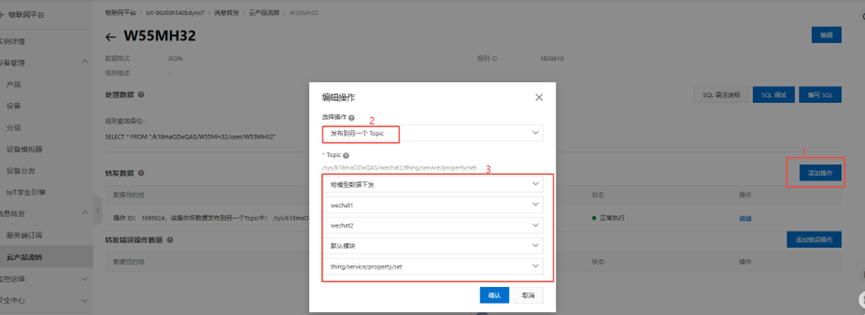
9. Add the operation to forward data and set the forwarded data to another topic.
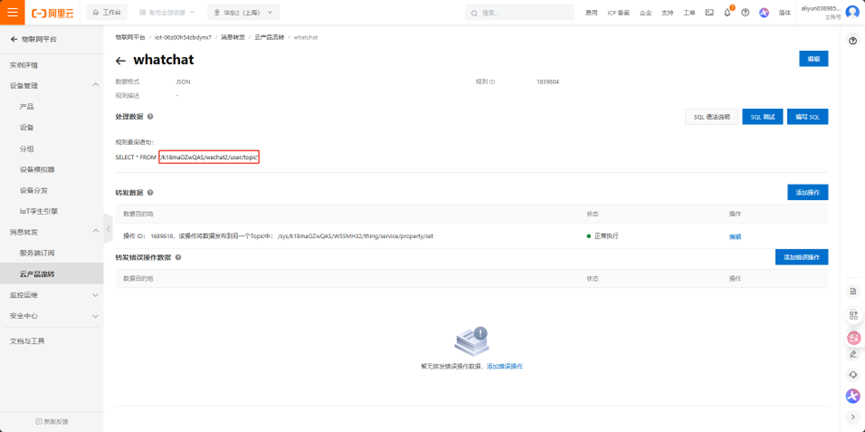
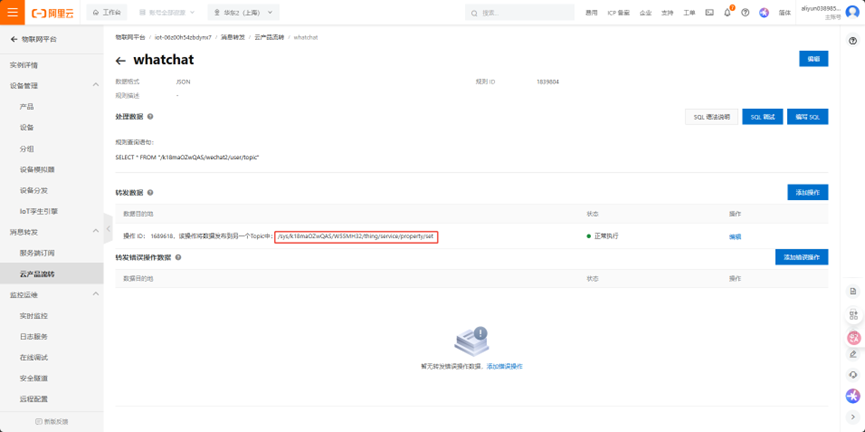
10. Then, following the same method, set up a rule for forwarding commands from the WeChat mini-program.
11. Then, follow the same steps to set up the program.
After setting up, the two devices on the cloud platform can connect to the local W55MH32 and the mini-program, and then forward data.
7. Mini Program Modification
7.1 Downloading the Mini Program Source Project
- Link: https://pan.baidu.com/s/1zZymmcZBy-CZJF-9mNTQ6A?pwd=rbdx Extraction Code: rbdx
After downloading, open the folder and click the app.wxss icon. This will redirect you to this page.
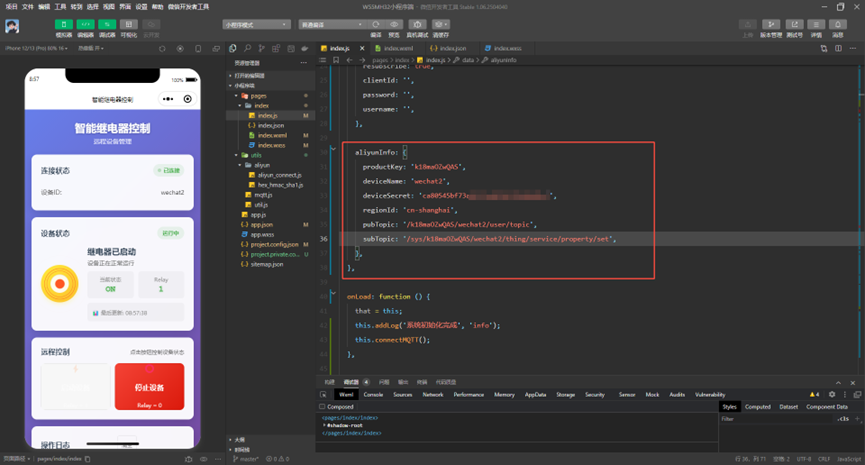
Then, in the device interface created on Alibaba Cloud, fill in the corresponding parameters in the parameters controlled by the mini program above:

- pubTopic should be filled with the WhatsApp topic.
- subTopic subscribes to the topic in this location, which is the topic forwarded by W55MH32.

After setting these up, you can compile and see the device online in the mini program.
8. W55MH32 Configuration
8.1 Completing Connection Parameters
Download the W55MH32 MQTT example and modify the `mqttconn` structure parameters to your Alibaba Cloud information:
Fill in the MQTT connection parameters as follows:
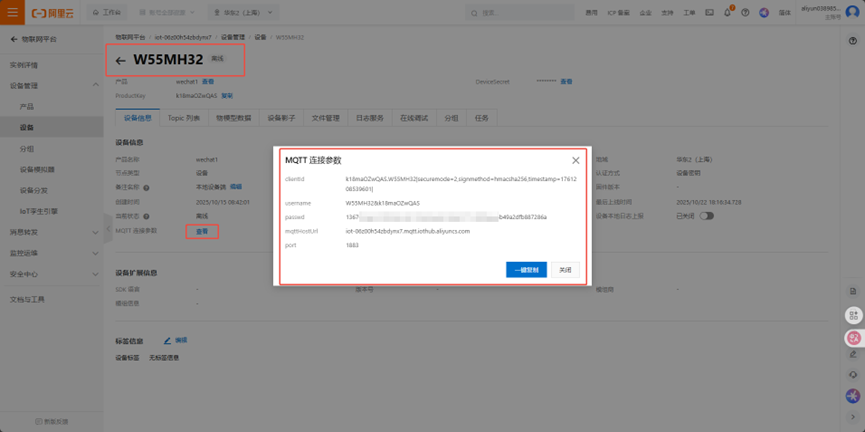
For publishing topics, select the topic shown in the image below.
For subscribing to topics, select the topic published by the mini-program and then forwarded.
Now we have completed the connection data, as shown below:
mqttconn mqtt_params = {
.mqttHostUrl = "iot-06z00h54zbdynx7.mqtt.iothub.aliyuncs.com",
.server_ip = {0,}, /Define the Connection Server IP/
.port = 1883, /Define the connection service port number/
.clientid = "k18maOZwQAS.W55MH32|securemode=2,signmethod=hmacsha256,timestamp=1760498715342|", /Define the client ID/
.username = "W55MH32&k18maOZwQAS", /Define the user name/
.passwd = "5e779efe8005537aef0c7a911c797a61beb2a6f3b61d7abf0b9d455cb0c4ea55", /Define user passwords/
.pubtopic = "/k18maOZwQAS/W55MH32/user/W55MH32", /Define the publication message/
.subtopic = "/sys/k18maOZwQAS/W55MH32/thing/service/property/set", /Define subscription messages/
.pubQoS = QOS0, /Defines the class of service for publishing messages/
};
Then we modify the json data reported below do_mqtt.c
case PUB_MESSAGE:
{
pubmessage.qos = QOS0;
char buffer[128];
snprintf(buffer, sizeof(buffer), "{"id":"123","version":"1.0","params":{"Relay":%d},"method":"thing.event.property.post"}",
led_status);
pubmessage.payload = buffer;
pubmessage.payloadlen = strlen(pubmessage.payload);

ret = MQTTPublish(&c, (char )&(mqtt_params.pubtopic), &pubmessage); / Publish message */
if (ret != SUCCESSS) {
run_status = ERR;
} else {
printf("publish:%s,%s\r\n\r\n", mqtt_params.pubtopic, (char *)pubmessage.payload);
publish_counter = 0;
run_status = RECV;
}
break;
After modifying this state machine, after compiling the device, you can see that the Alibaba Cloud W55MH32 device is online. We still need to parse the forwarded JSON data. We need to modify the json_decode function in do_mqtt.c
void json_decode(char *msg)
{
cJSON *jsondata = NULL;
cJSON *params = NULL;
cJSON *relay = NULL;
jsondata = cJSON_Parse(msg);
if (jsondata == NULL)
{
printf("json parse fail.\r\n");
return;
}
params = cJSON_GetObjectItem(jsondata, "params");
if (params == NULL)
{
printf("params not found.\r\n");
cJSON_Delete(jsondata);
return;
}
relay = cJSON_GetObjectItem(params, "Relay");
if (relay == NULL)
{
printf("Relay field not found.\r\n");
cJSON_Delete(jsondata);
return;
}
if (relay->valueint == 1)
{
printf("Relay ON\r\n");
led_status = 1;
set_led_status(1);
}
else if (relay->valueint == 0)
{
printf("Relay OFF\r\n");
led_status = 0;
set_led_status(0);
}
else
{
printf("Invalid Relay value: %d\r\n", relay->valueint);
}
cJSON_Delete(jsondata);
}
Now that the mini-program control method is usable, we still need to add web page control and local control.
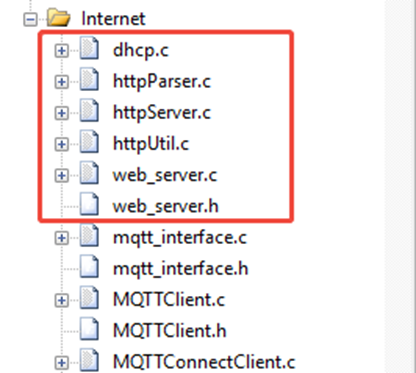
8.2 Adding Web Page Control
We add the following functions to the program. These functions can be found in the code of the [HTTP Server Example](https://www.w5500.com/w55mh32/example9.html).
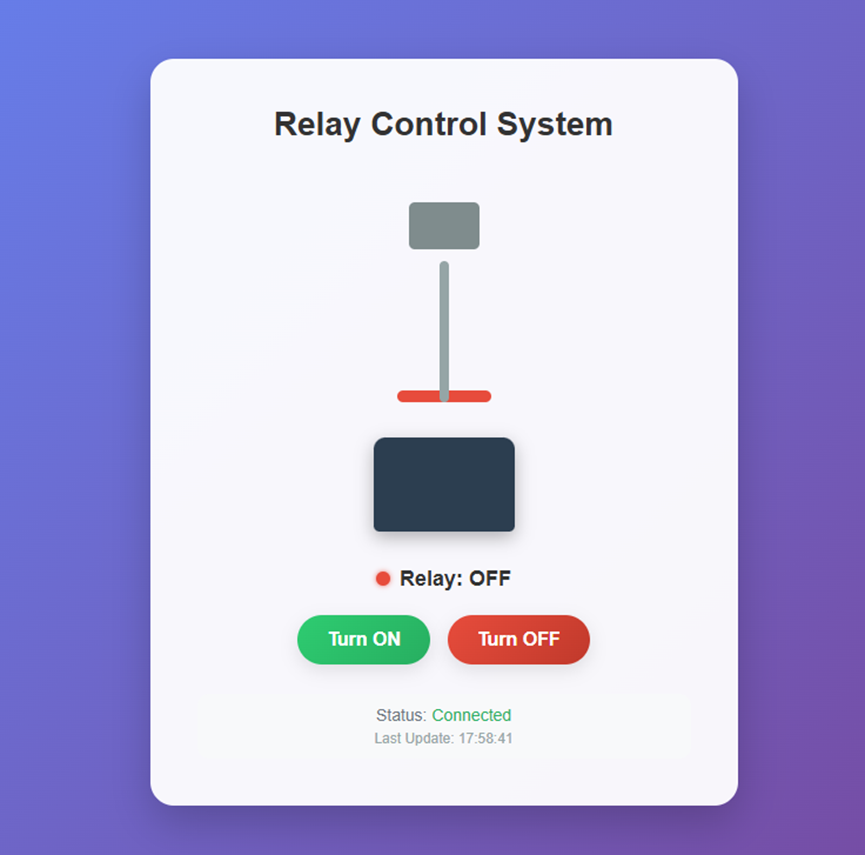
Next, we will edit the webpage's UI.
uint8_t content[] =
"<!DOCTYPE html>"
"<html>"
"<head>"
"<meta charset="UTF-8">"
"<meta name="viewport" content="width=device-width, initial-scale=1.0">"
"<title>Relay Control Panel</title>"
"<style>"
"*{margin:0;padding:0;box-sizing:border-box}"
"body{font-family:Arial,sans-serif;background:linear-gradient(135deg,#667eea 0%,#764ba2 100%);min-height:100vh;display:flex;justify-content:center;align-items:center;padding:20px}"
".container{background:rgba(255,255,255,0.95);border-radius:20px;box-shadow:0 15px 35px rgba(0,0,0,0.2);padding:40px;max-width:500px;width:100%;text-align:center}"
"h1{color:#333;margin-bottom:30px;font-size:28px;font-weight:600}"
".relay-container{position:relative;margin:30px auto;width:200px;height:300px}"
".relay-body{position:absolute;bottom:0;left:50%;transform:translateX(-50%);width:120px;height:80px;background:#2c3e50;border-radius:10px 10px 5px 5px;box-shadow:0 5px 15px rgba(0,0,0,0.3)}"
".relay-coil{position:absolute;top:20px;left:50%;transform:translateX(-50%);width:60px;height:40px;background:#7f8c8d;border-radius:5px}"
".relay-arm{position:absolute;top:70px;left:50%;transform:translateX(-50%) rotate(0deg);width:8px;height:120px;background:#95a5a6;border-radius:4px;transform-origin:top center;transition:transform 0.5s ease-in-out;z-index:2}"
".relay-arm.relay-on{transform:translateX(-50%) rotate(15deg)}"
".relay-contact{position:absolute;top:180px;left:50%;transform:translateX(-50%);width:80px;height:10px;background:#e74c3c;border-radius:5px;transition:background 0.5s ease-in-out}"
".relay-contact.relay-on{background:#2ecc71;box-shadow:0 0 15px #2ecc71}"
".status-indicator{display:inline-block;width:12px;height:12px;border-radius:50%;margin-right:8px;background:#e74c3c;box-shadow:0 0 5px #e74c3c;transition:all 0.5s ease-in-out}"
".status-indicator.relay-on{background:#2ecc71;box-shadow:0 0 10px #2ecc71}"
".status-text{font-size:18px;font-weight:600;margin:20px 0;color:#333}"
".btn-group{display:flex;justify-content:center;gap:15px;margin-top:20px}"
".btn{padding:12px 25px;border:none;border-radius:50px;font-size:16px;font-weight:600;cursor:pointer;transition:all 0.3s ease;box-shadow:0 5px 15px rgba(0,0,0,0.1)}"
".btn-on{background:linear-gradient(135deg,#2ecc71,#27ae60);color:white}"
".btn-off{background:linear-gradient(135deg,#e74c3c,#c0392b);color:white}"
".btn:hover{transform:translateY(-3px);box-shadow:0 8px 20px rgba(0,0,0,0.2)}"
".btn:active{transform:translateY(1px)}"
".connection-status{margin-top:25px;padding:10px;border-radius:10px;background:#f8f9fa;font-size:14px;color:#6c757d}"
".last-update{font-size:12px;color:#95a5a6;margin-top:5px}"
".pulse{animation:pulse 1.5s infinite}"
"@keyframes pulse{0%{opacity:1}50%{opacity:0.5}100%{opacity:1}}"
"</style>"
"</head>"
"<body>"
"<div class="container">"
"<h1>Relay Control System</h1>"
"<div class="relay-container">"
"<div class="relay-body"></div>"
"<div class="relay-coil"></div>"
"<div class="relay-arm" id="relayArm"></div>"
"<div class="relay-contact" id="relayContact"></div>"
"</div>"
"<div class="status-text">"
"<span class="status-indicator" id="statusIndicator"></span>"
"<span id="statusText">Relay: OFF</span>"
"</div>"
"<div class="btn-group">"
"<button class="btn btn-on" onclick="controlRelay(1)">Turn ON</button>"
"<button class="btn btn-off" onclick="controlRelay(0)">Turn OFF</button>"
"</div>"
"<div class="connection-status">"
"<div>Status: <span id="connStatus">Connected</span></div>"
"<div class="last-update">Last Update: <span id="lastUpdate">--</span></div>"
"</div>"
"</div>"
"<script>"
"const relayArm=document.getElementById('relayArm');"
"const relayContact=document.getElementById('relayContact');"
"const statusIndicator=document.getElementById('statusIndicator');"
"const statusText=document.getElementById('statusText');"
"const connStatus=document.getElementById('connStatus');"
"const lastUpdate=document.getElementById('lastUpdate');"
"let connectionOk=true;"
"function controlRelay(state){"
"fetch('/control?action='+state).then(r=>{"
"if(r.ok){connectionOk=true;updateConnectionStatus();setTimeout(fetchStatus,500)}"
"else{handleConnectionError()}}).catch(handleConnectionError)}"
"function fetchStatus(){"
"fetch('/status?t='+Date.now()).then(r=>{if(!r.ok)throw new Error('Bad status');return r.text()})"
".then(status=>{connectionOk=true;updateConnectionStatus();updateRelayUI(status.trim())})"
".catch(handleConnectionError)}"
"function updateRelayUI(status){"
"let isOn=status.includes('11');"
"if(isOn){"
"relayArm.classList.add('relay-on');"
"relayContact.classList.add('relay-on');"
"statusIndicator.classList.add('relay-on');"
"statusText.textContent='Relay: ON';"
"}else{"
"relayArm.classList.remove('relay-on');"
"relayContact.classList.remove('relay-on');"
"statusIndicator.classList.remove('relay-on');"
"statusText.textContent='Relay: OFF';"
"}"
"lastUpdate.textContent=new Date().toLocaleTimeString();"
"}"
"function handleConnectionError(){"
"connectionOk=false;updateConnectionStatus();statusIndicator.classList.add('pulse')}"
"function updateConnectionStatus(){"
"if(connectionOk){"
"connStatus.textContent='Connected';connStatus.style.color='#27ae60';statusIndicator.classList.remove('pulse')"
"}else{"
"connStatus.textContent='Disconnected';connStatus.style.color='#e74c3c'"
"}}"
"setInterval(fetchStatus,1500);"
"window.addEventListener('load',function(){lastUpdate.textContent=new Date().toLocaleTimeString()});"
"fetchStatus();"
"</script>"
"</body>"
"</html>";
This is our web design interface.
In addition to the web page, web_server.c also contains functions for initializing the server, starting the server, as well as interface functions and execution functions, all of which should be implemented in this function.
static uint8_t parse_url_action(uint8_t *url)
{
// Search for the string "action=" in the URL to locate the action parameter
uint8_t *pAction = (uint8_t *)strstr((char *)url, "action=");
if (pAction == NULL) // "action=" not found, parsing failed
{
return 0;
}
else // "action=" found, return the action value after it ("action=" has a length of 7, so offset by 7 bytes)
{
return *(pAction + 7);
}
}
static void do_led_action(uint8_t action)
{
if (action == '1') // Action value is '1', turn on the relay
{
led_status = 1; // Update the relay status flag to on (1)
// Update the status buffer (the specific meaning can be defined according to actual needs; the example here is a three-digit status value)
status_content[0] = '1';
status_content[1] = '1';
status_content[2] = '0';
printf("Relay ON"); // Print the relay on log
// Note: In actual applications, relay hardware control code can be added here, such as:
// HAL_GPIO_WritePin(RELAY_GPIO_Port, RELAY_Pin, GPIO_PIN_SET);
}
else if (action == '0') // The action value is '0', turn off the relay
{
led_status = 0; // Update the relay status flag to off (0)
// Update the status buffer
status_content[0] = '1';
status_content[1] = '0';
status_content[2] = '0';
printf("Relay OFF"); // Print the relay OFF log
}
}
void WebServer_Init(void)
{
// Initialize the HTTP server, specifying the send/receive buffer, number of sockets, and socket list
httpServer_init(txBuff, rxBuff, socketCount, socketList);
// Initialize the status buffer based on the initial state of the relay
if(led_status) { // If the relay is initially on
status_content[0] = '1';
status_content[1] = '1';
} else { // If the relay is initially off
status_content[0] = '1';
status_content[1] = '0';
}
status_content[2] = '0'; // Fixed value of the third bit of the status buffer (example)
// Register static web page content to the server
reg_httpServer_webContent(contentName, content);
/ // Register the "control" resource to provide feedback on control operation results
reg_httpServer_webContent("control", (uint8_t *)"OK");
/ // Register the "status" resource to return the current relay status
reg_httpServer_webContent("status", status_content);
}
void WebServer_Start(void)
{
/ // Iterate through all sockets and process the HTTP request on each socket
for (uint8_t i = 0; i < sizeof(socketList); i++)
{
httpServer_run(i);
}
}
void handler_user_function(uint8_t *url)
{
if (strstr((char *)url, "control") != NULL) // A control request (URL containing "control") was detected
{
// Parse the action parameter in the URL to obtain the relay control action
uint8_t action = parse_url_action(url);
/ Execute the relay control action
do_led_action(action);
/ Update the "status" resource on the server to synchronize the current relay status
reg_httpServer_webContent("status", status_content);
/ Update the "control" resource and report successful control
reg_httpServer_webContent("control", (uint8_t *)"OK");
}
else if (strstr((char *)url, "status") != NULL) // Detected a status query request (URL containing "status")
{
/ Update the "status" resource on the server and return the current relay status
reg_httpServer_webContent("status", status_content);
}
else
{
/ Other URL requests, not processed here
}
}
uint8_t* get_led_status(void)
{
return status_content;
}
void set_led_status(uint8_t status)
{
led_status = status; // Update relay status flag
if(status) { // If the target status is on
status_content[0] = '1';
status_content[1] = '1';
status_content[2] = '0';
} else { // If the target status is off
status_content[0] = '1';
status_content[1] = '0';
status_content[2] = '0';
}
/ Update the "status" resource on the server to ensure the web client gets the latest status
reg_httpServer_webContent("status", status_content);
}9. Functionality Verification
First, test the functionality using the WeChat mini-program to see if it works correctly.
The switch works normally. Now let's check if controlling it via the web page works properly.
The switch is working properly. Finally, we'll use the local button control to check if it works correctly.
The switches function normally, demonstrating that all three types of switches can be controlled and respond to changes in state.
Summary
If you are looking for an Ethernet interconnect solution that simplifies design, reduces costs, and improves stability, the W55MH32 is undoubtedly your ideal choice. It's not just a chip, but a powerful engine for your products to become intelligent and networked.
Visit [W55MH32](https://www.w5500.com/w55mh32.html) now to obtain the detailed W55MH32 datasheet, development board information, and complete project source code, and begin your single-chip Ethernet development journey!
This project successfully designed and implemented an intelligent relay control system integrating local, web, and remote control. The system uses the W55MH32 Ethernet microcontroller as its core, combined with the Alibaba Cloud IoT platform and WeChat mini-programs, to build a stable, efficient, and multi-access IoT application prototype, fully verifying the powerful applicability of the W55MH32 in industrial IoT control scenarios.