
W55MH32 Smart Agriculture Monitoring System
W55MH32 Smart Agriculture Monitoring System: Alibaba Cloud MQTT Monitoring + Web Control
Smart Agriculture Monitoring System Source Code
This repository provides a complete set of source code for a smart agriculture monitoring system based on the W55MH32 Ethernet microcontroller, implementing three core functions: collecting soil moisture and light data via ADC, and automatically controlling irrigation pumps based on thresholds; connecting to Alibaba Cloud via the MQTT protocol for remote data viewing and device control; and providing a local web interface for real-time monitoring and threshold adjustment.
1. Project Concept and Core Objectives
My relatives in my hometown grow greenhouses, and irrigation is a real headache. They have to check humidity levels daily and water based on experience. During busy periods, the crops wilt due to lack of water, and during rainy days, water accumulates and rots the roots. This is labor-intensive and wastes water, and the environmental regulation never keeps up with the crops' needs. I began to think about creating a simple system to solve these problems.
I've previously used WIZnet's W5500 chip for Ethernet projects and am quite familiar with their chips. Hearing about the new W55MH32 Ethernet chip with an integrated MCU, I applied for a development board to try it out. After receiving the board, I connected sensors to my own potted plants for testing. After confirming hardware compatibility and data stability, I officially built the smart agricultural monitoring system. This board has a built-in hardware TCP/IP engine and a rich set of peripheral interfaces, perfectly meeting my sensor connection and data transmission needs. The official Alibaba Cloud connection example also saves a lot of time. With this experience as a foundation, I felt confident connecting it to Alibaba Cloud and setting up a LAN monitoring webpage. I planned to build a sensor-pump linkage model: the sensors would collect data like soil moisture and light intensity, and transmit it to the cloud to automatically start and stop the pump. I immediately got to work, drawing the wiring diagram, connecting the sensors and relays, optimizing the MQTT logic for connection to Alibaba Cloud, and creating a simple webpage for remote monitoring and operation. After debugging, both data collection and automatic pump start and stop functions were stable. This model is still under development, and we'll be optimizing the hardware integration and code logic to make it more stable and durable. I'm documenting the development details now, and will open source the code and PCB files later. I hope this will serve as a reference for those interested in using IoT technology in the field, providing ideas and enabling technology to truly empower agricultural work.
Core objectives:
Hardware: Achieve stable linkage between sensor data collection and actuator (water pump) control, ensuring real-time environmental data and reliable device response.
Software: Complete MQTT protocol integration with Alibaba Cloud, enabling two-way data transmission between the device and the cloud, while also supporting local web control and environmental data viewing.
Application: By default, irrigation automatically starts when soil moisture falls below 30% and stops when it exceeds 50%. Remote dynamic adjustment of thresholds is supported, balancing automation and flexibility.
Future plans include further integration of the W55MH32 Ethernet microcontroller with light and soil moisture sensors, along with a protective enclosure designed for field environments. This hardware integration improves system stability while also protecting against temperature and humidity fluctuations, dust, and other interference within greenhouses, making the device more durable and easier to deploy in real-world agricultural scenarios. Furthermore, the complete hardware schematics and PCB design files will be publicly available for easy reference and reuse, lowering the barrier to entry for technical implementation and enabling easier application of this solution in the field.
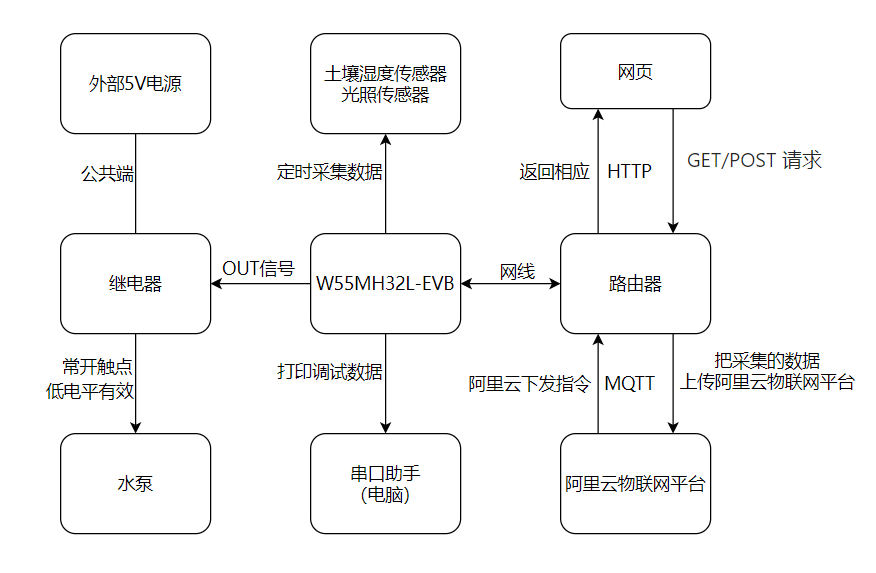
1.1 Solution Diagram
2 Hardware Selection and Construction
2.1 Core Component List
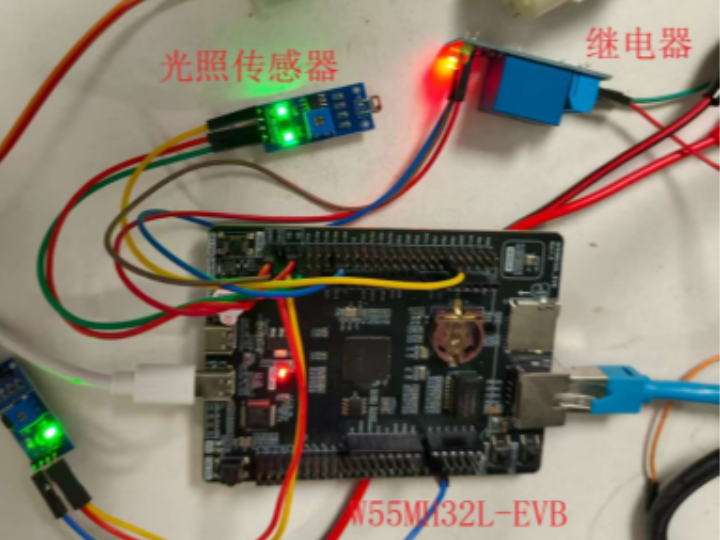
Main controller: W55MH32L-EVB (216MHz clock speed, built-in hardware TCP/IP engine).- Sensors: Soil moisture sensor (analog output), light sensor (analog output).
- Actuators: 5V relay module, small water pump.
- Auxiliary equipment: External 5V power supply, network cable, router, and DuPont cables.
2.2 Circuit Connection Tips
- The development board's pinout is complex, so I've simplified the connections by grouping them into functional groups:
- Analog input group: PA0 connects to the soil moisture sensor, PA3 connects to the light sensor (utilizing the microcontroller's ADC).
- Digital output group: PB10 connects to the relay's IN pin (control signal).
- Power supply group: The development board's 5V output powers the relay, while the sensor connects to a separate 3.3V pin (to avoid interference). The relay's COM pin connects to the positive terminal of an external power supply.
- Water pump: The positive terminal connects to the relay's normally open terminal, and the negative terminal connects to the negative terminal of an external power supply.
- Pay special attention to the relay's "active low" behavior—PB10 must be set high during initialization, and an action is triggered by pulling it low. This must be carefully considered in subsequent software design.
3. Development Environment Setup
3.1 Software Toolchain
- Compilation Environment: Keil uVision 5, version V5.3 or higher (requires the W55MH32 series chip package).
- Debugging Tool: WIZ UartTool serial port assistant; other serial port assistants are also acceptable.
- Browser: For opening web pages.
- Cloud Platform: Alibaba Cloud IoT Platform (real-name authentication required).
- Source Code: gitee Repository | Click to Redirect
4 Connecting to the Alibaba Cloud IoT Platform
4.1 MQTT Data Transmission and Reception Process for Alibaba Cloud
4.1.1 Preparation
Registration and Real-Name Authentication: Users must register an account on the Alibaba Cloud platform and complete real-name authentication.
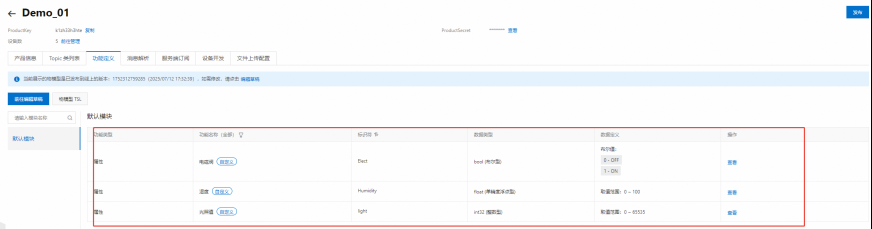
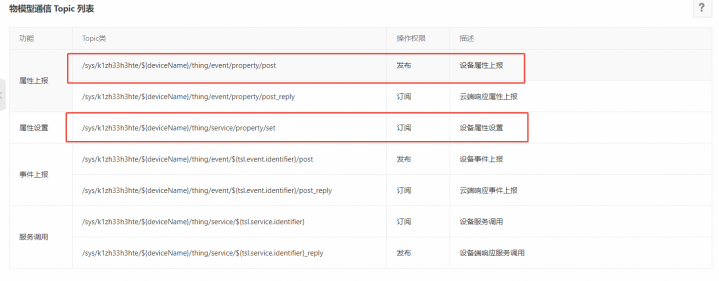
Create a product and add object models: Log in to the Alibaba Cloud IoT platform, create a product, and add the following object model functions to the product.
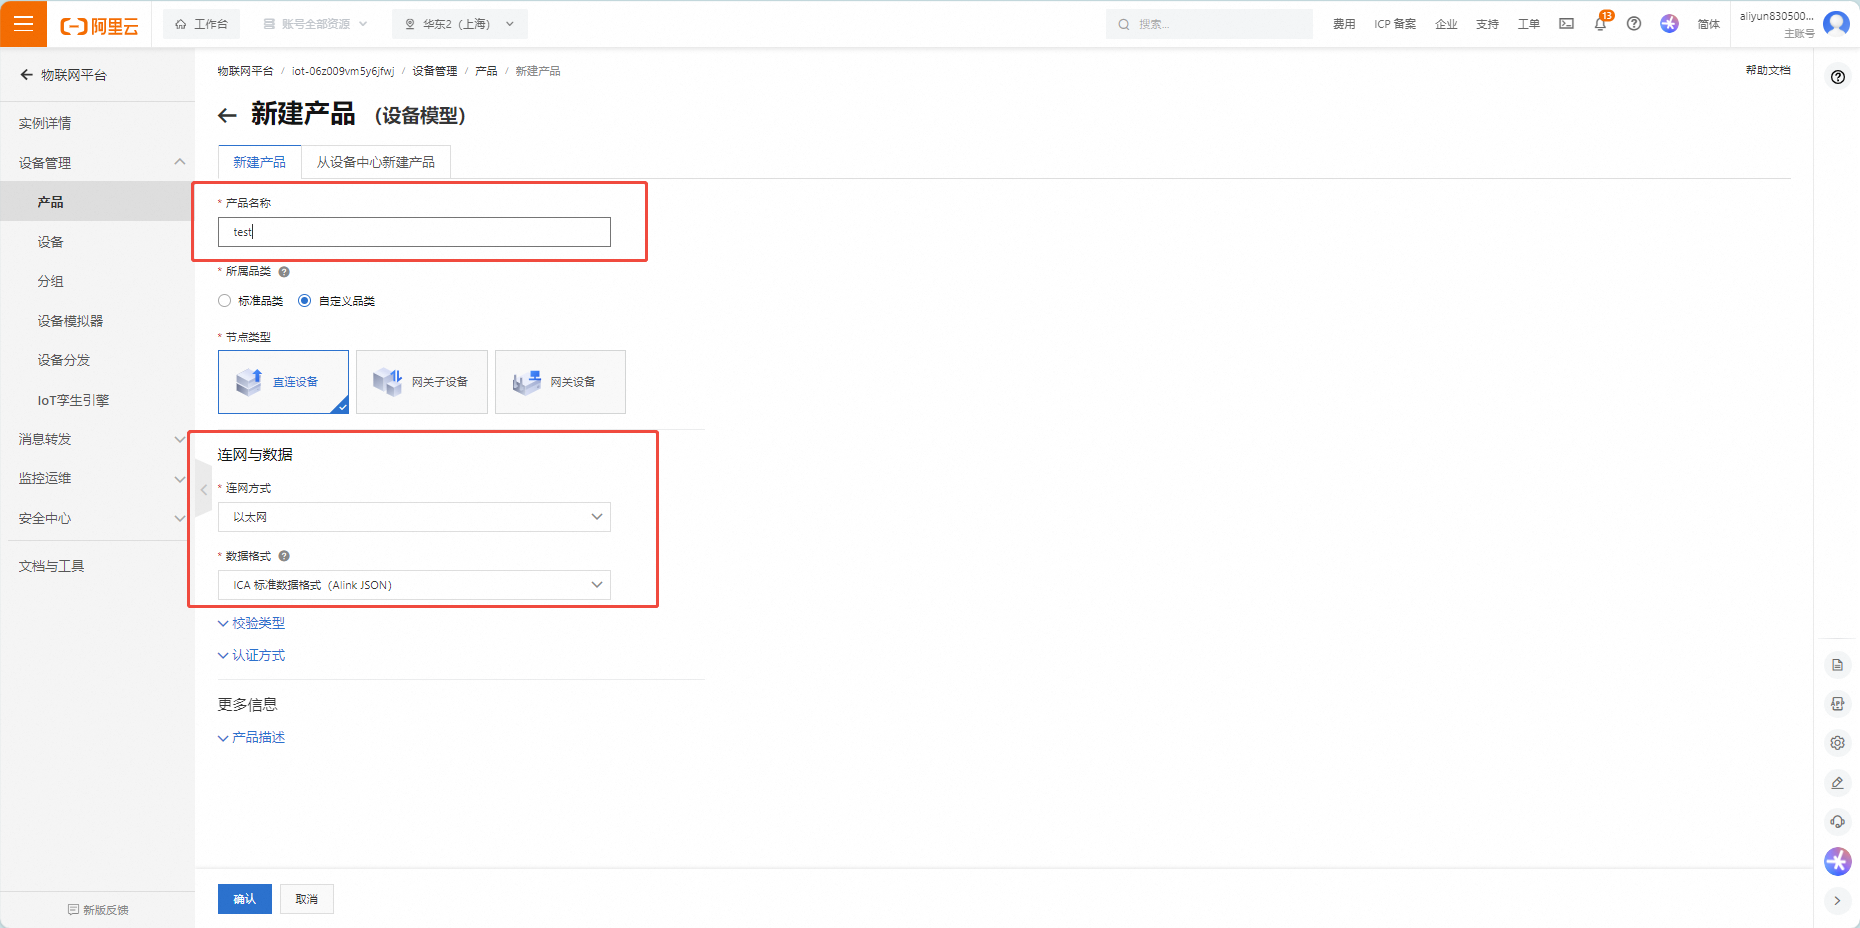
Create a device: Create a device under the product you just created.
4.1.2 Recording Parameters
Connection parameters: Find the MQTT connection parameters in the device details page you just created.
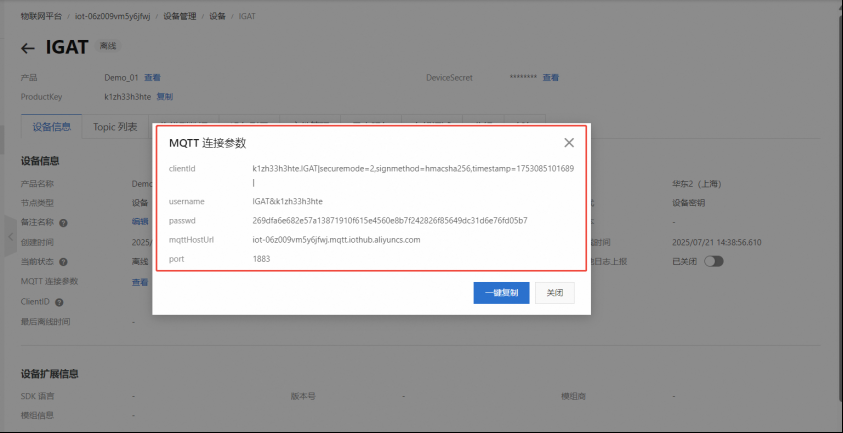
Subscribe to the topic: /sys/k1zh33h3hte/${deviceName}/thing/service/property/set (property setting topic)
Publish to the topic: /sys/k1zh33h3hte/${deviceName}/thing/event/property/post (reporting topic)
Note: In the two topics above, ${deviceName} must be replaced with the device name.
4.1.3 Connecting, Subscribing, and Publishing Messages
We can then connect using the connection parameters noted above. Once the connection is successful, subscribe to the subscription topic and report object model data by publishing to the topic.
On the Alibaba Cloud platform, if the data format selected during product creation is Alink JSON, both incoming and outgoing data will follow the following format:
{
  "method": "thing.event.property.post",
  "id": "2241348",
  "params": {
      "prop_float": 1.25,
      "prop_int16": 4658,
      "prop_bool": 1
  },
  "version": "1.0"
}
5 Main Program Analysis
5.1 Analysis of main.c
1. System Initialization and Hardware Configuration
- Complete basic hardware initialization (clock, delay, serial port, timer, etc.), configure the ADC (analog-to-digital converter) for sensor data acquisition, initialize the relay control module, and set the network parameters of the WIZnet Ethernet chip (MAC address, IP address, gateway, etc.).
2. Network Communication Functionality: Dual network communication capabilities are implemented:
- MQTT protocol: Remotely publish sensor data through the MQTT client (do_mqtt() and mqtt_post_properties()).
- Webpage Retrieval: TCP server functionality is provided through loopback_tcps(), handling HTTP requests and responses.
3. Sensor Data Processing and Control
- Periodically (every 5 seconds) read sensor data (humidity, light intensity) using process_sensors_and_control().
- Implement automatic relay control logic based on humidity thresholds (high and low thresholds).
- Publish real-time data (humidity, light intensity, relay status) to the Alibaba platform via MQTT and simultaneously refresh the webpage's environmental data.
#include "bsp_adc.h"
#include "bsp_rcc.h"
#include "bsp_tim.h"
#include "bsp_uart.h"
#include "delay.h"
#include "do_mqtt.h"
#include "do_sensor.h"
#include "loopback.h"
#include "sv.h"
#include "wiz_interface.h"
#include "wizchip_conf.h"
#include <stdio.h>
#include <stdlib.h>
#include <string.h>

/* 全局实时传感器数据(在do_mqtt.c中定义) */
extern float g_humidity_value;         // 当前湿度读数
extern float g_light_intensity;        // 当前光照强度读数
extern uint8_t g_solenoid_valve_state; // 电磁阀状态(1:开启, 0:关闭)

/* 湿度阈值(与阿里云IoT模型对齐,范围0~100) */
int g_humidity_low_threshold = 30;  // 浇水的下限阈值
int g_humidity_high_threshold = 50; // 停止浇水的上限阈值

/* 函数原型 */
extern void mqtt_post_properties(void);

/* 套接字和缓冲区配置常量 */
#define SOCKET_TCP_ID 0
#define SOCKET_MQTT_ID 1
#define ETHERNET_BUF_MAX_SIZE (1024 * 2) // 以太网缓冲区最大大小
#define SENSOR_READ_INTERVAL 5000        // 传感器采样间隔(毫秒)

uint16_t g_tcp_listen_port = 8080;     // TCP服务器监听端口
wiz_NetInfo g_default_network_info = { // 默认网络配置
   .mac = {0x00, 0x08, 0xdc, 0x12, 0x22, 0x12},
   .ip = {192, 168, 1, 30},
   .gw = {192, 168, 1, 1},
   .sn = {255, 255, 255, 0},
   .dns = {8, 8, 8, 8},
   .dhcp = NETINFO_DHCP};

uint8_t g_ethernet_data_buf[ETHERNET_BUF_MAX_SIZE] = {
   0}; // 以太网数据缓冲区
static uint8_t s_mqtt_send_buf[ETHERNET_BUF_MAX_SIZE] = {
   0}; // MQTT发送缓冲区(静态)
static uint8_t s_mqtt_recv_buf[ETHERNET_BUF_MAX_SIZE] = {
   0}; // MQTT接收缓冲区(静态)

/* 声明systick_count,名称与bsp_tim.o中的引用匹配 */
volatile uint32_t systick_count =
   0; // 系统滴答计数器(毫秒)- bsp_tim使用的名称

/**
* @brief 主程序循环
* @details 处理MQTT通信、TCP回环和传感器处理
*/
int main(void) {
 rcc_clk_config();          // RCC时钟配置
 delay_init();              // 延时初始化
 console_usart_init(115200); // 控制台串口初始化,波特率115200
 tim3_init();               // TIM3定时器初始化

 printf("%s 传感器监控系统\r\n", _WIZCHIP_ID_);

 adc_dma_init(); // ADC DMA初始化
 sv_init();      // 电磁阀初始化

 wiz_toe_init();                // WIZ芯片TOE初始化
 wiz_phy_link_check();          // WIZ物理层连接检查
 network_init(g_ethernet_data_buf, &g_default_network_info); // 网络初始化
 mqtt_init(SOCKET_MQTT_ID, s_mqtt_send_buf, s_mqtt_recv_buf); // MQTT初始化
 printf("系统初始化完成。\r\n");

 while (1) {
   do_mqtt(); // 处理MQTT通信

   // 处理TCP回环
   loopback_tcps(SOCKET_TCP_ID, g_ethernet_data_buf, g_tcp_listen_port);

   // 按间隔读取传感器并发布数据
   if (systick_count >= SENSOR_READ_INTERVAL) {
     systick_count = 0;
     process_sensors_and_control(); // 处理传感器数据并控制设备
     mqtt_post_properties();        // 通过MQTT发布传感器数据
   }
 }
}
5.2 ADC Acquisition
1. Key Configuration:
- Initialize the ADC to continuous scan mode and enable DMA transfer.
- Configure the GPIO pins to analog input mode, corresponding to the sensor pins.
- Set up DMA to transfer ADC data to the buffer in a circular manner, without CPU intervention.
2. Data Processing:
- The sampled data is alternately stored in the s_adc_dma_buffer buffer.
- The adc_get_average_value() function is provided to obtain the average sampled value of a specified channel, reducing the impact of noise.
#include "bsp_adc.h"
#include "w55mh32_adc.h"
#include "w55mh32_dma.h"
#include "w55mh32_gpio.h"
#include "w55mh32_rcc.h"


/* ADC DMA数据静态缓冲区(存储交替的通道读数) */
static uint16_t s_adc_dma_buffer[ADC_BUFFER_SIZE];

/**
* @brief 初始化带DMA功能的ADC
* @details 配置ADC通道(湿度和光照)、GPIO和DMA以实现连续采样
*/
void adc_dma_init(void) {
 ADC_InitTypeDef adc_init_struct;  // ADC初始化结构体
 GPIO_InitTypeDef gpio_init_struct; // GPIO初始化结构体
 DMA_InitTypeDef dma_init_struct;  // DMA初始化结构体

 // 使能ADC、GPIO和DMA的时钟
 RCC_APB2PeriphClockCmd(RCC_APB2Periph_GPIOA | RCC_APB2Periph_ADC1, ENABLE);
 RCC_AHBPeriphClockCmd(RCC_AHBPeriph_DMA1, ENABLE);

 // 配置GPIO引脚为模拟输入(PA0: 湿度, PA3: 光照)
 gpio_init_struct.GPIO_Pin = GPIO_Pin_0 | GPIO_Pin_3;
 gpio_init_struct.GPIO_Mode = GPIO_Mode_AIN;  // 模拟输入模式
 GPIO_Init(GPIOA, &gpio_init_struct);

 // 配置ADC为连续扫描模式
 ADC_StructInit(&adc_init_struct);  // 初始化ADC结构体为默认值
 adc_init_struct.ADC_Mode = ADC_Mode_Independent;  // 独立模式
 adc_init_struct.ADC_ScanConvMode = ENABLE;  // 使能扫描模式
 adc_init_struct.ADC_ContinuousConvMode = ENABLE;  // 使能连续转换模式
 adc_init_struct.ADC_ExternalTrigConv = ADC_ExternalTrigConv_None;  // 无外部触发
 adc_init_struct.ADC_DataAlign = ADC_DataAlign_Right;  // 数据右对齐
 adc_init_struct.ADC_NbrOfChannel = 2;  // 2个通道(湿度+光照)
 ADC_Init(ADC1, &adc_init_struct);

 // 配置ADC通道和采样时间
 ADC_RegularChannelConfig(ADC1, ADC_Channel_0, 1,
                          ADC_SampleTime_55Cycles5);  // 湿度通道(PA0)
 ADC_RegularChannelConfig(ADC1, ADC_Channel_3, 2,
                          ADC_SampleTime_55Cycles5);  // 光照通道(PA3)

 // 配置DMA用于ADC数据传输
 DMA_DeInit(DMA1_Channel1);  // 重置DMA通道1配置
 dma_init_struct.DMA_PeripheralBaseAddr = (uint32_t)&ADC1->DR;  // 外设基地址(ADC数据寄存器)
 dma_init_struct.DMA_MemoryBaseAddr = (uint32_t)s_adc_dma_buffer;  // 内存基地址(DMA缓冲区)
 dma_init_struct.DMA_DIR = DMA_DIR_PeripheralSRC;  // 传输方向:外设到内存
 dma_init_struct.DMA_BufferSize = ADC_BUFFER_SIZE;  // 缓冲区大小
 dma_init_struct.DMA_PeripheralInc = DMA_PeripheralInc_Disable;  // 禁止外设地址递增
 dma_init_struct.DMA_MemoryInc = DMA_MemoryInc_Enable;  // 使能内存地址递增
 dma_init_struct.DMA_PeripheralDataSize = DMA_PeripheralDataSize_HalfWord;  // 外设数据大小:半字(16位)
 dma_init_struct.DMA_MemoryDataSize = DMA_MemoryDataSize_HalfWord;  // 内存数据大小:半字(16位)
 dma_init_struct.DMA_Mode = DMA_Mode_Circular;  // 循环模式
 dma_init_struct.DMA_Priority = DMA_Priority_High;  // 高优先级
 dma_init_struct.DMA_M2M = DMA_M2M_Disable;  // 禁止内存到内存传输
 DMA_Init(DMA1_Channel1, &dma_init_struct);

 // 使能DMA和ADC
 DMA_Cmd(DMA1_Channel1, ENABLE);  // 使能DMA通道1
 ADC_DMACmd(ADC1, ENABLE);  // 使能ADC的DMA请求

 // 校准并启动ADC
 ADC_Cmd(ADC1, ENABLE);  // 使能ADC1
 ADC_ResetCalibration(ADC1);  // 重置校准寄存器
 while (ADC_GetResetCalibrationStatus(ADC1))  // 等待重置校准完成
   ;
 ADC_StartCalibration(ADC1);  // 开始校准
 while (ADC_GetCalibrationStatus(ADC1))  // 等待校准完成
   ;

 ADC_SoftwareStartConvCmd(ADC1, ENABLE);  // 软件触发ADC转换
}

/**
* @brief 获取特定通道的ADC平均值
* @param channel_index ADC通道索引(0: 湿度, 1: 光照)
* @param sample_count 用于平均的样本数量
* @return 平均ADC值(12位)
*/
uint16_t adc_get_average_value(uint8_t channel_index, uint8_t sample_count) {
 uint32_t sum = 0;  // 样本总和
 uint8_t valid_samples = 0;  // 有效样本数

 // 从DMA缓冲区读取交替的样本(通道0在偶数索引,通道1在奇数索引)
 for (uint8_t i = 0; i < sample_count && i < ADC_BUFFER_SIZE / 2; i++) {
   sum += s_adc_dma_buffer[i * 2 + channel_index];  // 累加对应通道的样本
   valid_samples++;  // 计数有效样本
 }

 return (valid_samples > 0) ? (sum / valid_samples) : 0;  // 返回平均值(避免除零)
}
5.3 Sensor Data Reading
1. Humidity Sensor Reading (humidity_read):
- Obtain the average raw value of the humidity channel from the ADC.
- Convert the ADC value to a voltage (based on a 3.3V reference voltage and a 12-bit ADC).
- Convert the voltage to a humidity value (0-100%) using a sensor-specific formula.
- Range-limit the result to ensure it is within the valid range.
2. Light Intensity Reading (light_read_intensity):
- Obtain the average raw value of the light channel from the ADC.
- Handle zero values to avoid division by zero errors.
- Convert the ADC value to light intensity (custom units) using a sensor formula.
3. Sensor Processing and Control (process_sensors_and_control):
- Read humidity and light values and update global variables.
- Control relays based on humidity thresholds: open (watering) below the low threshold and close (stop watering) above the high threshold.
- Print current status information (humidity, light, valve status, and thresholds).
#include "bsp_adc.h"
#include "do_sensor.h"
#include "sv.h"
#include <stdio.h>
extern float g_humidity_value;
extern float g_light_intensity;
extern uint8_t g_solenoid_valve_state;
extern int g_humidity_low_threshold;
extern int g_humidity_high_threshold;

/**
* @brief 从传感器读取湿度值
* @details 将ADC原始值转换为相对湿度(0~100%)
* @return 湿度值(0.0~100.0)
*/
float humidity_read(void) {
 // 从湿度通道(索引0)读取ADC平均值
 uint16_t adc_raw_value = adc_get_average_value(0, ADC_BUFFER_SIZE / 2);

 // 将ADC值转换为电压(参考电压3.3V,12位ADC)
 float voltage = adc_raw_value * 3.3f / 4096.0f;

 // 将电压转换为湿度(传感器特定公式)
 float humidity = (3.3f - voltage) * 30.3f;

 // 将值限制在有效范围内(0~100%)
 if (humidity < 0.0f) {
   humidity = 0.0f;
 }
 if (humidity > 100.0f) {
   humidity = 100.0f;
 }

 return humidity;
}

/**
* @brief 从传感器读取光照强度
* @details 将ADC原始值转换为光照强度(任意单位)
* @return 光照强度值
*/
float light_read_intensity(void) {
 // 从光照通道(索引1)读取ADC平均值
 uint16_t adc_raw_value = adc_get_average_value(1, ADC_BUFFER_SIZE / 2);

 // 避免除零错误
 if (adc_raw_value == 0) {
   adc_raw_value = 1;
 }

 // 将ADC值转换为光照强度(传感器特定公式)
 return 500000.0f / (float)adc_raw_value;
}

/**
* @brief 读取传感器并控制电磁阀
* @details 读取湿度和光照传感器,基于阈值控制阀门
*/
void process_sensors_and_control(void) {
 g_humidity_value = humidity_read();
 g_light_intensity = light_read_intensity();

 // 基于湿度阈值控制电磁阀
 if (g_humidity_value < g_humidity_low_threshold) {
   g_solenoid_valve_state = 1;
   sv_open(); // 打开阀门(开始浇水)
 } else if (g_humidity_value > g_humidity_high_threshold) {
   g_solenoid_valve_state = 0;
   sv_close(); // 关闭阀门(停止浇水)
 }

 // 打印当前状态
 printf("Humidity:%.1f Light:%.0f Valve:%s Low:%d High:%d\r\n",
        g_humidity_value, g_light_intensity,
        g_solenoid_valve_state ? "ON" : "OFF", g_humidity_low_threshold,
        g_humidity_high_threshold);
}
5.4 Relay-Controlled Watering
1. Hardware Definition and Initialization:
- Define the relay control pin as Pin 10 of GPIOB.
- The sv_init() function initializes the GPIO:
- Enable the GPIOB clock.
- Configure the pin to open-drain output mode (GPIO_Mode_Out_OD) at 50MHz.
- The initial state is set to high (disables the relay, utilizing the internal pull-up in open-drain mode).
2. Core Control Functions:
- sv_close(): Closes the relay by setting the pin high, stops watering, and prints status information.
- sv_open(): Opens the relay by clearing the pin low, starts watering, and prints status information.
#include "bsp_uart.h"
#include "sv.h"
#include "w55mh32_rcc.h"
#include <stdio.h>

/* 电磁阀控制引脚 */
#define SOLENOID_VALVE_PIN GPIO_Pin_10
#define SOLENOID_VALVE_PORT GPIOB

/**
* @brief 初始化电磁阀(继电器)控制
* @details 配置GPIO引脚为开漏模式用于继电器控制
*/
void sv_init(void) {
 GPIO_InitTypeDef gpio_init_struct;

 // 使能GPIOB时钟
 RCC_APB2PeriphClockCmd(RCC_APB2Periph_GPIOB, ENABLE);

 // 配置引脚为开漏输出(继电器控制)
 gpio_init_struct.GPIO_Mode = GPIO_Mode_Out_OD;
 gpio_init_struct.GPIO_Speed = GPIO_Speed_50MHz;
 gpio_init_struct.GPIO_Pin = SOLENOID_VALVE_PIN;
 GPIO_Init(SOLENOID_VALVE_PORT, &gpio_init_struct);

 // 初始状态:阀门关闭(引脚高电平,开漏模式配合内部上拉)
 GPIO_SetBits(SOLENOID_VALVE_PORT, SOLENOID_VALVE_PIN);
}

/**
* @brief 关闭继电器(停止浇水)
* @details 设置继电器控制引脚为高电平,使电磁阀失活
*/
void sv_close(void) {
 GPIO_SetBits(SOLENOID_VALVE_PORT, SOLENOID_VALVE_PIN);
 printf("Solenoid valve closed (high humidity).\r\n");
}

/**
* @brief 打开继电器(开始浇水)
* @details 清除继电器控制引脚为低电平,使电磁阀激活
*/
void sv_open(void) {
 GPIO_ResetBits(SOLENOID_VALVE_PORT, SOLENOID_VALVE_PIN);
 printf("Solenoid valve opened (low humidity).\r\n");
}
5.5 Connecting to Alibaba Cloud
1. Functional Positioning: Enables bidirectional communication between devices and the Alibaba Cloud IoT platform through the MQTT protocol, enabling sensor data reporting and cloud-based control command reception.
2. Core Configuration: Includes the Alibaba Cloud MQTT server address, port, authentication information (client ID, username, password), and send and receive topics. QoS level 0 communication is used.
3. Key Processes:
- Initialization: Resolves the domain name, establishes a network connection, and configures MQTT client parameters.
- Communication Mechanism: Manages connections, subscriptions, message sending and receiving, and error reconnection through a state machine.
- Data Exchange: Packages sensor data (humidity, light intensity, valve status) into JSON for reporting; parses JSON commands sent and received from the cloud to control valve opening and closing and update humidity thresholds.
4. System Integration: Associates sensor data with global variables, calls relay control functions, and synchronizes local device status with the cloud.
Note: The parameters in the mqttconn s_mqtt_connection_params function must be modified to the MQTT parameters and subscription and publication topics of the device created in 4.1.2.
#include "MQTTClient.h"
#include "cJSON.h"
#include "delay.h"
#include "do_dns.h"
#include "do_mqtt.h"
#include "mqtt_interface.h"
#include "sv.h"
#include "wiz_interface.h"
#include "wizchip_conf.h"
#include <string.h>


#define MQTT_ETHERNET_MAX_SIZE (1024 * 2) // MQTT缓冲区最大大小

/* MQTT控制句柄 */
MQTTClient g_mqtt_client = {0};
Network g_mqtt_network = {0};
int g_mqtt_conn_status;
static uint8_t s_mqtt_run_status = CONN; // MQTT状态机状态

/* MQTT连接参数(替换为你的设备凭证) */
static mqttconn s_mqtt_connection_params = {
   .mqttHostUrl = "iot-06z009vm5y6jfwj.mqtt.iothub.aliyuncs.com",
   .server_ip =
       {
           0,
       },
   .port = 1883,
   .clientid = "k1zh33h3hte.IGAT|securemode=2,signmethod=hmacsha256,timestamp="
               "1752635274022|",
   .username = "IGAT&k1zh33h3hte",
   .passwd =
       "f04b7d14d10a981e0eb6248da38b52060ff443c3f4b825d01594dfaa7e5720c1",
   .pubtopic = "/sys/k1zh33h3hte/IGAT/thing/event/property/post",
   .subtopic = "/sys/k1zh33h3hte/IGAT/thing/service/property/set",
   .pubQoS = QOS0,
};

/* MQTT接收缓冲区(静态) */
static char s_mqtt_received_msg[512] = {0};
static uint8_t s_mqtt_receive_flag = 0; // 新MQTT消息标志

/* MQTT消息/配置结构 */
MQTTMessage g_mqtt_pub_msg = {.qos = QOS0, .retained = 0, .dup = 0, .id = 0};
MQTTPacket_willOptions g_mqtt_will = MQTTPacket_willOptions_initializer;
MQTTPacket_connectData g_mqtt_conn_data = MQTTPacket_connectData_initializer;

/* 全局传感器数据(与main.c共享) */
float g_humidity_value = 0.0f;      // 当前湿度
float g_light_intensity = 0.0f;     // 当前光照强度
uint8_t g_solenoid_valve_state = 0; // 电磁阀状态(1:开启, 0:关闭)

/* 湿度阈值(与main.c共享) */
extern int g_humidity_low_threshold;
extern int g_humidity_high_threshold;

/**
* @brief 初始化MQTT客户端
* @param sn 套接字号
* @param send_buf MQTT发送数据缓冲区
* @param recv_buf MQTT接收数据缓冲区
*/
void mqtt_init(uint8_t sn, uint8_t *send_buf, uint8_t *recv_buf) {
 wiz_NetInfo network_info = {0};
 wizchip_getnetinfo(&network_info);

 // 将MQTT服务器域名解析为IP地址
 if (do_dns(send_buf, (uint8_t *)s_mqtt_connection_params.mqttHostUrl,
            s_mqtt_connection_params.server_ip)) {
   while (1)
     ; // DNS解析失败时停机
 }

 // 初始化网络和MQTT客户端
 NewNetwork(&g_mqtt_network, sn);
 ConnectNetwork(&g_mqtt_network, s_mqtt_connection_params.server_ip,
                s_mqtt_connection_params.port);
 MQTTClientInit(&g_mqtt_client, &g_mqtt_network, 1000, send_buf,
                MQTT_ETHERNET_MAX_SIZE, recv_buf, MQTT_ETHERNET_MAX_SIZE);

 // 配置MQTT连接参数
 g_mqtt_conn_data.willFlag = 0;
 g_mqtt_conn_data.MQTTVersion = 4;
 g_mqtt_conn_data.clientID.cstring = s_mqtt_connection_params.clientid;
 g_mqtt_conn_data.username.cstring = s_mqtt_connection_params.username;
 g_mqtt_conn_data.password.cstring = s_mqtt_connection_params.passwd;
 g_mqtt_conn_data.keepAliveInterval = 30;
 g_mqtt_conn_data.cleansession = 1;
}

/**
* @brief 解码MQTT JSON消息(设置阈值/阀门状态)
* @param msg JSON消息负载
*/
void mqtt_json_decode(char *msg) {
 cJSON *root_json = cJSON_Parse(msg);
 if (!root_json) {
   printf("MQTT JSON parse failed\r\n");
   return;
 }

 // 从JSON中提取"params"对象
 cJSON *params_json = cJSON_GetObjectItem(root_json, "params");
 if (!params_json) {
   cJSON_Delete(root_json);
   return;
 }

 // 如果"Elect"字段存在,更新电磁阀状态
 cJSON *valve_json = cJSON_GetObjectItem(params_json, "Elect");
 if (valve_json) {
   g_solenoid_valve_state = valve_json->valueint;
   if (g_solenoid_valve_state) {
     sv_open();
   } else {
     sv_close();
   }
 }

 // 如果"Low"/"High"字段存在,更新湿度阈值
 cJSON *low_threshold_json = cJSON_GetObjectItem(params_json, "Low");
 cJSON *high_threshold_json = cJSON_GetObjectItem(params_json, "High");
 if (low_threshold_json) {
   g_humidity_low_threshold = low_threshold_json->valueint;
 }
 if (high_threshold_json) {
   g_humidity_high_threshold = high_threshold_json->valueint;
 }

 // 确保阈值范围有效(下限 <= 上限)
 if (g_humidity_low_threshold > g_humidity_high_threshold) {
   g_humidity_low_threshold = g_humidity_high_threshold - 1;
 }

 cJSON_Delete(root_json); // 释放JSON对象
}

/**
* @brief 接收MQTT消息的回调函数
* @param md 消息数据(主题和负载)
*/
void mqtt_message_arrived(MessageData *md) {
 char topic_name[64] = {0};
 char msg_payload[512] = {0};

 // 提取主题和负载
 sprintf(topic_name, "%.*s", (int)md->topicName->lenstring.len,
         md->topicName->lenstring.data);
 sprintf(msg_payload, "%.*s", (int)md->message->payloadlen,
         (char *)md->message->payload);
 printf("MQTT recv: %s, %s\r\n\r\n", topic_name, msg_payload);

 // 存储消息并设置标志
 s_mqtt_receive_flag = 1;
 memset(s_mqtt_received_msg, 0, sizeof(s_mqtt_received_msg));
 memcpy(s_mqtt_received_msg, msg_payload, strlen(msg_payload));
}

/**
* @brief 通过MQTT发布传感器数据
* @details 以JSON格式发送湿度、光照、阀门状态和阈值
*/
void mqtt_post_properties(void) {
 char json_payload[256] = {0};

 // 将传感器数据格式化为JSON负载
 int payload_len =
     snprintf(json_payload, sizeof(json_payload),
              "{\"id\":\"123\",\"version\":\"1.0\",\"params\":{"
              "\"Elect\":%d,"
              "\"Humidity\":%.1f,"
              "\"light\":%.0f,"
              "\"Low\":%d,"
              "\"High\":%d"
              "},\"method\":\"thing.event.property.post\"}",
              g_solenoid_valve_state, g_humidity_value, g_light_intensity,
              g_humidity_low_threshold, g_humidity_high_threshold);

 // 发布消息
 g_mqtt_pub_msg.payload = json_payload;
 g_mqtt_pub_msg.payloadlen = payload_len;
 MQTTPublish(&g_mqtt_client, s_mqtt_connection_params.pubtopic,
             &g_mqtt_pub_msg);
 printf("MQTT published: %s, %s\r\n\r\n", s_mqtt_connection_params.pubtopic,
        json_payload);
}

/**
* @brief MQTT状态机(处理连接、订阅和消息)
*/
void do_mqtt(void) {
 uint8_t ret;
 switch (s_mqtt_run_status) {
 case CONN: // 连接到MQTT服务器
   ret = MQTTConnect(&g_mqtt_client, &g_mqtt_conn_data);
   printf("Connecting to MQTT server: %d.%d.%d.%d:%d\r\n",
          s_mqtt_connection_params.server_ip[0],
          s_mqtt_connection_params.server_ip[1],
          s_mqtt_connection_params.server_ip[2],
          s_mqtt_connection_params.server_ip[3],
          s_mqtt_connection_params.port);
   printf("Connection %s\r\n\r\n", ret == SUCCESSS ? "success" : "failed");
   s_mqtt_run_status = (ret == SUCCESSS) ? SUB : ERR;
   break;

 case SUB: // 订阅主题
   ret = MQTTSubscribe(&g_mqtt_client, s_mqtt_connection_params.subtopic,
                       s_mqtt_connection_params.pubQoS, mqtt_message_arrived);
   printf("Subscribing to %s\r\n", s_mqtt_connection_params.subtopic);
   printf("Subscription %s\r\n\r\n", ret == SUCCESSS ? "success" : "failed");
   s_mqtt_run_status = (ret == SUCCESSS) ? KEEPALIVE : ERR;
   break;

 case KEEPALIVE: // 维持连接并检查消息
   if (MQTTYield(&g_mqtt_client, 30) != SUCCESSS) {
     s_mqtt_run_status = ERR;
     break;
   }
   // 继续处理接收的消息
 case RECV: // 处理接收的消息
   if (s_mqtt_receive_flag) {
     s_mqtt_receive_flag = 0;
     mqtt_json_decode(s_mqtt_received_msg); // 解码并处理消息
   }
   break;

 case ERR: // 处理错误(重试)
   printf("MQTT error! Reconnecting...\r\n");
   delay_ms(1000);
   s_mqtt_run_status = CONN; // 重试连接
   break;

 default:
   break;
 }
}
5.6 Web Control
1. Functional Positioning: Provides a web service interface that supports obtaining device status and control parameters via HTTP.
2. Core Functions:
- Parses HTTP requests (supports GET and POST methods).
- Provides multiple API endpoints:
- Root path /: Returns web page content.
- /api/sensor: Returns sensor data (humidity, light, valve status, threshold) in JSON format.
- /api/threshold: Receives POST requests to update humidity thresholds.
3. Data Interaction:
- Reads global variables to obtain sensor status and thresholds.
- Returns JSON-formatted data via HTTP responses.
- Parses JSON data in POST requests to update system parameters.
4. Communication Management:
- Manages the connection lifecycle (establishment, data transmission, and closure) based on the TCP state machine.
- Handles different HTTP status codes (200, 204, 400, and 404).
#include "cJSON.h"
#include "loopback.h"
#include "socket.h"
#include "web_page.h"
#include "wizchip_conf.h"
#include <stdio.h>
#include <stdlib.h>
#include <string.h>


/* 使用web_page.h中定义的HTTP_RESPONSE_404 */
#define DATA_BUF_SIZE 1024
#define STR(x) #x // 用于行号的字符串化宏

/* 全局传感器数据(与main.c共享) */
extern float g_humidity_value;
extern float g_light_intensity;
extern uint8_t g_solenoid_valve_state;
extern int g_humidity_low_threshold;
extern int g_humidity_high_threshold;

/**
* @brief HTTP请求行结构(方法、URI、版本)
*/
typedef struct {
 char method[16];  // 例如:"GET"
 char uri[256];    // 例如:"/api/sensor"
 char version[16]; // 例如:"HTTP/1.1"
} HttpReqLine;

/**
* @brief 从原始数据解析HTTP请求行
* @param request 原始HTTP请求数据
* @param req_line 存储解析结果的输出结构
* @return 成功返回0,失败返回-1
*/
static int http_parse_request_line(const char *request, HttpReqLine *req_line) {
 char buffer[1024];
 strncpy(buffer, request, sizeof(buffer));
 buffer[sizeof(buffer) - 1] = '\0'; // 确保字符串以空字符结尾

 // 查找第一行的结束符("\r\n"或"\n")
 char *line_end = strstr(buffer, "\r\n");
 if (!line_end) {
   line_end = strstr(buffer, "\n"); // 兼容Unix换行符
 }
 if (!line_end) {
   return -1; // 格式无效
 }
 *line_end = '\0'; // 截断到第一行

 // 使用空格分割为方法、URI和版本
 char *method = strtok(buffer, " ");
 char *uri = strtok(NULL, " ");
 char *version = strtok(NULL, " ");

 if (!method || !uri || !version) {
   return -1; // 请求行不完整
 }

 // 将解析的值复制到结构中
 strncpy(req_line->method, method, sizeof(req_line->method) - 1);
 strncpy(req_line->uri, uri, sizeof(req_line->uri) - 1);
 strncpy(req_line->version, version, sizeof(req_line->version) - 1);

 return 0;
}

/**
* @brief 发送带有CORS头的HTTP响应
* @param sn 套接字号
* @param status HTTP状态码(例如:"200 OK")
* @param content_type MIME类型(例如:"application/json")
* @param body 响应体内容
*/
static void send_http_response(uint8_t sn, const char *status,
                              const char *content_type, const char *body) {
 char response[512];
 int body_len = strlen(body);

 // 构建带有CORS头的响应
 sprintf(response,
         "HTTP/1.1 %s\r\n"
         "Content-Type: %s\r\n"
         "Access-Control-Allow-Origin: *\r\n"
         "Access-Control-Allow-Methods: GET, POST, OPTIONS\r\n"
         "Access-Control-Allow-Headers: Content-Type\r\n"
         "Connection: close\r\n"
         "Content-Length: %d\r\n"
         "\r\n"
         "%s",
         status, content_type, body_len, body);

 // 发送完整响应
 send(sn, (uint8_t *)response, strlen(response));
}

/**
* @brief 带HTTP支持的TCP服务器回环测试
* @param sn 套接字号
* @param network_buf 网络数据缓冲区
* @param port 监听端口
* @return 成功返回1,失败返回错误码
*/
int32_t loopback_tcps(uint8_t sn, uint8_t *network_buf, uint16_t port) {
 int32_t ret;
 uint16_t recv_size = 0;
 uint16_t send_size = 0;

 switch (getSn_SR(sn)) {
 case SOCK_ESTABLISHED: // 连接已建立
   if (getSn_IR(sn) & Sn_IR_CON) {
     setSn_IR(sn, Sn_IR_CON); // 清除连接中断标志
   }

   // 检查接收数据
   if ((recv_size = getSn_RX_RSR(sn)) > 0) {
     if (recv_size > DATA_BUF_SIZE) {
       recv_size = DATA_BUF_SIZE; // 限制为缓冲区大小
     }

     // 读取接收的数据
     ret = recv(sn, network_buf, recv_size);
     if (ret <= 0) {
       return ret; // 处理错误
     }
     recv_size = (uint16_t)ret;
     network_buf[recv_size] = '\0'; // 添加空终止符

     // 解析HTTP请求行
     HttpReqLine req_line;
     if (http_parse_request_line((char *)network_buf, &req_line) == 0) {
       printf("HTTP Method: %s, URI: %s\n", req_line.method, req_line.uri);

       // 处理OPTIONS请求(CORS预检)
       if (strcmp(req_line.method, "OPTIONS") == 0) {
         send_http_response(sn, "204 No Content", "text/plain", "");
         disconnect(sn);
         close(sn);
       }

       // 处理GET /(提供网页)
       else if (strcmp(req_line.method, "GET") == 0 &&
                strcmp(req_line.uri, "/") == 0) {
         uint16_t content_len = strlen(index_page);
         send_size = 0;
         while (strlen(index_page) != send_size) {
           ret = send(sn, (uint8_t *)index_page + send_size,
                      strlen(index_page) - send_size);
           if (ret < 0) {
             close(sn);
             return ret;
           }
           send_size += ret;
         }
         disconnect(sn);
         close(sn);
       }

       // 处理GET /api/sensor(返回传感器数据)
       else if (strcmp(req_line.method, "GET") == 0 &&
                strcmp(req_line.uri, "/api/sensor") == 0) {
         char sensor_json[128];
         sprintf(sensor_json,
                 "{\"humi\":%.1f,\"light\":%.0f,\"sv\":\"%s\",\"low\":%d,"
                 "\"high\":%d}",
                 g_humidity_value, g_light_intensity,
                 g_solenoid_valve_state ? "ON" : "OFF",
                 g_humidity_low_threshold, g_humidity_high_threshold);

         send_http_response(sn, "200 OK", "application/json", sensor_json);
         disconnect(sn);
         close(sn);
       }

       // 处理POST /api/threshold(更新阈值)
       else if (strcmp(req_line.method, "POST") == 0 &&
                strcmp(req_line.uri, "/api/threshold") == 0) {
         // 查找请求体(健壮解析)
         char *body_start = NULL;
         char *header_end = strstr((char *)network_buf, "\r\n\r\n");

         if (header_end) {
           body_start = header_end + 4; // 跳过"\r\n\r\n"
         } else {
           // 兼容Unix换行符
           header_end = strstr((char *)network_buf, "\n\n");
           if (header_end) {
             body_start = header_end + 2; // 跳过"\n\n"
           }
         }

         // 验证请求体存在
         if (!body_start || body_start >= (char *)network_buf + recv_size) {
           send_http_response(
               sn, "400 Bad Request", "application/json",
               "{\"success\":false, \"error\":\"Missing request body\"}");
           disconnect(sn);
           close(sn);
           return 1;
         }

         // 解析JSON请求体
         cJSON *root_json = cJSON_Parse(body_start);
         if (!root_json) {
           send_http_response(
               sn, "400 Bad Request", "application/json",
               "{\"success\":false, \"error\":\"Invalid JSON format\"}");
           disconnect(sn);
           close(sn);
           return 1;
         }

         // 提取并验证阈值
         cJSON *low_json = cJSON_GetObjectItem(root_json, "low");
         cJSON *high_json = cJSON_GetObjectItem(root_json, "high");

         if (cJSON_IsNumber(low_json) && cJSON_IsNumber(high_json)) {
           int new_low = low_json->valueint;
           int new_high = high_json->valueint;

           // 验证范围
           if (new_low < 0 || new_high > 100 || new_low >= new_high) {
             send_http_response(sn, "400 Bad Request", "application/json",
                                "{\"success\":false, \"error\":\"Invalid "
                                "range (0-100, low < high)\"}");
           } else {
             // 更新阈值
             g_humidity_low_threshold = new_low;
             g_humidity_high_threshold = new_high;
             printf("Thresholds updated: Low=%d, High=%d\n", new_low,
                    new_high);

             send_http_response(sn, "200 OK", "application/json",
                                "{\"success\":true}");
           }
         } else {
           send_http_response(sn, "400 Bad Request", "application/json",
                              "{\"success\":false, \"error\":\"Missing 'low' "
                              "or 'high' parameters\"}");
         }

         cJSON_Delete(root_json); // 释放JSON对象
         disconnect(sn);
         close(sn);
       }

       // 处理未知请求
       else {
         send_http_response(sn, "404 Not Found", "text/html",
                            "<html><body>Page Not Found</body></html>");
         disconnect(sn);
         close(sn);
       }
     } else {
       printf("Failed to parse HTTP request\n");
       send_http_response(
           sn, "400 Bad Request", "application/json",
           "{\"success\":false, \"error\":\"Invalid request format\"}");
       disconnect(sn);
       close(sn);
     }
   }
   break;

 case SOCK_CLOSE_WAIT: // 关闭等待状态
   if ((ret = disconnect(sn)) != SOCK_OK) {
     return ret;
   }
   break;

 case SOCK_INIT: // 套接字已初始化,开始监听
   if ((ret = listen(sn)) != SOCK_OK) {
     return ret;
   }
   break;

 case SOCK_CLOSED: // 套接字已关闭,重新初始化
   if ((ret = socket(sn, Sn_MR_TCP, port, 0x00)) != sn) {
     return ret;
   }
   break;

 default:
   break;
 }
 return 1;
}
6 Functional Verification
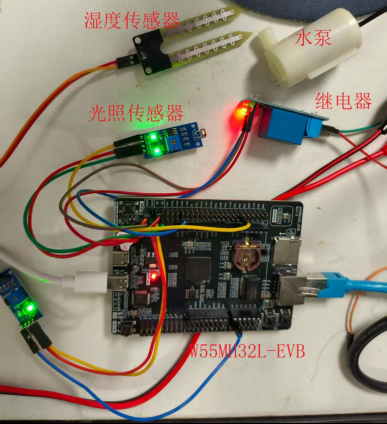
The program is burned and the hardware connections are complete as shown below:
After the hardware is connected, power on and the serial assistant will print the following information:
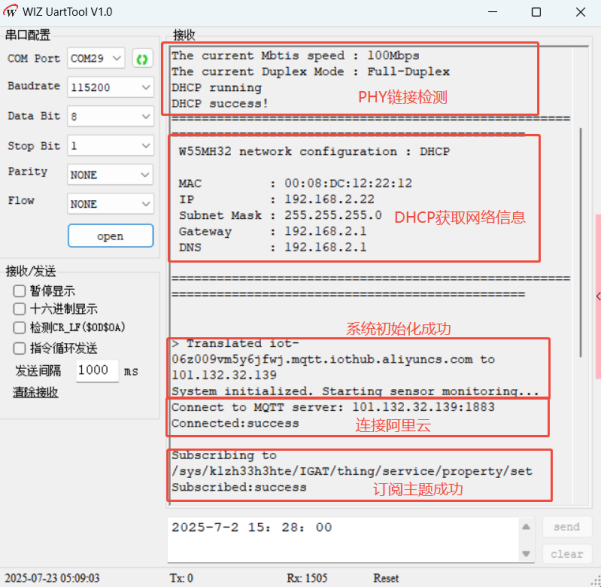
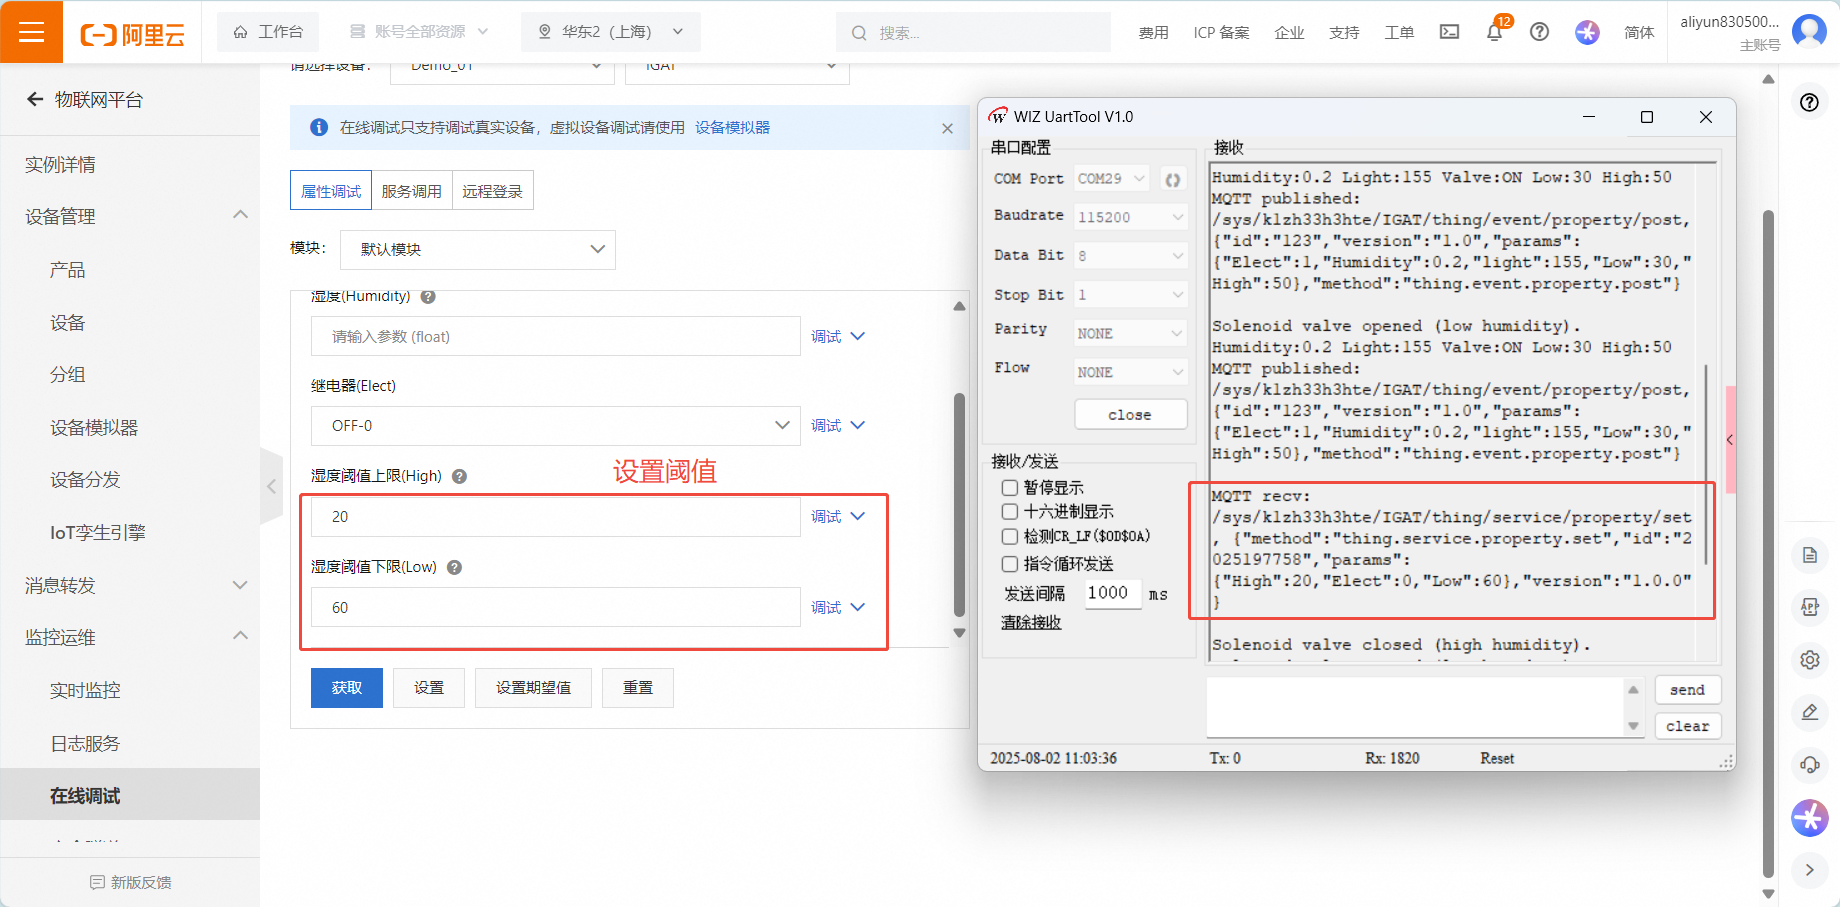
6.1 Synchronizing with Alibaba Cloud
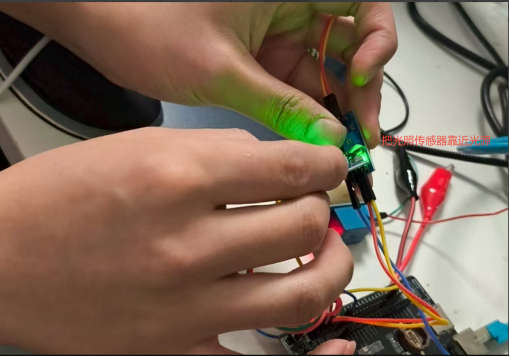
Data is collected every 5 seconds via the serial port and sent to the cloud platform. As we gradually move the light sensor closer to the light source, the light intensity increases. At this point, the soil moisture sensor, unplugged from the soil, detects air humidity below 30% RH. The relay opens, and irrigation begins.
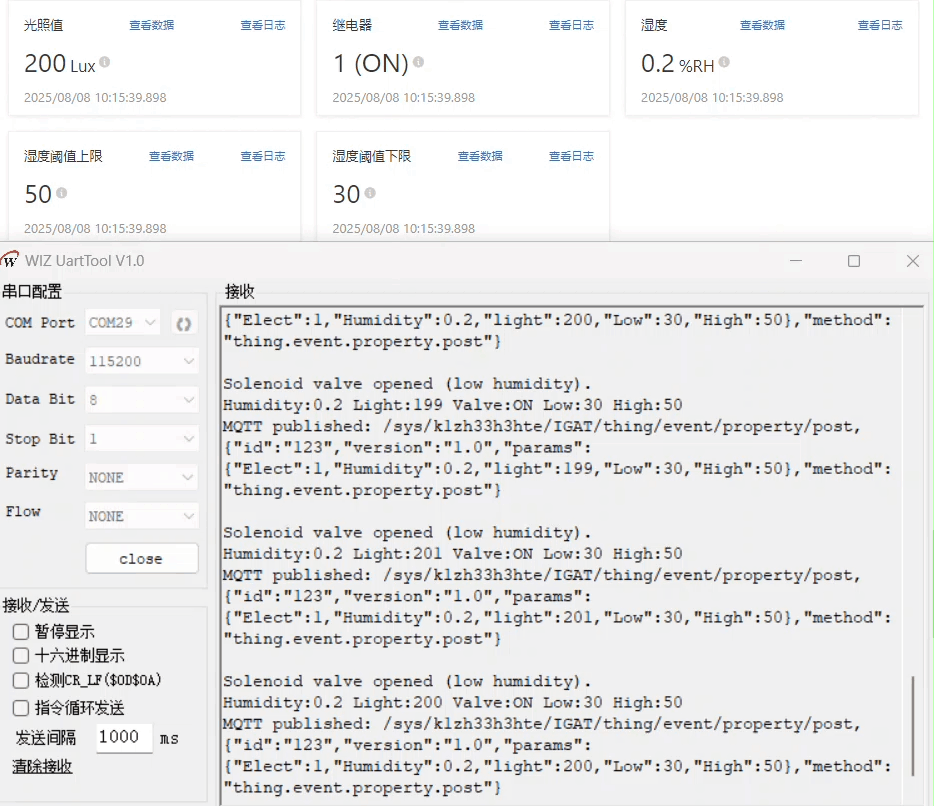
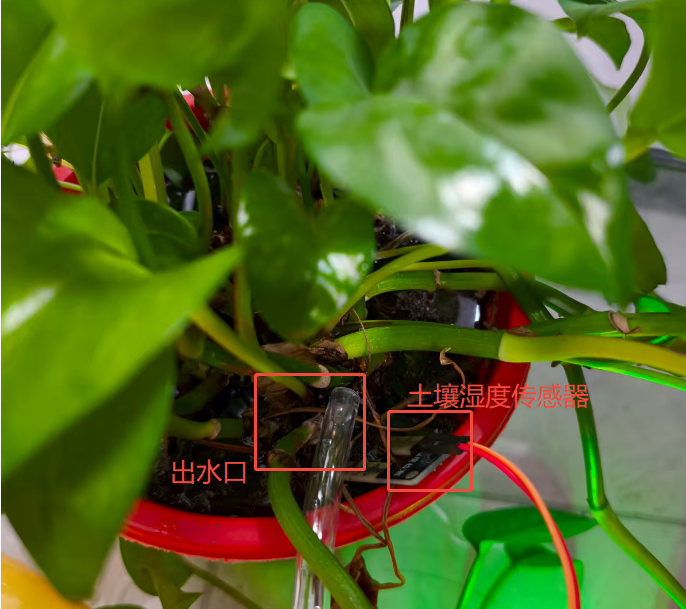
When we insert the soil moisture sensor into the potted plant, we can see that irrigation automatically starts when the humidity is less than 30%RH and stops when the humidity is greater than 50%RH.
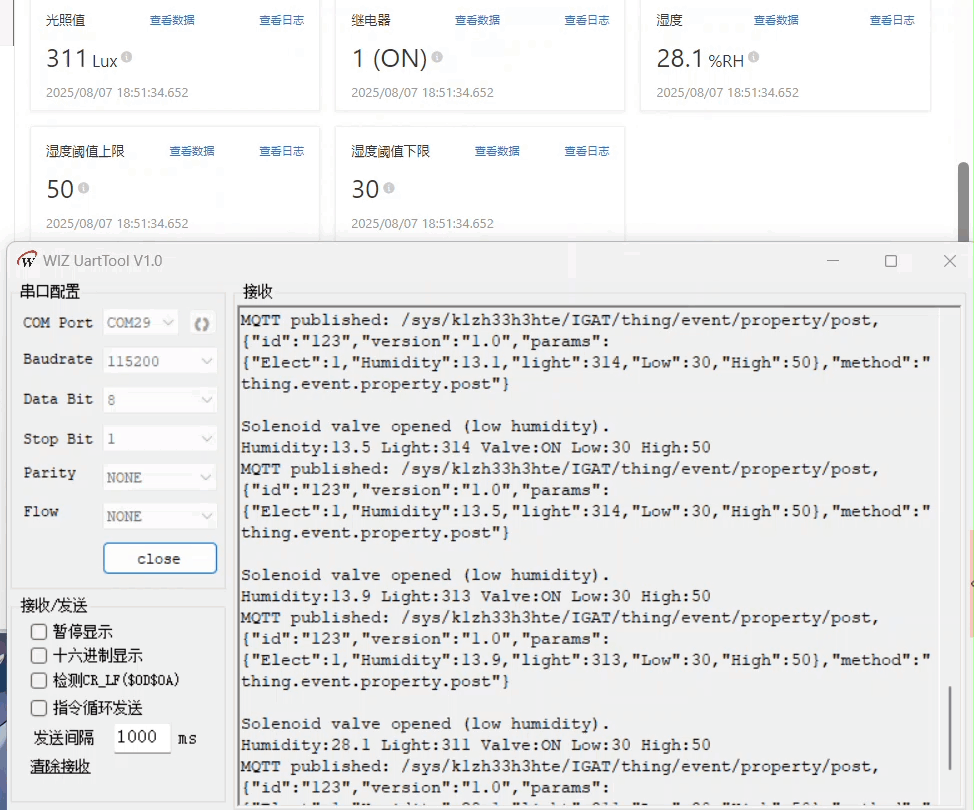
When the humidity is less than 30%RH, the relay opens and irrigation begins. When the humidity is greater than 50%RH, the relay closes and irrigation stops.
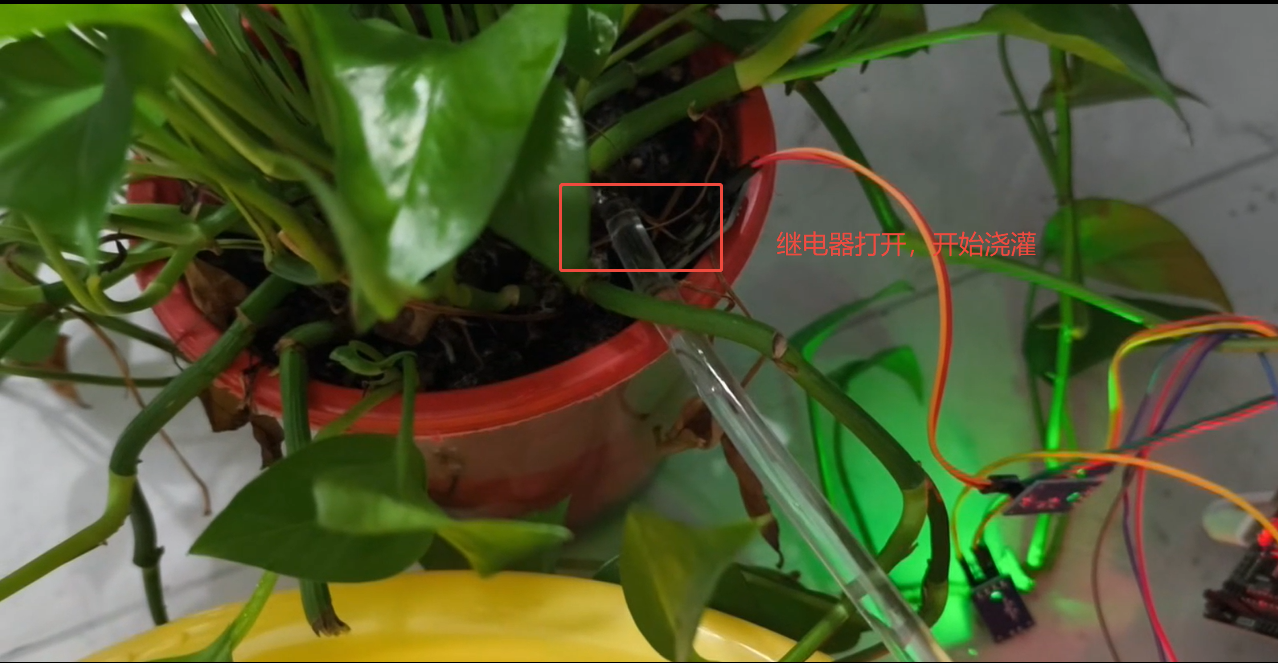
The server sends instructions to control the relay switch, thereby realizing the control of watering start and stop.
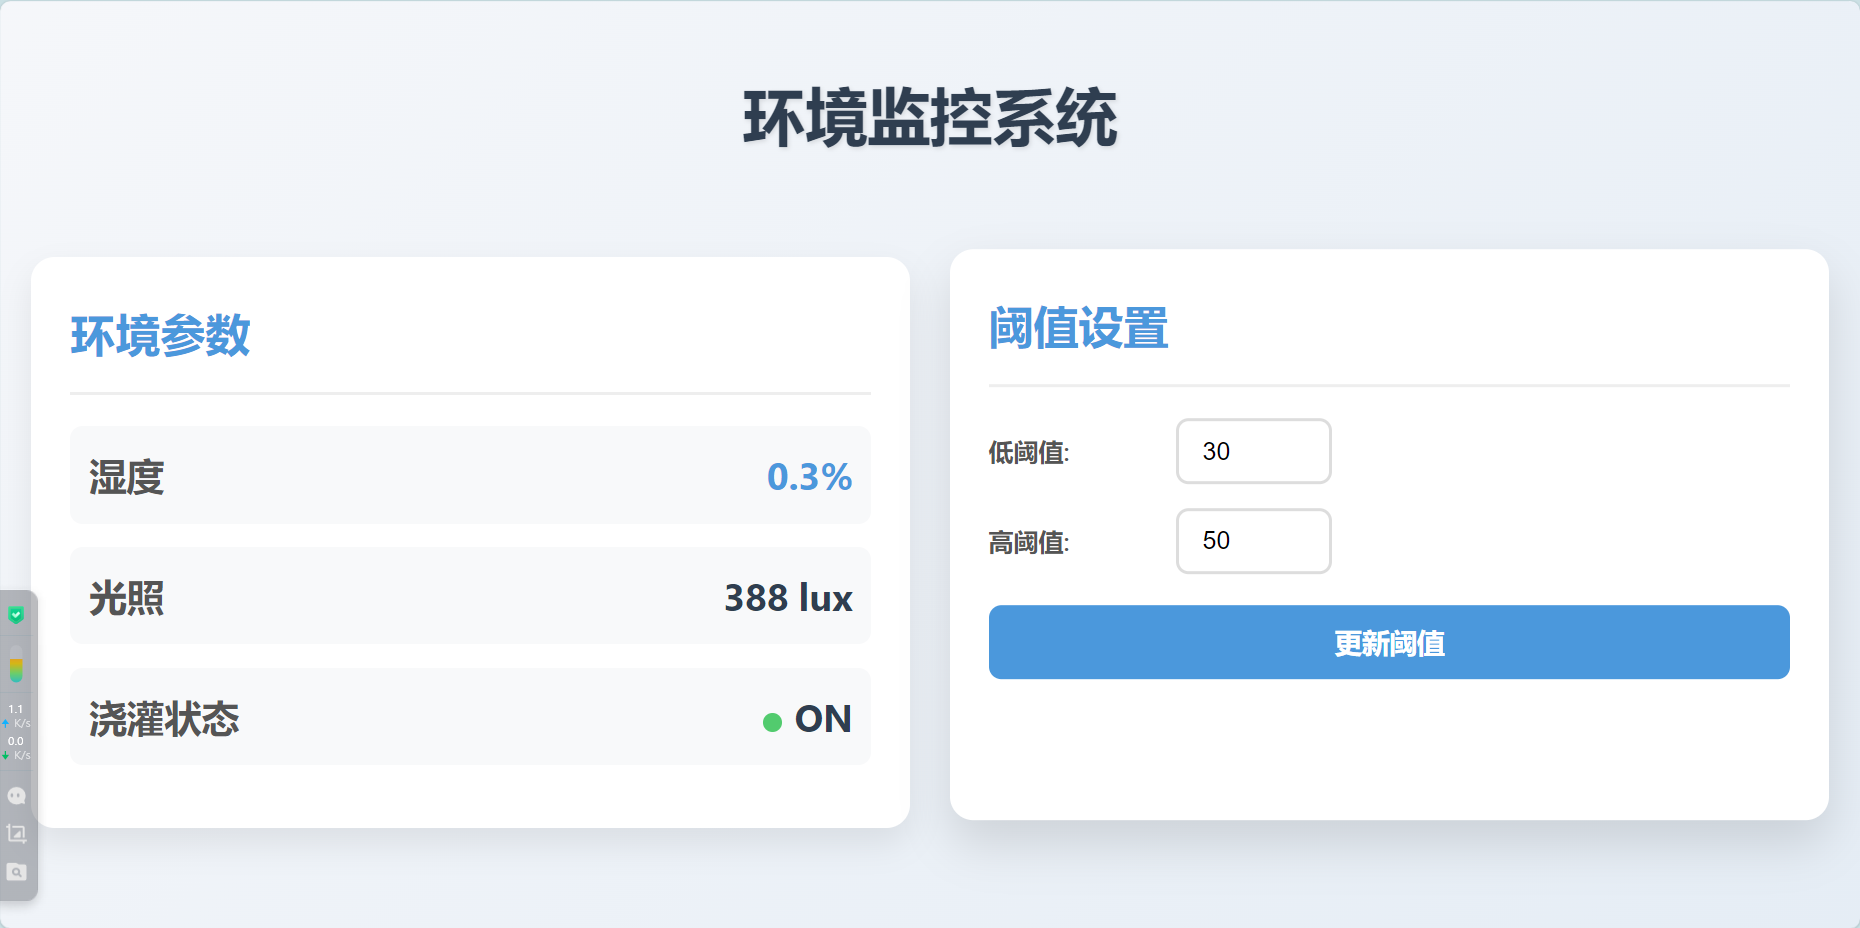
6.2 Web Control
The web platform not only allows real-time monitoring of farmland environmental data, but also allows for flexible remote control of control thresholds, enabling precise and intelligent field management.
7. Summary
This system, built around the W55MH32L-EVB, connects to Alibaba Cloud via MQTT to collect soil moisture and light data for intelligent water pump control. It supports automatic and remote control, collects data every 5 seconds, and supports modifying humidity thresholds via the web. This stable system provides an effective solution for smart irrigation. Thank you for your patience! If you encounter any issues with hardware wiring, Alibaba Cloud configuration, or code debugging during the setup process, please leave a comment in the comments section. If you find this helpful, please like and bookmark it. Your support is what motivates me to share!