
W5500io-M module connects to the OneNet platform via MQTT protocol
W5500io-M module connects to the OneNet platform via MQTT protocol (WeChat Mini Program control solution).
1. Introduction
MQTT is a lightweight communication protocol based on TCP/IP, employing a publish-subscribe model, and widely used in the Internet of Things (IoT) field.
MQTT's working principle revolves around three core components: Publishers, Brokers (also known as servers), and Subscribers. Publishers are responsible for sending messages to specific topics, while brokers receive these messages and forward them to all subscribers to that topic. This model allows asynchronous communication between devices, and devices do not need to be directly aware of each other's existence, thus reducing system complexity.
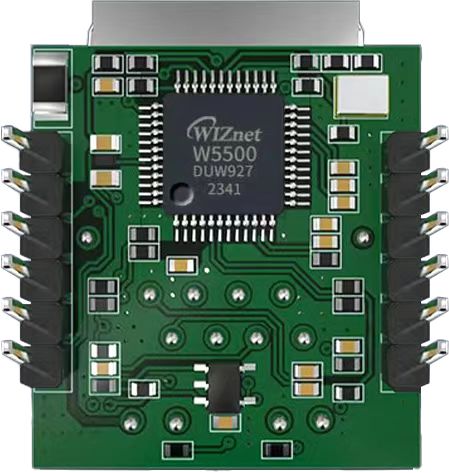
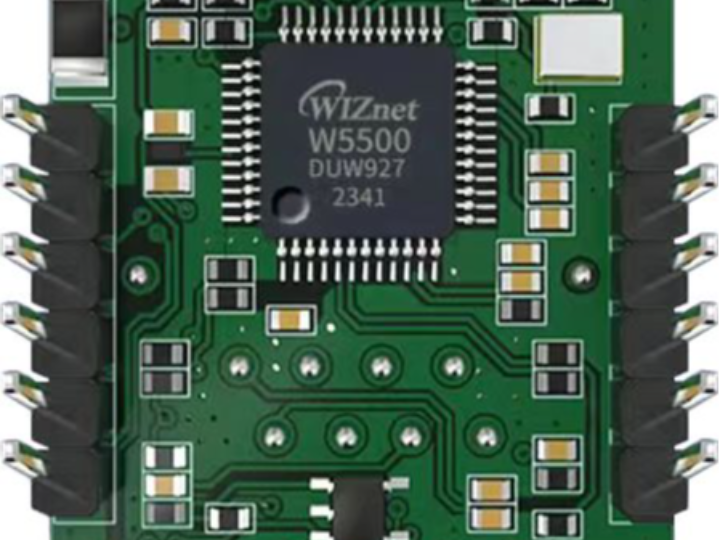
The W5500io-M is a high-performance SPI-to-Ethernet module launched by Weishi, with the following features:
- Minimalist Design: Integrates MAC, PHY, 32KB cache, and RJ45 Ethernet port. Directly connects to the main controller via a 4-wire SPI interface. Powered by 3.3V. Compact size suitable for embedded scenarios.
- Easy to Use: Users no longer need to port complex TCP/IP protocol stacks to the MCU; development can be done directly based on application-layer data.
- Abundant Resources: Provides rich MCU application examples and hardware reference designs for direct reference, greatly shortening development time. Hardware compatible with the W5100sIO-M module, facilitating solution development and iteration.
- Wide Applications: Widely used in industrial control, smart grids, charging piles, security and fire protection, new energy, and energy storage.
2. Project Environment
2.1 Hardware Environment
- W5500io-M
- STM32F103VCT6 EVB
- Network cable
- Several DuPont wires
- Switch or router
2.2 Software Environment
- OneNET IoT Open Platform
- WeChat Developer Platform
- Feisichuang Serial Port Assistant
- Example link: w5500.com/w5500.html
3. Hardware Connection and Solution
3.1 Solution Diagram

3.2 W5500 Hardware Connections
//W5500_SCS ---> STM32_GPIOD7 /*W5500's chip select pin*/
//W5500_SCLK ---> STM32_GPIOB13 /*W5500's clock pin*/
//W5500_MISO ---> STM32_GPIOB14 /*W5500's MISO pin*/
//W5500_MOSI ---> STM32_GPIOB15 /*W5500's MOSI pin*/
//W5500_RESET ---> STM32_GPIOD8 /*W5500's RESET pin*/ //W5500_INT ---> STM32_GPIOD9 /*INT pin of W5500*/
4. Registering a OneNet account and creating an object model
Account registration will not be detailed here. Below, we will see how to create an object model.
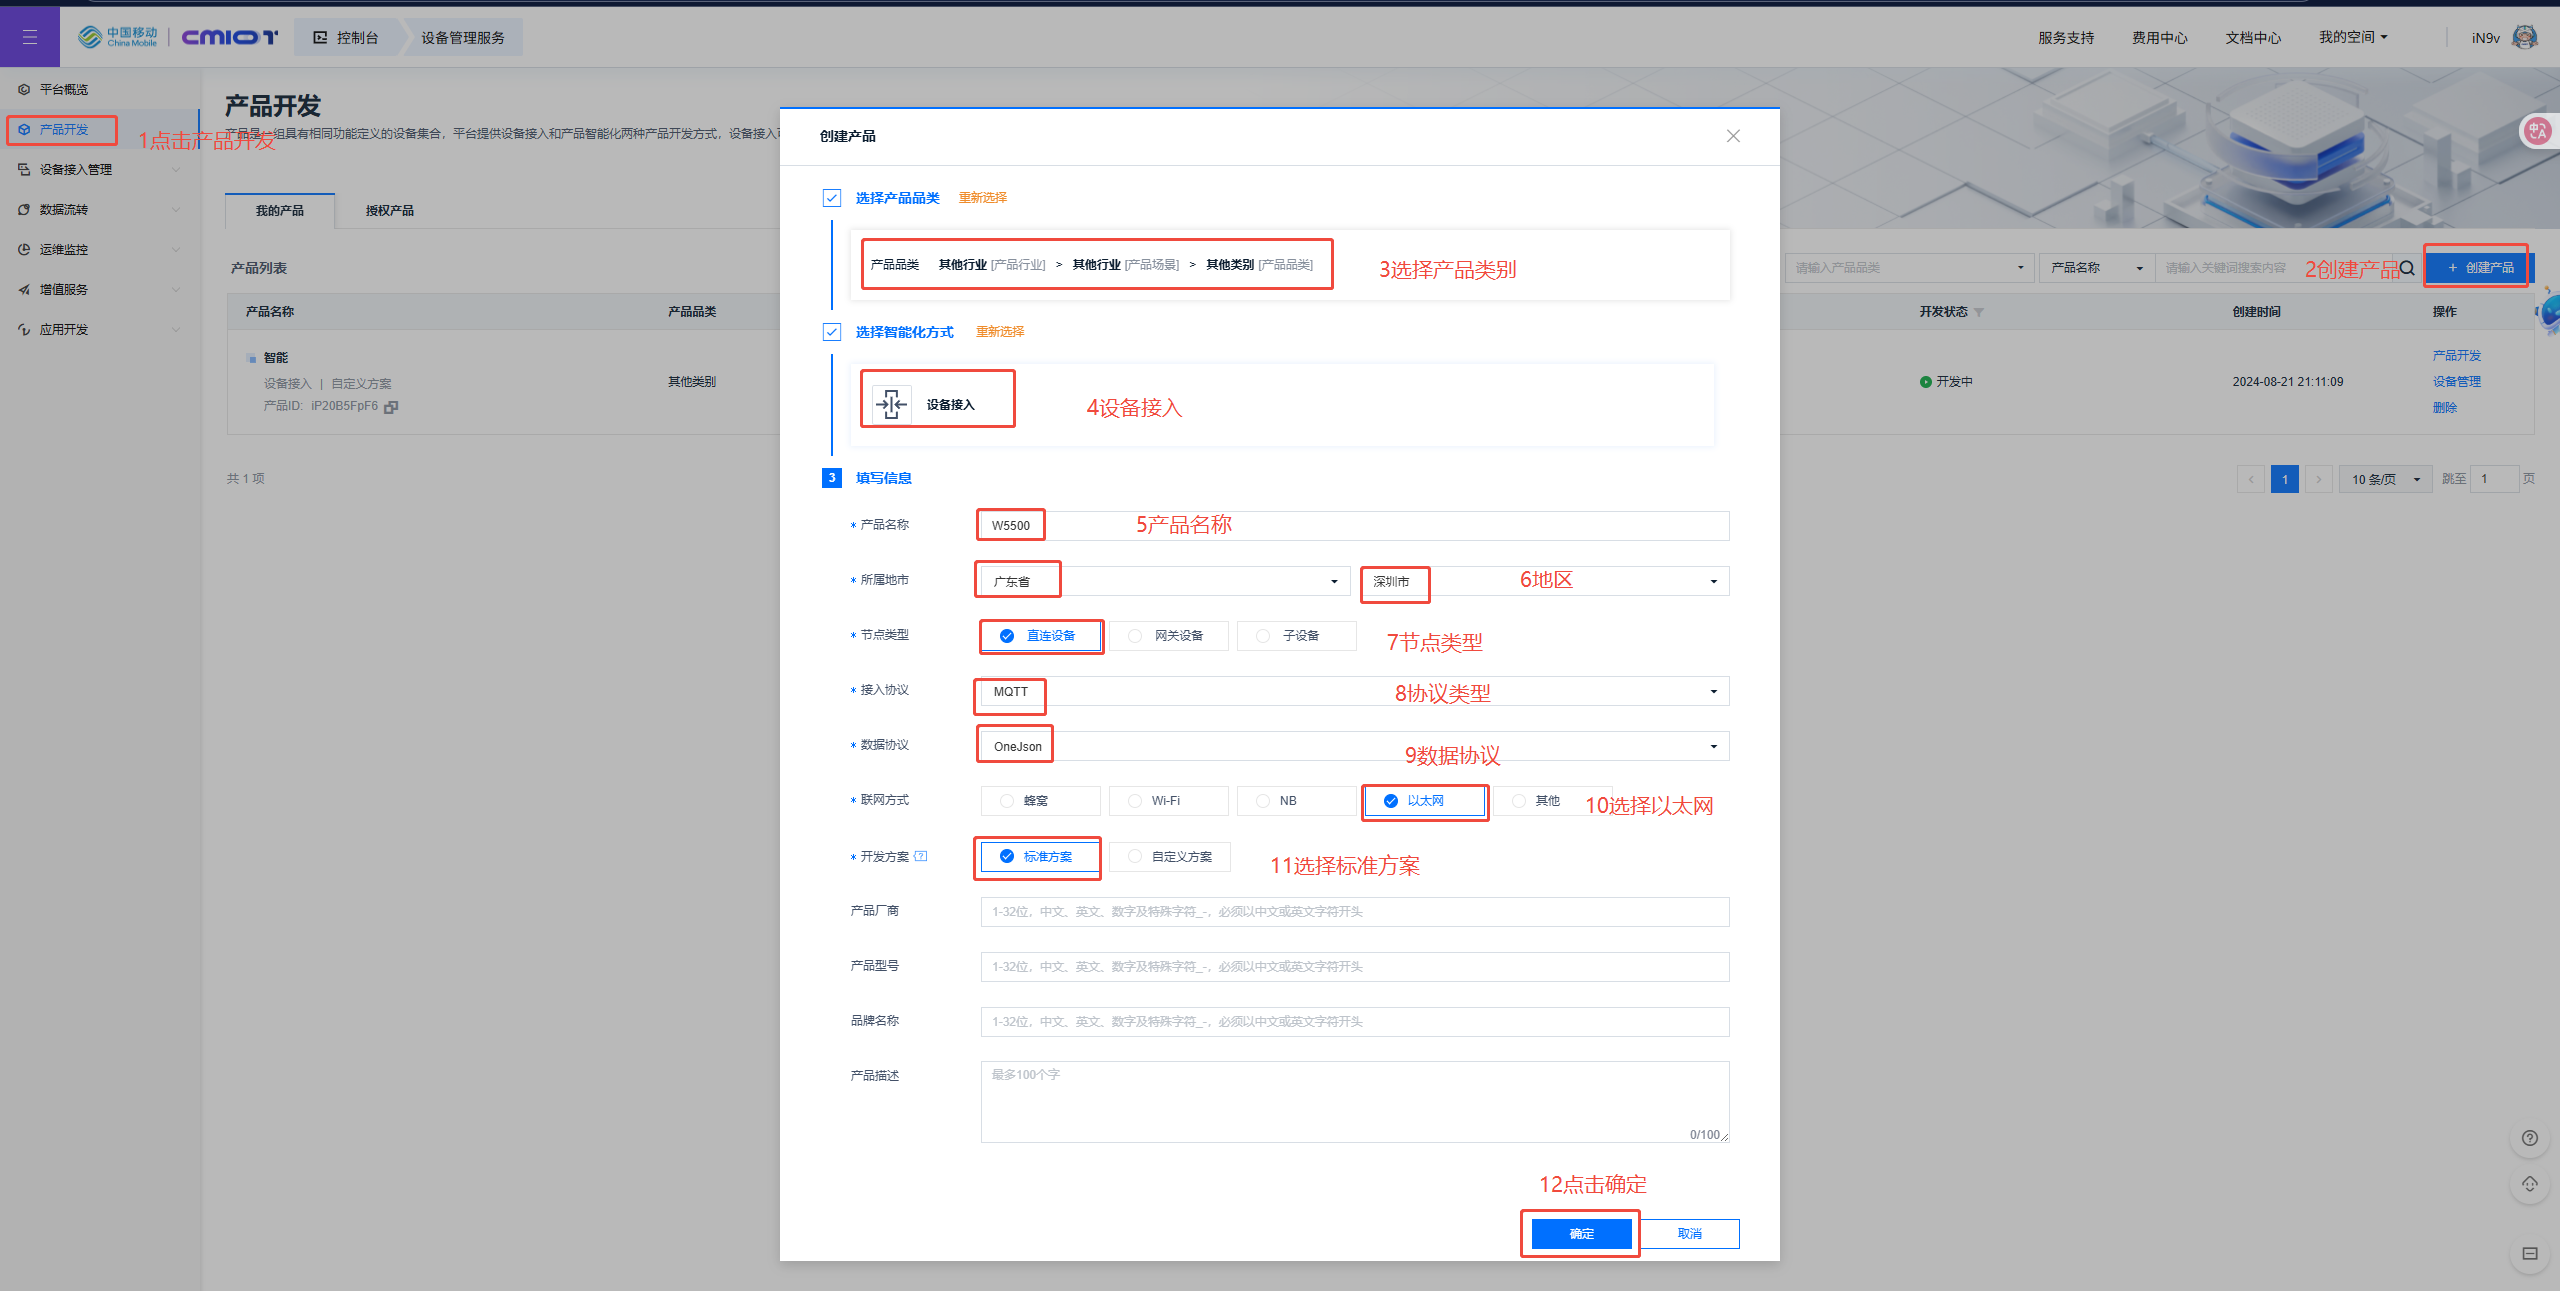
4.1 Creating a Product
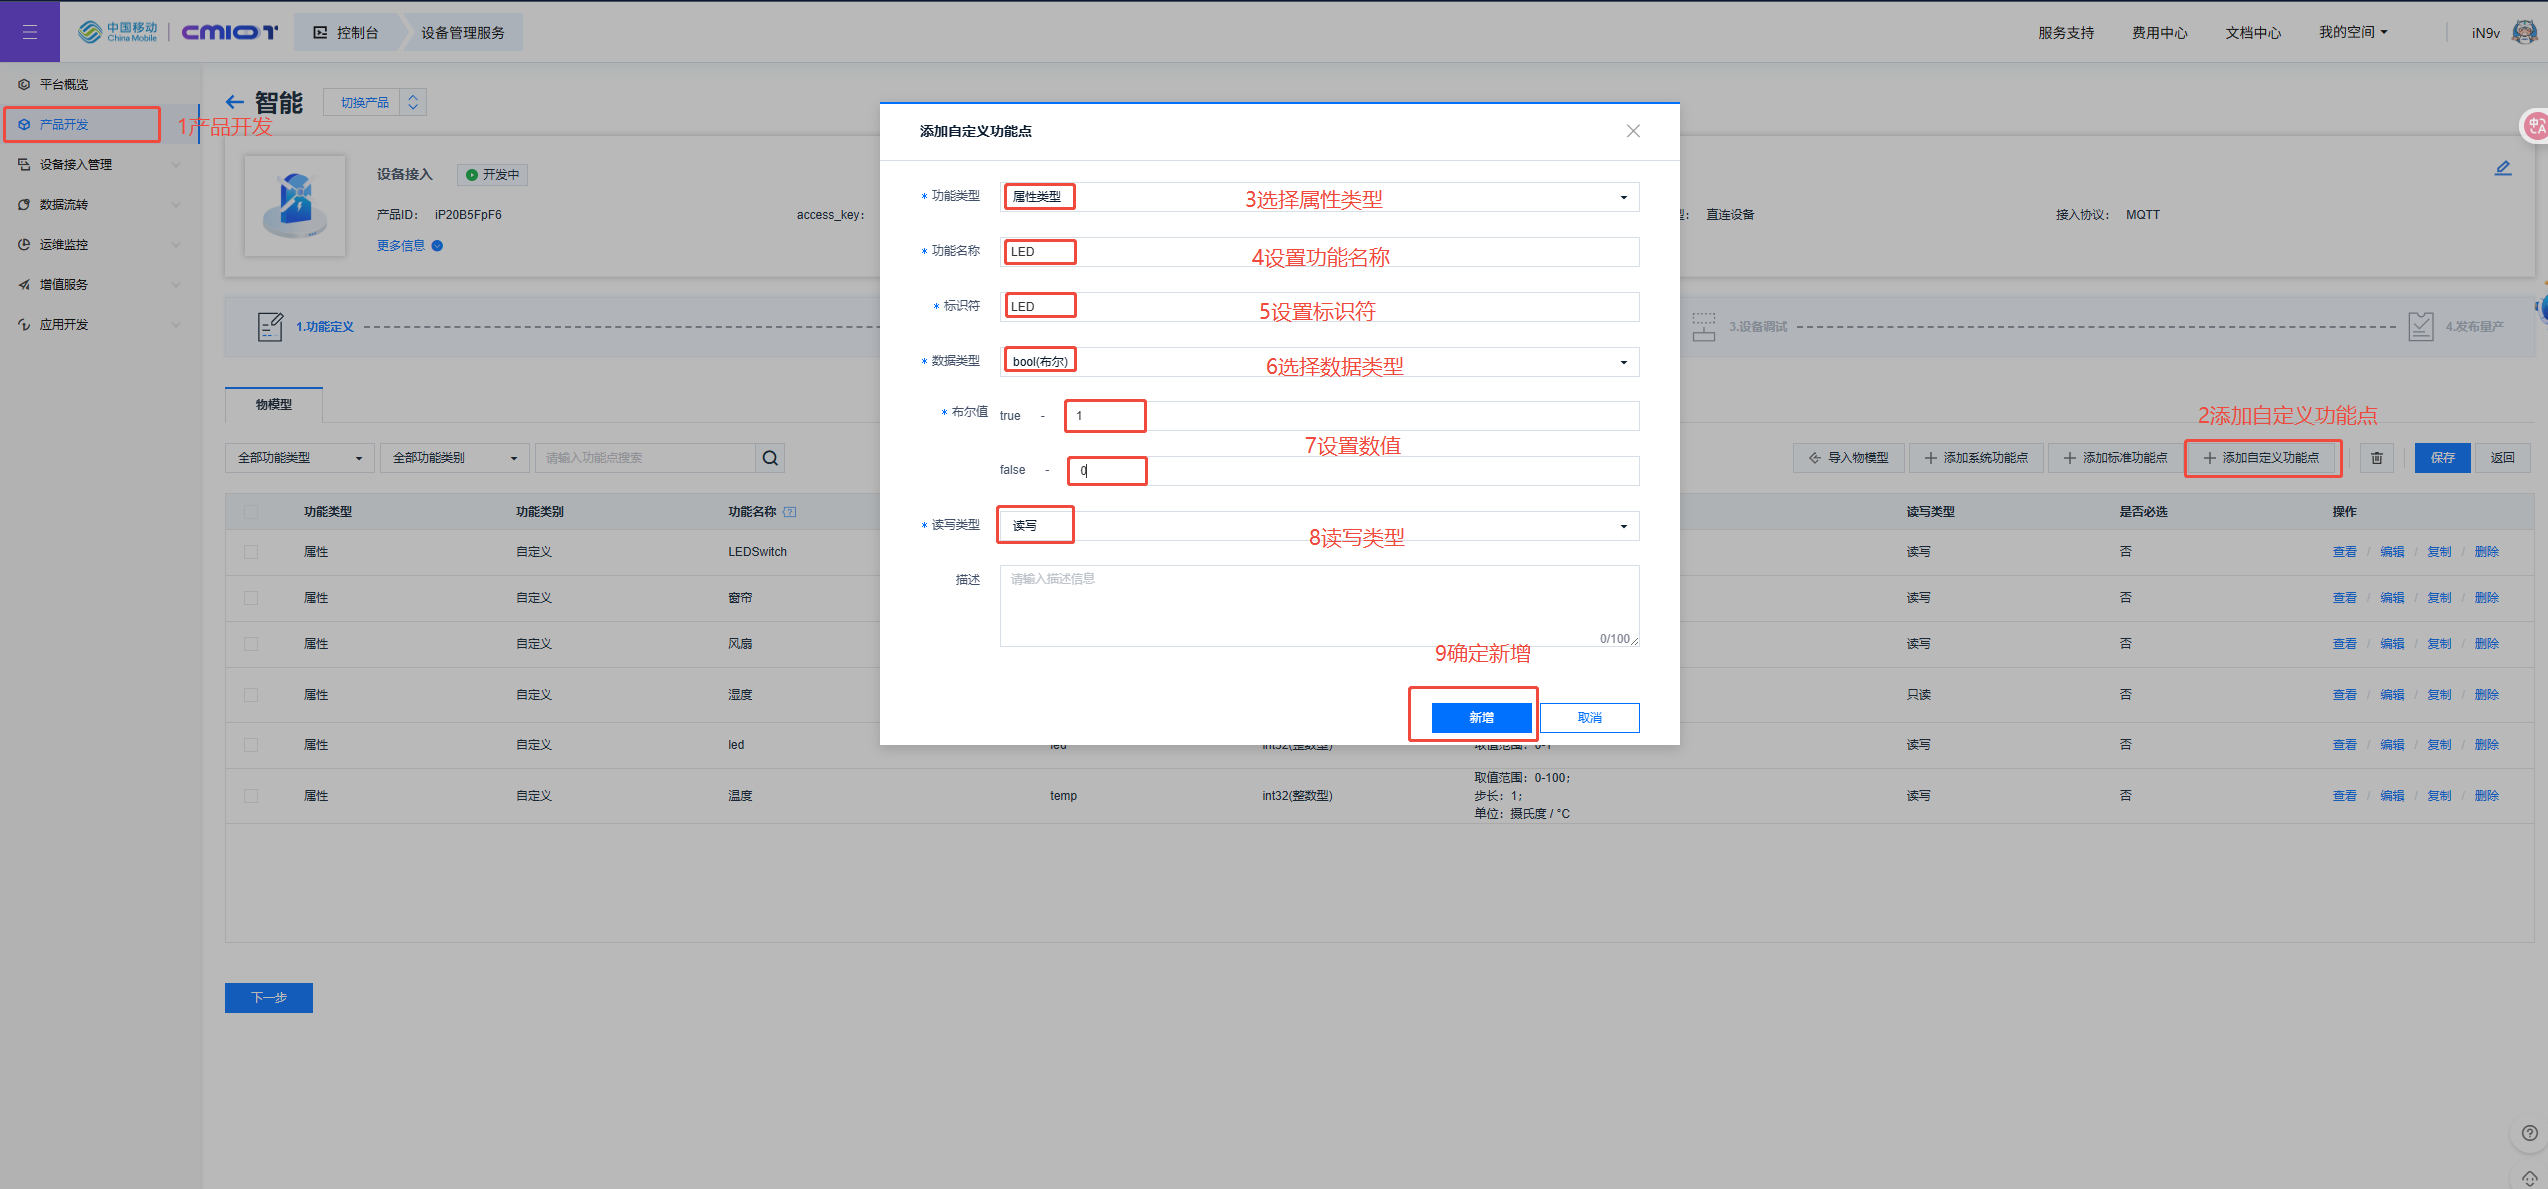
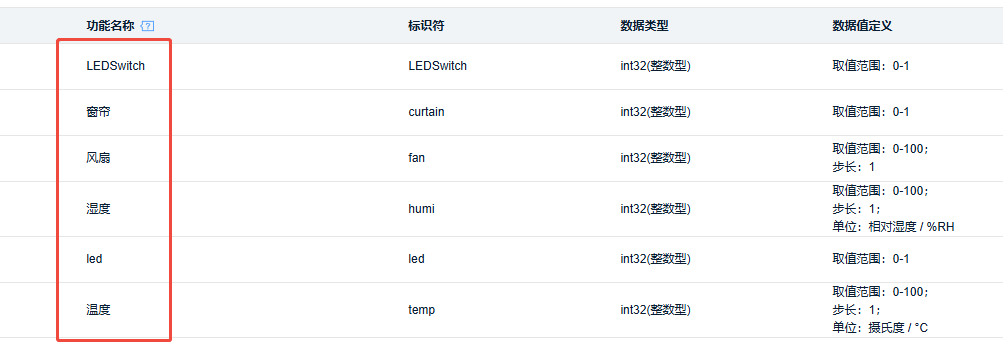
4.2 Creating Object Models
The physical model is built according to your own needs.
4.3 Obtaining Basic Information
Account registration and object model creation will not be detailed here. Below, we will view the basic information parameters of the project and equipment.
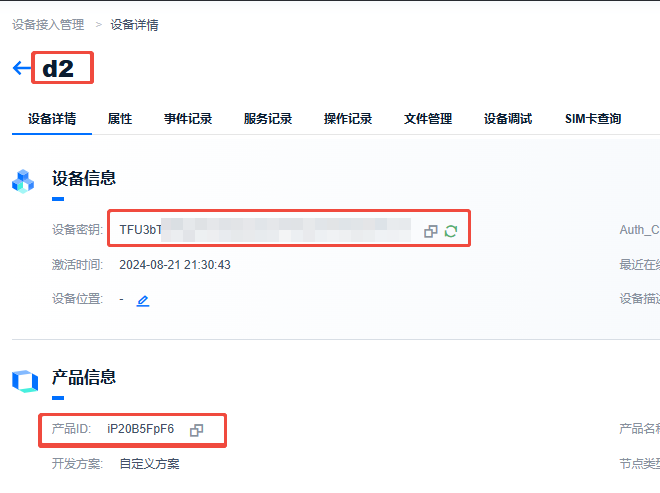
Obtain Product ID, Device Name, and Key
1. Product ID: iP20B5FpF6
2. Device Name: d2
3. Device Key: TFU3bT***********************=
4.4 Token Key Generation
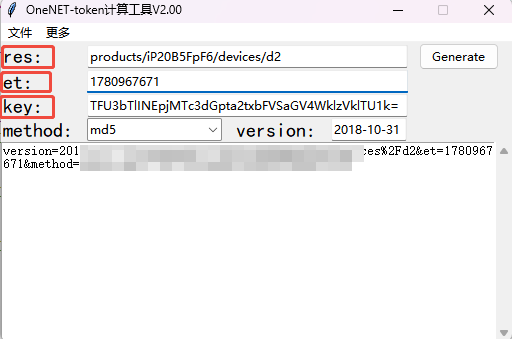
When a device communicates with the OneNet platform, the token serves as the device's or application's identity credential. Only devices or applications with valid tokens can be recognized and authenticated by the platform, thus establishing a secure connection and ensuring that only authorized devices and applications can access platform resources. Token key generation requires a token tool, which can be downloaded via the link OneNET - China Mobile IoT Open Platform.
1. The `res` field: `products/{product id}/devices/{device name}`, where `key` is the device-level key. Replace `{product id}` with your product's ID and `{device name}` with your device's name.
2. The `et` field: Enter the access expiration time. You can obtain a timestamp (Unix timestamp) conversion tool - online tool - from this website.
3. The `key` field: Enter the key for your device.
4. After filling in the information, click "generate" to obtain the token key.
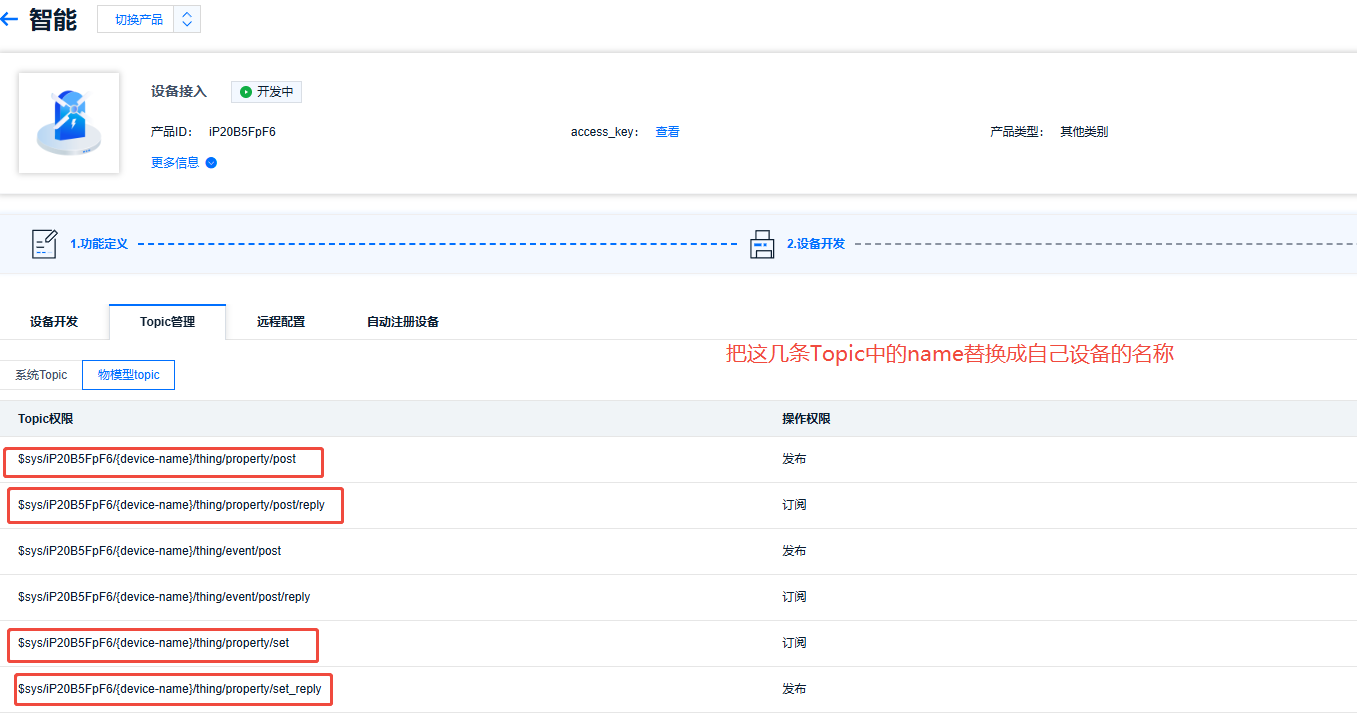
4.5 Object Model Topic
1. Set direct-connect device properties: $sys/iP20B5FpF6/d2/thing/property/set
2. Direct-connect device property setting response: $sys/iP20B5FpF6/d2/thing/property/set_reply
3. Direct-connect device reports properties: $sys/iP20B5FpF6/d2/thing/property/post
4. Direct-connect device reports properties response: $sys/iP20B5FpF6/d2/thing/property/post/reply
5. Modify the code
Locate the do-mqtt.c file and replace the parameters mentioned above with your own OneNet parameters. These parameters have been discussed above and can be replaced as needed.
// 定义MQTT连接参数结构体并初始化
mqttconn mqtt_params = {
   .mqttHostUrl = "mqtts.heclouds.com",      // MQTT服务器的URL地址
   .server_ip = {0,},                        // 服务器IP地址(此处未使用,保留默认值)
   .port = 1883,                             // 连接端口号,1883为MQTT默认非加密端口
   .clientid = "d2",                         // MQTT客户端ID,需保持唯一性
   .username = "iP20B5FpF6",                 // MQTT用户名,通常为产品ID
   .passwd = "vers=md5&sign=YT2N73HSjmyy%2BbQEFMDjMw%3D%3D", // 用户密码,包含签名认证信息
   .pubtopic = "$sys/iP20B5FpF6/d2/thing/property/post",        // 发布属性数据的主题
   .pubtopic_reply = "$sys/iP20B5FpF6/d2/thing/property/post/reply", // 属性数据发布响应主题
   .subtopic = "$sys/iP20B5FpF6/d2/thing/property/set",         // 订阅属性设置的主题
   .subtopic_reply = "$sys/iP20B5FpF6/d2/thing/property/set_reply", // 属性设置响应主题
   .pubQoS = QOS0,                        // 发布消息的服务质量等级(0:最多一次)
   .willtopic = "/wizchip/will",          // 遗嘱消息主题,客户端异常断开时发布
   .willQoS = QOS0,                       // 遗嘱消息的服务质量等级
   .willmsg = "wizchip offline!",         // 遗嘱消息内容
   .subQoS = QOS0,                        // 订阅消息的服务质量等级
};
Line 6 of the code below reports the data and identifier to the server's object model. The identifier must be identical to the server's object model, and the value is the data collected by the local sensor. This data is processed by the microcontroller, and the value is then appended to the end of the `value` field. This allows the local data to be uploaded to the server.
case PUB_MESSAGE:
{
   // 准备发布的MQTT消息
   pubmessage.qos = QOS0; // 设置服务质量等级为QoS0(最多一次)
   // 构建JSON格式的负载数据,包含温度值26
   pubmessage.payload = "{\"id\":\"123\",\"version\":\"1.0\",\"params\":{\"temp\":{\"value\":26}}}";
   pubmessage.payloadlen = strlen(pubmessage.payload); // 计算负载长度

   // 发布消息到指定主题
   ret = MQTTPublish(&c, (char *)&(mqtt_params.pubtopic), &pubmessage);

   // 检查发布结果
   if (ret != SUCCESSS)
   {
       run_status = ERR; // 发布失败,设置错误状态
   }
   else
   {
       // 发布成功,打印主题和消息内容
       printf("publish:%s,%s\r\n\r\n", mqtt_params.pubtopic, (char *)pubmessage.payload);
       run_status = KEEPALIVE; // 设置为保持连接状态
   }
   break;
}
6. Data Reporting
Now download the code into the microcontroller. The serial port display is as follows: MQTT connection successful, data reporting successful. Then we check the OneNet server.
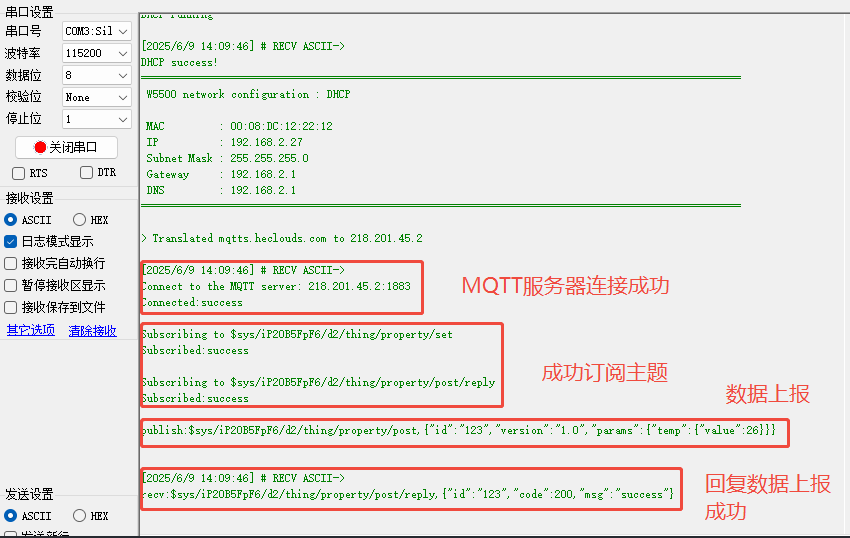
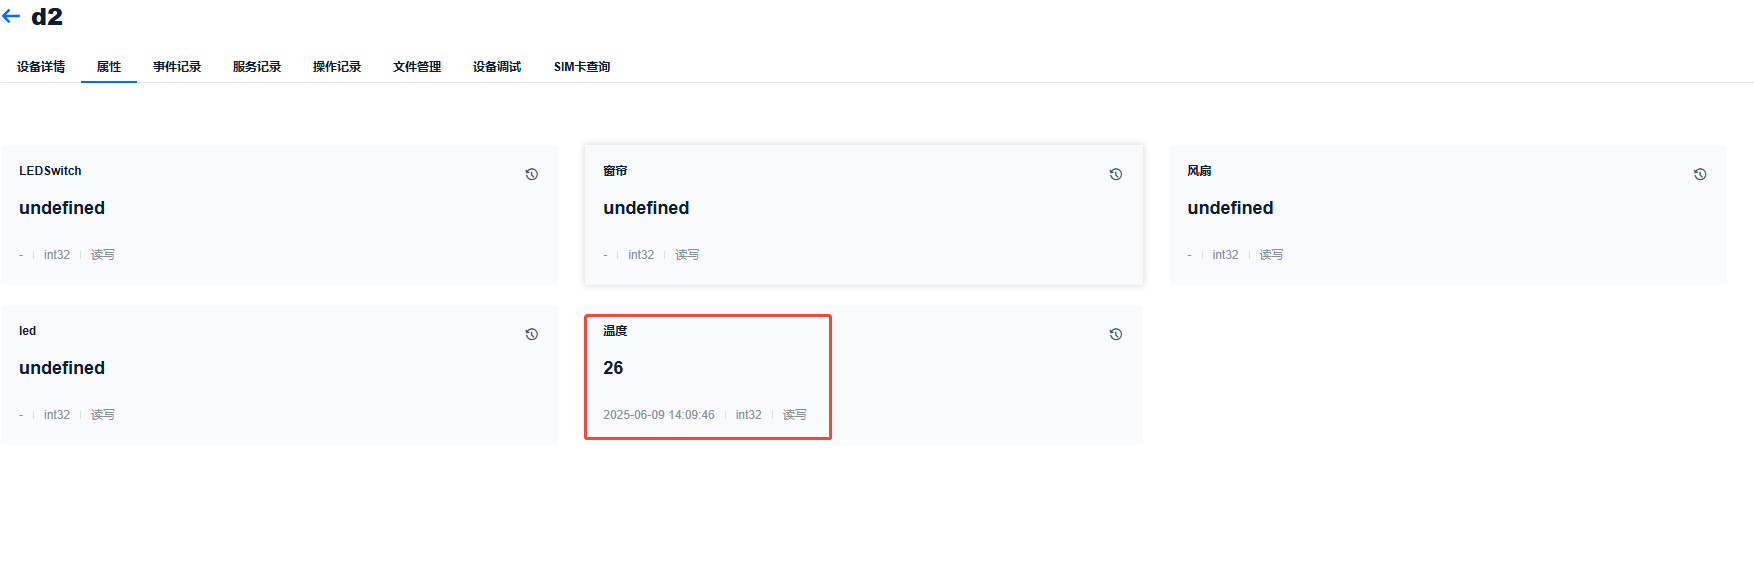
The server displays the locally uploaded data, at which point the local data can be successfully reported to the server.
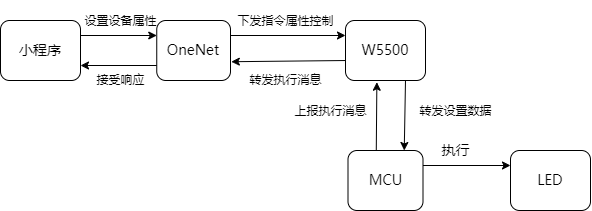
7. Command Issuance
What if you want to remotely control a local device? You can add code to the microcontroller to parse JSON data, and then send commands to the server to achieve the desired effect. This code snippet parses the commands sent by the server, allowing you to operate the local LED based on whether the server command is to turn the light on or off. If you want to control other local devices from the server, you can add similar code.
void json_decode(char *msg)
{
   int ret;
   char replymsg[128] = {0}; // 存储响应消息的缓冲区
   cJSON *id = NULL;         // 消息ID节点
   cJSON *jsondata = NULL;   // 根JSON对象
   cJSON *params = NULL;     // 参数节点
   cJSON *LED = NULL;        // LED控制节点

   // 解析JSON消息
   jsondata = cJSON_Parse(msg);
   if (jsondata == NULL)
   {
       printf("json parse fail.\r\n"); // 解析失败处理
       return;
   }

   // 提取关键数据节点
   id = cJSON_GetObjectItem(jsondata, "id");         // 提取消息ID
   params = cJSON_GetObjectItem(jsondata, "params"); // 提取参数部分

   // 处理LED控制命令
   LED = cJSON_GetObjectItem(params, "led");
   if (LED->valueint) // 判断LED控制值(1表示关闭)
   {
       printf("LED OFF\r\n");
       // TODO: 实际硬件控制代码 - 关闭LED
   }
   else // 0表示开启
   {
       printf("LED ON\r\n");
       // TODO: 实际硬件控制代码 - 开启LED
   }

   // 构建响应消息
   pubmessage.qos = QOS0;                                                                  // 设置QoS等级为0
   sprintf(replymsg, "{\"id\":\"%s\",\"code\":200,\"msg\":\"success\"}", id->valuestring); // 构建成功响应
   printf("reply:%s\r\n", replymsg);                                                       // 打印响应内容

   // 发布响应消息
   pubmessage.payload = replymsg;
   pubmessage.payloadlen = strlen(replymsg);
   ret = MQTTPublish(&c, mqtt_params.subtopic_reply, &pubmessage); // 发布响应到指定主题

   // 处理发布结果
   if (ret != SUCCESSS)
   {
       run_status = ERR; // 发布失败设置错误状态
   }
   else
   {
       printf("publish:%s,%s\r\n\r\n", mqtt_params.subtopic_reply, (char *)pubmessage.payload); // 打印发布信息
   }

   // 释放JSON解析资源
   cJSON_Delete(jsondata);
}
This shows that if the commands issued by the server can be correctly parsed and executed, it indicates that the data transmission is correct.
8. Host Computer
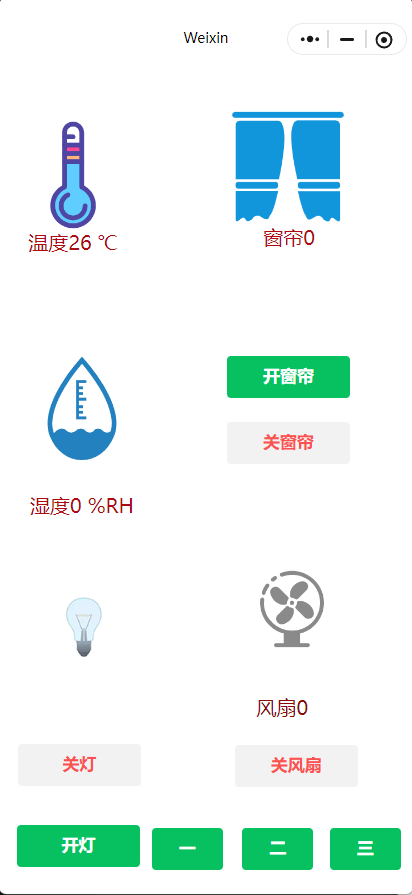
Using a server to view and issue commands may not be convenient. We can use a WeChat mini-program as a host computer for more intuitive viewing and control, as shown in the figure.
The mini-program obtains information and issues commands by sending requests to the HTTP API provided by OneNet using the wx.request method of the WeChat mini-program. It then retrieves the latest attribute data (simulated values) of the target device, parses the received data, and renders it onto the page. My mini-program source code is available at the link (extraction code: 2oqz). It can be imported into the WeChat Developer Platform. You can modify it according to the annotations at the end of the code, or customize it to your needs.
8.1 Get the latest attribute data
API Functionality: Query the latest property feature point data of a device based on its product ID and device name.
API Address: https://iot-api.heclouds.com/thingmodel/query-device-property
API Description:
Request Method: GET
HTTP Query Request Parameters:
| Parameters | Type | Required | Description |
| product_id | string | Yes | Product ID, a unique ID generated by the platform. |
| device_name | string | Yes | Equipment Name |
Returned data:
| Parameter Name | Type | Description |
| code | int | The code returned upon success or failure of the call |
| msg | string | The message returned upon success or failure of the call |
| request_id | string | The request identifier generated by the API call |
| data | - | The business data returned upon successful call |
| data.list | array | A collection of device attribute data |
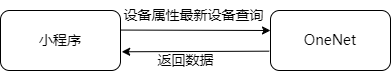
The WeChat mini-program sends a "Latest Device Attribute Data Query" request to the OneNET cloud platform.
The OneNET cloud platform returns the query results to the WeChat mini-program.
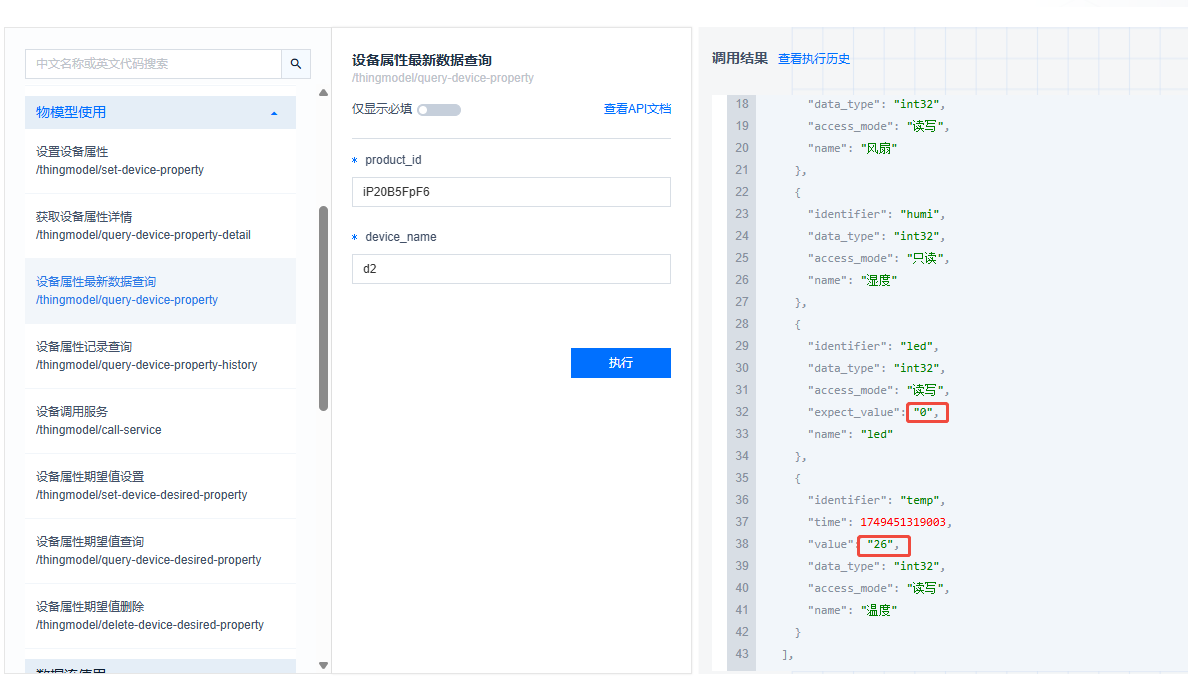
The graph shows the readings for the LED and temperature.
8.2 Setting up command issuance
API Functionality: Based on the product ID and device name, set the desired property value for the device. This value will be sent to the device once it goes online.
API Address: https://iot-api.heclouds.com/thingmodel/set-device-desired-property
API Description:
Request Method: POST
HTTP body request parameters:
| Parameters | Type | Required | Description |
| product_id | string | Yes | Product ID, a unique ID generated by the platform |
| device_name | string | Yes | Device name |
| params | object | Yes | The expected value of the set attribute. The data format is a JSON object, in key-value format. The key is the attribute function point identifier, and the value is the attribute value. The value must conform to the data type and value range defined in the object model, for example, {"switch": true} |
Returned data:
| Parameters | Type | Description |
| code | int | The code returned upon success or failure of the call |
| msg | string | The message returned upon success or failure of the call |
| request_id | string | The request identifier generated by the API call |
| data | - | Business data returned upon successful call |
The image shows that the command was set successfully.

8.3 Mini Program Control Demonstration
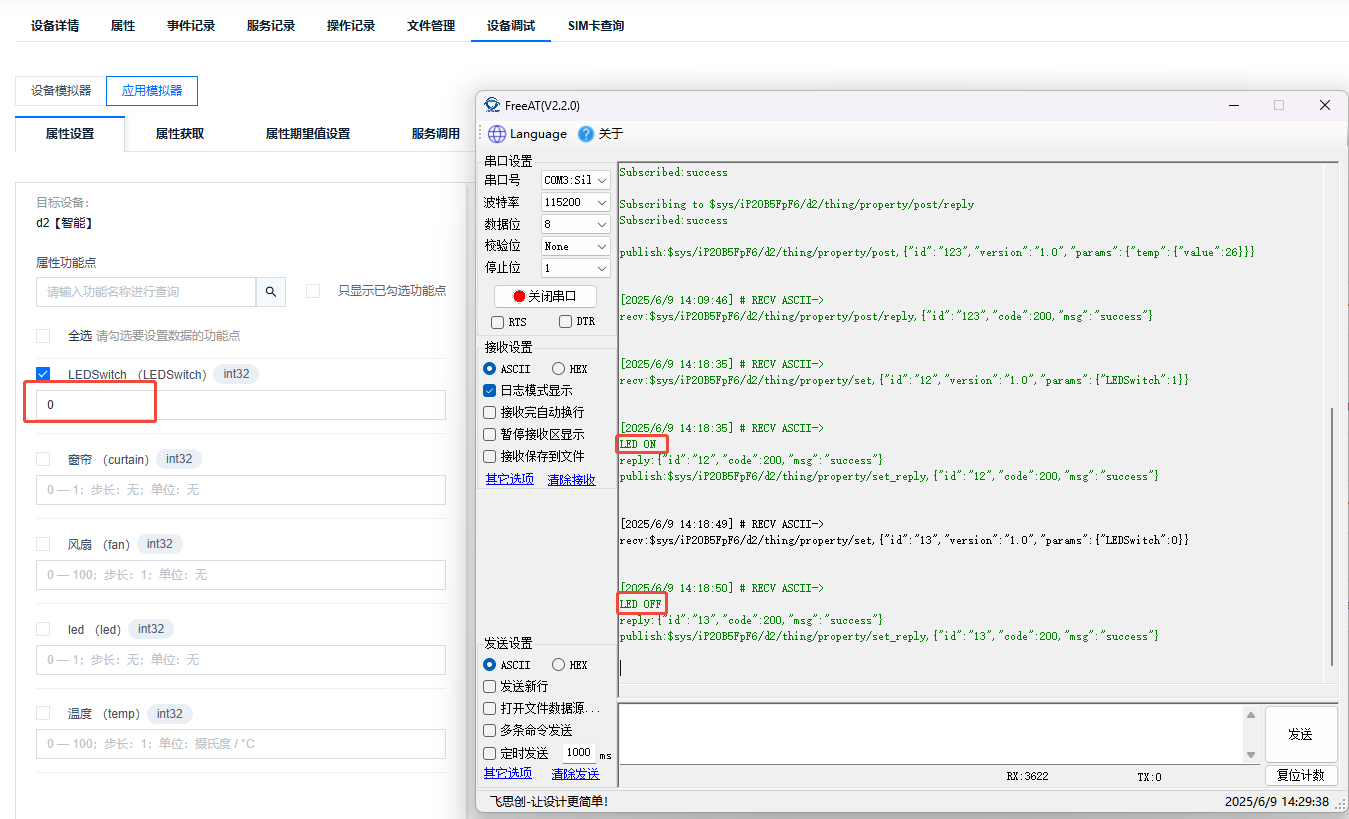
When the light is turned on by clicking the "Turn On" button, the microcontroller executes the operation by sending a command and prints the result on the serial port.
When the light is turned off by clicking the "Turn Off" button, the microcontroller executes the operation by sending a command and prints the result on the serial port.
Let's look at the information acquisition display. I manually modified the temperature to represent the temperature change, modifying it after the "value" field in line 6.
case PUB_MESSAGE:
{
   // 准备发布的MQTT消息
   pubmessage.qos = QOS0; // 设置服务质量等级为QoS0(最多一次)
   // 构建JSON格式的负载数据,包含温度值26
   pubmessage.payload = "{\"id\":\"123\",\"version\":\"1.0\",\"params\":{\"temp\":{\"value\":30}}}";
   pubmessage.payloadlen = strlen(pubmessage.payload); // 计算负载长度

   // 发布消息到指定主题
   ret = MQTTPublish(&c, (char *)&(mqtt_params.pubtopic), &pubmessage);

   // 检查发布结果
   if (ret != SUCCESSS)
   {
       run_status = ERR; // 发布失败,设置错误状态
   }
   else
   {
       // 发布成功,打印主题和消息内容
       printf("publish:%s,%s\r\n\r\n", mqtt_params.pubtopic, (char *)pubmessage.payload);
       run_status = KEEPALIVE; // 设置为保持连接状态
   }
   break;
}
At this point, we checked the temperature on the mini-program and it had changed; the function was working properly.

Thank you for watching. If you have any questions about this article or would like to learn more about the products, please feel free to send us a private message or leave a comment. We will reply to you promptly!
———————————————— Copyright Notice: This article is an original work by CSDN blogger "Playing with Ethernet," and is licensed under CC 4.0 BY-SA. Please include the original source link and this statement when reprinting.
Original Link: https://blog.csdn.net/2301_81684513/article/details/148656070