
Spotify name displayer with CircuitPython and W5100SEVBPICO2
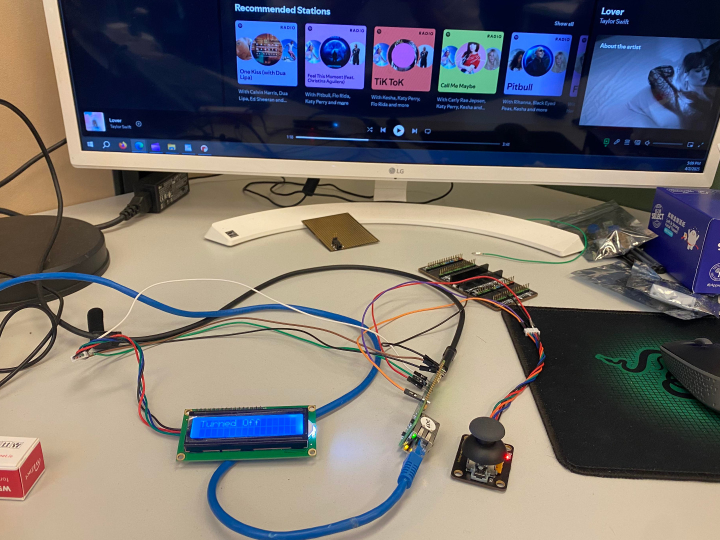
A device that shows the your username and the current song playing on the LCD screen using CircuitPython and W5100S-EVB-Pico 2
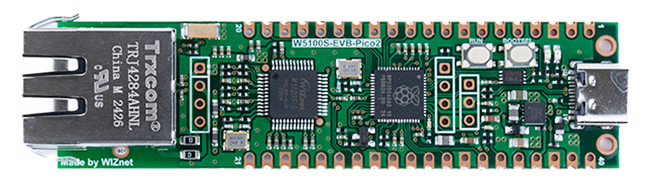
WIZnet - W5100S-EVB-Pico2
x 1
Introduction
Hello, Welcome to my new project on combining Spotify Web API with our W5100S-EVB-Pico 2 on CircuitPython. This project displays your username and the current song name on your Spotify Web Player onto a LCD screen connected with the board using I2C protocol.
Initially, this project is meant to be a local controller where you can control the Spotify Web App player by choosing the functions available by this program, but as the music pausing/resuming API requires Spotify Premium to work, the current program only allows printing your name. In this program, the template for skipping songs and pausing songs have already been implemented.
Components and CircuitPython Set Up
For the hardware section, you would need:
1. W5100S-EVB-Pico 2
2. 1602LCD Display (I2C Interface)
3. A rocker module (Controller Knob module)
For the software section, you would need:
1. CircuitPython
2. Spotify Web API
Before starting the project, make sure to follow this guide to set up the board.
Connect the compenents as follow.

Spotify Web API Set Up
Go to Spotify's Web API website and register as a developer.
To use the Spotify Web API, you first need to go to the dashboard page and create your new app.
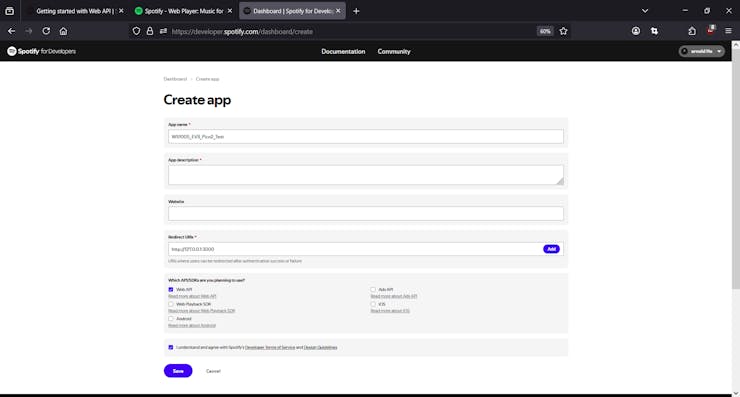
1. You can name your app accroding to your preference.
2. For the redirect URI, you would need to use the following URI for the program to work.
http://httpbin.org/anything3. Check the Web API box
4. Save your app.
Now you have created the app. Let's obtain the client credentials next.
After accessing the upon app on your dashboard, you should go to Settings to view your ID and secrets.
Create a secrets.py file in your lib folder of the microcontroller and insert the following JSON
secrets = {
    'client_id' : 'YOUR_CLIENT_ID',
    'client_secret' : 'YOUR_CLIENT_SECRETS',
    'redirect_uri' : "http://httpbin.org/anything",
    'auth_token' : null
}
CircuitPython Libraries Set Up
Before coding the projects, dowload the library bundle from CircuitPython Website and import these libraries to the lib folder.
1.adafruit_wiznet5k
2.adafruit_connection_manager
3.adafruit_requests
Next, dowload the hd44780 library from my GitHub page. This is an amendment on the library by Bernhard Bablok, as I have encounter some error and I have made some changes to the write function of the library.
In the following section, I will follow my series on Spotify Name DIsplayer from my Youtube channel to explain the codes, so there will be three sections
1. Using Spotify API on CircuitPython (Link)
2 Using 1602LCD on CircuitPython (Link)
3. Main function of Spotify Song Name Displayer (Link)
1. Spotify API with CircuitPython
First, start by importing these libraries to the program on CircuitPython.
import sys
import time
import board
from digitalio import DigitalInOut
from analogio import AnalogIn
import adafruit_connection_manager
import adafruit_requests
from adafruit_wiznet5k.adafruit_wiznet5k import WIZNET5K
import adafruit_wiznet5k.adafruit_wiznet5k_socketpool as socketpool
import countio
from hd44780 import HD44780
Next, we check if secrets.py is included in the lib folder or not.
# Get client credentials of Spotify Web App
try:
    from secrets import secrets
except ImportError:
    print("You need secrets.py to run this program. Please add them to the lib folder.")
    raise
After that, set up the internet connection with the following code.
# Initialize spi interface
import busio
cs = DigitalInOut(board.GP17)
spi_bus = busio.SPI(board.GP18, MOSI=board.GP19, MISO=board.GP16)

# Initialize ethernet interface with DHCP
eth = WIZNET5K(spi_bus, cs)

#Initialize a requests session
pool = adafruit_connection_manager.get_radio_socketpool(eth)
ssl_context = adafruit_connection_manager.get_radio_ssl_context(eth)
requests = adafruit_requests.Session(pool, ssl_context)
Our device can now connect to the internet. Let's start by obtaining authroization code from Spotify API.
We first import the client information and the redirect URI to the local variables.
# Set up Client Detail from secrets.py
client_id = secrets["client_id"]
client_secrets = secrets["client_secret"]
redirect_uri = secrets["redirect_uri"]
Next, define a list containing the scopes to be used in our program.
You can refer to the Spotify Web API scopes page to read more about the uses of different scopes.
To display our name, display the current song name, and also modify the Spotify player, we will need to use the following scopes.
1. user-read-private
2. user-read-currently-playing
3. user-modify-playback-state
# Add more scope here if needed
scope_list = ["user-read-private","user-read-currently-playing", "user-modify-playback-state"]
Referring to the Spotify API page, you would need to access a authorize endpoint and redirect to certain page to obtain the code.
In this project, we print the authorization url to the serial of the editor and access it through our web browser.
On the page, it provided an express framework for making the request.
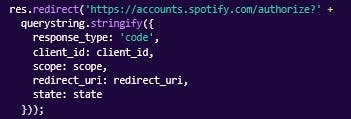
However, since we do not use JS nor the express framework, we need to understand how the code works.
The redirect call simply redirect the URL input. For our program, we will print the URL to the serial and we manually click it to authoriza our device and obtain the code.
querystring. stringify connect the JSON dictionary data with a default connector of "&". (Link)

Therefore, we can create our manual URL to be printed on the serial.
# Obtaining the URL
auth_url = f"https://accounts.spotify.com/authorize?client_id={client_id}&response_type=code&redirect_uri={redirect_uri}&scope={"%20".join(scope_list)}"
print("Please visit this URL to authorize:", auth_url)
Inside the scope, I used %20 to connect the scopes as it represents the URL coding of empty space.
After that, run the program once and click into the link. You should arrive to the page below with your own app name on top.
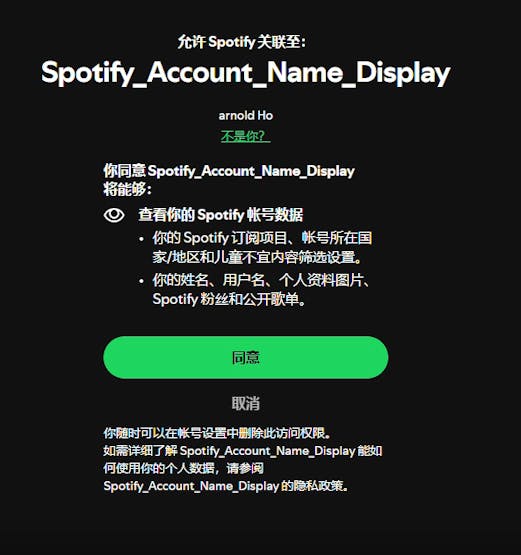
Press the agree button and you should be redirected to the http bin org link that includes information with your authorization code.
_PGflKJMdhA.png?auto=compress%2Cformat&w=740&h=555&fit=max)
Copy the authorization code and we can now use it to exchange a authorization token.
To exchange the token, we first need to refer back to our Spotify OAuth page.
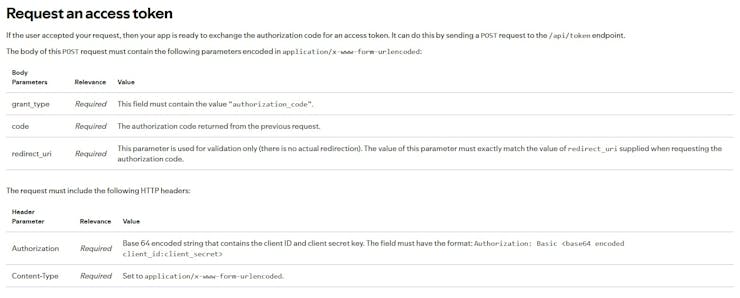
As you can see, we will require both the body parameters and header parameters to make the request call.
First, let's make the body parameter. Paste the auth code from HTTP BIN Org to a variable and make the following dictionary in your program.
# Comment this section if you already excahnged the token

code = "YOUR_AUTH_CODE"
data_token = {
    "code":code,
    "redirect_uri":redirect_uri,
    "grant_type": "authorization_code"
}
...
This is the body for our request call. Next, let's make the header parameter.
As in the upon photo, we are required to make our authetication details in base64.
For this, we need to first import the binascii library, encode our credential details in UTF-8 format and then change it to base64 format using b2a_base64 function from binascii.
But since the function returns a byte string object instead of a base64 string, we need to decode back our byte string into UTF-8 and remove the endline character at the end.
After that, include both the encoded credentials and the content-type into the headers parameter.
...
import binascii
credentials = f"{client_id}:{client_secrets}"
encoded_credentials = binascii.b2a_base64(credentials.encode('utf-8')).decode('utf-8').strip("\n")
headers_response_new = {
    'content-type': 'application/x-www-form-urlencoded',
    'Authorization': f'Basic {encoded_credentials}'
}
...
Lastly, make the HTTP request with the parametets to exchange the token.
...
response_new = requests.post('https://accounts.spotify.com/api/token',data = data_token, headers = headers_response_new)
print(response_new.json()["access_token"])
response_new = None

#Exit the program whenever we exchange for token
sys.exit()

# Comment until here if you exchanged the token
The token should now be printed onto the serial on the Code Editor. Copy the token and paste into the secrets.py file in your lib folder under the auth_token key.
Note that the token only lasts for an hour and if you completed the upon process, you should comment the section for token exchange to allow the program to run the remaining sections.
We have now completed the process of authorization of the Spotify Web API. You can test the toekn by trying to print your account name with the following code
headers_name = {
    'Authorization':f'Bearer {auth_token}'
}
requests.get('https://api.spotify.com/v1/me',  headers=headers_name)
my_name = name_req.json()["display_name"]
print(my_name)
Video Link:
2. 1602LCD Display (I2C Interface)
Next, let's talk about how to use the 1602LCD module with I2C interface on W5100S-EVB-Pico2 with CircuitPython.
In our board, it supports two I2C interface for users to use I2C devices.
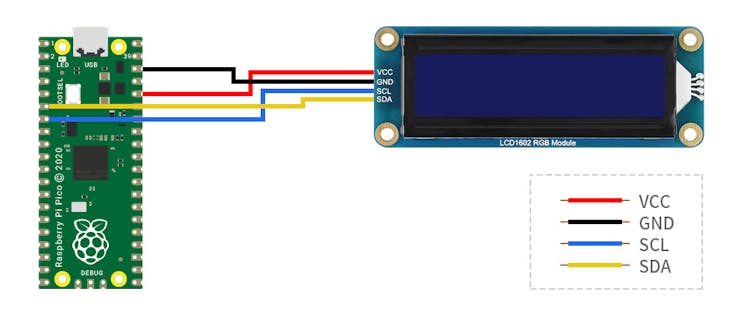
You can connect the I2C devices according to the diagram.
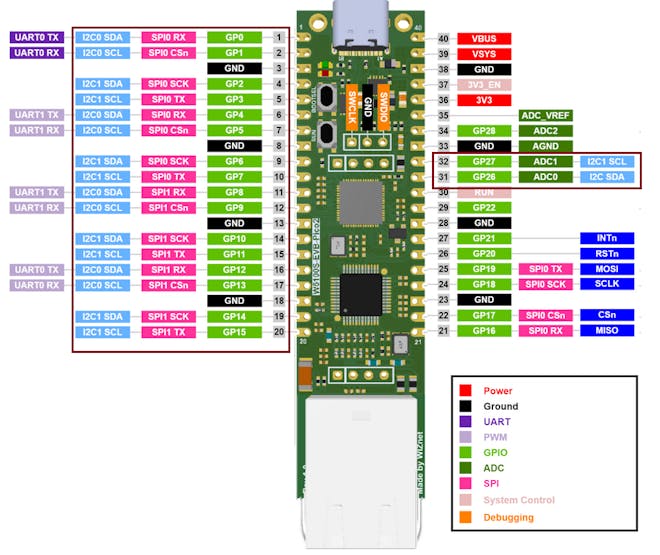
The module have four ports, which are Voltage, Ground, SCL and SDA. Connect the Voltage port to VBus for the 5V and also connect the Ground port. Next, I used GP2 for the SDA port and GP3 for the SCL port.
After that, let's make our pins into I2C Objects.
In CircuitPython, to make our pins connect with the I2C device, we need to use the following code.
# Connect to (SCL, SDA) pins
i2c = busio.I2C(board.GP3, board.GP2)
According to this page, after connecting the ports in the program, we need to check if our device is locked with communicating with our board or not. To do this, we need to call the following while-loop.
while not i2c.try_lock():
    pass
Next, we need to search for the I2C device address for our program to interact with. Use the i2c.sacn() function to look for the address and also encode it with hex to turn the string into hexadecimal.
address_all = [hex(x) for x in i2c.scan()]To check if the address is correct, you can refer to the device's datasheet. For the 1602LCD Module, the address should be at 0x27. This will be used as the initializing address of the HD44780 object.
Now, we can use the HD44780 library in our program. Let's talk about the changes I have made with the original file.
There are change the imports that we have used for the library.
Original:
import board
import busio
import time
from adafruit_bus_device.i2c_device import I2CDevice
Changed:
import board
import busio
import time
import math
First, I changed the initialization of the object as I encounter errors while using adafruit bus device.
Original:
def __init__(self,i2c=None,address=ADDRESS,trans_map={}):
     if i2c is None:
       i2c = busio.I2C(board.SCL,board.SDA)
     self._device = I2CDevice(i2c,address)
     self.trans_map = trans_map

     self._write(0x03)
     self._write(0x03)
     self._write(0x03)
     self._write(0x02)
...
Changed:
def __init__(self,i2c=None,address=ADDRESS,trans_map={}):
    if i2c is None:
        i2c = busio.I2C(board.SCL,board.SDA)
    else:
        self.i2c= i2c

    self.address = address
    self.trans_map = trans_map

    self._write(0x03)
    self._write(0x03)
    self._write(0x03)
    self._write(0x02)
...
Next, I changed the _write_to_i2c function with a longer delay and a different method to write data to the I2C device since we are no longer using adafruit bus-device. I refered to the I2C tutorial page for the writing byte data to the address.
Original:
def _write_to_i2c(self,data):
     with self._device:
       self._device.write(bytes([data]))
     time.sleep(0.0001)
Changed:
def _write_to_i2c(self,data):
    data_array = bytearray(1)
    data_array[0] = data
    self.i2c.writeto(0x27,data_array)
    time.sleep(0.001)
I have also increased the delay inside _strobe function.
Original:
def _strobe(self, data):
     self._write_to_i2c(data | HD44780.EN | HD44780.BACKLIGHT)
     time.sleep(.0005)
     self._write_to_i2c(((data & ~HD44780.EN) | HD44780.BACKLIGHT))
     time.sleep(.0001)
Changed:
def _strobe(self, data):
    self._write_to_i2c(data | HD44780.EN | HD44780.BACKLIGHT)
    time.sleep(.01)
    self._write_to_i2c(((data & ~HD44780.EN) | HD44780.BACKLIGHT))
    time.sleep(.01)
Lastly, I have changed the way that write function works. In the original function, if our string exceed 16 characters, the line we are supposed to write to will not show the remaining charcters. Therefore, I changed the way that the library works so that it can show every characters as songs names are usually very long.
First, I checked if the word exceed 16 characters. If it doesn't exceed, we remain the original code in writing the characters to the module.
def write(self,string,line):
    if len(string) >= 16:
        # Do Action of priniting more than 16 characters
        ...

    else:
        # Single Line
        self._write(HD44780.LINE[line-1])
        for char in string:
          if char in self.trans_map:
            self._write(self.trans_map[char],HD44780.RS)
          else:
            self._write(ord(char),HD44780.RS)
Next, I calculated the min lines needed to all the characters of the song.
I used math.ceil after divding the length of the string by 16 to obtain the required lines.
I also intialized a filled_line variable which stores how many lines we already filled for our LCDscreen.
The start and end variable points to the position of the string we are currently printing.
if len(string) >= 16:

# Check for Multiple Lines
        total_line_for_too_long= math.ceil(len(string) /16)
        filled_line = 0

        # Indicate the Start Position and Ending position of the String we need to print
        start = 0
        end = 16
After that, I use a for-loop to print the required lines.
for i in range(total_line_for_too_long):
    # Do something
I increment the lines by 1 for each iteration and check if the number of lines is more than 2 or not.
If it is more than 2, I will write spaces into each character on the LCD line. The way to write characters to the LCD screen is to first write the address of the line to-be-printed to the device, and then we write the required characters to the line. The ASCII code for space is 32.
...
# Inside the For-loop
filled_line = filled_line + 1

# If both line on the screen is occupied, clear the screen with spaces and start printing from start again
if filled_line >= 3:
    filled_line = 1

    # Printing Spaces onto line 1 and 2
    self._write(HD44780.LINE[0])
    for y in range(16):
        self._write(32,HD44780.RS)
    self._write(HD44780.LINE[1])
    for y in range(16):
        self._write(32,HD44780.RS)

....
After that, we can start printing the characters.
I first find out the line to be printed by ( i%2 ) + 1 so that the possible value of line is 1 and 2.
Then, we follow the original code in printing the strings character by character from GitHub.
Lastly, we update the start and end position of the characters to be printed onto the screen for the next iteration.
...
line = (i % 2) + 1
self._write(HD44780.LINE[line-1])

# Print the string from the start position to the end positione
for char in string[start:end]:
    if char in self.trans_map:
        self._write(self.trans_map[char],HD44780.RS)
    else:
        self._write(ord(char),HD44780.RS)

# Update the new start and end positon as we reached the lmit of the line

start = start + 16
if end + 16 <= len(string):
    end = end + 16
else:
    end = len(string)

... # Else section ...
Here is the whole write function for both the original code and our updated code.
Original:
def write(self,string,line):
    self._write(HD44780.LINE[line-1])
    for char in string:
       if char in self.trans_map:
         self._write(self.trans_map[char],HD44780.RS)
       else:
         self._write(ord(char),HD44780.RS)
Changed:
def write(self,string,line):

    if len(string) >= 16:

        # Check for Multiple Lines
        total_line_for_too_long= math.ceil(len(string) /16)
        filled_line = 0

        # Indicate the Start Position and Ending position of the String we need to print
        start = 0
        end = 16
        for i in range(total_line_for_too_long):
            filled_line = filled_line + 1

            # If both line on the screen is occupied, clear the screen with spaces and start printing from start again
            if filled_line >= 3:
                filled_line = 1

                # Printing Spaces onto line 1 and 2
                self._write(HD44780.LINE[0])
                for y in range(16):
                    self._write(32,HD44780.RS)
                self._write(HD44780.LINE[1])
                for y in range(16):
                    self._write(32,HD44780.RS)

            line = (i % 2) + 1
            self._write(HD44780.LINE[line-1])

            # Print the string from the start position to the end positione
            for char in string[start:end]:
              if char in self.trans_map:
                self._write(self.trans_map[char],HD44780.RS)
              else:
                self._write(ord(char),HD44780.RS)

            # Update the new start and end positon as we reached the lmit of the line
            start = start + 16
            if end + 16 <= len(string):
                end = end + 16
            else:
                end = len(string)


    else:

        # Single Line
        self._write(HD44780.LINE[line-1])
        for char in string:
          if char in self.trans_map:
            self._write(self.trans_map[char],HD44780.RS)
          else:
            self._write(ord(char),HD44780.RS)
Then, let's go back to our code.py file.
Start by setting the display object with the library and read the auth token from our secrets py file. Use the address 0x27 or the address printed from your I2C.scan() function.
# Initialize Screen
display = HD44780(i2c,0x27)
auth_token = secrets["auth_token"]
Next, test the write function with any string or you can use our previous obtained Spotify Username, as we stored the Spotify username in my_name vairable
# Print as you like for testing
display.write("Some String", 1)

# Printing your Name from Spotify for our project
display.write("Welcome, 1)
display.write(my_name,2)
time.sleep(4)
display.clear()
Now, we can start the section of getting the current song name and how to use the controller knob for controlling this device.
Video Link:
3. Main function of Spotify Song Name Displayer
For this section, we will separate into two parts, which are the main function on printing the song name and the interrupt function to list the function available in our device.
Before seperating these two secionts, we can start with initializing the variables to be used in both sections.
Set up the analog stick for the Vertical axis of the controller knob and use CountIO for the button on the controller module.
Different from DigitalIO, CountIO stores the number of changes of the button press instead of the current state of the button.
You can read more in this website. In our program, we count the number of fall edges as the initial state of the button is high and the pressed stae is low.
#Set up Joystick
dir_vetical = AnalogIn(board.GP26)
value_intial_ver = dir_vetical.value
pressed_count = countio.Counter(board.GP15, edge = countio.Edge.FALL)
Next, we set the available functions to be printed to the LCD screen, a power variable and a refresh timer variable to act similarly as a countdown timer for sending the request and refreshing the LCD screen. Also, set a constant of 204 which represents a status code of an empty response.
# Initializa Vairiable
function_player = ["Pause", "Start", "Skip", "Off"]
power = True
refresh_timer = -1
STATUS_CODE_FOR_EMPTY_RESPOPNSE = 204
We can now start to obtain the song name from the Spotify Web Player.
Start by a while-loop with the power variable as the condition for continuing the while loop. Then, we call the interrupt function, which we will code later.
while power:
    interrupt_function()

...
Inside the while loop, we can now send request for obtaing of the current song name.
First, let's refer to the Spotify page on the URL endpoint and its required parameters.
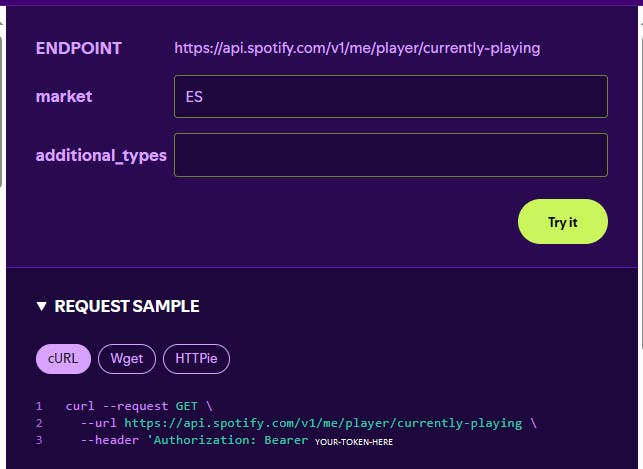
From the Spotify API page on getting current song tab, it shows the endpoint and the HTTP method and the header requried.
We first set the headers for the GET request with our authorization token.
...
headers_auth = {
    'Authorization': f'Bearer {auth_token}'
}
...
Then, we will check if the our countdown timer.
If the countdown timer is less than 0, then we will start making the request.
If not, the display will not change and we will decrease the timer by 1.
...
if refresh_timer < 0:
    # Do Request

else:
    refresh_timer = refresh_timer - 1
    time.sleep(0.5)
In the request making section, we first set the countdown timer as 5 and clear the display. Then we can start making the request with the URL endpoint and the headers for authorization.
...
if refresh_timer < 0:
    refresh_timer = 5
    display.clear()
    response_2 = requests.get('https://api.spotify.com/v1/me/player/currently-playing',  headers=headers_auth)

    # GET JSON FROM RESPONSE

    response_2 = None

...
Usually, if you have your Spotify Web Player turned on, you should recieve a non-empty response. In this case, you should successfully obtain the JSON from the request.
However, if you did not open the Web Player and you make the request to this endpoint, you would recieve an empty response and your program will have error in reading the JSON obtained from the GET request.
Therefore, we need to check if the response is empty or not first.
From this page, you can get the status code for empty response of Spotify API, which is 204 as defined in our initialize section.
If the status code is not 204, the we read the JSON from the response.
In my program, I would only display the name if the Spotify Web Player is playing the song. Therefore, I would need the current playing state and the song name from the JSON.
If the playing state is True, then we display the song name.
If the playing state is False, then we display to the user that the device is paused or off in my program.
For the case when the status code is 204, meaning that the Spotify Player is closed, we display the message of Spotify Disconnected and turn off the machine.
...
if response_2.status_code != STATUS_CODE_FOR_EMPTY_RESPOPNSE:
    playstate = response_2.json()["is_playing"]
    song_name = response_2.json()["item"]["name"]
    if (playstate):
        display.write(song_name,1)
    else:
        display.write("Device Off!", 1)
        time.sleep(2)
else:
    display.write("Spotify",1)
    display.write("DISCONNECTED",2)
    time.sleep(2)
    power = False

response_2 = None
Next, we can make the interrupt function
First, I set the power variable, pressed_count variable of the Joystick module button and the refresh_timer variable as global since these values will be changed in this function.
Also, we initialize another timer variable for simulating a countdown timer that helps return back to the main function if the user idles on the function page for too long, and initialize the function choice that the user chose to use in this function page.
def interrupt_function():
    global pressed_count, refresh_timer, power

    # Initialize
    function_player_choice = 0
    refresh_timer_interrupt = 5
...
After that, we check if the user peformed any presses on the joystick module.
We can obtain the value by reading from the pressed_count.count variable and if the value is not 0, then we will start the interrupt funciton.
If the variable is 0, then we ignore the interrupt function and return to the main display code.
...
if pressed_count.count > 0 :
    # Do Interrupt Function

else:
    # Do nothing
    # Return to Main Function
Then, we reset the timer of the main code to -1 and reset the count of the button press to 0, as we need to check whether the user chooses any functions from this page by pressing the button or not.
Clear the LCD Screen and display the first option for the function page, which is the pause function.
Next, we write a while-loop to check whether the user idles for too long or not. At the end of the while-loop, we reduce the value of the interrupt timer by 1 and reset the button press count to 0.
if pressed_count.count > 0:
    refresh_timer = -1
    pressed_count.count = 0
    display.clear()
    display.write(function_player[function_player_choice],1)

    while refresh_timer_interrupt >= 0:
        # Do change option or choose option...


        pressed_count.count = 0
        refresh_timer_interrupt = refresh_timer_interrupt - 1
        time.sleep(1)
    # End of While-Loop
...
Inside the while loop, we first set the threshold for changing the options.
I set the upper threshold as 55000 and the lower threshold as 5000. If the joystick reaches these two values, the option will either go to the next function or the previous funciton on the function list respectively.
For each change, we clear the display and print the new choice onto the LCD screen.
while refresh_timer_interrupt >= 0:
   print("Pressed Count:  Inside" ,pressed_count.count)
   if dir_vetical.value >= 55000:
        refresh_timer_interrupt = 5
        function_player_choice = (function_player_choice + 1) % len(function_player)
        display.clear()
        display.write(function_player[function_player_choice],1)

   elif dir_vetical.value <= 5000:
        refresh_timer_interrupt = 5
        function_player_choice = (function_player_choice - 1) % len(function_player)
        display.clear()
        display.write(function_player[function_player_choice],1)
...
Next, we can check if the user press the button or not during the action of choosing function. If the count variable is not 0, then it means that user have pressed the joystick module. In this case, we immediately set the interrupt timer to its lower limit, reset the count variable and perform the function requested. If not, we simply continue the loop of the interrupt timer unti it reaches the lower limit.
...  # Inside interrupt timer loop ...

if pressed_count.count > 0:

    refresh_timer_interrupt = 0
    pressed_count.count = 0

    ... # Do the different function afterwards....
As decribed in the introduction, the only supported option currently is quitting the device, but I have also checked the Spotify API page and made the codes for pausing the player. You can test and verify the code if you have Spotify Premium.
For the option of quitting the device, we simply turn the power variable into False and the device should quit after returning to the main display code.
if function_player_choice == 3: # Choice for quitting
    power = False
For the option of pausing the device, we can refer to the Spotify API Webpage and see the request sample and the response sample.
As desribed in the webpage, we will need to use the HTTP PUT method to pause the player.
Although the headers in the Spotify API website only included the authorization token, in CircuitPython, to perform a PUT request, we need to also include the Content type and the Content Length.
Set these two parameters to"application/json" and "0" respectively as we will not be putting any data to the API endpoint.
# headers for pause
headers_choice_pause = {
    'Authorization': f'Bearer {auth_token}',
    "Content-Type": "application/json",
    "Content-length": "0"
}
Next, we make the call to the pause API endpoint. If success, the request will return an empty response. If failed, it will return an response containing the reason of error.
Therefore, we can make the pause request with the following code.
elif function_player_choice == 0: # Choice = Pause/Start
    headers_choice_pause = {
        'Authorization': f'Bearer {auth_token}',
        "Content-Type": "application/json",
        "Content-length": "0"
}

    response_put = requests.put(f'https://api.spotify.com/v1/me/player/pause', headers = headers_choice_pause)

    if response_put.json()["error"]["reason"] == "PREMIUM_REQUIRED":
        display.clear()
        display.write("Premium",1)
        display.write("Needed", 2)
        time.sleep(3)
        display.clear()
    elif response_put.status_code == 204:
        display.write("Paused", 3)
        time.sleep(1)

    response_put = None
Similarly, the skip function works the same as the pause function according to the Spotify API Page, but with a different API endpoint.
As for the Start/Resume playback function, I did not implement the sample as an additional body parameter is required.
In my program, I have decided to ignore these two functions and simply print a return to main menu string to the serial.
To conclude, this is the interrupt function for my program.
def interrupt_function():

    global pressed_count, refresh_timer, power

    #Initialize
    function_player_choice = 0
    refresh_timer_interrupt = 5

    if pressed_count.count > 0:
        refresh_timer = -1
        pressed_count.count = 0
        display.clear()
        display.write(function_player[function_player_choice],1)

        while refresh_timer_interrupt >= 0:

            if dir_vetical.value >= 55000:

                refresh_timer_interrupt = 5
                function_player_choice = (function_player_choice + 1) % len(function_player)
                display.clear()
                display.write(function_player[function_player_choice],1)
            elif dir_vetical.value <= 5000:

                refresh_timer_interrupt = 5
                function_player_choice = (function_player_choice - 1) % len(function_player)
                display.clear()
                display.write(function_player[function_player_choice],1)

            if pressed_count.count > 0:
                refresh_timer_interrupt = 0
                pressed_count.count = 0


                if function_player_choice == 3:   # Choice = Off
                    power = False

                elif function_player_choice == 0: # Choice = Pause/Start
                    headers_choice_pause = {
                        'Authorization': f'Bearer {auth_token}',
                        "Content-Type": "application/json",
                        "Content-length": "0"
                    }

                    response_put = requests.put(f'https://api.spotify.com/v1/me/player/pause', headers = headers_choice_pause)

                    if response_put.json()["error"]["reason"] == "PREMIUM_REQUIRED":
                        display.clear()
                        display.write("Premium",1)
                        display.write("Needed", 2)
                        time.sleep(3)
                        display.clear()
                    elif response_put.status_code == 204:
                        display.write("Paused", 3)
                        time.sleep(1)
                    response_put = None
                else:
                    print("Back to main func")


            pressed_count.count = 0
            refresh_timer_interrupt = refresh_timer_interrupt - 1
            time.sleep(1)

    pressed_count.count = 0
    function_player_choice = 0
At last, after the power is set to False, I clear the display and wrote a Turned off message on the LCD screen to notify the user that the device is turned off.
...
display.clear()
display.write("Turned Off",1)
print("Machine Turned off")

# End of Program
Video Link:
Conclusion
This concludes the project of the Spotify Name Displayer. I hope that by this project, you learned how to operate I2C devices with W5100S-EVB-Pico 2 on CircuirPython, connect the W5100S-EVB-Pico 2 to Spotify Web API and make a local controller to Spotify on your own.
If you enjoyed this project, be sure to follow me here or follow my socials for more updated project information.
In the future, I might try to include the function for refreshing the token in this program, so be sure to follow the channel.
Since my original idea for controlling the online music platforms is hindered by the need of Spotify Premium, I will make another video on other music playforms such as SoundCloud in the coming future.
Thanks for reading!
-
code
