
Part 15: W55RP20-EVB-MKR MicroPython in Action (15): MQTT Protocol and ThingSpeak Platform Integrati
This is the 15th article in the WIZnet W55RP20 chip MicroPython tutorial series, based on the latest official firmware.
Copyright Notice: This is an original technical article from WIZnet official. Please indicate the source when reprinting.
In the previous tutorial, we completed the development of MQTT protocol integration with OneNET platform, achieving device cloud connectivity, Thing Model data periodic reporting, and cloud monitoring. In IoT data visualization and rapid prototyping scenarios, ThingSpeak platform, with its instant registration, no server configuration required, dual-protocol support, and flexible data format, is increasingly favored by developers.
This article will guide you through getting started with MicroPython development on the W55RP20-EVB-MKR module, focusing on implementing MQTT protocol integration with ThingSpeak platform. After completing this article, you will master:
Core principles of ThingSpeak platform MQTT access and channel configuration
Full process of ThingSpeak channel creation and MQTT connection parameter acquisition
Configuration methods for MQTT access address, ClientID, username, and password
W55RP20-EVB-MKR Ethernet + MQTT cloud reporting development
Standard field format data reporting and platform visualization display
Periodic reporting + cloud real-time chart joint debugging test
One-stop troubleshooting for MQTT cloud connection exceptions and faults
Core advantages of WIZnet hardware protocol stack in lightweight cloud scenarios
Series Tutorial Learning Path
This column consists of 16 articles, progressively covering the full MicroPython development process for the W55RP20-EVB-MKR module:
Part 1: Static IP Configuration and Network Basics
Part 2: DHCP Auto-Networking and Network Diagnostics
Part 3: TCP Client Communication
Part 4: TCP Server Communication
Part 5: UDP Unicast Data Communication
Part 6: UDP Multicast/Broadcast Data Communication
Part 7: DNS Domain Name Resolution
Part 8: NTP Time Retrieval from Network
Part 9: HTTP Client Request
Part 10: HTTP Server Setup
Part 11: HTTP Protocol and OneNET Platform Data Upload
Part 12: MQTT Protocol Basic Communication Verification
Part 13: MQTT Protocol and Alibaba Cloud Platform Integration
Part 14: MQTT Protocol and OneNET Platform Integration
Part 15: MQTT Protocol and ThingSpeak Platform Integration (This Article)
Part 16: Modbus Industrial Protocol Communication
It is recommended to bookmark this column and follow the tutorials step by step. All code will be synchronized to the official Gitee repository.
Table of Contents
2. Flash W55RP20-EVB-MKR Module Specific MicroPython Firmware
3. Hardware Connection and Development Environment Configuration
3.1.1 Basic Connection (Power + Debug)
3.1.3 Module and Development Board Wiring
3.2 Thonny Development Environment Configuration
4. MQTT + ThingSpeak Core Principles
4.1 MQTT Protocol Introduction
4.2 ThingSpeak Platform Access Process
5. ThingSpeak Platform Configuration Process
6.2 Key Code Steps Explanation
7. Running Results and Testing Verification
7.2 ThingSpeak Platform Verification
8. One-Stop Troubleshooting Guide for Common Issues
9. W55RP20 Core Advantages Comparison
10. Typical Application Scenarios
12. Series Preview and Resource Acquisition
1. Preparation
1.1 Software Preparation
All required software are free versions. Download and install them according to the requirements, no additional payment needed.
| Software Name | Version Requirement | Download Link | Description |
|---|---|---|---|
| Thonny | 4.0 and above | Thonny Official Download | Lightweight MicroPython IDE, supports code editing, flashing, and serial debugging, beginner-friendly |
| W55RP20-EVB-MKR Module MicroPython Driver Library | Latest stable version | WIZnet Official Firmware/Driver Library Download | Specifically written for W55RP20-EVB-MKR module, integrated with WIZnet hardware driver, TCP/IP protocol stack, and MQTT client library |
| Serial Debugging Tool (e.g., SecureCRT) | Any version | Official download or third-party tools | For viewing serial output logs, debugging information, locating connection and data upload issues |
| ThingSpeak IoT Platform | Online version | ThingSpeak IoT Platform Official Website | Create channels, obtain MQTT device credentials, view uploaded temperature and humidity data and trend charts |
1.2 Hardware Preparation
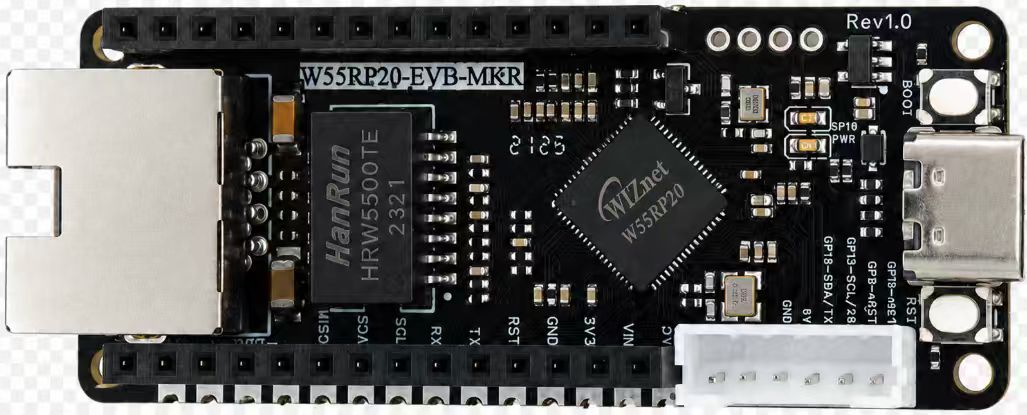
W55RP20-EVB-MKR × 1
Micro USB data cable (must support data transfer, cannot use charge-only cable) × 1
Standard Ethernet cable × 1
Router / switch with DHCP function enabled × 1 (for obtaining network parameters, implementing DNS resolution)
W55RP20-EVB-MKR module has integrated Ethernet related components, no additional soldering or wiring required. Combined with RP2040 development board, it can quickly build a development environment, significantly reducing wiring errors and hardware failure probability.
2. Flash W55RP20-EVB-MKR Module Specific MicroPython Firmware
W55RP20-EVB-MKR module is fully compatible with Raspberry Pi MKR UF2 firmware flashing method. The operation is simple and requires no additional programmer, beginners can get started quickly:
Hold down the BOOTSEL button on the RP2040 development board;
Connect the development board to the computer using Micro USB data cable;
After the computer recognizes the RPI-RP2 USB drive, release the BOOTSEL button;
Drag and drop the downloaded W5500_RP2040_firmware.uf2 firmware file into the USB drive;
The development board will automatically restart, and firmware flashing is complete.
Note: If the computer does not recognize the RPI-RP2 USB drive, please try changing the USB data cable, re-plugging the development board, or changing the computer USB port (preferably use USB 2.0 port).
3. Hardware Connection and Development Environment Configuration
3.1 Hardware Connection
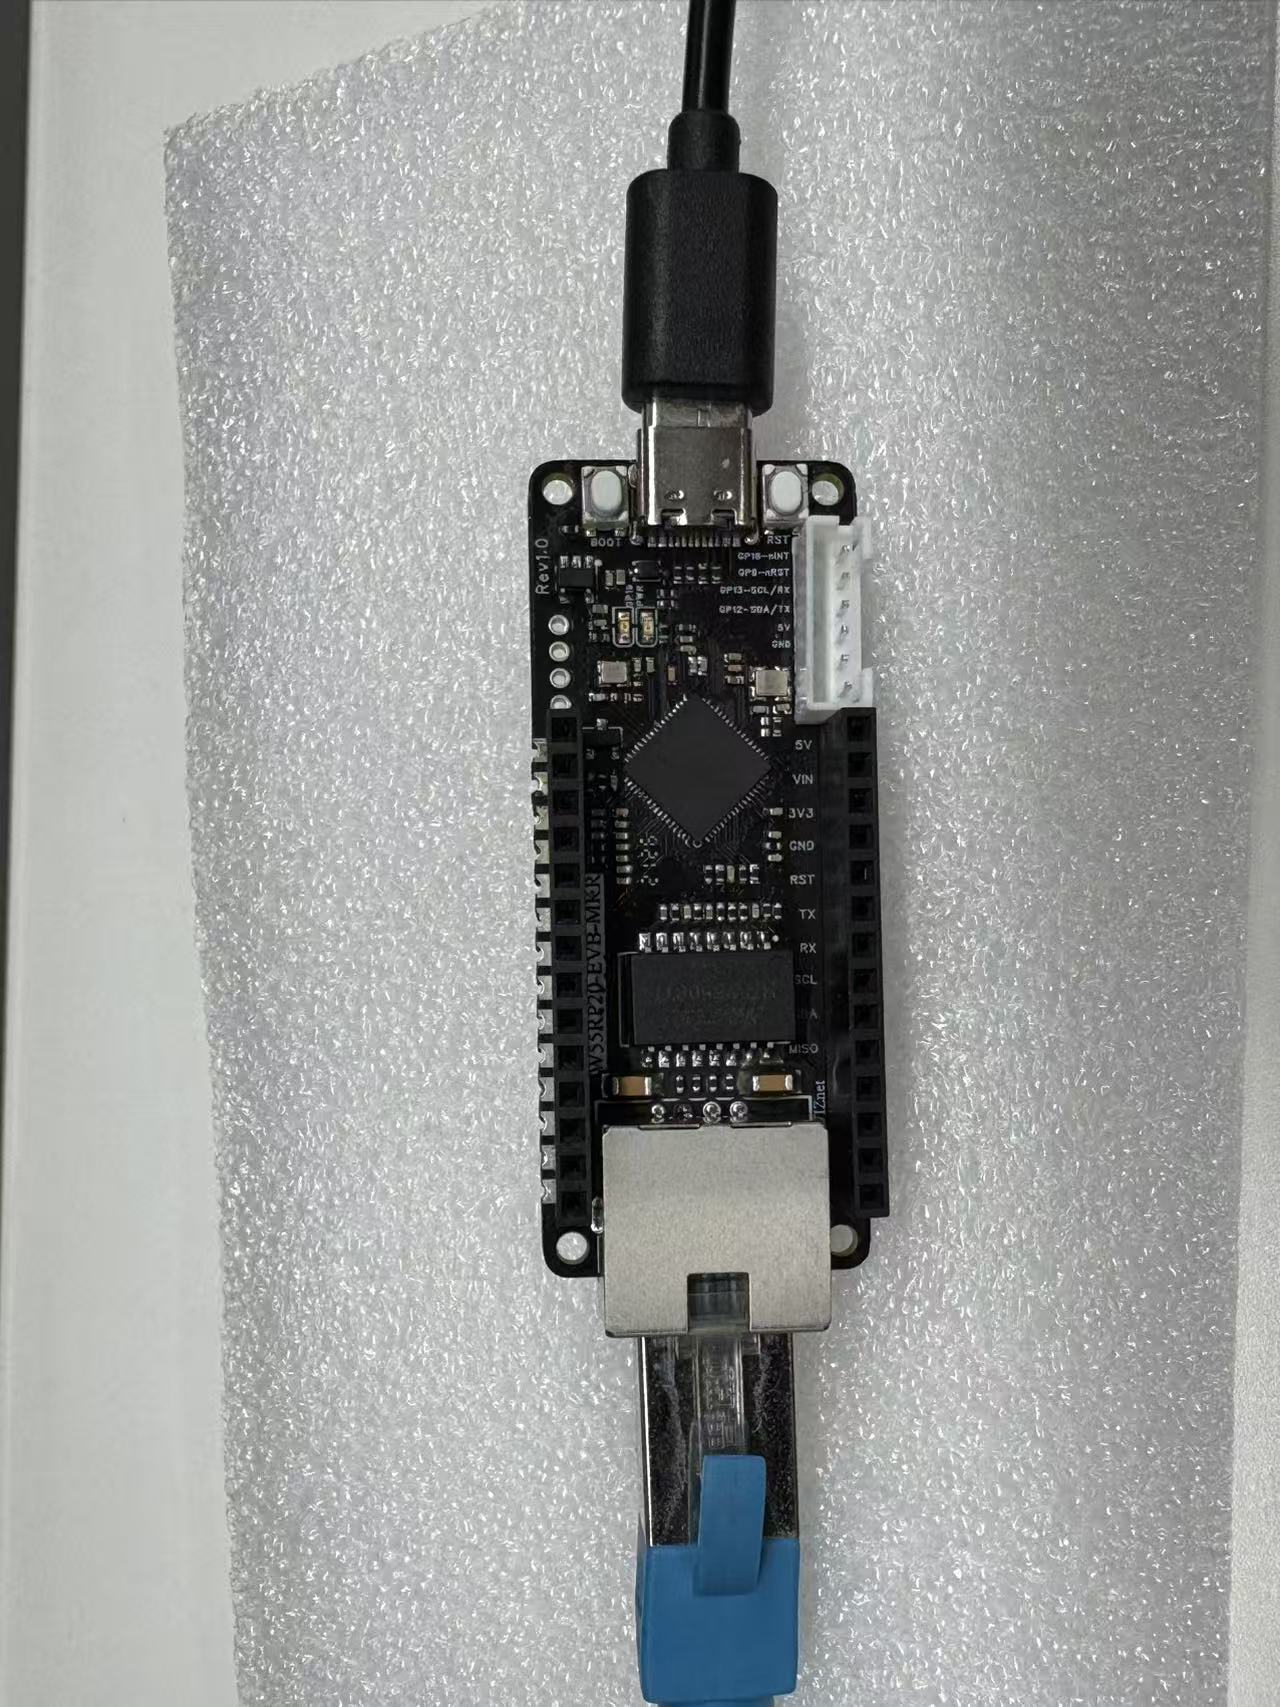
W55RP20-EVB-MKR module connection is divided into two steps, respectively implementing power/debug and Ethernet connection. The operation is simple, no complex wiring required:
3.1.1 Basic Connection (Power + Debug)
Use Micro USB data cable to connect RP2040 development board with computer, for development board power supply, code flashing, and serial debugging.
3.1.2 Ethernet Connection
Use Ethernet cable to connect W55RP20-EVB-MKR module's Ethernet interface with router's LAN port (or directly connect to computer network port, need to manually configure computer IP to be in the same subnet as the development board).
3.1.3 Module and Development Board Wiring
If using separate module and development board, connect according to the following pin correspondence (SPI communication):
3.2 Thonny Development Environment Configuration
Open Thonny software, configure the development environment according to the following steps to ensure code can be flashed and run normally:
Click top menu bar "Run" → "Configure Interpreter";
Switch to "Interpreter" tab;
Select MicroPython (Generic) from the "Interpreter" dropdown list;
Select the serial port corresponding to the development board from the "Port" dropdown list (usually displayed as Board CDC @ COMx);
Check "Restart interpreter before running code" and "Synchronize device's real-time clock";
Click "OK" to complete configuration.
If the development board does not appear in the port list, please try:
Re-plug the USB data cable;
Change to a USB data cable that supports data transfer;
Close other software occupying the serial port (such as serial assistant, Arduino IDE, etc.);
Re-flash MicroPython firmware;
Install Raspberry Pi Pico USB driver.
4. MQTT + ThingSpeak Core Principles
4.1 MQTT Protocol Introduction
MQTT (Message Queuing Telemetry Transport) is a lightweight IoT communication protocol based on publish/subscribe mode, transmitted over TCP protocol, featuring small message size, low bandwidth usage, low power consumption, and strong stability. It is the mainstream global standard protocol for IoT devices to connect to the cloud.
4.2 ThingSpeak Platform Access Process
ThingSpeak is a lightweight IoT cloud platform supporting data upload, storage, and visualization, suitable for quickly verifying IoT data reporting functions.
Register ThingSpeak account -> Create Channel;

Configure channel fields (Field 1: Temperature, Field 2: Humidity);
Obtain MQTT connection parameters (Write API Key, ClientID, username, password);
Device connects to network through W55RP20 -> Establishes MQTT connection;
Device reports data in standard field format -> Platform displays charts in real-time.
| Parameter Name | Parameter Value |
|---|---|
| mqttHostUrl | mqtt3.thingspeak.com (fixed) |
| port | 1883 (fixed) |
| clientId | Nx45MSAgCAkFNzQYDwwOOAc |
| username | Nx45MSAgCAkFNzQYDwwOOAc |
| passwd | WGG/tlO7RcEA89G8Ab+vIhmW |
| Publish Topic | channels/[Channel ID]/publish |
Note: The Channel ID in the publish topic needs to be replaced with the ID of your own created channel; passwd should be properly saved for MQTT connection authentication.
4.3 Core Advantages
Instant registration, no server configuration required;
Supports dual-protocol access: MQTT and HTTP;
Built-in data visualization charts, real-time trend display;
Hardware protocol stack independently handles networking, zero MCU overhead.
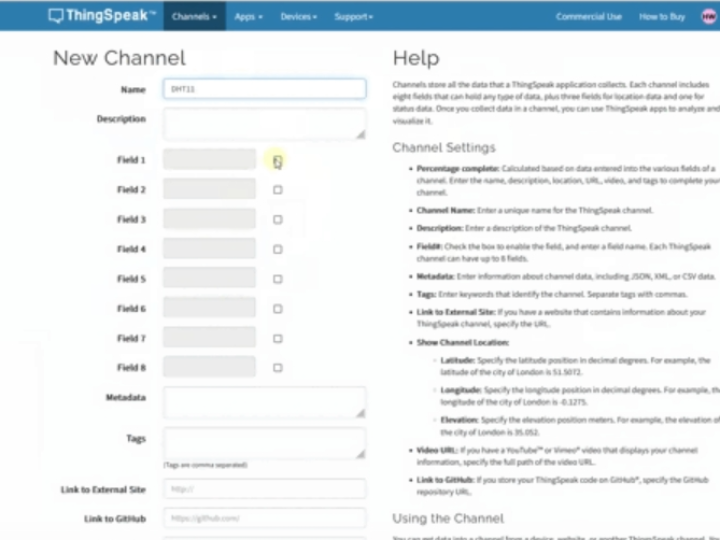
5. ThingSpeak Platform Configuration Process
Visit ThingSpeak official website, register and log in to your account;
Click top menu bar "Channels" → "Create New Channel", enter the channel creation page;
Fill in channel basic information (such as channel name, description), enter "Temperature" in "Field 1", "Humidity" in "Field 2", other parameters default;
Click "Save Channel" at the bottom of the page to complete channel creation, record the "Channel ID" displayed on the page;
Enter the created channel, click "API Keys" at the top, view and save "Write API Key";
Click "MQTT Settings" at the top to obtain core MQTT connection parameters.
6. Core Code Analysis
W55RP20-EVB-MKR module's MicroPython library has fully encapsulated underlying network and MQTT functions. Integrating with ThingSpeak only requires simple configuration to run.
6.1 Complete Runnable Code
# main.py
# ==============================
# W55RP20 Ethernet Initialization
# ==============================
import network
import time
from machine import Pin, WIZNET_PIO_SPI, Timer
from umqttsimple import MQTTClient, MQTTException
# Initialize Ethernet (stable version)
def init_w55rp20():
print("[ETH] Initializing W55RP20...")
spi = WIZNET_PIO_SPI(
baudrate=20000000, # Reduce speed to avoid driver errors
sck=Pin(21),
cs=Pin(20),
mosi=Pin(23),
miso=Pin(22)
)
nic = network.WIZNET6K(spi, Pin(20), Pin(25))
nic.active(True)
nic.ifconfig(("192.168.1.129", "255.255.255.0", "192.168.1.1", "8.8.8.8"))
timeout = 0
while not nic.isconnected() and timeout < 20:
time.sleep(0.5)
print("[ETH] Waiting for network connection...")
timeout += 1
print("[ETH] Connected")
print("[ETH] IP:", nic.ifconfig())
return nic
# ==============================
# ThingSpeak MQTT Configuration
# ==============================
TS_CONFIG = {
"host": "mqtt3.thingspeak.com",
"port": 1883,
"client_id": "DhMGLycADBorAAAxFCE9MBE",
"user": "DhMGLycADBorAAAxFCE9MBE",
"password": "lL+FaB1bnWFR9KlYIm7cTSnU",
"topic": "channels/3360951/publish",
}
# Fixed temperature and humidity (modify here)
TEMP = 26
HUMI = 52
UPLOAD_INTERVAL = 15
# Global variables (create client only once)
client = None
timer_cnt = 0
# Secure connection (fix memory leak)
def mqtt_connect():
global client
try:
# Clean up old connection before each connection
client = MQTTClient(
client_id=TS_CONFIG["client_id"],
server=TS_CONFIG["host"],
port=TS_CONFIG["port"],
user=TS_CONFIG["user"],
password=TS_CONFIG["password"],
keepalive=30
)
client.connect(clean_session=True)
print("[MQTT] Connection successful!")
return True
except MQTTException as e:
print("[MQTT] Authentication failed:", e)
return False
except Exception as e:
print("[MQTT] Network error:", e)
return False
# Upload data
def upload():
payload = f"field1={TEMP}&field2={HUMI}"
try:
client.publish(TS_CONFIG["topic"], payload)
print("[Upload successful]", payload)
except:
print("[Upload failed] Reconnecting...")
mqtt_connect()
# Timer callback
def tick(t):
global timer_cnt
timer_cnt += 1
if timer_cnt >= UPLOAD_INTERVAL:
timer_cnt = 0
upload()
# ==============================
# Main Program
# ==============================
def main():
print("=== W55RP20 + ThingSpeak Temperature/Humidity Upload ===")
init_w55rp20()
time.sleep(1)
# Connect only once! Avoid memory explosion
while not mqtt_connect():
print("Retrying in 5 seconds...")
time.sleep(5)
# Start periodic upload
tim = Timer(period=1000, mode=Timer.PERIODIC, callback=tick)
while True:
time.sleep(1)
if __name__ == "__main__":
main()# umqttsimple.py file
import usocket as socket
import ustruct as struct
from ubinascii import hexlify
class MQTTException(Exception):
pass
class MQTTClient:
def __init__(
self,
client_id,
server,
port=0,
user=None,
password=None,
keepalive=0,
ssl=False,
ssl_params={},
):
if port == 0:
port = 8883 if ssl else 1883
self.client_id = client_id
self.sock = None
self.server = server
self.port = port
self.ssl = ssl
self.ssl_params = ssl_params
self.pid = 0
self.cb = None
self.user = user
self.pswd = password
self.keepalive = keepalive
self.lw_topic = None
self.lw_msg = None
self.lw_qos = 0
self.lw_retain = False
def _send_str(self, s):
self.sock.write(struct.pack("!H", len(s)))
self.sock.write(s)
def _recv_len(self):
n = 0
sh = 0
while 1:
b = self.sock.read(1)[0]
n |= (b & 0x7F) << sh
if not b & 0x80:
return n
sh += 7
def set_callback(self, f):
self.cb = f
def set_last_will(self, topic, msg, retain=False, qos=0):
assert 0 <= qos <= 2
assert topic
self.lw_topic = topic
self.lw_msg = msg
self.lw_qos = qos
self.lw_retain = retain
def connect(self, clean_session=True):
self.sock = socket.socket()
addr = socket.getaddrinfo(self.server, self.port)[0][-1]
self.sock.connect(addr)
if self.ssl:
import ussl
self.sock = ussl.wrap_socket(self.sock, **self.ssl_params)
premsg = bytearray(b"\x10\0\0\0\0\0")
msg = bytearray(b"\x04MQTT\x04\x02\0\0")
sz = 10 + 2 + len(self.client_id)
msg[6] = clean_session << 1
if self.user is not None:
sz += 2 + len(self.user) + 2 + len(self.pswd)
msg[6] |= 0xC0
if self.keepalive:
assert self.keepalive < 65536
msg[7] |= self.keepalive >> 8
msg[8] |= self.keepalive & 0x00FF
if self.lw_topic:
sz += 2 + len(self.lw_topic) + 2 + len(self.lw_msg)
msg[6] |= 0x4 | (self.lw_qos & 0x1) << 3 | (self.lw_qos & 0x2) << 3
msg[6] |= self.lw_retain << 5
i = 1
while sz > 0x7F:
premsg[i] = (sz & 0x7F) | 0x80
sz >>= 7
i += 1
premsg[i] = sz
self.sock.write(premsg, i + 2)
self.sock.write(msg)
# print(hex(len(msg)), hexlify(msg, ":"))
self._send_str(self.client_id)
if self.lw_topic:
self._send_str(self.lw_topic)
self._send_str(self.lw_msg)
if self.user is not None:
self._send_str(self.user)
self._send_str(self.pswd)
resp = self.sock.read(4)
assert resp[0] == 0x20 and resp[1] == 0x02
if resp[3] != 0:
raise MQTTException(resp[3])
return resp[2] & 1
def disconnect(self):
self.sock.write(b"\xe0\0")
self.sock.close()
def ping(self):
self.sock.write(b"\xc0\0")
def publish(self, topic, msg, retain=False, qos=0):
pkt = bytearray(b"\x30\0\0\0")
pkt[0] |= qos << 1 | retain
sz = 2 + len(topic) + len(msg)
if qos > 0:
sz += 2
assert sz < 2097152
i = 1
while sz > 0x7F:
pkt[i] = (sz & 0x7F) | 0x80
sz >>= 7
i += 1
pkt[i] = sz
# print(hex(len(pkt)), hexlify(pkt, ":"))
self.sock.write(pkt, i + 1)
self._send_str(topic)
if qos > 0:
self.pid += 1
pid = self.pid
struct.pack_into("!H", pkt, 0, pid)
self.sock.write(pkt, 2)
self.sock.write(msg)
if qos == 1:
while 1:
op = self.wait_msg()
if op == 0x40:
sz = self.sock.read(1)
assert sz == b"\x02"
rcv_pid = self.sock.read(2)
rcv_pid = rcv_pid[0] << 8 | rcv_pid[1]
if pid == rcv_pid:
return
elif qos == 2:
assert 0
def subscribe(self, topic, qos=0):
assert self.cb is not None, "Subscribe callback is not set"
pkt = bytearray(b"\x82\0\0\0")
self.pid += 1
struct.pack_into("!BH", pkt, 1, 2 + 2 + len(topic) + 1, self.pid)
# print(hex(len(pkt)), hexlify(pkt, ":"))
self.sock.write(pkt)
self._send_str(topic)
self.sock.write(qos.to_bytes(1, "little"))
while 1:
op = self.wait_msg()
if op == 0x90:
resp = self.sock.read(4)
# print(resp)
assert resp[1] == pkt[2] and resp[2] == pkt[3]
if resp[3] == 0x80:
raise MQTTException(resp[3])
return
# Wait for a single incoming MQTT message and process it.
# Subscribed messages are delivered to a callback previously
# set by .set_callback() method. Other (internal) MQTT
# messages processed internally.
def wait_msg(self):
res = self.sock.read(1)
# self.sock.setblocking(True)
if res is None:
return None
if res == b"":
raise OSError(-1)
if res == b"\xd0": # PINGRESP
sz = self.sock.read(1)[0]
assert sz == 0
return None
op = res[0]
if op & 0xF0 != 0x30:
return op
sz = self._recv_len()
topic_len = self.sock.read(2)
topic_len = (topic_len[0] << 8) | topic_len[1]
topic = self.sock.read(topic_len)
sz -= topic_len + 2
if op & 6:
pid = self.sock.read(2)
pid = pid[0] << 8 | pid[1]
sz -= 2
msg = self.sock.read(sz)
self.cb(topic, msg)
if op & 6 == 2:
pkt = bytearray(b"\x40\x02\0\0")
struct.pack_into("!H", pkt, 2, pid)
self.sock.write(pkt)
elif op & 6 == 4:
assert 0
return op
# Checks whether a pending message from server is available.
# If not, returns immediately with None. Otherwise, does
# the same processing as wait_msg.
def check_msg(self):
# self.sock.setblocking(False)
return self.wait_msg()# wiznet_init.py
import network
import time
try:
from machine import Pin, WIZNET_PIO_SPI
except ImportError:
WIZNET_PIO_SPI = None
Pin = None
_DEFAULTS = {
# Auto-construct boards (no explicit PIO SPI)
"w5100s-evb-pico": {},
"w5500-evb-pico": {},
"w6100-evb-pico": {},
"w5100s-evb-pico2": {},
"w5500-evb-pico2": {},
"w6100-evb-pico2": {},
# W55RP20 — single SPI (PIO SPI)
"w55rp20-evb-pico": {"baudrate": 31250000, "sck": 21, "cs": 20, "mosi": 23, "miso": 22, "reset": 25},
# W6300 — QSPI QUAD(io0..io3)
"w6300-evb-pico": {"baudrate": 31250000, "sck": 17, "cs": 16, "io0": 18, "io1": 19, "io2": 20, "io3": 21, "reset": 22},
"w6300-evb-pico2": {"baudrate": 31250000, "sck": 17, "cs": 16, "io0": 18, "io1": 19, "io2": 20, "io3": 21, "reset": 22},
}
_AUTO = {
"w5100s-evb-pico", "w5500-evb-pico", "w6100-evb-pico",
"w5100s-evb-pico2","w5500-evb-pico2","w6100-evb-pico2",
}
_SINGLE = {"w55rp20-evb-pico"} # PIO single-SPI
_QSPI = {"w6300-evb-pico", "w6300-evb-pico2"}
def _pin(x): return x if isinstance(x, Pin) else Pin(x)
def wiznet(board, *, dhcp=True, spi=None, cs=None, reset=None, **kw):
board = board.strip().lower()
if board not in _DEFAULTS:
raise ValueError("Unsupported board: {}".format(board))
cfg = _DEFAULTS[board].copy()
cfg.update(kw)
# Manual override path: if spi is provided, use it directly
if spi is not None:
if cs is None or reset is None:
raise ValueError("When passing custom spi, also pass cs and reset")
nic = network.WIZNET6K(spi, cs, reset)
else:
if board in _AUTO:
nic = network.WIZNET6K()
elif board in _SINGLE:
if WIZNET_PIO_SPI is None or Pin is None:
raise RuntimeError("WIZNET_PIO_SPI/Pin not available on this port")
required = ["sck", "cs", "mosi", "miso", "reset"]
missing = [k for k in required if k not in cfg]
if missing:
raise ValueError("Missing pins for W55RP20 single-SPI: " + ", ".join(missing))
spi = WIZNET_PIO_SPI(
baudrate=cfg.get("baudrate", 31250000),
sck=_pin(cfg["sck"]), cs=_pin(cfg["cs"]),
mosi=_pin(cfg["mosi"]), miso=_pin(cfg["miso"]),
)
nic = network.WIZNET6K(spi, _pin(cfg["cs"]), _pin(cfg["reset"]))
elif board in _QSPI:
if WIZNET_PIO_SPI is None or Pin is None:
raise RuntimeError("WIZNET_PIO_SPI/Pin not available on this port")
for k in ["sck","cs","io0","io1","io2","io3"]:
if k not in cfg: raise ValueError("Missing pin '{}' for W6300 QSPI".format(k))
spi = WIZNET_PIO_SPI(
baudrate=cfg.get("baudrate", 31250000),
sck=_pin(cfg["sck"]), cs=_pin(cfg["cs"]),
io0=_pin(cfg["io0"]), io1=_pin(cfg["io1"]),
io2=_pin(cfg["io2"]), io3=_pin(cfg["io3"]),
)
nic = network.WIZNET6K(spi, _pin(cfg["cs"]), _pin(cfg.get("reset", cfg["cs"])))
else:
raise ValueError("Unexpected board mapping")
# Bring up (if supported)
try: nic.active(True)
except AttributeError: pass
if dhcp:
try: nic.ifconfig("dhcp")
except Exception: pass
else:
ip = cfg.get("ip"); sn = cfg.get("sn"); gw = cfg.get("gw"); dns = cfg.get("dns", gw or "8.8.8.8")
if not (ip and sn and gw): raise ValueError("Static mode requires ip/sn/gw")
nic.ifconfig((ip, sn, gw, dns))
while not nic.isconnected():
print("Waiting for the network to connect...")
time.sleep(1)
print("MAC Address:", ":".join("%02x" % b for b in nic.config("mac")))
print("IP Address:", nic.ifconfig())
return nic6.2 Key Code Steps Explanation
Ethernet Initialization: Use WIZNET_PIO_SPI to initialize W55RP20, configure static IP or DHCP auto-acquisition;
MQTT Connection: Use ThingSpeak standard parameters to establish persistent connection;
Field Format Reporting: Upload in field1=temperature&field2=humidity format, platform can directly parse;
Periodic Reporting: Hardware timer triggers every second, reports once every 15 seconds, does not occupy main thread;
Exception Reconnection: Automatically reconnects MQTT when upload fails, ensuring long-term stable operation.
7. Running Results and Testing Verification
7.1 Serial Output Results
=== W55RP20 + ThingSpeak Temperature/Humidity Upload ===
[ETH] Initializing W55RP20...
[ETH] Waiting for network connection...
[ETH] Connected
[ETH] IP: ('192.168.1.129', '255.255.255.0', '192.168.1.1', '8.8.8.8')
[MQTT] Connection successful!
[Upload successful] field1=26&field2=52
7.2 ThingSpeak Platform Verification
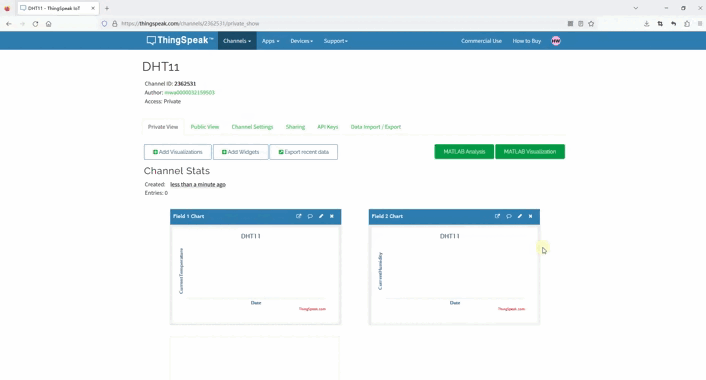
Open ThingSpeak personal channel page, check whether "Field 1" (Temperature) and "Field 2" (Humidity) are updated in real-time;
Enter "Private View" to view data visualization charts, confirm temperature and humidity curves display normally;
If data is displayed, the entire system is operating normally.

Note: Because MicroPython's print function enables stdout buffering, content may not be printed immediately sometimes. You can wait patiently for 1-2 seconds, or add time.sleep(0.5) in the code to alleviate this issue.
8. One-Stop Troubleshooting Guide for Common Issues
8.1 Flashing Related Issues
| Symptom | Troubleshooting Steps | Key Solutions |
|---|---|---|
| Computer cannot recognize "RPI-RP2" USB drive | 1. Confirm holding BOOTSEL button before inserting USB data cable; 2. Change to USB data cable supporting data transfer; 3. Change computer USB port (preferably USB 2.0); 4. Try another computer. | 1. Must hold BOOTSEL before inserting data cable; 2. Avoid using charge-only cable; 3. USB 2.0 has better compatibility. |
| No response from development board after firmware drag-and-drop | 1. Confirm downloaded firmware is specific for W55RP20; 2. Re-flash firmware; 3. Check if USB power supply is stable. | 1. Must use W5500_RP2040_firmware.uf2; 2. Ensure data cable is not loose during drag-and-drop; 3. Can change USB port or use external power supply. |
8.2 Network Connection Issues
| Symptom | Troubleshooting Steps | Key Solutions |
|---|---|---|
| Network initialization failure, continuously printing register information | 1. Confirm Ethernet cable is firmly plugged, check if port indicator light is blinking; 2. Check if router has DHCP enabled; 3. Change Ethernet cable or router LAN port; 4. Re-flash W55RP20 specific firmware. | 1. Observe port indicator light status; 2. Confirm DHCP is enabled in router admin panel; 3. Try using static IP configuration for testing. |
| IP address shows as 0.0.0.0 | 1. Execute above network connection troubleshooting steps; 2. Confirm firmware is correct; 3. Check router DHCP address pool; 4. Restart router and retry. | 1. Re-flash firmware to exclude software issues; 2. Expand DHCP address pool range; 3. Use static IP to bypass DHCP issues. |
8.3 MQTT Integration Issues
| Symptom | Troubleshooting Steps | Key Solutions |
|---|---|---|
| Cannot connect to MQTT server | 1. Confirm MQTT parameters are filled correctly; 2. Check if development board and computer are connected to the same router; 3. Confirm ThingSpeak channel has been created; 4. Try disabling computer firewall. | 1. Verify host, port, client_id, username, password; 2. Ensure network is通畅; 3. API Key has not expired. |
| Can connect but cannot report data | 1. Check if publish topic is correct; 2. Confirm message format meets requirements; 3. View serial print to confirm sensor data is valid; 4. Check if umqttsimple library is correctly imported. | 1. Topic format: channels/[Channel ID]/publish; 2. Message format: field1=temperature&field2=humidity; 3. Library file needs to be uploaded to development board root directory. |
9. W55RP20 Core Advantages Comparison
To help you more intuitively understand the value of W55RP20, we compare the three mainstream embedded Ethernet solutions currently available:
| Comparison Dimension | W55RP20 Integrated Solution | External PHY Chip Solution | External Serial-to-Ethernet Module Solution |
|---|---|---|---|
| BOM Cost | Low (single chip) | Medium-High (MCU + module + peripheral components) | High |
| PCB Area | Small (only need Ethernet port circuit) | Large (need to reserve chip and routing space) | High |
| Development Difficulty | Low (one line of code for networking) | Medium-High (debug protocol stack, write drivers) | Low |
| Network Stability | Extremely high (WIZnet has focused on hardware TCP/IP protocol stack for 25 years) | Uncertain (high requirements for R&D personnel) | Uncertain (depends on R&D company capability) |
| CPU Resource Usage | 0% (protocol stack network processing completely handled by hardware) | 50% and above (protocol stack completely runs on MCU) | 0% |
| Hardware Socket Count | 8 independent hardware Sockets | Depends on MCU capability | Generally single-channel transparent transmission |
| Network Throughput | Up to 15Mbps | Depends on MCU capability | About 3-5Mbps |
| Interface Usability | Single chip integration | Requires MCU with MII/RMII and other interfaces | TTL interface |
| Deployment Difficulty | Low (mature MicroPython firmware, most application layer protocols have library files) | High (application layer protocols need manual porting of open source libraries) | Depends on module integration, functions without integration need self-encapsulation and decapsulation |
10. Typical Application Scenarios
W55RP20 chip integrates Ethernet functionality, combined with its industrial-grade stability, making it very suitable for the following application scenarios:
Environmental Monitoring Terminal: Used for temperature, humidity, light, and other data collection in indoor, greenhouse, machine room environments, reporting to cloud platform via MQTT for remote monitoring;
Smart Sensor Node: As an IoT edge node, collecting various sensor data, achieving data visualization and analysis through platforms like ThingSpeak;
Remote Control Terminal: Receives MQTT commands from cloud platform, controls relays, LEDs, and other peripherals, achieving device remote switching and parameter adjustment;
Industrial Data Collection: Adapts to sensors in industrial scenarios, collects equipment operation parameters, uploads to industrial IoT platform via MQTT protocol;
Teaching Experiment Platform: Suitable for embedded and IoT related teaching, quickly achieves network connection, data reporting, and other functions, reducing teaching difficulty.
11. Summary
This article detailed the complete process of implementing MQTT protocol integration with ThingSpeak platform using MicroPython on W55RP20-EVB-MKR development board. From ThingSpeak platform channel creation, field configuration, MQTT connection parameter acquisition, to core code implementation and flashing, and finally verifying the success of data reporting through serial output and ThingSpeak platform, we completed the IoT device cloud connectivity step by step.
Through the study of this article, you should have mastered:
How to create channels, configure fields, and obtain MQTT parameters on ThingSpeak platform
Basic working principles of MQTT protocol (publish/subscribe mode, QoS levels, etc.)
Configuration methods for ThingSpeak MQTT access parameters (ClientID, username, password)
Using umqtt.simple library to implement MQTT client connection with ThingSpeak platform
Standard field format data reporting method
Periodic reporting + cloud real-time chart joint debugging test process
Troubleshooting ideas for common connection issues (network, MQTT, reporting)
W55RP20 chip, with its built-in Ethernet MAC+PHY high-integration design, combined with WIZnet hardware TCP/IP protocol stack, demonstrates significant advantages in IoT cloud scenarios. Whether in environmental monitoring, smart sensing, or teaching experiments, it can achieve stable and reliable cloud communication at very low cost.
12. Series Preview and Resource Acquisition
12.1 Series Preview
Next tutorial: Modbus Industrial Protocol Communication will explain Modbus TCP Server setup, register read/write, industrial field device communication, achieving standard industrial protocol data collection and control.
12.2 Resource Acquisition
Complete code for this article: WIZnet Pico MicroPython Example Project
W55RP20 chip datasheet: WIZnet Official Documentation Page
If this article is helpful to you, welcome to like, bookmark, and follow. Your support is our motivation for continuous updates!
If you have any questions, welcome to leave a comment, and we will reply as soon as possible.