
MQTTS Connection to Adafruit IO Platform Example
Implement secure MQTTS connection from W55MH32 to Adafruit IO platform for bidirectional cloud communication, remote LED control, and sensor data publishing.

This article details how to implement the MQTTS protocol on the W55MH32 chip. Through practical examples, we demonstrate how to use W55MH32's MQTTS protocol to connect to the Adafruit IO IoT platform, enabling bidirectional data exchange between the device and the cloud.
For other network protocols such as TCP, DNS, and DHCP, please refer to the relevant sections. For W55MH32 initialization, refer to the Network install chapter.
MQTTS Introduction
MQTTS (MQTT Secure / MQTT over SSL/TLS) is a security-enhanced version of the standard MQTT protocol. By introducing an SSL/TLS encryption layer on top of TCP connections, it provides comprehensive security for IoT communications. It is widely used in financial payments, smart homes, healthcare, and industrial control - fields with extremely high data privacy requirements. MQTTS retains MQTT's lightweight and efficient characteristics while solving data leakage risks in public network transmission, making it particularly suitable for embedded systems transmitting sensitive data over insecure networks like the public internet.
MQTTS Features
- Data Encryption: Uses SSL/TLS to encrypt all transmitted packets, effectively preventing eavesdropping or packet analysis during transmission.
- Authentication: Supports one-way authentication (client verifies server certificate) and two-way authentication (mTLS, server verifies client certificate), ensuring only legitimate devices and servers can establish connections.
- Data Integrity: Through TLS message authentication mechanisms, ensures data is not maliciously tampered or accidentally corrupted during transmission.
- Seamless Compatibility: Upper-layer application logic (publish/subscribe, QoS, etc.) is completely consistent with standard MQTT. Developers only need to configure security certificates and ports without modifying business code.
Adafruit IO Platform Introduction
Adafruit IO is a free IoT data platform developed by Adafruit Industries, building a lightweight, efficient, and easy-to-use bridge between IoT devices and cloud applications. The platform supports MQTT/MQTTS protocols and RESTful APIs for real-time uploading and visualization of sensor data and device status. It provides rich Dashboard components and automation rule engines to support rapid development of maker projects, educational experiments, and smart hardware prototypes.
Adafruit IO Feed Introduction
Feed is the core unit for organizing and transmitting device data on the Adafruit IO platform. It defines data names, types, storage strategies, and access permissions, making data interaction between devices and the cloud more structured and manageable. Through Feeds, developers can conveniently categorize and store sensor data for real-time queries and historical backtracking.
MQTT Connection to Adafruit IO Data Flow
The entire process includes: network parameter configuration, Adafruit IO account configuration, MQTTS parameter initialization, TLS secure connection establishment, MQTT connection establishment, and publish/subscribe data operations.
1. Preparation Phase
First, log in to the Adafruit IO platform and complete the following configuration:
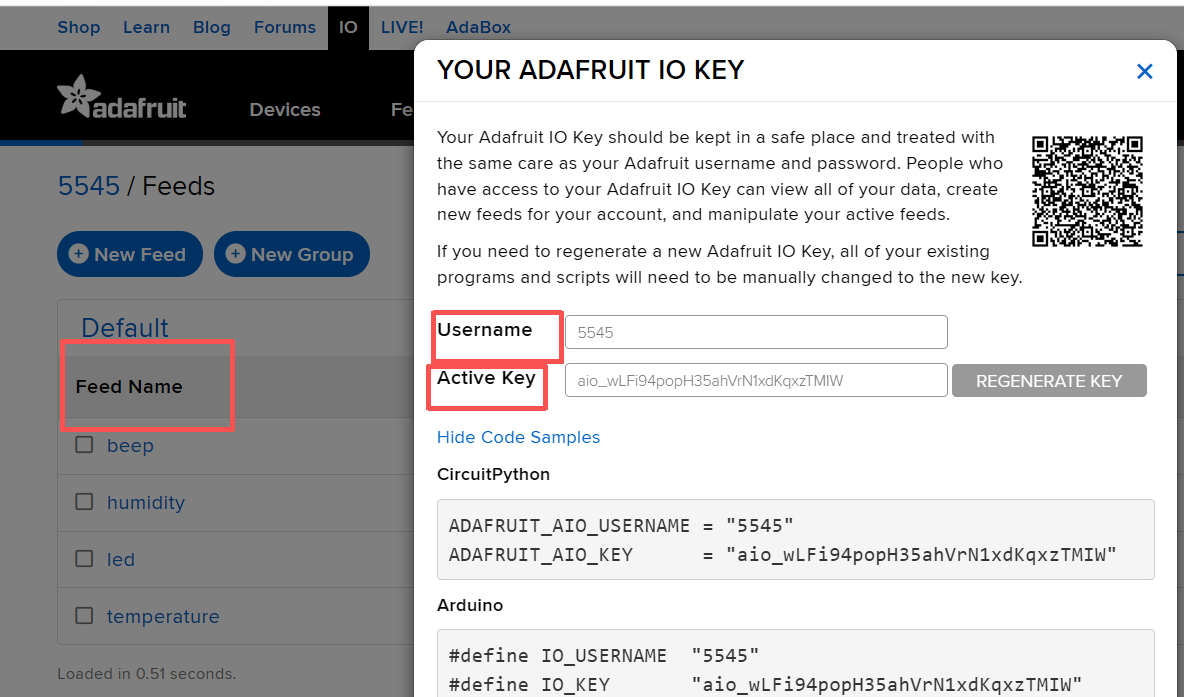
- Register and log in to an Adafruit IO account
- Record the current account username
- Obtain the AIO Key for the account
- Create Feeds required for the application
Example Feeds created:
- temperature
- humidity
- led
- beep
Parameters to record:
- Username: Your Adafruit IO username
- AIO Key: Your platform access key
- Feed names: e.g., led, temperature, beep
2. Record Parameters
Before device access, record the following MQTT parameters:
- mqttHostUrl
- port
- clientid
- username
- passwd
- pubtopic
- subtopic
Reference Code:
mqttconn mqtt_params = {
    .mqttHostUrl = "io.adafruit.com",
    .server_ip   = {0},
#ifdef MQTTS
    .port = 8883,
#else
    .port = 1883,
#endif
    .local_port = 5000,
    .clientid   = "5545_adafruit_io_connection",
    .username   = "5545",
    .passwd     = "aio_wLFi94popH35ahVrN1xdKqxzTMIW",
    .pubtopic   = "5545/feeds/temperature",
    .subtopic   = "5545/feeds/led",
    .pubQoS     = QOS0,
};
3. Connection, Subscribe, and Publish
After parameter configuration, the device performs the following steps:
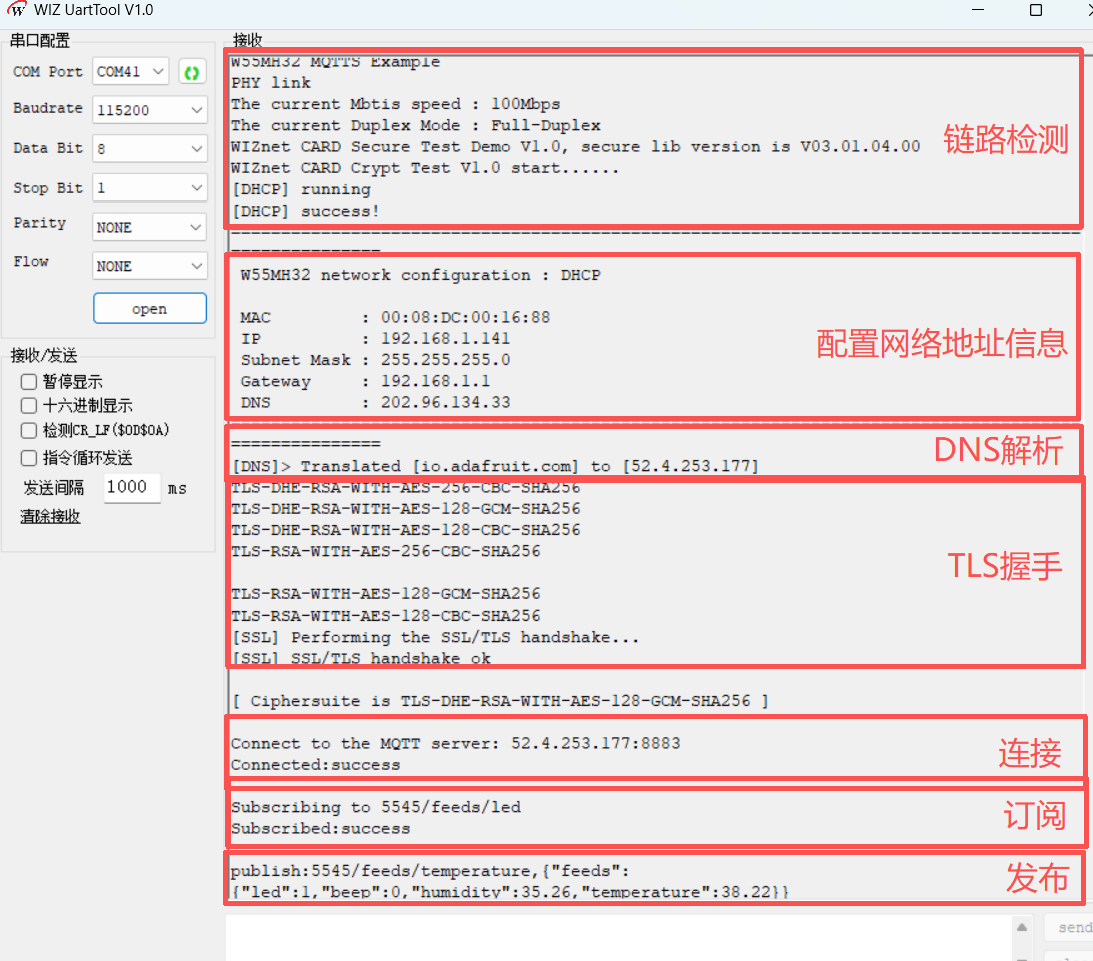
- DHCP obtains network parameters
- DNS resolves io.adafruit.com
- Establish TCP connection
- Initialize TLS
- Execute SSL/TLS handshake
- Establish MQTT connection
- Subscribe to LED control Topic
- Periodically publish sensor data
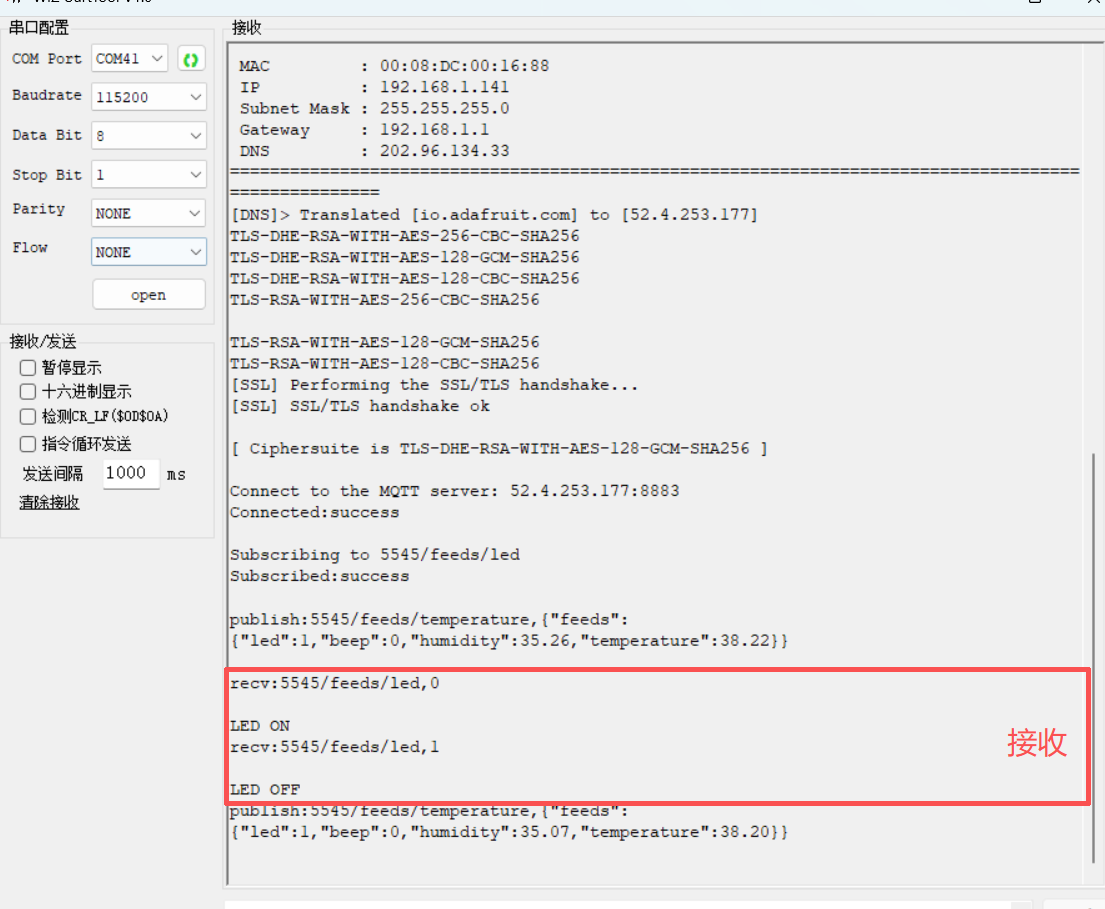
4. Message Reception Handling
When the device receives cloud messages, it first saves the received Topic and Payload in messageArrived(), then in the RECV branch of do_mqtt(), it parses the message and executes corresponding controls.
Control logic (LED example):
Receive 0: LED ON (low level active)
Receive 1: LED OFF
Note: The onboard LED is active low, so:
LED ON corresponds to GPIO_ResetBits(LED_PORT, LED_PIN)
LED OFF corresponds to GPIO_SetBits(LED_PORT, LED_PIN)
Implementation Process
Step 1: Register MQTT Timer Interrupt Function
void TIM3_IRQHandler(void)
{
    static uint32_t tim3_1ms_count = 0;
    if (TIM_GetITStatus(TIM3, TIM_IT_Update) != RESET)
    {
        tim3_1ms_count++;
        MilliTimer_Handler();

        if (tim3_1ms_count >= 1000)
        {
            DHCP_time_handler();
            DNS_time_handler();
            tim3_1ms_count = 0;
        }

        TIM_ClearITPendingBit(TIM3, TIM_IT_Update);
    }
}
Step 2: MQTT Initialization
Step 3: do_mqtt() Function
Step 4: Message Reception Callback
Test Results
Important Note: This example requires internet access. Ensure W55MH32's network environment can access the internet normally.
After flashing, the program performs PHY link detection, obtains network parameters via DHCP, completes DNS resolution and TLS handshake, then connects to Adafruit IO's MQTT server. Upon successful connection, the device subscribes to the 5545/feeds/led topic and periodically publishes temperature/humidity/status data to the 5545/feeds/temperature topic. When the platform sends LED control messages, the device correctly receives and executes the corresponding control operations.
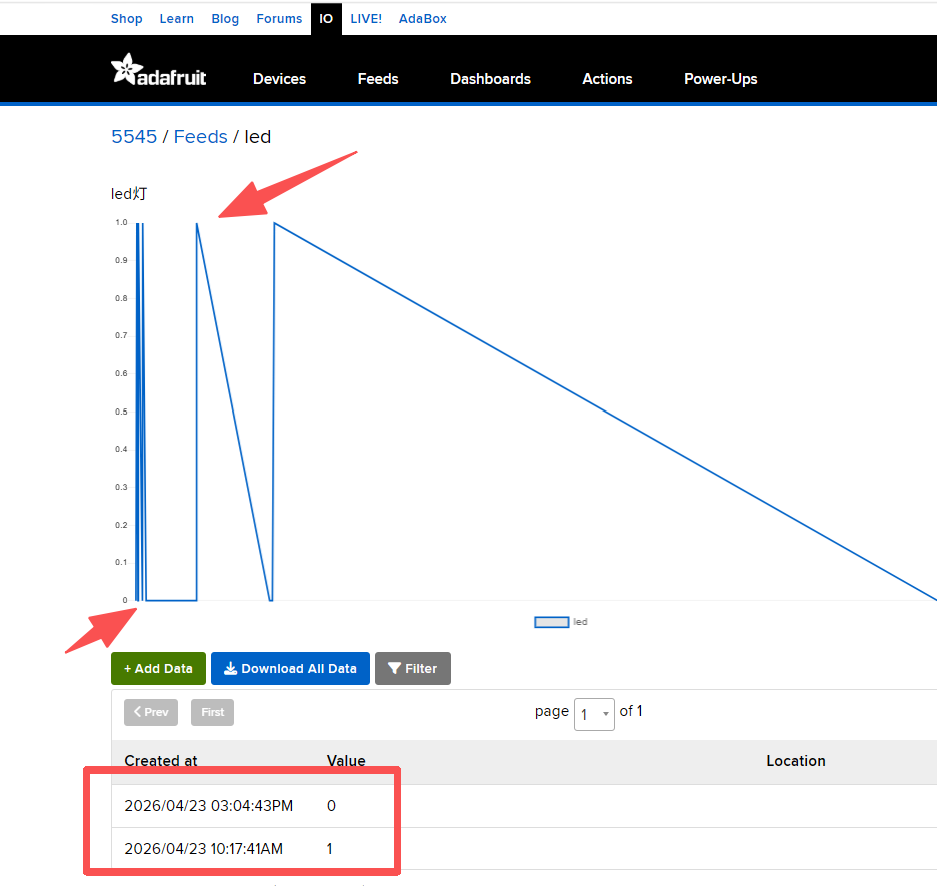
Remote Control via Adafruit IO
Write control data in the Adafruit IO led Feed page:
Write 0 → LED ON
Write 1 → LED OFF
The serial output confirms successful reception of control messages from Adafruit IO with corresponding LED control execution. The platform also records the corresponding Feed data changes.
Summary
This article explained how to implement the MQTT protocol on the W55MH32 chip and connect to the Adafruit IO platform. Through practical examples, it demonstrated the complete process including preparation, network configuration, TLS secure connection establishment, MQTT subscription, publishing, and message reception handling. The article introduced MQTT protocol concepts, publish/subscribe patterns, and Adafruit IO platform integration, with actual testing verifying device-platform data interaction functionality.
Next article: RT-Thread + TCP examples, demonstrating TCP communication implementation on the W55MH32 platform with RT-Thread, further showcasing device applications in network data transmission scenarios. Stay tuned!
-
MQTTS Connection to Adafruit IO Platform
