Wiznet makers

ronpang

Published August 01, 2025 © Apache License 2.0 (Apache-2.0)

130 UCC

63 WCC

32 VAR

0 Contests

1 Followers

0 Following

Hardwired TCP/IP Chapter 9: W55MH32 HTTP Server Example

Hardwired TCP/IP Chapter 9: W55MH32 HTTP Server Example

COMPONENTS
PROJECT DESCRIPTION

Hardwired TCP/IP Chapter 9: W55MH32 HTTP Server Example

In this article, we will provide a detailed explanation on how to implement the HTTP Server function on the W55MH32 chip. Through practical examples, we will also explain to you how to modify the network address information of the W55MH32 through the browser.

Other network protocols used in this example, such as DHCP, please refer to the relevant chapters. Regarding the initialization process of the W55MH32, please also refer to the relevant chapters. We will not elaborate on this here.

1 Introduction to the HTTP Protocol

HTTP (HyperText Transfer Protocol) is an application layer protocol used in distributed, collaborative, and hypermedia information systems. It transmits data based on the TCP/IP communication protocol and forms the basis of data communication on the World Wide Web (WWW). The original purpose of designing HTTP was to provide a method for publishing and receiving HTML pages. The resources requested through the HTTP or HTTPS protocol are identified by Uniform Resource Identifiers (URI). 

This is a brief introduction to the HTTP protocol. If you want to have a deeper understanding of this protocol, please refer to the introduction on the Mozilla website: HTTP Overview - HTTP | MDN

2 Characteristics of HTTP Protocol

  • Based on the request-response model: The client initiates a request, and the server processes it and returns a response. For example, when a user enters a website address in the browser, the browser sends an HTTP request to the corresponding server, and the server returns the web page content.
  • Statelessness: HTTP itself does not store the state between requests. Each request is independent. However, state can be maintained through mechanisms such as Cookies and Sessions.

Connectionless: The meaning of connectionless is to limit each connection to handle only one request. After the server processes the client's request and receives the client's response, it immediately disconnects the connection.

3 HTTP Server Application Scenarios

The W55MH32 can be used in HTTP Server mode for the following applications:

  • Equipment configuration and management: Access the WEB interface provided by W55MH32 through the browser to perform operations such as network configuration, system parameter adjustment, and firmware upgrade.
  • Real-time monitoring and data display: Access the WEB page provided by W55MH32 through the browser to monitor sensor data, status information, and view work logs, etc. in real time.
  • Remote control: Access the WEB page provided by W55MH32 through the browser to remotely control the equipment, such as turning on/off, etc.

4 The basic workflow of the HTTP protocol

            The HTTP request-response model typically consists of the following steps:

1. Establishing a connection: A connection is established between the client and the server based on the TCP/IP protocol.

2. Sending a request: The client sends a request to the server, which includes the URL of the resource to be accessed, the request method (GET, POST, PUT, DELETE, etc.), request headers (such as Accept, User-Agent), and an optional request body (for POST or PUT requests).

3. Processing the request: After receiving the request, the server finds the corresponding resource and performs the corresponding processing operation. This may involve retrieving data from a database, generating dynamic content, or simply returning a static file.

4. Sending a response: The server encapsulates the processed result in a response and sends it back to the client. The response includes a status code (used to indicate the success or failure of the request), response headers (such as Content-Type, Content-Length), and an optional response body (such as an HTML page, image data).

5. Closing the connection: After completing the request-response cycle, the connection between the client and the server will be closed, unless a persistent connection (such as keep-alive in HTTP/1.1) is used.

5 HTTP request method

In the HTTP protocol, GET and POST are two commonly used request methods, which are used by the client to send data to the server and obtain resources.

GET method

The GET method is typically used to retrieve resources from the server. It has the following characteristics:

  • Parameter passing: Request parameters are passed through the query string in the URL, in the form of key1=value1&key2=value2.
  • Data size limitation: Since the parameters are appended to the URL, their length may be limited by the URL length (depending on the settings of the browser and the server).
  • Security: The data is displayed in plain text in the URL, and is not suitable for transmitting sensitive information. Request format:
GET <Request-URI> HTTP/<Version>
<Headers>
<Blank Line>

Request-URI: Represents the path of the target resource, which may include parameters.

Version: The version of the HTTP protocol.

Headers: Contains metadata, such as client attributes, supported formats, etc.

Blank Line: An empty line.

POST Method

The POST method is typically used to submit data to the server. It has the following characteristics:

Parameter Passing: Data is placed in the request body rather than in the URL.

Data Size Limitation: There is no obvious limit on the volume of the POST request, and it can transmit a large amount of data.

Security: Data is transmitted in the request body, which is relatively more secure. 

Request format:

POST <Request-URI> HTTP/<Version>
<Headers>
<Blank Line>
<Body>
  • Request-URI: The path of the target resource, usually the endpoint of the API.
  • Headers: Metadata, such as content type and length.
  • Blank Line: A blank line, used to separate headers from the body.
  • Body: The main part of the data, containing the length of the data sent by the client to the server.

6 HTTP protocol response content

The response content of the HTTP protocol consists of three parts: the status line, the response header, and the response body.

Status Line

The HTTP status line includes the HTTP protocol version, the status code, and the status description.

The status code is composed of three decimal numbers, and the first decimal number defines the type of the status code.

The status codes are divided into five categories:

  • 1xx (Informational Status Code): Indicates that the received request is being processed.
  • 2xx (Successful Status Code): Indicates that the request has been processed successfully.
  • 3xx (Redirection Status Code): Requires subsequent actions to complete this request.
  • 4xx (Client Error Status Code): Indicates that the request contains a syntax error or cannot be completed.
  • 5xx (Server Error Status Code): The server encountered an error while processing the request.

Example: 

HTTP/1.1 200 OK

Response Headers

The response headers will contain information such as content type, length, and encoding.

Common response header fields include:

  • Content-Type: The MIME type of the response content, such as text/html, application/json.
  • Content-Length: The byte length of the response content.
  • Server: Information about the server.
  • Set-Cookie: Sets the Cookie for the client.

Example:

Content-Type: text/html; charset=UTF-8
Content-Length: 3495
Server: Apache/2.4.41 (Ubuntu)

Response body

The response body contains the actual data content, and its specific form depends on the type of response and the content of the request. For example: HTML page content, JSON data, binary data of a file, etc.

If the status code of the response is 204 No Content or 304 Not Modified, there is usually no body.

Note: An empty line is added between the response body and the response header to separate the content.

7 The basic composition of a web page

  1. HTML (HyperText Markup Language)
  • Function: Defines the structure and content of the web page.
  • Content:
    • Structural tags: such as <html>, <head>, <body>.
    • Content tags: such as <h1>, <p>, <img>, <a>.
    • Form tags: such as <form>, <input>, <button>.
  1. CSS (Cascading Style Sheets)
  • Function: Controls the style and layout of the web page.
  • Content:
    • Font settings: such as font-family, font-size.
    • Color settings: such as color, background-color.
    • Layout design: such as margin, padding, display, flex.
    • Responsive design: such as media queries (@media).
  1. JavaScript (scripting language)
  • Function: Enhance the interactivity and dynamic features of the webpage.
  • Application:
    • Form validation.
    • Animation effects.
    • Interacting with the server (such as through AJAX requests).
    • Handling user events (such as clicks, mouseovers).
  1. Meta Information
  • Function: Provides metadata for the page, usually included within the <head> section.
  • Content:
    • Webpage Title: <title>
    • Character Set: <meta charset="UTF-8">
    • SEO Information: Such as <meta name="description" content="Description">
    • Device Adaptation: Such as <meta name="viewport" content="width=device-width, initial-scale=1.0">.

Example: 

<!DOCTYPE html>
<html lang="en">
<head>
    <meta charset="UTF-8">
    <meta name="viewport" content="width=device-width, initial-scale=1.0">
    <title>Simple Page</title>
    <style>
        body { font-family: Arial, sans-serif; text-align: center; padding: 20px; }
        button { padding: 10px 20px; cursor: pointer; }
    </style>
</head>
<body>
    <h1>Hello, Web!</h1>
    <p>Click the button for a surprise.</p>
    <button onclick="alert('You clicked the button!')">Click Me</button>
</body>
</html>

8 Web page interaction

The way a web page makes HTTP requests:

  1. HTTP Request Page
  • Description: The client sends a request to the server via the HTTP protocol, and the server processes it and then returns a response.
  • Characteristics:

The most basic interaction method.

It includes common HTTP methods such as GET, POST, PUT, DELETE, etc.

Example:

GET request: The browser accesses a web page and retrieves static resources (HTML, CSS, JavaScript, etc.).

POST request: Submitting form data.

Form submission

Description: Submitting data to the server via an HTML form.

 Feature:

The form data will be encoded and sent along with the request.

Either the GET or POST method can be used.

Example: 

<form action="/submit" method="post">
    <input type="text" name="username" placeholder="Enter your name">
    <button type="submit">Submit</button>
</form>
  1. AJAXAsynchronous JavaScript and XML
  • Description: Use JavaScript to communicate with the server in the background and update certain page contents without refreshing the entire page. 
  • Feature:
    • Improve user experience and reduce page loading time.
    • In modern development, JSON is often used instead of XML.

Example:

fetch('/api/data', {
    method: 'GET'
})
.then(response => response.json())
.then(data => console.log(data));


Web server response processing

1. Direct response

  • Definition: The server directly processes the request, returns static resources or simple dynamic content, and does not invoke external scripts or programs. Characteristics
    • Efficient: Directly processes requests without the need for additional calls to external programs. Suitable for static content. 
  • Applicable scenarios:
    • Distribution of static resources (HTML, CSS, JavaScript, images, etc.).
    • Lightweight dynamic content generation.

Work Flow

1) The client sends an HTTP request.

2) The server parses the request URL and locates the corresponding resource (such as file path).

3) The server directly reads the content of the resource and returns it to the client, along with appropriate HTTP response headers.

  1. CGI Response
  • Definition: The server invokes external programs or scripts through CGI (Common Gateway Interface) to handle client requests and generate dynamic response content. Characteristics
    • Flexibility: Capable of dynamically generating content and supporting complex logic. 
  • Applicable scenarios:
    • Dynamic conte         nt generation (such as user login, data query).
    • Complex logic processing for interacting with the database or other background services.

Work Flow

1) The client sends an HTTP request.

2) The server parses the request and passes the request data (such as URL parameters or form data) to the CGI program.

3) The CGI program processes the request, generates the response content, and returns it to the server.

4) The server packages the content generated by the CGI program as an HTTP response and sends it to the client.

9 The implementation process

Next, let's see how to modify the network configuration of W55MH32 through the browser.

Note: The test instance requires that the PC and W55MH32 be on the same network segment.

First, we need to write the web content. Here, we have written the content of a web configuration page and the content of the page to wait for a restart after submission, as follows:

 1. #define index_page "<html>\n"                                                                                                                                                                           \
 2.                    "<head>\n"                                                                                                                                                                           \
 3.                    "   <title>W55MH32 Configuration Page</title>\n"                                                                                                                                    \
 4.                    "   <style>\n"                                                                                                                                                                      \
 5.                    "        body { font-family: Arial, sans-serif; margin: 20px; padding: 20px; background-color: #f4f4f9; }\n"                                                                         \
 6.                    "        h1 { text-align: center; color: #333; }\n"                                                                                                                                  \
 7.                    "        form { max-width: 400px; margin: auto; background: #ffffff; padding: 20px; border-radius: 8px; box-shadow: 0 0 10px rgba(0, 0, 0, 0.1); }\n"                                 \
 8.                    "        label { display: block; margin-bottom: 8px; font-weight: bold; }\n"                                                                                                         \
 9.                    "       input[type=text], input[type=submit] { width: 400px; padding: 8px; margin-bottom: 12px; border: 1px solid #ccc; border-radius: 4px; }\n"                                     \
10.                    "       input[type=submit] { background-color: #4CAF50; color: white; border: none; cursor: pointer; }\n"                                                                           \
11.                    "       input[type=submit]:hover { background-color: #45a049; }\n"                                                                                                                  \
12.                    "       input[readonly] { background-color: #e9ecef; color: #6c757d; border: 1px solid #ced4da; cursor: not-allowed; }\n"                                                           \
13.                    "       .error { color: red; font-size: 12px; margin-top: -10px; margin-bottom: 10px; }\n"                                                                                          \
14.                    "       input::placeholder { color: #aaa; font-style: italic; }\n"                                                                                                                  \
15.                    "   </style>\n"                                                                                                                                                                     \
16.                    "   <script>\n"                                                                                                                                                                     \
17.                    "       function validateForm(event) {\n"                                                                                                                                           \
18.                    "           const ipPattern = /^(\\d{1,3}\\.){3}\\d{1,3}$/;\n"                                                                                                                      \
19.                    "           let isValid = true;\n"                                                                                                                                                  \
20.                    "           document.querySelectorAll('.error').forEach(e => e.textContent = '');\n"                                                                                                \
21.                    "           const fields = ['ip', 'subnet', 'gateway', 'dns'];\n"                                                                                                                   \
22.                    "           fields.forEach(field => {\n"                                                                                                                                            \
23.                    "               const input = document.forms[0][field];\n"                                                                                                                          \
24.                    "               if (input.value.trim() === '') {\n"                                                                                                                                 \
25.                    "                   input.placeholder = 'e.g., 192.168.1.1';\n"                                                                                                                     \
26.                    "                   document.getElementById(field + '-error').textContent = 'This field is required.';\n"                                                                           \
27.                    "                   isValid = false;\n"                                                                                                                                             \
28.                    "               } else if (!ipPattern.test(input.value)) {\n"                                                                                                                       \
29.                    "                   document.getElementById(field + '-error').textContent = 'Invalid IP address format.';\n"                                                                        \
30.                    "                   isValid = false;\n"                                                                                                                                             \
31.                    "               }\n"                                                                                                                                                                \
32.                    "           });\n"                                                                                                                                                                  \
33.                    "           if (!isValid) {\n"                                                                                                                                                      \
34.                    "               event.preventDefault();\n"                                                                                                                                          \
35.                    "           }\n"                                                                                                                                                                    \
36.                    "       }\n"                                                                                                                                                                        \
37.                    "   </script>\n"                                                                                                                                                                    \
38.                    "</head>\n"                                                                                                                                                                          \
39.                    "<body>\n"                                                                                                                                                                           \
40.                    "   <h1>W55MH32 Configuration Page</h1>\n"                                                                                                                                          \
41.                    "    <form method=\"post\" action=\"config.cgi\" onsubmit=\"validateForm(event)\">\n"                                                                                                \
42.                    "       <label>MAC Address: </label><input type=\"text\" value=\"%s\" readonly><br>\n"                                                                                              \
43.                    "       <label>IP Address: </label><input type=\"text\" name=\"ip\" placeholder=\"e.g., 192.168.1.1\" value=\"%s\"><div id=\"ip-error\" class=\"error\"></div><br>\n"                \
44.                    "       <label>Subnet Mask: </label><input type=\"text\" name=\"subnet\" placeholder=\"e.g., 255.255.255.0\" value=\"%s\"><div id=\"subnet-error\" class=\"error\"></div><br>\n"     \
45.                    "       <label>Default Gateway: </label><input type=\"text\" name=\"gateway\" placeholder=\"e.g., 192.168.1.1\" value=\"%s\"><div id=\"gateway-error\" class=\"error\"></div><br>\n" \
46.                    "       <label>DNS Server: </label><input type=\"text\" name=\"dns\" placeholder=\"e.g., 8.8.8.8\" value=\"%s\"><div id=\"dns-error\" class=\"error\"></div><br>\n"                  \
47.                    "       <input type=\"submit\" value=\"Submit\">\n"                                                                                                                                 \
48.                    "   </form>\n"                                                                                                                                                                      \
49.                    "</body>\n"                                                                                                                                                                          \
50.                    "</html>\n"

Here, the way we submit the network address information is via POST, and the submitted address is config.cgi:

 1. #define CONFIG_SUCCESS_PAGE                                                                              \
 2.     "<!DOCTYPE html>\n"                                                                                  \
 3.     "<html lang=\"en\">\n"                                                                               \
 4.     "<head>\n"                                                                                           \
 5.     "    <meta charset=\"UTF-8\">\n"                                                                     \
 6.     "    <meta name=\"viewport\" content=\"width=device-width, initial-scale=1.0\">\n"                    \
 7.     "    <title>Configuration Modification Succeeded</title>\n"                                           \
 8.     "    <style>\n"                                                                                      \
 9.     "        body {\n"                                                                                   \
10.     "           font-family: Arial, sans-serif;\n"                                                      \
11.     "           text-align: center;\n"                                                                  \
12.     "           padding-top: 100px;\n"                                                                  \
13.     "           background-color: #f0f0f0; \n"                                                          \
14.     "       }\n"                                                                                        \
15.     "        h1 {\n"                                                                                     \
16.     "           color: green;\n"                                                                        \
17.     "           animation: fadeInOut 2s infinite;\n"                                                    \
18.     "       }\n"                                                                                        \
19.     "       #countdown {\n"                                                                             \
20.     "           font-size: 24px;\n"                                                                     \
21.     "           margin-top: 20px;\n"                                                                    \
22.     "           opacity: 0; \n"                                                                         \
23.     "           animation: fadeIn 1s forwards;\n"                                                       \
24.     "           animation-delay: 1s; \n"                                                                \
25.     "       }\n"                                                                                        \
26.     "        /* Define the keyframes for fade-in */\n"                                                   \
27.     "       @keyframes fadeIn {\n"                                                                      \
28.     "           from {\n"                                                                               \
29.     "               opacity: 0;\n"                                                                      \
30.     "           }\n"                                                                                    \
31.     "           to {\n"                                                                                 \
32.     "               opacity: 1;\n"                                                                      \
33.     "           }\n"                                                                                    \
34.     "       }\n"                                                                                        \
35.     "   </style>\n"                                                                                     \
36.     "</head>\n"                                                                                          \
37.     "<body>\n"                                                                                           \
38.     "   <h1>Configuration Modification Succeeded!</h1>\n"                                               \
39.     "    <p id=\"countdown\">Will redirect in 10 seconds. Please wait...</p>\n"                           \
40.     "<script>\n"                                                                                         \
41.     "        let seconds = 10;\n"                                                                        \
42.     "        const countdownElement = document.getElementById('countdown');\n"                           \
43.     "        const countdownInterval = setInterval(() => {\n"                                             \
44.     "           seconds--;\n"                                                                           \
45.     "           countdownElement.textContent = `Will redirect in ${seconds} seconds. Please wait...`;\n" \
46.     "           if (seconds === 0) {\n"                                                                 \
47.     "               clearInterval(countdownInterval);\n"                                                \
48.     "               window.location.href = 'http://%d.%d.%d.%d/';\n"                                     \
49.     "           }\n"                                                                                    \
50.     "        }, 1000);\n"                                                                                \
51.     "</script>\n"                                                                                        \
52.     "</body>\n"                                                                                          \
53.     "</html>"
55. #endif  

Step 1: Read the network address information from the EEPROM and configure it.

1.     check_eeprom_network_info(&default_net_info);
2.     network_init(ethernet_buf, &default_net_info);  

The function `check_eeprom_network_info()` is designed to check whether there is network address information in the EEPROM. If such information exists, it will be assigned to the `default_net_info` structure. The function content is as follows:

 1. uint8_t check_eeprom_network_info(wiz_NetInfo *net_info)
 2. {
 3.     wiz_NetInfo eeprom_net_info = {0};
 4.  
 5.     /*-----------------------------------------------------------------------------------*/
 6.     if (ee_CheckDevice(EEPROM_DEV_ADDR) == 1)
 7.     {
 8.         /* No EEPROM detected */
 9.         printf("No serial EEPROM detected!\r\n");
10.  
11.         return 0;
12.     }
13.     ee_ReadBytes((uint8_t *)&eeprom_net_info, 0, sizeof(eeprom_net_info));
14.     if (eeprom_net_info.mac[0] == 0x00 && eeprom_net_info.mac[1] == 0x08 && eeprom_net_info.mac[2] == 0xdc)
15.     {
16.         memcpy(net_info, &eeprom_net_info, sizeof(wiz_NetInfo));
17.         return 1;
18.     }
19.     return 0;
20. }

Step 2: Register web page content and initialize HTTP Server

 1.     printf("Please enter% d.% d.% d.% d in your browser to access the %s HTTP server\r\n", net_info.ip[0], net_info.ip[1], net_info.ip[2], net_info.ip[3], _WIZCHIP_ID_);
 2.  
 3.     sprintf(mac, "%02X:%02X:%02X:%02X:%02X:%02X", net_info.mac[0], net_info.mac[1], net_info.mac[2], net_info.mac[3], net_info.mac[4], net_info.mac[5]);
 4.     sprintf(ip, "%d.%d.%d.%d", net_info.ip[0], net_info.ip[1], net_info.ip[2], net_info.ip[3]);
 5.     sprintf(sn, "%d.%d.%d.%d", net_info.sn[0], net_info.sn[1], net_info.sn[2], net_info.sn[3]);
 6.     sprintf(gw, "%d.%d.%d.%d", net_info.gw[0], net_info.gw[1], net_info.gw[2], net_info.gw[3]);
 7.     sprintf(dns, "%d.%d.%d.%d", net_info.dns[0], net_info.dns[1], net_info.dns[2], net_info.dns[3]);
 8.     sprintf(page, (char *)index_page, mac, ip, sn, gw, dns);
 9.  
10.     reg_httpServer_webContent((uint8_t *)"index.html", (uint8_t *)page);         // Build HTTP server web pages
11.     httpServer_init(http_tx_ethernet_buf, http_rx_ethernet_buf, 1, socknumlist); // Initializing the HTTP server

The function reg_httpServer_webContent() is responsible for registering web content, which can be a page or JavaScript code.

The function httpServer_init is used to initialize the parameters of the HTTP Server, with four parameters namely HTTP send cache, HTTP receive cache, the number of used SOCKETS, and the corresponding SOCKET list.

Step 3: Register the HTTP timeout interrupt program

1. /**
 2.  * @brief  1ms timer IRQ Handler
 3.  * @param  none
 4.  * @return none
 5.  */
 6. void TIM3_IRQHandler(void)
 7. {
 8.     static uint32_t tim3_1ms_count = 0;
 9.     if (TIM_GetITStatus(TIM3, TIM_IT_Update) != RESET)
10.     {
11.         tim3_1ms_count++;
12.         if (tim3_1ms_count >= 1000)
13.         {
14.             DHCP_time_handler();
15.             httpServer_time_handler();
16.              tim3_1ms_count = 0;
17.         }
18.         TIM_ClearITPendingBit(TIM3, TIM_IT_Update);
19.     }
20. } 

Step 4: Run the HTTP Server program

1.     while (1)
2.     {
3.         httpServer_run(SOCKET_ID);
4.     }

The logic of the httpServer_run() function is basically the same as that of the TCP Server. It also runs a state machine and performs the corresponding processing of the HTTP Server based on different states of the SOCKET. The details are as follows:

  1. void httpServer_run(uint8_t seqnum)
  2. {
  3.     uint8_t  s; // socket number
  4.     uint16_t len;
  5.     uint32_t gettime = 0;
  6.  
  7. #ifdef _HTTPSERVER_DEBUG_
  8.     uint8_t destip[4] = {
  9.         0,
 10.     };
 11.     uint16_t destport = 0;
 12. #endif
 13.  
 14.     http_request        = (st_http_request *)pHTTP_RX; // Structure of HTTP Request
 15.     parsed_http_request = (st_http_request *)pHTTP_TX;
 17.     // Get the H/W socket number
 18.     s = getHTTPSocketNum(seqnum);
 19.  
 20.     /* HTTP Service Start */
 21.     switch (getSn_SR(s))
 22.     {
 23.     case SOCK_ESTABLISHED:
 24.         // Interrupt clear
 25.         if (getSn_IR(s) & Sn_IR_CON)
 26.         {
 27.             setSn_IR(s, Sn_IR_CON);
 28.         }
 29.  
 30.         // HTTP Process states
 31.         switch (HTTPSock_Status[seqnum].sock_status)
 32.         {
 33.         case STATE_HTTP_IDLE:
 34.             if ((len = getSn_RX_RSR(s)) > 0)
 35.             {
 36.                 if (len > DATA_BUF_SIZE) len = DATA_BUF_SIZE;
 37.                 len = recv(s, (uint8_t *)http_request, len);
 38.  
 39.                 *(((uint8_t *)http_request) + len) = '\0';
 40.  
 41.                 parse_http_request(parsed_http_request, (uint8_t *)http_request);
 42. #ifdef _HTTPSERVER_DEBUG_
 43.                 getSn_DIPR(s, destip);
 44.                 destport = getSn_DPORT(s);
 45.                 printf("\r\n");
 46.                 printf("> HTTPSocket[%d] : HTTP Request received ", s);
 47.                 printf("from %d.%d.%d.%d : %d\r\n", destip[0], destip[1], destip[2], destip[3], destport);
 48. #endif
 49. #ifdef _HTTPSERVER_DEBUG_
 50.                 printf("> HTTPSocket[%d] : [State] STATE_HTTP_REQ_DONE\r\n", s);
 51. #endif
 52.                 // HTTP 'response' handler; includes send_http_response_header / body function
 53.                 http_process_handler(s, parsed_http_request);
 54.  
 55.                 gettime = get_httpServer_timecount();
 56.                 // Check the TX socket buffer for End of HTTP response sends
 57.                 while (getSn_TX_FSR(s) != (getSn_TxMAX(s)))
 58.                 {
 59.                     if ((get_httpServer_timecount() - gettime) > 3)
 60.                     {
 61. #ifdef _HTTPSERVER_DEBUG_
 62.                         printf("> HTTPSocket[%d] : [State] STATE_HTTP_REQ_DONE: TX Buffer clear timeout\r\n", s);
 63. #endif
 64.                         break;
 65.                     }
 66.                 }
 68.                 if (HTTPSock_Status[seqnum].file_len > 0)
 69.                     HTTPSock_Status[seqnum].sock_status = STATE_HTTP_RES_INPROC;
 70.                 else
 71.                     HTTPSock_Status[seqnum].sock_status = STATE_HTTP_RES_DONE; // Send the 'HTTP response' end
 72.             }
 73.             break;
 74.  
 75.         case STATE_HTTP_RES_INPROC:
 76.             /* Repeat: Send the remain parts of HTTP responses */
 77. #ifdef _HTTPSERVER_DEBUG_
 78.             printf("> HTTPSocket[%d] : [State] STATE_HTTP_RES_INPROC\r\n", s);
 79. #endif
 80.             // Repeatedly send remaining data to client
 81.             send_http_response_body(s, 0, http_response, 0, 0);
 82.  
 83.             if (HTTPSock_Status[seqnum].file_len == 0) HTTPSock_Status[seqnum].sock_status = STATE_HTTP_RES_DONE;
 84.             break;
 85.  
 86.         case STATE_HTTP_RES_DONE:
 87. #ifdef _HTTPSERVER_DEBUG_
 88.             printf("> HTTPSocket[%d] : [State] STATE_HTTP_RES_DONE\r\n", s);
 89. #endif
 90.             // Socket file info structure re-initialize
 91.             HTTPSock_Status[seqnum].file_len    = 0;
 92.             HTTPSock_Status[seqnum].file_offset = 0;
 93.             HTTPSock_Status[seqnum].file_start  = 0;
 94.             HTTPSock_Status[seqnum].sock_status = STATE_HTTP_IDLE;
 95.  
 96. //#ifdef _USE_SDCARD_
 97. //                                            f_close(&fs);
 98. //#endif
 99. #ifdef _USE_WATCHDOG_
100.             HTTPServer_WDT_Reset();
101. #endif
102.             http_disconnect(s);
103.             break;
104.  
105.         default:
106.             break;
107.         }
108.         break;
109.  
110.     case SOCK_CLOSE_WAIT:
111. #ifdef _HTTPSERVER_DEBUG_
112.         printf("> HTTPSocket[%d] : ClOSE_WAIT\r\n", s); // if a peer requests to close the current connection
113. #endif
114.         disconnect(s);
115.         break;
116.  
117.     case SOCK_CLOSED:
118.         if (reboot_flag)
119.         {
120.             NVIC_SystemReset();
121.         }
122. #ifdef _HTTPSERVER_DEBUG_
123.         printf("> HTTPSocket[%d] : CLOSED\r\n", s);
124. #endif
125.         if (socket(s, Sn_MR_TCP, HTTP_SERVER_PORT, 0x00) == s) /* Reinitialize the socket */
126.         {
127. #ifdef _HTTPSERVER_DEBUG_
128.             printf("> HTTPSocket[%d] : OPEN\r\n", s);
129. #endif
130.         }
131.         break;
132.  
133.     case SOCK_INIT:
134.         listen(s);
135.         break;
136.  
137.     case SOCK_LISTEN:
138.         break;
139.  
140.     default:
141.         break;
142.  
143.     } // end of switch
144.  
145. #ifdef _USE_WATCHDOG_
146.     HTTPServer_WDT_Reset();
147. #endif
148. }

Step 5: Request Content Processing

The processing of POST-style CGI requests is handled in the predefined_set_cgi_processor() function of the httpUtil.c file. The processing of GET-style CGI requests is handled in the predefined_get_cgi_processor() function of the httpUtil.c file.

 1. uint8_t predefined_set_cgi_processor(uint8_t *uri_name, uint8_t *uri, uint8_t *buf, uint16_t *len)
 2. {
 3.     if (strcmp((const char *)uri_name, "config.cgi") == 0)
 4.     {
 5.         uint8_t    *param;
 6.         wiz_NetInfo new_net_info = {0};
 7.         wizchip_getnetinfo(&new_net_info);
 8.  
 9.         param = get_http_param_value((char *)uri, "ip");        // Obtain IP address
10.         parse_ip((char *)param, new_net_info.ip);               // Update IP Address
11.         param = get_http_param_value((char *)uri, "subnet");    // Obtain the subnet mask
12.         parse_ip((char *)param, new_net_info.sn);               // Update subnet mask
13.         param = get_http_param_value((char *)uri, "gateway");   // Obtain the default gateway
14.         parse_ip((char *)param, new_net_info.gw);               // Update default gateway
15.         param = get_http_param_value((char *)uri, "dns");       // Obtain DNS address
16.         parse_ip((char *)param, new_net_info.dns);              // Update DNS address
17.  
18.         new_net_info.dhcp = NETINFO_STATIC; 
19.         ee_WriteBytes((uint8_t *)&new_net_info, 0, sizeof(wiz_NetInfo));
20.         reboot_flag = 1; 
21.         *len        = sprintf((char *)buf, (char *)CONFIG_SUCCESS_PAGE, new_net_info.ip[0], new_net_info.ip[1], new_net_info.ip[2], new_net_info.ip[3]); 
22.         return 1;
23.     }
24.     return 0;
25. }

Step 6: Restart the device

In the httpServer_run() function, when the SOCKET is in the SOCK_CLOSED state (that is, the previous request has been processed), perform the reset operation again to avoid the situation where the W55MH32 does not respond to the client request after the client makes a request, resulting in a timeout of the client request.

1. case SOCK_CLOSED:
2.   if (reboot_flag)
3.   {
4.       NVIC_SystemReset();
5.   }

10 Run results

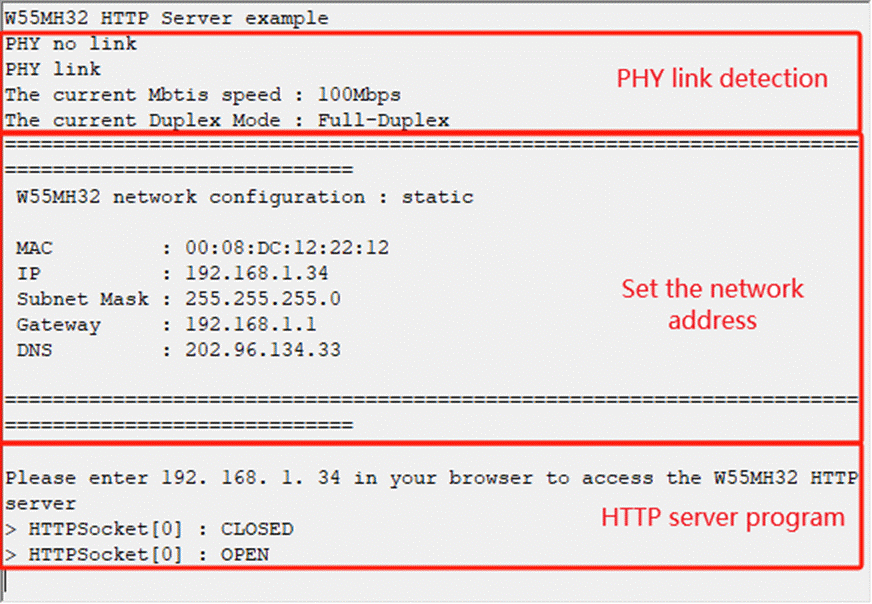
After the burning routine is executed, the PHY link is first detected, then the network address is obtained through DHCP and the network address information is printed. Finally, the HTTP Server program starts to listen for client requests and process the responses, as shown in the following figure:


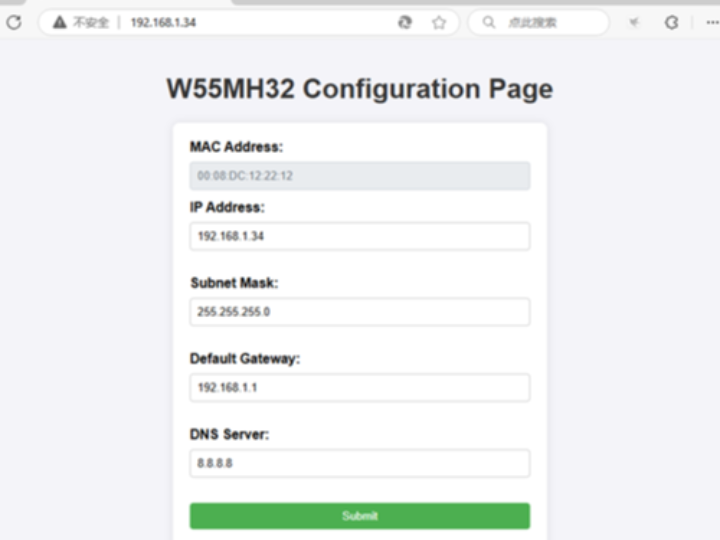
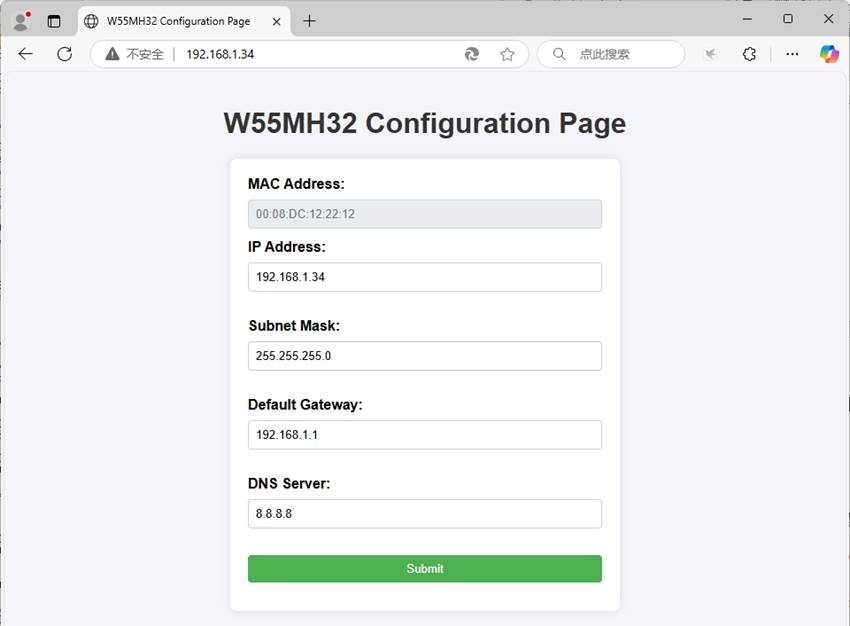
Then we opened the browser and entered the IP address of W55MH32 to access it.

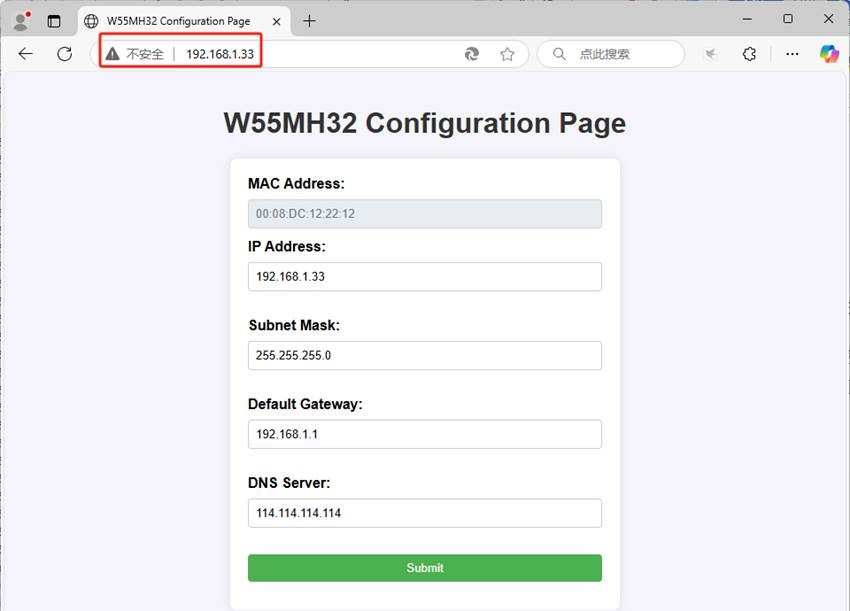
Then we changed the IP address to 192.168.1.33, and the DNS server address to 114.114.114.114. After clicking the "Submit" button, the browser will automatically redirect to the new address after W55MH32 restarts.


11Summary

This article introduces the implementation of HTTP Server functionality on the W55MH32 chip, as well as the method of modifying its network address information through a browser. It elaborates on the concepts, characteristics, application scenarios, workflow, request methods, response content of the HTTP protocol, as well as the composition and interaction mode of web pages. It also demonstrates the implementation process on the W55MH32 chip.

The next article will explain the implementation of the SNTP timing function on this chip, and introduce the principle and implementation steps of obtaining accurate time from the SNTP server. Please stay tuned!


WIZnet is a non-fabrication semiconductor company founded in 1998. Its products include the Internet processor iMCU™, which adopts TOE (TCP/IP Offloading Engine) technology and is based on a unique patented fully hardwired TCP/IP. iMCU™ is designed for embedded Internet devices in various applications.

WIZnet has over 70 distributors worldwide, with offices in Hong Kong, South Korea, and the United States, providing technical support and product marketing.

The region managed by the Hong Kong office includes: Australia, India, Turkey, and Asia (excluding South Korea and Japan).


Documents
Comments Write