
Chapter 41: DFU-Based Firmware Upgrade Solution for W55MH32
Device Firmware Update (DFU) is a technology that allows firmware updates of embedded devices without physical disassembly.
Chapter 41: DFU-Based Firmware Upgrade Solution for W55MH32
Device Firmware Update (DFU) is a technology that allows firmware updates of embedded devices without physical disassembly. For the W55MH32 chip, DFU enables reliable firmware recovery and updates directly through the USB interface.
Features
- Bootloader
- Device recovery from bricked state
- Dual-bank flash with rollback protection
- CRC validation for firmware integrity
- Device recovery from bricked state
- Programming
- USB DFU class protocol support
- Works with DFU-util and STM32CubeProgrammer
- Supports binary and hex file formats
- USB DFU class protocol support
- Security
- Firmware signature verification
- Flash sector write protection
- Safe boot validation
- Firmware signature verification
- Usability
- Simple button combination entry
- Factory programming compatible
- End-user field updates
- Simple button combination entry
Applications
- Industrial: Production line updates, remote maintenance, emergency patches
- IoT: Smart home devices, sensor networks, edge computing
- Consumer: Appliances, security devices, medical equipment
- Development: Rapid prototyping, production programming, field updates
Storage Architecture Design
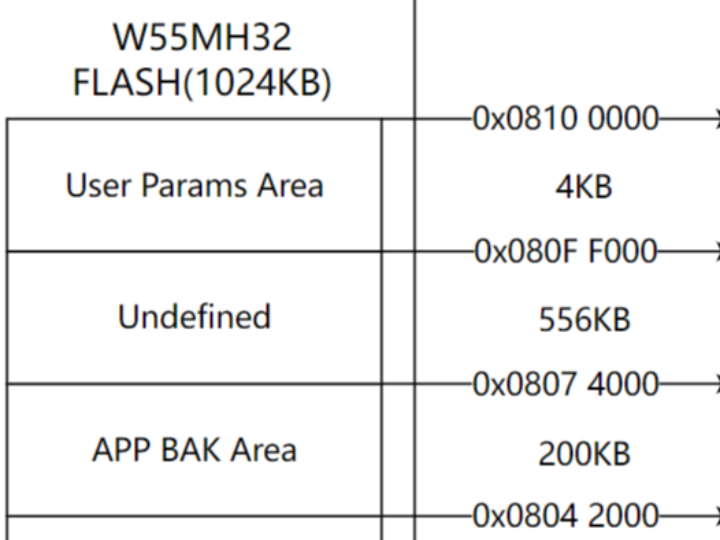
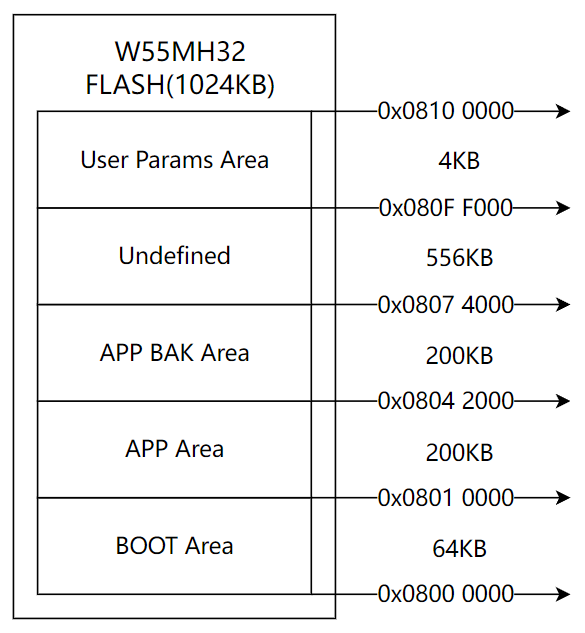
In the firmware upgrade process, we need to store multiple programs in FLASH memory, such as BOOT program and APP program. The BOOT program is the first program to run when the device starts up, primarily responsible for determining whether an APP program upgrade is needed and subsequent jump operations. The APP program is the main running application.
Therefore, we need to partition the FLASH memory, typically divided into BOOT program area, APP program area, and APP backup area.
FLASH Partition Design
Memory Layout Configuration
Implementation Process (MicroPython Environment)
This method utilizes the USB Device Firmware Upgrade protocol for MicroPython firmware programming. The DFU approach leverages the dedicated USB Device Port and is particularly suited for production deployment and field updates, as it separates programming functions from development interfaces.
Required Hardware
- W55MH32 Development Board
- USB Type-C cable (for DAPLink port and USB Device Port)
- Windows 10/11 with WSL2 enabled
Software Requirements
- Windows: usbipd, Device Manager access
- WSL: OpenOCD, git, make
- Keil MDK (for DFU flashing)
Step 1: Install DFU Bootloader using Keil
The DFU bootloader contains critical decision logic to determine whether to stay in DFU mode or jump to the main application.
- Prepare DFU Project
1. DFU Boot Logic
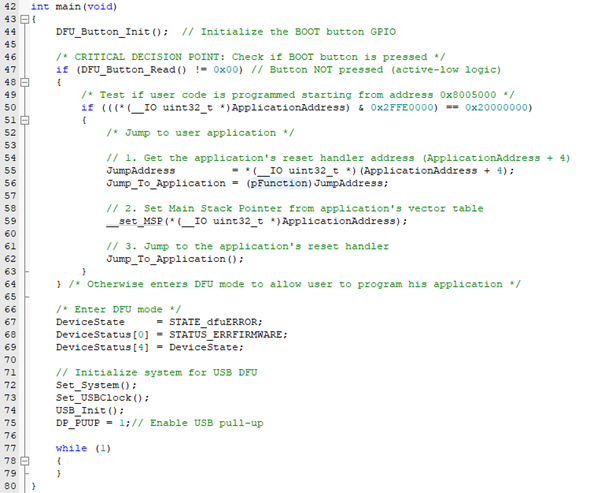
This code implements the DFU (Device Firmware Update) bootloader logic for the W55MH32 chip. It determines whether the device should boot into the main application or enter DFU mode for firmware updates.
The code starts by initializing the BOOT button GPIO. The critical decision point checks if the BOOT button is NOT pressed (active-low logic where pressed = 0, not pressed ≠ 0). This is a key design choice - typically, holding the button during boot forces DFU mode.
If the button is not pressed, the code validates whether a valid user application exists at ApplicationAddress (0x8005000). The validation checks if the first 32-bit value at that address (the initial stack pointer) has a reasonable value in the RAM address range (0x20000000-0x20020000 for Cortex-M).
If validation passes, the code performs three essential operations:
- Extracts the reset handler address from ApplicationAddress + 4
- Sets the Main Stack Pointer from the first vector table entry
- Jumps to the application's reset handler
If either the button IS pressed OR no valid application is detected, the device enters DFU mode. It configures the system for USB communication, enables the USB pull-up resistor, and enters an infinite loop waiting for DFU commands from a host computer.
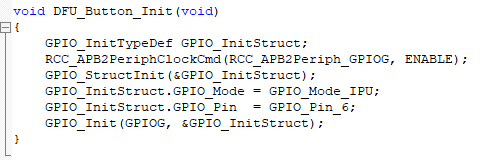
2. DFU Button Configuration
Function: DFU_Button_Init(void)
Purpose: Configures the hardware button for entering DFU mode
Specific Settings:
- Button Pin: GPIO Port G, Pin 6 (GPIOG_Pin_6)
- Mode: Input with internal pull-up (GPIO_Mode_IPU)
- Active State: When button pressed = LOW (0), not pressed = HIGH (1)
Boot Behavior:
- Button pressed (LOW) → Force DFU mode
- Button not pressed (HIGH) → Try booting application
3. Application Address Configuration
- Macro: ApplicationAddress 0x08005000
- Purpose: Defines where the user application starts in flash memory
3. Understanding the DFU Bootloader Code Let's examine the key DFU bootloader code that determines whether to jump to the main application or stay in DFU mode:
- Flash DFU using Keil
- Open Keil MDK
- Load the DFU project for W55MH32
- Connect board via DAPLink port
- Build and flash the DFU bootloader
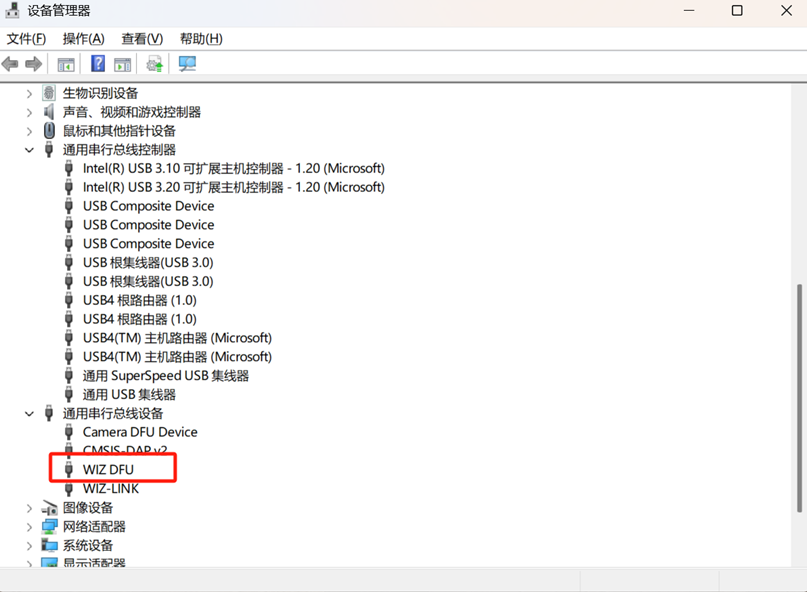
4. Verify DFU Installation
- Reset board while holding BOOT button
- Device should enumerate as DFU device in Windows
- Confirm "WIZ DFU" appears
Step 2: USB Device Forwarding to WSL
This procedure forwards the board's USB programming interface from Windows to the WSL environment, enabling Linux-based tools to access the hardware.
- Launch Terminal Environments:
- Open Windows PowerShell with Administrator privileges
- Open a WSL terminal
- Open Windows PowerShell with Administrator privileges
- Execute the following command sequence in the Windows PowerShell:
- usbipd list
- Identify the USB port corresponding to the W55MH32 device. The bus ID will be displayed (example: 4-4).
- usbipd bind --busid 4-4
- This command binds the specified USB device for WSL sharing.
- usbipd attach --wsl --busid 4-4
- This command attaches the bound USB device to the WSL environment.
- usbipd list
- Verify the attachment by checking USB devices in WSL:
Note: Replace 4-4 with the actual bus ID displayed by the usbipd list command. For detailed usbipd documentation, please find information from this link

Step 3: Build and Flash MicroPython
This section details the compilation and programming of MicroPython firmware to the W55MH32 board via the DFU method. Ensure all preceding steps—including repository preparation, DFU bootloader installation, USB device forwarding, and successful entry into DFU mode—have been successfully completed before proceeding. The DFU method provides a standardized USB-based programming approach suitable for production deployment and field updates.
- Execute the following commands in sequence within the WSL terminal:
- cd /home/yourusername/micropython/ports/w55mh32
- Change to the W55MH32 port directory within the MicroPython repository.
- make clean
- Clean Build Environment
- Clean Build Environment
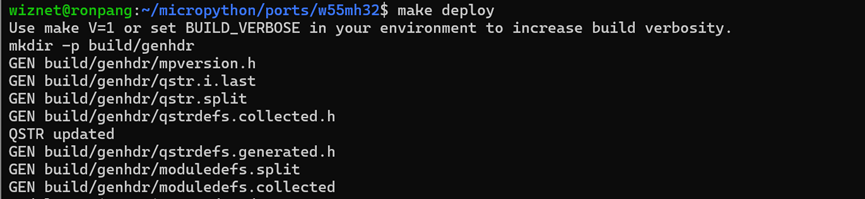
- sudo make deploy
- Compile and Flash Firmware
- Compile and Flash Firmware
- cd /home/yourusername/micropython/ports/w55mh32
Note:
- Replace /home/yourusername with the actual path to your MicroPython installation.
- The sudo command is required to grant the necessary permissions for accessing the USB DFU device.

DFU Build and Programming Process
1. Linker Script Compilation (w55mh32.ld)
The W55MH32 linker script organizes these instructions into specific memory regions, placing the interrupt vector table at address 0x08005000 and reserving the first 20KB (0x08000000-0x08005000) for the DFU bootloader.

2. DFU File Creation (Makefile)
The firmware.bin file is converted to a DFU format file using the DFU tool with the correct offset.

This command creates a DFU file that instructs the programmer to write firmware.bin starting at address 0x08005000.
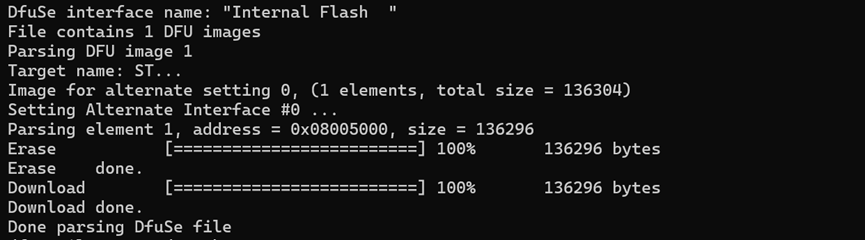
3. DFU Programming (Makefile)
When executing make deploy, DFU-util programmed the firmware to the MCU via USB:

The firmware is programmed starting at 0x08005000, preserving the DFU bootloader in the first 20KB of flash.
4. Boot Sequence (DFU Bootloader Code)
After programming, when the board resets:
- CPU begins execution at 0x08000000 (DFU bootloader)
- Bootloader checks BOOT button and validates application at 0x08005000
- Either enters DFU mode or jumps to application's interrupt vectors
Step 3.1: DFU Mode Verification
- Connect Hardware:
- Plug USB cable into the USB Device Port
- Enter DFU Mode:
- Hold the USER IO button
- Press and release the RESET button
- Release the USER IO button
- The board enters DFU mode
- Hold the USER IO button
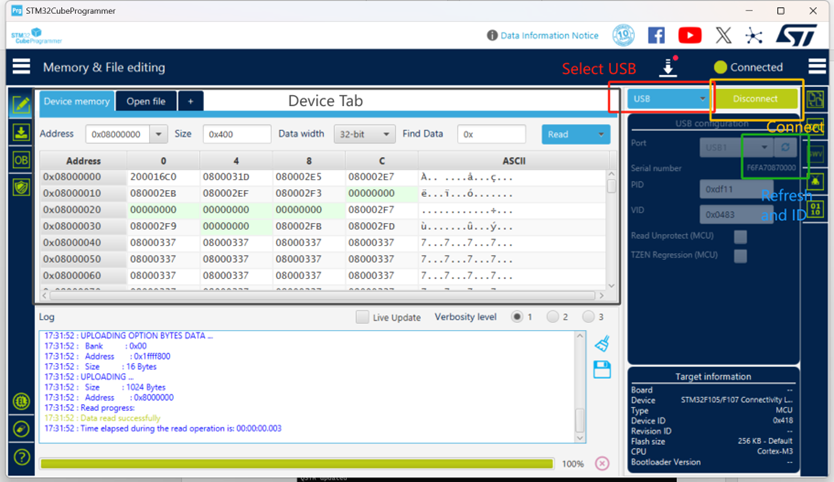
- Software Verification with STM32CubeProgrammer:
- Launch STM32CubeProgrammer
- Select USB connection mode
- Click Refresh in Port configuration
- Click Connect button
- Launch STM32CubeProgrammer
- Memory Verification:
- Navigate to memory view
- Search address 0x08005000
- Verify memory contains valid data (non-zero, non-0xFF values)
- Navigate to memory view
Step 3.2: Serial Terminal Verification
After successful MicroPython installation, verify the firmware functionality through serial terminal access.
- Open Serial Terminal
- Launch the serial terminal application (Tera Term, PuTTY, or similar)
- Configure connection settings:
- Baud Rate: 115200
- Data Bits: 8
- Parity: None
- Stop Bits: 1
- Flow Control: None
- Baud Rate: 115200
- Select the correct COM port corresponding to the board's UART interface
- Press the RESET button on the W55MH32 board
- This triggers the MicroPython firmware to restart and display the REPL interface
- Launch the serial terminal application (Tera Term, PuTTY, or similar)

This DFU solution provides reliable firmware recovery and update capability for the W55MH32 platform. It enables field updates through USB interface while maintaining device recoverability, significantly reducing development and maintenance costs while improving system reliability and serviceability.