
Chapter 40: OpenOCD - The Essential Embedded Debugging Tool
Open On-Chip Debugger (OpenOCD) is an open-source, vendor-neutral debugging framework that provides comprehensive development capabilities for embedded systems.
Introduction
Open On-Chip Debugger (OpenOCD) is an open-source, vendor-neutral debugging framework that provides comprehensive development capabilities for embedded systems. For the W55MH32 chip, OpenOCD offers professional debugging, programming, and testing tools through standardized debug interfaces.
Features
- Multi-Protocol Support: JTAG, SWD, cJTAG, CMSIS-DAP interfaces
- Cross-Platform Compatibility: Windows, Linux, macOS support
- Production-Ready: Automated flashing, batch programming, validation
- Open Source: No vendor lock-in, community-driven development
- Extensible Architecture: Plugin-based interface drivers and target support
OpenOCD Applications
- Development & Manufacturing
- Industrial: Production line programming, factory testing, batch updates
- Automotive: ECU debugging, infotainment updates, ADAS development
- Industrial: Production line programming, factory testing, batch updates
- Consumer & IoT
- Consumer Electronics: Smart home devices, wearables, appliances
- IoT Systems: Sensor networks, edge devices, gateway programming
- Consumer Electronics: Smart home devices, wearables, appliances
- Medical & Specialized
- Medical Equipment: Diagnostic devices, patient monitors, wearable health
- Aerospace/Defense: Avionics testing, military equipment, drone development
- Medical Equipment: Diagnostic devices, patient monitors, wearable health
- Services & Support
- Field Service: On-site device maintenance, emergency repairs, remote updates
- Education: Embedded courses, student projects, research prototyping
- Field Service: On-site device maintenance, emergency repairs, remote updates
How It Works
- Three-Layer Structure
- Command Interface Layer: Telnet (4444), GDB (3333), Other Protocols
- Server Core Layer: Target state management, flash algorithms
- Driver Layer: Interface drivers, transport protocols
- Configuration System
- OpenOCD uses a hierarchical configuration approach:
- Interface Config: Debug adapter settings
- Target Config: MCU/CPU specific settings
- Board Config: Board-specific connections
- User Scripts: Custom initialization sequences
- Communication Flow for W55MH32
- OpenOCD connects to W55MH32 via CMSIS-DAP
- Target chip identified (W55MH32 ARM Cortex-M3)
- Debug session starts with halt/resume control
- Flash programming using chip-specific algorithms
- Real-time debugging with breakpoints/watchpoints
Implementation Process (MicroPython Environment)
This method utilizes the board's integrated CMSIS-DAP debug interface for MicroPython firmware programming. The OpenOCD tool provides comprehensive programming and debugging capabilities through a standardized interface. This approach requires the CMSIS-DAP+UART+ISP port connection and is recommended for development environments where both programming and serial console access are needed simultaneously.
Required Hardware
- W55MH32 Development Board
- USB Type-C cable (for DAPLink port)
- Windows 10/11 with WSL2 enabled
Software Requirements
- Windows: usbipd, Device Manager access
- WSL: OpenOCD, GNU Toolchain, git, make
Step 1: USB Device Forwarding to WSL
This procedure forwards the board's USB programming interface from Windows to the WSL environment, enabling Linux-based tools to access the hardware.
- Hardware Connection
- Plug Type-C cable into the USB Device Port
- Open Device Manager
- Navigate to Universal Serial Bus devices
- Confirm "CMSIS-DAP v2" appears in the device list
- Plug Type-C cable into the USB Device Port
- Launch Terminal Environments:
- Open Windows PowerShell with Administrator privileges
- Open a WSL terminal
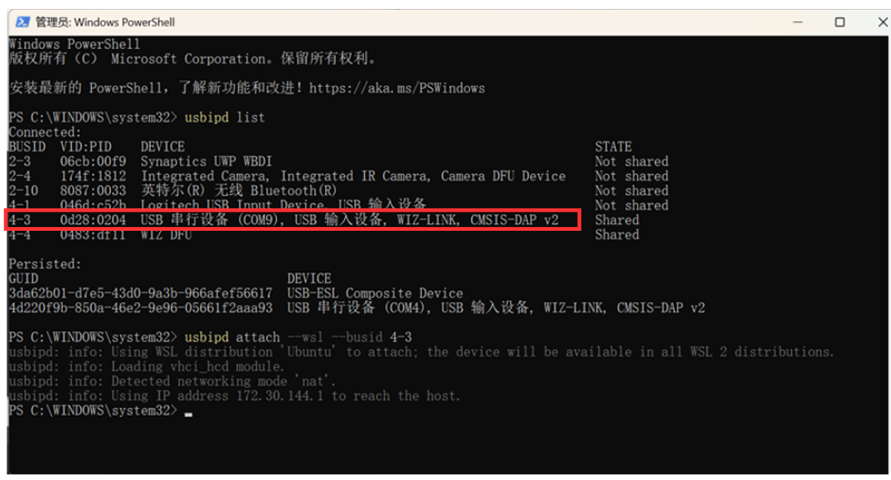
- Execute the following command sequence in the Windows PowerShell:
- usbipd list
- Identify the USB port corresponding to the W55MH32 device. The bus ID will be displayed (example: 4-3).
- usbipd bind --busid 4-3
- This command binds the specified USB device for WSL sharing.
- usbipd attach --wsl --busid 4-3
- This command attaches the bound USB device to the WSL environment.
- Verify the attachment by checking USB devices in WSL:
- lsusb
- The output should include the device.
- The output should include the device.
- lsusb
- usbipd list

Note: Replace 4-3 with the actual bus ID displayed by the usbipd list command. For detailed usbipd documentation, please find information from this link

Step 2: Build and Flash MicroPython
This section details the compilation and programming of MicroPython firmware to the W55MH32 board via the OpenOCD method. Ensure all preceding steps—including repository preparation, DFU bootloader installation, and USB device forwarding—have been successfully completed before proceeding.
- Execute the following commands in sequence within the WSL terminal:
- cd /home/yourusername/micropython/ports/w55mh32
- Change to the W55MH32 port directory within the MicroPython repository.
- Change to the W55MH32 port directory within the MicroPython repository.
- make clean
- Clean Build Environment
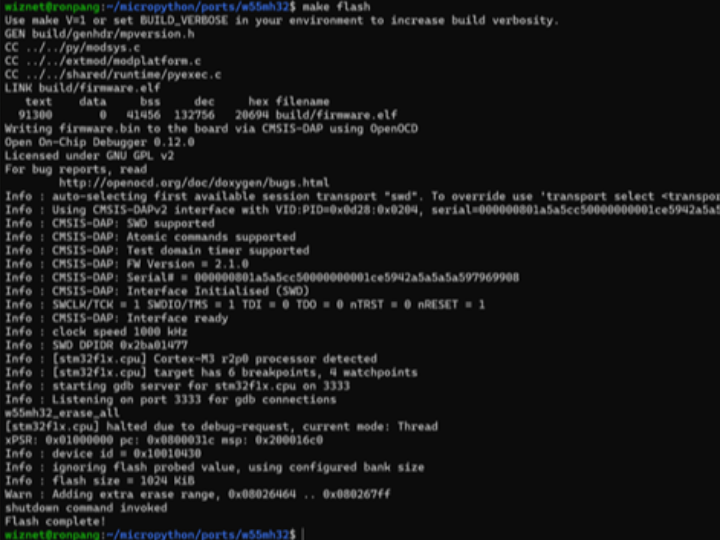
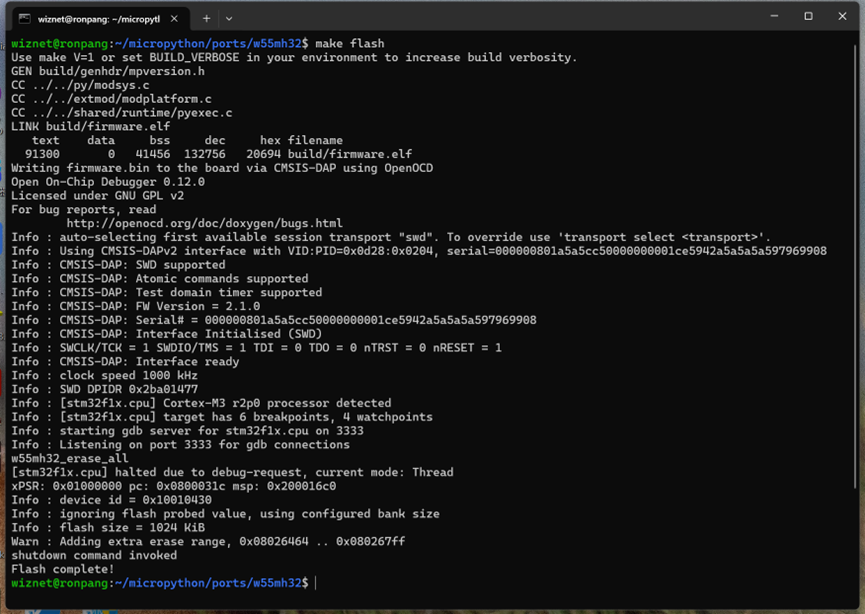
- make flash
- Compile and Flash Firmware
- Compile and Flash Firmware
- cd /home/yourusername/micropython/ports/w55mh32
Note:
- Replace /home/yourusername with the actual path to your MicroPython installation.
OpenOCD Build and Programming Process
1. Linker Script Compilation (w55mh32.ld)
The W55MH32 linker script organizes these instructions into specific memory regions, with the interrupt vector table placed first at address 0x08000000.

2. OpenOCD Programming (Makefile)
When you execute make flash, OpenOCD transfers the entire firmware.bin file to the W55MH32's flash memory starting at address 0x08000000. This writes both the interrupt vector table and the main program code in one operation.

3. OpenOCD Programming (board.cfg)
When executing make flash, OpenOCD runs the w55mh32_flash TCL script which programs the chip via CMSIS-DAP debug interface. The followings are the communication flow commands while programming the firmware into W55MH32.

Step 3: Serial Terminal Verification
After successful MicroPython installation, verify the firmware functionality through serial terminal access.
- Open Serial Terminal
- Launch the serial terminal application (Tera Term, PuTTY, or similar)
- Configure connection settings:
- Baud Rate: 115200
- Data Bits: 8
- Parity: None
- Stop Bits: 1
- Flow Control: None
- Baud Rate: 115200
- Select the correct COM port corresponding to the board's UART interface
- Press the RESET button on the W55MH32 board
- This triggers the MicroPython firmware to restart and display the REPL interface
- Launch the serial terminal application (Tera Term, PuTTY, or similar)

Summary
This demonstration showed the complete workflow for using OpenOCD to flash MicroPython onto the W55MH32 chip:
- DFU Preparation: Initial bootloader installation via Keil
- Environment Setup: MicroPython repository cloning and preparation
- USB Forwarding: Bridging Windows USB to WSL using usbipd
- OpenOCD Flashing: Using the CMSIS-DAP interface for programming
- Verification: Testing the flashed MicroPython firmware
The OpenOCD method provides:
- Reliable programming through industry-standard debug interface
- Debug capability alongside programming
- Scriptable automation for CI/CD workflows
- Vendor independence using open-source tools