
Building a W55MH32 Ethernet ambient air quality monitoring system from scratch
Building a W55MH32 Ethernet Ambient Air Quality Monitoring System from Scratch: MQTT Alibaba Cloud Platform Monitoring + Built-in Web Page Display
1 前言
I'm someone who pays close attention to the details of life. I often feel a nasal discomfort and a dry throat in various places. But some places are quite clean and tidy. I often wonder, "No one's smoking here, and it's not windy. Is it the air?" But you can't tell if the air is good or not! PM2.5: These dust particles, dozens of times finer than a hair, lodge in your lungs once you breathe them in. Over time, this can be a serious problem. Those with elderly or children at home should pay special attention to this. Carbon dioxide: Do you think crowded places are just "stuffy"? That's because CO2 levels are exceeding the standard! Spending too much time in classrooms, meeting rooms, or even your bedroom with the door closed can cause dizziness, drowsiness, and difficulty concentrating—it's likely to be caused by CO2. Everyone in the office is feeling sleepy in the afternoon? Maybe the ventilation isn't good enough, and the CO2 levels are off the charts! Is the air clean? I have no idea! I rely entirely on my senses, only noticing when my nose and throat start to irritate. Should I open the windows? I'm torn! The weather outside looks nice, but opening the window might let in a cloud of dust (PM2.5). If I close the window, the room becomes crowded, and CO2 levels rise, making it suffocating. Should I turn on the purifier/fresh air? And for how long? It's all guesswork! My electricity bill is skyrocketing, and I have no idea how effective it is. So I thought: Can I make a simple, cheap, internet-connected gadget that lets me know the "nearby details" of the air around me?
If I want to "know at all times," I definitely need an internet connection! Sending data to a phone or a website is convenient. Developing my own network protocol? The thought of it was overwhelming! Until I discovered the W55MH32 board. It's a perfect fit: an MCU with built-in network card. Its most impressive feature is that it integrates a hardware TCP/IP protocol stack, Ethernet MAC, and PHY right into the chip! What does this mean? I no longer need to connect a complex external WiFi module or run a separate protocol stack, consuming precious CPU resources. The hardware handles the underlying network infrastructure, making development much simpler! All I have to worry about is reading sensor data and packaging and sending it out. Low cost and minimal wiring: Basically, just add a network adapter and an RJ45 port, plug in an Ethernet cable, and you're online! Its stability is also more reliable than many WiFi solutions. Performance: The W55MH32 is more than adequate for processing data from a few sensors, performing some simple calculations, and then transmitting it over the network.
Based on this, I decided to embark on this project: This project, based on the W55MH32 Ethernet development board, utilizes the JW01-CO2 sensor (for real-time monitoring of carbon dioxide concentration) and the DC01 infrared PM2.5 sensor (for accurate detection of fine particulate matter in the air) to build an intelligent environmental monitoring solution. The system establishes a stable communication link with the Alibaba Cloud IoT platform via the MQTT protocol, enabling remote cloud-based transmission, storage, and analysis of monitoring data. Users can view historical data trends and alarm information in real time via mobile devices or the web.
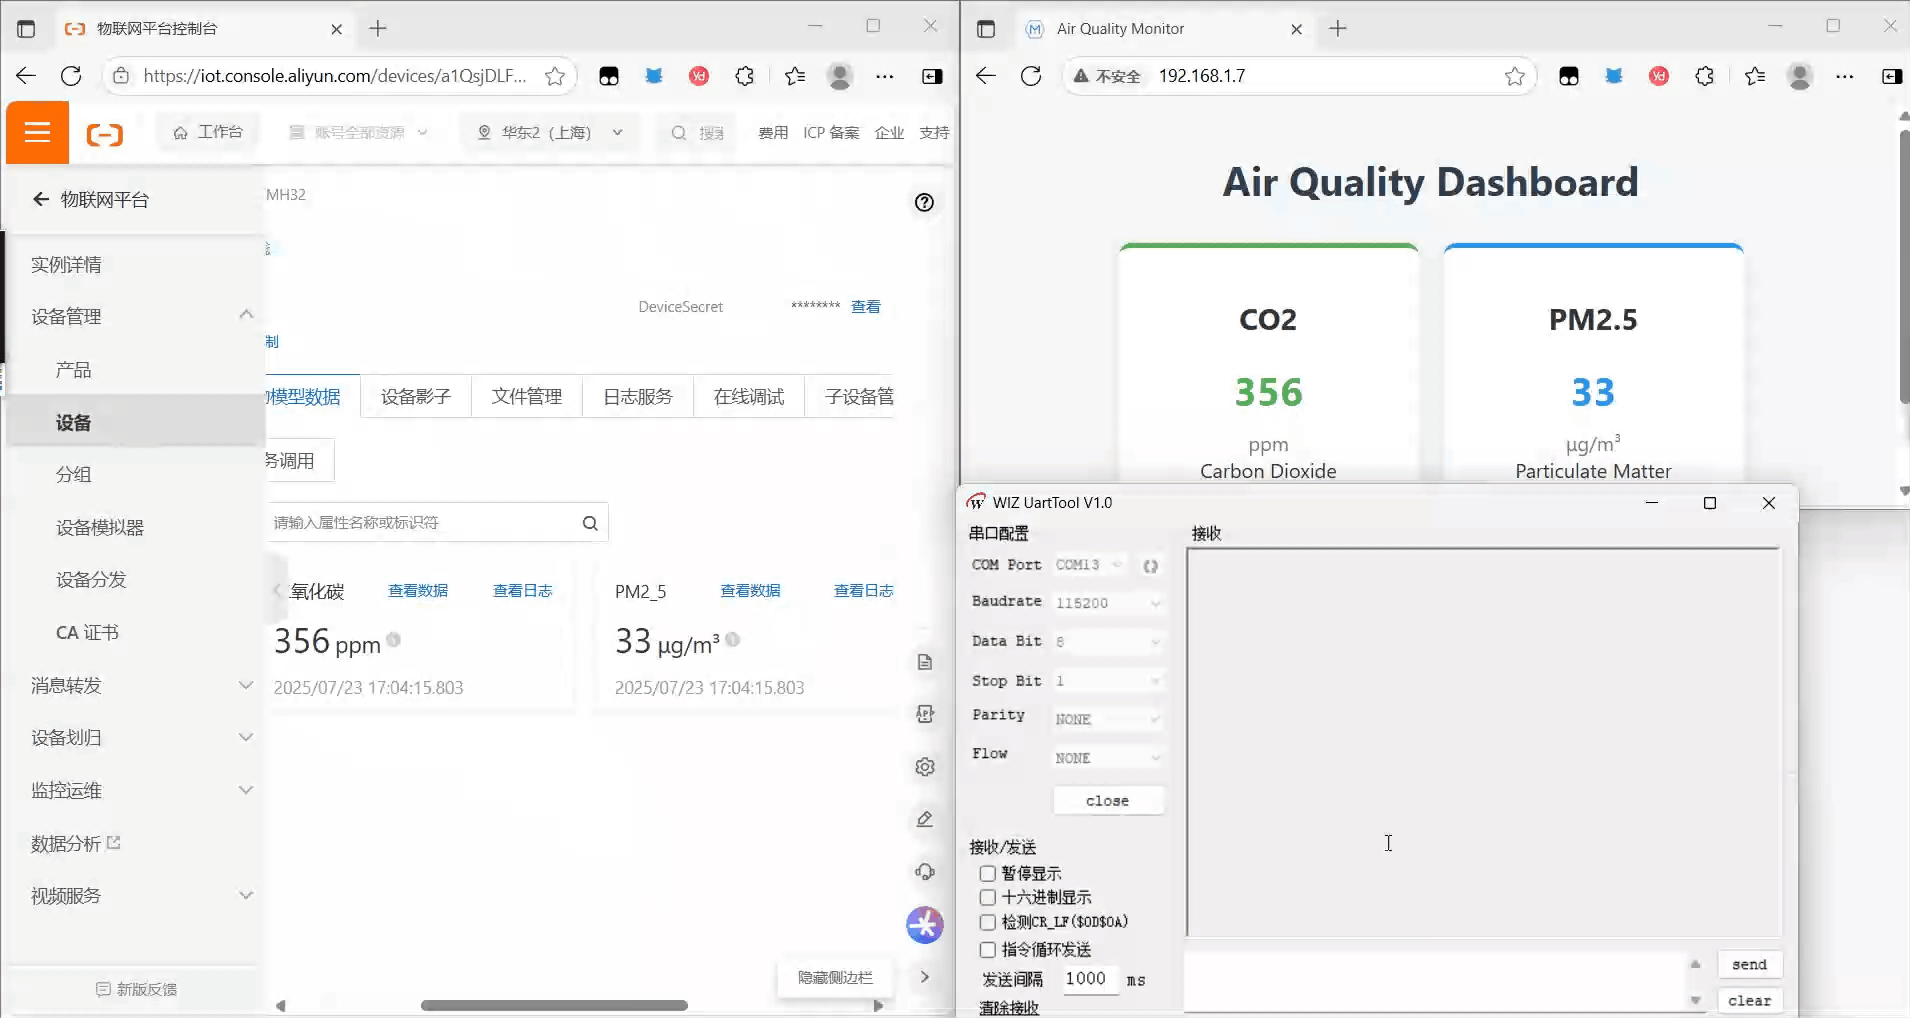
An innovative local real-time data visualization webpage has been developed. The device has a built-in lightweight web server, allowing users to access the device's IP address directly through a browser to obtain a dynamically refreshed display of sensor data (updated every 5 seconds). The ultimate goal is to make the "invisible" air "visible, tangible, and controllable", use data to guide our lives, and breathe more clearly and healthily.
开源项目源码:https://gitee.com/hupeiyuan0218/w55mh32_aircheck.git
视频演示:https://www.bilibili.com/video/BV162tzzaEcg/?vd_source=0e464ab43d68457de7bac889723ef284
2 Project Environment
2.1 Hardware Environment
- W55MH32 development board
- JW01 CO2 sensor
- DC01 infrared PM2.5 sensor
- Ethernet cable
- Several DuPont cables
2.2 Software Preparation
- Development Environment: Keil uVision 5
- Wiznet Serial Port Assistant (other serial port tools are also acceptable)
- Alibaba Cloud Server
- Web Browser
2.3 Solution Diagram

3. Register an Alibaba Cloud account and create a physical model
Registering an account is not described here. Next, let's see how to build a physical model.
3.1 Create a product
Search for IoT Platform → Click on IoT Platform → Click on Public Instance

Select Device Management → Click Products → Click Create Product

Set product name, category, node type, connection method, and data format

3.2 Adding a device
After successfully creating the product, click Add Device → Enter DeviceName

3.3 Creating an Object Model
Define the IoT model, select the product → click Function Definition → Click to go to edit draft

Click Add Custom Function → Select Function Type → Enter Function Name → Set Identifier → Set Data Type → Set Value Range → Set Step Size → Set Unit → Set Read/Write Type

3.4 Obtaining device connection information
Click Product → Select the created product → Click Topic Class List → Select Object Model Communication

Subscribe to the platform's message topic:
/sys/a1QsjDLF7Rq/${deviceName}/thing/service/property/set
Device-published message topic:
/sys/a1QsjDLF7Rq/${deviceName}/thing/event/property/post
Note: In both topics, you need to change {device_id} to your device ID.
Click Device Management → Select a device → Click View

Click to view DeviceSecret and obtain the device certificate
{
   "ProductKey": "a1QsjDLF7Rq",
   "DeviceName": "W55MH32",
   "DeviceSecret": "5a2b4550d9a3e7a8c19c1c8943d8f710"
}
Get MQTT connection parameters


4 Routine modification
This example uses MQTT & Aliyun:
Find the do_mqtt.c file and replace the parameters listed above with those for your Alibaba Cloud. These parameters are described above and can be replaced at your convenience.
mqttconn mqtt_params = {
   .mqttHostUrl = "a1QsjDLF7Rq.iot-as-mqtt.cn-shanghai.aliyuncs.com",
   .server_ip =
       {
           0,
       },        /*Define the Connection Server IP*/
   .port = 1883, /*Define the connection service port number*/
   .clientid = "a1QsjDLF7Rq.W55MH32|securemode=2,signmethod=hmacsha256,"
               "timestamp=1752545118110|", /*Define the client ID*/
   .username = "W55MH32&a1QsjDLF7Rq",      /*Define the user name*/
   .passwd = "f0dcd6ce4df2493438e42dbd9dd789d348309201ac18f18dd158ddceea45fc5"
             "d", /*Define user passwords*/
   .pubtopic =
       "/sys/a1QsjDLF7Rq/W55MH32/thing/event/property/post", /*Define the
                                                                publication
                                                                message*/
   .subtopic =
       "/sys/a1QsjDLF7Rq/W55MH32/thing/service/property/set", /*Define
                                                                 subscription
                                                                 messages*/
   .pubQoS = QOS0, /*Defines the class of service for publishing messages*/
};
First, a data packet is sent to subscribe to the topic {device_id}.
After the subscription is successful, a message "SUCCESS" is received from the topic: /sys/a1QsjDLF7Rq/W55MH32/thing/service/property/set.
case SUB: {
   ret = MQTTSubscribe(&c, mqtt_params.subtopic,mqtt_params.subQoS,
                       messageArrived); /* Subscribe to Topics */
   printf("Subscribing to %s\r\n", mqtt_params.subtopic);
   printf("Subscribed:%s\r\n\r\n", ret == SUCCESSS ? "success" : "failed");
   if (ret != SUCCESSS) {
     run_status = ERR;
   } else {
     run_status = PUB_MESSAGE;
   }
   break;
 }
Next, publish the data. Ensure that the service ID (Temperature) and attribute name (CurrentTemperature) are identical (including capitalization) to the product model you defined on Alibaba Cloud. After a successful release, the status will be updated to "Stay Connected."
case PUB_MESSAGE: {
   // Dynamically constructing JSON payload
   snprintf(payload_buffer, PAYLOAD_BUFFER_SIZE,
            "{\"id\":\"123\",\"version\":\"1.0\","
            "\"params\":{\"co2\":%d,\"PM2_5\":%d},"
            "\"method\":\"thing.event.property.post\"}",
            co2_concentration, concentration);
   pubmessage.qos = QOS0;
   pubmessage.payload = payload_buffer;
   pubmessage.payloadlen = strlen(payload_buffer);
   ret = MQTTPublish(&c, (char *)&(mqtt_params.pubtopic),
                     &pubmessage); /* Publish message */
   if (ret != SUCCESSS) {
     run_status = ERR;
   } else {
     printf("publish:%s,%s\r\n\r\n", mqtt_params.pubtopic, payload_buffer);
     run_status = KEEPALIVE;
   }
   break;
 }
After completing these two steps, you can successfully connect to Alibaba Cloud and upload data to it.
The sensors used for data collection are the JW01-CO2 sensor and the DC01 infrared PM2.5 sensor. Both sensors communicate via serial ports. After initializing the serial port, the sensors automatically transmit collected data via the serial port every second. The DC01 infrared PM2.5 sensor is connected via serial port 2, and the JW01-CO2 sensor is connected via serial port 3.
Initialize serial port 2 and serial port 3
// Serial port 2 initialization function
void pm25_usart2_init(uint32_t baudrate)
{
   GPIO_InitTypeDef  GPIO_InitStructure;
   USART_InitTypeDef USART_InitStructure;
   NVIC_InitTypeDef  NVIC_InitStructure;
   // Enable clock
   RCC_APB2PeriphClockCmd(RCC_APB2Periph_GPIOA, ENABLE);
   RCC_APB1PeriphClockCmd(RCC_APB1Periph_USART2, ENABLE);
   // Configure TX pin (PA0)
   GPIO_InitStructure.GPIO_Pin   = GPIO_Pin_0;
   GPIO_InitStructure.GPIO_Speed = GPIO_Speed_50MHz;
   GPIO_InitStructure.GPIO_Mode  = GPIO_Mode_AF_PP;
   GPIO_Init(GPIOA, &GPIO_InitStructure);
   // Configure RX pin (PA3)
   GPIO_InitStructure.GPIO_Pin  = GPIO_Pin_3;
   GPIO_InitStructure.GPIO_Mode = GPIO_Mode_IN_FLOATING;
   GPIO_Init(GPIOA, &GPIO_InitStructure);
   // Configure serial port parameters
   USART_InitStructure.USART_BaudRate            = baudrate;
   USART_InitStructure.USART_WordLength          = USART_WordLength_8b;
   USART_InitStructure.USART_StopBits            = USART_StopBits_1;
   USART_InitStructure.USART_Parity              = USART_Parity_No;
   USART_InitStructure.USART_HardwareFlowControl = USART_HardwareFlowControl_None;
   USART_InitStructure.USART_Mode                = USART_Mode_Rx | USART_Mode_Tx;
   USART_Init(USART2, &USART_InitStructure);

   // Enable receive interrupt
   USART_ITConfig(USART2, USART_IT_RXNE, ENABLE);

   // Configuring NVIC
   NVIC_InitStructure.NVIC_IRQChannel = USART2_IRQn;
   NVIC_InitStructure.NVIC_IRQChannelPreemptionPriority = 1;
   NVIC_InitStructure.NVIC_IRQChannelSubPriority = 1;
   NVIC_InitStructure.NVIC_IRQChannelCmd = ENABLE;
   NVIC_Init(&NVIC_InitStructure);

   // Enable the serial port
   USART_Cmd(USART2, ENABLE);
}

// Serial port 3 initialization
void co2_usart3_init(uint32_t baudrate)
{
   GPIO_InitTypeDef GPIO_InitStructure;
   USART_InitTypeDef USART_InitStructure;
   NVIC_InitTypeDef NVIC_InitStructure;
   // Enable clock
   RCC_APB2PeriphClockCmd(RCC_APB2Periph_GPIOB, ENABLE);
   RCC_APB1PeriphClockCmd(RCC_APB1Periph_USART3, ENABLE);
   // Configure USART3 TX (PB10) as multiplexed push-pull output
   GPIO_InitStructure.GPIO_Pin = GPIO_Pin_10;
   GPIO_InitStructure.GPIO_Speed = GPIO_Speed_50MHz;
   GPIO_InitStructure.GPIO_Mode = GPIO_Mode_AF_PP;
   GPIO_Init(GPIOB, &GPIO_InitStructure);
   // Configure USART3 RX (PB11) as floating input
   GPIO_InitStructure.GPIO_Pin = GPIO_Pin_11;
   GPIO_InitStructure.GPIO_Mode = GPIO_Mode_IN_FLOATING;
   GPIO_Init(GPIOB, &GPIO_InitStructure);
   // USART parameter configuration
   USART_InitStructure.USART_BaudRate = baudrate;
   USART_InitStructure.USART_WordLength = USART_WordLength_8b;
   USART_InitStructure.USART_StopBits = USART_StopBits_1;
   USART_InitStructure.USART_Parity = USART_Parity_No;
   USART_InitStructure.USART_HardwareFlowControl = USART_HardwareFlowControl_None;
   USART_InitStructure.USART_Mode = USART_Mode_Rx | USART_Mode_Tx;
   USART_Init(USART3, &USART_InitStructure);
   // Enable receive interrupt
   USART_ITConfig(USART3, USART_IT_RXNE, ENABLE);
   // Configure USART3 interrupt
   NVIC_InitStructure.NVIC_IRQChannel = USART3_IRQn;
   NVIC_InitStructure.NVIC_IRQChannelPreemptionPriority = 2; // 优先级低于串口2
   NVIC_InitStructure.NVIC_IRQChannelSubPriority = 1;
   NVIC_InitStructure.NVIC_IRQChannelCmd = ENABLE;
   NVIC_Init(&NVIC_InitStructure);
   // Enable the serial port
   USART_Cmd(USART3, ENABLE);
}
After initialization is completed, the PM2.5 concentration and carbon dioxide concentration are calculated by parsing the data format.
//Analyze and calculate PM2.5 concentration
void pm25_data_process_usart2(void)
{
// Calculate the checksum: the sum of the lower 7 bits of the first three bytes
uint8_t calculated_checksum = (rx_buffer[0] & 0x7F) +
(rx_buffer[1] & 0x7F) +
(rx_buffer[2] & 0x7F);
calculated_checksum &= 0x7F; // Keep the lower 7 bits
// Get the received check digit (fourth byte)
uint8_t received_checksum = rx_buffer[3] & 0x7F;
// Calibration Check
if (calculated_checksum != received_checksum)
{
checksum_error = 1;
return; // Verification failed, discarding data
}
checksum_error = 0;
// Calculate concentration value
// Concentration value = (DATAH[6:0] << 7) | DATAL[6:0]
g_pm25_concentration = ((rx_buffer[1] & 0x7F) << 7) | (rx_buffer[2] & 0x7F);
}
//Analytical calculation of CO2 concentration
void co2_usart3_init(uint32_t baudrate) {
GPIO_InitTypeDef GPIO_InitStructure;
USART_InitTypeDef USART_InitStructure;
NVIC_InitTypeDef NVIC_InitStructure;
// Enable clock
RCC_APB2PeriphClockCmd(RCC_APB2Periph_GPIOB,ENABLE);
RCC_APB1PeriphClockCmd(RCC_APB1Periph_USART3, ENABLE);
// Configure USART3 TX (PB10) as multiplexed push-pull output
GPIO_InitStructure.GPIO_Pin = GPIO_Pin_10;
GPIO_InitStructure.GPIO_Speed = GPIO_Speed_50MHz;
GPIO_InitStructure.GPIO_Mode = GPIO_Mode_AF_PP;
GPIO_Init(GPIOB, &GPIO_InitStructure);
// Configure USART3 RX (PB11) as floating input
GPIO_InitStructure.GPIO_Pin = GPIO_Pin_11;
GPIO_InitStructure.GPIO_Mode = GPIO_Mode_IN_FLOATING;
GPIO_Init(GPIOB, &GPIO_InitStructure);
// USART parameter configuration
USART_InitStructure.USART_BaudRate = baudrate;
USART_InitStructure.USART_WordLength = USART_WordLength_8b;
USART_InitStructure.USART_StopBits = USART_StopBits_1;
USART_InitStructure.USART_Parity = USART_Parity_No;
USART_InitStructure.USART_HardwareFlowControl =
USART_HardwareFlowControl_None;
USART_InitStructure.USART_Mode = USART_Mode_Rx | USART_Mode_Tx;
USART_Init(USART3, &USART_InitStructure);
// Enable receive interrupt
USART_ITConfig(USART3, USART_IT_RXNE, ENABLE);
// Configure USART3 interrupt
NVIC_InitStructure.NVIC_IRQChannel = USART3_IRQn;
NVIC_InitStructure.NVIC_IRQChannelPreemptionPriority = 2; // 优先级低于串口2
NVIC_InitStructure.NVIC_IRQChannelSubPriority = 1;
NVIC_InitStructure.NVIC_IRQChannelCmd = ENABLE;
NVIC_Init(&NVIC_InitStructure);
// Enable the serial port
USART_Cmd(USART3, ENABLE);
}
In this way, we obtain the ambient air quality data, and then create a web page to display the PM2.5 concentration and CO2 concentration, refreshing it every five seconds.
int32_t loopback_tcps(uint8_t sn, uint8_t *buf, uint16_t port) {
 int32_t ret;
 uint16_t size = 0, sentsize = 0;
 switch (getSn_SR(sn)) {
 case SOCK_ESTABLISHED:
   if (getSn_IR(sn) & Sn_IR_CON) {
     setSn_IR(sn, Sn_IR_CON);
   }
   if ((size = getSn_RX_RSR(sn)) >
       0) // Don't need to check SOCKERR_BUSY because it doesn't not occur.
   {
     if (size > DATA_BUF_SIZE)
       size = DATA_BUF_SIZE;
     ret = recv(sn, buf, size);
     if (ret <= 0)
       return ret; // check SOCKERR_BUSY & SOCKERR_XXX. For showing the
                   // occurrence of SOCKERR_BUSY.
     size = (uint16_t)ret;
     sentsize = 0;
     buf[size] = 0x00;
     printf("rece data:%s\r\n", buf);
     HttpRequestLine req_line;
     if (parse_request_line((char *)buf, &req_line) == 0) {
       printf("Method: %s\n", req_line.method);   // 输出: GET
       printf("URI: %s\n", req_line.uri);         // 输出: /
       printf("Version: %s\n", req_line.version); // 输出: HTTP/1.1
       if (strcmp(req_line.method, "GET") == 0 &&
           strcmp(req_line.uri, "/") == 0) {
         char html_buffer[2048]; // 确保缓冲区足够大
         snprintf(html_buffer, sizeof(html_buffer), index_page,
                  g_co2_concentration, g_pm25_concentration);
         uint16_t content_len = strlen(html_buffer);
         sentsize = 0;
         while (content_len != sentsize) {
           ret = send(sn, (uint8_t *)html_buffer + sentsize,
                      content_len - sentsize);
           if (ret < 0) {
             close(sn);
             return ret;
           }
           sentsize += ret;
         }
         disconnect(sn);
         close(sn);
       } else if (strcmp(req_line.method, "GET") == 0 &&
                  strcmp(req_line.uri, "/api/sensor") == 0) {
         char sensor_data[64];
         sprintf(sensor_data, "{\"pm25\":%u,\"co2\":%u}", g_co2_concentration,
                 g_pm25_concentration);
         char response[128];
         sprintf(response,
                 "HTTP/1.1 200 OK\r\n"
                 "Content-Type: application/json\r\n"
                 "Connection: close\r\n"
                 "\r\n"
                 "%s",
                 sensor_data);
         send(sn, (uint8_t *)response, strlen(response));
         disconnect(sn);
         close(sn);
       } else {
         send(sn, (uint8_t *)HTTP_RESPONSE_404, strlen(HTTP_RESPONSE_404));
         disconnect(sn);
         close(sn);
       }
     }
     else {
       printf("Parsing failed!\n");
     }
   }
   break;
 case SOCK_CLOSE_WAIT:
   if ((ret = disconnect(sn)) != SOCK_OK)
     return ret;
   break;
 case SOCK_INIT:
   if ((ret = listen(sn)) != SOCK_OK)
     return ret;
   break;
 case SOCK_CLOSED:
   if ((ret = socket(sn, Sn_MR_TCP, port, 0x00)) != sn)
     return ret;
   break;
 default:
   break;
 }
 return 1;
}
Finally add initialization in the main function and add the function in the while function
pm25_usart2_init(9600);
   co2_usart3_init(9600);
   while (1) {
   do_mqtt();
   pm25_data_process_usart2();
   co2_data_process_usart3();
   loopback_tcps(1, ethernet_buf, 80);
   }
5 Functional Verification
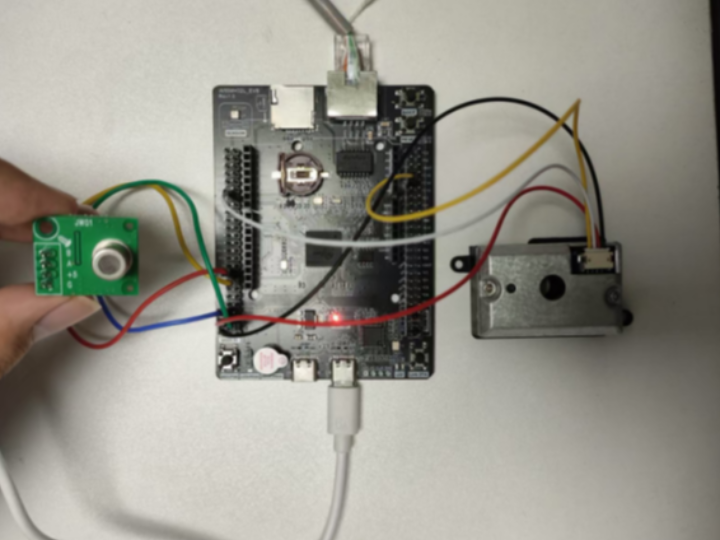
The program has been burned and the hardware connections are complete, as shown in the figure below:
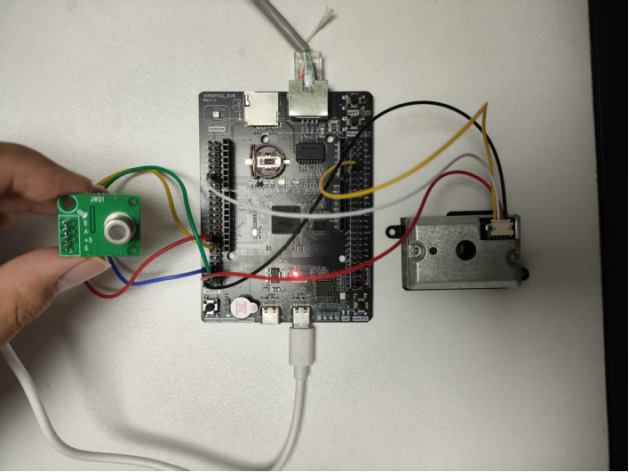
After the hardware connections are complete, power on and the serial port assistant will print the following information:
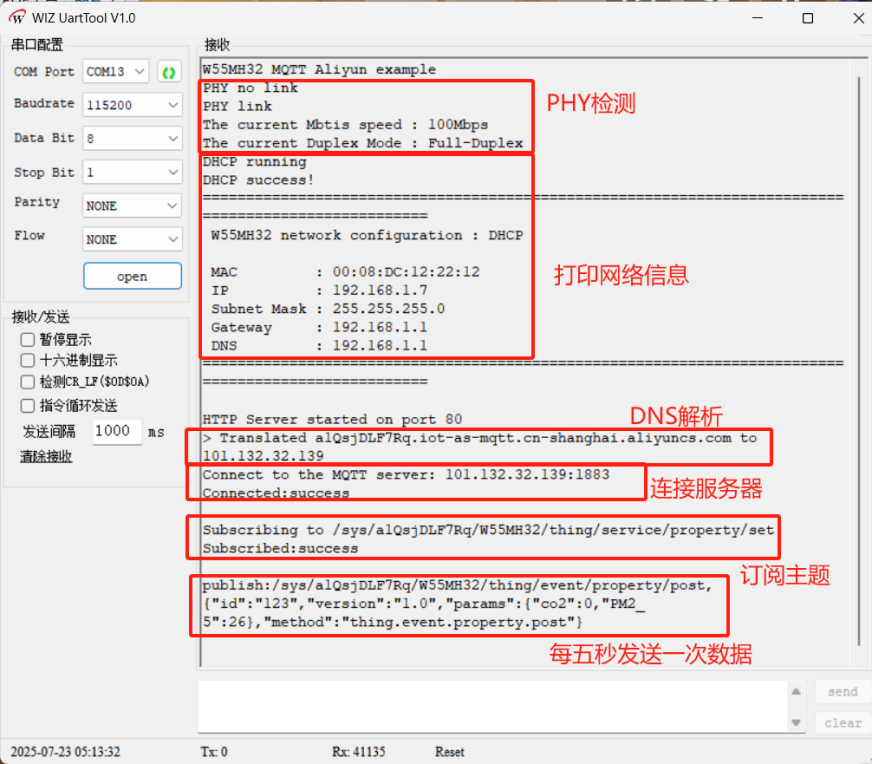
The CO2 sensor requires a warm-up period of 5-10 minutes before testing. After warm-up, it can measure the CO2 and PM2.5 concentrations in the ambient air and upload them to the Alibaba Cloud server and a local webpage, refreshing every five seconds.
6 Summary
This project successfully implemented ambient air quality monitoring by integrating hardware resources, communication protocols, and cloud platform capabilities, validating the practicality of the W55MH32 in the IoT. Thank you for your patience in reading! If you have any questions or would like to learn more about this product and its applications, please feel free to leave a message via private message or in the comments section. We will respond as soon as possible and provide more detailed answers and assistance!
————————————————
Copyright Notice: This article is original and licensed under the CC 4.0 BY-SA license. Please include the original link and this notice when reposting.
Original link: https://blog.csdn.net/weixin_63332238/article/details/150056745