3. W5100S/W5500+RP2040 Raspberry Pi Pico<TCP Client Data Loopback Test>
3. W5100S/W5500+RP2040 Raspberry Pi Pico<TCP Client Data Loopback Test>
0

Components
Hardware components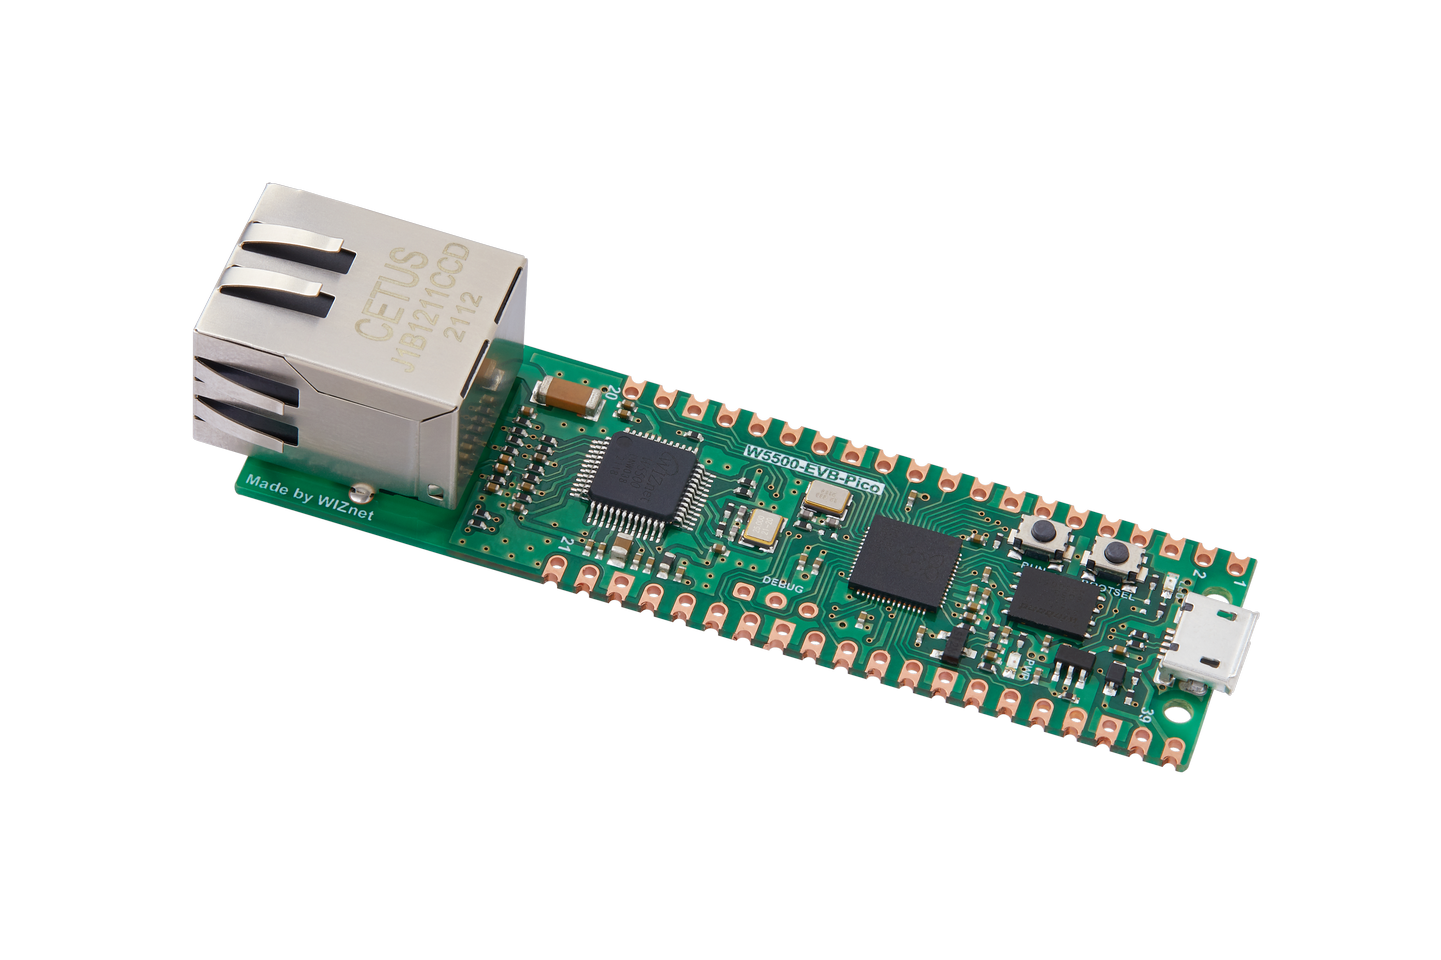
WIZnet - W5500-EVB-Pico
x 1

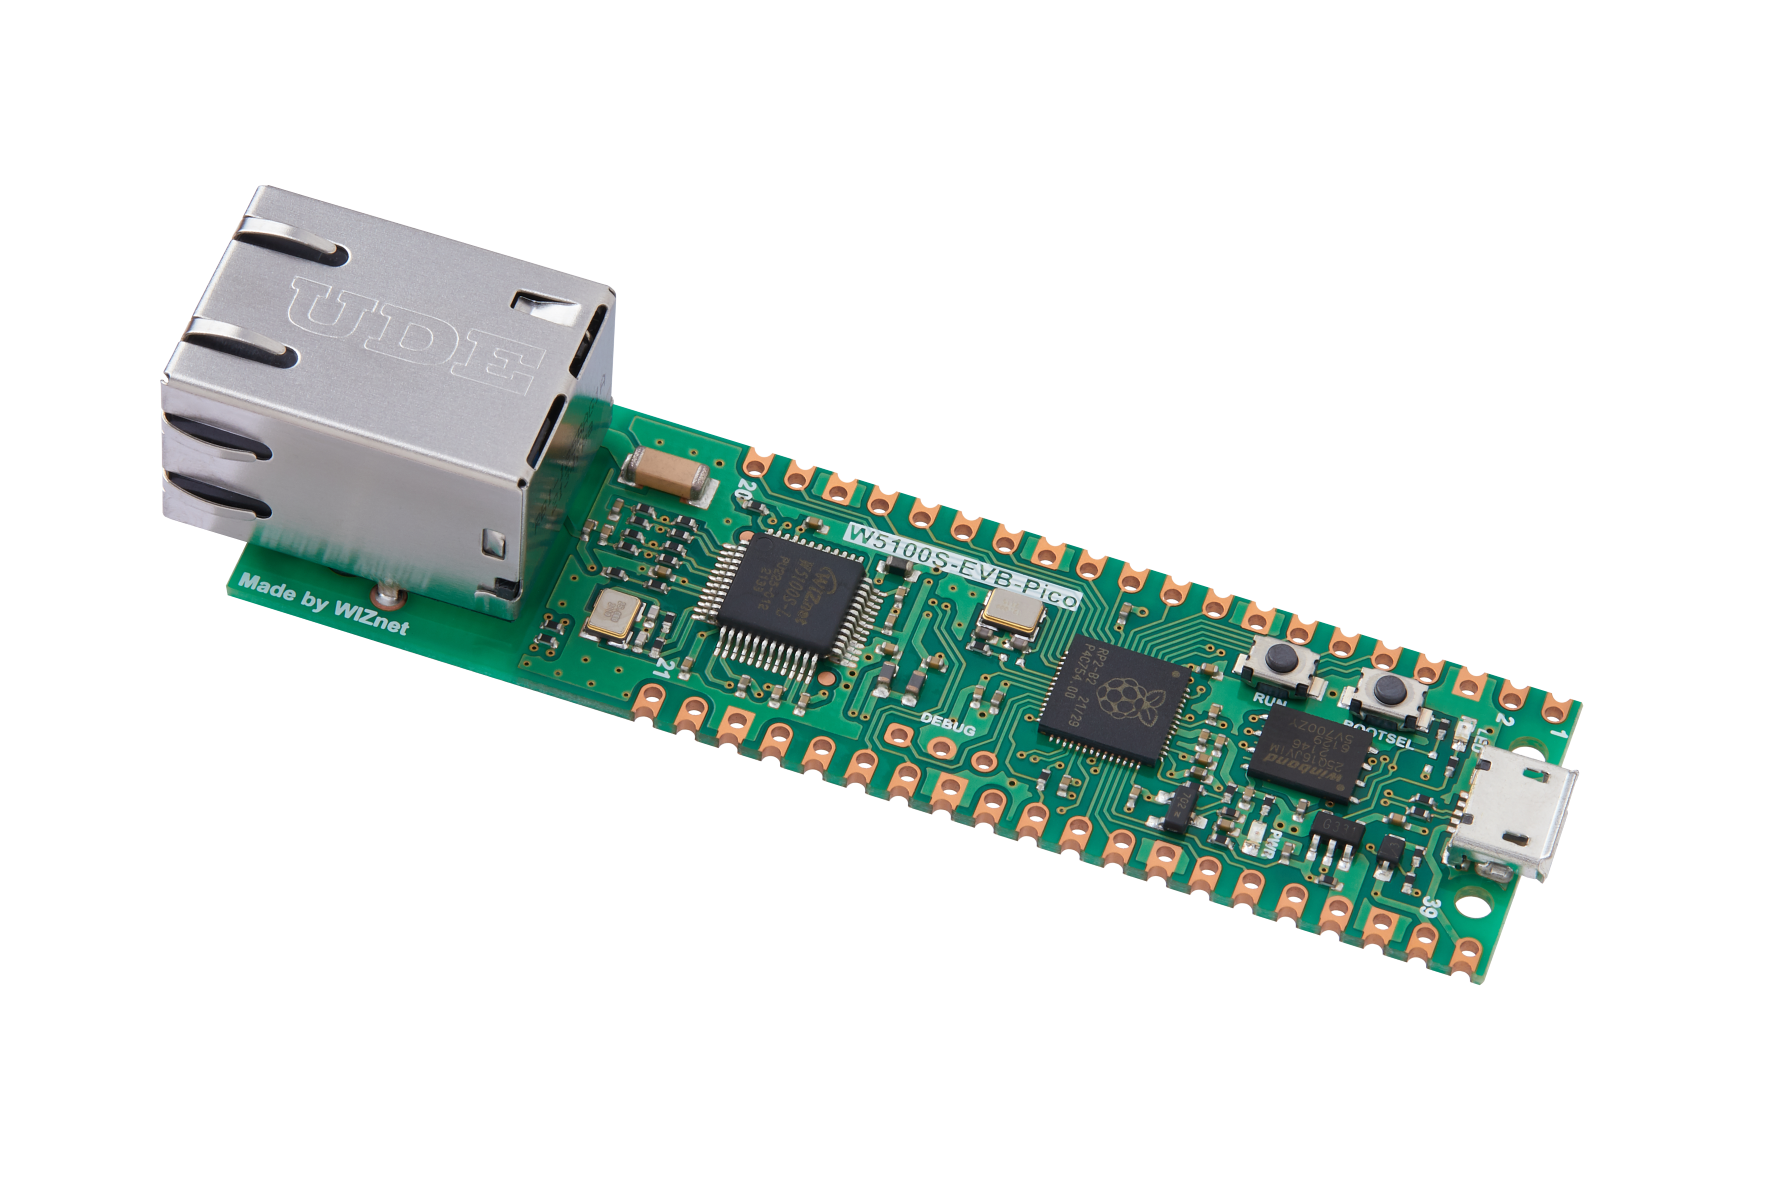
WIZnet - W5100S-EVB-Pico
x 1
Project description
1 Introduction
In today's computer network environment, TCP (Transmission Control Protocol) is a very important communication protocol. TCP provides a reliable, orderly and error-controlled data transmission method and is widely used in various network applications. In TCP communication, TCP Client is the role of the client, which is responsible for establishing connections, sending data, and receiving data.
This article takes TCP Client as the core and allows the device to perform data loopback testing in TCP Client mode.
W5100S/W5500 is an embedded Ethernet controller integrating a full hardware TCP/IP protocol stack. It is also an industrial-grade Ethernet control chip. Using the W5100S/W5500 in Ethernet applications makes it easier for users to connect and communicate remotely between devices.
2. Introduction to the protocol
2.1 Brief description
TCP (Transmission Control Protocol) is a connection-oriented, reliable, byte stream-based transmission protocol used to transmit data on computer networks. TCP Client refers to the client connection of TCP network service, which actively initiates a connection request to the server and establishes a connection. It is used to realize the interaction of serial port data and server data to ensure reliable exchange of data. TCP Clent is usually used for data interaction between devices and servers and is the most commonly used networking communication method. The main function of TCP Client is to establish and manage the connection with the TCP server to achieve reliable transmission of data. Through TCP Client, the device can send data to and receive data from the server, thereby realizing data interaction between the device and the server. In TCP Client, the client program needs to specify the IP address and port number of the server, and use the TCP protocol to establish a connection with the server. Once the connection is successfully established, the client program can interact with the server through the data stream object (NetworkStream). Hence, TCP Client can help devices achieve reliable data exchange with servers and is one of the important ways for devices to communicate on the Internet. TCP Client is widely used in industrial automation, Internet of Things, smart home and other applications.
2.2 Advantages
Reliability: During the data transmission process, TCP Client ensures the accuracy and integrity of data through the confirmation mechanism, retransmission mechanism, congestion control mechanism, etc. of the TCP protocol to avoid data loss or disorder.
Stability: When establishing a connection, TCP Client needs to go through a three-way handshake process to ensure the stability and reliability of the connection. After the data transfer is completed, the connection is also disconnected to save system resources.
Efficiency: TCP's full-duplex transmission mode enables TCP Client to have high data transmission efficiency.
Orderly: TCP's byte stream transmission method can ensure the order and integrity of data.
Application friendliness: The TCP Client class provides simpler and more friendly interfaces for application layer protocols such as FTP and HTTP, reducing the cost of application layer protocol development and maintenance.
2.3 Application
Network database connection: Many database systems, such as MySQL and PostgreSQL, support the use of TCP connections to receive client connection requests and process data requests.
Remote Desktop Connection: Use a TCP connection to remotely control the desktop of another computer or perform network browsing through the operation of another computer, etc. For example, protocols such as RDP, VNC, and SSH are all examples of using TCP connections for remote control and operation.
File transfer: Many file transfer protocols such as FTP and TFTP use TCP connections to transfer files.
Mail Server: Email protocols such as SMTP, POP, and IMAP all use TCP connections to send and receive email.
Online games: Many online games use TCP connections to transmit game data and control instructions to achieve real-time interaction and synchronization.
Instant Messaging: Many instant messaging applications use TCP connections to transmit audio, video, and text messages.
E-commerce: TCP can also be used in e-commerce applications, such as handling user logins, payments, and shopping carts.
3. WIZnet Ethernet chip
WIZnet mainstream hardware protocol stack Ethernet chip parameter comparison
| Model | Embedded Core | Host I/F | TX/RX Buffer | HW Socket | Network Performance |
|---|---|---|---|---|---|
| W5100S | TCP/IPv4, MAC & PHY | 8bit BUS, SPI | 16KB | 4 | Max.25Mbps |
| W6100 | TCP/IPv4/IPv6, MAC & PHY | 8bit BUS, Fast SPI | 32KB | 8 | Max.25Mbps |
| W5500 | TCP/IPv4, MAC & PHY | Fast SPI | 32KB | 8 | Max 15Mbps |
W5100S/W6100 supports 8-bit data bus interface, and the network transmission speed will be better than W5500.
W6100 supports IPV6 and is compatible with W5100S hardware. If users who already use W5100S need to support IPv6, they can be Pin to Pin compatible.
W5500 has more Sockets and send and receive buffers than W5100S.
4. TCP Client data loopback test
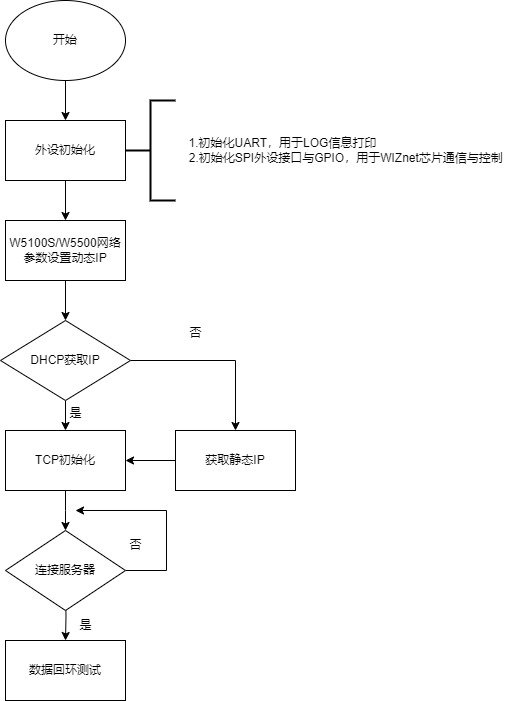
4.1 Program flow chart
4.2 Test preparation
Software:
Visual Studio Code
WIZnet UartTool
SocketTester
Translation results
Translation result
W5100SIO module + RP2040 Raspberry Pi Pico development board or WIZnet W5100S-EVB-Pico development board
Micro USB interface data cable
TTL to USB
cable
4.3 Connection method
Connect the USB port of the PC through the data cable (mainly used for burning programs, but can also be used as a virtual serial port)
Convert TTL serial port to USB and connect the default pin of UART0:
RP2040 GPIO0 (UART0 TX) <----> USB_TTL_RX
RP2040 GPIO1 (UART0 RX) <----> USB_TTL_TX
When using the module to connect RP2040 for wiring
RP2040 GPIO16 <----> W5100S MISO
RP2040 GPIO17 <----> W5100S CS
RP2040 GPIO18 <----> W5100S SCK
RP2040 GPIO19 <----> W5100S MOSI
RP2040 GPIO20 <----> W5100S RST
Directly connect to the PC network port through a network cable (or: both the PC and the device are connected to the switch or router LAN port through a network cable)
4.4 Related code
We directly open the tcp_client.c file (path: examples/tcp_client/tcp_client.c) to see the specific implementation:
You can see that the network information is configured in DHCP mode. Therefore, after the master control and W5100S are initialized, DHCP initialization will be performed, and then a timer initialization will be added to time the DHCP process for timeout processing; then enter DHCP configures network information. If it succeeds, it will directly enter the loop to call the loopback test function. If it fails, it will use the static network information we initialized to configure, and then enter the loop to call the loopback test function, as shown below:
/* Network information to be configured. */
wiz_NetInfo net_info = {
.mac = {0x00, 0x08, 0xdc, 0x1e, 0xed, 0x2e}, // Configured MAC address
.ip = {192, 168, 1, 10}, // Configured IP address
.sn = {255, 255, 255, 0}, // Configured subnet mask
.gw = {192, 168, 1, 1}, // Configured gateway
.dns = {8, 8, 8, 8}, // Configured domain address
.dhcp = NETINFO_DHCP}; // Configured dhcp model,NETINFO_DHCP:use dhcp; NETINFO_STATIC: use static ip.
wiz_NetInfo get_info;
static uint8_t ethernet_buf[ETHERNET_BUF_MAX_SIZE] = {
0,
}; // Send and receive cache
static uint8_t des_ip[4] = {192, 168, 1, 2}; // Server IP address
static uint16_t des_port = 8080; // Server port
static uint16_t local_port = 8000; // Local port
static uint8_t dhcp_get_ip_flag = 0; // Define the DHCP acquisition flag
int main()
{
struct repeating_timer timer; // Define the timer structure
/* MCU init */
stdio_init_all(); // Initialize the main control peripheral
wizchip_initialize(); // Initialize the chip interface
/*dhcp init*/
DHCP_init(SOCKET_ID, ethernet_buf); // DHCP initialization
add_repeating_timer_ms(1000, repeating_timer_callback, NULL, &timer); // Add DHCP 1s Tick Timer handler
printf("wiznet chip tcp client example.\r\n");
network_init(&net_info); // Configuring Network Information
print_network_information(&get_info); // Read back the configuration information and print it
while (true)
{
loopback_tcpc(SOCKET_ID, ethernet_buf, des_ip, des_port, local_port); // tcp client data loop test
}
}Jump into the loopback test to see its specific implementation: This function has these parameters, socket port number, data sending and receiving cache, target IP address, and target port; you can fill in the parameters as needed. The whole process polls the socket status through a switch state machine, performs corresponding processing according to the difference, and sequentially completes the operations of initialization, opening the port, connecting to the server, and sending back the data after receiving the data; the local port is initialized directly within the function. As follows:
/**
* @brief tcp client loopback test
* @param sn: socket number
* @param buf: Data sending and receiving cache
* @param destip: Destination IP address
* @param destport: Destination port
* @return value for SOCK_ERRORs,return 1:no error
*/
int32_t loopback_tcpc(uint8_t sn, uint8_t* buf, uint8_t* destip, uint16_t destport)
{
int32_t ret; // return value for SOCK_ERRORs
uint16_t size = 0, sentsize=0;
// Destination (TCP Server) IP info (will be connected)
// >> loopback_tcpc() function parameter
// >> Ex)
// uint8_t destip[4] = {192, 168, 0, 214};
// uint16_t destport = 5000;
// Port number for TCP client (will be increased)
uint16_t any_port = 50000;
// Socket Status Transitions
// Check the W5500 Socket n status register (Sn_SR, The 'Sn_SR' controlled by Sn_CR command or Packet send/recv status)
switch(getSn_SR(sn))
{
case SOCK_ESTABLISHED :
if(getSn_IR(sn) & Sn_IR_CON) // Socket n interrupt register mask; TCP CON interrupt = connection with peer is successful
{
#ifdef _LOOPBACK_DEBUG_
printf("%d:Connected to - %d.%d.%d.%d : %d\r\n",sn, destip[0], destip[1], destip[2], destip[3], destport);
#endif
setSn_IR(sn, Sn_IR_CON); // this interrupt should be write the bit cleared to '1'
}
//////////////////////////////////////////////////////////////////////////////////////////////
// Data Transaction Parts; Handle the [data receive and send] process
//////////////////////////////////////////////////////////////////////////////////////////////
if((size = getSn_RX_RSR(sn)) > 0) // Sn_RX_RSR: Socket n Received Size Register, Receiving data length
{
if(size > DATA_BUF_SIZE) size = DATA_BUF_SIZE; // DATA_BUF_SIZE means user defined buffer size (array)
ret = recv(sn, buf, size); // Data Receive process (H/W Rx socket buffer -> User's buffer)
buf[ret]=0x00; // Add a string terminator
printf("recv: %s\n",buf); // print the receive data
if(ret <= 0) return ret; // If the received data length <= 0, receive failed and process end
size = (uint16_t) ret;
sentsize = 0;
// Data sentsize control
while(size != sentsize)
{
ret = send(sn, buf+sentsize, size-sentsize); // Data send process (User's buffer -> Destination through H/W Tx socket buffer)
if(ret < 0) // Send Error occurred (sent data length < 0)
{
close(sn); // socket close
return ret;
}
sentsize += ret; // Don't care SOCKERR_BUSY, because it is zero.
}
}
//////////////////////////////////////////////////////////////////////////////////////////////
break;
case SOCK_CLOSE_WAIT :
#ifdef _LOOPBACK_DEBUG_
//printf("%d:CloseWait\r\n",sn);
#endif
if((ret=disconnect(sn)) != SOCK_OK) return ret;
#ifdef _LOOPBACK_DEBUG_
printf("%d:Socket Closed\r\n", sn);
#endif
break;
case SOCK_INIT :
#ifdef _LOOPBACK_DEBUG_
printf("%d:Try to connect to the %d.%d.%d.%d : %d\r\n", sn, destip[0], destip[1], destip[2], destip[3], destport);
#endif
if( (ret = connect(sn, destip, destport)) != SOCK_OK) return ret; // Try to TCP connect to the TCP server (destination)
break;
case SOCK_CLOSED:
close(sn);
if((ret=socket(sn, Sn_MR_TCP, any_port++, 0x00)) != sn){
if(any_port == 0xffff) any_port = 50000;
return ret; // TCP socket open with 'any_port' port number
}
#ifdef _LOOPBACK_DEBUG_
//printf("%d:TCP client loopback start\r\n",sn);
//printf("%d:Socket opened\r\n",sn);
#endif
break;
default:
break;
}
return 1;
}4.5 Test phenomena
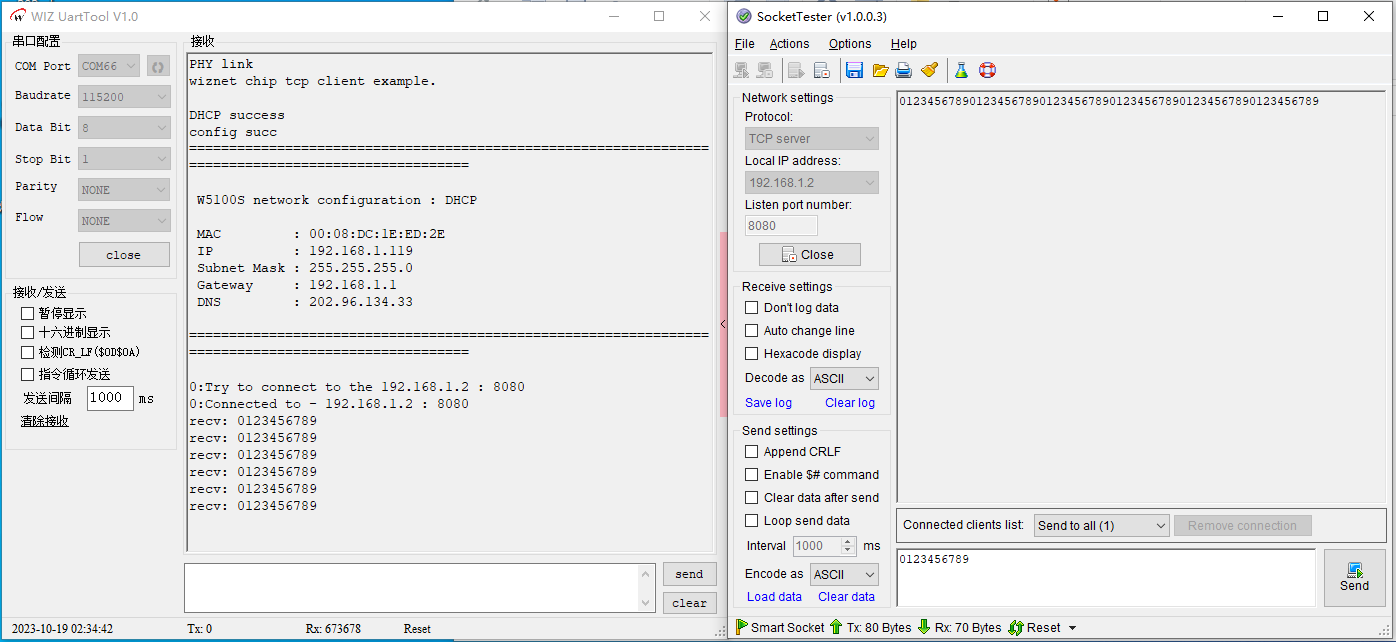
After the hardware connection is correct, compile the burning program (for details, please refer to Chapter 1), open WIZ UartTool, select the corresponding COM port, and fill in the parameters: baud rate 115200, 8 data bits, 1 stop bit, no correction Verification, no flow control, click open after filling in the parameters, observe the information printed on the serial port to obtain the device running status; open SocketTester, fill in the corresponding parameters in the left column, select TCP server mode, the local IP and listening port are based on Fill in the information printed by the serial port. After completion, click Listen to monitor. After the connection is successful, send the data to observe the phenomenon; you can see that the data is successfully sent and returned successfully, as shown in the following figure:
5. Precautions
Don't confuse server IP and client IP.
Do not suddenly disconnect the network cable during the interaction after connection, causing a false link.
If we want to use WIZnet's W5500 to implement the example in this chapter, we only need to modify two places:
Find the wizchip_conf.h header file under library/ioLibrary_Driver/Ethernet/ and modify the WIZCHIP macro definition to W5500.
Find the CMakeLists.txt file under the library and set COMPILE_SEL to ON. OFF is W5100S and ON is W5500.


