
Spresense-Arduinoで堅牢な有線通信!W5500イーサネットモジュールを使ったIoT入門🌐
Spresense + WIZnet W5500 wired Ethernet web server tutorial: SPI wiring, Ethernet2 setup, CS/RST, init order, and troubleshooting for reliable bring-up.
Access check (required)
The URL https://www.culture-book-club.com/202509/article_202509190425.html was not reliably accessible from my execution environment (page fetch failed).
However, you provided screenshots + the article text, so I verified the content from your materials and wrote the curation based on that scope.
Because CodeFun’s policy states the site content is copyrighted and copying is prohibited, this curation is written as analysis + summarized guidance, not a reproduction of the original text/code.
Title
Getting “Wired IoT” working on Spresense-Arduino: WIZnet W5500 (SPI) + Ethernet2 to bring up a minimal HTTP Web Server (wiring, library setup, example pitfalls, troubleshooting)
Introduction
This project is a curated, engineer-oriented walkthrough of a CodeFun tutorial posted by Kousukei: “Spresense-Arduinoで堅牢な有線通信!W5500イーサネットモジュールを使ったIoT入門🌐” (published/updated 2025-09-19). The tutorial shows how to connect a WIZnet W5500 Ethernet module to a Sony Spresense board over SPI, configure the Ethernet2 library in Arduino IDE, and bring up a simple HTTP server you can reach from a browser on the same LAN.
What makes the original post practical is that it doesn’t stop at “it should work”—it explicitly covers the failure points that usually waste time: correct SPI wiring, CS/RST pin mapping, init order, MAC/IP conflicts, and step-by-step troubleshooting when ping or HTTP fails.
Note: To respect CodeFun’s copyright policy, I’m intentionally not copying the article’s full text or code verbatim. Instead, I’m presenting the underlying mechanism and the “what to change / what to check” logic so engineers can reproduce the outcome while using the original article as the canonical reference.
Overview
The content effectively answers three questions:
Why choose Ethernet instead of Wi-Fi for IoT?
It frames wired LAN as a strong choice when you care about stability, security, and predictable latency—especially in environments where RF interference, congestion, or security policy makes Wi-Fi a liability.
How do you physically add Ethernet to Spresense with W5500?
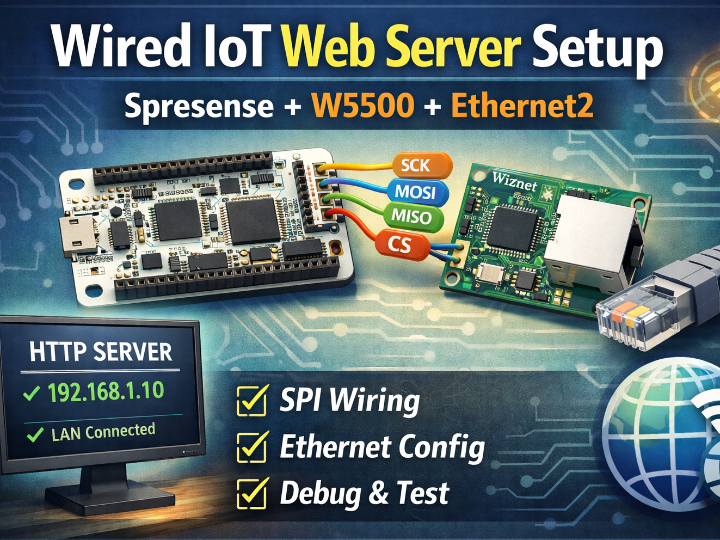
W5500 is connected via SPI (SCK/MISO/MOSI plus CS, optional RST). The tutorial emphasizes that CS and RST can be assigned to different digital pins, but the firmware must match your wiring exactly—this is a common source of “nothing works” failures.
How do you get a web server running in Arduino IDE—reliably?
It uses Ethernet2 (rather than the standard Ethernet library) and modifies the WebServer example with attention to the real gotchas: CS pin registration before Ethernet init, careful MAC/IP assignment, and creating the server object after the Ethernet stack is initialized to avoid subtle startup issues.
Quick background
Why Spresense + W5500 is a meaningful combo
Spresense is often used for feature-rich edge applications (sensing, audio, GNSS, camera, etc.), but connectivity choice can constrain real deployments. If your IoT node needs to live in a place where Wi-Fi is unreliable or regulated, adding Ethernet makes the node more “field-friendly.”
Where W5500 fits in the architecture
In this project, the WIZnet W5500 is the Ethernet interface that bridges the LAN to the MCU:
PC browser → LAN (router/switch) → W5500 (RJ45)
W5500 ↔ SPI ↔ Spresense (HTTP server sketch)
Spresense generates the HTTP response → SPI → W5500 → LAN → browser
What “Web Server” means here (realistically)
This is the smallest viable HTTP server: listen on port 80, accept a client, parse/ignore headers, and return a simple HTML page (plus a basic runtime signal like uptime). That “tiny success unit” is important—once it works, you can grow it into sensor dashboards, JSON endpoints, MQTT bridges, etc.
“It’s also worth noting that W5500 support is available in the Spresense SDK ecosystem, which lowers the integration risk and improves reproducibility for Spresense-based Ethernet projects.
URL: https://maker.wiznet.io/matthew/projects/spresense%2Dsdk/
Author & Community (who wrote it, how it spreads)
About the author (within verified scope)
The article is shown as “Posted by Kousukei.”
From the site’s policy text you shared, the site lists a representative name “Kosukei” but does not publish direct contact information (“please inquire”).
Since there’s no verified public profile data in the materials provided, I’m not inferring identity beyond what the site itself states.
What kind of content creator this is
The tutorial is clearly structured as an educational, field-oriented guide: target reader → prerequisites → rationale → step-by-step build → common failure modes → fixes → summary + next steps. That’s the shape of a “reference post” meant to be returned to when something breaks.
Where the impact tends to come from (qualitative)
Even without view/like numbers, this type of post typically spreads through:
Search-driven troubleshooting (“Spresense W5500 Ethernet2 ping fails”, “CS pin mismatch”, “IP conflict”)
Hands-on hardware communities (Spresense users, Arduino Ethernet users, W5500 module users)
Internal lab notes / training materials, because it’s procedural and includes debugging logic—not just theory.
Architecture & Data Flow (mechanism-first)
1) Hardware wiring model
The tutorial treats W5500 as an SPI Ethernet module, wired to the Spresense extension board pins:
Power: use 3.3V to match Spresense logic levels (even if some W5500 modules can also run on 5V)
SPI signals: SCK, MISO, MOSI wired to the appropriate Spresense SPI pins
CS (Chip Select): can be any digital pin, but your code must match
RST (Reset): optional (some modules expose it; if used, firmware can reset the module programmatically)
Then connect the module’s RJ45 to a router/switch with a LAN cable.
2) Arduino IDE software stack
Install the Spresense board package (via the board manager URL shown in the article)
Install Ethernet2 via the Arduino Library Manager (the tutorial specifically calls this out for W5500)
3) Initialization and runtime flow (key engineering points)
The article’s “high-success” sequence can be summarized as:
Pin definitions must match wiring (CS/RST in particular)
Assign CS pin to the Ethernet stack before initialization
Bring up Ethernet with either:
fixed IP (recommended outside the router’s DHCP pool), or
DHCP + fallback to fixed IP on failure
MAC address must be unique on your LAN (don’t blindly reuse sample MACs in multi-device setups)
Create/start the HTTP server after the Ethernet stack is initialized, to avoid ordering issues that can cause the server to be “up” before the interface is actually usable
4) HTTP request/response data path
Wait for an incoming client
Read the request (or consume headers)
Return a minimal HTTP 200 response with HTML
Close the connection cleanly
WIZnet / Ethernet Section
WIZnet’s role here is direct and central:
W5500 is the Ethernet hardware that gives Spresense a wired network interface over SPI
The tutorial uses Ethernet2 to operate the W5500 (chip select handling, IP configuration, sockets)
The end result is a working LAN-accessible HTTP endpoint, where browser traffic traverses W5500 ↔ SPI ↔ Spresense
From a “maker-to-deployment” viewpoint, the most valuable W5500-specific lessons in the tutorial are:
CS pin correctness (wiring ↔ code alignment)
RST control as an optional stability tool
init order and “start the server after Ethernet is ready” discipline
Results / Lessons learned / Limitations
Results
A minimal web server runs on Spresense and is reachable from a PC browser over wired LAN via W5500.
Lessons learned (what engineers should take away)
When ping/HTTP fails, wiring mistakes dominate—especially SPI lines and CS
CS pin mismatch is a silent killer: the stack “runs” but talks to nothing
IP/MAC conflicts can mimic hardware failure
Library choice matters (Ethernet2 vs Ethernet), and having both installed can cause confusion/compile conflicts
A controlled reset sequence via RST can improve bring-up reliability
Debugging is faster if you validate in stages (simpler address examples) before the full web server
Limitations
This is a LAN-level HTTP demo. Production concerns (auth, encryption/TLS, segmentation, threat model) require additional design.
W5500 modules vary (power regulation, level shifting, reset pin availability), so double-check the specific module datasheet.
Where this matters (who should read this)
Spresense developers needing reliable wired connectivity instead of Wi-Fi
Arduino users new to wired Ethernet who want a guide that includes wiring + software + debugging
Engineers building local dashboards / gateways where a minimal HTTP server is the fastest first milestone
Quick Reproduce / Getting Started (checklist)
Gather: Spresense main + extension board, W5500 SPI module, jumper wires, LAN cable, USB cable, Arduino IDE PC
Wire: 3.3V/GND, SPI signals, CS (chosen pin), optional RST (chosen pin)
Connect RJ45 → router/switch
Install Spresense board package in Arduino IDE (board manager URL)
Install Ethernet2 library
Start from Ethernet2 WebServer example and adapt:
set CS/RST pin constants to match wiring
set a unique MAC
choose fixed IP (preferably outside DHCP pool) or DHCP+fallback
ensure CS pin is registered before Ethernet init
ensure server object start happens after Ethernet init
Upload, check the serial output for IP, then hit that IP from a browser
If it fails: re-check wiring → verify CS mapping → verify IP/MAC conflicts → verify Ethernet vs Ethernet2 library usage → validate in simpler staged tests before WebServer
References (collected)
[1] Source tutorial (original, do not copy; use as canonical reference):
    CodeFun / culture-book-club.com
    “Spresense-Arduinoで堅牢な有線通信!W5500イーサネットモジュールを使ったIoT入門🌐”
    https://www.culture-book-club.com/202509/article_202509190425.html

[2] Spresense Arduino board package index (as shown in the tutorial):
    https://raw.githubusercontent.com/sonydevworld/spresense-arduino-compatible/master/package_spresense_index.json

[3] CodeFun site policy excerpt provided by the user:
    - Content copyright belongs to the site; unauthorized copying is prohibited.
    - Representative name: Kosukei; contact information not publicly listed (“please inquire”).
    - Links are allowed without prior permission.

[4] The tutorial’s “References” section (links should be followed from the original article for the latest URLs):
    - Spresense developer site
    - W5500 Ethernet Controller datasheet
    - Ethernet2 library GitHub repository
Title
Spresense-Arduino로 “견고한 유선 IoT” 시작하기: WIZnet W5500(SPI) + Ethernet2로 Web Server 구현 (배선·라이브러리·예제 핵심 수정·트러블슈팅)
Introduction
본 프로젝트는 CodeFun(Posted by Kousukei)의 튜토리얼 *“Spresense-Arduinoで堅牢な有線通信!W5500イーサネットモジュールを使ったIoT入門”*을 바탕으로, Sony Spresense를 Arduino IDE로 개발하면서 WIZnet W5500 이더넷 모듈을 SPI로 연결해, 로컬 네트워크에서 동작하는 간단한 HTTP Web Server를 올리는 방법을 엔지니어 관점에서 정리한 큐레이션입니다.
특히 이 글은 “될 때까지 해보세요”가 아니라, 정확한 배선(Spresense 확장보드 핀 기준), Ethernet2 라이브러리 선택, CS/RST 핀 지정과 초기화 순서, MAC/IP 충돌 회피, ping/접속 불가 시 점검 순서까지 포함해 “현장에서 실제로 막히는 지점”을 꽤 정직하게 다룹니다.
저작권 정책을 준수하기 위해, 본 큐레이션은 원문/코드를 그대로 옮기지 않고 핵심 구조와 학습 포인트를 재구성한 해설이며, 상세 구현은 원문을 참고하도록 안내합니다.
Overview
이 콘텐츠가 유용한 이유는 “Spresense에 Ethernet을 붙인다”가 아니라, 아래 3가지를 한 번에 해결해주기 때문입니다.
왜 유선(Ethernet)인가?
글은 IoT에서 Wi-Fi가 편하지만, 특정 환경에서는 안정성(간섭/혼잡 영향 감소), 보안(물리적 접근 장벽), 지연/실시간성 때문에 유선이 더 적합할 수 있다고 정리합니다. 특히 공장 센서망, 감시 시스템, 의료 기기, 데이터센터 등 “끊기면 곤란한 곳”을 예로 들어 설득합니다.
W5500을 Spresense에 어떻게 연결하나?
W5500 모듈을 SPI로 연결하는 배선이 핵심이고, 특히 CS/RST는 ‘임의 핀’도 가능하지만 코드에서 반드시 일치해야 한다는 실전 팁이 반복됩니다. (RST는 모듈에 없거나 쓰지 않으면 생략 가능)
Arduino 쪽에서 어떤 스택으로 Web Server를 올리나?
W5500은 표준 Ethernet 라이브러리 대신 Ethernet2 사용을 전제로 하고,
예제(WebServer)를 기반으로 CS 지정 → Ethernet 초기화 → 서버 생성/시작 → 클라이언트 처리(HTTP 응답) 흐름을 완성합니다.
글이 특히 강조하는 포인트는 초기화 순서(CS 핀 지정이 먼저, 서버 객체 생성 위치는 뒤로)와 MAC/IP 충돌 방지입니다.
Quick background
1) Spresense + W5500 조합이 의미 있는 이유
Spresense는 센싱/오디오/카메라/GNSS 등 다양한 기능을 가진 보드로 알려져 있고, Arduino IDE 기반 개발도 가능해 진입장벽이 낮습니다. 하지만 네트워크가 Wi-Fi 중심이면 환경 제약이 생깁니다. 이 튜토리얼은 Spresense를 “현장형(안정성/신뢰성)” IoT 노드로 확장하기 위한 가장 단순한 출발점으로 유선 LAN을 선택합니다.
2) W5500은 이 프로젝트에서 “어디에, 어떻게” 쓰이나
이 튜토리얼에서 WIZnet W5500은 Spresense에 유선 LAN을 추가하는 핵심 부품입니다.
물리 계층: RJ45(모듈) ↔ LAN 케이블 ↔ 라우터/허브
로컬 인터페이스: Spresense ↔ (SPI: SCK/MISO/MOSI/CS) ↔ W5500
소프트웨어: Ethernet2 라이브러리가 SPI를 통해 W5500을 제어해 IP 설정/DHCP/소켓을 운용
애플리케이션: Spresense가 포트 80에서 HTTP 요청을 받고 HTML을 반환
즉 데이터 흐름은 이렇게 단순화됩니다.
PC 브라우저 → LAN → W5500 → SPI → Spresense(HTTP 응답 생성) → 다시 역방향으로 응답이 돌아옵니다.
3) 여기서 말하는 “Web Server”의 현실적 정의
이 튜토리얼이 목표로 하는 서버는 무거운 프레임워크가 아니라, Arduino 예제 기반으로
접속을 받으면
최소한의 HTTP 응답(HTML)을 반환하고
uptime(millis) 같은 값을 보여주며
“네트워크가 진짜로 동작한다”를 확인하는 가장 작은 성공 단위(MVP) 입니다.
이 MVP가 잡히면 센서 데이터 페이지/JSON 응답/MQTT 연계 같은 확장도 자연스럽게 이어질 수 있습니다(글에서도 향후 확장 아이디어를 언급).
Author & Community (저자는 누구이고, 어디서 파급력이 생기나)
Kousukei는 누구인가
게시글 상단에 **“Posted by Kousukei”**로 표시됩니다.
사용자가 제공한 개인정보처리방침(코드펀)에는 “대표 이름: 코스케이”라고만 기재되어 있고, 연락처는 “문의해 주세요” 형태로 비공개입니다.
따라서 본 큐레이션에서는 실명/외부 계정 등 추가적인 개인 식별을 시도하지 않고, 사이트 내 표기된 정보 범위로만 다룹니다.
어떤 활동을 하는가(콘텐츠 성격)
이 글은 “대상 독자/이 글로 알 수 있는 것 → 전제지식 → 왜 유선인가 → 단계별 절차 → 하마った点(트러블슈팅) → 정리(요약) → 다음 확장” 구조로 작성된 교육형(튜토리얼+디버깅) 콘텐츠입니다.
특히 초보가 막히기 쉬운 지점(배선, CS 지정, IP/MAC 충돌, 라이브러리 충돌)을 “문제-원인-해결”로 정리해 레퍼런스형 글로 남깁니다.
파급력은 어디서 생기나(정성 분석)
정량 지표(조회수/공유 수)는 확인되지 않지만, 파급 경로는 다음이 유력합니다.
검색 유입(문제 해결형): “Spresense W5500 Ethernet2”, “ping 안됨”, “CS 핀”, “DHCP 범위 밖 IP” 같은 키워드는 실습 중에 바로 검색되는 유형입니다.
보드/모듈 실습 커뮤니티: Spresense 사용자, Arduino 유선 네트워크 관심층, W5500 모듈 사용자에게 반복적으로 재사용될 가능성이 큽니다.
교육/스터디 자료: 절차+트러블슈팅+요약 형태는 내부 교육 자료로도 쓰기 좋습니다.
Architecture & Data Flow (메커니즘)
1) 하드웨어 구성과 배선
튜토리얼이 제시하는 기준(Spresense 확장보드 핀 기준) 요약:
전원: W5500은 모듈에 따라 5V도 가능하지만 Spresense 로직 레벨에 맞춰 3.3V 권장
SPI 기본 라인:
SCK ↔ D41 (SP_GPIO08)
MISO ↔ D43 (SP_GPIO10)
MOSI ↔ D40 (SP_GPIO07)
선택 라인(임의 핀 가능):
CS ↔ D32 (SP_GPIO00)
RST ↔ D33 (SP_GPIO01) (모듈에 없거나 사용 안 하면 생략 가능)
네트워크: W5500 ↔ LAN 케이블 ↔ 라우터/허브
2) 소프트웨어 스택(Arduino IDE)
Spresense 보드 매니저 설치(글에 보드 매니저 URL 제시)
Ethernet2 라이브러리 설치(W5500 대응)
Ethernet2WebServer 예제를 기반으로, “보드/배선/네트워크 환경”에 맞게 최소 수정
3) 초기화와 동작 흐름(중요 포인트만)
원문이 강조하는 “성공 확률을 올리는 순서”는 다음과 같습니다.
(A) CS 핀을 라이브러리에 먼저 알려준다Ethernet.begin() 호출보다 먼저 CS 핀 설정이 필요하다는 점을 강조합니다.
(B) MAC은 중복되지 않게
예시 MAC을 그대로 쓰면 같은 네트워크에서 충돌이 날 수 있어 “유일값”을 권장합니다.
(C) IP는 고정/동적 중 하나를 선택하되 충돌을 피한다
고정 IP는 라우터 DHCP 범위 밖 권장
DHCP 사용 시 실패하면 고정 IP로 fallback하는 패턴 제시
(D) 서버 객체 생성 위치
어떤 환경에서는 Ethernet 초기화가 끝나기 전에 서버가 먼저 초기화되면 문제가 날 수 있어, Ethernet.begin() 이후에 서버를 생성/시작하도록 안내합니다.
4) 런타임(요청/응답) 데이터 흐름
클라이언트 접속을 기다렸다가, 접속되면 HTTP 헤더를 처리하고
간단한 HTML을 반환(“Hello from Spresense” + uptime 등)
접속 종료 후 client를 정리
이로써 “네트워크, SPI, 라이브러리, 서버 루프”가 모두 정상 동작함을 확인합니다.
WIZnet / Ethernet Section
이 튜토리얼은 WIZnet W5500을 “부품 소개”가 아니라 시스템의 통신 핵심으로 다룹니다.
어디에 쓰였나: Spresense에 유선 Ethernet 기능을 추가하는 모듈/컨트롤러로 사용
어떤 데이터가 오가나: HTTP 요청/응답(브라우저 ↔ Spresense) 트래픽이 W5500을 통해 LAN으로 흐름
왜 W5500인가(튜토리얼 관점): SPI로 쉽게 붙일 수 있고, Arduino 생태계에서 Ethernet2 예제/라이브러리로 빠르게 Web Server MVP를 만들 수 있기 때문
Results / Lessons learned / Limitations
Results
Spresense + W5500 + Ethernet2로 유선 LAN 기반의 HTTP Web Server MVP를 만들고, 브라우저로 접속해 정상 응답을 확인합니다.
Lessons learned (현장형 포인트)
“핑이 안 된다/접속이 안 된다”의 최다 원인은 배선(특히 SPI 라인과 CS)
CS 핀은 “임의로 잡을 수 있다”가 아니라, 코드 정의와 배선이 반드시 일치해야 함
IP 충돌, DHCP 범위 내부/외부 선택, MAC 중복은 보드가 고장난 것처럼 보이게 만들 수 있음
Ethernet2 vs Ethernet 동시 설치는 충돌을 만들 수 있어 정리 필요
문제 해결은 WebServer부터가 아니라, 단순 예제(DHCPAddressPrinter/StaticAddressPrinter 등) → WebServer 순으로 단계적으로 가는 게 빠름
RST 핀을 코드에서 제어하는 리셋 시퀀스는 초기화 안정화에 도움 될 수 있음
Limitations
본 튜토리얼은 “로컬 네트워크의 간단한 HTTP 서버”까지가 목표입니다. 실서비스 수준(인증/TLS/네트워크 분리/운영 보안)은 별도 설계가 필요합니다.
W5500 모듈 종류(전원/레벨시프터 포함 여부)에 따라 전원·배선 실수가 더 치명적일 수 있으니, 모듈 데이터시트 확인이 권장됩니다.
Where this matters (누가 보면 좋은가)
Spresense 기반 IoT를 만들지만, Wi-Fi 대신 유선 안정성이 필요한 팀
Arduino에서 “유선 네트워크 붙이기”를 처음 시도하는 개발자(특히 CS/IP/MAC/라이브러리 충돌에서 자주 막히는 분)
W5500을 이용해 센서 게이트웨이/로컬 웹 대시보드 같은 MVP를 빠르게 만들고 싶은 메이커/엔지니어
Quick Reproduce / Getting Started (복붙용 체크리스트)
준비물: Spresense(메인+확장), W5500 모듈, 점퍼선, LAN 케이블, Micro USB, Arduino IDE PC
배선: 3.3V/GND + SCK/MISO/MOSI + CS(임의) + RST(선택) 연결
W5500에 LAN 연결 → 라우터/허브 연결
Arduino IDE에 Spresense 보드 매니저 설치
라이브러리 매니저에서 Ethernet2 설치
예제 Ethernet2 → WebServer를 열고, 다음을 환경에 맞게 설정
CS/RST 핀 번호
MAC(중복 금지)
IP(고정 IP는 DHCP 범위 밖 권장) 또는 DHCP+fallback
CS 핀 지정은 Ethernet 초기화보다 먼저
서버 객체 생성/시작은 Ethernet 초기화 이후
업로드 후 시리얼 모니터로 IP 확인 → 브라우저에서 접속
문제 시: (1) 배선 재점검 → (2) CS 정의 일치 확인 → (3) IP/MAC 충돌 확인 → (4) Ethernet/Ethernet2 충돌 정리 → (5) 단순 예제로 단계 테스트
References (한 번에 정리)
[1] 원문 튜토리얼(출처/저작권 존중, 원문은 링크로만 참조)
    CodeFun / culture-book-club.com
    "Spresense-Arduinoで堅牢な有線通信!W5500イーサネットモジュールを使ったIoT入門🌐"
    https://www.culture-book-club.com/202509/article_202509190425.html

[2] (원문에 제시된) Spresense Arduino Board Manager URL
    https://raw.githubusercontent.com/sonydevworld/spresense-arduino-compatible/master/package_spresense_index.json

[3] (사용자 제공) CodeFun 개인정보처리방침/저작권/면책 요약 텍스트
    - 콘텐츠 저작권은 사이트에 귀속, 무단 복제 금지, 링크는 허용
    - 대표 이름: 코스케이 / 연락처: “문의해 주세요”(비공개)

[4] (원문 ‘참고자료’에 언급) Spresense 개발자 사이트 / W5500 데이터시트 / Ethernet2 GitHub
    ※ 원문 하단의 링크를 통해 최신 URL 확인 권장
원하시면 다음 턴에, 위 내용을 그대로 기반으로 **영문 버전(영어권 임베디드 엔지니어 톤)**으로도 “복붙 가능한” 형태로 변환해드릴게요.