
Simple Web Camera
Spresense + W5500 minimal web-camera: SPI5 setup, EEPROM MAC, static IP web server that returns a JPEG snapshot via HTTP. Curated from elchika.
(Curated from elchika, Japanese / Author: yukinco)
Overview
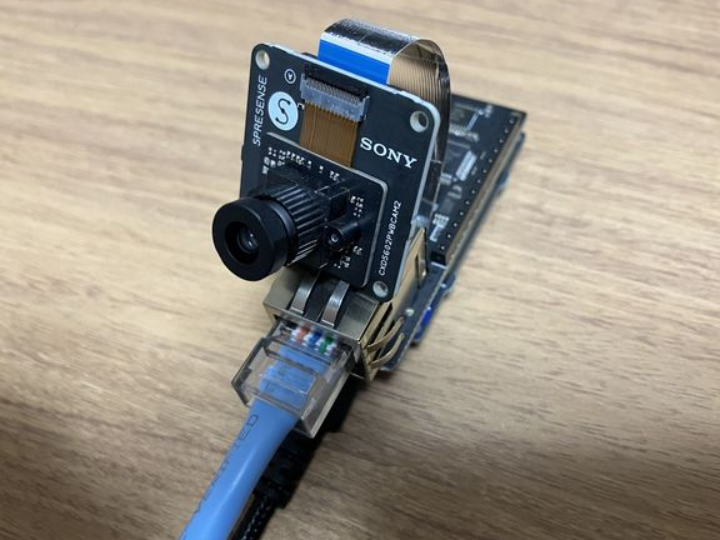
This tutorial combines a Sony Spresense Main Board, HDR Camera Board, and a W5500 Ethernet add-on to build a minimal web camera that serves a single JPEG snapshot to any browser. The sketch initializes camera and Ethernet, reads a MAC address from the add-on board’s EEPROM, brings the link up, and returns a Content-Type: image/jpeg response from an HTTP server bound to 192.168.1.240. (elchika)
Original Language & Author
Originally published in Japanese on elchika (Jan 2, 2024), this article by yukinco focuses on reproducibility: it shows the exact parts stack, the SPI5 requirement for Spresense add-ons, and practical code for reset/CS control and MAC loading. Japanese readers can verify parts and wiring easily; this English curation preserves the concrete identifiers so global readers can reproduce the same results. (elchika)
Key Highlights
Hardware & Wiring
Parts: Spresense Main Board, HDR Camera Board, W5500-Ether add-on. The W5500 add-on from Crane Electronics documents the onboard 24C64 EEPROM (I²C 0x57) storing the MAC (Rev.2), and shows how SJ1/SJ2 jumpers affect RESET and CS pin choices—useful when matching code to board revision. (elchika)
SPI5 declare + Ethernet init
Spresense add-on SPI is SPI5, so the sketch defines #define USE_SPRESENSE_SPI5 (used inside the Ethernet library).
The example toggles RESET on D21, then sets CS via Ethernet.init(19) before starting the stack. (elchika)
MAC from EEPROM
The code scans I²C devices, initializes M24C64 at 0x57, and reads six MAC bytes for Ethernet.begin(mac, ip). (Rev.1 boards lack stored MAC; Rev.2 stores it in EEPROM—see vendor notes.) (elchika)
Camera pipeline & HTTP snapshot
The sketch initializes the camera, starts streaming, sets White Balance: Daylight, and configures Still: QQVGA / JPG.
On HTTP request, it calls theCamera.takePicture() and writes the buffer directly to the client with headers (200 OK, image/jpeg). (elchika)
Link-up checks & robustness
It verifies Ethernet hardware presence and waits for link stability before serving. This increases first-run success on wired networks. (elchika)
Why It Matters (Curator’s take)
Fast on-ramp to networked imaging: A single-file, working example that covers camera bring-up, MAC handling, and HTTP response—perfect as a teaching scaffold or demo baseline. (elchika)
Spresense-specific know-how: Captures the non-obvious bits—SPI5, board RESET/CS handling, and EEPROM MAC—that often block first-time success. Vendor docs back the hardware nuances. (elchika)
Clear path to extensions: From a single JPEG snapshot, it’s straightforward to add DHCP/mDNS, auth, or move to MJPEG streaming via multipart/x-mixed-replace. The code already demonstrates the core capture loop and headers. (elchika)
Quick Reproduce (Checklist)
Assemble hardware: Spresense Main + HDR Camera + W5500-Ether (confirm jumper settings per board rev). (株式会社クレイン電子)
Firmware essentials:
#define USE_SPRESENSE_SPI5
Toggle RESET (D21); set CS via Ethernet.init(19) (or per your jumper config)
Read MAC from EEPROM 0x57 → Ethernet.begin(mac, ip) (default 192.168.1.240) (elchika)
Camera setup: theCamera.begin() → startStreaming(true) → Daylight WB → Still QQVGA/JPG. (elchika)
Test: Browse to http://192.168.1.240/ → you should receive a JPEG snapshot. Wait for link-up logs if needed. (elchika)
Ops tips: Avoid static-IP conflicts (consider DHCP), open port 80 on your LAN, and avoid exposing the unauthenticated endpoint to the public internet.
References
Original (Japanese): elchika — Simple Web Camera (by yukinco, 2024-01-02). (elchika)
W5500-Ether Add-on (Crane Electronics): EEPROM/MAC (0x57), jumper-dependent RESET & CS notes, library guidance. (株式会社クレイン電子)
Spresense Camera Library Guide (Sony): Overview of theCamera and JPEG capture. (developer.sony.com)
Overview
이 튜토리얼은 Sony Spresense Main Board와 HDR Camera Board, 그리고 W5500 Ethernet 확장보드를 이용해, 브라우저에서 접속하면 즉시 JPEG 스냅샷을 반환하는 웹 카메라를 구현한 실습입니다. 기본 IP를 192.168.1.240으로 설정하고, HTTP 요청이 들어오면 카메라로 촬영한 이미지를 Content-Type: image/jpeg로 응답합니다. 하드웨어 초기화(카메라·이더넷), SPI5 사용 선언, EEPROM에서 MAC 읽기, 링크 업 등 실전 배선/펌웨어 포인트를 모두 담은 “최소구성” 예제입니다. (elchika)
Original Language & Author
원문은 **일본어(Japanese)**로, elchika에 2024-01-02 게시되었습니다. 저자 yukinco는 Spresense 생태계 부품(HDR Camera, W5500 Ether 보드)을 조합해 작동 재현성을 우선으로 한 간결한 예제를 제시합니다. 일본어 UI/부품명과 현지 보드(크레인전자) 문서 링크를 그대로 활용하므로 일본 메이커의 검증이 특히 쉽고, 본 큐레이션을 통해 글로벌 독자도 영문으로 동일 절차를 재현할 수 있습니다. (elchika)
Key Highlights
부품 & 배선
보드: Spresense Main Board, HDR Camera Board, W5500-Ether 확장보드. 배선은 사진대로 스택 결합합니다. (elchika)
크레인전자 문서: W5500-Ether 보드의 EEPROM(24C64, I2C 0x57, Rev.2), 점퍼(SJ1/SJ2)와 리셋·CS 핀 차이 등 하드웨어 스펙 및 초기화 차이를 확인할 수 있습니다. (株式会社クレイン電子)
SPI5 선언 & 이더넷 초기화
Spresense 애드온 보드의 SPI는 SPI5이므로 #define USE_SPRESENSE_SPI5 선언이 필요(라이브러리 socket.cpp에서 사용). (elchika)
W5500 리셋 & CS 설정: D21 리셋 토글 후, Ethernet.init(19)로 W5500 CS를 지정합니다. (보드 리비전/점퍼에 따라 변경될 수 있음) (elchika)
MAC 주소: EEPROM에서 읽기
M24C64(I2C 0x57)에서 MAC 주소를 읽어 Ethernet.begin(mac, ip)에 사용합니다. Rev.1/Rev.2에 따른 차이는 제조사 문서를 참고. (elchika)
카메라 설정 & 촬영
카메라 초기화 → 스트리밍 시작 → 화이트밸런스: Daylight → 스틸 사진 포맷: QQVGA(JPG) 설정. 요청 수신 시 theCamera.takePicture()로 버퍼/크기를 얻어 바로 전송합니다. (elchika)
HTTP 스냅샷 서버(포트 80)
클라이언트 접속 감지 → 헤더 전송(200 OK, Content-Type: image/jpeg) → 단일 JPEG 프레임을 송신 후 연결 종료. 링크 업 안정화 대기와 하드웨어 존재 확인 로직도 포함돼 실사용에 안전합니다. (elchika)
Why It Matters (전문 큐레이터 시각)
진입장벽↓: “한 장짜리” 웹캠
HTTP 서버, JPEG 캡처, 이더넷 초기화까지 한 파일에 집약된 “작동 예제”라서, 네트워킹 카메라의 핵심 흐름을 빠르게 체득할 수 있습니다. (elchika)
Spresense 고유 포인트 학습
SPI5 경로 선언, 전용 CS/리셋 핀(점퍼 의존), EEPROM 기반 MAC 로딩 등 Spresense + W5500 조합에서 흔히 막히는 지점들을 코드로 확인합니다. (제조사 문서로 하드웨어 차이까지 추적 가능) (elchika)
확장 아이디어의 발판
현재는 정적 스냅샷이지만, multipart/x-mixed-replace로 MJPEG 스트리밍을 구현하거나, DHCP/MDNS, 권한/토큰 기반 접근제어, 해상도·화이트밸런스 동적 변경 등 실전 과제로 자연스럽게 확장 가능합니다. (현 코드는 정적 IP·무인증 구조이므로 보안/운영 환경에 맞게 보완 필요) (elchika)
Quick Reproduce (Checklist)
하드웨어 조립: Spresense Main + HDR Camera + W5500-Ether(점퍼 상태 확인). (elchika)
펌웨어 핵심 설정
#define USE_SPRESENSE_SPI5 추가
W5500 리셋(D21) 토글 → Ethernet.init(19)로 CS 지정(점퍼에 따라 변경 가능)
EEPROM(0x57)에서 MAC 읽기 → Ethernet.begin(mac, ip) (기본 IP 192.168.1.240) (elchika)
카메라 파이프라인
theCamera.begin() → startStreaming(true) → WB Daylight → Still: QQVGA/JPG 설정 후 요청 시 takePicture()로 응답. (elchika)
테스트: 브라우저에서 http://192.168.1.240/ 접속 → JPEG 스냅샷 표시. 링크 업이 뜰 때까지 대기 로그 확인. (elchika)
운영 팁: 내부망 IP 충돌 방지(정적 IP → DHCP 전환 고려), 방화벽 포트 80 허용, 무인증 공개망 노출 금지.
References
Original (Japanese): elchika — Simple Web Camera (by yukinco, 2024-01-02) (elchika)
W5500-Ether Board (Crane Electronics): EEPROM/MAC(0x57), 점퍼-핀 차이, 라이브러리 안내 (株式会社クレイン電子)