Moving to a RTOS on the RP2040
As projects get more complicated the tooling has to improve. Outgrowing the arduino-ide is easy on the Pi Pico with the excelent pico-sdk but what if things get

(+ RP2040 Video Control Joystick with W5500 Ethernet)
1. Introduction
This project is a real-world story of when bare-metal on the RP2040 stops being fun and you begin to seriously consider an RTOS.
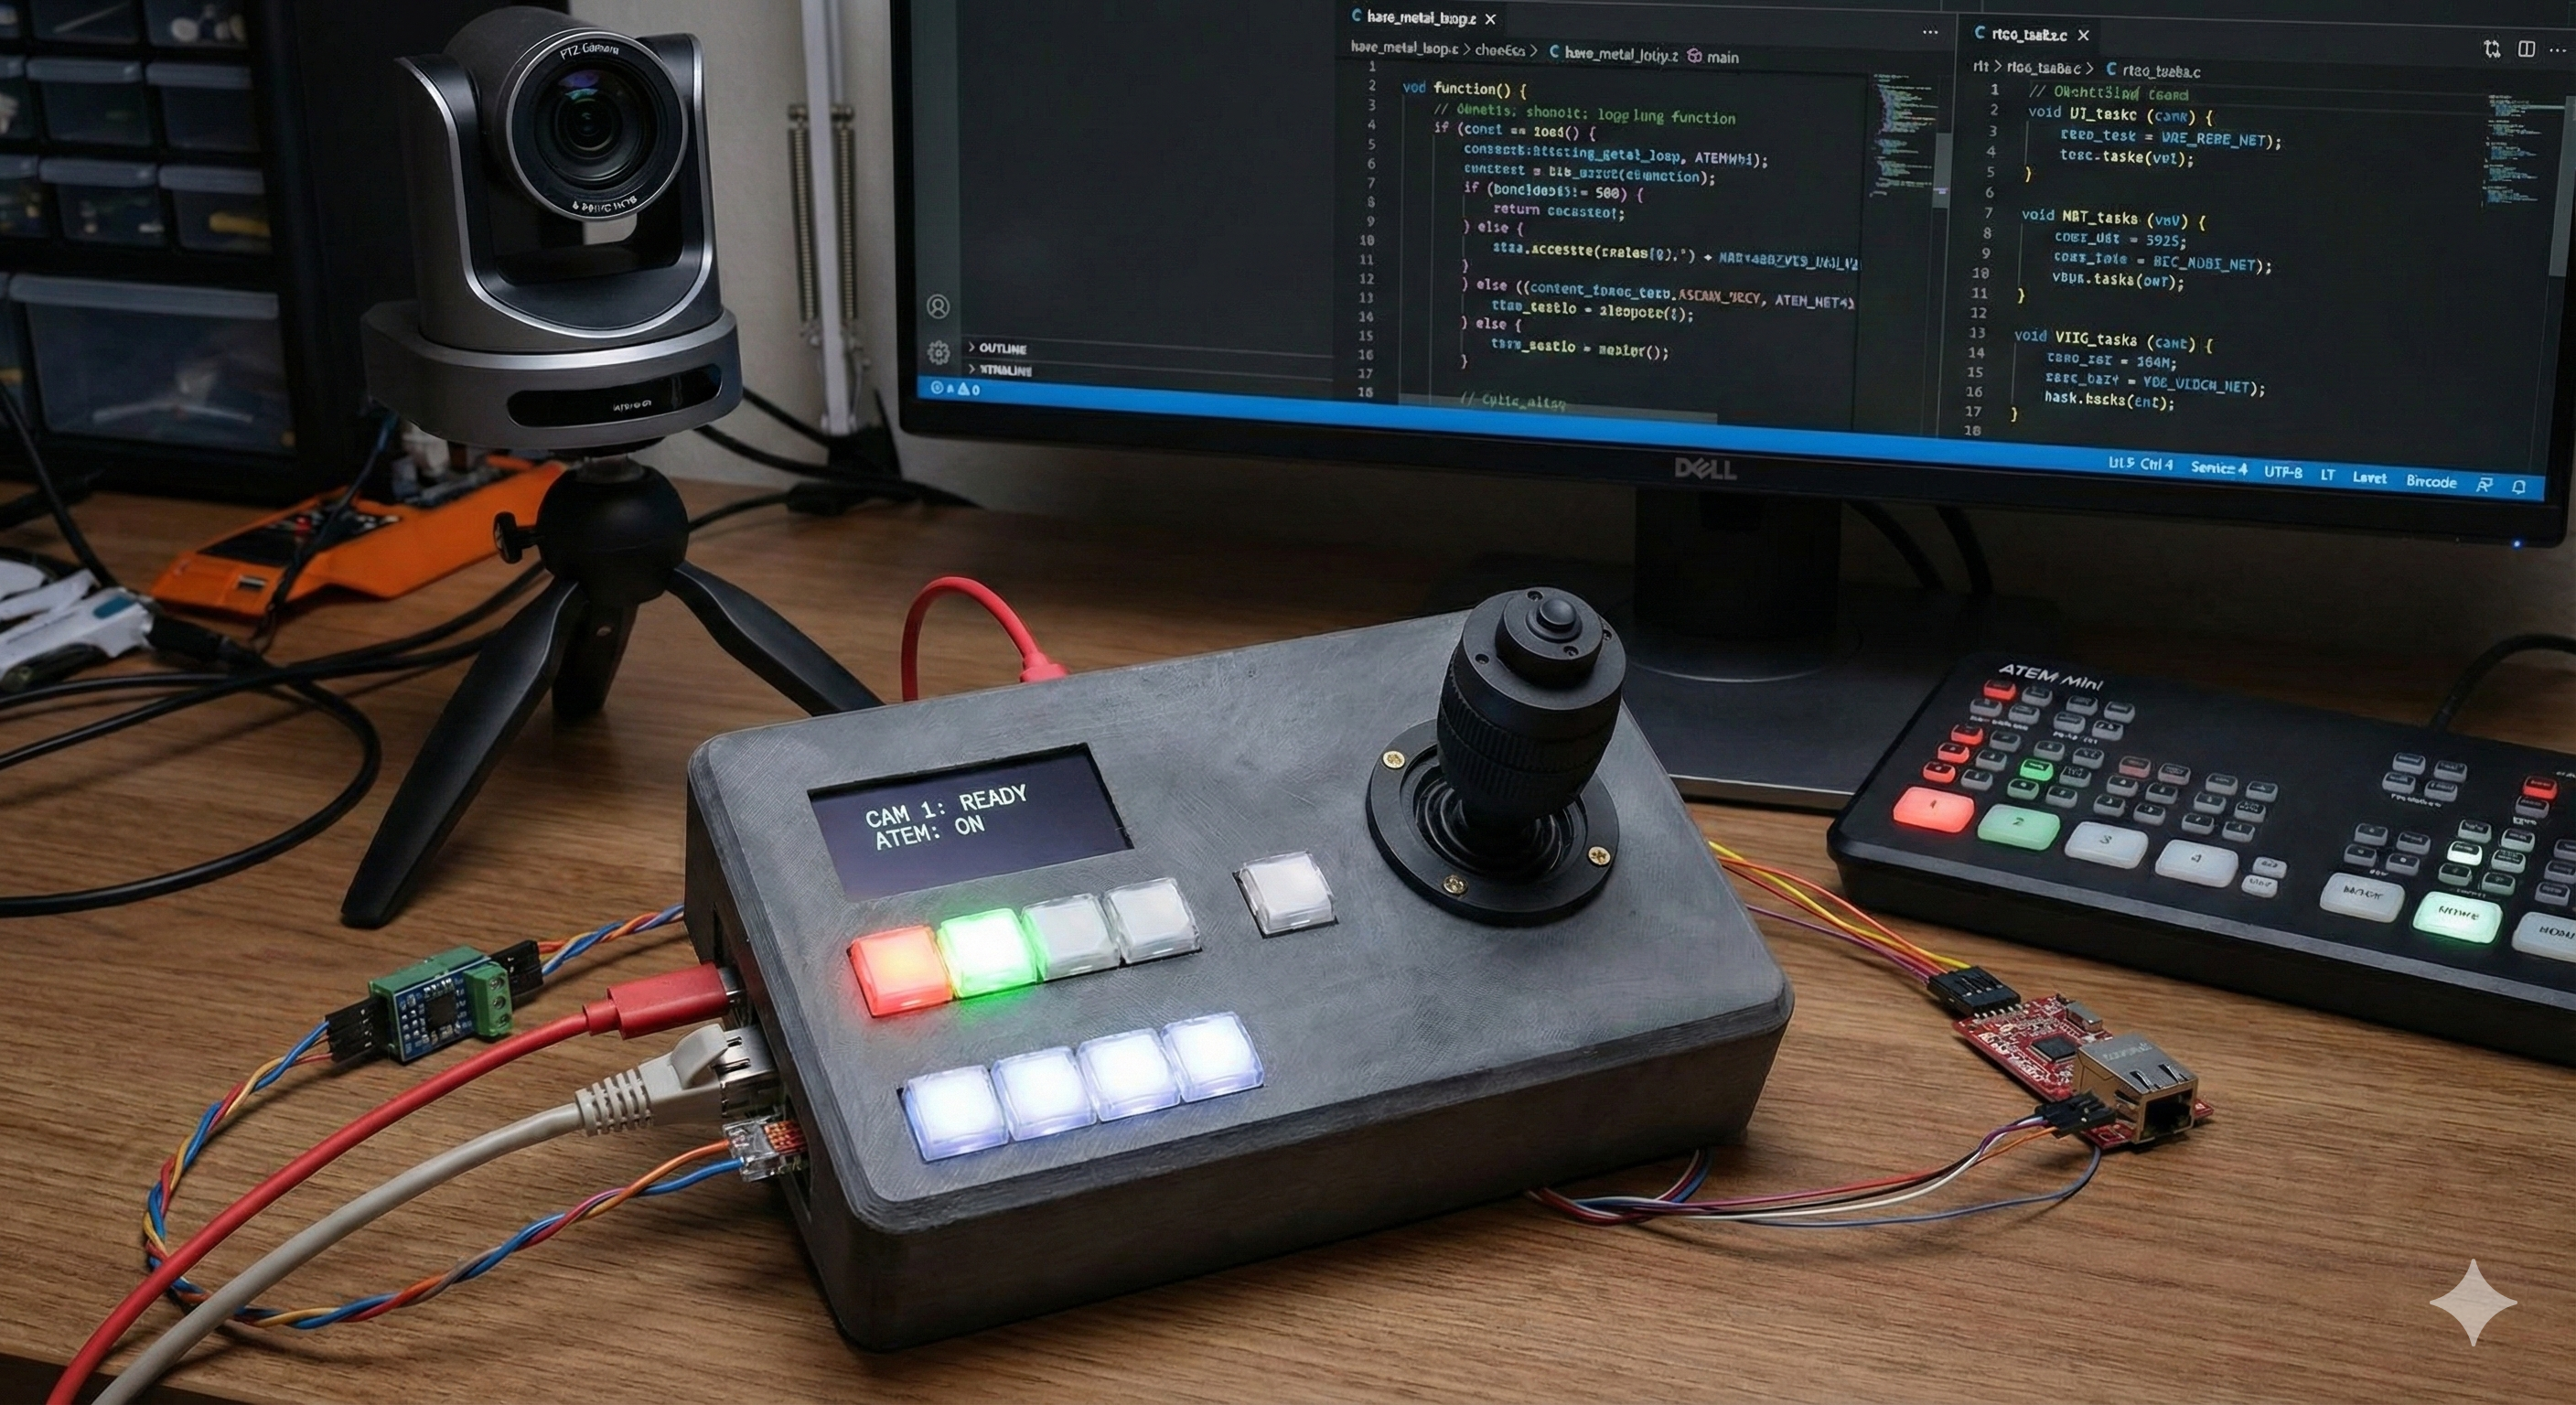
The hardware is a video control joystick built around a Raspberry Pi Pico (RP2040) plus:
- RS-485 transceiver for PTZ cameras
- A WIZnet W5500 Ethernet module to talk to an ATEM video switcher
- A 4-axis joystick, nine RGB buttons, and an OLED display
The software must simultaneously:
- Draw a smooth UI
- Poll buttons and joystick
- Send VISCA commands over RS-485 to PTZ cameras
- Keep the network stack alive (DHCP, mDNS/DNS-SD, ATEM UDP protocol) on top of W5500
The blog post “Moving to a RTOS on the RP2040” walks through trying FreeRTOS, NuttX, and Zephyr on this real device, asking:
“At what point does this kind of project really need an RTOS?”
2. What this project is
(기존 제품 이미지와 AI툴을 이용하여 만든 이미지입니다. )
2.1 The article: “Moving to a RTOS on the RP2040”
Martijn Braam’s article is essentially a three-RTOS field report for the RP2040.
He experiments with:
1.FreeRTOS
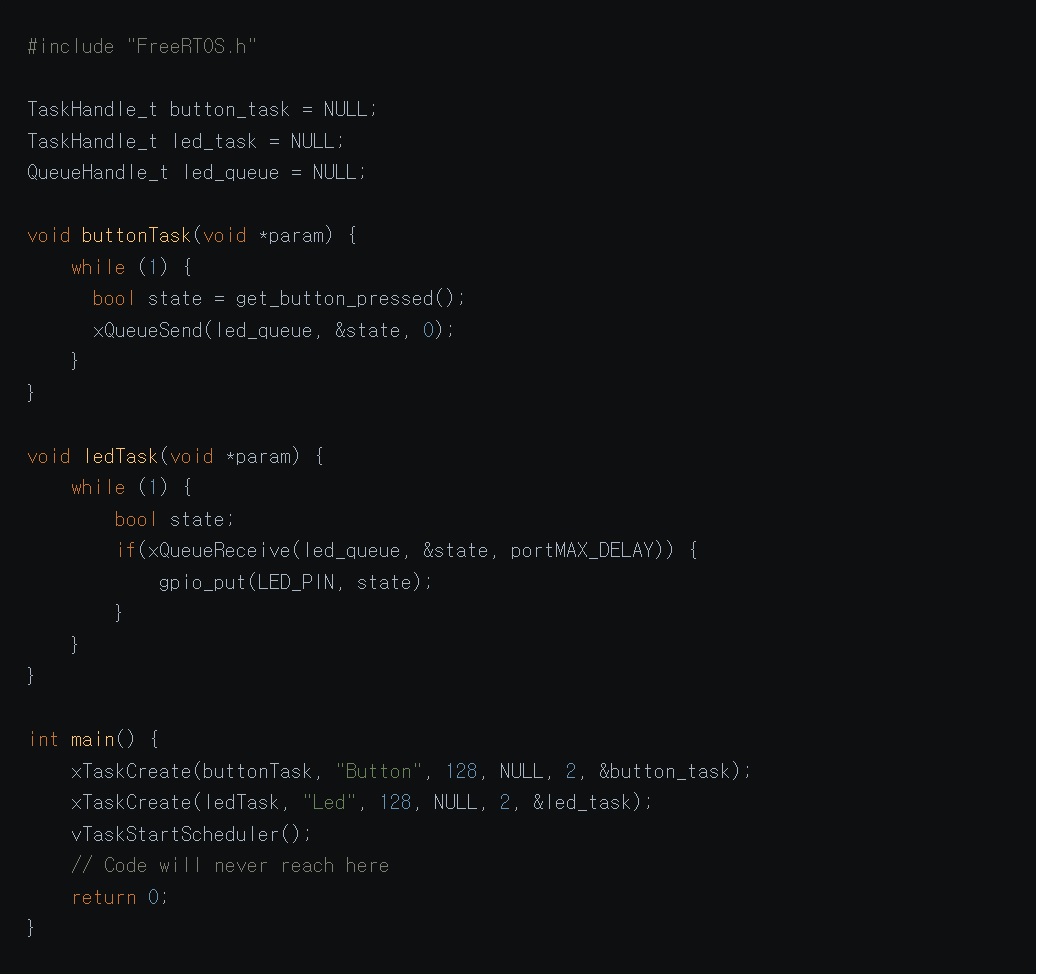
- Split the application into tasks: buttons, LEDs, network, DHCP, mDNS, ATEM, VISCA…
- Quickly runs into “task explosion” and painful debugging (including
printfmisbehaving), but concludes FreeRTOS is still the most realistic fit for his setup.
출처: https://blog.brixit.nl/moving-to-a-rtos-on-the-rp2040/
2.Apache NuttX
- Feels like “a tiny Unix”: shell,
/dev/i2c0style device files, Kconfig/menuconfig for driver and pin selection. - Initially thinks I²C doesn’t work, later realizes it was a configuration mistake and corrects himself in the post.
3.Zephyr
- Impressed by the tooling, but cloning and installing a multi-gigabyte SDK plus toolchains and QEMU feels very heavy for one Pico-based joystick.
The post ends with a pragmatic stance:
FreeRTOS integrates into his existing Pico toolchain the most smoothly, so that’s where he decides to invest more time.
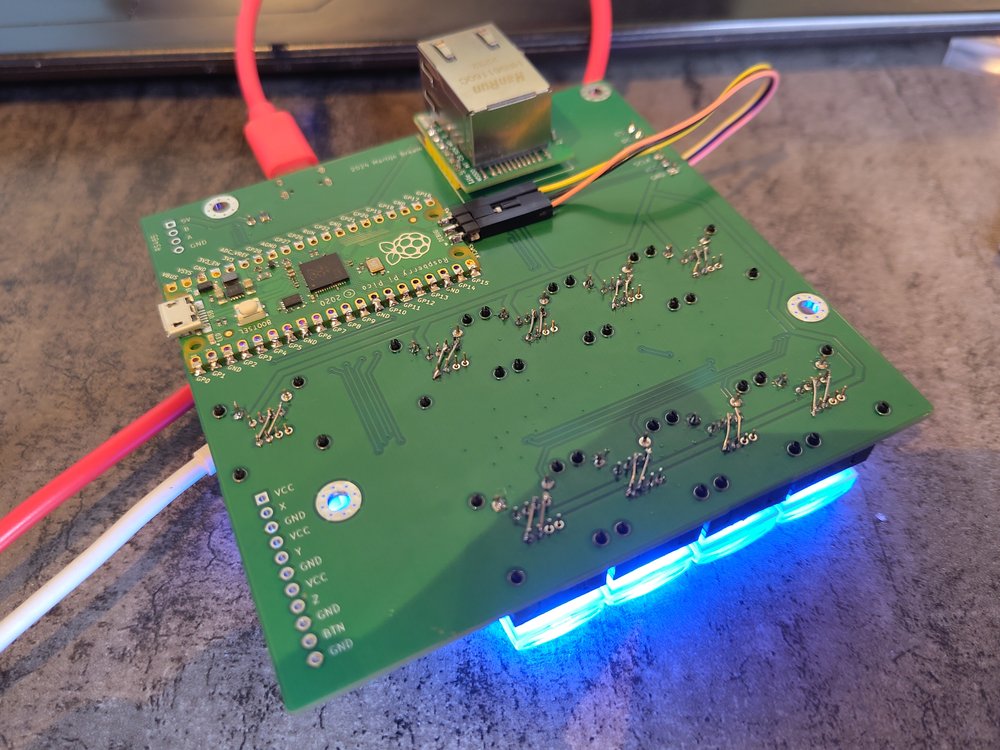
2.2 The PCB: Video control joystick

출처: https://blog.brixit.nl/moving-to-a-rtos-on-the-rp2040/

The PCB shared on PCBWay is the actual controller hardware used in the article.
Key points from the project page:
- Use case: a desk controller for PTZ cameras + ATEM video switcher in a live-video environment.
- Core components:
- Raspberry Pi Pico (RP2040 module)
- TP8485E RS-485 transceiver
- WIZnet W5500 Ethernet module for ATEM control
- 9 RGB backlit buttons and a 4-axis joystick
- 2.42" OLED display for status and UI
- PCBWay description notes that, via RS-485 and Ethernet, the controller can talk to almost any PTZ camera and ATEM switcher, and that the Pico is fast enough to update button LEDs with live/preview states from the switcher.
In other words: the RTOS article isn’t hypothetical—this board is the pressure-test for each RTOS.
3. Original language, author & audience
3.1 Language & platform
- The article is written in English and published on the BrixIT blog (Electronics section).
- The PCB is shared as a PCBWay community project, with Gerbers, BOM and case files available.
3.2 Author: Martijn Braam
- Martijn Braam is a Dutch software developer, known in the Linux world—especially for his early and ongoing work on postmarketOS.
- In interviews he describes himself as:
“a software developer from the Netherlands… involved in the postmarketOS project since the very start in 2017.”
- His GitHub / GitLab / YouTube accounts show a long history of work on PinePhone, PineTab and other mobile-Linux hardware, so this RP2040 + W5500 joystick is very much in character: embedded systems, networking, Linux-adjacent.
3.3 Where this content “lands” (influence & reach)
The post escaped the blog and moved into the wider tech community:
- OSNews picked it up as a feature link about choosing an RTOS on the RP2040.
- It has been shared on Hacker News, Reddit and GeekNews, often with the framing: “Good write-up on FreeRTOS vs NuttX vs Zephyr on RP2040.”
- In the NuttX community, the article is referenced in a discussion about making the SDK easier for newcomers.
Because of that, the article has turned into a reference piece for embedded developers wondering, “Is it time to move my Pico project to an RTOS?”
4. Software side — why an RTOS here?
From the article, the “job list” for this one RP2040 is:
- Render a smooth UI on the OLED
- Read joystick and 9 RGB buttons (with debouncing)
- Send VISCA commands over RS-485 to PTZ cameras
- Run the network stack on W5500:
- DHCP lease handling
- mDNS / DNS-SD discovery of the ATEM switcher
- ATEM UDP protocol with strict timeouts and buffer limits
The original pico-sdk setup looked like:
- Core 1 → W5500 networking + DHCP
- Core 0 → UI, buttons, joystick, camera control
As more features were layered on, timing and state handling became fragile—everything depended on the main loop never being “busy” too long.
The RTOS experiments show:
- FreeRTOS: good integration but easy to fall into “too many tasks, not enough structure” if you’re not disciplined.
- NuttX: very nice Unix-like model (shell,
/dev, Kconfig), but configuration mistakes can be subtle and the system is heavier. - Zephyr: powerful but “overkill” for a single RP2040 joystick, given the large SDK and tooling download.
The takeaway is not “one RTOS to rule them all” but:
As soon as you’re juggling UI + Ethernet + serial + timing-sensitive protocols on the RP2040,
you should at least consider an RTOS, or you’ll eventually reinvent one badly.
5. Hardware side — video control joystick layout
From the PCB and description:
- MCU: Raspberry Pi Pico (RP2040)
- Inputs:
- R400B-M4 4-axis joystick for pan/tilt/zoom/focus
- 9x RGB pushbuttons (live/preview/aux, etc.)
- Comms:
- TP8485E RS-485 transceiver → PTZ camera control (VISCA and similar)
- WIZnet W5500 Ethernet module → ATEM switcher control & status over UDP
- Display: 2.42″ OLED for menus, camera info and status.
- Mechanical:
- Pico on the back side of the PCB; USB-C and BOOTSEL routed to the front panel
- FreeCAD case file shared (
joystick_Case_v2.FCStd) so other makers can print their own enclosure
On the network side, W5500 handles all Ethernet PHY + TCP/UDP/IP, while the RTOS on RP2040 keeps all the higher-level tasks (ATEM protocol, UI, camera control) responsive.
6. Why this matters (WIZnet & maker perspective)
1.A grounded answer to “Do I need an RTOS on RP2040?”
This isn’t a synthetic benchmark—it’s a real controller with UI + RS-485 + W5500 Ethernet + multiple protocols. The article shows where bare-metal starts to creak and how each RTOS feels in practice.
2.A concrete RP2040 + W5500 + RTOS pattern
The joystick is effectively a template for projects that need:
- deterministic Ethernet (via W5500),
- a non-trivial UI,
- and multiple time-sensitive I/O paths.
3.Community impact & reproducibility
- The post has been circulated on OSNews, HN, Reddit and more, and is now a go-to link when people ask about RTOSes on Pico.
- Because the PCB is shared on PCBWay, others can build the exact same hardware, flash their own RTOS experiments, and compare notes.
7. Quick reproduce (for readers who want to try it)
Hardware
- Open the PCBWay project “Video control joystick” and download Gerbers/BOM/case files.
- Assemble with a Raspberry Pi Pico, W5500 module, TP8485E RS-485 transceiver, RGB buttons, joystick and OLED display.
Software / RTOS experiments
- Start from a pico-sdk project and integrate FreeRTOS (or follow the article’s steps for NuttX/Zephyr).
- Split work into tasks for UI, buttons, RS-485 VISCA, and W5500 networking (DHCP, mDNS, ATEM UDP).
- Observe where each RTOS helps—or gets in the way—compared to a simple dual-core bare-metal loop.
1. Introduction
본 컨텐츠는
Martijn Braam이 자신의 블로그에 쓴 글 **“Moving to a RTOS on the RP2040”**와
그 글 속에서 실제로 사용하는 하드웨어인 Video control joystick PCB 를 함께 다룹니다.
이 조이스틱은
Raspberry Pi Pico(RP2040),
RS-485 트랜시버(TP8485E),
WIZnet W5500 Ethernet 모듈,
9개의 RGB 버튼과 조이스틱, OLED 디스플레이
로 구성된 라이브 비디오 장비용 컨트롤 패널이고, PTZ 카메라(VISCA)와 ATEM 영상 스위처를 동시에 제어하도록 설계돼 있습니다.
문제는 소프트웨어 복잡도였습니다.
디스플레이에 부드러운 UI를 그려야 하고,
RS-485로 PTZ 카메라에 VISCA 명령을 보내야 하고,
버튼 입력을 처리해야 하고,
DHCP·mDNS·ATEM UDP 프로토콜까지 포함한 네트워크 스택을 항상 살아있게 유지해야 합니다.
기존 pico-sdk 기반 “코어 0 = UI, 코어 1 = W5500 네트워크” 구조로는 점점 감당이 안 되자,
결국 RTOS로 갈아타 보기로 한 이야기입니다.
2. What this project is
2-1. 블로그 글: “Moving to a RTOS on the RP2040”
글의 핵심은 3가지 RTOS 비교 체험기입니다.
FreeRTOS – pico-sdk 안에도 들어 있지만, 튜토리얼을 따라 새로 가져와 사용.
버튼·LED·네트워크·DHCP·mDNS·ATEM·VISCA 각각을 태스크로 쪼갰다가,
printf가 멈춰버리고 디버깅이 지옥이 되는 바람에 코드베이스가 엉망이 된 경험을 솔직하게 적습니다.
Apache NuttX – “마치 마이크로 컨트롤러용 리눅스”처럼 느끼는 OS.
nsh 쉘에서 uname, i2c 같은 명령을 직접 실행해 보고,
/dev/i2c0 같은 디바이스 파일, Kconfig/menuconfig 기반 핀/드라이버 설정 방식이 마음에 들었다고 평가합니다.
다만 초기에 I²C 설정을 삐끗해 “안 된다”고 썼다가, 나중에 설정 실수였다고 정정하기도 합니다.
Zephyr – “첫 명령부터 5GB Git 리포를 받는” 헤비급 RTOS.
전 아키텍처용 HAL을 통째로 끌어오고, 자체 툴체인·QEMU·OpenOCD까지 설치하도록 요구하는 점에서 과도하게 복잡하다고 느낍니다.
결론적으로는,
“내 환경에 비교적 자연스럽게 통합할 수 있는 건 FreeRTOS뿐이라,
결국 FreeRTOS에 더 시간을 써 보겠다”
라는 방향으로 글을 마무리합니다.
2-2. PCB: Video control joystick
PCBWay에 공개된 Video control joystick 보드는 이 글에 등장하는 바로 그 하드웨어입니다.
용도: 라이브 비디오 제작 환경에서 PTZ 카메라 + ATEM 스위처를 제어하는 하드웨어 패널.
주요 구성:
Raspberry Pi Pico(RP2040 모듈)
RS-485용 TP8485E 트랜시버
Wiznet W5500 Ethernet 모듈 (ATEM 스위처와 통신)
9개의 RGB 버튼 (방송용 스위처 스타일 키캡)
4축 조이스틱 (PTZ 팬/틸트/줌/포커스)
2.42" OLED 디스플레이
PCBWay 설명에 따르면,
“RS-485와 Ethernet 연결로 거의 모든 PTZ 카메라를 제어할 수 있고, Pi Pico는 ATEM 프로토콜을 처리해 버튼 LED에 현재 live/preview 카메라 상태를 반영하기에 충분히 빠르다”
RTOS 글에서 예시로 드는 “조이스틱 + 9 RGB 버튼 + OLED + RS-485 + W5500” 하드웨어가 바로 이 PCB입니다.
3. Original Language & Author / Community
3-1. 언어 & 플랫폼
글은 영어로 작성된 블로그 포스트이며, BrixIT 블로그의 Electronics 섹션에 실려 있습니다.
PCB는 PCBWay 커뮤니티 프로젝트로 공유되어, Gerber/BOM/케이스 파일까지 다운로드 할 수 있습니다.
3-2. 저자: Martijn Braam
BrixIT 블로그 프로필에 **“I do computer stuff”**라고 본인을 소개하는 네덜란드 개발자.
postmarketOS(리눅스 폰 OS) 초기부터 핵심 기여자로 활동했으며, 인터뷰에서
“I’m Martijn, a software developer from the Netherlands. I’ve been involved in the postmarketOS project since the very start in 2017.” 라고 자신을 밝힙니다.
GitHub/GitLab/YouTube에서도 MartijnBraam 계정으로 활발히 활동하고, PinePhone/PineTab 등 모바일 리눅스 하드웨어 관련 작업과 영상으로 잘 알려져 있습니다.
3-3. 어디서 파급력이 있나?
이 글은 단순히 개인 블로그에만 머무르지 않았습니다.
OSNews에서 기사화
OSNews는 이 글을 인용하며 “FreeRTOS, NuttX, Zephyr를 저울질하는 프로젝트”로 소개합니다.
Hacker News / Reddit / Mastodon / GeekNews
Hacker News·Reddit의 /r/hackernews, 한국 GeekNews 등에서 링크가 공유되어 **“RP2040에서 RTOS 선택기”**로 회자되었습니다.
NuttX 커뮤니티 메일링 리스트에서는 이 글을 언급하며 “NuttX에도 더 친절한 SDK가 필요하다”는 논의를 하기도 했습니다.
→ 결과적으로, 이 글은 “RP2040에서 FreeRTOS / NuttX / Zephyr 중 뭘 써야 하나?”를 고민하는 개발자들에게 많이 인용되는 레퍼런스가 되었습니다.
4. Software Side — 왜 RTOS가 필요했나?
Martijn이 bare-metal + pico-sdk에서 RTOS로 넘어가려 한 이유는, 글에 직접 정리되어 있습니다.
해야 할 일:
디스플레이 UI를 부드럽게 그리기
RS-485로 VISCA 명령을 주기적으로 송신
버튼 스캔 및 디바운스
네트워크 스택 유지:
DHCP 리스 갱신
mDNS/DNS-SD로 ATEM 스위처 자동 탐색
W5500 버퍼 제한을 고려하며 ATEM UDP 패킷 송수신 (타임아웃이 매우 짧음)
초기 버전은
코어 1 → W5500 네트워크 처리 + DHCP
코어 0 → UI/버튼/조이스틱
처럼 나누어 구현했지만, 점점 타이밍·상태 관리가 꼬이기 시작합니다.
그래서 “스케줄러 + 태스크 간 통신”을 제공하는 RTOS로 넘어가면서,
FreeRTOS에서는 buttonTask, ledTask, networkTask, dhcpTask, mdnsTask, atemTask, viscaTask 등 태스크 폭발을 경험하고, printf 문제가 겹쳐 디버깅 지옥을 맛봅니다.
NuttX에서는 shell과 /dev 파일, Kconfig 기반 핀 설정에 감탄하지만, 설정 실수로 I²C가 안 되면서 “유닉스풍 OS가 꼭 행복한 것만은 아니다”를 깨닫습니다.
Zephyr는 5GB Git fetch + 거대한 SDK 설치 요구로 “이건 내 프로젝트 규모에 비해 너무 무겁다”는 판단을 내립니다.
이 과정 자체가 RP2040 + 네트워크 + UI + 주변장치가 섞인 프로젝트가 RTOS를 필요로 하는 순간을 아주 잘 보여줍니다.
5. Hardware Side — Video control joystick 구조
PCBWay 페이지와 블로그를 종합하면, 하드웨어는 대략 이런 구조입니다.
MCU: Raspberry Pi Pico (RP2040)
입력:
R400B-M4 4축 조이스틱 (팬/틸트/줌/포커스)
9x RGB 버튼 (방송용 스위처 스타일)
통신:
TP8485E RS-485 → PTZ 카메라 제어 (VISCA 등)
W5500 Ethernet 모듈 → ATEM 스위처 제어 및 상태 수신
표시: 2.42" OLED 디스플레이 (카메라 상태·UI)
기구:
Pi Pico는 PCB 뒷면에 납땜, USB-C·BOOTSEL를 전면 케이스에 맞게 연장
케이스용 FreeCAD 파일 공유 (joystick_Case_v2.FCStd)
네트워크 측에서는
DHCP로 IP를 얻고,
mDNS/DNS-SD로 ATEM 스위처를 찾고,
ATEM 프로토콜 특성상 W5500 버퍼보다 큰 패킷과 짧은 타임아웃을 다뤄야 해서,
RTOS 없이 처리하기엔 꽤 빡센 워크로드임을 글에서 강조합니다.
6. Why this matters (WIZnet & Maker 관점)
“언제 RTOS를 써야 하는가?”에 대한 현실적인 사례
단순 블링킹 LED가 아니라,
UI + RS-485 + 이더넷(W5500) + 프로토콜 스택이 섞인 실제 프로젝트에서
FreeRTOS / NuttX / Zephyr를 직접 써보고 장단점을 솔직하게 기록했습니다.
RP2040 + W5500 + RTOS 삼각 조합
W5500 모듈은 ATEM 스위처와의 UDP 통신, DHCP, mDNS 등 “네트워크의 모든 것”을 담당합니다.
RTOS 위에서 W5500을 돌리며, RP2040 듀얼 코어와 함께 저렴하지만 제법 복잡한 비디오 제어 패널을 구현하는 레퍼런스로 쓸 수 있습니다.
커뮤니티 파급력
OSNews, Hacker News, Mastodon, GeekNews 등 여러 커뮤니티에서 이 글을 인용하며,
“비슷한 프로젝트에서 RTOS 선택할 때 참고하라”는 의견이 많이 나왔습니다.
PCBWay의 공유 프로젝트로써, 같은 하드웨어를 그대로 주문해 따라 해볼 수 있다는 점도 큽니다.
7. Quick Reproduce (요약 가이드)
하드웨어 쪽
PCBWay에서 Video control joystick 프로젝트를 열고,
Gerber / BOM / 케이스 파일을 내려받아 제작.
Pi Pico, W5500 모듈, TP8485E, RGB 버튼, 조이스틱, OLED 등 부품을 준비해 조립.
소프트웨어/RTOS 실험 쪽
RP2040 + pico-sdk 프로젝트를 만들고,
본문에서 소개한 것처럼 FreeRTOS를 통합하거나,
NuttX/Zephyr 튜토리얼을 따라가며 Martijn이 겪은 동일한 장단점을 직접 체험해볼 수 있습니다.
네트워크 태스크를
DHCP, mDNS, ATEM 프로토콜, W5500 버퍼 관리
로 나눠 보고, RTOS의 큐/태스크 모델이 bare-metal보다 어떤 차이를 만들어 내는지 탐구해 보세요.