
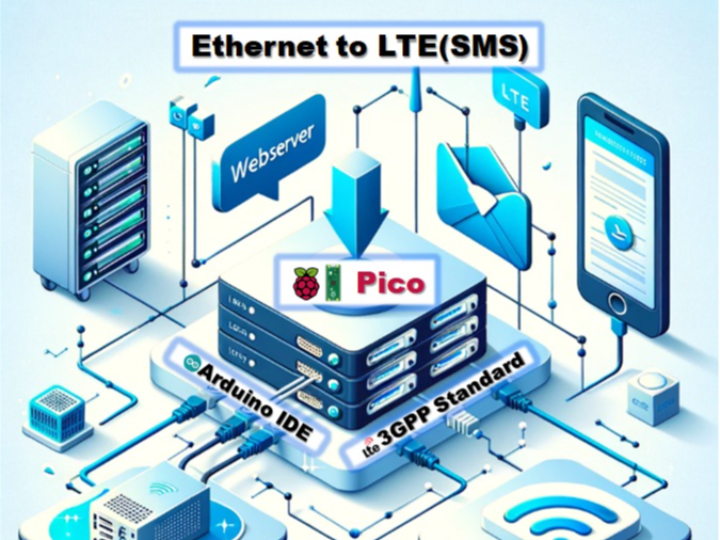
Building an Ethernet to LTE SMS Basic Gateway with WIZnet Pico on Arduino IDE(3GPP)
Learn to build an SMS gateway using WIZnet Pico on Arduino IDE, sending messages from WebServer to phones via LTE Cat.M1.
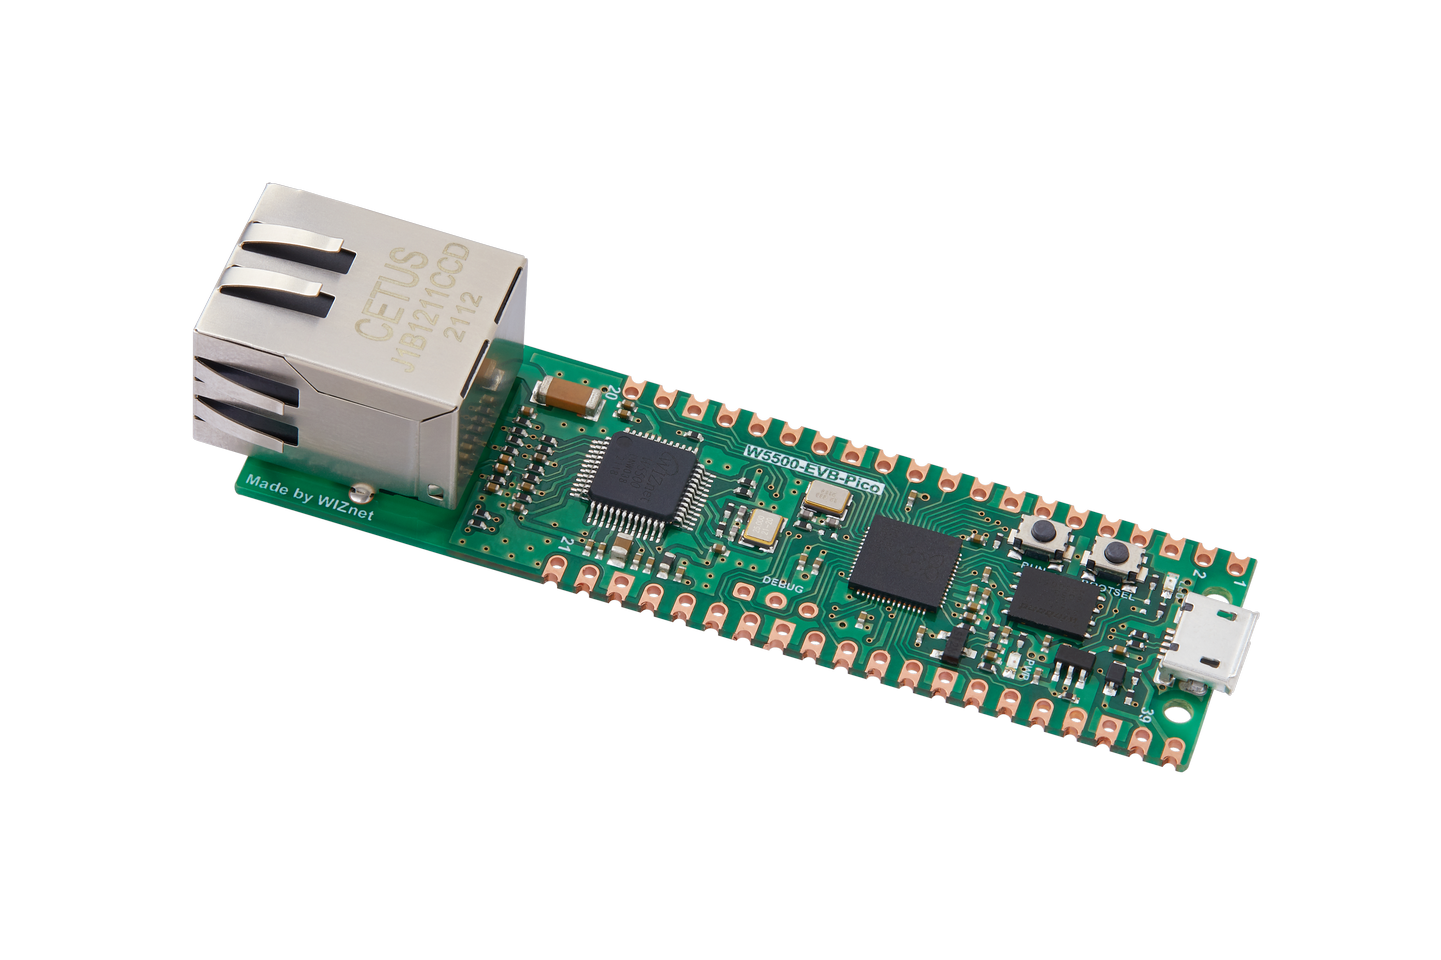
WIZnet - W5500-EVB-Pico
x 1
Raspberry Pi Pico + W5500(Ethernet Module)
Woorinet - WD-N522S
x 1
LTE Cat.M1 Modem(3GPP)

Arduino - Arduino IDE
x 1
Overview
This guide details setting up an SMS gateway with the WIZnet Pico board, combining Raspberry Pi Pico and W5500 Ethernet in Arduino IDE. The WIZnet Pico, acting as a WebServer, accepts phone numbers and messages, and sends them as SMS via LTE Cat.M1 module using 3GPP AT Commands. This project is a practical example for those interested in Arduino-based networking and telecommunications, providing both technical insights and hands-on experience in IoT and communication technology.
STEP 1. Setting Up the Arduino IDE Environment
Setting up the environment to use Ethernet with Raspberry Pi Pico.
- WIZnet Github: https://github.com/Wiznet/arduino-pico
- Getting Start Arduino: The Arduino Raspberry Pi Pico/RP2040-Ethernet V2.1.1 - Hackster.io
STEP 2. Raspberry Pi Pico Multi Serial Set(Serial, Serial2)
This project requires two serial communication ports: one for standard debug messages and another to connect with the LTE Cat.M1 Module.
Default Serial settings for Raspberry Pi Pico by Earle Philhower's Arduino Board Package are detailed below. In this project, Serial (USB Port, for Debug) and Serial2 (for LTE Cat.M1 Module) are used.

[Board Pin map Image]
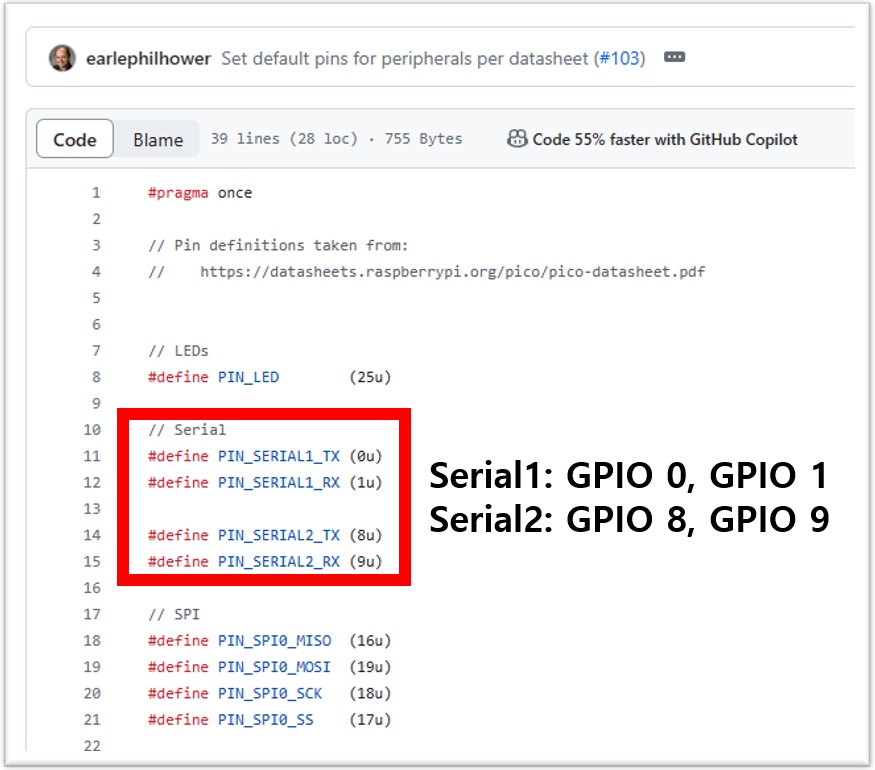
[Earle Philhower Serial Default Setting]
- For more on Arduino Multi Serial usage, refer to the following link:
- Multi Serial Usage Link: W5100S-EVB-Pico Basic Operation in Arduino Environment (Multi-Serial, Serial to Serial2) (wiznet.io)
STEP 3. Implementing a WebServer
The WebServer in this project simply receives and stores phone numbers and messages. An HTML source to input these details on the WebServer hosted by Raspberry Pi Pico was created using ChatGPT.
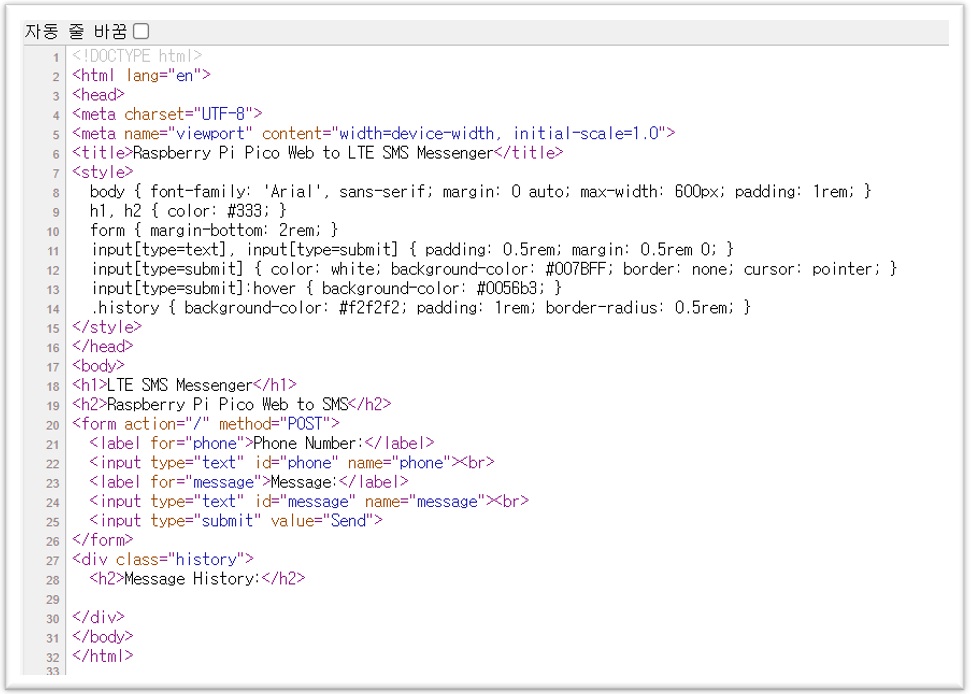
[HTML Source]
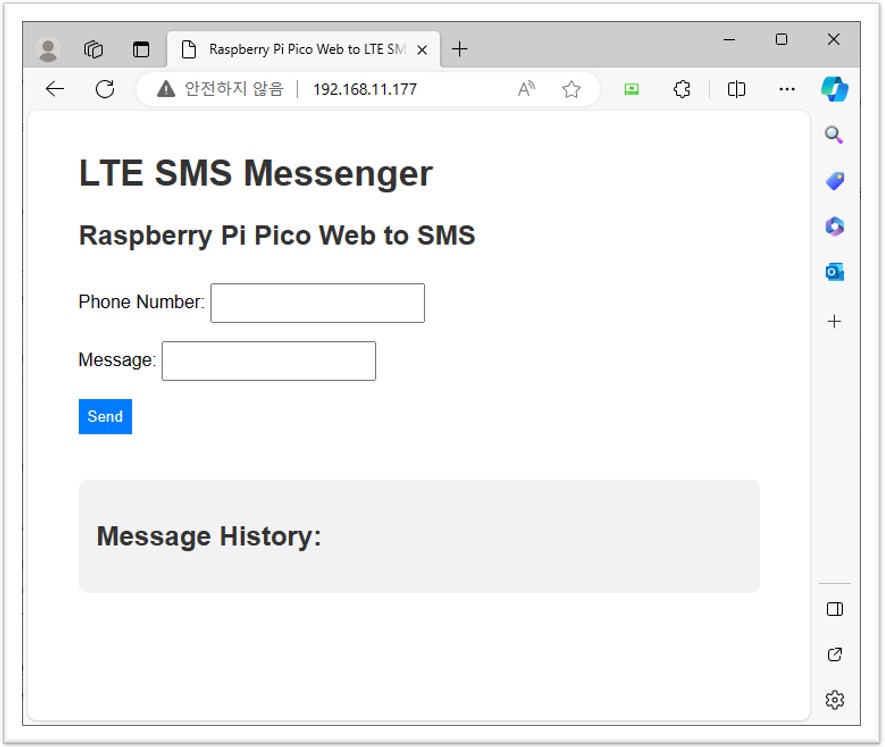
[Webserver]
The following code was implemented in Arduino IDE, illustrating WebServer operation and storing phone numbers and messages in 'phone' and 'message' variables.
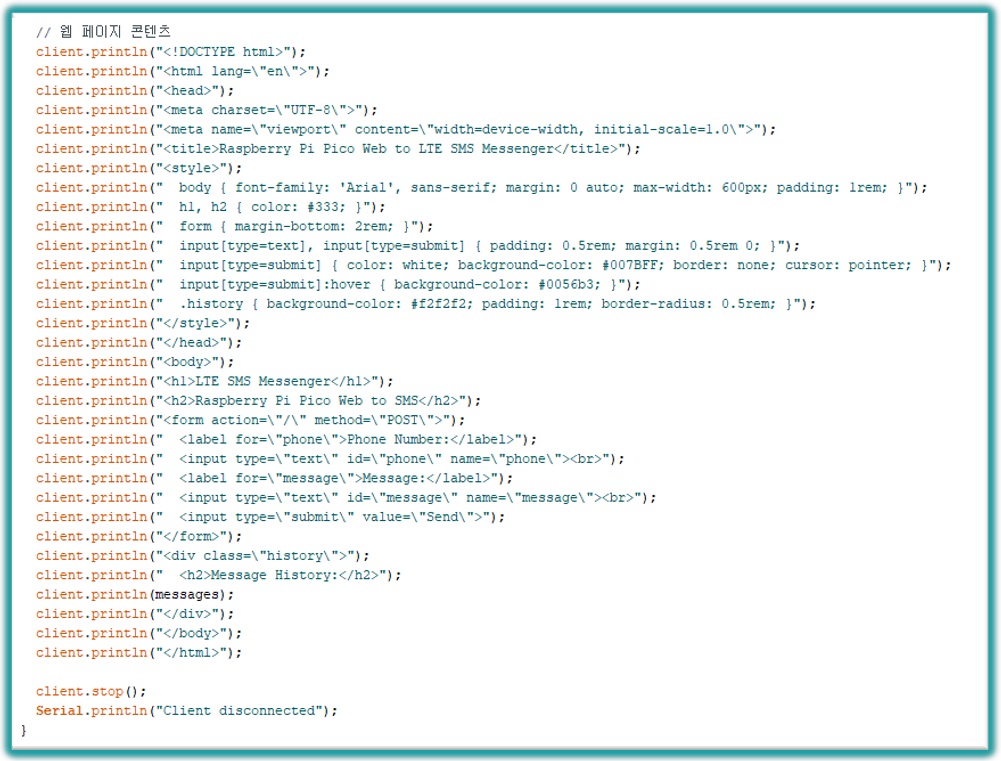
[Arduino IDE WebServer Source]
STEP 4. Implementing a SMS (LTE Cat.M1 Module)
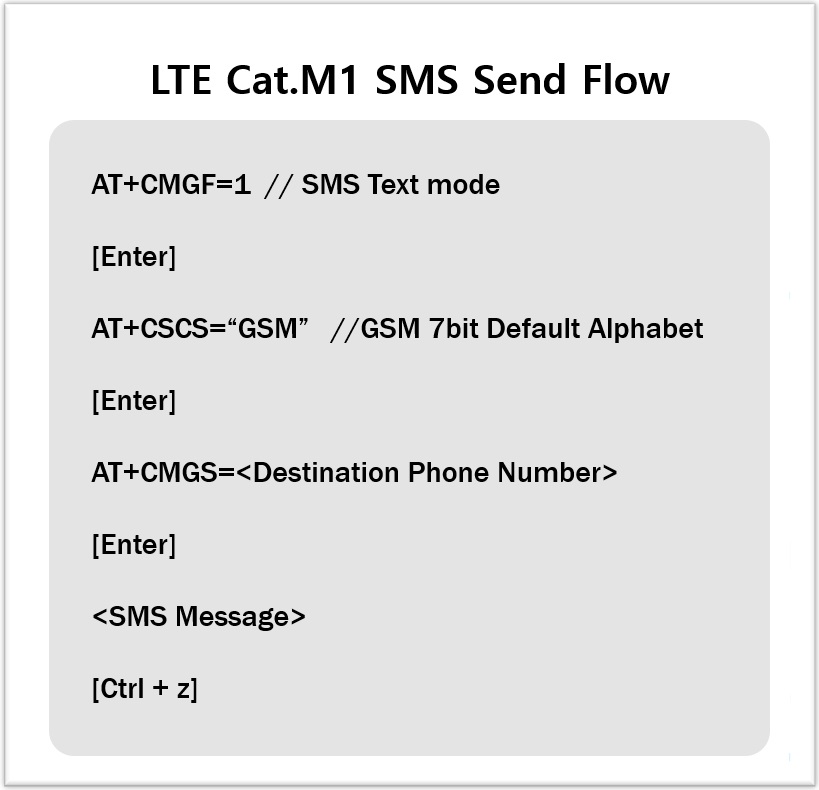
To use the LTE Cat.M1 Module, 3GPP-defined AT Commands were utilized. Note that each module manufacturer may support different commands.
For this project, the commands used are shown below, along with the data flow diagram.
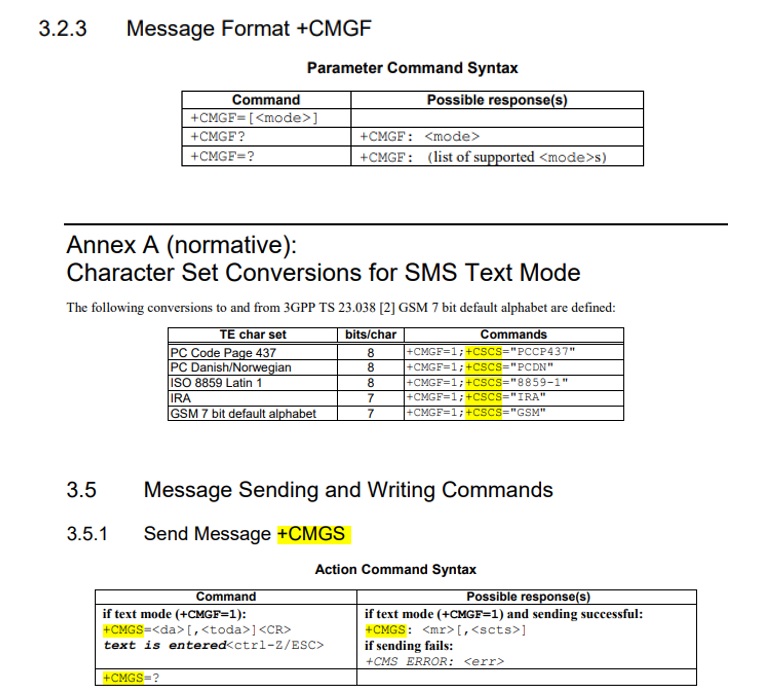
[3GPP Commands Image]
[Data Flow Diagram]
Entering AT Commands through Serial communication will return results, which can be checked for successful operation. It is recommended to test the LTE Cat.M1 Module in StandAlone mode with a PC before connecting to Raspberry Pi Pico. Alternatively, a Serial to Serial2 (Multi-Serial) connection can be used for testing: PC -<Serial0>- Raspberry Pi Pico -<Serial2>- LTE Cat.M1 Module.
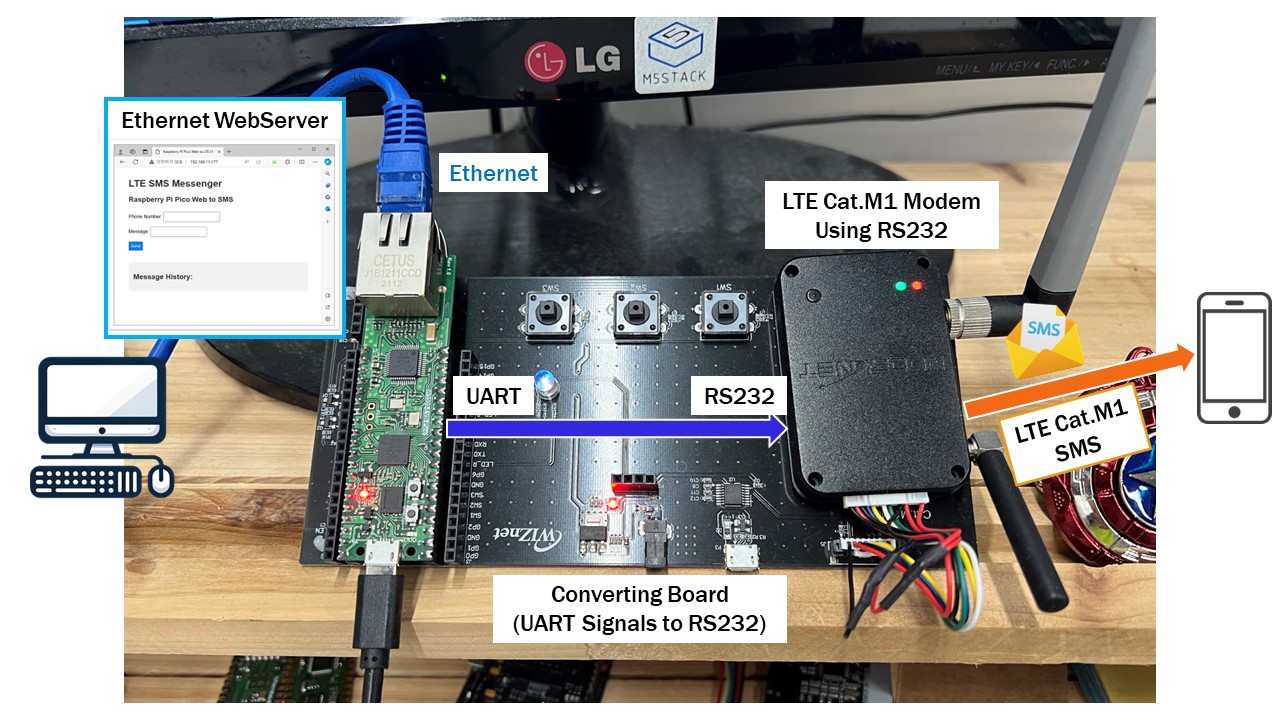
STEP 5. Adding LTE Cat.M1 SMS Functionality to WebServer Source
Based on the above content, you can implement a simple WebServer (Ethernet) to LTE Cat.M1 SMS Gateway using W5500-EVB-Pico(Raspberry Pi Pico+W5500), Arduino IDE, and an LTE Cat.M1 modem. The code below is a basic example of the WebServer to LTE Cat.M1 SMS Send function. It involves the Raspberry Pi Pico receiving phone numbers and SMS messages from clients connected to the WebServer and sending these SMS messages to mobile phones through the LTE Cat.M1 modem. This code utilizes the Arduino IDE's Ethernet Library and 3GPP-defined AT Commands. You can view the operation in the following video.
- [Result Video]
Youtube Video Link
https://www.youtube.com/shorts/5XyrA-1Fyd0
- Source
```cpp
#include <SPI.h>
#include <Ethernet.h>

// Enter a MAC address and IP address for your controller below.
// The IP address will be dependent on your local network:
byte mac[] = {
  0xDE, 0xAD, 0xBE, 0xEF, 0xFE, 0xED
};
IPAddress ip(<Your IP>);

// Initialize the Ethernet server library
// with the IP address and port you want to use
// (port 80 is default for HTTP):
EthernetServer server(80);

String messages = "";


void setup() {
  // You can use Ethernet.init(pin) to configure the CS pin
  //Ethernet.init(10);  // Most Arduino shields
  //Ethernet.init(5);   // MKR ETH shield
  //Ethernet.init(0);   // Teensy 2.0
  //Ethernet.init(20);  // Teensy++ 2.0
  //Ethernet.init(15);  // ESP8266 with Adafruit Featherwing Ethernet
  //Ethernet.init(33);  // ESP32 with Adafruit Featherwing Ethernet
  Ethernet.init(17);
  // Open serial communications and wait for port to open:
  Serial.begin(9600);

  //Serial2 = LTE Cat.M1
  /*
    Serial2.setTX(8);
    Serial2.setRX(9); */
  Serial2.begin(115200);

  while (!Serial) {
    ; // wait for serial port to connect. Needed for native USB port only
  }
  Serial.println("Ethernet WebServer Example");

  // start the Ethernet connection and the server:
  Ethernet.begin(mac, ip);

  // Check for Ethernet hardware present
  if (Ethernet.hardwareStatus() == EthernetNoHardware) {
    Serial.println("Ethernet shield was not found.  Sorry, can't run without hardware. :(");
    while (true) {
      delay(1); // do nothing, no point running without Ethernet hardware
    }
  }
  if (Ethernet.linkStatus() == LinkOFF) {
    Serial.println("Ethernet cable is not connected.");
  }

  // start the server
  server.begin();
  Serial.print("server is at ");
  Serial.println(Ethernet.localIP());
}


void loop() {
  EthernetClient client = server.available();
  if (client) {
    boolean currentLineIsBlank = true;
    String httpMethod, httpPath, postData;
    while (client.connected()) {
      if (client.available()) {
        char c = client.read();
        Serial.write(c);

        if (httpMethod.length() == 0 || httpPath.length() == 0) {
          if (c == ' ') {
            if (httpMethod.length() == 0) {
              httpMethod = postData;
              postData = "";
            } else if (httpPath.length() == 0) {
              httpPath = postData;
              postData = "";
            }
          } else {
            postData += c;
          }
        } else if (c == '\n' && currentLineIsBlank) {
          if (httpMethod == "POST") {
            Serial.println("POST data received");
            int endIndex;
            while (client.available()) {
              char k = client.read();
              postData += k;
              if (postData.endsWith("\r\n\r\n")) {
                break; // End
              }
            }

            // Phone Number and Message Parsing
            String phone = parsePostData(postData, "phone=");
            String message = parsePostData(postData, "&message=");
            messages += "Phone: " + phone + ", Message: " + message + "<br>";

            Serial.println(messages); // Debug Message

            //SMS Send
            Serial2.print("AT+CMGF=1\r\n");
            delay(50);
            while (1) {
              if (Serial2.available())
              {
                char RC = Serial2.read();
                Serial.write(RC);
                if (RC == '\n') break;
              }
            }
            Serial2.print("AT+CSCS=\"GSM\"\r\n");
            delay(50);
            while (1) {
              if (Serial2.available())
              {
                char RC = Serial2.read();
                Serial.write(RC);
                if (RC == '\n') break;
              }
            }
            Serial2.print("AT+CMGS=\"");
            Serial2.print(phone);
            Serial2.print("\"\r\n");
            delay(50);
            while (1) {
              if (Serial2.available())
              {
                char RC = Serial2.read();
                Serial.write(RC);
                if (RC == '\n') break;
              }
            }
            Serial2.print(message);
            Serial2.println();
            delay(50);
            while (1) {
              if (Serial2.available())
              {
                char RC = Serial2.read();
                Serial.write(RC);
                if (RC == '\n') break;
              }
            }
            Serial2.println((char)26);
            delay(50);
            while (1) {
              if (Serial2.available())
              {
                char RC = Serial2.read();
                Serial.write(RC);
                if (RC == '\n') break;
              }
            }
          }

          client.println("HTTP/1.1 200 OK");
          client.println("Content-type:text/html");
          client.println("Connection: close");
          client.println();

          // Webpage Contents
          client.println("<!DOCTYPE html>");
          client.println("<html lang=\"en\">");
          client.println("<head>");
          client.println("<meta charset=\"UTF-8\">");
          client.println("<meta name=\"viewport\" content=\"width=device-width, initial-scale=1.0\">");
          client.println("<title>Raspberry Pi Pico Web to LTE SMS Messenger</title>");
          client.println("<style>");
          client.println("  body { font-family: 'Arial', sans-serif; margin: 0 auto; max-width: 600px; padding: 1rem; }");
          client.println("  h1, h2 { color: #333; }");
          client.println("  form { margin-bottom: 2rem; }");
          client.println("  input[type=text], input[type=submit] { padding: 0.5rem; margin: 0.5rem 0; }");
          client.println("  input[type=submit] { color: white; background-color: #007BFF; border: none; cursor: pointer; }");
          client.println("  input[type=submit]:hover { background-color: #0056b3; }");
          client.println("  .history { background-color: #f2f2f2; padding: 1rem; border-radius: 0.5rem; }");
          client.println("</style>");
          client.println("</head>");
          client.println("<body>");
          client.println("<h1>LTE SMS Messenger</h1>");
          client.println("<h2>Raspberry Pi Pico Web to SMS</h2>");
          client.println("<form action=\"/\" method=\"POST\">");
          client.println("  <label for=\"phone\">Phone Number:</label>");
          client.println("  <input type=\"text\" id=\"phone\" name=\"phone\"><br>");
          client.println("  <label for=\"message\">Message:</label>");
          client.println("  <input type=\"text\" id=\"message\" name=\"message\"><br>");
          client.println("  <input type=\"submit\" value=\"Send\">");
          client.println("</form>");
          client.println("<div class=\"history\">");
          client.println("  <h2>Message History:</h2>");
          client.println(messages);
          client.println("</div>");
          client.println("</body>");
          client.println("</html>");

          client.stop();
          Serial.println("Client disconnected");
        }

        if (c == '\n') {
          // New Line
          currentLineIsBlank = true;
        } else if (c != '\r') {
          currentLineIsBlank = false;
        }
      }
    }
  }
}

// POST Data Parsing Function
String parsePostData(String data, String field) {
  String result = "";
  int startIndex = data.indexOf(field);
  if (startIndex != -1) {
    startIndex += field.length();
    int endIndex = data.indexOf('&', startIndex);
    if (endIndex == -1) {
      endIndex = data.length();
    }
    result = data.substring(startIndex, endIndex);
    result.replace('+', ' '); // Blank
    result.replace("%20", " "); // URL Encoding Blank
  }
  return result;
}
[Result Code]
-
WebServer Send SMS Basic Arduino Code
