
Three ways to master network relays! W55MH32 enables seamless control between web browser
Three ways to master network relays! W55MH32 enables seamless control between web browser, Alibaba Cloud, and local machine.

1. Introduction
HTTP (Hypertext Transfer Protocol) is an application-layer protocol for distributed, collaborative, hypermedia information systems. Based on the TCP/IP communication protocol, it transmits data and is the foundation of data communication on the World Wide Web (WWW). HTTP was initially designed to provide a method for publishing and receiving HTML pages. Resources requested via HTTP or HTTPS are identified by Uniform Resource Identifiers (URIs). This is a brief introduction to the HTTP protocol. For a deeper understanding of this protocol, please refer to the introduction on the Mozilla website: HTTP Overview - HTTP | MDN
MQTT is a lightweight communication protocol based on TCP/IP, employing a publish-subscribe model, and widely used in the Internet of Things (IoT) field.
MQTT works around three core components: Publishers, Brokers (also called servers), and Subscribers. Publishers are responsible for sending messages to specific topics, while brokers receive these messages and forward them to all subscribers to that topic. This model allows for asynchronous communication between devices, and the devices do not need to be aware of each other's existence, thus reducing the complexity of the system.
The W55MH32 is WIZnet's newly launched high-performance Ethernet microcontroller. It utilizes a high-performance Arm® Cortex-M3 core with a maximum clock speed of 216MHz, and integrates 1024KB FLASH and 96KB SRAM. Notably, it features the WIZnet TCP/IP Offload Engine (TOE), integrating a full hardware TCP/IP protocol stack, MAC, and PHY. It also includes a 32KB independent Ethernet transceiver buffer for eight hardware sockets, making it a true all-in-one solution.
2 Project Environment
2.1 Hardware Preparation
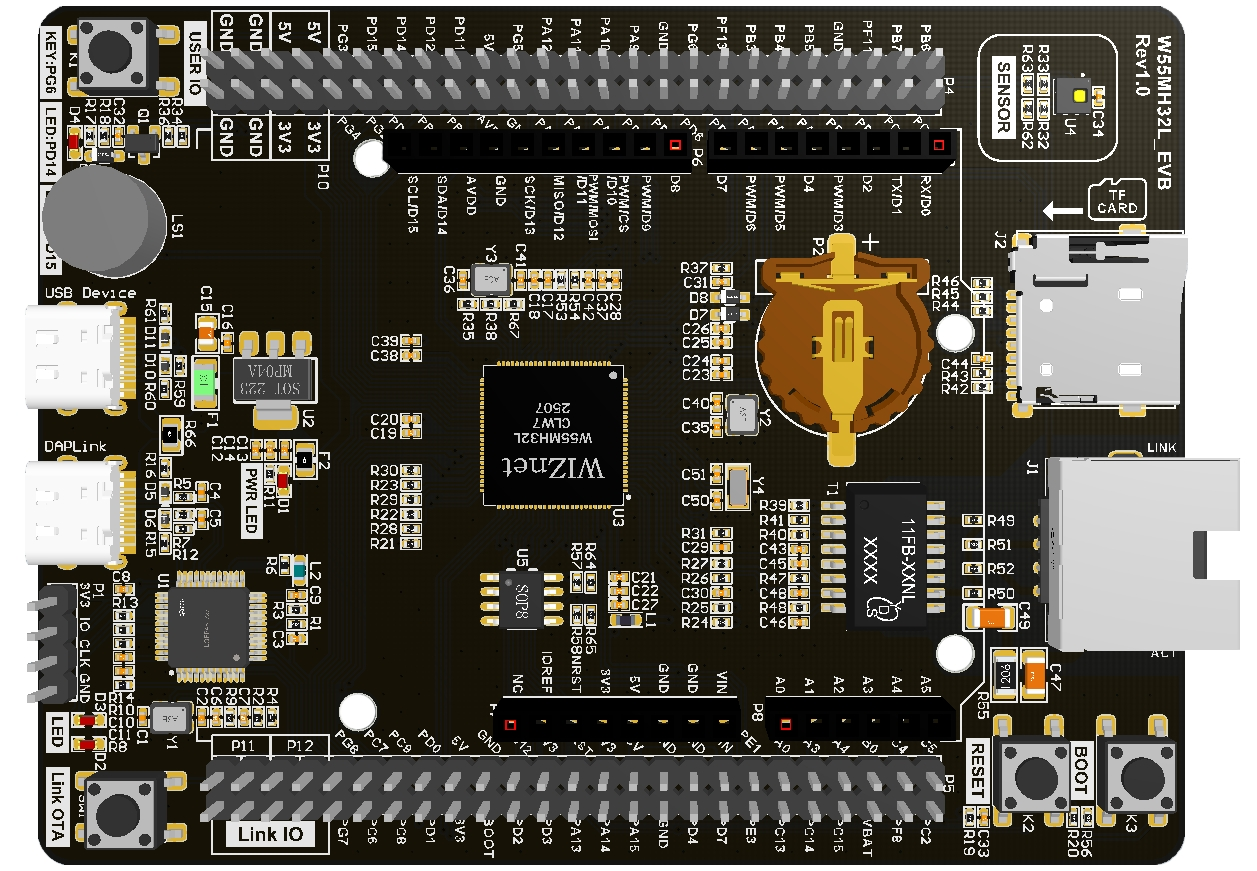
- W55MH32L-EVB
- One network cable
- USB Type-C
2.2 Software Preparation
- Example Link: w5500.com/w55mh32.html
- Development Environment: Keil uVision 5
- Freescale Serial Port Assistant
- Browser
- Alibaba Cloud
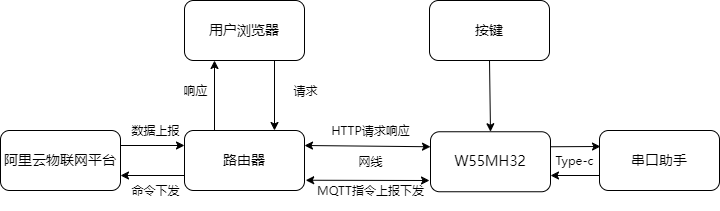
2.3 Solution Diagram
3. Example Modification
1. We download the HTTP_Server example and the MQTT & Aliyun example. We will modify the HTTP_Server example first. We create a web_server.c and a web_server.h, and add header files, global variables, and initialization to web_server.c.
#include "user_main.h"
#include "web_server.h"
#include <stdio.h>
#include <string.h>
// Global variables
uint8_t txBuff[2048] = {0}; // Send buffer
uint8_t rxBuff[2048] = {0}; // Receive buffer
uint8_t socketCount = 8; // Number of supported sockets
uint8_t socketList[] = {0,1}; // Socket list
// LED status management
uint8_t led_status = 0; // 0: Light off 1: Light on
uint8_t status_content[2] = "0"; // Status page content
2. Create an HTML user interface, mainly including an on/off control button (JavaScript event), a real-time debugging information panel, a status polling mechanism (updated every 2 seconds), and a timestamp logging function.
uint8_t *contentName = "index.html";
uint8_t content[] =
"<!doctype html>\n"
"<html lang=\"en\">\n"
"<head>\n"
" <meta charset=\"GBK\">\n"
" <meta name=\"viewport\" content=\"width=device-width, initial-scale=1.0\">\n"
" <title>LED Control</title>\n"
" <style>\n"
" #light {\n"
" width: 100px; height: 100px; border-radius: 50%;\n"
" margin: 20px auto; border: 2px solid #333;\n"
" transition: background-color 0.5s;\n"
" }\n"
" .light-on { background-color: yellow; box-shadow: 0 0 20px yellow; }\n"
" .light-off { background-color: #ccc; }\n"
" .btn { padding: 10px 20px; margin: 5px; }\n"
" #debug { margin-top: 20px; padding: 10px; border: 1px solid #ccc; font-family: monospace; max-height: 200px; overflow-y: auto; }\n"
" </style>\n"
"</head>\n"
"<body>\n"
" <h1>LED Control Panel</h1>\n"
" <button class=\"btn\" onclick=\"controlLED(1)\">Turn on the light</button>\n"
" <button class=\"btn\" onclick=\"controlLED(0)\">Turn off the light</button>\n"
" <div id="debug">Debug information will appear here...</div>\n"
<script>\n"
const light = document.getElementById('light');\n"
const debugDiv = document.getElementById('debug');\n"
\n"
/ // Debug function - Display debug information on the page\n"
function log(message) {\n"
console.log(message);\n"
debugDiv.innerHTML += '<p>' + new Date().toLocaleTimeString() + ': ' + message + '</p>';\n"
debugDiv.scrollTop = debugDiv.scrollHeight; // Automatically scroll to the bottom\n"
}\n"
\n"
/ // Get status on initial load\n"
fetchStatus();\n"
\n"
function controlLED(state) {\n"
" log('Sending control: ' + state);\n"
" fetch(`/control?action=${state ? '1' : '0'}&t=${Date.now()}`)\n"
" .then(response => {\n"
" log(`Control response: ${response.status}`);\n"
" if (response.ok) {\n"
" log('Control command successful');\n"
" fetchStatus();\n"
" } else {\n"
" log('Control command failed');\n"
" }\n"
" })\n"
" .catch(error => {\n"
" log('Control error: ' + error);\n"
" });\n"
" }\n"
"\n"
" function fetchStatus() {\n"
" const url = '/status?t=' + Date.now();\n"
" log('Fetching status: ' + url);\n"
"\n"
" fetch(url)\n"
" .then(response => {\n"
" log(`Status response: ${response.status}`);\n"
" if (!response.ok) {\n"
" throw new Error('Bad status: ' + response.status);\n"
" }\n"
" return response.text();\n"
" })\n"
" .then(status => {\n"
" log('Received status: ' + status);\n"
" updateLight(status.trim()); // Make sure to remove whitespace characters\n"
" })\n"
" .catch(error => {\n"
" log('Status error: ' + error);\n"
" });\n"
" }\n"
" \n"
" function updateLight(status) {\n"
" if (status === '1') {\n"
" light.className = 'light-on';\n"
" log('Light ON - UI updated');\n"
" } else if (status === '0') {\n"
" light.className = 'light-off';\n"
" log('Light OFF - UI updated');\n"
" } else {\n"
" log('Invalid status: ' + status);\n"
" }\n"
" }\n"
" \n"
" // Poll status every 2 seconds\n"
" setInterval(fetchStatus, 2000);\n"
" \n"
" // Initial log\n"
" log('Control panel initialized');\n"
" log('Waiting for status updates...');\n"
" </script>\n"
"</body>\n"
"</html>";
3. Add URL parsing and control logic
static uint8_t parse_url_action(uint8_t *url) {
// Extract the action parameter from the URL
uint8_t *pAction = (uint8_t *)strstr((char *)url, "action=");
return *(pAction + 7); // Return the action value
}
// Perform LED operation based on action
static void do_led_action(uint8_t action)
{
if (action == '1') // Turn on the light
{
printf("[LED] Turning ON\n");
led_status = 1;
status_content[0] = '1';
}
else if (action == '0') // Turn off the light
{
printf("[LED] Turning OFF\n");
led_status = 0;
status_content[0] = '0';
}
else
{
printf("[LED] Unknown action: %c\n", action);
}
/ // Print the current status
printf("[STATUS] Current LED status: %d\n", led_status);
}
4. Add an initialization function for the web server.
// Initialize the Web server
void WebServer_Init(void)
{
// Initialize the HTTP server
httpServer_init(txBuff, rxBuff, socketCount, socketList);
// Register the HTML page
reg_httpServer_webContent(contentName, content);
// Register the status page - Critical fix: Ensure the status page is correctly registered
reg_httpServer_webContent("status", status_content);
// Register the control endpoint
reg_httpServer_webContent("control", (uint8_t *)"OK");
printf("[WEB] Server initialized\n");
printf("[STATUS] Initial LED status: %d\n", led_status); }
5. Add a web server
// Start the Web server
void WebServer_Start(void)
{
for (uint8_t i = 0; i < sizeof(socketList); i++)
{
httpServer_run(i);
}
}
6. Add the core processing function
void handler_user_function(uint8_t *url)
{
printf("[HTTP] Request received: %s\n", url);
// Check if it is a control request
if (strstr((char *)url, "control") != NULL)
{
// 1. Extract the value of action from the URL
uint8_t action = parse_url_action(url);
// 2. Execute the corresponding LED operation based on the value of action
do_led_action(action);
// Debug output
printf("[CONTROL] Processed action: %c\n", action);
}
// Check if it is a status request
else if (strstr((char *)url, "status") != NULL)
{
// Ensure the latest status value is returned
printf("[STATUS] Request received. Returning: %s\n", status_content);

// Update status page content - ensure the latest value is returned
reg_httpServer_webContent("status", status_content);
}
}
// Status retrieval function
uint8_t* get_led_status(void)
{
return status_content;
}
// Status update notification
void update_led_status(void)
{
// Call this function when the LED status changes
reg_httpServer_webContent("status", status_content);
printf("[STATUS] Updated status page to: %s\n", status_content);
}
7. Add the web_server function.
#ifndef __WEB_SERVER_H
#define __WEB_SERVER_H
#include "httpServer.h"
#include <string.h>
// Initialize the Web server
void WebServer_Init(void);
// Start the Web server
void WebServer_Start(void);
extern uint8_t led_status; // 0: Lights off 1: Lights on
extern uint8_t status_content[2]; // Status page content
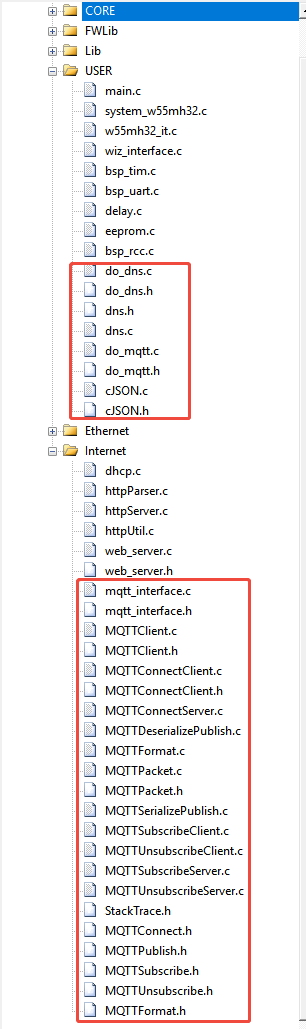
#endif8. Next, we will add the functions from MQTT & Aliyun to HTTP_Server, as shown in the figure, by adding the necessary files.
9. In the do_mqtt.c function, modify clientid, passwd, and username to your own parameters, and modify the product name and device name in the POST and SET topics to your own.
mqttconn mqtt_params = {
   .mqttHostUrl = "iot-06z00h54zbdynx7.mqtt.iothub.aliyuncs.com",
   .server_ip = {
       0,
   },                                                                   /*Define the Connection Server IP*/
   .port = 1883,                                                   /*Define the connection service port number*/
   .clientid = "k18mmode=2,signmethod=hmacsha256,timestamp=1751966302834|", /*Define the client ID*/
   .username = "zhao&k18maZe3w1u",                                         /*Define the user name*/
   .passwd = "1f0069321cb554e432ad893177919fc65579c227a65a9a420b303b7bf8301778", /*Define user passwords*/
   .pubtopic = "/sys/k18maZe3w1u/zhao/thing/event/property/post",           /*Define the publication message*/
   .subtopic = "/sys/k18maZe3w1u/zhao/thing/service/property/set",          /*Define subscription messages*/
   .pubQoS = QOS0,                                 /*Defines the class of service for publishing messages*/
};
10. Modify the function to periodically upload data to the cloud platform; make changes in PUB_MESSAGE and RECV.
#define PUBLISH_COUNTER_MAX 500 // 10-second interval (assuming the main loop cycle is 10ms)
static uint32_t publish_counter = 0;
case PUB_MESSAGE:
{
pubmessage.qos = QOS0;
char buffer[128]; // Ensure the buffer is large enough
snprintf(buffer, sizeof(buffer),
"{\"id\":\"123\",\"version\":\"1.0\",\"params\":{\"LEDSwitch\":%d},\"method\":\"thing.event.property.post\"}",
led_status);
pubmessage.payload = buffer;
pubmessage.payloadlen = strlen(pubmessage.payload);
ret = MQTTPublish(&c, (char *)&(mqtt_params.pubtopic), /* Publish message */
if (ret != SUCCESSS) {
run_status = ERR;
} else {
printf("publish:%s,%s\r\n\r\n", mqtt_params.pubtopic, (char *)pubmessage.payload);
publish_counter = 0; // Reset the counter
run_status = RECV; // Switch to receive/heartbeat status
}
break;
}
case RECV: // Combine heartbeat and receive processing
{
// Keep the MQTT connection active
if (MQTTYield(&c, 30) != SUCCESSS) {
run_status = ERR;
break;
}
/ Process the received message
if (mqtt_recv_flag) {
mqtt_recv_flag = 0;
json_decode(mqtt_recv_msg);
}
/ // Counter scheme: Check if the publish interval has been reached
publish_counter++;
if(publish_counter >= PUBLISH_COUNTER_MAX) {
run_status = PUB_MESSAGE; // Re-enter publish state
}
break;
}
11. When the receiving function prints the LED status, the value of led_status needs to be changed. This should be done by adding lines 17 and 22. The purpose of this is to unify the data between the cloud platform and the web page.
void json_decode(char *msg)
{
   cJSON *jsondata = NULL;
   cJSON *params = NULL;
   cJSON *LED = NULL;
   jsondata = cJSON_Parse(msg);
   if (jsondata == NULL)
   {
       printf("json parse fail.\r\n");
       return;
   }
   params = cJSON_GetObjectItem(jsondata, "params");
   LED = cJSON_GetObjectItem(params, "LEDSwitch");
   if (LED->valueint == 1)
   {
       printf("LED ON\r\n");
            led_status=1; status_content[0] = '1';
   }
   else
   {
       printf("LED OFF\r\n");led_status=0; status_content[0] = '0';
   }
   cJSON_Delete(jsondata);

}
12. In the main function, allocate a socket for MQTT, and then add code for an external interrupt (PG6). The PG6 will be used to locally control the relay switch.
#define SOCKET_ID4 4
void EXTI_Configuration(void)
{
EXTI_InitTypeDef EXTI_InitStructure;
GPIO_InitTypeDef GPIO_InitStructure;
NVIC_InitTypeDef NVIC_InitStructure;
// 1. Enable GPIOG clock
RCC_APB2PeriphClockCmd(RCC_APB2Periph_GPIOG, ENABLE);
// 2. Configure PG6 as floating input
GPIO_InitStructure.GPIO_Pin = GPIO_Pin_6;
GPIO_InitStructure.GPIO_Mode = GPIO_Mode_IN_FLOATING;
GPIO_InitStructure.GPIO_Speed = GPIO_Speed_50MHz;
GPIO_Init(GPIOG, &GPIO_InitStructure);
// 3. Enable AFIO clock
RCC_APB2PeriphClockCmd(RCC_APB2Periph_AFIO, ENABLE);
// 4. Map PG6 to EXTI6
GPIO_EXTILineConfig(GPIO_PortSourceGPIOG, GPIO_PinSource6);
// 5. Configure EXTI6 interrupt line
EXTI_InitStructure.EXTI_Line = EXTI_Line6;
EXTI_InitStructure.EXTI_Mode = EXTI_Mode_Interrupt;
EXTI_InitStructure.EXTI_Trigger = EXTI_Trigger_Falling; // rising edge trigger
EXTI_InitStructure.EXTI_LineCmd = ENABLE;
EXTI_Init(&EXTI_InitStructure);
// 6. Configure NVIC NVIC_InitStructure.NVIC_IRQChannel = EXTI9_5_IRQn; // Shared interrupt channel for EXTI5~9
NVIC_InitStructure.NVIC_IRQChannelPreemptionPriority = 0;
NVIC_InitStructure.NVIC_IRQChannelSubPriority = 0;
NVIC_InitStructure.NVIC_IRQChannelCmd = ENABLE;
NVIC_Init(&NVIC_InitStructure);
}
// EXTI9_5 interrupt service function
void EXTI9_5_IRQHandler(void)
{
// Check EXTI6 interrupt flag
if (EXTI_GetITStatus(EXTI_Line6) != RESET)
{
// Clear interrupt flag
EXTI_ClearITPendingBit(EXTI_Line6);
// Execute interrupt handling
led_status = !led_status;
status_content[0] = (status_content[0] == '0') ? '1' : '0';
if(led_status==0)
printf("LED_OFF");
}
else
{ printf("LED_ON");}
}
}
}13. Add the `do_mqtt()` function to the loop, and then add the header file `#include "do_mqtt.h"` to `main.c`.
4. Function Verification
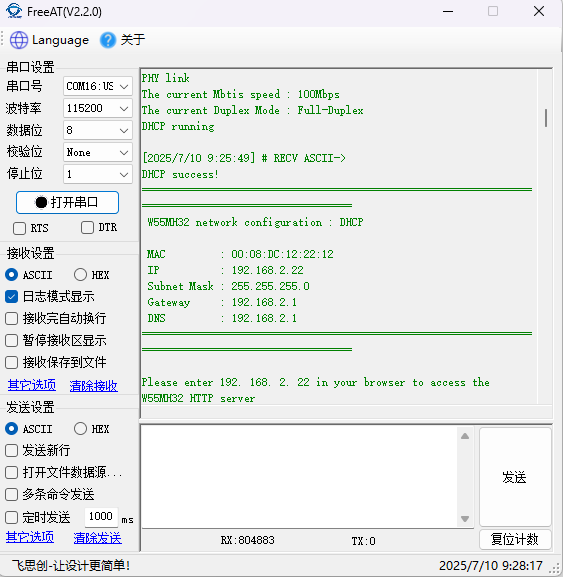
1. After hardware connection is complete, the following information will be printed after the program is burned and powered on: Enter 192.168.2.22 in the browser to access the HTML page.
2. We simultaneously open the serial port assistant, Alibaba Cloud IoT Platform, and HTML webpage control for observation. We will first use the webpage control to observe the phenomenon.
3. Turn off the LED.

4. We will then use Alibaba Cloud for control, first setting the LED to be on.
5. Turn off the LED.

6. Local button control, observe the status of the Alibaba Cloud IoT Platform and the changes in the HTML webpage. First, we tested the on/off state.

7. Then, we conducted a local button-based off test.

As shown above, the function is complete. The relay switch can be controlled via Alibaba Cloud, an HTML webpage, and buttons. The on/off and control modes are interconnected, and the relay status can be viewed in all three modes.
5. Summary
This project successfully implemented remote control of the relay via a webpage and cloud platform using the W55MH32, verifying the feasibility of an Ethernet-based embedded web server solution and cloud platform control. Thank you for your patience in reading! If you have any questions during the reading process, or would like to learn more about this product and its applications, please feel free to leave a message via private message or in the comments section. We will reply to your message as soon as possible to provide you with more detailed answers and assistance!
———————————————— Copyright Notice: This article is an original article by CSDN blogger "Playing with Ethernet," and follows the CC 4.0 BY-SA copyright agreement. Please include the original source link and this statement when reprinting.
Original link: https://blog.csdn.net/2301_81684513/article/details/150446482