

Story
This time I had made a Air Quality System based on W5100S-EVB-PICO with different kinds of air quality sensors to collect air quality readings.
Those sensors will be collected by W5100S-EVB-PICO and uploaded to beebotte IOT server.
By the support of Beebotte IOT server, it could post a lot of data in the same time and it has webhook feature that allows me to connect with IFTTT platform to display notification to my phone.
For details, please refer to the information below.
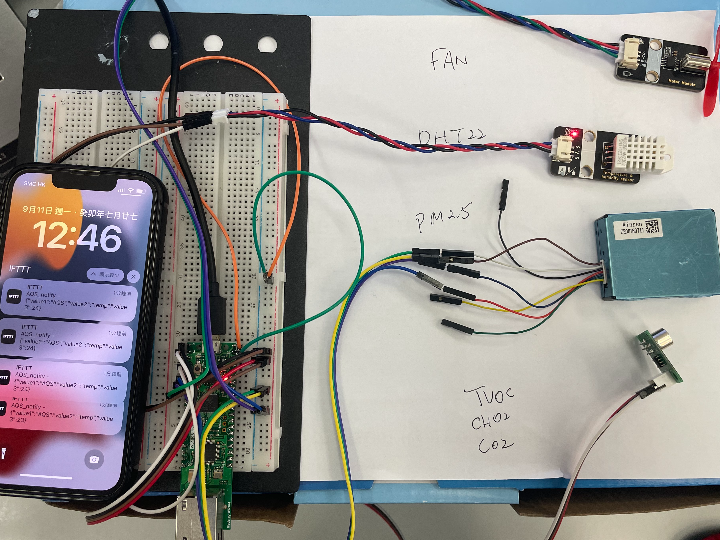
Structure:

AQ Sensor - It is a 3 in 1 sensor that I found from Taobao shop that collects TVOC, CHO2 and CO2 readings from Air. It used UART format to send out those data.
PM Sensor - It is a sensor that records PM1.0 , PM2.5 and PM10 readings from Air. It also used UART format to send out those data.
DHT22 sensor - A module collects Temperature and Humidity Sensor.
Fan - It is a four pin fan motor that could move forward and backward. However, I just connect the forward pin to let the fan moving forward.
Beebotte IOT server - W5100S-EVB-PICO used MQTT protocol to communicate with Beebotte. It display all the readings with show history records in line chart and control the fan with IOT server rules.
IFTTT - It used the webhook provided by Beebotte IOT server to delivery message to IFTTT. I had connect the "Then" section to IFTTT mobile APP notification.
Programming - Sensors
General Structure
From the sensors that I used, they are using the same structure and format to handle data.
It contains the starting byte to notified the module that you are using, few bytes of data from those readings and a checking byte to check the data are correct.
For these module, it contains another method "Request and Respond (Q&A)" to receive those readings. For simplify and allow viewers to easily get use to those module, I had just used "wait for response" method to collect those readings from these sensor modules.
Starting Byte:
Since I'm just using each type sensor for showing the possibility of this applicaiton, I could just use the GPIO pins that I input to seperate with two of my sensor modules.
For details, you could click on the links for the sensors. It includes enough information you to setup the sensor.


Data Bytes:
For my sensor, each of my module has 3 sets of data from the UART terminal. Each set of data contain 2 bytes. It is required to translate into correct format to allow viewers to understand those value. The method has provided from the links above.


Checking Byte:
The End byte of each string of data will allow user to identify the message received from the UART terminal is it accurate. The calucation method is adding the first byte to the byte before the checking byte. Since I had used "wait for response" format, it provides the standard length from the sensors. Thus, I will check those data to prevent receving any missing data.


PM Sensors:
The following are the circuitpython codings for PM sensors:
import board
import busio
import time
import gc

class PM2_5:
    # Create a UART connection with the module
    def __init__(self, TX_pin : pin, RX_pin:pin) -> None:
        self.uart = busio.UART(TX_pin,RX_pin, baudrate = 9600)

    #Collect data function from the correct bytes
    def collect_data (self) -> None:
        try:
            self.data  = self.uart.read(32) #PM sensor data size is 32 byte
            self._check_data() #Check data to prevent any data lost
            PM10 = int.from_bytes((self.data[10].to_bytes(1,'big') + self.data[11].to_bytes(1,'big')),'big')
            PM25 = int.from_bytes((self.data[12].to_bytes(1,'big') + self.data[13].to_bytes(1,'big')),'big')
            PM100 = int.from_bytes((self.data[14].to_bytes(1,'big') + self.data[15].to_bytes(1,'big')),'big')
            gc.collect()
            return PM10, PM25, PM100

        except Exception as error:
            raise error

     # Internal function to check data lost. If yes, it will skip those message and display error
    def _check_data(self) -> None:
        check = 0
        self.uart.reset_input_buffer()
        for i in range (30):
            check = check + self.data[i]
        result = int.from_bytes((self.data[30].to_bytes(1,'big') + self.data[31].to_bytes(1,'big')),'big')
        if result != check:
            raise ValueError ("Data Incorrect")
Air Quality Sensor:
The following are the circuitpython codings for Air Quality:
import board
import busio
import time
import gc

class air_quality:
    # Create a UART connection with the module
    def __init__(self, TX_pin : pin, RX_pin:pin) -> None:
        self.uart = busio.UART(TX_pin,RX_pin, baudrate = 9600)
        self.data = {}

    #Collect data function from the correct bytes
    def collect_data (self) -> None:
        try:
            for i in range (9): #PM sensor data size is 9 byte
                self.data[i]  = self.uart.read(1)
            self._check_data() #Check data to prevent any data lost
            TV0C = int.from_bytes((self.data[2] + self.data[3]),'big')
            CH02 = int.from_bytes((self.data[4] + self.data[5]),'big')
            C02 = int.from_bytes((self.data[6] + self.data[7]),'big')
            if TV0C == 0 and CH02 == 0 and C02 == 0:
                raise SyntaxError ("Module not Ready")
            else:
                gc.collect()
                return TV0C, CH02, C02

        except Exception as error:
            raise error

     # Internal function to check data lost. If yes, it will skip those message and display error
    def _check_data(self) -> None:
        check = 0
        self.uart.reset_input_buffer()
        for i in range (8):
            check = check + int.from_bytes(self.data[i],'big')
        final = check.to_bytes(2,'big')
        if final[1].to_bytes(1,'big') != self.data[8]:
            raise ValueError ("Data Incorrect")
Programming - DHT22 Sensor:
I just based circuitpython and adafruit's DHT22 library and example to collect Temperature and Humidity readings.
Programming - Fan:
I just used Digitalio to active the GPIO pins for fan. If it received data from beebotte IOT platform. It will turn on the fan.
The purpose for this section is to show the communication are in both side using MQTT protocol.
Code:
#Add Fan
fan = digitalio.DigitalInOut(board.GP6)
fan.direction = digitalio.Direction.OUTPUT

#Receive message function for MQTT (beebotte)
def message(client, topic, message):
    # Method callled when a client's subscribed feed has a new value.
    print("New message on topic {0}: {1}".format(topic, message))
    if message != None:
        fan.value = 1
Programming - All in ONE:
This section is showing how to create a full communication for all the sensors to communicate with Beebotte IOT platform.
Import libraries:
import board
import busio
import PM2_5 #PM sensor
import aq #Air Quality
import time
import adafruit_dht #
import digitalio
from random import randint
from secrets import secrets

#WIZnet Ethernet libraries
from adafruit_wiznet5k.adafruit_wiznet5k import *
import adafruit_wiznet5k.adafruit_wiznet5k_socket as socket

import adafruit_minimqtt.adafruit_minimqtt as MQTT #MQTT library
Activate modules:
#Add PM2.5
PM_test = PM2_5.PM2_5(board.GP4, board.GP5)

#Add air quality
air_q = aq.air_quality(board.GP0, board.GP1)

#Add DHT22
dhtDevice = adafruit_dht.DHT22(board.GP2)

#Add Fan
fan = digitalio.DigitalInOut(board.GP6)
fan.direction = digitalio.Direction.OUTPUT
MQTT Topic setups:
MQTT topics for Beebotte are combined with the channel name with the resources of that channel. For details, I will explained it on Beebotte section.
# MQTT Topic
# Use this topic if you'd like to connect to a standard MQTT broker
mqtt_topic = secrets["Beebotte_channel"] #hidden in secret
mqtt_temp = "/temp"
mqtt_hum = "/hum"
mqtt_pm1 = "/pm1"
mqtt_pm25 = "/pm25"
mqtt_pm10 = "/pm10"
mqtt_tvoc = "/tvoc"
mqtt_cho2 = "/ch02"
mqtt_co2 = "/c02"
mqtt_fan = "/fan"
Callback setup:
For MQTT protocol, it required to monitor the MQTT channel to monitor on any updates. If it contains new updates from the channel, it is required to use this callback to receive those data.
# Define callback methods which are called when events occur
# pylint: disable=unused-argument, redefined-outer-name
def connect(client, userdata, flags, rc):
    # This function will be called when the client is connected
    # successfully to the broker.
    print("Connected to MQTT Broker!")
    print("Flags: {0}\n RC: {1}".format(flags, rc))


def disconnect(client, userdata, rc):
    # This method is called when the client disconnects
    # from the broker.
    print("Disconnected from MQTT Broker!")


def subscribe(client, userdata, topic, granted_qos):
    # This method is called when the client subscribes to a new feed.
    print("Subscribed to {0} with QOS level {1}".format(topic, granted_qos))

def unsubscribe(client, userdata, topic, pid):
    # This method is called when the client unsubscribes from a feed.
    print("Unsubscribed from {0} with PID {1}".format(topic, pid))


def publish(client, userdata, topic, pid):
    # This method is called when the client publishes data to a feed.
    print("Published to {0} with PID {1}".format(topic, pid))

def message(client, topic, message):
    # Method callled when a client's subscribed feed has a new value.
    print("New message on topic {0}: {1}".format(topic, message))
    if message != None:
        fan.value = 1

# Connect callback handlers to client
mqtt_client.on_connect = connect
mqtt_client.on_disconnect = disconnect
mqtt_client.on_subscribe = subscribe
mqtt_client.on_unsubscribe = unsubscribe
mqtt_client.on_publish = publish
mqtt_client.on_message = message
Connect to Beebotte using MQTT:
It username will be the token provided by Beebotte.
# Initialize MQTT interface with the ethernet interface
MQTT.set_socket(socket, eth)

# Initialize a new MQTT Client object
mqtt_client = MQTT.MQTT(
    broker="mqtt.beebotte.com",
    username=secrets["Beebotte_user"],
    password= "",
    client_id= "",
    is_ssl=False,
)
Main Loop:
This section will collect readings from from each activated sensor modules and publish it to Beebotte IOT platform. It used try except statement to ignore error readings from those sensors.
while True:
    mqtt_client.loop() #Monitor feedbacks from Beebotte
    try:
        # Print the values to the serial port
        temperature_c = int(dhtDevice.temperature)
        print("Publishing to %s" % mqtt_topic)
        mqtt_client.publish(mqtt_topic+mqtt_temp, '{"data": '+ '{}'.format(temperature_c) + ', "write": true}')
        humidity = int(dhtDevice.humidity)
        mqtt_client.publish(mqtt_topic+mqtt_hum, '{"data": '+ '{}'.format(humidity) + ', "write": true}')
        print(
            "Temp:  {:.1f} C    Humidity: {}% ".format(temperature_c, humidity)
        )
        TV0C,CH02,C02 = air_q.collect_data()
        mqtt_client.publish(mqtt_topic+mqtt_tvoc, '{"data": '+ '{}'.format(TV0C) + ', "write": true}')
        mqtt_client.publish(mqtt_topic+mqtt_cho2, '{"data": '+ '{}'.format(CH02) + ', "write": true}')
        mqtt_client.publish(mqtt_topic+mqtt_co2, '{"data": '+ '{}'.format(C02) + ', "write": true}')
        print ("TV0C value = {} ug/m3".format(TV0C))
        print ("CH02 value = {} ug/m3".format(CH02))
        print ("C02 value = {} PPM".format(C02))
        PM1,PM25,PM10 = PM_test.collect_data()
        mqtt_client.publish(mqtt_topic+mqtt_pm1, '{"data": '+ '{}'.format(PM1) + ', "write": true}')
        mqtt_client.publish(mqtt_topic+mqtt_pm25, '{"data": '+ '{}'.format(PM25) + ', "write": true}')
        mqtt_client.publish(mqtt_topic+mqtt_pm10, '{"data": '+ '{}'.format(PM10) + ', "write": true}')
        print ("PM1.0 value = {} ug/m3".format(PM1))
        print ("PM2.5 value = {} ug/m3".format(PM25))
        print ("PM10 value = {} ug/m3".format(PM10))

        time.sleep (0.5)

    except RuntimeError as error:
        # Errors happen fairly often, DHT's are hard to read, just keep going
        print(error.args[0])
        time.sleep(2.0)
        continue
    except SyntaxError as error:
        print (error)
        time.sleep(2.0)
        continue
    except TypeError as error:
        time.sleep(0.1)
        continue
    except ValueError as error:
        time.sleep(0.1)
        continue
    except Exception as error:
        dhtDevice.exit()
        raise error

    time.sleep(2.0)
Beebotte IOT Platform:
Beebotte IOT platform is a powerful IOT platform that allows user to easily upload a lot of device into this platform and it includes different kind of setups to communicate with different kinds of platforms or device.
The only limitation is the amount message and the response method are fixed.
Pro:
- Unlimted channels and resources
- Records a long record information
- BeeRules to communicate with other platforms or return message back to device
Con:
- Limited message to Beebotte
- BeeRules responded method are fixed
Steps:
1. Sign up for a new account ( it required activate through email)
2. Create channels
3. Find the channel token
4. Use "mqtt.beebotte.com" without SSL to communicate with beebotte
5. Create a dashboard
6. Set Beerules to communicate with IFTTT and our W5100S-EVB-PICO
Create Channels:
FInd create new from the My channel section:

It is required to fill in the channel name and resource name to communicate with the Beebotte IOT platform.

Find Channel Token:
After you had created a channel, you are required to find the channel token for connecting with this channel.
This Token will place it on username section without adding any password.

Connect to Beebotte with MQTT:
For simplication, I had simply used MQTT protocol without SSL to connect with Beebotte.
Details: mqtt.beebotte.com, Port 1883, no SSL
After it has connected, it is required to subscribe or publish information to specific resource. The following are the format for communicating with those resources.
Format : "channel/resource"
Publish Format (Json) : {"data": object, "write": true}
For calucating the usage of the message or other detials to communicate through MQTT, you could refer to this LINK.
Create Dashboard:
Creating a Dashboard is simple, you just required to provide the correct name for your dashboard and collected from which channel's resource will be good to go.
It contains gauge meter and line chart to allow user easily to create their simple dashboard.


Set BeeRules:
BeeRules has three part that are required to set. Details - Please refer to this LINK.
1. Set the Trigger Event:
The Trigger event has seperate into 3 part. The first one is selecting the trigger event. there are few option that showed as follow.

The second part is selecting the channel that will be trigger. You could use * for checking with all your channels.
The last part is selecting the resource of that channel. You could use * for checking with all your resources.
2. Set the condition:
This is a selective rules. You could skip it by changing it to OFF.
For the trigger events that required condition, you could select the trigger data that you get from the event.
Please selecting the condition's operator and related value.
If the trigger data has passed the condition, it will take the action step.

3. Set Action:
You could select your action to communicate with different platforms using webhook or send information to different channels.
For my case, I had selected to change one of my resources that has been subscribed by W5100S-EVB-PICO to make my fan turn on.
I also send an action to post it on IFTTT mobile APP.

For changing one of my subscribe event, I just select "write to channel" action to one of my resources with the triggered data.
Since I had subscribed with that specific resource with W5100S-EVB-PICO, it will trigger my fan to turn on.

For Webhook with IFTTT, I just need to find the correct link from IFTTT and place it to the Link section will be fine. Beebotte will handle the rest for me.
IFTTT + IFTTT APP notification
For IFTTT, I had make it in the most simple way.
For details, please refer to this LINK.
Steps:
1. Create a IFTTT account
2.Create a Applet
a) IF section: Webhook
b) Then section: Notification (It will be IFTTT APP notification)
3. Provide the correct link to Beebotte
Create a Applet - IF section:
Select Create - it will show the IF section. Press Add and find webhook


Please select trigger "Receive a web request with a JSON payload". Beebotte has JSON payload in this request.

Please input the Event name. This information will affected webhook link.

Create a Applet - Then section:
After IF section has been done, you are required to add Then section to complete the progress.
Press Add in then section after the IF section was completed.

Select the notification section.

Since the information provided from Beebotte is simple, I will just use "Send a notification from the IFTTT app"

Make the correct message for displaying on your IFTTT APP

Provide the correct link to Beebotte:
Please go to "Explore" and "Find webhooks" then go to "Documentation"


When you are inside documentations, it shows the key for connection to your account. There will be a example link for you like the following.

Code the link and change the {event} section to your event name that just made from IF section.

After you had put the correct link to Beebotte, it will publish a notification after action has been taken from Beebotte IOT platform.
Results:
These are the results for my application.
W5100S-EVB-PICO in Thonny:
From W5100S-EVB-PICO Section, it shows our PICO has collected the readings from those modules.
If there are any changes from the temperature section, it will activate the fan to turn on. This section is controlled by Beebotte's BeeRules.
As you could see from the image below, it shows the resource that I had subscribe showed an information from Beebotte IOT platform.

Beebotte Dashboard:
The following are the dashboard section on Beebotte. It shows it could display multiple readings from W5100S-EVB-PICO and I had made a simple line graph to show the records for my readings.
I had open this dashboard to public. (LINK)

IFTTT APP:
IFTTT APP could display the detail information provided by BeeBotte. However, the format and style from Beebotte is fixed. Thus, it cannot be changed.

YouTube:
Please find the whole progress for my application.