
SPI-Ethernet Module W5500 Usage Manual for mros2-esp32
SPI-Ethernet Module W5500 Usage Manual for mros2-esp32
A Step-by-Step Guide to Creating a Wired mros-Esp32 Node with the WIZnet W5500
This guide provides detailed instructions for connecting an mros-esp32 node to a stable, low-latency wired network using the WIZnet W5500 SPI-to-Ethernet module. By replacing a potentially unstable Wi-Fi connection with a wired one, you can significantly improve the reliability and performance of your robotics projects.
This project leverages the W5500's hardware TCP/IP stack to offload network processing from the ESP32, ensuring high-speed and stable communication for mros-esp32 topics and services. With a few configuration changes, you can easily switch the mros-esp32 networking interface from Wi-Fi to Ethernet and test it immediately with the echoback_string example.
What is ROS 2 ?
- ROS 2 is an open-source framework for developing robot software applications.
- It acts as communication middleware, helping a robot's various programs (nodes) exchange data with one another.
- It is the next-generation version with improved performance and stability, making it suitable for real-time control, multi-robot systems, and commercial products.
Micro-ROS
https://github.com/micro-ROS
https://www.hackster.io/search?q=ros&i=projects
## 1. Prerequisites Hardware Components
Before you begin, make sure you have all the necessary hardware and software components.
Hardware Components⚙️
- ESP32-S3 Development Board: An
ESP32-S3-DevKitC-1is used in this guide. - WIZnet W5500 Module: The
WIZ850iomodule is recommended as it's a compact board featuring the W5500 chip. - External 3.3V Power Supply: A dedicated power source for the W5500 module is highly recommended to prevent instability.
- Jumper Wires & Breadboard: For connecting the components.
- Ethernet Cable & LAN Connection: To connect your project to a network switch, router, or PC.
Software & Services💻
- Ubuntu: Ubuntu 22.04 is used as the development environment.
- ESP-IDF v5.x: The Espressif IoT Development Framework. Ensure it is properly installed and configured.
- mros-esp32: The project files for mros-esp32 on the ESP32, including the required Ethernet sample code (
PR #27 - idf.py CLI: The command-line interface for managing ESP-IDF projects.
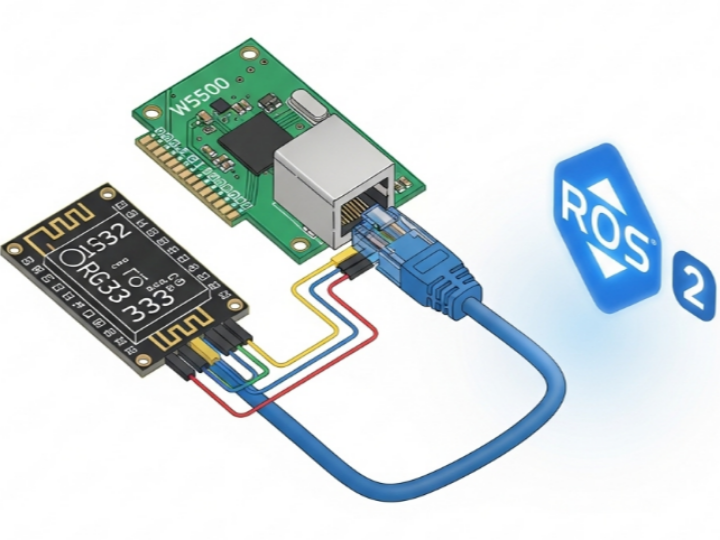
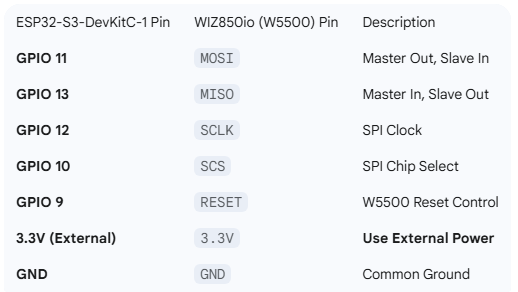
## 2. Hardware Setup & Wiring
Properly connecting the ESP32-S3 to the WIZ850io module is the first critical step. The communication is handled over the SPI protocol.
Follow this wiring diagram carefully. Pay special attention to the power supply—powering the WIZ850io directly from the ESP32's 3.3V pin can cause the module to reset unexpectedly. Using a stable external 3.3V source is the best practice.
## 3. Software Configuration
With the hardware wired, the next step is to configure the mros-esp32 project to use the SPI-Ethernet interface instead of Wi-Fi.


- Navigate to your project directory in the terminal.
- Launch the configuration menu by running the following command:
idf.py menuconfig - Configure the network interface by navigating to the following path:
mros-esp32→Network Interface→ SelectEthernet-SPI - Set up the Ethernet driver in the next menu:
Example Ethernet Configuration→SPI Ethernet→Enable - Assign the Reset Pin to match your hardware wiring:
PHY Reset GPIO number→ Enter9Save your changes and exitmenuconfig.
Code Initialization Snippet
The ESP-IDF Ethernet driver makes initialization straightforward. The configuration you just set in menuconfig is used by code like this to set up the W5500's MAC (Media Access Control) and PHY (Physical) layers and install the driver.
// Summary of the initialization process in the application code
// 1. Define default MAC and PHY configurations.
eth_mac_config_t mac_config = ETH_MAC_DEFAULT_CONFIG();
eth_phy_config_t phy_config = ETH_PHY_DEFAULT_CONFIG();
// 2. Configure the SPI device interface.
spi_device_interface_config_t spi_cfg = {
// ... SPI pin settings are configured here based on menuconfig ...
};
// 3. Create new MAC and PHY instances for the W5500.
esp_eth_mac_t *mac = esp_eth_mac_new_w5500(&spi_cfg, &mac_config);
esp_eth_phy_t *phy = esp_eth_phy_new_w5500(&phy_config);
// 4. Combine MAC and PHY into a default Ethernet configuration.
esp_eth_config_t eth_config = ETH_DEFAULT_CONFIG(mac, phy);
// 5. Install the Ethernet driver.
esp_eth_handle_t eth_handle = NULL;
ESP_ERROR_CHECK(esp_eth_driver_install(ð_config, ð_handle));
## 4. Build, Flash, and Test
Now you're ready to build the firmware, flash it to your ESP32, and test the mros-esp32 communication.

- Build the project using the following command. If you've previously built for Wi-Fi, run
idf.py fullcleanfirst to avoid build errors.
idf.py build - Flash the firmware to the ESP32-S3 (make sure it's connected via USB):
idf.py -p /dev/ttyUSB0 flash
Replace/dev/ttyUSB0with your device's serial port. - Monitor the output to see the device connect to the network and start the mros-esp32 node:
idf.py monitor - Test the connection using the
echoback_stringexample. On your PC (which should have mros-esp32 2 installed and be on the same network), publish a message to theto_magtopic. The ESP32 node will receive it and echo it back on theto_linuxtopic. You should see the message appear on your PC, confirming a successful round trip.
## 5. Performance and Benefits
By switching to a wired connection with the W5500, you can expect significant performance gains and stability.
Low Latency: Average ping times can drop to less than 1 ms, which is over 10 times faster than a typical Wi-Fi connection.
High Throughput: iperf tests show TCP throughput reaching ~40 Mbps, making it suitable for high-bandwidth ROS 2 data.
Reliability: In a 30-minute ROS 2 topic echo test, there was 0% packet loss. This stability is crucial for robotics applications where dropped messages can lead to failures.
The diagram below shows how ROS 2 DDS frames are sent directly over the wired interface, reducing the software buffering and wireless-related jitter that can affect Wi-Fi.

## 6. Troubleshooting and Lessons Learned
Here are solutions to common challenges you might encounter during setup.

## 7. Future Improvements
This project provides a solid foundation. Here are a few ways it could be enhanced:
Power-over-Ethernet (PoE): Add a PoE HAT to deliver both power and data over a single Ethernet cable.
IPv6 Support: Upgrade the hardware to the WIZnet W6100 chip to add support for IPv6.
QoS Optimization: Fine-tune the mros-esp32 Quality of Service (QoS) profiles for different types of ROS2 data to optimize real-time performance.
-
Github
