


DMX-Unit-DIY: W5500 Art-Net node and 2-universe DMX512 controller on ESP32-S3
An ESP32-S3 DMX box that receives Art-Net over UDP 6454 through a W5500 and drives two DMX512 universes via MAX485, for about $29,33 in parts.
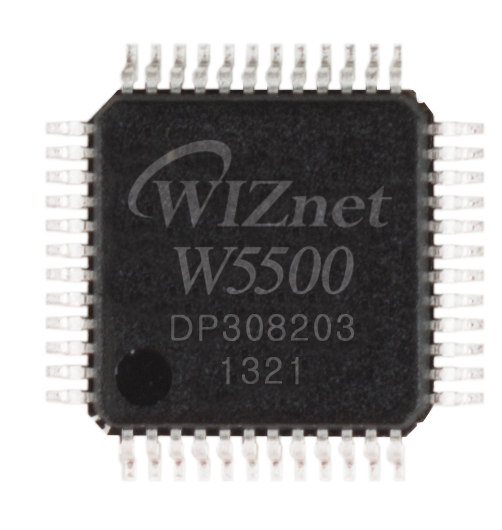
WIZnet - W5500
x 1

GLOXIOU/DMX-Unit-DIY
Overview
DMX-Unit-DIY is a self-built stage-lighting controller box in which a WIZnet W5500 receives Art-Net over Ethernet, an ESP32-S3 decodes and routes the lighting data, and two MAX485 transceivers drive up to two DMX512 universes out of panel-mounted XLR connectors. The repository states the motivation directly: "The goal is to not pay hundred of dollars on a already existing product, and learn !", and adds that "DMX Unit DIY is also intended to be a hardware platform for a future open-source lighting-control system." Besides the Art-Net path, the unit accepts USB-C and Wi-Fi input, serves its own web interface for configuration, and manages a PWM-controlled fan for active cooling.
The build is deliberately low-cost and reproducible. There is no PCB at all, the parts are wired with Dupont cables and housed in a custom 3D-printed enclosure sized 12x17x10 with external access to all main connections, and the bill of materials in the repository comes to $29,33 of components. The project takes the ENTTEC Open DMX USB interface as its stated inspiration while remaining an independent design. Development is logged in JOURNAL.md, which the author describes as covering in-depth design, configuration, part of the code, enclosure design, BOM creation and the problems encountered during development.
Hardware & Software Configuration
The main components are listed in the README and in BOM.csv, whose first data row is W5500,1,$6.27. The Ethernet side is a single W5500 module at $6.27. The processor is an ESP32-S3 at $3.95, chosen because, as the author puts it, the project needs "a bit of processing power for two DMX universes, though not a huge amount", which is why it is considered better suited to the task than a Raspberry Pi. Two MAX485 RS-485 modules at 2x$1 sit between the MCU and two XLR 3-pin panel-mount female connectors at $4.88. Cooling and mechanics account for the rest: a 40 x 40 mm fan at $3.21, a 2N2222 transistor at $1.55 and a 1 kΩ resistor at $1.59 for its PWM drive, four heat-set threaded inserts at $1.86, four M2 metric screws at $1.54, and a Dupont cable kit at $2.48. The stated total of $29,33 excludes assembly, enclosure parts, future design changes, and print filament the author already had.
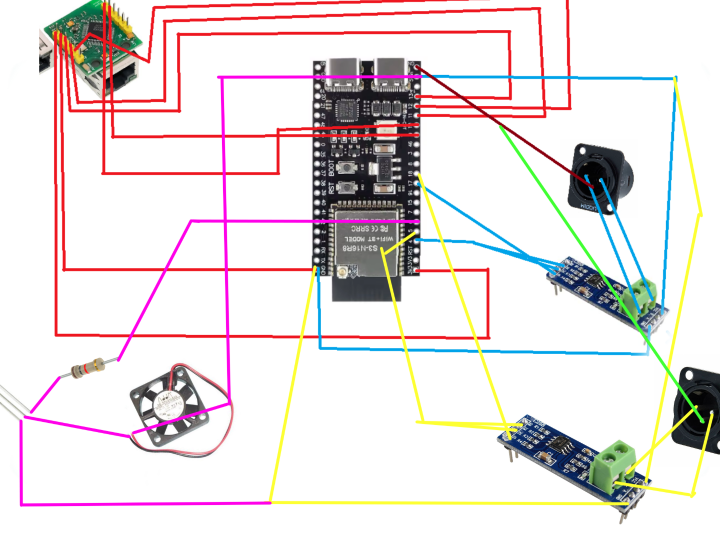
On the software side the repository ships two Arduino sketches, firmware - V1.ino and firmware - V2.ino. Both open by including the Arduino Ethernet.h header on line 2 and later bring the interface up with Ethernet.begin, at line 95 in V1 and line 272 in V2. The ESP32-S3 also handles Art-Net communication, DMX universe management, DMX monitoring, failover logic, fan and thermal management, system logs and diagnostics, the web interface, and the USB-C and Wi-Fi inputs; all saved data lives in the ESP32's internal storage. The wiring table in JOURNAL.md records the power and ground distribution, including 3V3 to the W5500 Mini at 3.3V on J1 Pin 1, and a common GND shared by the W5500 Mini, both MAX485 modules and Pin 1 of both XLR connectors. The mechanical design is published as a STEP assembly at 3D-files/assembly/Unite DMX - Assembly.step. Air enters through the fan at the top of the box, is directed onto the ESP32 as the hottest module, and leaves through grilles on the two sides.
Additional photos are available in the original repository: https://github.com/GLOXIOU/DMX-Unit-DIY
System Architecture
The README summarises the flow in one sentence: "The ESP32-S3 is the central processor of the system. It handles network communication, DMX processing, website and other. Lighting data is processed by the MAX485 module and sent to the required DMX outputs, or ArtNet output via the W5500 RJ45 module." Three input paths converge on the same processor. Art-Net arrives from the local network through the W5500; a USB-C connection feeds DMX output 1 and can be toggled from the web interface; Wi-Fi carries both control traffic and the configuration portal. Downstream, each DMX output uses an RS-485 transceiver with transient protection, and the two hardware UARTs of the ESP32 clock the standard DMX waveform at 250 kbit/s.
flowchart TB
    SW["Lighting software on LAN<br/>QLC+ or other Art-Net source"]
    ETH["WIZnet W5500<br/>SPI Ethernet controller"]
    USB["USB-C input<br/>feeds DMX output 1"]
    WIFI["Wi-Fi input<br/>web portal 192.168.4.1"]
    MCU["ESP32-S3<br/>universe routing, failover,<br/>fan PWM, logs"]
    OUT1["MAX485 transceiver 1<br/>XLR 3-pin, universe 1"]
    OUT2["MAX485 transceiver 2<br/>XLR 3-pin, universe 2"]
    SW -- "ArtDmx, UDP 6454" --> ETH
    ETH -- "SPI" --> MCU
    USB -- "serial" --> MCU
    WIFI -- "Wi-Fi" --> MCU
    MCU -- "UART 250 kbit/s" --> OUT1
    MCU -- "UART 250 kbit/s" --> OUT2
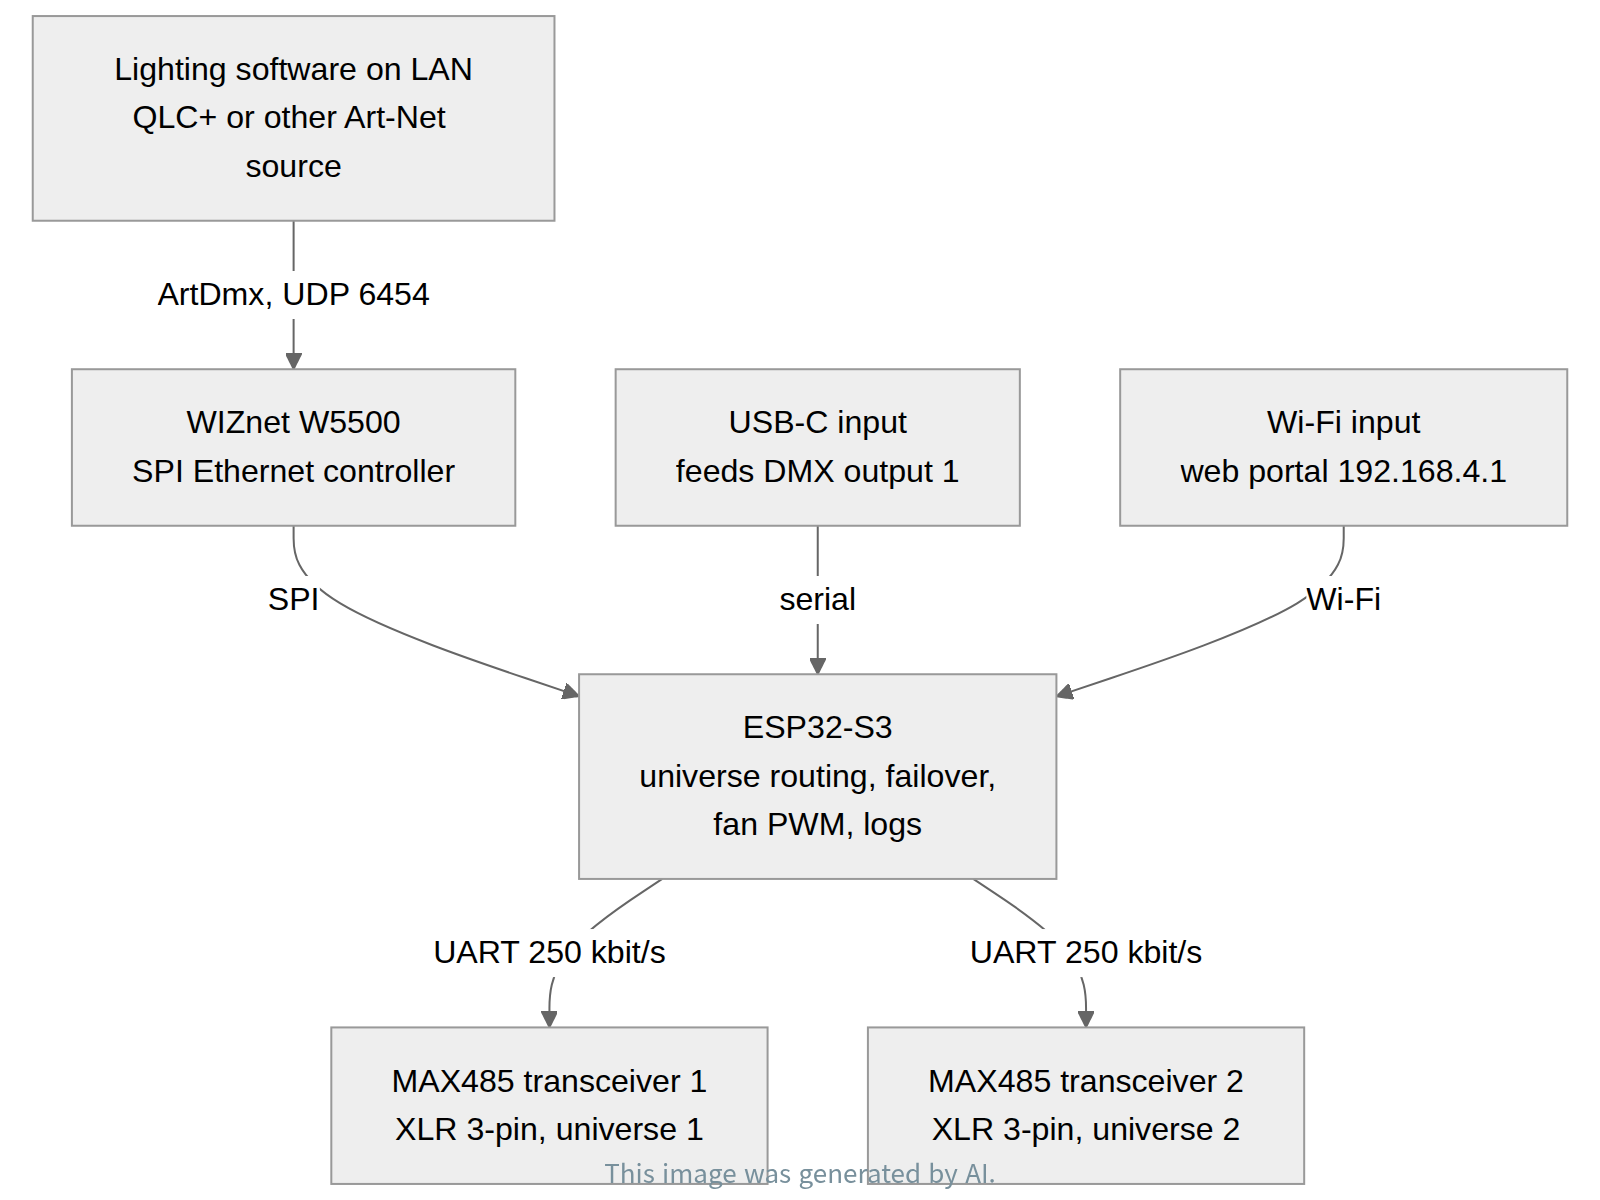
Routing between the network side and the physical side is flexible rather than fixed: the README notes that one network universe can be routed to several physical outputs, and lists USB signal-loss detection with automatic failover among the integrated DMX features. A DMX universe carries up to 512 channels, so two universes give what the author calls a theoretical total of 1024 channels. The web server is reachable in Station mode at the local network IP, or in Access Point mode through a captive portal at 192.168.4.1, and it exposes real-time network and DMX output status, Ethernet settings for static IP, gateway and subnet mask, Wi-Fi credentials, Art-Net universe routing with short and long node names, fan PWM duty cycle, the USB input toggle for DMX output 1, and a remote reboot.
Role of the WIZnet W5500
The W5500 is the wired network front end of the unit and sits on the ESP32-S3's SPI bus. Power comes from the 3V3 rail of the wiring table in JOURNAL.md, which maps 3.3V to the W5500 Mini at J1 Pin 1, and the module shares the common ground with both MAX485 boards and the XLR shells. That the link is SPI is visible in the firmware's own diagnostics: when the controller is not found, firmware - V1.ino line 98 prints "ERREUR: W5500 non detecte, verifiez le cablage SPI.", telling the builder to check the SPI wiring.
Above that interface the protocol is Art-Net, which the README describes precisely: "Art-Net data is received via UDP on port 6454 through the W5500 SPI Ethernet controller." The listed Art-Net features are ArtDmx packet reception with universe decoding, an automated ArtPoll discovery response (ArtPollReply), and static IP and netmask configuration from the web portal. Both firmware versions reach the network through the Arduino Ethernet API: Ethernet.h is included at line 2 of each sketch, and Ethernet.begin opens the interface at firmware - V1.ino line 95 and firmware - V2.ino line 272, with a second Ethernet.h reference near the W5500 detection block at line 267 of V2.
The end-to-end path is therefore short and one-directional for show data. A controller such as QLC+ emits ArtDmx frames onto the LAN, the W5500 accepts them as UDP datagrams on port 6454 and hands the payload to the ESP32-S3 over SPI, the MCU decodes the universe number and applies its routing table, and the resulting channel values are clocked out of the two hardware UARTs at 250 kbit/s into the RS-485 transceivers and the XLR outputs. Discovery runs in the opposite direction on the same socket, since ArtPoll requests are answered with ArtPollReply. The Ethernet path is also treated as optional at runtime rather than mandatory: firmware - V2.ino line 268 prints "ERREUR: W5500 non detecte. Poursuite en Wi-Fi seul.", meaning the unit keeps running on Wi-Fi alone when the Ethernet controller does not answer.
FAQ
Can the unit run a light show on its own?
No. The README states that the unit cannot control lights in standalone mode and is designed for use with DMX output software such as QLC+.
How many universes and channels does it handle?
Up to 2 DMX512 universes. Each universe carries up to 512 channels, which the author describes as a theoretical total of 1024 channels, sent at a DMX data rate of 250 kbit/s.
Is there a PCB to order?
No. The README says there is no PCB in this project because it is not required; the ESP32-S3, two MAX485 modules, two female XLR ports, the W5500 and the 40x40 fan with its transistor and resistor are wired directly inside the enclosure.
How is the device configured?
Through its own web interface, reachable in Station mode at the local network IP or in Access Point mode through a captive portal at 192.168.4.1, where Ethernet, Wi-Fi, Art-Net routing, fan speed, the USB input toggle and reboot are exposed.
What happens if the Ethernet module is missing or miswired?
V1 reports "ERREUR: W5500 non detecte, verifiez le cablage SPI." and V2 reports "ERREUR: W5500 non detecte. Poursuite en Wi-Fi seul.", so the newer firmware continues with Wi-Fi only.
What does the hardware cost?
The repository's own estimate is $29,33 of components, excluding assembly, enclosure parts, future design changes and filament already owned.
About the Author
The project is published by GLOXIOU on GitHub, where the repository was last pushed on 2026-09-14. The GitHub profile behind it lists no public email address, blog or social account, so the repository and its journal are the way to reach the work. No license is declared on the repository at the time of writing, which is worth keeping in mind before reusing the enclosure files or firmware.
The author credits the ENTTEC Open DMX USB interface as the inspiration for the project concept and for the overall goal of creating an affordable DMX interface, and the GrabCAD community for 3D component models used as reference geometry in the CAD assembly, noting that the original authors retain ownership of their respective models. All custom enclosure designs, assembly work, wiring, firmware and project documentation were created as part of the DMX Unit DIY project unless otherwise stated.
개요


DMX-Unit-DIY는 무대 조명 제어 박스를 직접 만든 프로젝트다. 이더넷으로 들어온 Art-Net 데이터를 WIZnet W5500이 받아 ESP32-S3에 넘기고, ESP32-S3가 유니버스를 해석해 두 개의 MAX485 송수신기로 보내면 패널에 붙은 XLR 커넥터에서 최대 2개의 DMX512 유니버스가 나간다. 저장소는 만든 이유를 그대로 적어 두었다. "The goal is to not pay hundred of dollars on a already existing product, and learn !" 즉 이미 나와 있는 제품에 수백 달러를 쓰지 않고 직접 배우면서 만드는 것이 목적이며, 같은 문단에서 이 장치를 "a hardware platform for a future open-source lighting-control system", 곧 앞으로 만들 오픈소스 조명 제어 시스템의 하드웨어 플랫폼으로 삼겠다고 밝힌다. Art-Net 경로 외에 USB-C와 Wi-Fi로도 입력을 받고, 설정용 웹 인터페이스를 스스로 띄우며, PWM으로 제어되는 팬으로 능동 냉각을 한다.
만드는 방식은 처음부터 저비용과 재현성을 노렸다. PCB는 아예 없고, 부품은 듀폰 케이블로 연결해 12x17x10 크기의 직접 설계한 3D 프린팅 케이스에 넣었으며, 주요 연결부는 모두 케이스 밖에서 접근할 수 있게 배치했다. 저장소가 정리한 부품 비용 합계는 $29,33이다. 개념의 출발점으로는 ENTTEC Open DMX USB 인터페이스를 밝히면서도 설계 자체는 독립적으로 진행했다고 적어 두었다. 개발 과정은 JOURNAL.md에 남아 있는데, 저자는 이 문서가 상세 설계와 설정, 코드 일부, 케이스 설계, BOM 작성, 그리고 개발 중에 부딪힌 문제들을 담고 있다고 설명한다.
하드웨어·소프트웨어 구성
주요 부품은 README의 표와 BOM.csv에 정리돼 있고, BOM.csv의 첫 데이터 행은 W5500,1,$6.27이다. 유선 네트워크 쪽은 $6.27짜리 W5500 모듈 한 개가 담당한다. 프로세서는 $3.95의 ESP32-S3인데, 저자는 두 개의 DMX 유니버스를 처리할 만큼의 연산 능력이 필요하지만 아주 큰 성능이 필요한 것은 아니어서 라즈베리 파이보다 이 작업에 더 잘 맞는다고 선택 이유를 적었다. MCU와 출력 사이에는 2x$1인 MAX485 RS-485 모듈 두 개가 들어가고, 그 뒤로 $4.88짜리 XLR 3핀 패널 마운트 암 커넥터 두 개가 붙는다. 나머지는 냉각과 기구물이다. 40 x 40 mm 팬이 $3.21, 팬을 PWM으로 구동하기 위한 2N2222 트랜지스터가 $1.55, 1 kΩ 저항이 $1.59이고, 열간 삽입 인서트 4개가 $1.86, M2 나사 4개가 $1.54, 듀폰 케이블 키트가 $2.48이다. 합계 $29,33에는 조립과 케이스 부품, 앞으로의 설계 변경, 그리고 저자가 이미 갖고 있던 출력용 필라멘트 값은 들어 있지 않다.
소프트웨어 쪽에는 두 개의 아두이노 스케치, firmware - V1.ino와 firmware - V2.ino가 함께 올라와 있다. 두 파일 모두 2번 줄에서 아두이노 Ethernet.h 헤더를 포함하고, 뒤에서 Ethernet.begin으로 인터페이스를 올린다. 호출 위치는 V1이 95번 줄, V2가 272번 줄이다. ESP32-S3는 Art-Net 통신과 DMX 유니버스 관리, DMX 모니터링, 페일오버 로직, 팬과 발열 관리, 시스템 로그와 진단, 웹 인터페이스, USB-C 입력과 Wi-Fi 입력까지 맡고, 저장되는 데이터는 모두 ESP32 내부 저장소에 들어간다. JOURNAL.md의 배선 표에는 전원과 접지 분배가 기록돼 있는데, 3V3은 W5500 Mini의 J1 1번 핀에 3.3V로 들어가고, GND는 W5500 Mini와 두 개의 MAX485, 그리고 두 XLR 커넥터의 1번 핀이 함께 쓴다. 기구 설계는 3D-files/assembly/Unite DMX - Assembly.step 경로에 STEP 어셈블리로 공개돼 있다. 공기는 박스 윗면 팬으로 들어와 가장 열이 많은 모듈인 ESP32 쪽으로 향한 다음 양옆 그릴로 빠져나간다.
추가 사진은 원본 저장소에서 볼 수 있다: https://github.com/GLOXIOU/DMX-Unit-DIY
시스템 구조
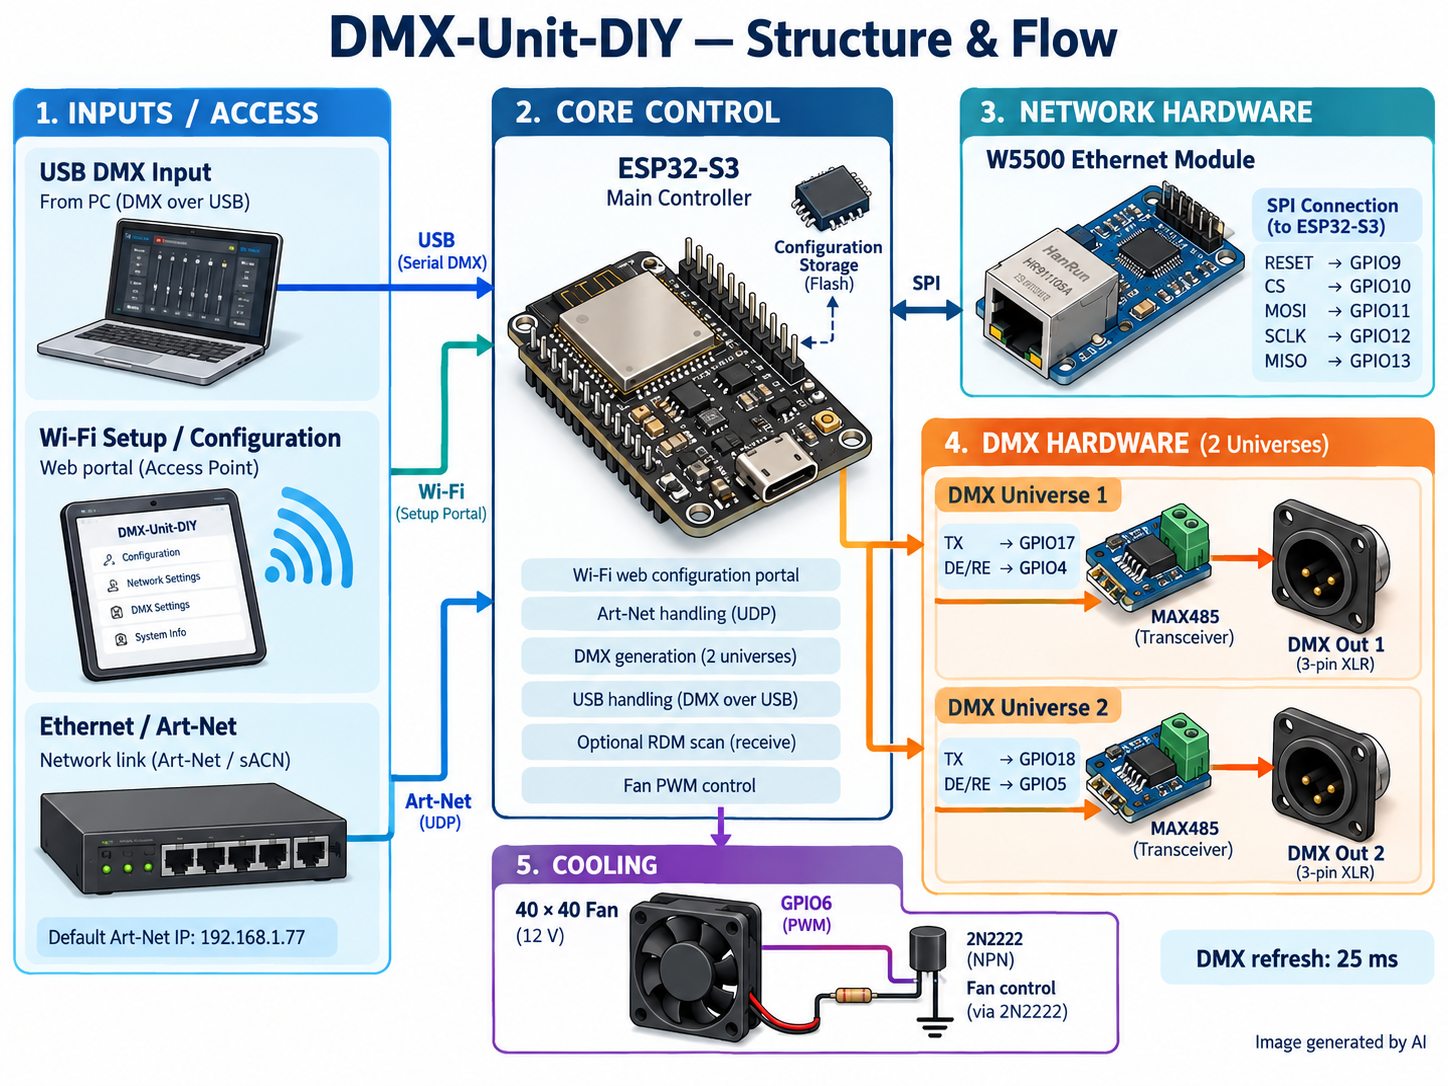
README는 전체 흐름을 한 문단으로 요약한다. ESP32-S3가 시스템의 중앙 프로세서로서 네트워크 통신과 DMX 처리, 웹사이트 등을 담당하고, 조명 데이터는 MAX485 모듈에서 처리돼 필요한 DMX 출력으로 나가거나 W5500 RJ45 모듈을 통해 Art-Net 출력으로 나간다는 설명이다. 입력 경로는 세 갈래이고 모두 같은 프로세서로 모인다. Art-Net은 로컬 네트워크에서 W5500을 거쳐 들어오고, USB-C 연결은 DMX 출력 1번을 먹이며 웹 인터페이스에서 켜고 끌 수 있다. Wi-Fi는 제어 트래픽과 설정 포털을 함께 나른다. 출력 쪽에서는 각 DMX 포트가 과도 전압 보호를 갖춘 RS-485 송수신기를 쓰고, ESP32의 하드웨어 UART 두 개가 250 kbit/s의 표준 DMX 파형을 내보낸다.
네트워크 쪽 유니버스와 물리 출력의 연결은 고정이 아니라 라우팅이다. README는 하나의 네트워크 유니버스를 여러 물리 출력으로 보낼 수 있다고 적었고, 통합 DMX 기능으로 USB 신호 유실 감지와 자동 페일오버, DMX 모니터링을 든다. DMX 유니버스 하나는 최대 512채널을 담으므로 두 유니버스면 저자가 이론상 총량이라고 표현한 1024채널이 된다. 웹 서버는 Station 모드에서 로컬 네트워크 IP로, Access Point 모드에서는 192.168.4.1의 캡티브 포털로 접속한다. 여기에서 실시간 네트워크·DMX 출력 상태 모니터링, 고정 IP와 게이트웨이·서브넷 마스크를 포함한 이더넷 설정, Wi-Fi 자격증명 관리, Art-Net 유니버스 라우팅과 노드 이름(Short Name·Long Name) 지정, 팬 속도 PWM 듀티 조절, DMX 출력 1번의 USB 입력 토글, 원격 재부팅을 다룰 수 있다.
WIZnet W5500의 역할
W5500은 이 장치의 유선 네트워크 앞단이며 ESP32-S3의 SPI 버스에 붙는다. 전원은 JOURNAL.md 배선 표의 3V3 계통에서 오고, 그 표는 3.3V가 W5500 Mini의 J1 1번 핀으로 들어간다고 적고 있다. 접지는 두 MAX485 보드, XLR 커넥터와 공통으로 묶인다. 연결이 SPI라는 사실은 펌웨어 자체의 진단 메시지에서도 드러난다. 컨트롤러를 찾지 못하면 firmware - V1.ino 98번 줄이 "ERREUR: W5500 non detecte, verifiez le cablage SPI."를 출력해 SPI 배선을 확인하라고 알린다.
그 인터페이스 위에 올라가는 프로토콜은 Art-Net이다. README의 표현은 정확하다. "Art-Net data is received via UDP on port 6454 through the W5500 SPI Ethernet controller." 즉 Art-Net 데이터는 W5500 SPI 이더넷 컨트롤러를 거쳐 UDP 6454번 포트로 수신된다. 저장소가 밝힌 Art-Net 기능은 ArtDmx 패킷 수신과 유니버스 디코딩, 자동 ArtPoll 탐색 응답(ArtPollReply), 웹 포털을 통한 고정 IP와 넷마스크 설정이다. 두 펌웨어 모두 아두이노 Ethernet API를 통해 네트워크에 접근한다. 각 스케치 2번 줄에 Ethernet.h가 포함돼 있고, firmware - V1.ino 95번 줄과 firmware - V2.ino 272번 줄에서 Ethernet.begin이 인터페이스를 연다. V2에서는 W5500 감지 블록 근처인 267번 줄에도 Ethernet.h 참조가 한 번 더 나온다.
그래서 쇼 데이터가 지나는 경로는 짧고 한 방향이다. QLC+ 같은 제어 소프트웨어가 LAN으로 ArtDmx 프레임을 보내면 W5500이 6454번 포트의 UDP 데이터그램으로 받아 페이로드를 SPI로 ESP32-S3에 넘기고, MCU가 유니버스 번호를 해석해 라우팅 표를 적용한 뒤, 결과 채널 값을 하드웨어 UART 두 개에서 250 kbit/s로 RS-485 송수신기와 XLR 출력으로 내보낸다. 탐색 트래픽은 같은 소켓에서 반대 방향으로 흐른다. ArtPoll 요청에 ArtPollReply로 답하기 때문이다. 이더넷 경로는 필수가 아니라 실행 시점에 선택 가능한 경로로 다뤄진다. firmware - V2.ino 268번 줄이 "ERREUR: W5500 non detecte. Poursuite en Wi-Fi seul."를 출력하는데, 이더넷 컨트롤러가 응답하지 않으면 Wi-Fi만으로 동작을 이어 간다는 뜻이다.
자주 묻는 질문
이 장치만으로 조명 쇼를 돌릴 수 있나?
아니다. README는 이 유닛이 단독 모드로는 조명을 제어할 수 없으며 QLC+ 같은 DMX 출력 소프트웨어와 함께 쓰도록 설계됐다고 못박는다.
유니버스와 채널은 몇 개까지 되나?
DMX512 유니버스 최대 2개다. 유니버스 하나가 최대 512채널을 담으므로 저자가 이론상 총량이라고 부른 1024채널이 되고, DMX 데이터 전송률은 250 kbit/s다.
주문해야 할 PCB가 있나?
없다. README는 이 프로젝트에 PCB가 없으며 필요하지 않았다고 적는다. ESP32-S3 한 개, MAX485 두 개, XLR 암 포트 두 개, W5500, 그리고 트랜지스터와 저항을 포함한 40x40 팬 구성이 케이스 안에서 직접 배선된다.
설정은 어떻게 하나?
자체 웹 인터페이스로 한다. Station 모드에서는 로컬 네트워크 IP로, Access Point 모드에서는 192.168.4.1 캡티브 포털로 접속해 이더넷과 Wi-Fi, Art-Net 라우팅, 팬 속도, USB 입력 토글, 재부팅을 다룬다.
이더넷 모듈이 없거나 배선이 잘못되면 어떻게 되나?
V1은 "ERREUR: W5500 non detecte, verifiez le cablage SPI."를, V2는 "ERREUR: W5500 non detecte. Poursuite en Wi-Fi seul."를 출력한다. 즉 나중 펌웨어는 Wi-Fi만으로 동작을 계속한다.
하드웨어 비용은 얼마인가?
저장소가 밝힌 추정치는 부품 기준 $29,33이며, 조립과 케이스 부품, 앞으로의 설계 변경, 이미 갖고 있던 필라멘트는 빠져 있다.
저자 소개
이 프로젝트는 GitHub 사용자 GLOXIOU가 공개했고, 저장소의 마지막 푸시는 2026-09-14다. 프로필에는 공개된 이메일 주소나 블로그, 소셜 계정이 적혀 있지 않아 저장소와 개발 저널이 작업을 들여다보는 통로가 된다. 현재 저장소에는 선언된 라이선스가 없으므로, 케이스 파일이나 펌웨어를 가져다 쓰기 전에 이 점을 염두에 두는 편이 좋다.
저자는 감사의 글에서 ENTTEC Open DMX USB 인터페이스를 프로젝트 개념과 저렴한 DMX 인터페이스를 만든다는 목표의 영감으로, GrabCAD 커뮤니티를 CAD 어셈블리의 참조 형상으로 쓴 3D 부품 모델의 출처로 밝히며, 그 모델들의 소유권은 원저자에게 있다고 적는다. 그 밖의 케이스 설계와 조립, 배선, 펌웨어, 프로젝트 문서는 따로 명시하지 않는 한 모두 DMX Unit DIY 프로젝트의 일부로 직접 만든 것이라고 밝히고 있다.
-
GitHub Repository
Original project repository
